stop start Lancia Musa 2008 Owner handbook (in English)
[x] Cancel search | Manufacturer: LANCIA, Model Year: 2008, Model line: Musa, Model: Lancia Musa 2008Pages: 218, PDF Size: 3.68 MB
Page 13 of 218
12
SAFETY
DEVICES
STARTING
AND
DRIVING
WARNING
LIGHTS AND
MESSAGES
IN AN
EMERGENCY
MAINTENANCE
AND CARE
TECHNICALSPECIFICATIONS
INDEX
DASHBOARD
AND CONTROLS
In this case, turn the key to STOP
and then back to MAR. Try with the
other keys provided if the problem
persists. If the engine will not start up
after this operation contact the
Lancia Dealership.
IMPORTANT Each key has its own
code which must be stored by the sys-
tem ECU. Contact the Lancia Dealer-
ship to have new keys (up to max.
eight) with the code stored in them.OPERATION
Each time the car is started by turn-
ing the ignition key to MAR, the Lan-
cia CODE system control unit sends
an acknowledgement code to the en-
gine control unit to deactivate the in-
hibitor. The code is sent only if the
control unit of the Lancia CODE sys-
tem has acknowledged the code re-
ceived from the key. Each time the ig-
nition key is turned to STOP, the
Lancia CODE system deactivates the
functions of the electronic engine con-
trol unit.
If, during ignition, the code is not cor-
rectly recognized, a warning light
Yis lit on the instrument panel.The electronic components
inside the key may be dam-
aged if the key is submitted
to sharp knocks.
Warning light Ycoming on
when driving
❒If the warning lightYturns on,
the system is running a self-test
(such as following a voltage fail-
ure). If the problem persists, con-
tact the Lancia Dealership.
007-037 MUSA 3ed GB 12-11-2007 11:33 Pagina 12
Page 21 of 218
20
SAFETY
DEVICES
STARTING
AND
DRIVING
WARNING
LIGHTS AND
MESSAGES
IN AN
EMERGENCY
MAINTENANCE
AND CARE
TECHNICALSPECIFICATIONS
INDEX
DASHBOARD
AND CONTROLS
IGNITION DEVICE
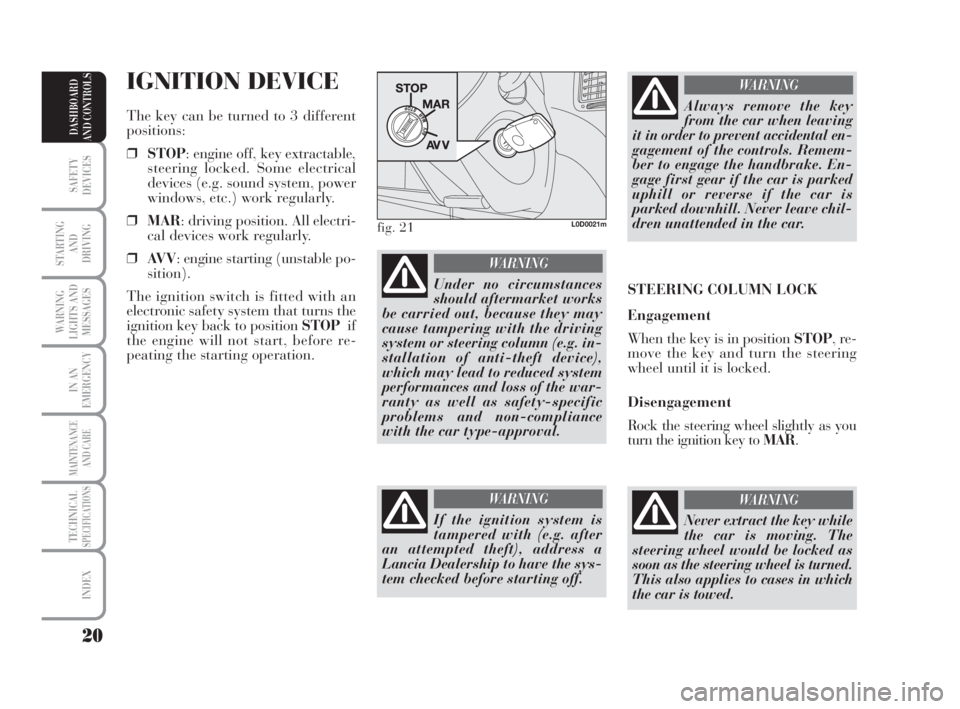
The key can be turned to 3 different
positions:
❒STOP: engine off, key extractable,
steering locked. Some electrical
devices (e.g. sound system, power
windows, etc.) work regularly.
❒MAR: driving position. All electri-
cal devices work regularly.
❒AV V: engine starting (unstable po-
sition).
The ignition switch is fitted with an
electronic safety system that turns the
ignition key back to position STOPif
the engine will not start, before re-
peating the starting operation.
Under no circumstances
should aftermarket works
be carried out, because they may
cause tampering with the driving
system or steering column (e.g. in-
stallation of anti-theft device),
which may lead to reduced system
performances and loss of the war-
ranty as well as safety-specific
problems and non-compliance
with the car type-approval.
WARNING
fig. 21L0D0021m
If the ignition system is
tampered with (e.g. after
an attempted theft), address a
Lancia Dealership to have the sys-
tem checked before starting off.
WARNING
Always remove the key
from the car when leaving
it in order to prevent accidental en-
gagement of the controls. Remem-
ber to engage the handbrake. En-
gage first gear if the car is parked
uphill or reverse if the car is
parked downhill. Never leave chil-
dren unattended in the car.
WARNING
STEERING COLUMN LOCK
Engagement
When the key is in position STOP, re-
move the key and turn the steering
wheel until it is locked.
Disengagement
Rock the steering wheel slightly as you
turn the ignition key to MAR.
Never extract the key while
the car is moving. The
steering wheel would be locked as
soon as the steering wheel is turned.
This also applies to cases in which
the car is towed.
WARNING
007-037 MUSA 3ed GB 12-11-2007 11:33 Pagina 20
Page 23 of 218
22
SAFETY
DEVICES
STARTING
AND
DRIVING
WARNING
LIGHTS AND
MESSAGES
IN AN
EMERGENCY
MAINTENANCE
AND CARE
TECHNICALSPECIFICATIONS
INDEX
DASHBOARD
AND CONTROLS
MULTIFUNCTIONAL
DISPLAY
(on two-line modal
panel)
The car can be equipped with a multi-
function display that shows useful in-
formation for car driving according to
the settings made. ENGINE COOLANT
TEMPERATURE GAUGE fig. 25
Warning light Aturns on to indicate
that the temperature of the engine
coolant has remarkably increased. In
this case, stop the engine and go to a
Lancia Dealership. This shows the tem-
perature of the engine coolant fluid and
starts working when the fluid temper-
ature exceeds approx. 50°C. In regular
operating conditions the needle moves
to the different positions allowed inside
the gauge according to the car operat-
ing conditions and management of the
engine cooling system.
IMPORTANT If the needle gets posi-
tioned at the beginning of the scale
(temperature low) and the warning
lightAis on, a failure has occurred in
the system. If this is the case, go to a
Lancia Dealership to have the system
checked.
If the needle indicating the
engine coolant temperature
reaches the red area, stop
the engine immediately and
contact a Lancia Dealership.
fig. 26L0D0027m
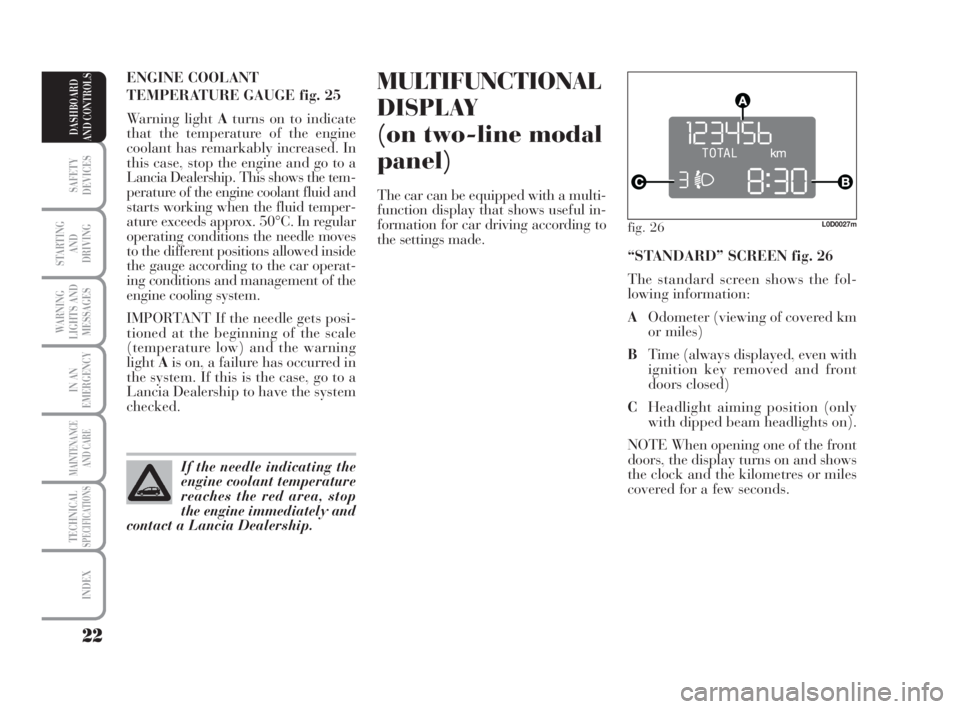
“STANDARD” SCREEN fig. 26
The standard screen shows the fol-
lowing information:
AOdometer (viewing of covered km
or miles)
BTime (always displayed, even with
ignition key removed and front
doors closed)
CHeadlight aiming position (only
with dipped beam headlights on).
NOTE When opening one of the front
doors, the display turns on and shows
the clock and the kilometres or miles
covered for a few seconds.
007-037 MUSA 3ed GB 12-11-2007 11:33 Pagina 22
Page 25 of 218
24
SAFETY
DEVICES
STARTING
AND
DRIVING
WARNING
LIGHTS AND
MESSAGES
IN AN
EMERGENCY
MAINTENANCE
AND CARE
TECHNICALSPECIFICATIONS
INDEX
DASHBOARD
AND CONTROLS
Setting the unit
To set the required unit (kilometres or
miles) proceed as follows:
❒press the button MODEseveral
times until the text “Unit” ap-
pears;
❒press the button +or–to change
the unit;
❒press the button MODEand hold
it pressed for over 2 seconds to
confirm the unit setting.
Viewing of the
fuel cut-off inertial switch
tripping
The screen automatically appears
whenever the fuel cut-off inertial
switch trips after a significant colli-
sion.
This switch stops fuel supply.
See the information provided in the
dedicated chapter “Fuel cut-off iner-
tial switch”. Set this function as follows:
❒press the button MODEseveral
times until the text “SPEED” ap-
pears;
❒press the button +to increase the
speed value (max. limit being 250
Km/h);
❒press the button –to reduce the
speed value (min. limit being 30
Km/h below which the system
goes back to “OFF” mode);
❒press the button MODEand hold
it pressed for over 2 seconds to
confirm the speed setting.
If, after the message
“FPSon” appears, you
smell fuel or see leaks from the fuel
supply system, do not reset the
switch to avoid the risk of starting
a fire.
WARNING
007-037 MUSA 3ed GB 12-11-2007 11:33 Pagina 24
Page 28 of 218
27
SAFETY
DEVICES
STARTING
AND
DRIVING
WARNING
LIGHTS AND
MESSAGES
IN AN
EMERGENCY
MAINTENANCE
AND CARE
TECHNICALSPECIFICATIONS
INDEX
DASHBOARD
AND CONTROLS
Day
YearMonth Example:
EXITING THE MENUSPEED BEEP.CLOCK SETTING
LIGHT SENS.TRIP B
CLOCK MODE
SETTING THE DATE
KEY
DIST. UNIT
VOL. BUTTONS
VOL. BUZZER SERVICE
LANGUAGETEMP. UNIT
Example:
– +
+– – –
+ +
–
–
+
+++
–––
+ +
–
MODE
brief button
pressing
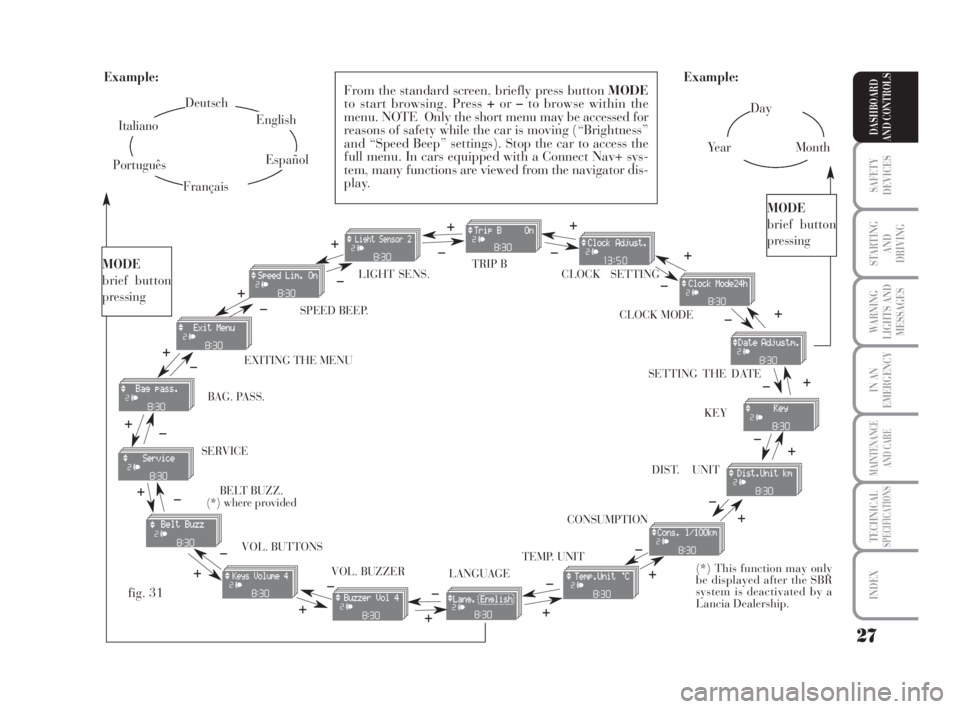
From the standard screen, briefly press button MODE
to start browsing. Press +or–to browse within the
menu. NOTE Only the short menu may be accessed for
reasons of safety while the car is moving (“Brightness”
and “Speed Beep” settings). Stop the car to access the
full menu. In cars equipped with a Connect Nav+ sys-
tem, many functions are viewed from the navigator dis-
play.
–
+ +
–
MODE
brief button
pressing
Deutsch
English
Español
Italiano
Português
Français
(*) This function may only
be displayed after the SBR
system is deactivated by a
Lancia Dealership.
fig. 31
+
– +
–+
–
+
–
+
–
CONSUMPTION BAG. PASS.
BELT BUZZ.
(*) where provided
007-037 MUSA 3ed GB 12-11-2007 11:33 Pagina 27
Page 39 of 218
38
SAFETY
DEVICES
STARTING
AND
DRIVING
WARNING
LIGHTS AND
MESSAGES
IN AN
EMERGENCY
MAINTENANCE
AND CARE
TECHNICALSPECIFICATIONS
INDEX
DASHBOARD
AND CONTROLS
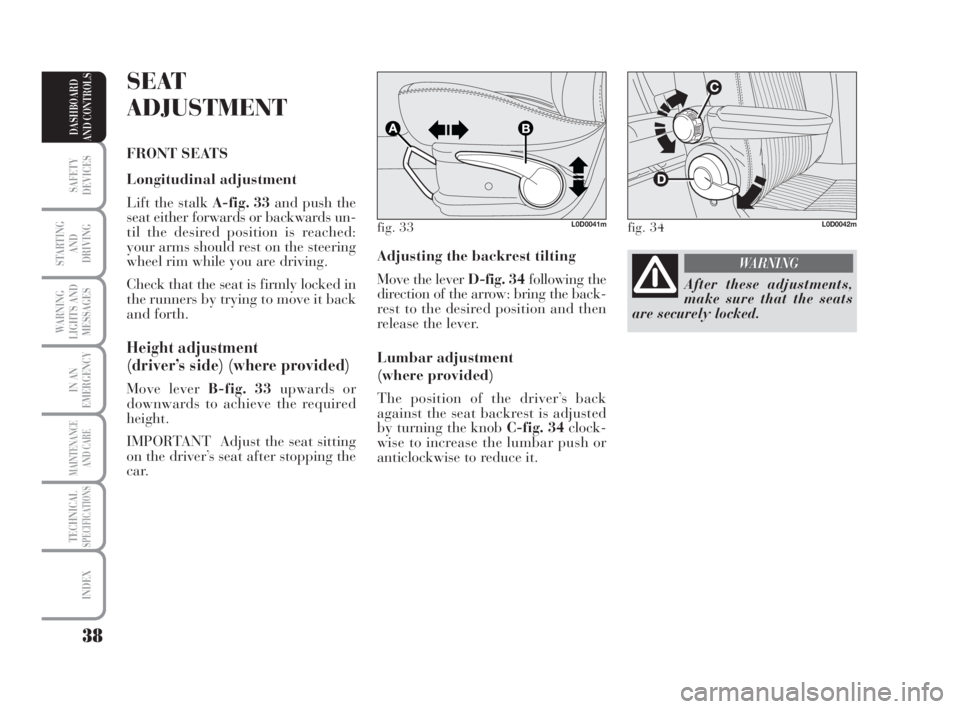
Adjusting the backrest tilting
Move the lever D-fig. 34following the
direction of the arrow: bring the back-
rest to the desired position and then
release the lever.
Lumbar adjustment
(where provided)
The position of the driver’s back
against the seat backrest is adjusted
by turning the knob C-fig. 34clock-
wise to increase the lumbar push or
anticlockwise to reduce it.
SEAT
ADJUSTMENT
FRONT SEATS
Longitudinal adjustment
Lift the stalk A-fig. 33and push the
seat either forwards or backwards un-
til the desired position is reached:
your arms should rest on the steering
wheel rim while you are driving.
Check that the seat is firmly locked in
the runners by trying to move it back
and forth.
Height adjustment
(driver’s side) (where provided)
Move lever B-fig. 33upwards or
downwards to achieve the required
height.
IMPORTANT Adjust the seat sitting
on the driver’s seat after stopping the
car.
fig. 33L0D0041mfig. 34L0D0042m
After these adjustments,
make sure that the seats
are securely locked.
WARNING
038-094 MUSA 3ed GB 12-11-2007 11:34 Pagina 38
Page 43 of 218
42
SAFETY
DEVICES
STARTING
AND
DRIVING
WARNING
LIGHTS AND
MESSAGES
IN AN
EMERGENCY
MAINTENANCE
AND CARE
TECHNICALSPECIFICATIONS
INDEX
DASHBOARD
AND CONTROLS
Rest position on driver’s side
It is the same procedure as above.
However, the headrest must be re-
moved from the seat on the driver’s
side (see paragraph “Headrest” in this
section).
IMPORTANT Refer to section “Boot
Enlargement” for information on the
operations to be carried out with seats
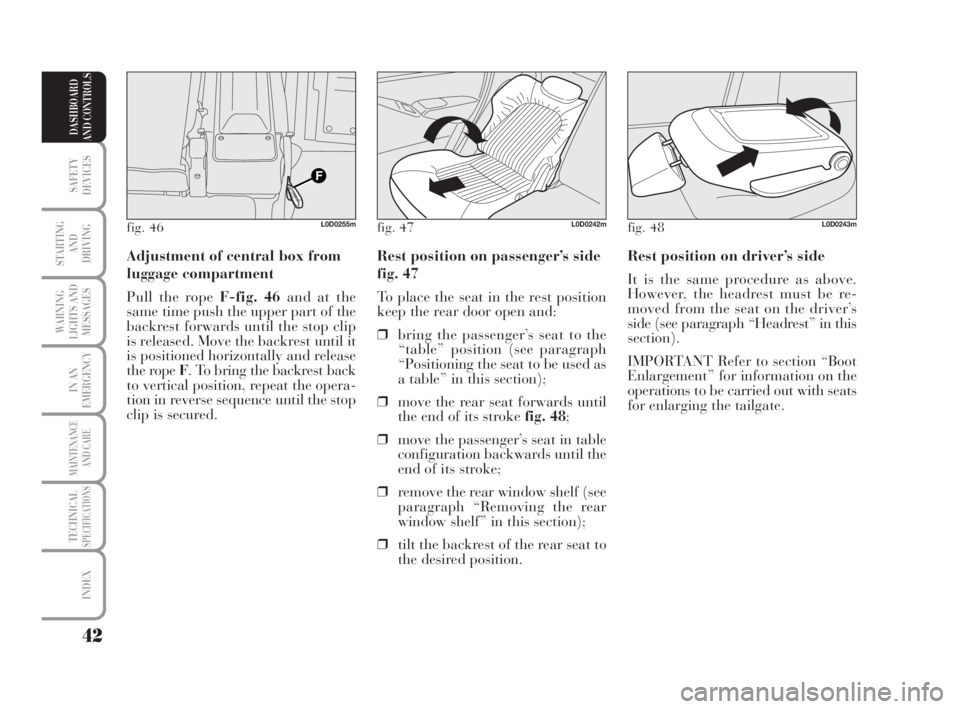
for enlarging the tailgate. Rest position on passenger’s side
fig. 47
To place the seat in the rest position
keep the rear door open and:
❒bring the passenger’s seat to the
“table” position (see paragraph
“Positioning the seat to be used as
a table” in this section);
❒move the rear seat forwards until
the end of its stroke fig. 48;
❒move the passenger’s seat in table
configuration backwards until the
end of its stroke;
❒remove the rear window shelf (see
paragraph “Removing the rear
window shelf” in this section);
❒tilt the backrest of the rear seat to
the desired position. Adjustment of central box from
luggage compartment
Pull the rope F-fig. 46and at the
same time push the upper part of the
backrest forwards until the stop clip
is released. Move the backrest until it
is positioned horizontally and release
the rope F. To bring the backrest back
to vertical position, repeat the opera-
tion in reverse sequence until the stop
clip is secured.
fig. 46L0D0255mfig. 47L0D0242mfig. 48L0D0243m
038-094 MUSA 3ed GB 12-11-2007 11:35 Pagina 42
Page 44 of 218
43
SAFETY
DEVICES
STARTING
AND
DRIVING
WARNING
LIGHTS AND
MESSAGES
IN AN
EMERGENCY
MAINTENANCE
AND CARE
TECHNICALSPECIFICATIONS
INDEX
DASHBOARD
AND CONTROLS
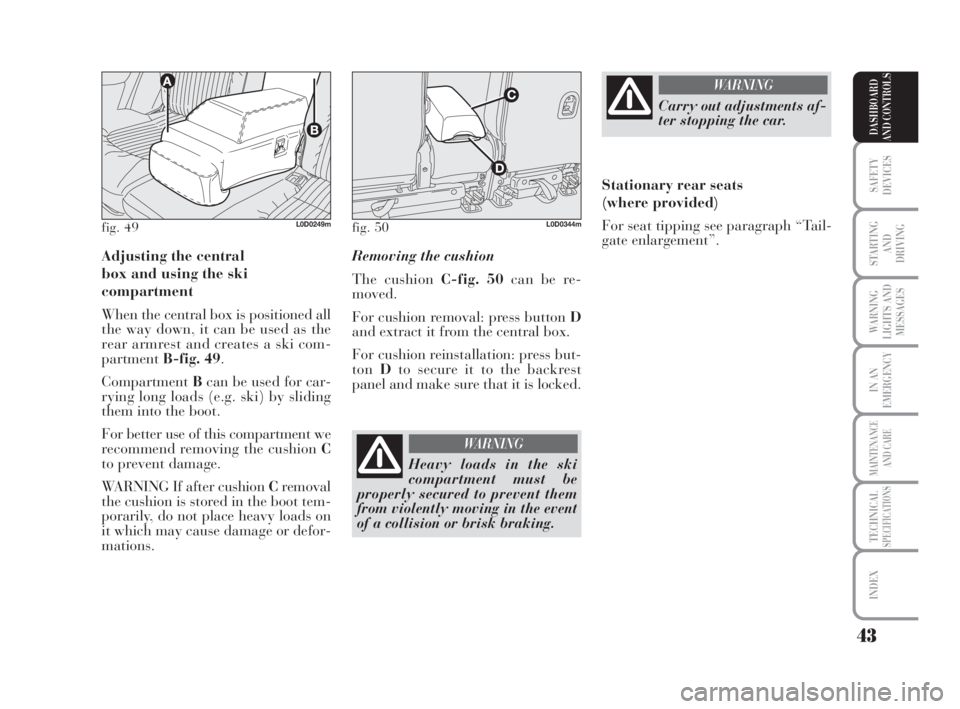
Adjusting the central
box and using the ski
compartment
When the central box is positioned all
the way down, it can be used as the
rear armrest and creates a ski com-
partmentB-fig. 49.
CompartmentBcan be used for car-
rying long loads (e.g. ski) by sliding
them into the boot.
For better use of this compartment we
recommend removing the cushion C
to prevent damage.
WARNING If after cushion Cremoval
the cushion is stored in the boot tem-
porarily, do not place heavy loads on
it which may cause damage or defor-
mations.Removing the cushion
The cushion C-fig. 50can be re-
moved.
For cushion removal: press button D
and extract it from the central box.
For cushion reinstallation: press but-
tonDto secure it to the backrest
panel and make sure that it is locked.
fig. 49L0D0249mfig. 50L0D0344m
Heavy loads in the ski
compartment must be
properly secured to prevent them
from violently moving in the event
of a collision or brisk braking.
WARNING
Carry out adjustments af-
ter stopping the car.
WARNING
Stationary rear seats
(where provided)
For seat tipping see paragraph “Tail-
gate enlargement”.
038-094 MUSA 3ed GB 12-11-2007 11:35 Pagina 43
Page 47 of 218
46
SAFETY
DEVICES
STARTING
AND
DRIVING
WARNING
LIGHTS AND
MESSAGES
IN AN
EMERGENCY
MAINTENANCE
AND CARE
TECHNICALSPECIFICATIONS
INDEX
DASHBOARD
AND CONTROLS
Adjust the mirrors after the car has
been stopped and the hand brake en-
gaged.
The electric demisting device of the
mirrors is automatically engaged
when the rear window demister is ac-
tivated.
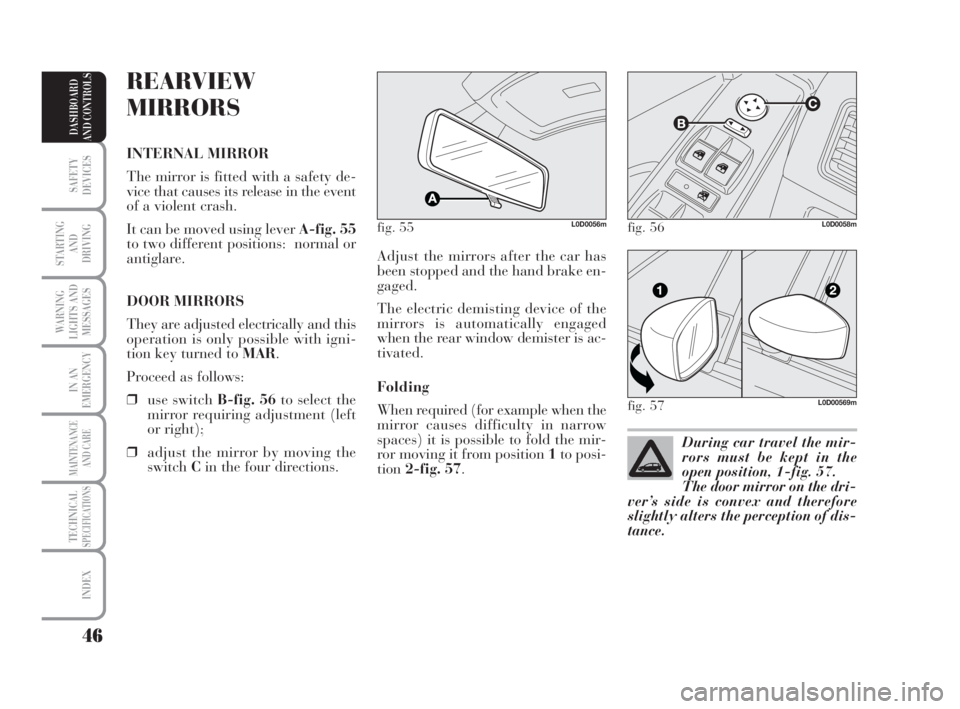
Folding
When required (for example when the
mirror causes difficulty in narrow
spaces) it is possible to fold the mir-
ror moving it from position 1to posi-
tion2-fig. 57.
REARVIEW
MIRRORS
INTERNAL MIRROR
The mirror is fitted with a safety de-
vice that causes its release in the event
of a violent crash.
It can be moved using lever A-fig. 55
to two different positions: normal or
antiglare.
DOOR MIRRORS
They are adjusted electrically and this
operation is only possible with igni-
tion key turned to MAR.
Proceed as follows:
❒use switch B-fig. 56to select the
mirror requiring adjustment (left
or right);
❒adjust the mirror by moving the
switchCin the four directions.
fig. 55L0D0056m
During car travel the mir-
rors must be kept in the
open position, 1-fig. 57.
The door mirror on the dri-
ver’s side is convex and therefore
slightly alters the perception of dis-
tance.
fig. 56L0D0058m
fig. 57L0D00569m
038-094 MUSA 3ed GB 12-11-2007 11:35 Pagina 46
Page 50 of 218
49
SAFETY
DEVICES
STARTING
AND
DRIVING
WARNING
LIGHTS AND
MESSAGES
IN AN
EMERGENCY
MAINTENANCE
AND CARE
TECHNICALSPECIFICATIONS
INDEX
DASHBOARD
AND CONTROLS
AIR DISTRIBUTION
The rotating knurled ring Eenables
the air in the car to reach all the ar-
eas in the passenger compartment ac-
cording to 5 options:
«delivery of air from the central and
side vents 2 and 4;
Δdelivery of air from the central and
side vents 2 and 4 and downwards
5 and 6 (bilevel function);
≈delivery of air downwards 5 and
6;
ƒdelivery of air downwards 5 and 6
and to the windscreen 3 simulta-
neously;
-demisting and defrosting of wind-
screen 3 and front side windows
vents 1.ACTIVATING THE INTERNAL
AIR RECIRCULATION
Position the knob F-fig. 61on
….
It is advisable to activate air recycle
in queues or in tunnels to prevent the
introduction of polluted air. Do not
use the function for a long time, par-
ticularly if there are many passengers
on board, to prevent the windows
from misting up.
IMPORTANT The internal air recir-
culation system makes it possible to
reach the required “heating” or
“cooling” conditions faster. Do not use
the air recirculation function on
rainy/cold days as it would consider-
ably increase the possibility of the
windows misting inside. REGULATING THE
TEMPERATURE
Proceed as follows:
Turn the rotating knurled ring B-fig.
61to the right (gauge on red area) to
increase the temperature or to the left
to reduce it.
REGULATING THE FAN SPEED
To ventilate the passengers compart-
ment properly proceed as follows:
❒deliver air from the central and
side vents 4 and 2;
❒position the rotating knurled ring
B-fig. 61on the blue section;
❒turn knob Ato the required speed;
❒position the knurled ring Eon
«;
❒stop internal air recirculation by
placing knob Fon
Ú.
038-094 MUSA 3ed GB 12-11-2007 11:35 Pagina 49