Lancia Musa 2010 Owner handbook (in English)
Manufacturer: LANCIA, Model Year: 2010, Model line: Musa, Model: Lancia Musa 2010Pages: 218, PDF Size: 3.71 MB
Page 151 of 218
150
WARNING
LIGHTS AND
MESSAGES
MAINTENANCE
AND CARE
TECHNICAL
SPECIFICA-
TIONS
INDEX
DASHBOARD
AND
CONTROLS
SAFETY
STARTING
AND DRIVING
IN AN
EMERGENCY
REPLACING
EXTERIOR BULBS
For the type of bulb and power rat-
ing, see “When needing to change a
bulb”.
FRONT LIGHT CLUSTER
The front light clusters contain side
lights, dipped beam, main beam and
direction indicator bulbs.
Remove the protective caps to remove
the side lights, the dipped beam and
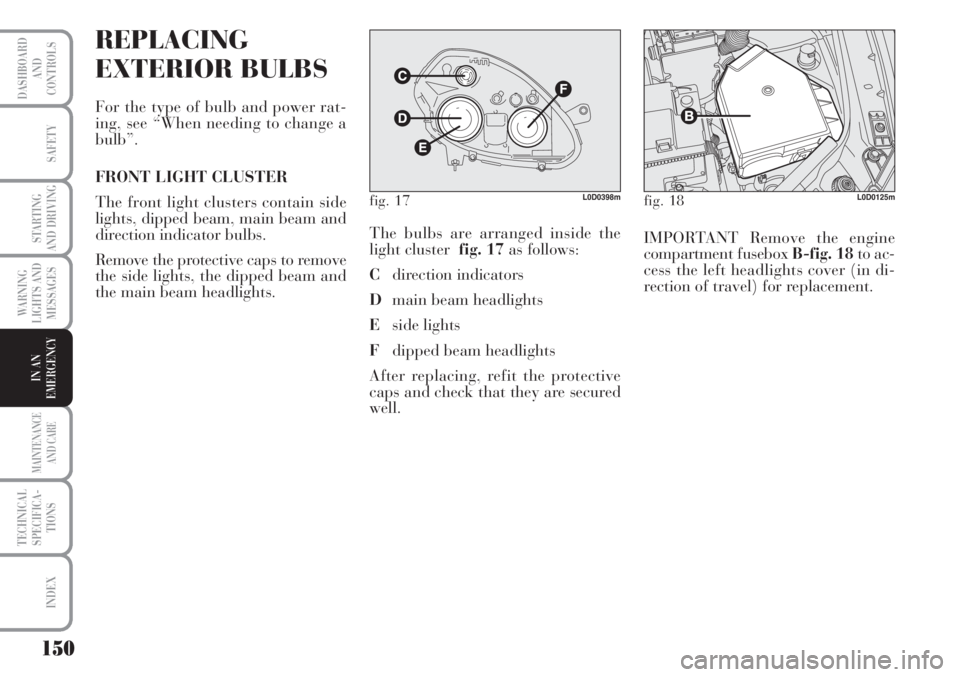
the main beam headlights.The bulbs are arranged inside the
light cluster fig. 17as follows:
Cdirection indicators
Dmain beam headlights
Eside lights
Fdipped beam headlights
After replacing, refit the protective
caps and check that they are secured
well.IMPORTANT Remove the engine
compartment fusebox B-fig. 18to ac-
cess the left headlights cover (in di-
rection of travel) for replacement.
fig. 17L0D0398mfig. 18L0D0125m
Page 152 of 218
151
WARNING
LIGHTS AND
MESSAGES
MAINTENANCE
AND CARE
TECHNICAL
SPECIFICA-
TIONS
INDEX
DASHBOARD
AND
CONTROLS
SAFETY
STARTING
AND DRIVING
IN AN
EMERGENCY
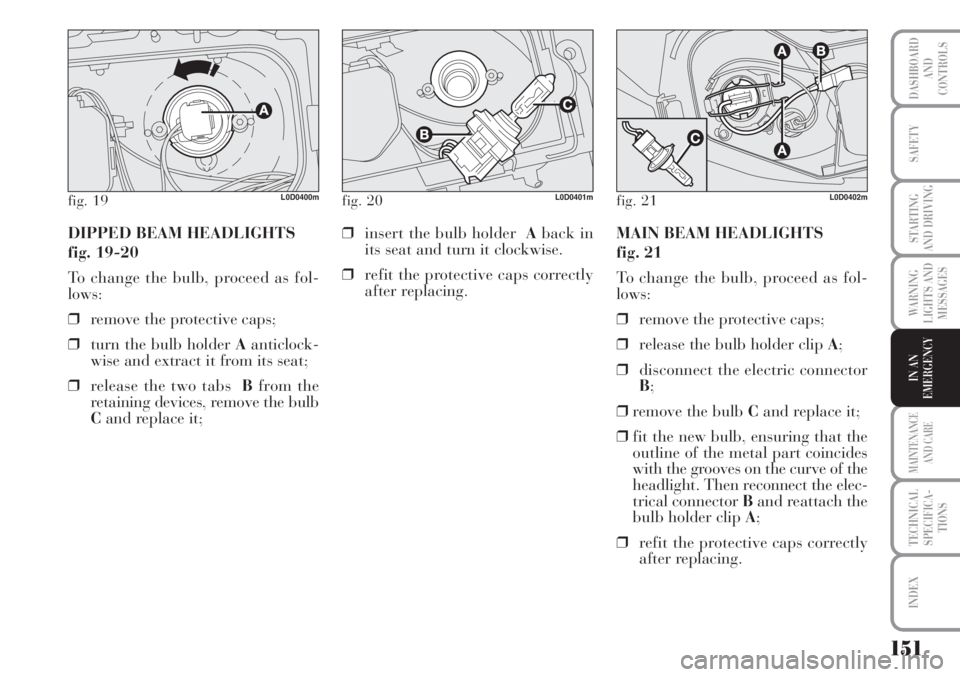
DIPPED BEAM HEADLIGHTS
fig. 19-20
To change the bulb, proceed as fol-
lows:
❒remove the protective caps;
❒turn the bulb holder Aanticlock-
wise and extract it from its seat;
❒release the two tabs Bfrom the
retaining devices, remove the bulb
Cand replace it;❒insert the bulb holder Aback in
its seat and turn it clockwise.
❒refit the protective caps correctly
after replacing.MAIN BEAM HEADLIGHTS
fig. 21
To change the bulb, proceed as fol-
lows:
❒remove the protective caps;
❒release the bulb holder clip A;
❒disconnect the electric connector
B;
❒remove the bulb Cand replace it;
❒fit the new bulb, ensuring that the
outline of the metal part coincides
with the grooves on the curve of the
headlight. Then reconnect the elec-
trical connector Band reattach the
bulb holder clip A;
❒refit the protective caps correctly
after replacing.
fig. 20L0D0401mfig. 21L0D0402mfig. 19L0D0400m
Page 153 of 218
152
WARNING
LIGHTS AND
MESSAGES
MAINTENANCE
AND CARE
TECHNICAL
SPECIFICA-
TIONS
INDEX
DASHBOARD
AND
CONTROLS
SAFETY
STARTING
AND DRIVING
IN AN
EMERGENCY
fig. 22L0C0403m
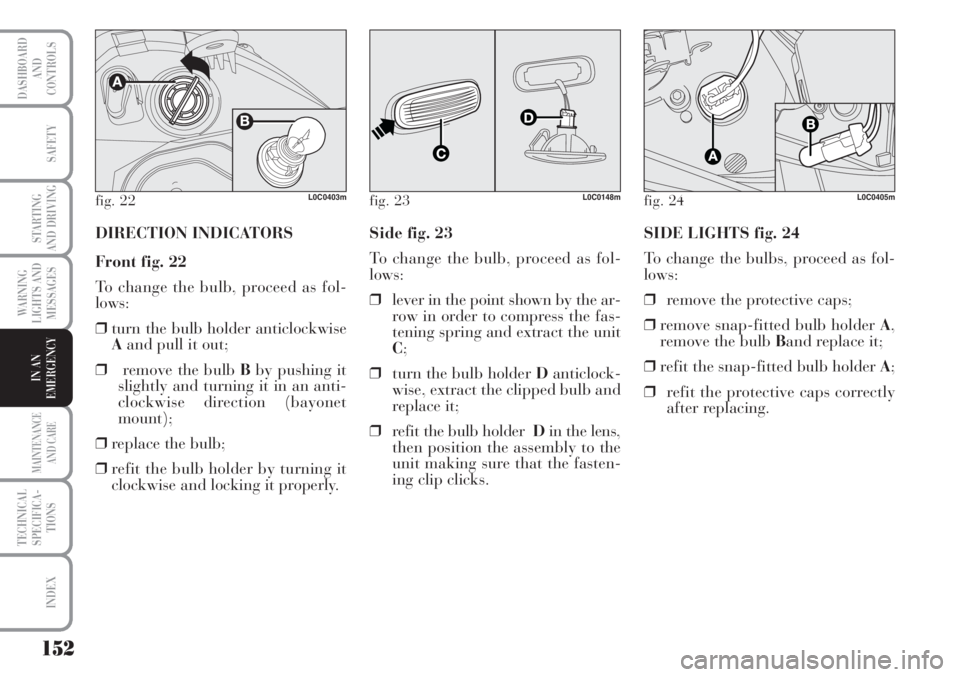
DIRECTION INDICATORS
Front fig. 22
To change the bulb, proceed as fol-
lows:
❒turn the bulb holder anticlockwise
Aand pull it out;
❒remove the bulb Bby pushing it
slightly and turning it in an anti-
clockwise direction (bayonet
mount);
❒replace the bulb;
❒refit the bulb holder by turning it
clockwise and locking it properly.Side fig. 23
To change the bulb, proceed as fol-
lows:
❒lever in the point shown by the ar-
row in order to compress the fas-
tening spring and extract the unit
C;
❒turn the bulb holder Danticlock-
wise, extract the clipped bulb and
replace it;
❒refit the bulb holder Din the lens,
then position the assembly to the
unit making sure that the fasten-
ing clip clicks.SIDE LIGHTS fig. 24
To change the bulbs, proceed as fol-
lows:
❒remove the protective caps;
❒remove snap-fitted bulb holder A,
remove the bulb Band replace it;
❒refit the snap-fitted bulb holder A;
❒refit the protective caps correctly
after replacing.
fig. 23L0C0148mfig. 24L0C0405m
Page 154 of 218
153
WARNING
LIGHTS AND
MESSAGES
MAINTENANCE
AND CARE
TECHNICAL
SPECIFICA-
TIONS
INDEX
DASHBOARD
AND
CONTROLS
SAFETY
STARTING
AND DRIVING
IN AN
EMERGENCY
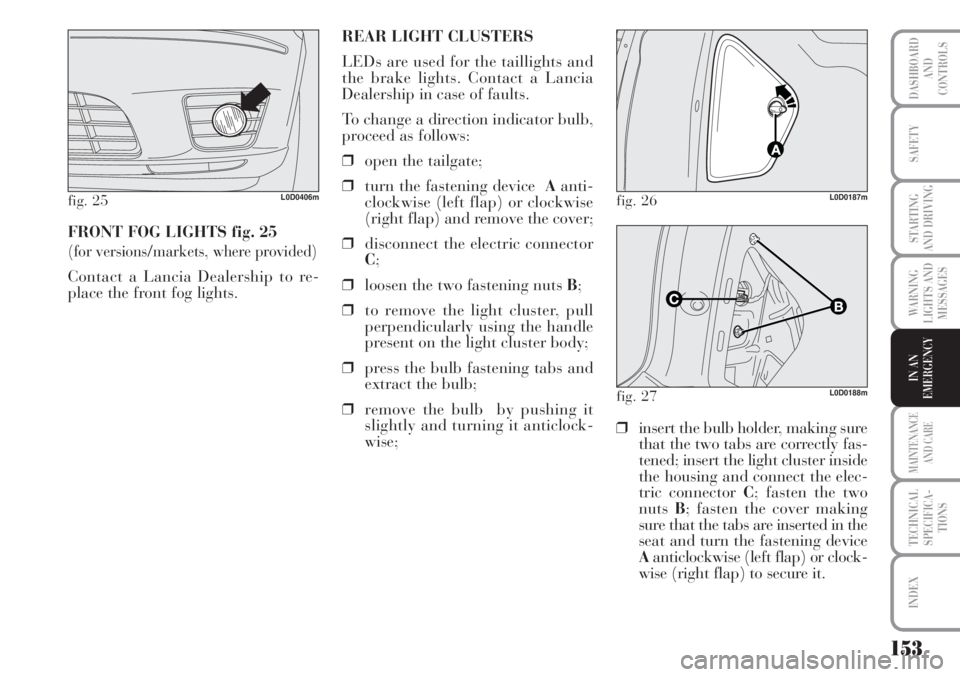
FRONT FOG LIGHTS fig. 25
(for versions/markets, where provided)
Contact a Lancia Dealership to re-
place the front fog lights.
fig. 25L0D0406m
REAR LIGHT CLUSTERS
LEDs are used for the taillights and
the brake lights. Contact a Lancia
Dealership in case of faults.
To change a direction indicator bulb,
proceed as follows:
❒open the tailgate;
❒turn the fastening deviceAanti-
clockwise (left flap) or clockwise
(right flap) and remove the cover;
❒disconnect the electric connector
C;
❒loosen the two fastening nuts B;
❒to remove the light cluster, pull
perpendicularly using the handle
present on the light cluster body;
❒press the bulb fastening tabs and
extract the bulb;
❒remove the bulb by pushing it
slightly and turning it anticlock-
wise;❒insert the bulb holder, making sure
that the two tabs are correctly fas-
tened; insert the light cluster inside
the housing and connect the elec-
tric connector C; fasten the two
nutsB; fasten the cover making
sure that the tabs are inserted in the
seat and turn the fastening device
Aanticlockwise (left flap) or clock-
wise (right flap) to secure it.
fig. 26L0D0187m
fig. 27L0D0188m
Page 155 of 218
154
WARNING
LIGHTS AND
MESSAGES
MAINTENANCE
AND CARE
TECHNICAL
SPECIFICA-
TIONS
INDEX
DASHBOARD
AND
CONTROLS
SAFETY
STARTING
AND DRIVING
IN AN
EMERGENCY
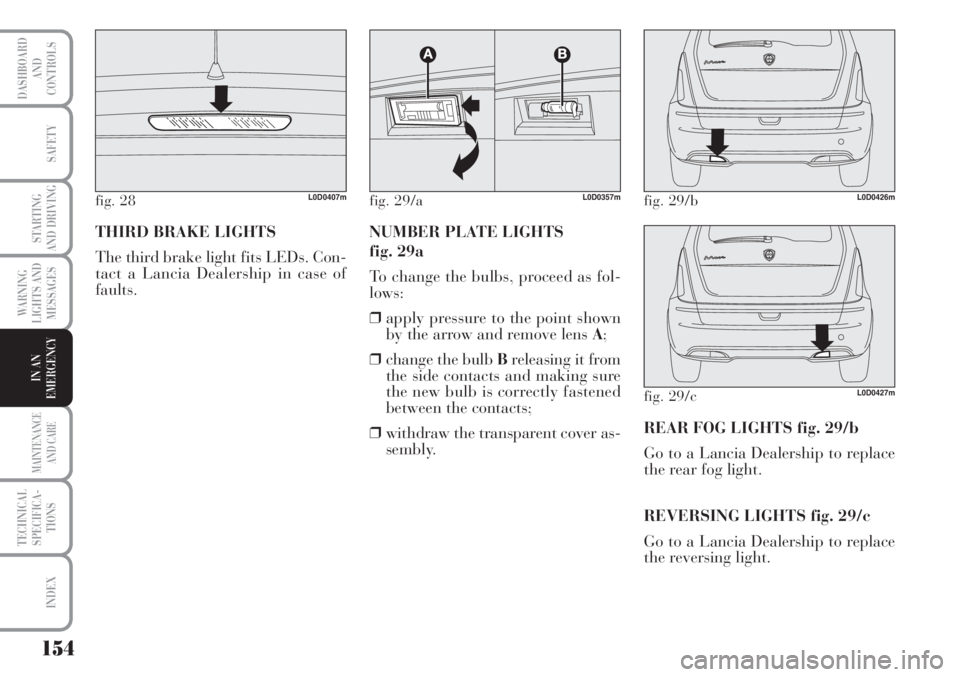
THIRD BRAKE LIGHTS
The third brake light fits LEDs. Con-
tact a Lancia Dealership in case of
faults.
fig. 28L0D0407m
NUMBER PLATE LIGHTS
fig. 29a
To change the bulbs, proceed as fol-
lows:
❒apply pressure to the point shown
by the arrow and remove lens A;
❒change the bulb Breleasing it from
the side contacts and making sure
the new bulb is correctly fastened
between the contacts;
❒withdraw the transparent cover as-
sembly.
fig. 29/aL0D0357mfig. 29/bL0D0426m
fig. 29/cL0D0427m
REAR FOG LIGHTS fig. 29/b
Go to a Lancia Dealership to replace
the rear fog light.
REVERSING LIGHTS fig. 29/c
Go to a Lancia Dealership to replace
the reversing light.
Page 156 of 218
155
WARNING
LIGHTS AND
MESSAGES
MAINTENANCE
AND CARE
TECHNICAL
SPECIFICA-
TIONS
INDEX
DASHBOARD
AND
CONTROLS
SAFETY
STARTING
AND DRIVING
IN AN
EMERGENCY
fig. 30L0D0193m
fig. 31L0D0194m
REPLACING AN
INTERIOR BULB
For the type of bulb and power rat-
ing, see “When needing to change a
bulb”.
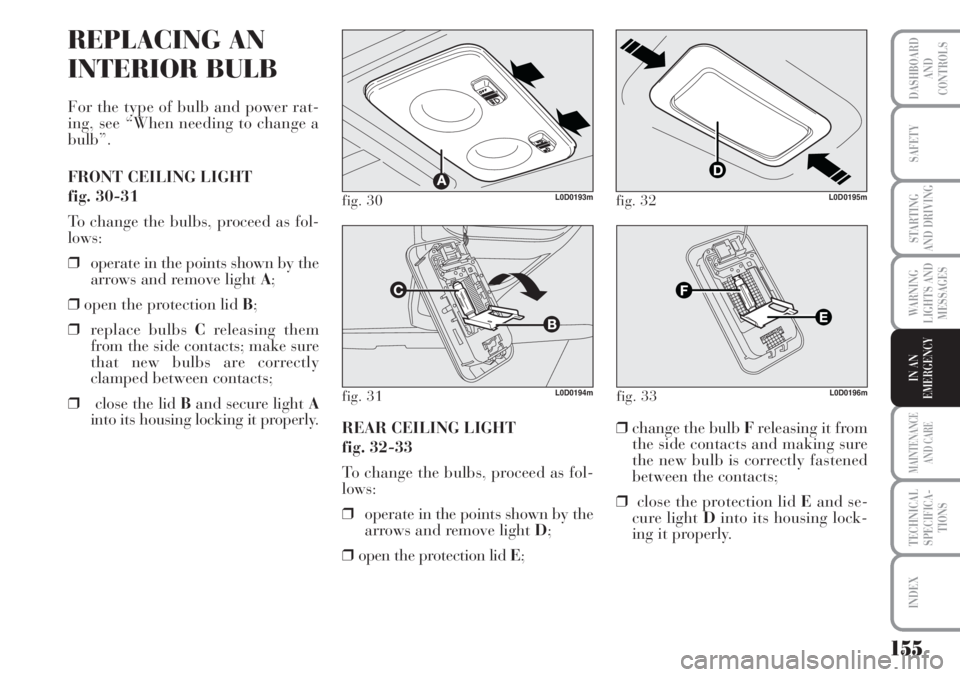
FRONT CEILING LIGHT
fig. 30-31
To change the bulbs, proceed as fol-
lows:
❒operate in the points shown by the
arrows and remove light A;
❒open the protection lid B;
❒replace bulbs Creleasing them
from the side contacts; make sure
that new bulbs are correctly
clamped between contacts;
❒close the lid Band secure light A
into its housing locking it properly.
REAR CEILING LIGHT
fig. 32-33
To change the bulbs, proceed as fol-
lows:
❒operate in the points shown by the
arrows and remove light D;
❒open the protection lid E;
fig. 32L0D0195m
❒change the bulb Freleasing it from
the side contacts and making sure
the new bulb is correctly fastened
between the contacts;
❒close the protection lid Eand se-
cure light Dinto its housing lock-
ing it properly.
fig. 33L0D0196m
Page 157 of 218
156
WARNING
LIGHTS AND
MESSAGES
MAINTENANCE
AND CARE
TECHNICAL
SPECIFICA-
TIONS
INDEX
DASHBOARD
AND
CONTROLS
SAFETY
STARTING
AND DRIVING
IN AN
EMERGENCY
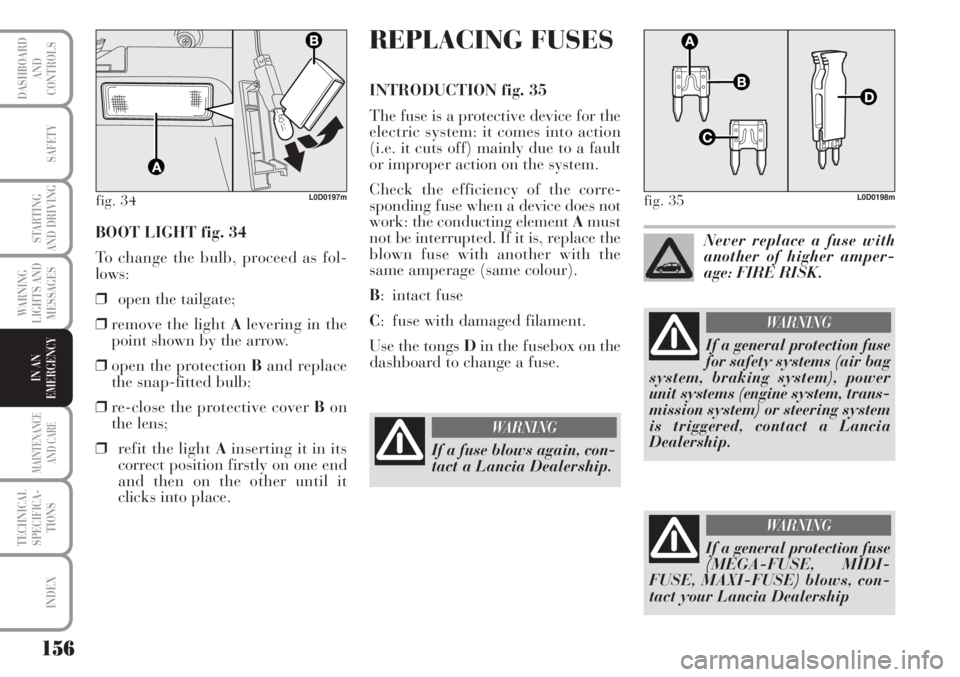
BOOT LIGHT fig. 34
To change the bulb, proceed as fol-
lows:
❒open the tailgate;
❒remove the light Alevering in the
point shown by the arrow.
❒open the protection Band replace
the snap-fitted bulb;
❒re-close the protective cover Bon
the lens;
❒refit the light Ainserting it in its
correct position firstly on one end
and then on the other until it
clicks into place.
fig. 34L0D0197m
REPLACING FUSES
INTRODUCTION fig. 35
The fuse is a protective device for the
electric system: it comes into action
(i.e. it cuts off) mainly due to a fault
or improper action on the system.
Check the efficiency of the corre-
sponding fuse when a device does not
work: the conducting element Amust
not be interrupted. If it is, replace the
blown fuse with another with the
same amperage (same colour).
B: intact fuse
C: fuse with damaged filament.
Use the tongs Din the fusebox on the
dashboard to change a fuse.
fig. 35L0D0198m
If a fuse blows again, con-
tact a Lancia Dealership.
WARNING
Never replace a fuse with
another of higher amper-
age: FIRE RISK.
If a general protection fuse
(MEGA-FUSE, MIDI-
FUSE, MAXI-FUSE) blows, con-
tact your Lancia Dealership
WARNING
If a general protection fuse
for safety systems (air bag
system, braking system), power
unit systems (engine system, trans-
mission system) or steering system
is triggered, contact a Lancia
Dealership.
WARNING
Page 158 of 218
157
WARNING
LIGHTS AND
MESSAGES
MAINTENANCE
AND CARE
TECHNICAL
SPECIFICA-
TIONS
INDEX
DASHBOARD
AND
CONTROLS
SAFETY
STARTING
AND DRIVING
IN AN
EMERGENCY
Remove the key from the
ignition switch and switch
off all loads before replacing a
fuse.
WARNING
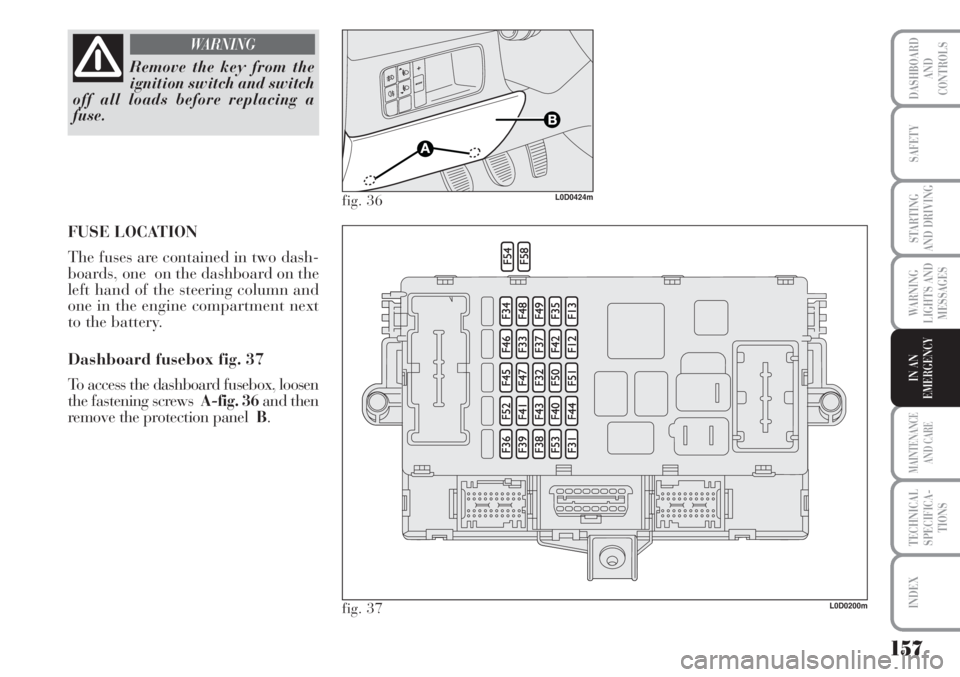
FUSE LOCATION
The fuses are contained in two dash-
boards, one on the dashboard on the
left hand of the steering column and
one in the engine compartment next
to the battery.
Dashboard fusebox fig. 37
To access the dashboard fusebox, loosen
the fastening screws A-fig. 36and then
remove the protection panel B.
L0D0200m
fig. 36L0D0424m
fig. 37
Page 159 of 218
158
WARNING
LIGHTS AND
MESSAGES
MAINTENANCE
AND CARE
TECHNICAL
SPECIFICA-
TIONS
INDEX
DASHBOARD
AND
CONTROLS
SAFETY
STARTING
AND DRIVING
IN AN
EMERGENCY
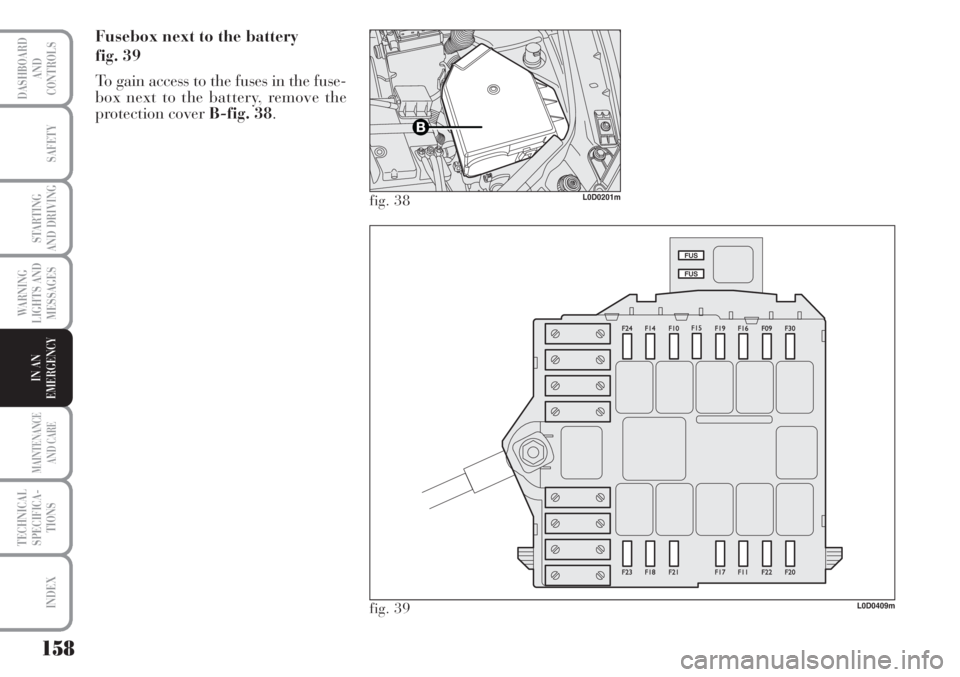
Fusebox next to the battery
fig. 39
To gain access to the fuses in the fuse-
box next to the battery, remove the
protection cover B-fig. 38.
L0D0409m
fig. 38L0D0201m
fig. 39
Page 160 of 218
159
WARNING
LIGHTS AND
MESSAGES
MAINTENANCE
AND CARE
TECHNICAL
SPECIFICA-
TIONS
INDEX
DASHBOARD
AND
CONTROLS
SAFETY
STARTING
AND DRIVING
IN AN
EMERGENCY
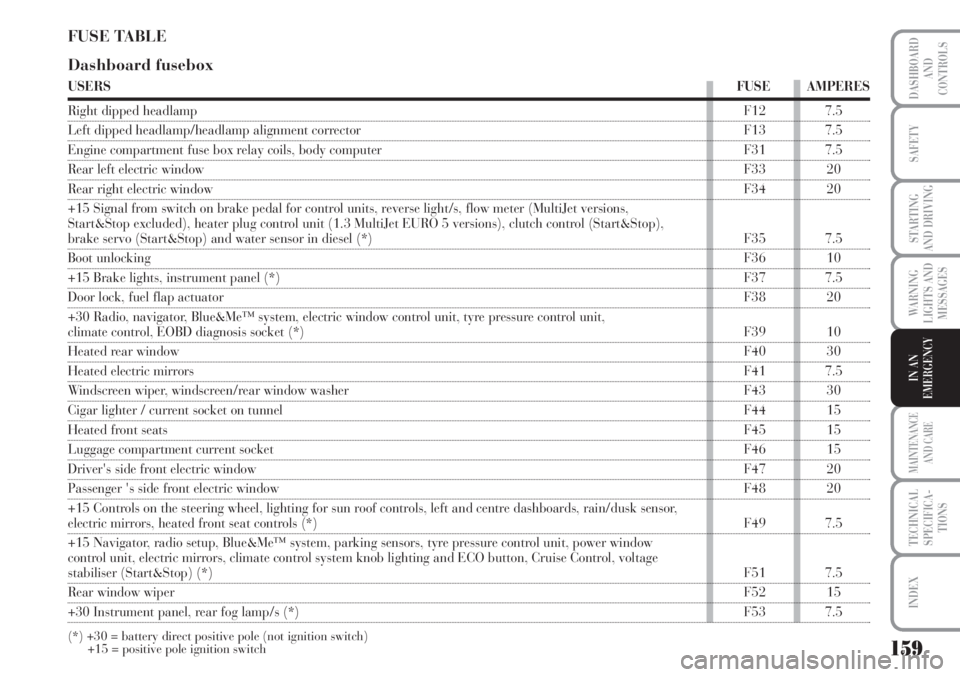
FUSE TABLE
Dashboard fusebox
USERSFUSE AMPERES
Right dipped headlampF12 7.5
Left dipped headlamp/headlamp alignment corrector F13 7.5
Engine compartment fuse box relay coils, body computer F31 7.5
Rear left electric windowF33 20
Rear right electric windowF34 20
+15 Signal from switch on brake pedal for control units, reverse light/s, flow meter (MultiJet versions,
Start&Stop excluded), heater plug control unit (1.3 MultiJet EURO 5 versions), clutch control (Start&Stop),
brake servo (Start&Stop) and water sensor in diesel (*) F35 7.5
Boot unlocking F36 10
+15 Brake lights, instrument panel (*)F37 7.5
Door lock, fuel flap actuatorF38 20
+30 Radio, navigator, Blue&Me™ system, electric window control unit, tyre pressure control unit,
climate control, EOBD diagnosis socket (*)F39 10
Heated rear window F40 30
Heated electric mirrorsF41 7.5
Windscreen wiper, windscreen/rear window washer F43 30
Cigar lighter / current socket on tunnelF44 15
Heated front seatsF45 15
Luggage compartment current socketF46 15
Driver's side front electric windowF47 20
Passenger 's side front electric windowF48 20
+15 Controls on the steering wheel, lighting for sun roof controls, left and centre dashboards, rain/dusk sensor,
electric mirrors, heated front seat controls (*)F49 7.5
+15 Navigator, radio setup, Blue&Me™ system, parking sensors, tyre pressure control unit, power window
control unit, electric mirrors, climate control system knob lighting and ECO button, Cruise Control, voltage
stabiliser (Start&Stop) (*)F51 7.5
Rear window wiperF52 15
+30 Instrument panel, rear fog lamp/s (*)F53 7.5
(*) +30 = battery direct positive pole (not ignition switch)
+15 = positive pole ignition switch