remote control Lancia Voyager 2012 Owner handbook (in English)
[x] Cancel search | Manufacturer: LANCIA, Model Year: 2012, Model line: Voyager, Model: Lancia Voyager 2012Pages: 344, PDF Size: 3.95 MB
Page 24 of 344
will sound. If this occurs, disarm the
Vehicle Security Alarm.
If the Vehicle Security Alarm is armed
and the battery becomes discon-
nected, the Vehicle Security Alarm
will remain armed when the battery is
reconnected; the exterior lights will
flash, the horn will sound. If this oc-
curs, disarm the Vehicle Security
Alarm.
ILLUMINATED ENTRY
(for versions/markets,
where provided)
The courtesy lights will turn on when
you use the Remote Keyless Entry
(RKE) transmitter to unlock the
doors or open any door.
This feature also turns on the ap-
proach lighting in the outside mirrors
(for versions/markets, where pro-
vided). Refer to “Mirrors” in “Under-
standing The Features Of Your Ve-
hicle” for further information.
The lights will fade to off after ap-
proximately 30 seconds, or they willimmediately fade to off once the igni-
tion switch is turned to ON/RUN from
the OFF position.
NOTE:
The front courtesy overhead
console and door courtesy lights
will not turn off if the dimmer
control is in the “Dome ON” po-
sition (extreme top position).
The illuminated entry system will not operate if the dimmer
control is in the “dome defeat”
position (extreme bottom posi-
tion).
REMOTE KEYLESS
ENTRY (RKE) (for
versions/markets, where
provided)
This system allows you to lock or un-
lock the doors and liftgate, open both
front windows, open or close the op-
tional power liftgate, left power slid-
ing door, and right power sliding door
from distances up to approximately
11 m using a hand-held RKE trans-
mitter. The RKE transmitter does not need to be pointed at the vehicle to
activate the system.
NOTE:
Inserting the RKE transmitter with
Integrated Key into the ignition
switch disables all buttons on that
transmitter; however, the buttons
on the remaining transmitters will
continue to work. Driving at
speeds 8 km/h and above disables
all RKE transmitter buttons for all
RKE transmitters.
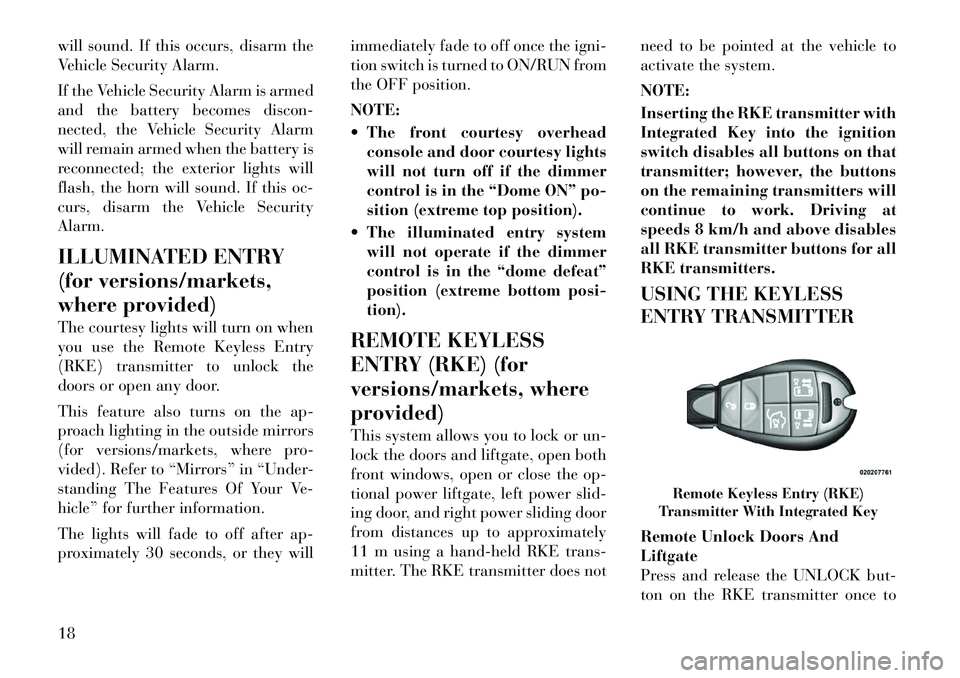
USING THE KEYLESS
ENTRY TRANSMITTER
Remote Unlock Doors And
Liftgate
Press and release the UNLOCK but-
ton on the RKE transmitter once to
Remote Keyless Entry (RKE)
Transmitter With Integrated Key
18
Page 38 of 344
2. Slide the Child Protection Door
Lock control outward (away from the
vehicle) to disengage the Child Pro-
tection Door Lock.
3. Repeat Steps 1 and 2 on the oppo-
site sliding door (for versions/
markets, where provided).
NOTE:
After setting the Child Protec-tion Door Lock system, always
test the door from the inside to
make certain it is in the desired
position.
The power sliding side door switches will not open the power
sliding doors if the vehicle is in
gear or the vehicle speed is
above 0 km/h.
The power sliding door will op- erate from the outside door
handle, the RKE transmitter, the
switches on the overhead con-
sole, or the switches located on
the trim panel just in front of the
power sliding door when the
shift lever is in PARK, regardless
of the child lock lever position. LIFTGATE
On vehicles equipped with power
locks, the liftgate can be unlocked
using the Remote Keyless Entry
(RKE) transmitter button, or by acti-
vating the power door lock switches
located on the front doors.
To open the liftgate, press the liftgate
release handle located on the under-
side of the license plate bar and pull
the liftgate open with one fluid mo-
tion.
POWER LIFTGATE (for
versions/markets, where
available)
The power liftgate may be opened
manually or by using the button on
the Remote Keyless Entry (RKE)
transmitter. Press the button on the transmitter twice within five seconds,
to open the power liftgate. When the
liftgate is fully open, pressing the but-
ton twice within five seconds, a sec-
ond time, will close the liftgate.
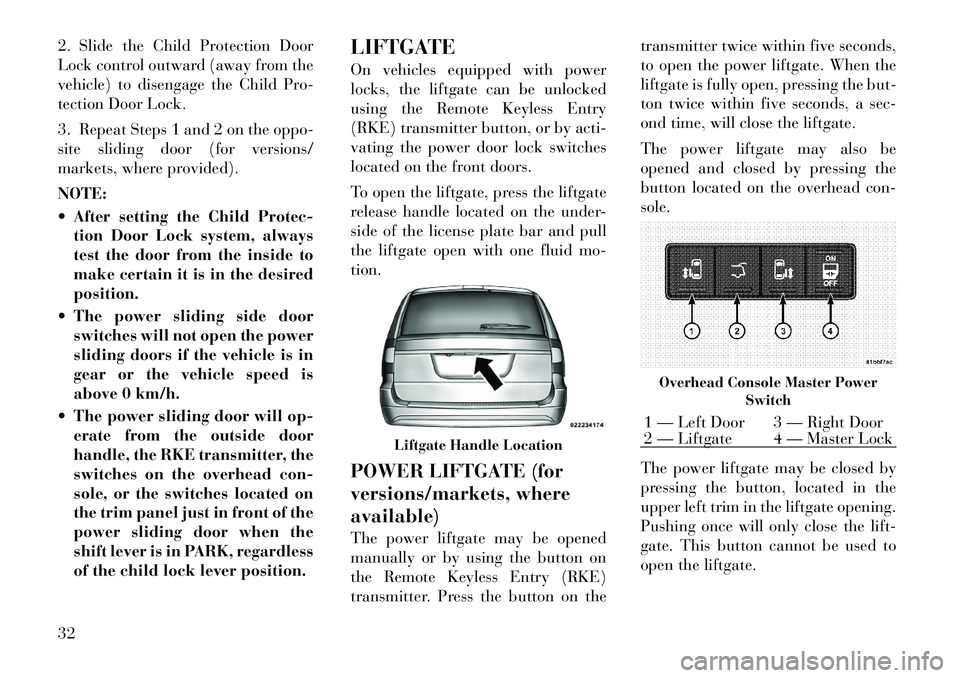
The power liftgate may also be
opened and closed by pressing the
button located on the overhead con-
sole.
The power liftgate may be closed by
pressing the button, located in the
upper left trim in the liftgate opening.
Pushing once will only close the lift-
gate. This button cannot be used to
open the liftgate.
Liftgate Handle Location
Overhead Console Master Power
Switch1 — Left Door 3 — Right Door
2 — Liftgate 4 — Master Lock
32
Page 125 of 344
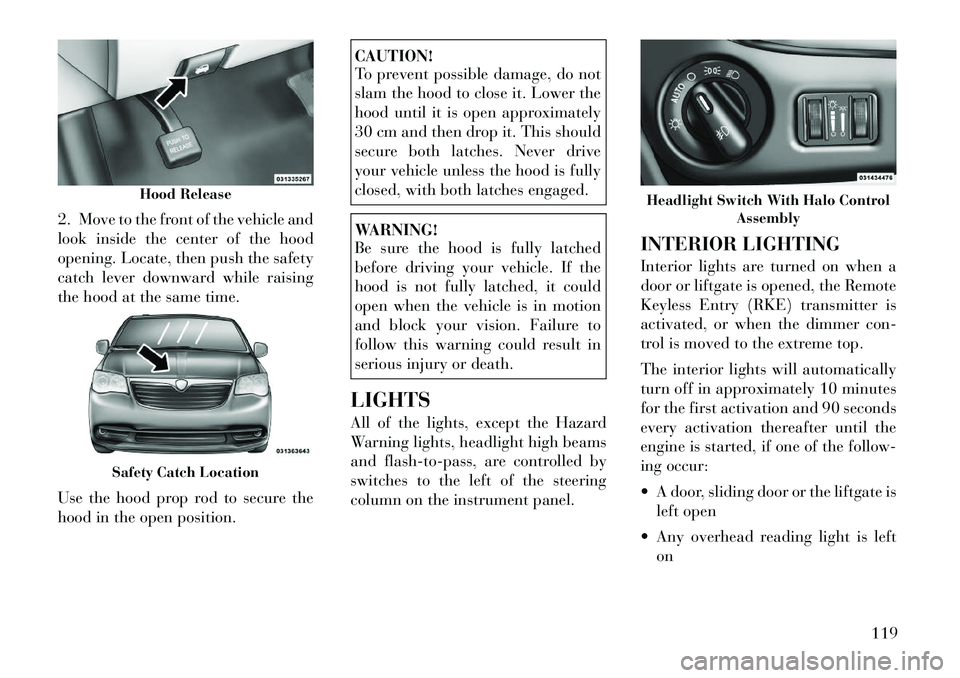
2. Move to the front of the vehicle and
look inside the center of the hood
opening. Locate, then push the safety
catch lever downward while raising
the hood at the same time.
Use the hood prop rod to secure the
hood in the open position.
CAUTION!
To prevent possible damage, do not
slam the hood to close it. Lower the
hood until it is open approximately
30 cm and then drop it. This should
secure both latches. Never drive
your vehicle unless the hood is fully
closed, with both latches engaged.WARNING!
Be sure the hood is fully latched
before driving your vehicle. If the
hood is not fully latched, it could
open when the vehicle is in motion
and block your vision. Failure to
follow this warning could result in
serious injury or death.
LIGHTS
All of the lights, except the Hazard
Warning lights, headlight high beams
and flash-to-pass, are controlled by
switches to the left of the steering
column on the instrument panel. INTERIOR LIGHTING
Interior lights are turned on when a
door or liftgate is opened, the Remote
Keyless Entry (RKE) transmitter is
activated, or when the dimmer con-
trol is moved to the extreme top.
The interior lights will automatically
turn off in approximately 10 minutes
for the first activation and 90 seconds
every activation thereafter until the
engine is started, if one of the follow-
ing occur:
A door, sliding door or the liftgate is
left open
Any overhead reading light is left on
Hood Release
Safety Catch Location
Headlight Switch With Halo Control Assembly
119
Page 143 of 344
COURTESY/INTERIOR
LIGHTING
At the forward end of the console are
two courtesy lights (standard dome
light has two buttons). The lights turn
on when a front door, a sliding door or
the liftgate is opened. If your vehicle is
equipped with Remote Keyless Entry
(RKE) the lights will also turn on
when the UNLOCK button on the
RKE transmitter is pressed.
The courtesy lights also function as
reading lights. Press in on each lens to
turn these lights on while inside the
vehicle. Press a second time to turn
each light off. You may adjust the
direction of these lights by pressingthe outside ring, which is identified
with four directional arrows (LED
lamps only).
The area around the instrument panel
cupholders is also illuminated from a
light in the overhead console (pre-
mium console only). This light is
turned on when the headlight switch
is on, and will adjust in brightness
when the dimmer control is rotated up
or down.
SUNGLASS STORAGE
(NON-SUNROOF ONLY)
At the front of the overhead console, a
compartment is provided for the stor-
age of two pairs of sunglasses.
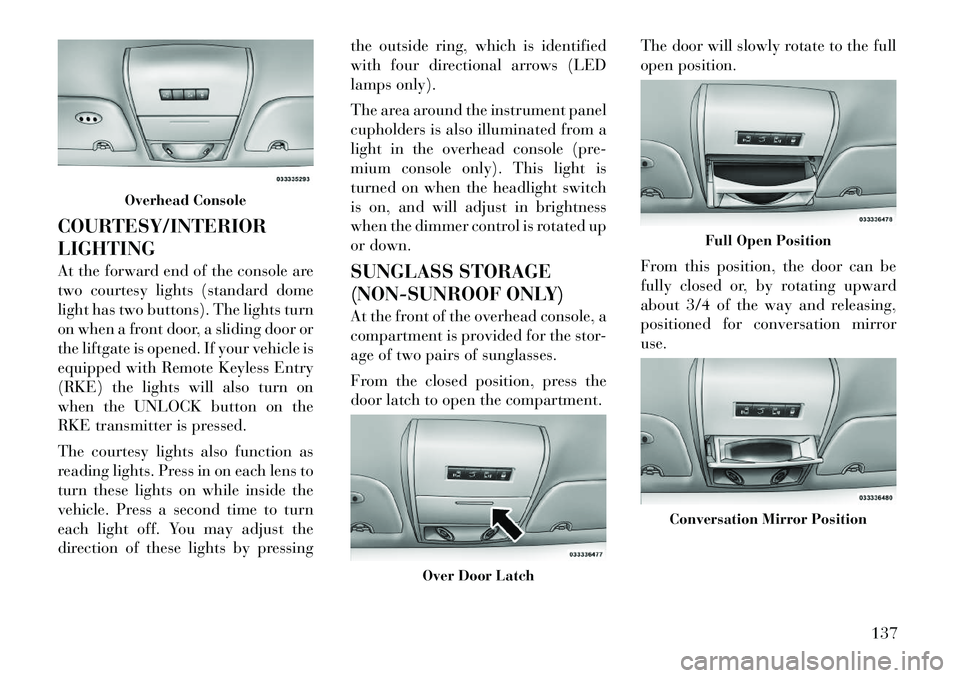
From the closed position, press the
door latch to open the compartment.
The door will slowly rotate to the full
open position.
From this position, the door can be
fully closed or, by rotating upward
about 3/4 of the way and releasing,
positioned for conversation mirror
use.
Overhead Console
Over Door Latch
Full Open Position
Conversation Mirror Position
137
Page 165 of 344
Listen To An Audio Source On Channel 2While A Video Is Playing On Channel 1 . . . . . 192
Dual Video Screen . . . . . . . . . . . . . . . . . . . . . 193
Play A DVD Using The Touch-Screen Radio . . . . . . . . . . . . . . . . . . . . . . . . . . . . . . . 193
Play A DVD Using The VES™ Player (for versions/markets, where provided) . . . . . . . . 194
Listen To An Audio Source While A Video Is Playing . . . . . . . . . . . . . . . . . . . . . . . . . . . . . 195
Third Row Swivel Screen (for versions/ markets, where provided) . . . . . . . . . . . . . . . 196
Important Notes For Dual Video Screen System . . . . . . . . . . . . . . . . . . . . . . . . . . . . . . 196
Remote Control . . . . . . . . . . . . . . . . . . . . . . . 196
Remote Control Storage . . . . . . . . . . . . . . . . . 198
Locking The Remote Control . . . . . . . . . . . . . 198
Replacing The Remote Control Batteries . . . . 198
Headphones Operation . . . . . . . . . . . . . . . . . 198
Controls . . . . . . . . . . . . . . . . . . . . . . . . . . . . . 199
Replacing The Headphone Batteries . . . . . . . 199
Unwired® Stereo Headphone Lifetime Limited Warranty . . . . . . . . . . . . . . . . . . . . . 200
System Information . . . . . . . . . . . . . . . . . . . . 200
STEERING WHEEL AUDIO CONTROLS (for versions/markets, where provided) . . . . . . . . . . 207
Radio Operation . . . . . . . . . . . . . . . . . . . . . . 208
159
Page 180 of 344
Unstored Messages
This message type is displayedindefi-
nitely or until the condition that acti-
vated the message is cleared. Ex-
amples of this message type are "Turn
Signal On" (if a turn signal is left on)
and "Lights On" (if driver leaves the
vehicle).
Unstored Messages Until RUN
These messages deal primarily with
the Remote Start feature. This mes-
sage type is displayed until the igni-
tion is in the RUN state. Examples of
this message type are "Remote Start
Aborted - Door Ajar" and "Press
Brake Pedal and Push Button to
Start".
Five Second Unstored Messages
When the appropriate conditions oc-
cur, this type of message takes control
of the main display area for five sec-
onds and then returns to the previous
screen. Examples of this message type
are "Memory System Unavailable -
Not in Park" and "Automatic High
Beams On".
The Reconfigurable Telltales section
is divided into the white telltales area on the right, amber telltales in the
middle, and red telltales on the left.
When the appropriate conditions ex-
ist, the EVIC displays the following
messages:
Key in ignition
Ignition or Accessory On
Wrong Key
Damaged Key
Key not programmed
Vehicle Not in Park
Key Left Vehicle
Key Not Detected
Press Brake Pedal and Push Button
to Start
Liftgate Ajar (chime will sound when vehicle starts moving)
Low Tire Pressure
Service TPM System (refer to “Tire Pressure Monitoring System” in
“Starting And Operating”)
Turn Signal On
RKE Battery Low
Service Keyless System LOW WASHER FLUID
Oil Change Required
Check Gascap
Left Front Turn Signal Lamp Out
Left Rear Turn Signal Lamp Out
Right Front Turn Signal Lamp Out
Right Rear Turn Signal Lamp Out
Park Assist Disabled
Service Park Assist System
Personal Settings Not Available —
Vehicle Not in Park
Blind Spot System Off — This mes- sage is displayed when the ignition
is turned to ON to indicate the Blind
Spot System has been turned off.
Blind Spot System Not Available — This message is displayed to indi-
cate the Blind Spot Monitor (BSM)
system is temporarily unavailable
due to sensor blockage, electronic
interference, or other "temporary"
conditions. When this message is
displayed both outside rear view
icons will be illuminated. If elec-
tronic interference is present, the
BSM system will illuminate the icon
174
Page 198 of 344
Turn on the VES™ player (forversions/markets, where provided
on Dual Screen System) by pushing
the Power button, located on the far
left, or by pressing the button on
the Remote Control.
When the Video Screen(s) are open and a DVD is inserted into the
VES™ player, the screen(s) turn(s)
on automatically, the headphone
transmitters turn on and playback
begins.
For Dual Video Screen System, Channel 1 on the Remote Control
and Headphones refers to Screen 1
(second row) and Channel 2 on the
Remote Control and Headphones
refers to Screen 2 (third row). Refer
to the Dual Video Screen section for
more information.
Play Video Games
Connect the video game console to the
Auxiliary RCA input jacks (1 set or 2
depending on vehicle) located on the
back of the center console or on left
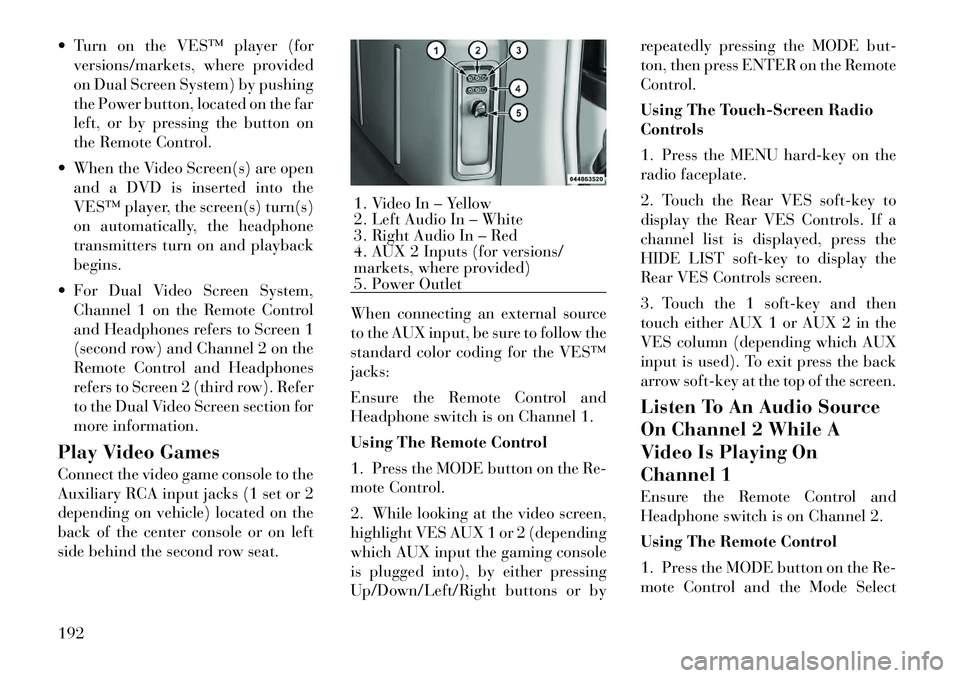
side behind the second row seat. When connecting an external source
to the AUX input, be sure to follow the
standard color coding for the VES™
jacks:
Ensure the Remote Control and
Headphone switch is on Channel 1.
Using The Remote Control
1. Press the MODE button on the Re-
mote Control.
2. While looking at the video screen,
highlight VES AUX 1 or 2 (depending
which AUX input the gaming console
is plugged into), by either pressing
Up/Down/Left/Right buttons or byrepeatedly pressing the MODE but-
ton, then press ENTER on the Remote
Control.
Using The Touch-Screen Radio
Controls
1. Press the MENU hard-key on the
radio faceplate.
2. Touch the Rear VES soft-key to
display the Rear VES Controls. If a
channel list is displayed, press the
HIDE LIST soft-key to display the
Rear VES Controls screen.
3. Touch the 1 soft-key and then
touch either AUX 1 or AUX 2 in the
VES column (depending which AUX
input is used). To exit press the back
arrow soft-key at the top of the screen.
Listen To An Audio Source
On Channel 2 While A
Video Is Playing On
Channel 1
Ensure the Remote Control and
Headphone switch is on Channel 2.
Using The Remote Control
1. Press the MODE button on the Re-
mote Control and the Mode Select
1. Video In – Yellow
2. Left Audio In – White
3. Right Audio In – Red
4. AUX 2 Inputs (for versions/
markets, where provided)
5. Power Outlet
192
Page 199 of 344
Screen will display, unless a video is
playing then only a small banner will
appear on the bottom of the screen.
2. While looking at the video screen,
either press Up/Down/Left/Right on
the Remote Control to highlight the
desired audio source or repeatedly
press the MODE button on the remote
until the desired audio source appears
on the screen.
Using The Touch-Screen Radio
Controls
1. Press the MENU hard-key on the
radio faceplate.
2. Touch the Rear VES soft-key to
display the Rear VES Controls. If a
channel list is displayed, press the
HIDE LIST soft-key to display the
Rear VES Controls screen.
3. To listen to an audio source on
Channel 2 while a video is playing on
Channel 1, touch the 2 soft-key and
choose an audio source. To exit touch
the back arrow soft-key at the top left
of the left screen.Dual Video Screen
NOTE:
Typically there are two different
ways to operate the features of the
Video Entertainment System
(VES)™.
The Remote Control
The Touch-Screen Radio (for
versions/markets, where pro-
vided)
Play A DVD Using The
Touch-Screen Radio
1. Press the OPEN/CLOSE or LOAD
hard-key on the radio faceplate
(Touch-Screen).
2. Insert the DVD with the label fac-
ing up. The radio automatically se-
lects the appropriate mode after the
disc is recognized and displays the
menu screen or starts playing the first
track.
3. To watch a DVD on Screen 1 for
second row passengers, ensure the Re-
mote Control and Headphone switch
is on Channel 1. 4. To watch a DVD on Screen 2 for
third row passengers, ensure the Re-
mote Control and Headphone switch
is on Channel 2.
Using The Remote Control
1. Press the MODE button on the Re-
mote Control.
2. While looking at Screen 1 or 2,
highlight DISC by either pressing Up/
Down/Left/Right buttons or by re-
peatedly pressing the MODE button,
then press ENTER.
NOTE:
Channel/Screen 1 select mode
information is shown on the left
side of the screen.
Channel/Screen 2 select mode information is shown on the
right side of the screen.
The VES™ will retain the last setting when turned off.
Using The Touch-Screen Radio
Controls
1. Press the MENU hard-key on the
radio faceplate.
193
Page 200 of 344
2. Touch the Rear VES soft-key to
display the Rear VES Controls. If a
channel list is displayed, press the
HIDE LIST soft-key to display the
Rear VES Controls screen.
3. Touch the 1 or 2 soft-key based on
the channel you want to change and
then the DISC soft-key in the MEDIA
column. To exit touch the back arrow
at the top left of the screen.
NOTE:
To view a DVD on the radiopress the RADIO/MEDIA hard-
key, on the radio faceplate, then
touch the DISC tab soft-key and
then the VIEW VIDEO soft-key.
Viewing a DVD on the Touch- Screen radio screen is not avail-
able in all states/provinces, and
the vehicle must be stopped, and
the shift lever must be in the
PARK position for vehicles with
automatic transmission. In ve-
hicles with manual transmission
the parking brake must be en-
gaged. Touching the screen on a Touch-
Screen radio while a DVD is
playing brings up basic remote
control functions for DVD play
such as scene selection, Play,
Pause, FF, RW, and Stop. Press-
ing the X in the upper corner
will turn off the remote control
screen functions.
Play A DVD Using The
VES™ Player (for
versions/markets, where
provided)
1. Insert the DVD with the label fac-
ing up. The VES™ player automati-
cally selects the appropriate mode af-
ter the disc is recognized and starts
playing the DVD.
NOTE:
The VES™ player has basic DVD
control function such as Menu,
Play, Pause, FF, RW and Stop
2. To watch a DVD on Screen 1 for
second row passengers, ensure the Re-
mote Control and Headphone switch
is on Channel 1. 3. To watch a DVD on Screen 2 for
third row passengers, ensure the Re-
mote Control and Headphone switch
is on Channel 2.
Using The Remote Control
1. Press the MODE button on the Re-
mote Control.
2. While looking at Screen 1 or 2,
highlight VES DISC by either press-
ing Up/Down/Left/Right buttons or
by repeatedly pressing the MODE
button, then press ENTER on the Re-
mote Control.
NOTE:
Channel/Screen 1 select mode
information is shown on the left
side of the screen.
Channel/Screen 2 select mode information is shown on the
right side of the screen.
The VES™ will retain the last setting when turned off.
Using The Touch-Screen Radio
Controls
1. Press the MENU hard-key on the
radio faceplate.
194
Page 201 of 344
2. Touch the Rear VES soft-key to
display the Rear VES Controls. If a
channel list is displayed, touch the
HIDE LIST soft-key to display the
Rear VES Controls screen.
3. Touch the 1 or 2 soft-key and then
the DISC soft-key in the VES column.
To exit touch the back arrow soft-key
at the top left of the screen.
NOTE:
To view a DVD on the radiopress the RADIO/MEDIA hard-
key, on the radio faceplate, then
touch the DISC tab soft-key and
then the VIEW VIDEO soft-key.
Viewing a DVD on the Touch- Screen radio screen is not avail-
able in all states/provinces, and
the vehicle must be stopped, and
the shift lever must be in the
PARK position for vehicles with
automatic transmission. In ve-
hicles with manual transmission
the parking brake must be en-
gaged. Listen To An Audio Source
While A Video Is Playing
Ensure the Remote Control and
Headphone switch are on the same
channel. If watching a video on
Screen 1 (second row), then Channel
2 could be used for audio. If watching
a video on Screen 2 (third row), then
Channel 1 could be used for audio.
Using The Remote Control
1. Press the MODE button on the Re-
mote Control and either the Mode Se-
lect Screen will display or a small
banner will appear at the bottom of
the screen.
2. To listen to an audio source on
Channel 1 or 2, either press Up/
Down/Left/Right on the Remote Con-
trol to highlight the desired audio
source or press the MODE button re-
peatedly until the desired audio
source appears on the screen.
Using The Touch Screen Radio
Controls
1. Press the MENU hard-key on the
radio faceplate.
2. Touch the Rear VES soft-key to
display the Rear VES Controls. If a
channel list is displayed, touch the
HIDE LIST soft-key to display the
Rear VES Controls screen.
3. To listen to an audio source on
Channel 1 while a video is playing on
Channel/Screen 2, touch the 1 soft-
key and choose an audio source. To
listen to an audio source on Channel 2
while a video is playing on Channel/
Screen 1, touch the 2 soft-key and
choose an audio source. To exit touch
the back arrow soft-key at the top left
of the screen.
195