ECU LAND ROVER DISCOVERY 2002 Owners Manual
[x] Cancel search | Manufacturer: LAND ROVER, Model Year: 2002, Model line: DISCOVERY, Model: LAND ROVER DISCOVERY 2002Pages: 1672, PDF Size: 46.1 MB
Page 262 of 1672

ENGINE - V8
REPAIRS 12-2-19
Gasket - rocker cover - LH
$% 12.29.40
Remove
1.Remove upper inlet manifold gasket.
+ MANIFOLDS AND EXHAUST
SYSTEMS - V8, REPAIRS, Gasket - inlet
manifold - upper - Without Secondary Air
Injection.
2. Models with air conditioning: Release 4
clips and remove fan cowl.
3. Models with air conditioning: Release
tension on auxiliary drive belt and remove belt
from air conditioning compressor. Disconnect
compressor multiplug. Remove 4 bolts
securing compressor and position compressor
aside. 4.Release ht leads from rocker cover clips.
5.Remove screw securing dip stick tube.
6.Remove 4 bolts securing rocker cover.
7.Remove rocker cover and collect gasket.
Refit
1.Clean mating faces of rocker cover and
cylinder head.
2.Using a new gasket, fitted dry, position rocker
cover ensuring gasket is correctly located.
3.Fit rocker cover bolts and working in diagonal
sequence, tighten to:
lStage 1 - 3 Nm (2.5 lbf.ft)
lStage 2 - 8 Nm (6 lbf.ft)
4.Ensure that outer rim of gasket is correctly
positioned around periphery of rocker cover.
5.Fit and tighten screw securing dip stick tube.
6.Secure ht leads in rocker cover clips.
7. Models with air conditioning: Clean
compressor dowels and dowel holes. Position
compressor, fit bolts and tighten to 22 Nm (16
lbf.ft). Release auxiliary drive belt tensioner
and fit belt to compressor.
Page 263 of 1672

ENGINE - V8
12-2-20 REPAIRS
8. Models with air conditioning: Position fan
cowl and secure clips.
9.Fit upper inlet manifold.
+ MANIFOLDS AND EXHAUST
SYSTEMS - V8, REPAIRS, Gasket - inlet
manifold - upper - Without Secondary Air
Injection.
Gasket - rocker cover - RH
$% 12.29.41
Remove
1.Drain cooling system.
+ COOLING SYSTEM - V8,
ADJUSTMENTS, Drain and refill.
2.Remove upper inlet manifold gasket.
+ MANIFOLDS AND EXHAUST
SYSTEMS - V8, REPAIRS, Gasket - inlet
manifold - upper - Without Secondary Air
Injection.
3. Models with SAI: Disconnect 2 air manifold
unions from adapters in cylinder head and
remove manifold.
4.Remove 2 bolts securing coolant rails to inlet
manifold.
Page 264 of 1672

ENGINE - V8
REPAIRS 12-2-21
5.Release coolant rail from inlet manifold and
discard 'O' ring.
6.Remove nuts securing alternator cables and
release cables from alternator.
7.Disconnect multiplugs from RH bank of
injectors and release harness from fuel rail.
8.Release ht leads from clips on rocker cover.
9.Remove 4 bolts securing rocker cover.
10.Remove rocker cover and collect gasket. Refit
1.Clean mating faces of rocker cover and
cylinder head.
2.Using a new gasket, fitted dry, position rocker
cover ensuring gasket is correctly located.
3.Fit rocker cover bolts and working in diagonal
sequence, tighten to:
lStage 1 - 3 Nm (2.5 lbf.ft)
lStage 2 - 8 Nm (6 lbf.ft)
4.Ensure that outer rim of gasket is correctly
positioned around periphery of rocker cover.
5.Secure ht leads in rocker cover clips.
6.Secure injector harness to fuel rail and connect
multiplugs to injectors.
7.Position alternator cables, and tighten terminal
B+ nut to 18 Nm (13 lbf.ft) and terminal D+ nut
to 5 Nm (3 lbf.ft).
8.Clean coolant rail 'O' ring recess.
9.Lubricate and fit new 'O' ring to coolant rail,
position coolant rails, fit bolts and tighten to 22
Nm (16 lbf.ft).
10. Models with SAI: Clean air manifold unions,
position manifold and tighten unions nuts to 25
Nm (18 lbf.ft).
11.Fit upper inlet manifold.
+ MANIFOLDS AND EXHAUST
SYSTEMS - V8, REPAIRS, Gasket - inlet
manifold - upper - Without Secondary Air
Injection.
12.Refill cooling system.
+ COOLING SYSTEM - V8,
ADJUSTMENTS, Drain and refill.
Page 265 of 1672

ENGINE - V8
12-2-22 REPAIRS
Mounting - front - LH
$% 12.45.01
Remove
1.Release turnbuckles and remove battery cover.
2.Disconnect battery earth lead.
3.Raise front of vehicle.
WARNING: Do not work on or under a
vehicle supported only by a jack. Always
support the vehicle on safety stands.
4.Remove underbelly panel.
+ EXTERIOR FITTINGS, REPAIRS,
Panel - underbelly.
5.Position a jack beneath the sump, and support
the engine on the jack.
CAUTION: To prevent damage to
components, cushion the jack pad with a
block of wood or hard rubber.
6.Remove 2 nuts securing engine mountings to
chassis.
7.Remove nut securing LH mounting to cylinder
block.
8.Raise engine sufficiently to allow engine
mounting to be removed, take care not to trap
any cables, pipes or harness.
9.Remove engine mounting. Collect heat shield,
if fitted.Refit
1.Fit heat shield to engine mounting, if fitted.
2.Fit engine mounting ensuring dowel is located.
3.Lower the jack and engage engine mounting
studs in chassis.
4.Fit nuts securing LH engine mounting and
tighten to 85 Nm (63 lbf.ft).
5.Fit underbelly panel.
+ EXTERIOR FITTINGS, REPAIRS,
Panel - underbelly.
6.Remove stand(s) and lower vehicle.
7.Connect battery earth lead.
8.Fit battery cover and secure turnbuckles.
Page 266 of 1672

ENGINE - V8
REPAIRS 12-2-23
Mounting - front - RH
$% 12.45.03
Remove
1.Release turnbuckles and remove battery cover.
2.Disconnect battery earth lead.
3.Raise front of vehicle.
WARNING: Do not work on or under a
vehicle supported only by a jack. Always
support the vehicle on safety stands.
4.Remove underbelly panel.
+ EXTERIOR FITTINGS, REPAIRS,
Panel - underbelly.
5.Position a jack beneath the sump, and support
the engine on the jack.
CAUTION: To prevent damage to
components, cushion the jack pad with a
block of wood or hard rubber.
6.Remove 2 nuts securing engine mountings to
chassis.
7.Remove nut securing RH mounting to cylinder
block.
8.Raise engine sufficiently to allow engine
mounting to be removed. Take care not to trap
any cables, pipes or harness.
9.Remove engine mounting.
10.Collect heat shield. Refit
1.Position heat shield.
2.Fit engine mounting ensuring dowel is located.
3.Lower the jack and engage engine mounting
studs in chassis.
4.Fit engine mounting nuts and tighten to 85 Nm
(63 lbf.ft).
5.Fit underbelly panel.
+ EXTERIOR FITTINGS, REPAIRS,
Panel - underbelly.
6.Remove stand(s) and lower vehicle.
7.Connect battery earth lead.
8.Fit battery cover and secure turnbuckles.
Page 267 of 1672

ENGINE - V8
12-2-24 REPAIRS
Mounting - rear - LH
$% 12.45.07
Remove
1.Raise vehicle on lift.
2.Remove 8 bolts securing rear cross member
and remove cross member.
3.Support transfer gearbox on jack.
CAUTION: To prevent damage to
components, cushion the jack pad with a
block of wood or hard rubber.
4.Release and disconnect HO2S multiplug.5.Remove nut securing mounting to body
bracket.
6.Remove nut securing mounting to mounting
bracket.
7.Remove 4 bolts securing mounting bracket to
gearbox.
8.Remove mounting and mounting bracket
assembly.
9.Remove mounting rubber.
10.Remove heat shield, if fitted.
Refit
1.If fitted position heatshield, fit mounting rubber
to mounting bracket, fit nut but do not tighten.
2.Position mounting bracket assembly, fit bolts
securing mounting bracket to gearbox and
tighten to 85 Nm (63 lbf.ft).
3.Fit nut securing mounting to body bracket and
tighten to 48 Nm (35 lbf.ft).
4.Tighten nut securing mounting to gearbox
bracket to 48 Nm (35 lbf.ft).
5.Connect HO2S multiplug and secure to support
bracket.
6.Position rear cross member, fit bolts and
tighten to 26 Nm (19 lbf.ft).
7.Lower vehicle.
Page 268 of 1672

ENGINE - V8
REPAIRS 12-2-25
Mounting - rear - RH
$% 12.45.09
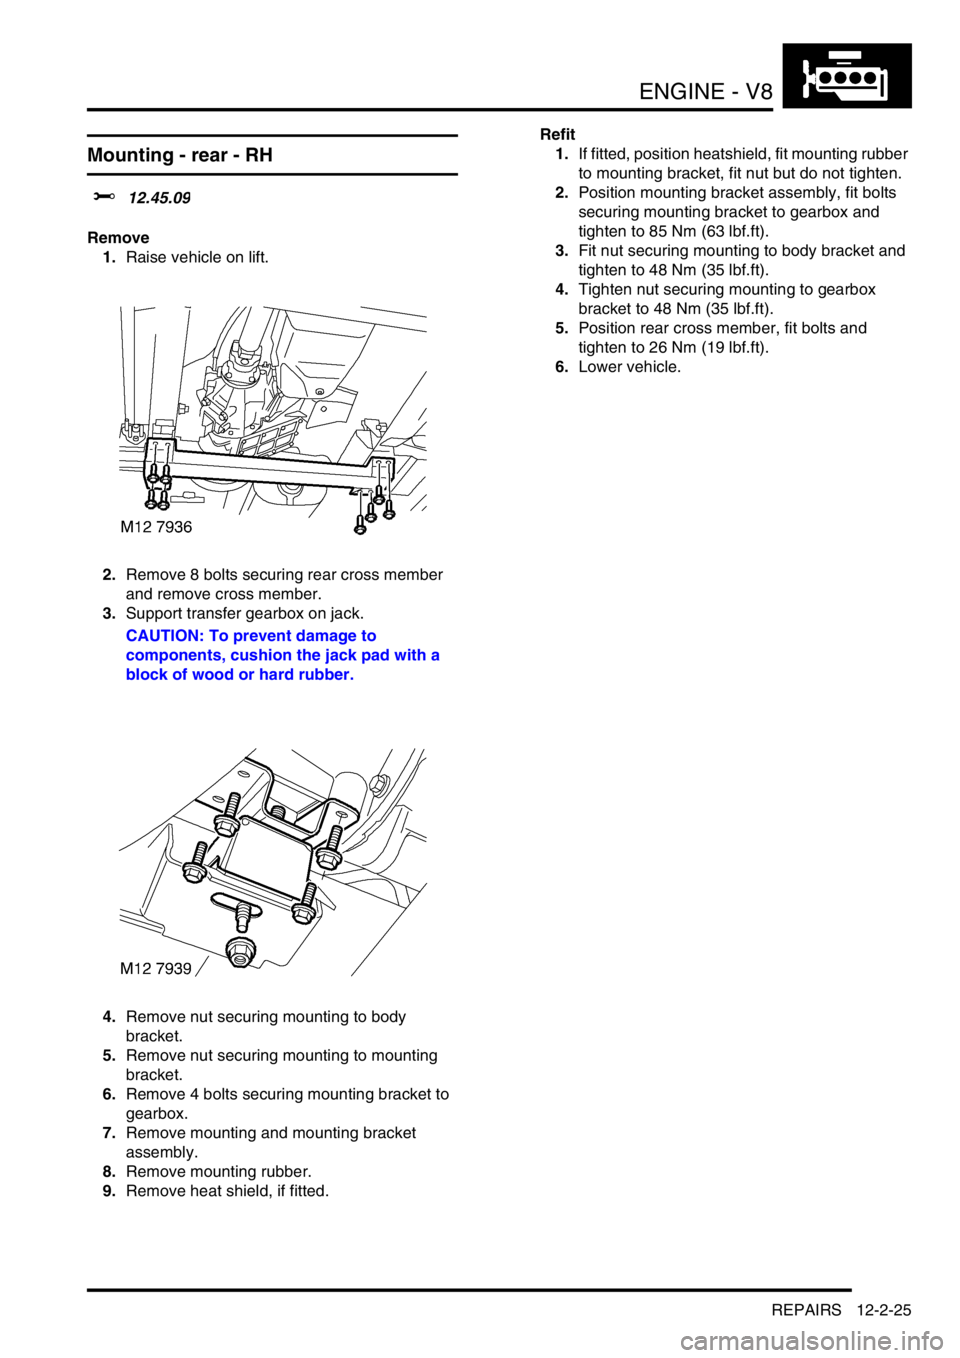
Remove
1.Raise vehicle on lift.
2.Remove 8 bolts securing rear cross member
and remove cross member.
3.Support transfer gearbox on jack.
CAUTION: To prevent damage to
components, cushion the jack pad with a
block of wood or hard rubber.
4.Remove nut securing mounting to body
bracket.
5.Remove nut securing mounting to mounting
bracket.
6.Remove 4 bolts securing mounting bracket to
gearbox.
7.Remove mounting and mounting bracket
assembly.
8.Remove mounting rubber.
9.Remove heat shield, if fitted.Refit
1.If fitted, position heatshield, fit mounting rubber
to mounting bracket, fit nut but do not tighten.
2.Position mounting bracket assembly, fit bolts
securing mounting bracket to gearbox and
tighten to 85 Nm (63 lbf.ft).
3.Fit nut securing mounting to body bracket and
tighten to 48 Nm (35 lbf.ft).
4.Tighten nut securing mounting to gearbox
bracket to 48 Nm (35 lbf.ft).
5.Position rear cross member, fit bolts and
tighten to 26 Nm (19 lbf.ft).
6.Lower vehicle.
Page 269 of 1672

ENGINE - V8
12-2-26 REPAIRS
Engine assembly
$% 12.41.01.99
Remove
1.Drain engine oil and remove oil filter.
2.Remove radiator.
+ COOLING SYSTEM - V8, REPAIRS,
Radiator.
3.Remove upper inlet manifold.
+ MANIFOLDS AND EXHAUST
SYSTEMS - V8, REPAIRS, Gasket - inlet
manifold - upper - Without Secondary Air
Injection.
4.Remove ignition coil assemblies.
5.Position absorbent material to catch spillage
and disconnect fuel pipe from fuel rail.
CAUTION: Always fit plugs to open
connections to prevent contamination.
6.Release 2 hose clips and remove top hose.
7.Using a 15 mm spanner, release auxiliary drive
belt tension and remove drive belt. 8.Remove 3 bolts securing ACE pump, release
pump and tie aside.
9.Disconnect multiplug from A/C compressor.
10.Remove 4 bolts securing A/C compressor,
release compressor and tie aside.
Page 270 of 1672

ENGINE - V8
REPAIRS 12-2-27
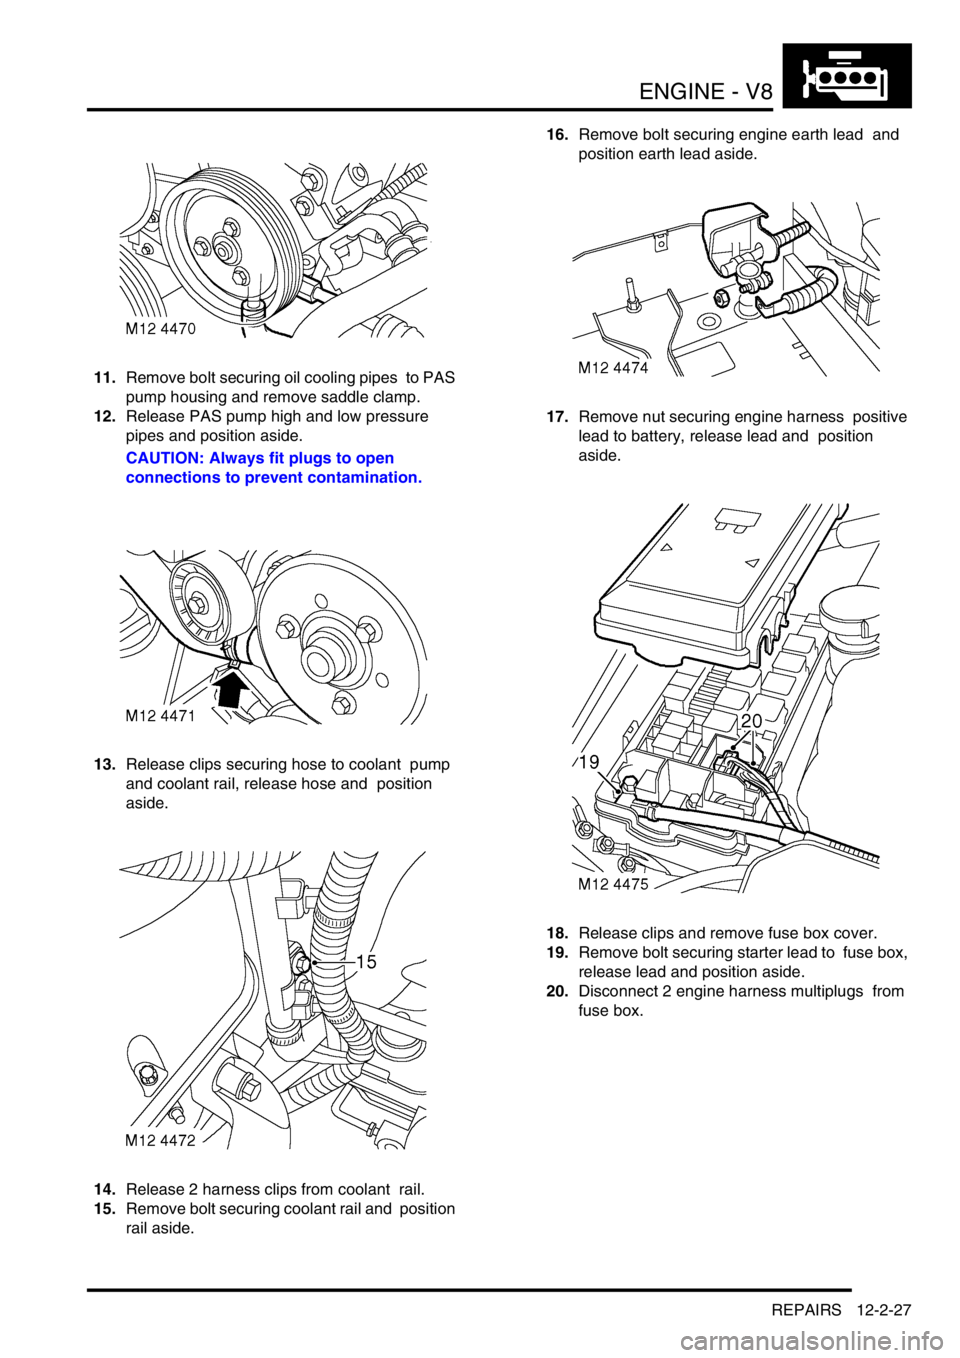
11.Remove bolt securing oil cooling pipes to PAS
pump housing and remove saddle clamp.
12.Release PAS pump high and low pressure
pipes and position aside.
CAUTION: Always fit plugs to open
connections to prevent contamination.
13.Release clips securing hose to coolant pump
and coolant rail, release hose and position
aside.
14.Release 2 harness clips from coolant rail.
15.Remove bolt securing coolant rail and position
rail aside. 16.Remove bolt securing engine earth lead and
position earth lead aside.
17.Remove nut securing engine harness positive
lead to battery, release lead and position
aside.
18.Release clips and remove fuse box cover.
19.Remove bolt securing starter lead to fuse box,
release lead and position aside.
20.Disconnect 2 engine harness multiplugs from
fuse box.
Page 271 of 1672

ENGINE - V8
12-2-28 REPAIRS
21.Disconnect multiplug from EVAP purge valve.
22.Remove nut securing engine harness earth to
body and disconnect engine harness to main
harness multiplug.
23.Remove trim fixings securing toe board and
remove toe board. 24.Disconnect 5 multiplugs connecting engine
harness to ECM.
25.Release engine harness, pull into engine bay
and coil on top of engine.
26.Raise vehicle on ramp.
27.Remove 3 bolts securing oil cooling pipes to
sump and remove saddle clamps.
28.Tie oil cooling pipes aside.
29.Remove exhaust front pipe.
+ MANIFOLDS AND EXHAUST
SYSTEMS - V8, REPAIRS, Front pipe.