light LAND ROVER DISCOVERY 2002 Service Manual
[x] Cancel search | Manufacturer: LAND ROVER, Model Year: 2002, Model line: DISCOVERY, Model: LAND ROVER DISCOVERY 2002Pages: 1672, PDF Size: 46.1 MB
Page 276 of 1672
ENGINE - V8
REPAIRS 12-2-33
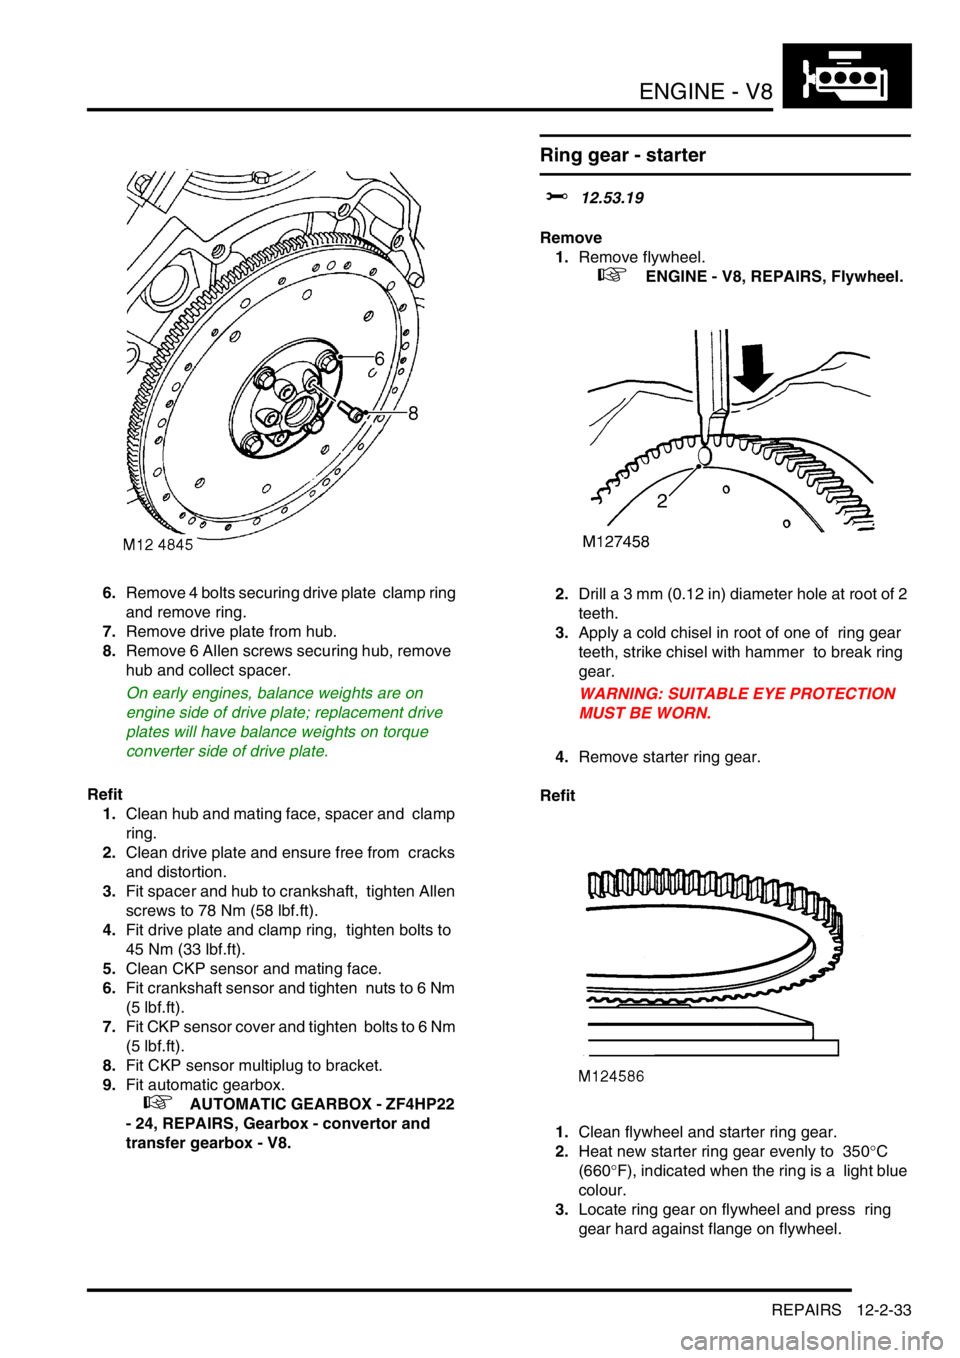
6.Remove 4 bolts securing drive plate clamp ring
and remove ring.
7.Remove drive plate from hub.
8.Remove 6 Allen screws securing hub, remove
hub and collect spacer.
On early engines, balance weights are on
engine side of drive plate; replacement drive
plates will have balance weights on torque
converter side of drive plate.
Refit
1.Clean hub and mating face, spacer and clamp
ring.
2.Clean drive plate and ensure free from cracks
and distortion.
3.Fit spacer and hub to crankshaft, tighten Allen
screws to 78 Nm (58 lbf.ft).
4.Fit drive plate and clamp ring, tighten bolts to
45 Nm (33 lbf.ft).
5.Clean CKP sensor and mating face.
6.Fit crankshaft sensor and tighten nuts to 6 Nm
(5 lbf.ft).
7.Fit CKP sensor cover and tighten bolts to 6 Nm
(5 lbf.ft).
8.Fit CKP sensor multiplug to bracket.
9.Fit automatic gearbox.
+ AUTOMATIC GEARBOX - ZF4HP22
- 24, REPAIRS, Gearbox - convertor and
transfer gearbox - V8.
Ring gear - starter
$% 12.53.19
Remove
1.Remove flywheel.
+ ENGINE - V8, REPAIRS, Flywheel.
2.Drill a 3 mm (0.12 in) diameter hole at root of 2
teeth.
3.Apply a cold chisel in root of one of ring gear
teeth, strike chisel with hammer to break ring
gear.
WARNING: SUITABLE EYE PROTECTION
MUST BE WORN.
4.Remove starter ring gear.
Refit
1.Clean flywheel and starter ring gear.
2.Heat new starter ring gear evenly to 350
°C
(660
°F), indicated when the ring is a light blue
colour.
3.Locate ring gear on flywheel and press ring
gear hard against flange on flywheel.
Page 280 of 1672
ENGINE - V8
REPAIRS 12-2-37
9.Remove 2 clips securing oil cooler pipes at
front of sump.
10.Remove clip securing oil cooler pipes to side of
sump.
11.Remove clip bracket.
12.Remove 2 forward facing bolts securing sump
to bell housing.
13.Remove 4 rear facing bolts securing sump to
bell housing.
14.Remove 2 bolts in sump recess.
15.Remove 3 nuts securing front of sump. 16.Remove 12 bolts securing sump flange to
engine.
17.Manoeuvre sump over front axle and remove
sump.
18.Discard sump gasket.
Refit
1.Clean all traces of sealant from the sump and
sump mating faces using a plastic scraper or
solvent.
2.Apply a 5 mm wide bead of sealant, Part No.
STC 50550, across the cylinder block to front
cover joint and across the cylinder block to rear
main bearing joint. Apply a globule of sealant to
cover the end of the cruciform seal, (see
illustration).
3.Fit new gasket, dry, to sump, ensuring that
locating tags are correctly positioned.
4.Manoeuvre sump into position, fit and lightly
tighten 2 bolts to retain sump in place, then fit
and lightly tighten remainder of bolts.
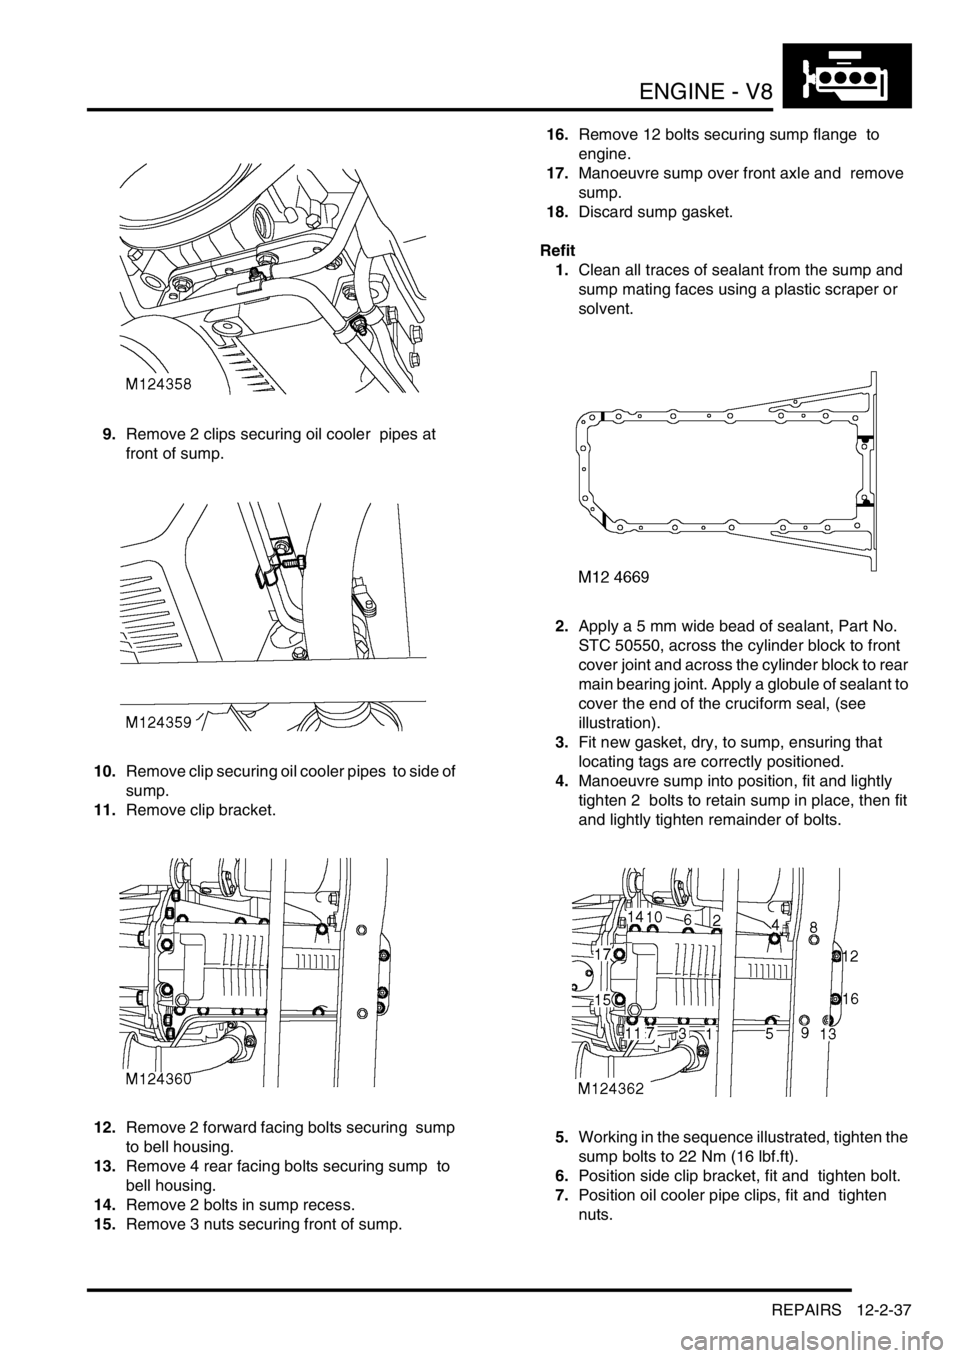
5.Working in the sequence illustrated, tighten the
sump bolts to 22 Nm (16 lbf.ft).
6.Position side clip bracket, fit and tighten bolt.
7.Position oil cooler pipe clips, fit and tighten
nuts.
Page 290 of 1672
ENGINE - V8
OVERHAUL 12-2-47
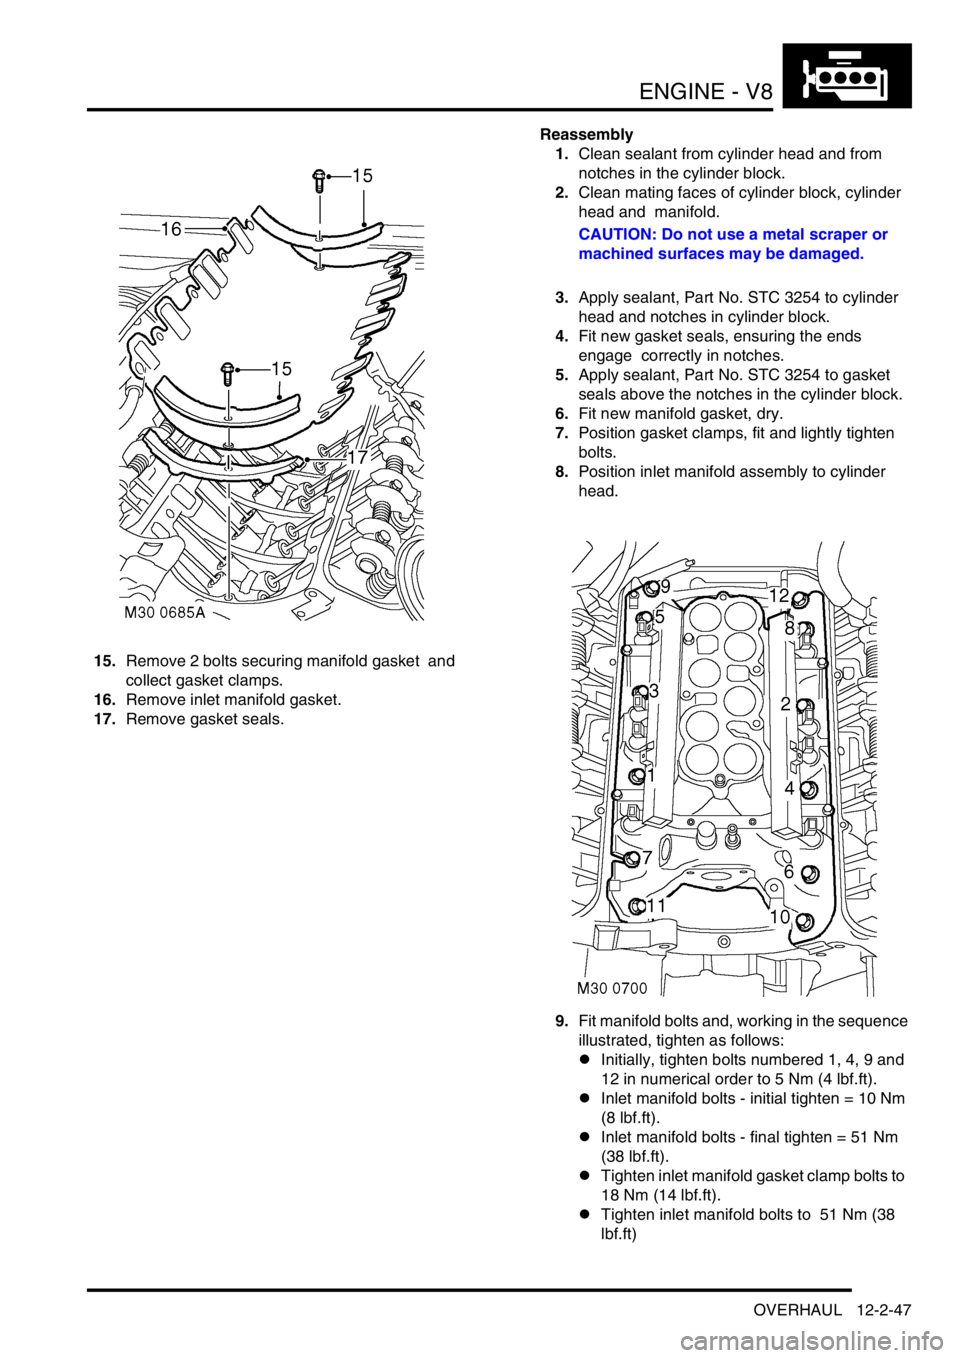
15.Remove 2 bolts securing manifold gasket and
collect gasket clamps.
16.Remove inlet manifold gasket.
17.Remove gasket seals. Reassembly
1.Clean sealant from cylinder head and from
notches in the cylinder block.
2.Clean mating faces of cylinder block, cylinder
head and manifold.
CAUTION: Do not use a metal scraper or
machined surfaces may be damaged.
3.Apply sealant, Part No. STC 3254 to cylinder
head and notches in cylinder block.
4.Fit new gasket seals, ensuring the ends
engage correctly in notches.
5.Apply sealant, Part No. STC 3254 to gasket
seals above the notches in the cylinder block.
6.Fit new manifold gasket, dry.
7.Position gasket clamps, fit and lightly tighten
bolts.
8.Position inlet manifold assembly to cylinder
head.
9.Fit manifold bolts and, working in the sequence
illustrated, tighten as follows:
lInitially, tighten bolts numbered 1, 4, 9 and
12 in numerical order to 5 Nm (4 lbf.ft).
lInlet manifold bolts - initial tighten = 10 Nm
(8 lbf.ft).
lInlet manifold bolts - final tighten = 51 Nm
(38 lbf.ft).
lTighten inlet manifold gasket clamp bolts to
18 Nm (14 lbf.ft).
lTighten inlet manifold bolts to 51 Nm (38
lbf.ft)
Page 304 of 1672
ENGINE - V8
OVERHAUL 12-2-61
9.Remove cylinder head gasket.
CAUTION: Support both ends of cylinder
head on blocks of wood.
Inspect
1.Clean mating faces of cylinder block and head
using suitable gasket removal spray and a
plastic scraper, ensure that bolt holes in block
are clean and dry.
CAUTION: Do not use a metal scraper or
machined surfaces may be damaged.
2.Check head and block faces for warping and
pitting.
lMaximum cylinder head warp = 0.05 mm
(0.002 in).
Note: Cylinder head can be refaced to 0.50
mm (0.02 in) maximum below head height –
See cylinder head overhaul.Reassembly
1.Fit cylinder head gasket with the word TOP
uppermost.
CAUTION: Gaskets must be fitted dry.
2.Carefully fit cylinder head and locate on
dowels.
3.Lightly lubricate new cylinder head bolt threads
with clean engine oil.
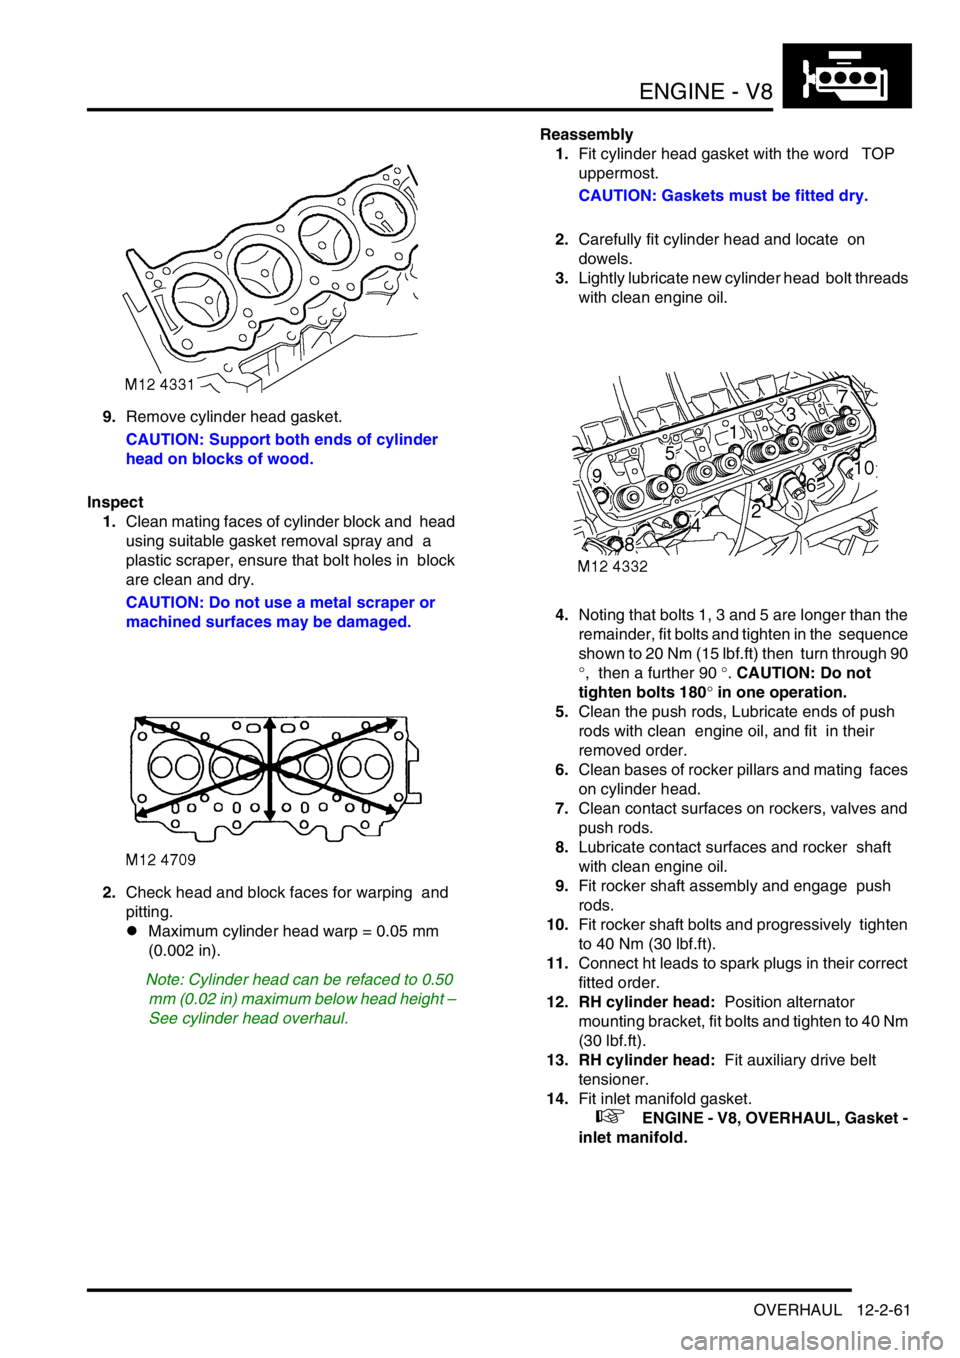
4.Noting that bolts 1, 3 and 5 are longer than the
remainder, fit bolts and tighten in the sequence
shown to 20 Nm (15 lbf.ft) then turn through 90
°, then a further 90 °. CAUTION: Do not
tighten bolts 180
° in one operation.
5.Clean the push rods, Lubricate ends of push
rods with clean engine oil, and fit in their
removed order.
6.Clean bases of rocker pillars and mating faces
on cylinder head.
7.Clean contact surfaces on rockers, valves and
push rods.
8.Lubricate contact surfaces and rocker shaft
with clean engine oil.
9.Fit rocker shaft assembly and engage push
rods.
10.Fit rocker shaft bolts and progressively tighten
to 40 Nm (30 lbf.ft).
11.Connect ht leads to spark plugs in their correct
fitted order.
12. RH cylinder head: Position alternator
mounting bracket, fit bolts and tighten to 40 Nm
(30 lbf.ft).
13. RH cylinder head: Fit auxiliary drive belt
tensioner.
14.Fit inlet manifold gasket.
+ ENGINE - V8, OVERHAUL, Gasket -
inlet manifold.
Page 309 of 1672
ENGINE - V8
12-2-66 OVERHAUL
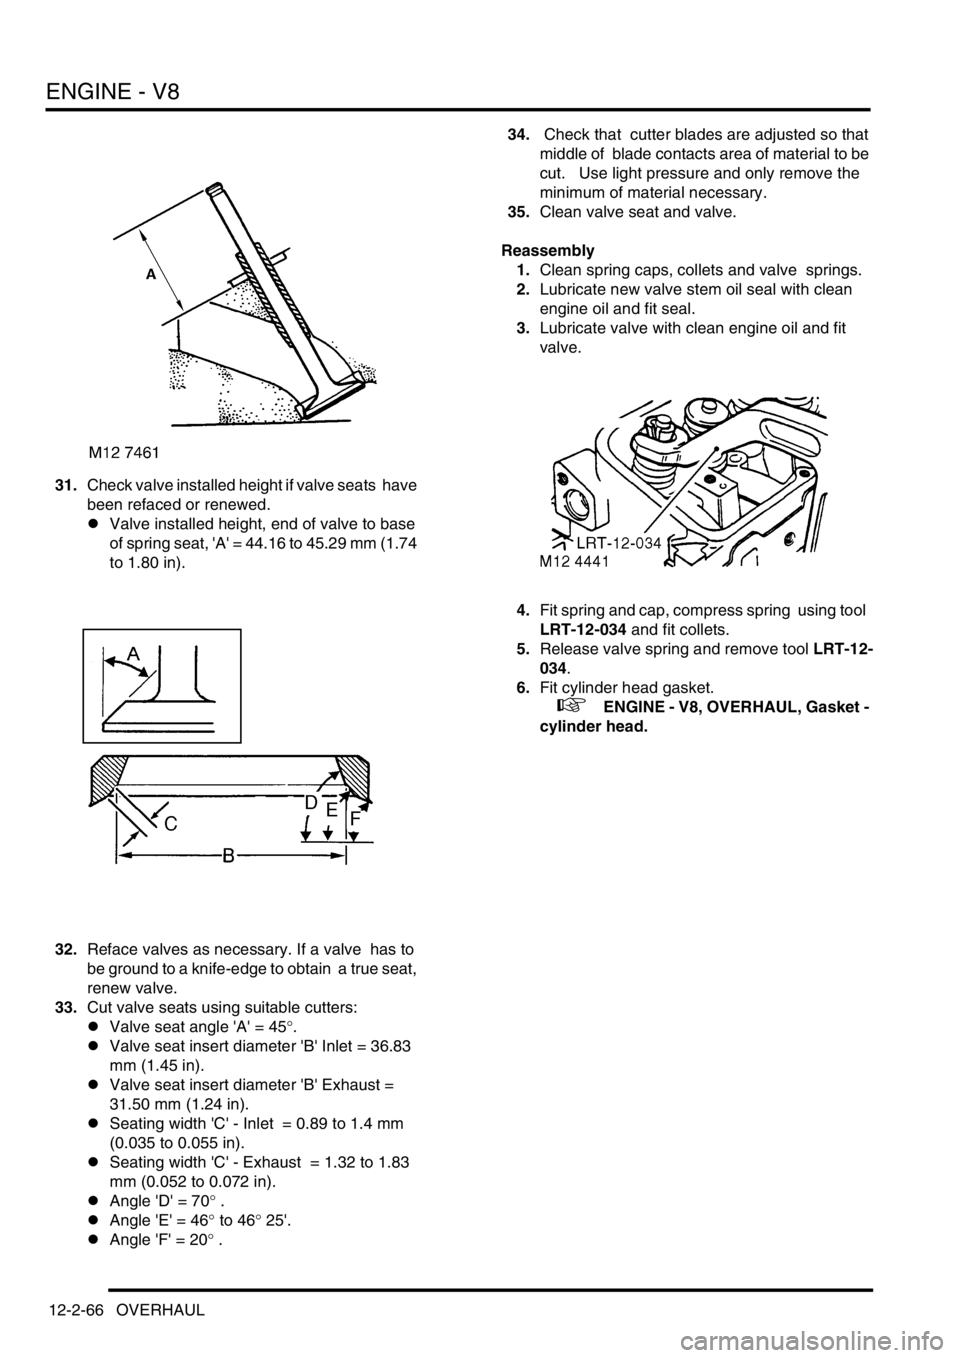
31.Check valve installed height if valve seats have
been refaced or renewed.
lValve installed height, end of valve to base
of spring seat, 'A' = 44.16 to 45.29 mm (1.74
to 1.80 in).
32.Reface valves as necessary. If a valve has to
be ground to a knife-edge to obtain a true seat,
renew valve.
33.Cut valve seats using suitable cutters:
lValve seat angle 'A' = 45
°.
lValve seat insert diameter 'B' Inlet = 36.83
mm (1.45 in).
lValve seat insert diameter 'B' Exhaust =
31.50 mm (1.24 in).
lSeating width 'C' - Inlet = 0.89 to 1.4 mm
(0.035 to 0.055 in).
lSeating width 'C' - Exhaust = 1.32 to 1.83
mm (0.052 to 0.072 in).
lAngle 'D' = 70
° .
lAngle 'E' = 46
° to 46° 25'.
lAngle 'F' = 20
° .34. Check that cutter blades are adjusted so that
middle of blade contacts area of material to be
cut. Use light pressure and only remove the
minimum of material necessary.
35.Clean valve seat and valve.
Reassembly
1.Clean spring caps, collets and valve springs.
2.Lubricate new valve stem oil seal with clean
engine oil and fit seal.
3.Lubricate valve with clean engine oil and fit
valve.
4.Fit spring and cap, compress spring using tool
LRT-12-034 and fit collets.
5.Release valve spring and remove tool LRT-12-
034.
6.Fit cylinder head gasket.
+ ENGINE - V8, OVERHAUL, Gasket -
cylinder head.
Page 310 of 1672
ENGINE - V8
OVERHAUL 12-2-67
Piston assemblies
$% 12.17.02.01
Disassembly
1.Remove cylinder head.
+ ENGINE - V8, OVERHAUL, Gasket -
cylinder head.
2.Remove oil pick-up strainer
+ ENGINE - V8, OVERHAUL, Strainer
- oil pick-up.
3.Suitably identify each connecting rod and
piston assembly to its respective cylinder bore.
4.Remove 2 bolts securing each connecting rod
bearing cap.
5.Remove connecting rod bearing cap and
collect connecting rod bearings.
6.Remove ridge of carbon from top of cylinder
bores.
7.Carefully push each piston assembly from the
top of the cylinder.
CAUTION: Ensure that connecting rods do
not contact cylinder bores.
8.Refit bearing cap onto connecting rod, lightly
tighten dowel bolts.
9.Suitably identify each piston to its respective
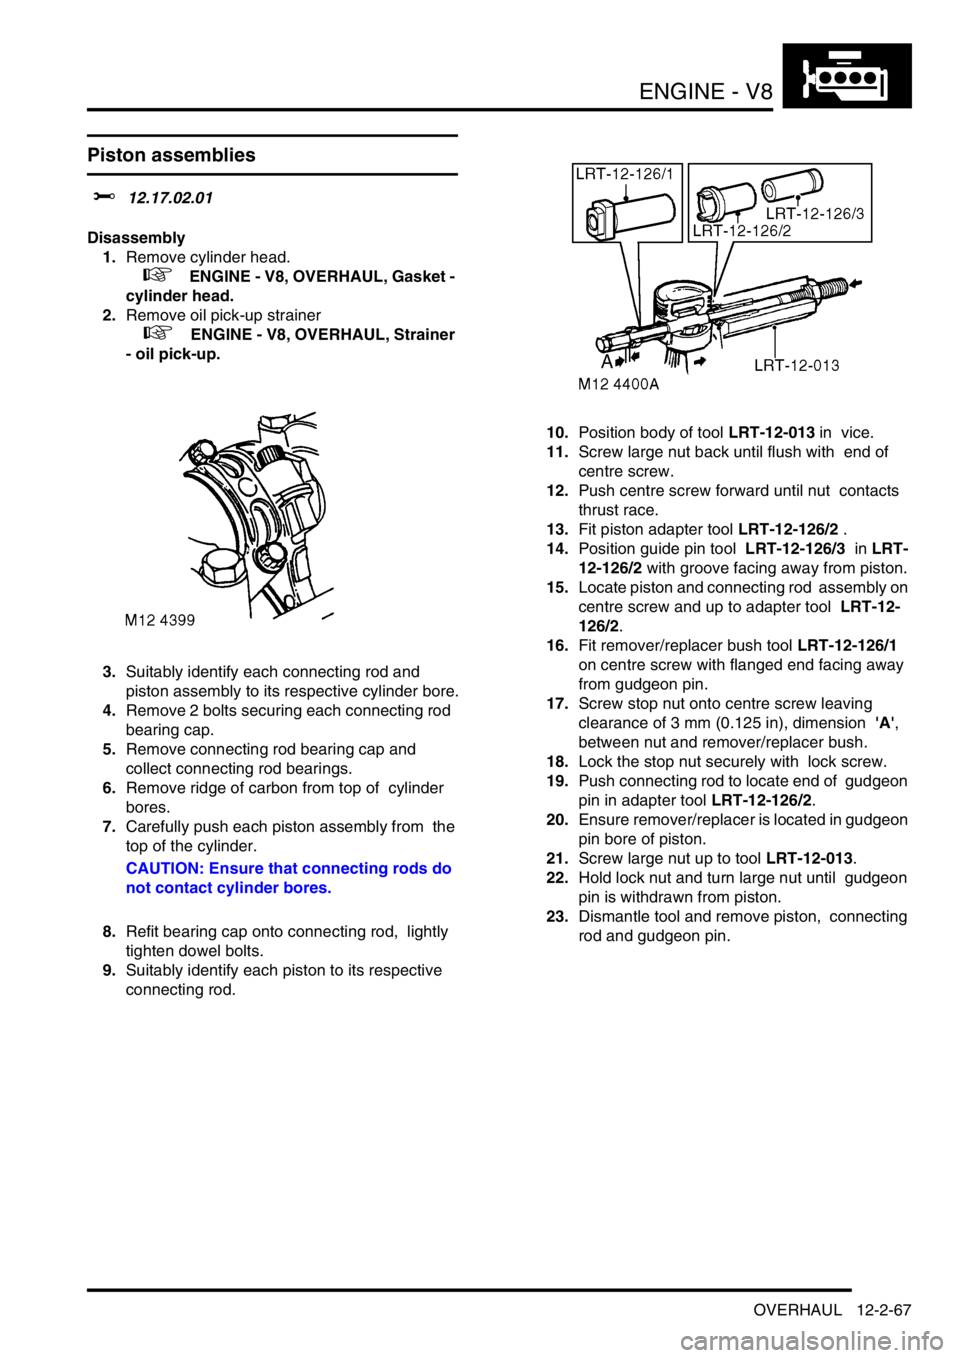
connecting rod.10.Position body of tool LRT-12-013 in vice.
11.Screw large nut back until flush with end of
centre screw.
12.Push centre screw forward until nut contacts
thrust race.
13.Fit piston adapter tool LRT-12-126/2 .
14.Position guide pin tool LRT-12-126/3 in LRT-
12-126/2 with groove facing away from piston.
15.Locate piston and connecting rod assembly on
centre screw and up to adapter tool LRT-12-
126/2.
16.Fit remover/replacer bush tool LRT-12-126/1
on centre screw with flanged end facing away
from gudgeon pin.
17.Screw stop nut onto centre screw leaving
clearance of 3 mm (0.125 in), dimension 'A',
between nut and remover/replacer bush.
18.Lock the stop nut securely with lock screw.
19.Push connecting rod to locate end of gudgeon
pin in adapter tool LRT-12-126/2.
20.Ensure remover/replacer is located in gudgeon
pin bore of piston.
21.Screw large nut up to tool LRT-12-013.
22.Hold lock nut and turn large nut until gudgeon
pin is withdrawn from piston.
23.Dismantle tool and remove piston, connecting
rod and gudgeon pin.
Page 314 of 1672
ENGINE - V8
OVERHAUL 12-2-71
Bearings - connecting rods
$% 12.17.16.01
Disassembly
1.Remove oil pick up strainer.
+ ENGINE - V8, OVERHAUL, Strainer
- oil pick-up.
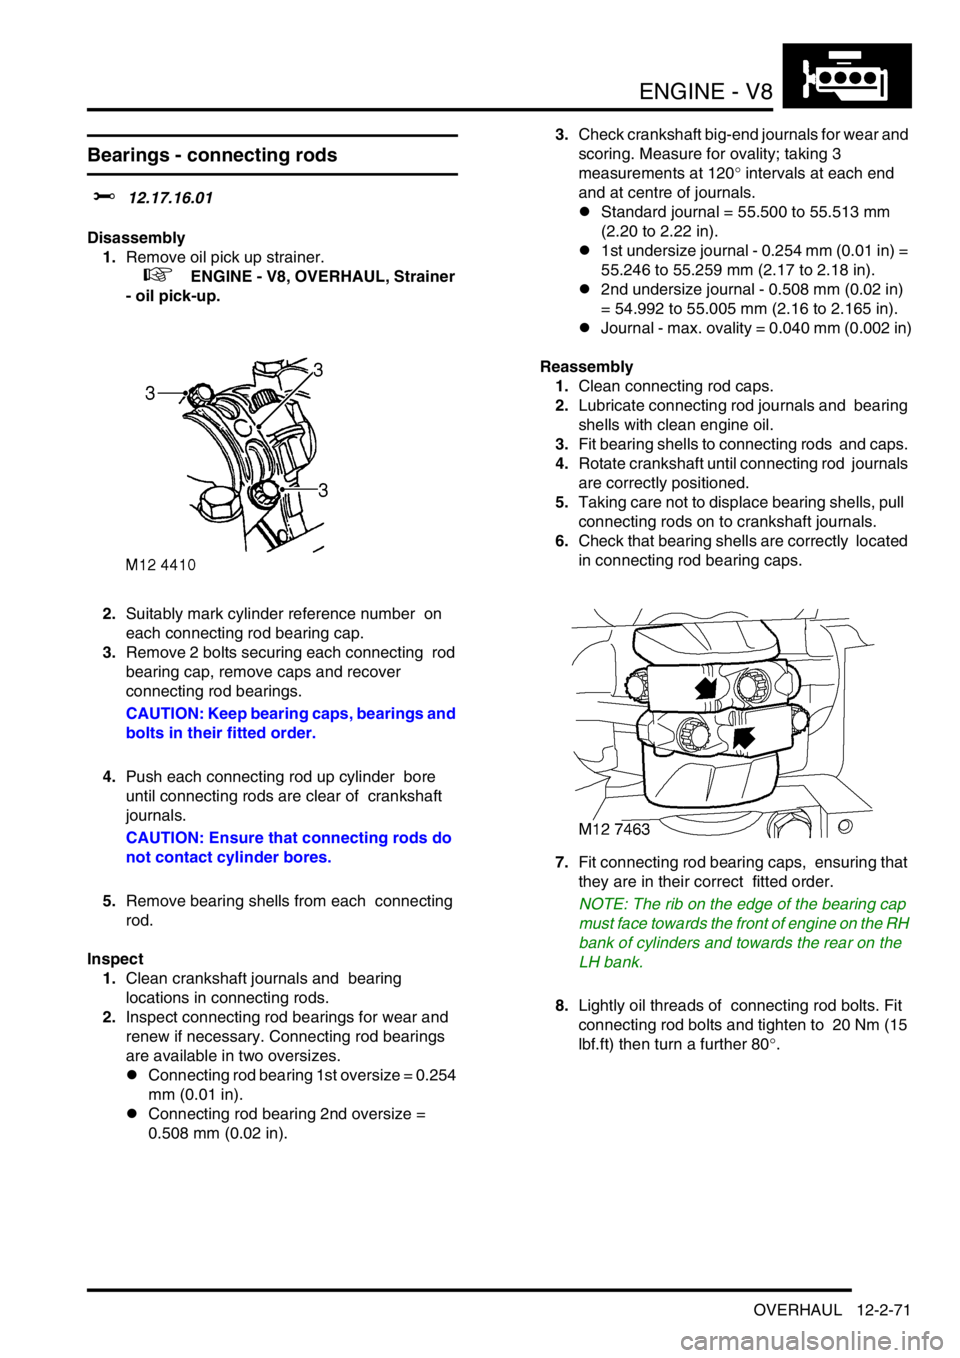
2.Suitably mark cylinder reference number on
each connecting rod bearing cap.
3.Remove 2 bolts securing each connecting rod
bearing cap, remove caps and recover
connecting rod bearings.
CAUTION: Keep bearing caps, bearings and
bolts in their fitted order.
4.Push each connecting rod up cylinder bore
until connecting rods are clear of crankshaft
journals.
CAUTION: Ensure that connecting rods do
not contact cylinder bores.
5.Remove bearing shells from each connecting
rod.
Inspect
1.Clean crankshaft journals and bearing
locations in connecting rods.
2.Inspect connecting rod bearings for wear and
renew if necessary. Connecting rod bearings
are available in two oversizes.
lConnecting rod bearing 1st oversize = 0.254
mm (0.01 in).
lConnecting rod bearing 2nd oversize =
0.508 mm (0.02 in).3.Check crankshaft big-end journals for wear and
scoring. Measure for ovality; taking 3
measurements at 120
° intervals at each end
and at centre of journals.
lStandard journal = 55.500 to 55.513 mm
(2.20 to 2.22 in).
l1st undersize journal - 0.254 mm (0.01 in) =
55.246 to 55.259 mm (2.17 to 2.18 in).
l2nd undersize journal - 0.508 mm (0.02 in)
= 54.992 to 55.005 mm (2.16 to 2.165 in).
lJournal - max. ovality = 0.040 mm (0.002 in)
Reassembly
1.Clean connecting rod caps.
2.Lubricate connecting rod journals and bearing
shells with clean engine oil.
3.Fit bearing shells to connecting rods and caps.
4.Rotate crankshaft until connecting rod journals
are correctly positioned.
5.Taking care not to displace bearing shells, pull
connecting rods on to crankshaft journals.
6.Check that bearing shells are correctly located
in connecting rod bearing caps.
7.Fit connecting rod bearing caps, ensuring that
they are in their correct fitted order.
NOTE: The rib on the edge of the bearing cap
must face towards the front of engine on the RH
bank of cylinders and towards the rear on the
LH bank.
8.Lightly oil threads of connecting rod bolts. Fit
connecting rod bolts and tighten to 20 Nm (15
lbf.ft) then turn a further 80
°.
Page 317 of 1672
ENGINE - V8
12-2-74 OVERHAUL
Reassembly
1.Clean main bearing locations in cylinder block
and bearing caps.
2.Clean sealant from rear main bearing cap and
mating faces.
3.Fit key to keyway.
4.Check threads of main bearing cap bolts for
damage, renew bolts in pairs.
5.Lubricate grooved main bearing shells with
clean engine oil and fit to their locations in
cylinder block.
NOTE: Ensure that the flanged bearing is fitted
to the centre position.
6.Lubricate crankshaft journals with clean engine
oil.
7.Position crankshaft in cylinder block.
8.Attach a DTI to front of cylinder block, move
crankshaft rearwards, position stylus of gauge
on end of crankshaft and zero gauge.
9.Move crankshaft forwards, measure and
record end-float obtained.
l Crankshaft end-float = 0.08 to 0.26 mm
(0.003 to 0.01 in).
10.Lubricate plain bearing shells with clean
engine oil and fit to main bearing caps. 11.Fit main bearing caps 1 to 4 only at this stage,
ensuring that they are the correct way round
and in their fitted order.
12.Lightly lubricate threads of main bearing cap
bolts with clean engine oil.
13.Fit main bearing cap bolts but do not tighten at
this stage. Do not fit side bolts at this stage.
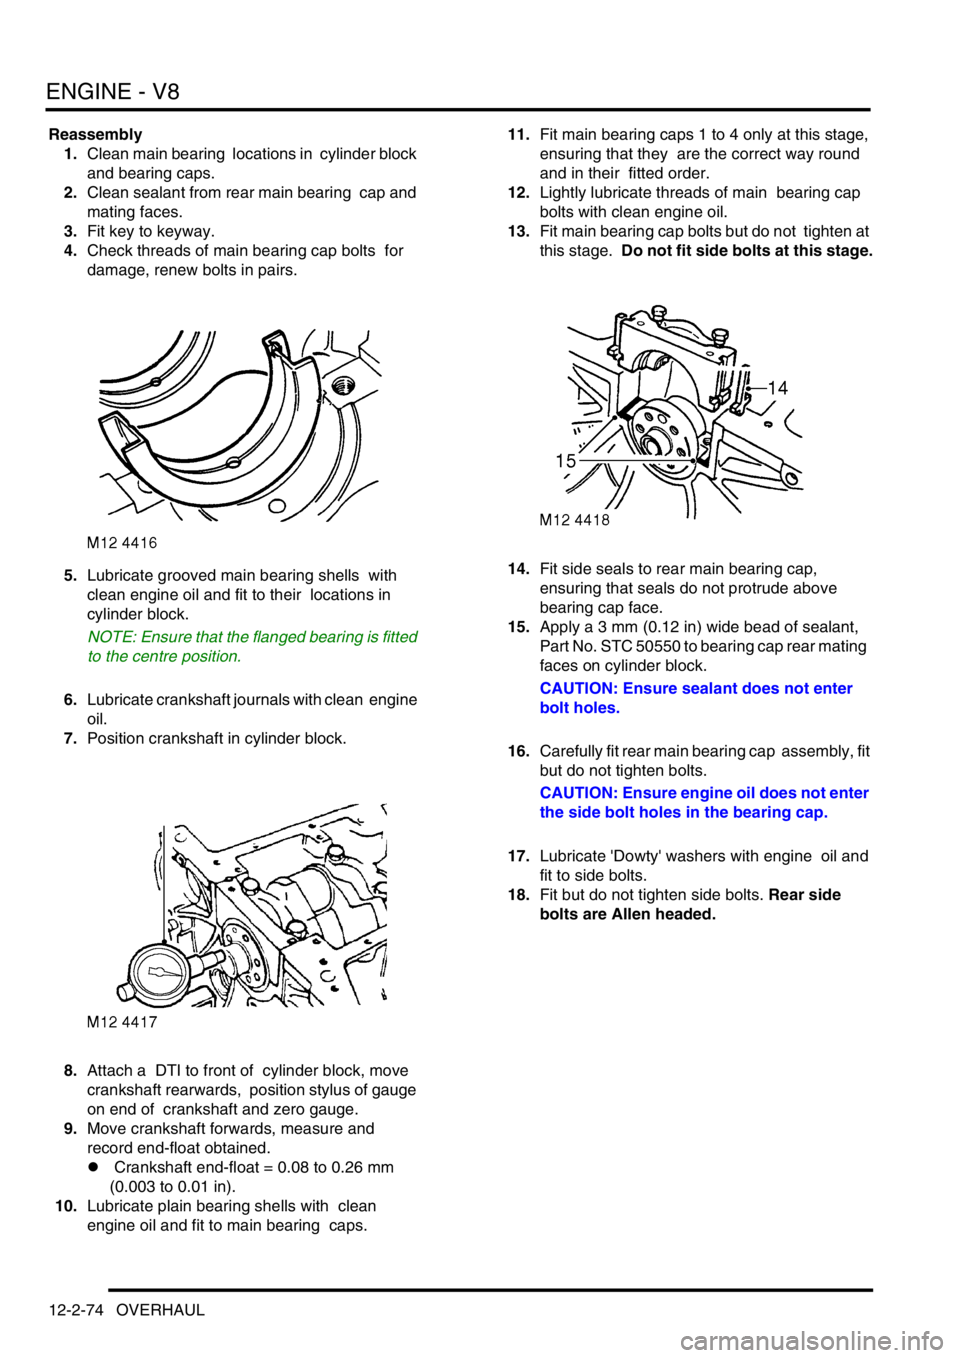
14.Fit side seals to rear main bearing cap,
ensuring that seals do not protrude above
bearing cap face.
15.Apply a 3 mm (0.12 in) wide bead of sealant,
Part No. STC 50550 to bearing cap rear mating
faces on cylinder block.
CAUTION: Ensure sealant does not enter
bolt holes.
16.Carefully fit rear main bearing cap assembly, fit
but do not tighten bolts.
CAUTION: Ensure engine oil does not enter
the side bolt holes in the bearing cap.
17.Lubricate 'Dowty' washers with engine oil and
fit to side bolts.
18.Fit but do not tighten side bolts. Rear side
bolts are Allen headed.
Page 319 of 1672
ENGINE - V8
12-2-76 OVERHAUL
Camshaft
$% 12.13.02.01
Disassembly
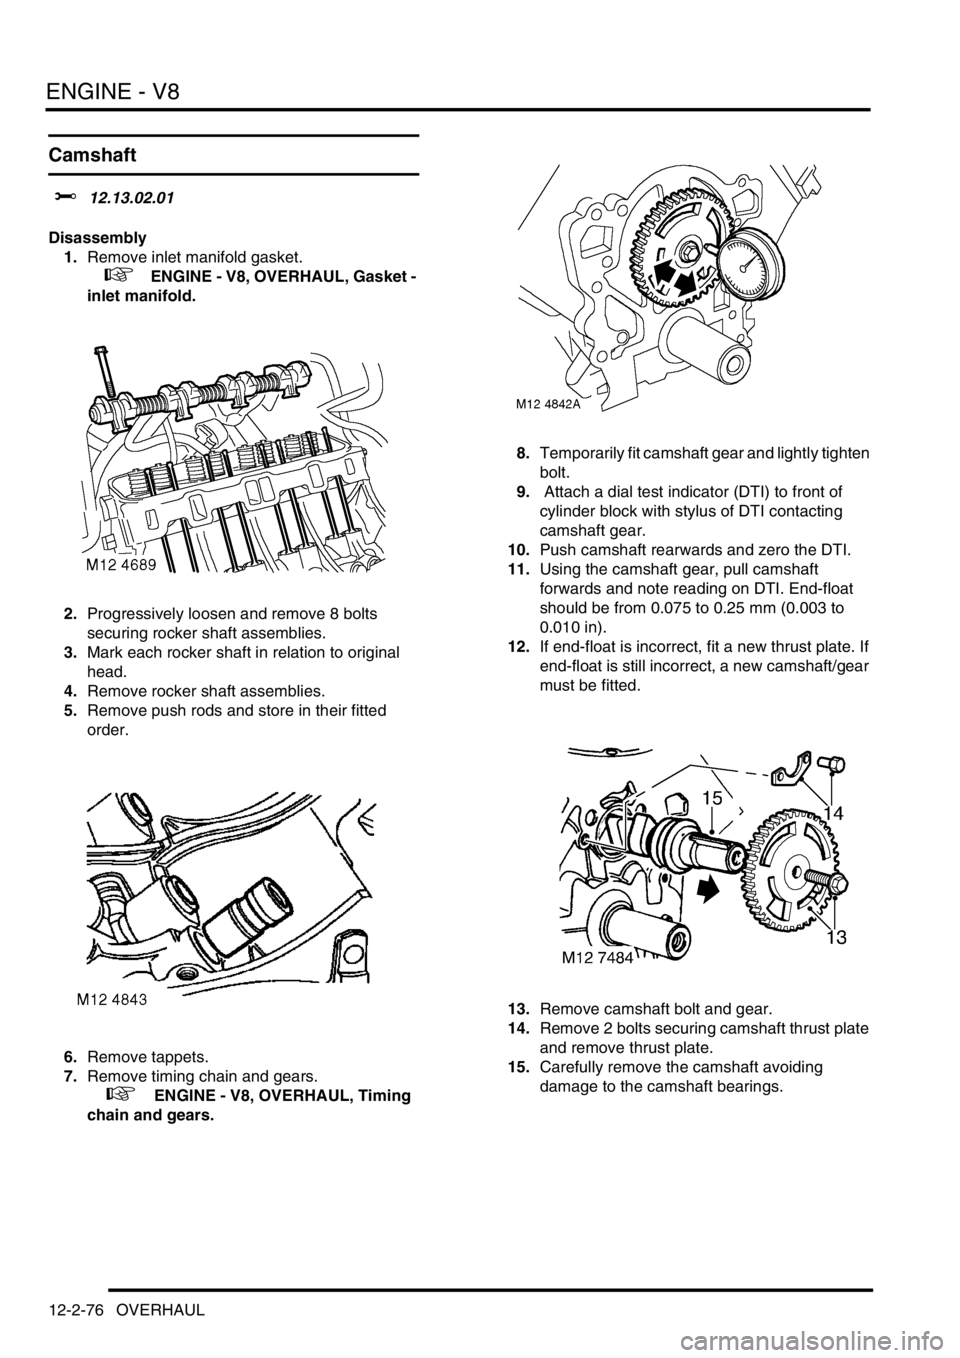
1.Remove inlet manifold gasket.
+ ENGINE - V8, OVERHAUL, Gasket -
inlet manifold.
2.Progressively loosen and remove 8 bolts
securing rocker shaft assemblies.
3.Mark each rocker shaft in relation to original
head.
4.Remove rocker shaft assemblies.
5.Remove push rods and store in their fitted
order.
6.Remove tappets.
7.Remove timing chain and gears.
+ ENGINE - V8, OVERHAUL, Timing
chain and gears.8.Temporarily fit camshaft gear and lightly tighten
bolt.
9. Attach a dial test indicator (DTI) to front of
cylinder block with stylus of DTI contacting
camshaft gear.
10.Push camshaft rearwards and zero the DTI.
11.Using the camshaft gear, pull camshaft
forwards and note reading on DTI. End-float
should be from 0.075 to 0.25 mm (0.003 to
0.010 in).
12.If end-float is incorrect, fit a new thrust plate. If
end-float is still incorrect, a new camshaft/gear
must be fitted.
13.Remove camshaft bolt and gear.
14.Remove 2 bolts securing camshaft thrust plate
and remove thrust plate.
15.Carefully remove the camshaft avoiding
damage to the camshaft bearings.
Page 342 of 1672
EMISSION CONTROL - V8
DESCRIPTION AND OPERATION 17-2-5
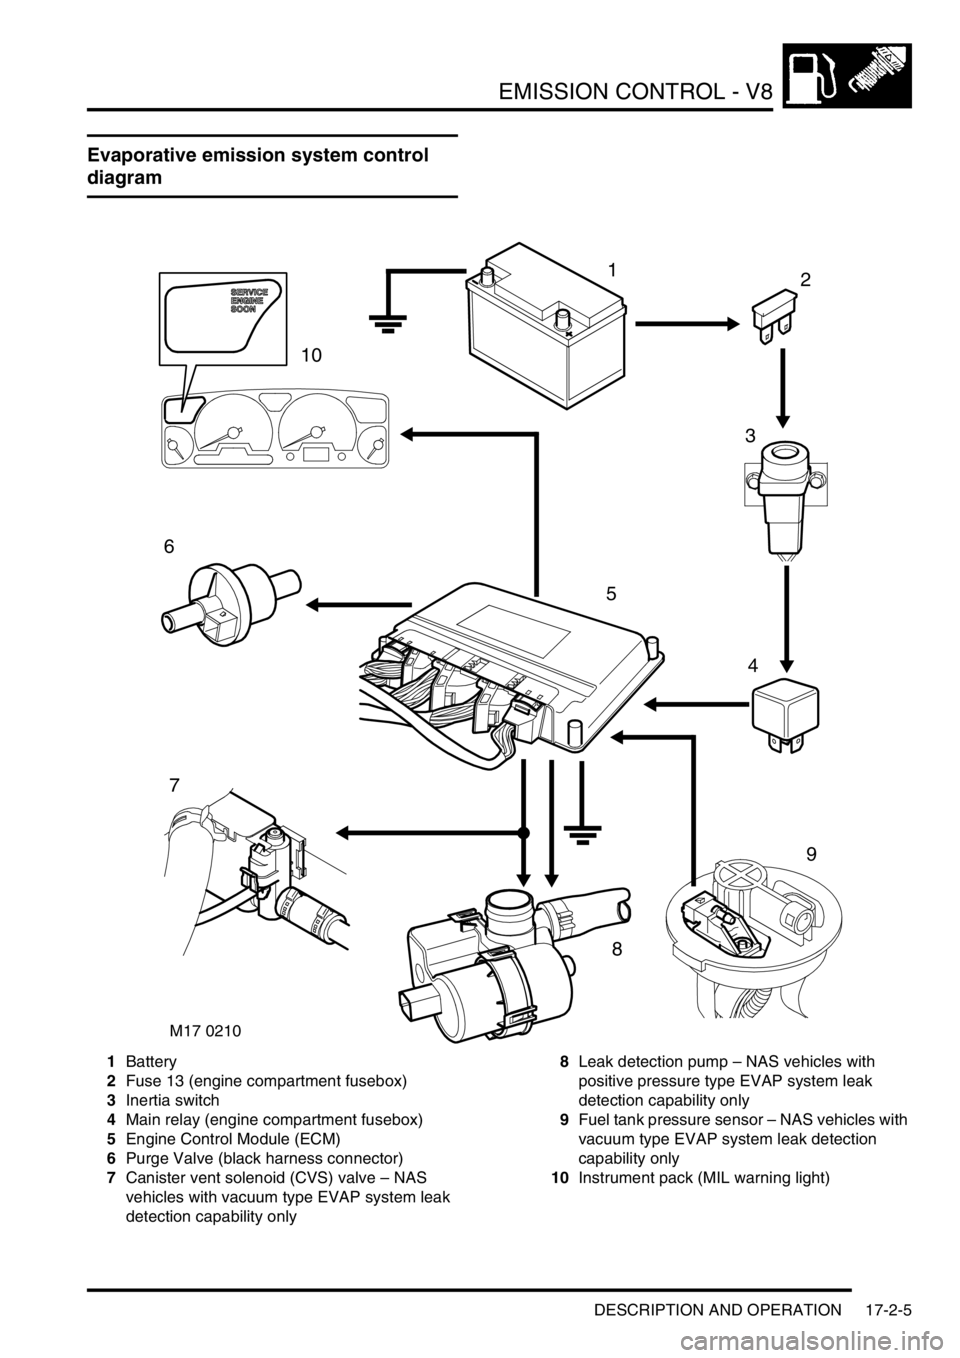
Evaporative emission system control
diagram
1Battery
2Fuse 13 (engine compartment fusebox)
3Inertia switch
4Main relay (engine compartment fusebox)
5Engine Control Module (ECM)
6Purge Valve (black harness connector)
7Canister vent solenoid (CVS) valve – NAS
vehicles with vacuum type EVAP system leak
detection capability only8Leak detection pump – NAS vehicles with
positive pressure type EVAP system leak
detection capability only
9Fuel tank pressure sensor – NAS vehicles with
vacuum type EVAP system leak detection
capability only
10Instrument pack (MIL warning light)
M17 0210
12
3
4
5
6
7
9
8
10