tow LAND ROVER FREELANDER 2001 Owner's Guide
[x] Cancel search | Manufacturer: LAND ROVER, Model Year: 2001, Model line: FREELANDER, Model: LAND ROVER FREELANDER 2001Pages: 1007, PDF Size: 23.47 MB
Page 675 of 1007
INTERIOR TRIM COMPONENTS
76-3-14 REPAIRS
Fascia - up to 04MY
$% 76.46.23
Remove
1.Remove front console.
+ INTERIOR TRIM COMPONENTS,
REPAIRS, Console - front - up to 04MY.
2.Remove rotary coupler.
+ RESTRAINT SYSTEMS, REPAIRS,
Rotary coupler - (SRS) air bag system.
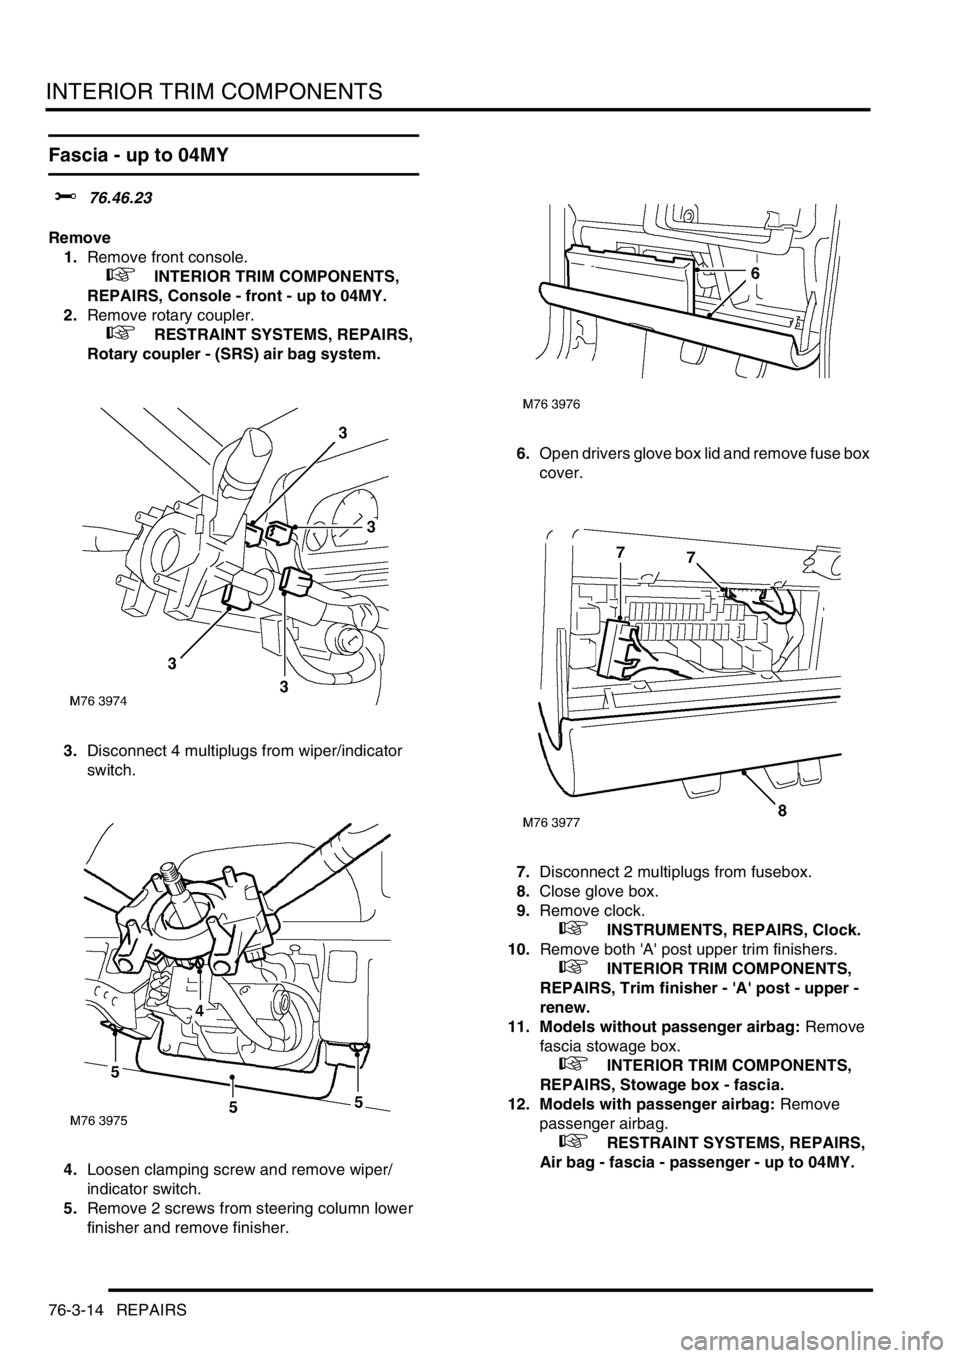
3.Disconnect 4 multiplugs from wiper/indicator
switch.
4.Loosen clamping screw and remove wiper/
indicator switch.
5.Remove 2 screws from steering column lower
finisher and remove finisher.6.Open drivers glove box lid and remove fuse box
cover.
7.Disconnect 2 multiplugs from fusebox.
8.Close glove box.
9.Remove clock.
+ INSTRUMENTS, REPAIRS, Clock.
10.Remove both 'A' post upper trim finishers.
+ INTERIOR TRIM COMPONENTS,
REPAIRS, Trim finisher - 'A' post - upper -
renew.
11. Models without passenger airbag: Remove
fascia stowage box.
+ INTERIOR TRIM COMPONENTS,
REPAIRS, Stowage box - fascia.
12. Models with passenger airbag: Remove
passenger airbag.
+ RESTRAINT SYSTEMS, REPAIRS,
Air bag - fascia - passenger - up to 04MY.
Page 679 of 1007

INTERIOR TRIM COMPONENTS
76-3-18 REPAIRS
Refit
1.Fit fascia and coin tray mats.
2.Fit immobilisation ECU to fascia and secure
with nuts.
3.Connect multiplug to immobilisation ECU.
4.Fit switch blank.
5.Fit glove box locks to fascia and secure with
screws.
6.Fit glove box and secure with screws.
7.Fit glove box lamp and mat.
8.Fit glove box lids and secure hinge pins.
9.Fit face level vents and seals to fascia.
10.Fit centre bracket and secure with screws.
11. Models without passenger airbag: Fit grab
handle and secure with nuts.
12.Fit instrument pack lower cover and secure with
screws.
13.Fit instrument pack to fascia and secure with
screws.
14.Fit fascia harness to fascia and secure with
clips.
15.Connect Lucars to glove box lamp and switch.
16.Connect multiplugs to mirror switch and
headlamp levelling switch.
17.Fit mirror switch and headlamp levelling switch.
18.Connect multiplugs to instrument pack.
19.Fit instrument pack upper cover and secure
with screws.
20.Connect multiplugs to switches on instrument
bezel finisher, fit bezel and secure with screws.
21.With assistance fit fascia to vehicle and secure
with bolts.22.Connect fascia harness multiplugs to main
harness.
23. Models with passenger airbag: Fit passenger
airbag.
+ RESTRAINT SYSTEMS, REPAIRS,
Air bag - fascia - passenger - up to 04MY.
24. Models without passenger airbag: Fit fascia
stowage box.
+ INTERIOR TRIM COMPONENTS,
REPAIRS, Stowage box - fascia.
25.Fit 'A' post upper trim finishers.
+ INTERIOR TRIM COMPONENTS,
REPAIRS, Trim finisher - 'A' post - upper -
renew.
26.Fit clock.
+ INSTRUMENTS, REPAIRS, Clock.
27.Open drivers glove box lid and remove fuse box
cover.
28.Connect multiplugs to fusebox.
29.Fit fusebox cover and close glove box lid.
30.Fit steering column lower cover and secure with
screws.
31.Fit wiper/indicator switch and tighten clamping
screw.
32.Connect multiplugs to wiper/indicator switch.
33.Fit rotary coupler.
+ RESTRAINT SYSTEMS, REPAIRS,
Rotary coupler - (SRS) air bag system.
34.Fit front console.
+ INTERIOR TRIM COMPONENTS,
REPAIRS, Console - front - up to 04MY.
Page 684 of 1007
INTERIOR TRIM COMPONENTS
REPAIRS 76-3-23
Drink tray assembly - fascia - up to 04MY
$% 76.46.41
Remove
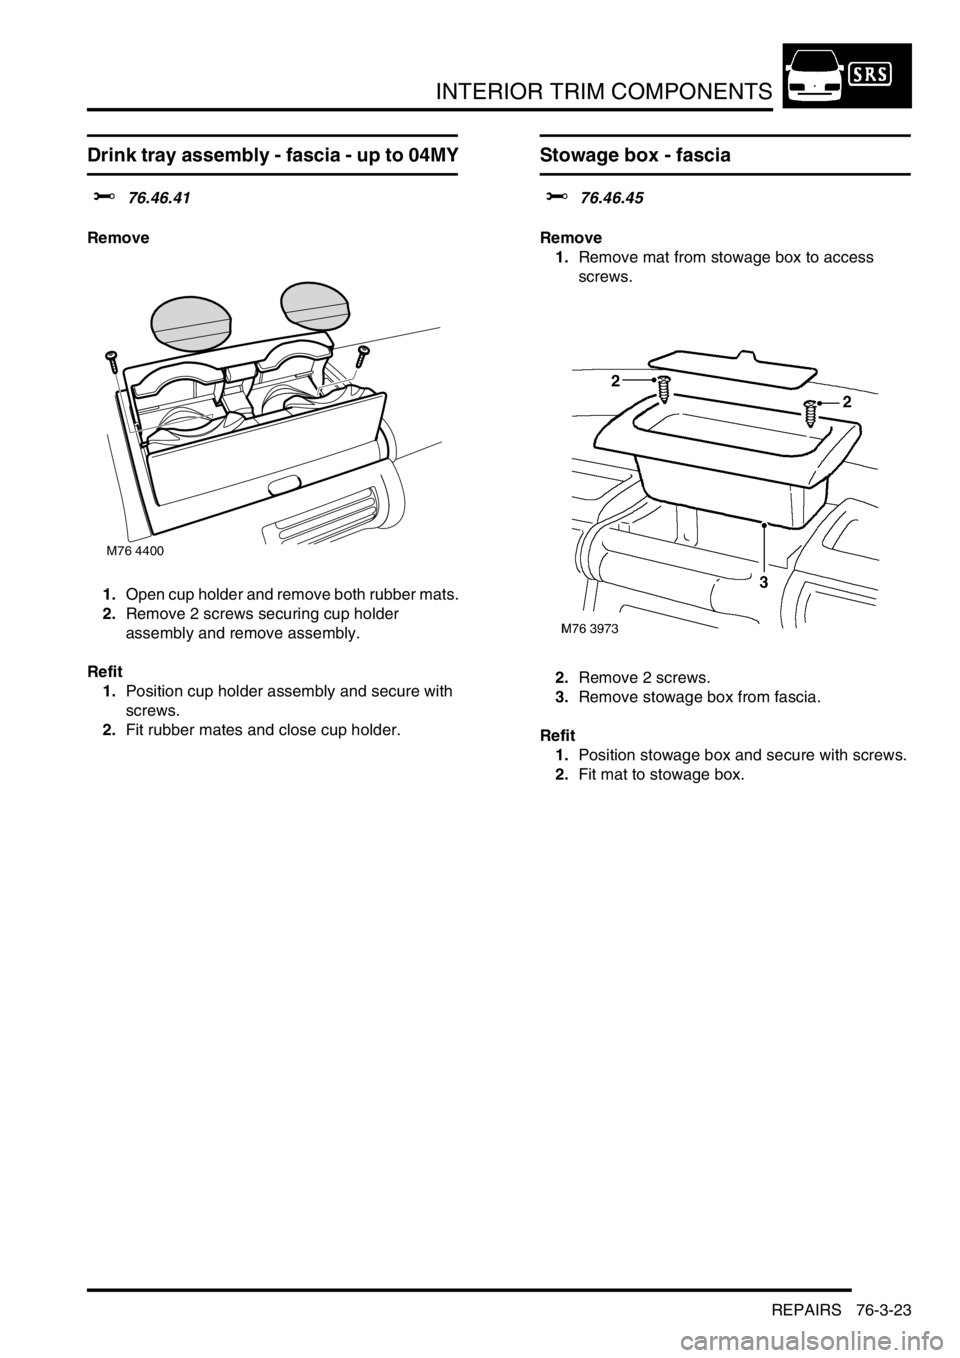
1.Open cup holder and remove both rubber mats.
2.Remove 2 screws securing cup holder
assembly and remove assembly.
Refit
1.Position cup holder assembly and secure with
screws.
2.Fit rubber mates and close cup holder.
Stowage box - fascia
$% 76.46.45
Remove
1.Remove mat from stowage box to access
screws.
2.Remove 2 screws.
3.Remove stowage box from fascia.
Refit
1.Position stowage box and secure with screws.
2.Fit mat to stowage box.
M76 4400
Page 689 of 1007
INTERIOR TRIM COMPONENTS
76-3-28 REPAIRS
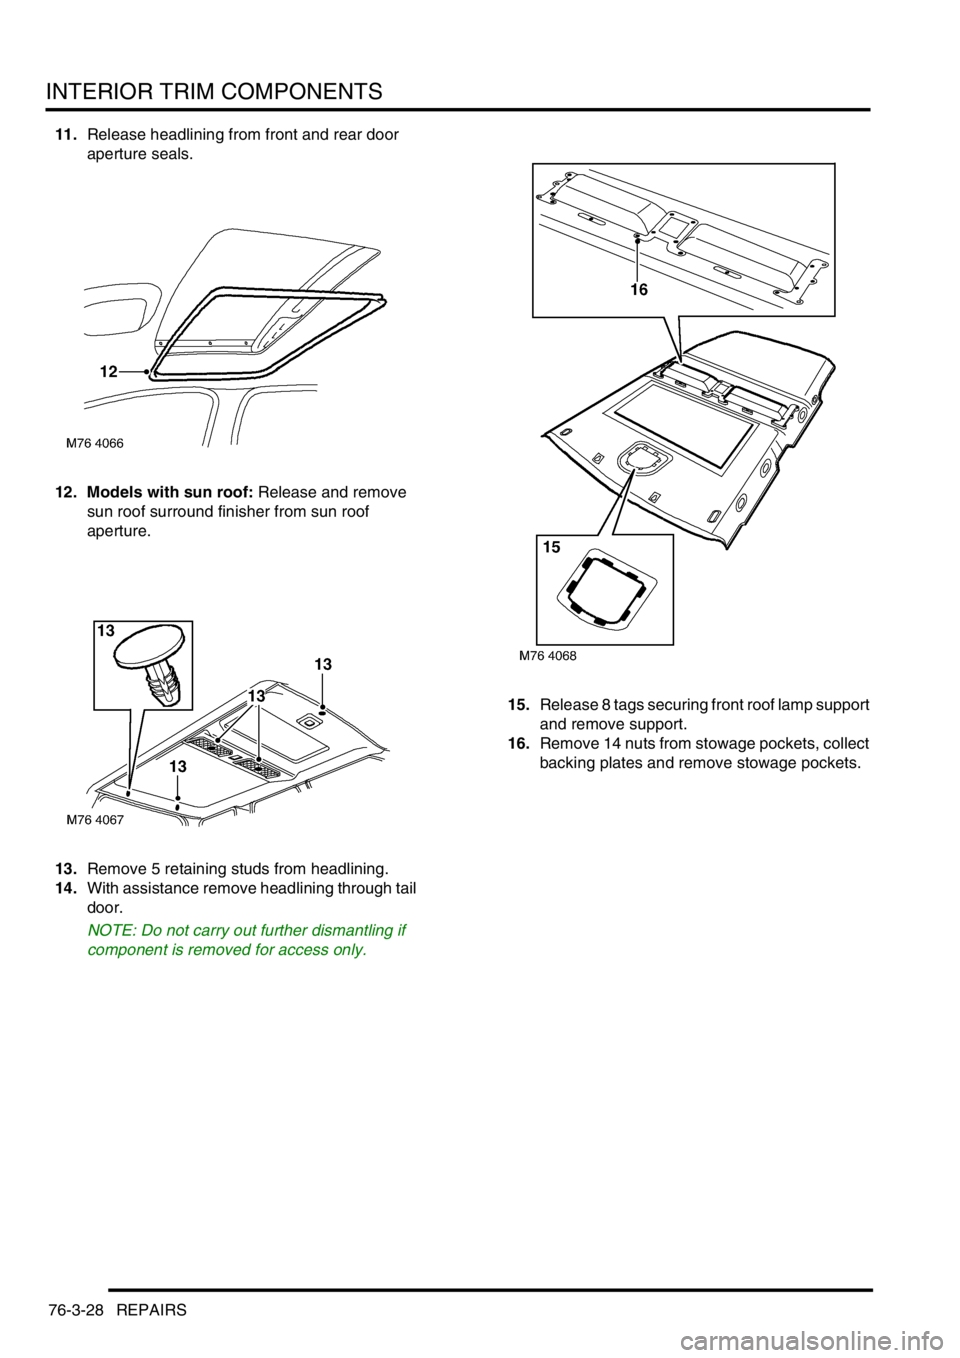
11.Release headlining from front and rear door
aperture seals.
12. Models with sun roof: Release and remove
sun roof surround finisher from sun roof
aperture.
13.Remove 5 retaining studs from headlining.
14.With assistance remove headlining through tail
door.
NOTE: Do not carry out further dismantling if
component is removed for access only.15.Release 8 tags securing front roof lamp support
and remove support.
16.Remove 14 nuts from stowage pockets, collect
backing plates and remove stowage pockets.
Page 690 of 1007

INTERIOR TRIM COMPONENTS
REPAIRS 76-3-29
Refit
1.Position stowage pockets, and backing plates
to headlining and secure with nuts.
2.Position roof lamp support and secure retaining
tags.
3.With assistance position headlining and secure
with retaining studs.
4. Models with sun roof: Position sun roof
surround finisher and secure in position.
5.Locate headlining to front and rear door
aperture seals.
6.Fit and secure 'B/C' post upper finishers.
7.Position rear interior lamp and connect
multiplug.
8.Fit rear interior lamp to headlining.
9.Position front interior lamp and connect
multiplug.
10.Fit front interior lamp to headlining and secure
with bolts.
11.Fit grab handle blanking plugs.
12.Fit grab handles, tighten screws and fit screw
covers.
13.Fit both sun visors.
+ INTERIOR TRIM COMPONENTS,
REPAIRS, Sun visor.
14.Fit 'A' post upper trim finishers.
+ INTERIOR TRIM COMPONENTS,
REPAIRS, Trim finisher - 'A' post - upper -
renew.
15.Fit rear quarter upper trim casings.
+ INTERIOR TRIM COMPONENTS,
REPAIRS, Trim casing - rear quarter - upper
- 5 door.
Page 727 of 1007
HOOD
76-7-2 REPAIRS
Frame & hood cover - assembly - remove
for access & refit
$% 76.61.10.99
Remove
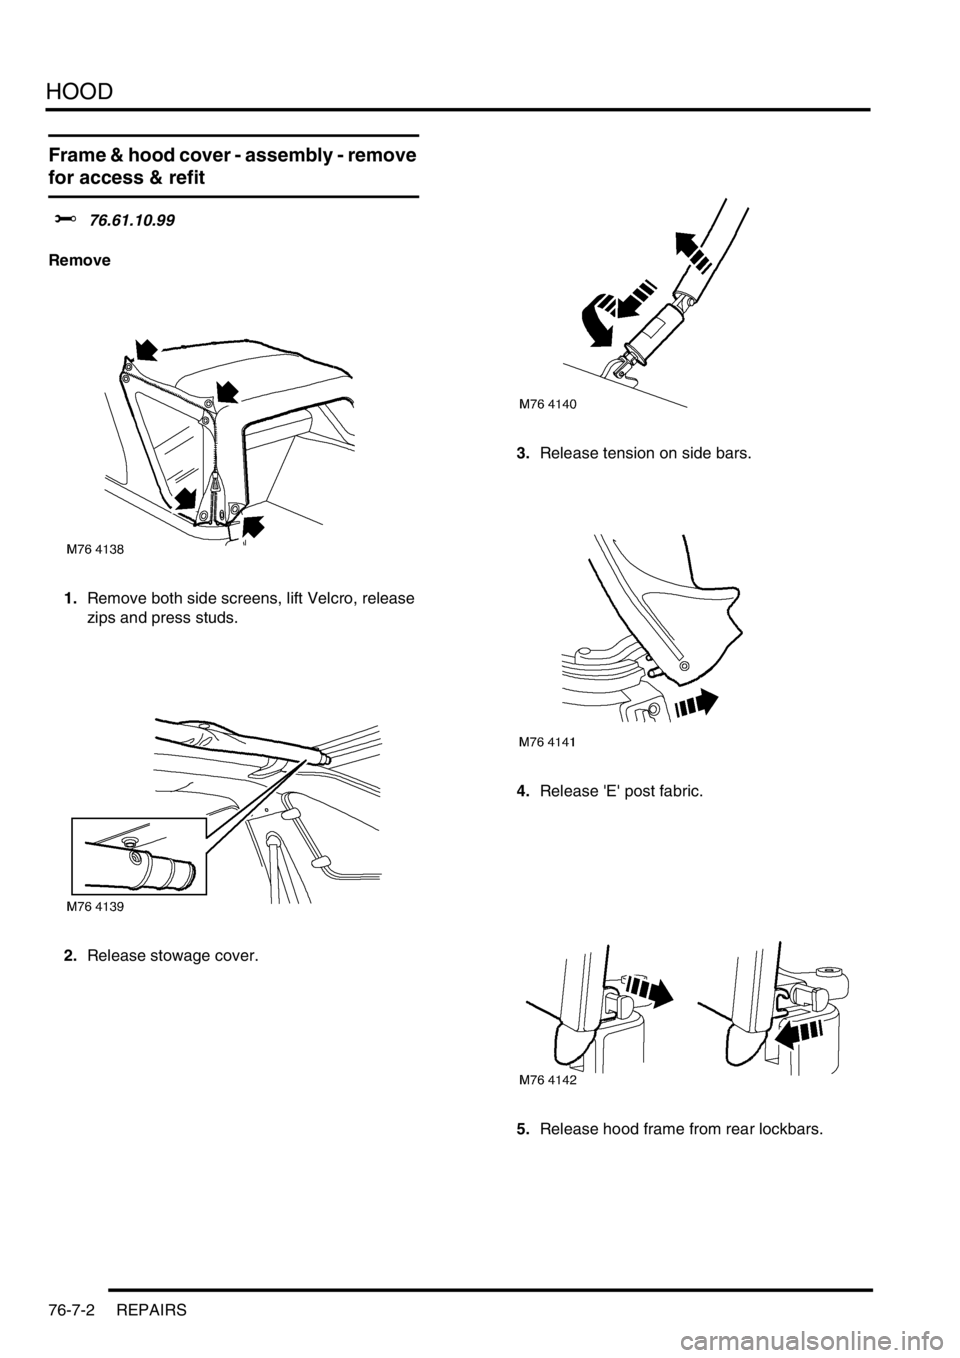
1.Remove both side screens, lift Velcro, release
zips and press studs.
2.Release stowage cover.3.Release tension on side bars.
4.Release 'E' post fabric.
5.Release hood frame from rear lockbars.
Page 936 of 1007
LIGHTING
REPAIRS 86-2-5
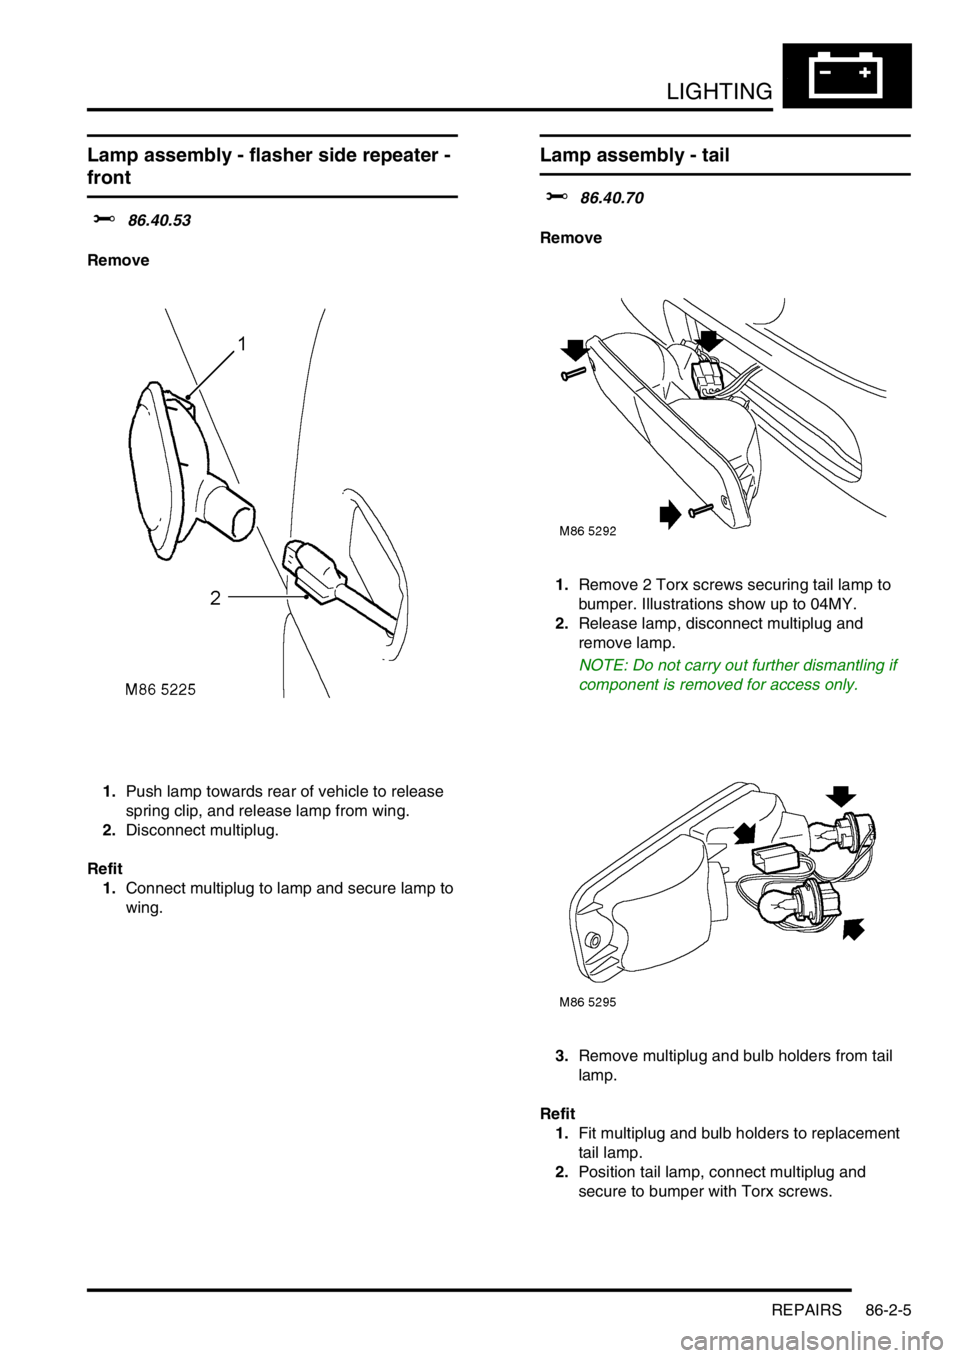
Lamp assembly - flasher side repeater -
front
$% 86.40.53
Remove
1.Push lamp towards rear of vehicle to release
spring clip, and release lamp from wing.
2.Disconnect multiplug.
Refit
1.Connect multiplug to lamp and secure lamp to
wing.
Lamp assembly - tail
$% 86.40.70
Remove
1.Remove 2 Torx screws securing tail lamp to
bumper. Illustrations show up to 04MY.
2.Release lamp, disconnect multiplug and
remove lamp.
NOTE: Do not carry out further dismantling if
component is removed for access only.
3.Remove multiplug and bulb holders from tail
lamp.
Refit
1.Fit multiplug and bulb holders to replacement
tail lamp.
2.Position tail lamp, connect multiplug and
secure to bumper with Torx screws.
Page 984 of 1007
HARNESSES
REPAIRS 86-7-9
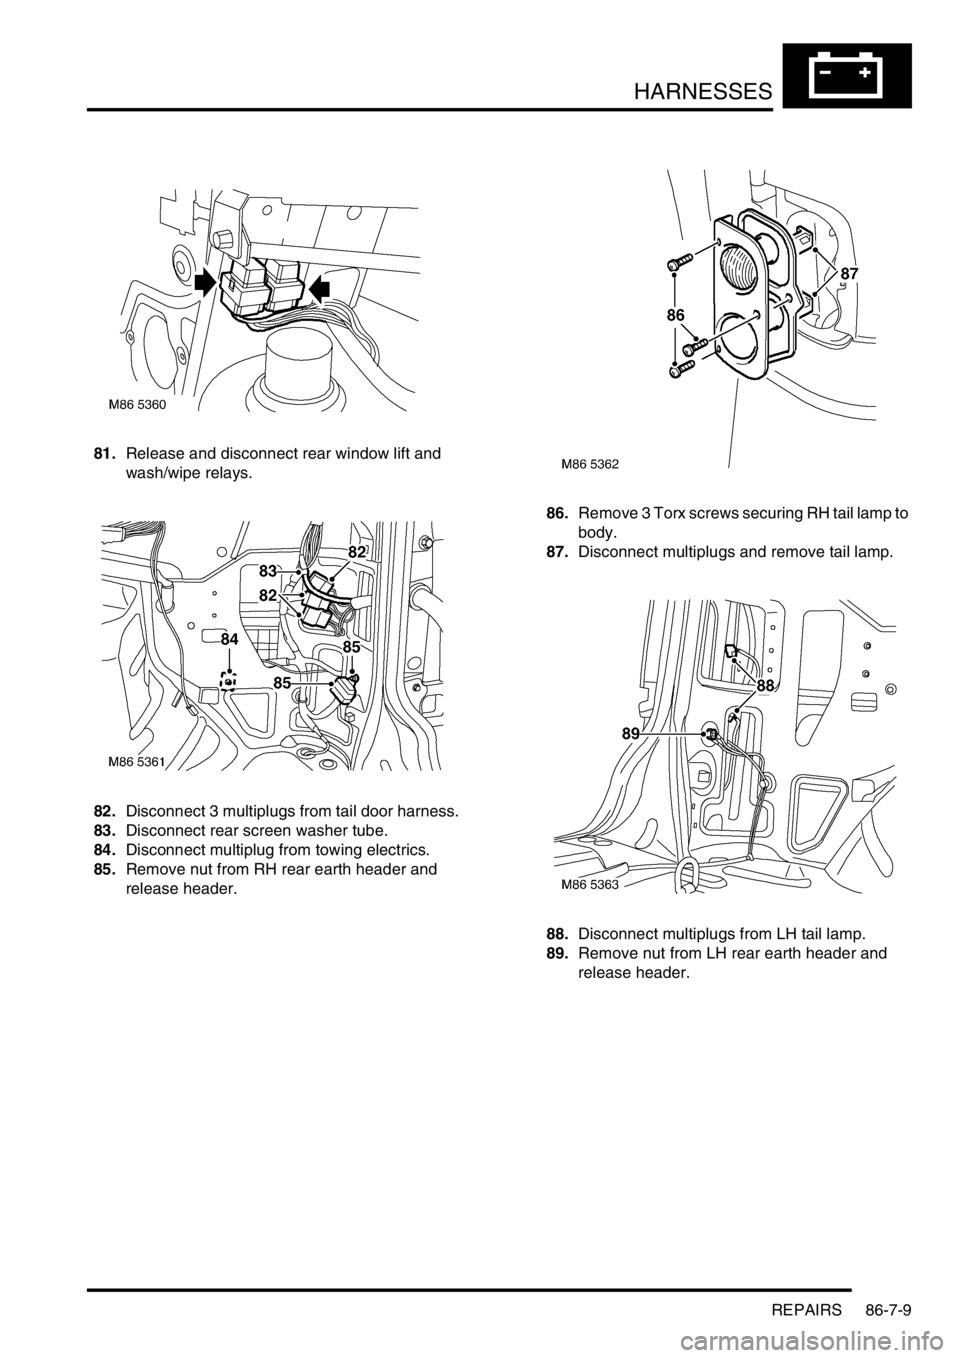
81.Release and disconnect rear window lift and
wash/wipe relays.
82.Disconnect 3 multiplugs from tail door harness.
83.Disconnect rear screen washer tube.
84.Disconnect multiplug from towing electrics.
85.Remove nut from RH rear earth header and
release header.86.Remove 3 Torx screws securing RH tail lamp to
body.
87.Disconnect multiplugs and remove tail lamp.
88.Disconnect multiplugs from LH tail lamp.
89.Remove nut from LH rear earth header and
release header.
Page 985 of 1007

HARNESSES
86-7-10 REPAIRS
90.Remove 4 screws from rear bumper lamps,
release lamps and disconnect multiplugs.
91.Release harness clips and pull harness into
luggage compartment.
92.Release main harness retaining clips and pull
harness into vehicle interior.
93.Remove main harness.Refit
1.Lay main harness in vehicle.
2.Locate rear section and secure in retaining
clips.
3.Feed harness to rear bumper lamps, secure in
clips and grommets.
4.Connect multiplugs to rear bumper lamps, fit
rear lamps and secure with screws.
5.Fit LH rear earth header and secure with nut.
6.Connect multiplugs to LH tail lamp.
7.Position RH tail lamp and connect multiplugs.
8.Fit RH tail lamp and secure with Torx screws.
9.Fit RH rear earth header and secure with nut.
10.Connect multiplug to towing electrics.
11.Connect rear screen washer tube.
12.Connect tail door harness multiplugs.
13.Connect and fit rear window lift and wash/wipe
relays.
14.Position harness into luggage compartment.
15.Connect both rear ABS speed sensor
multiplugs and secure harness grommets.
16.Connect multiplug to fuel pump.
17.Fit fuel pump access cover and secure with
screws.
18.Fit luggage compartment carpet.
+ INTERIOR TRIM COMPONENTS,
REPAIRS, Carpet - luggage compartment.
19.Connect multiplugs at the base of 'B/C' Posts.
20.Fit all harness clips to interior of vehicle.
21.Fit multiplugs and earth header to LH lower 'A'
post.
22.Fit earth header to RH lower 'A' post.
23.Connect multiplug to window lift ECU.
24.Fit face level vent ducting.
25.Fit steering column to bracket and secure with
nuts.
26.Fit rear heater ducting and secure with nut.
27.Secure harness to rear heater ducting with
clips.
28.Position mounting bracket and secure relays.
29.Connect Lucar to handbrake switch.
30. Manual gearbox only: Connect multiplug to
gear lever hill descent switch.
31.Connect multiplug to accelerometer.
32. Automatic gearbox only: Connect multiplugs
to gear selector.
33.Connect heated oxygen sensor multiplug.
34.Fit earth header to floor tunnel and secure with
nut.
35.Fit earth lead to airbag ECU and secure with
bolt.
36.Connect multiplug to airbag ECU.
37.Connect multiplugs to brake light switch and
brake pedal position switch.
38.Connect multiplug to throttle position sensor.
39.Fit harness clip to steering column.
40.Connect multiplug to steering column switch.