LAND ROVER FREELANDER 2001 Workshop Manual
Manufacturer: LAND ROVER, Model Year: 2001, Model line: FREELANDER, Model: LAND ROVER FREELANDER 2001Pages: 1007, PDF Size: 23.47 MB
Page 791 of 1007
PANEL REPAIRS
77-2-36 REPAIRS
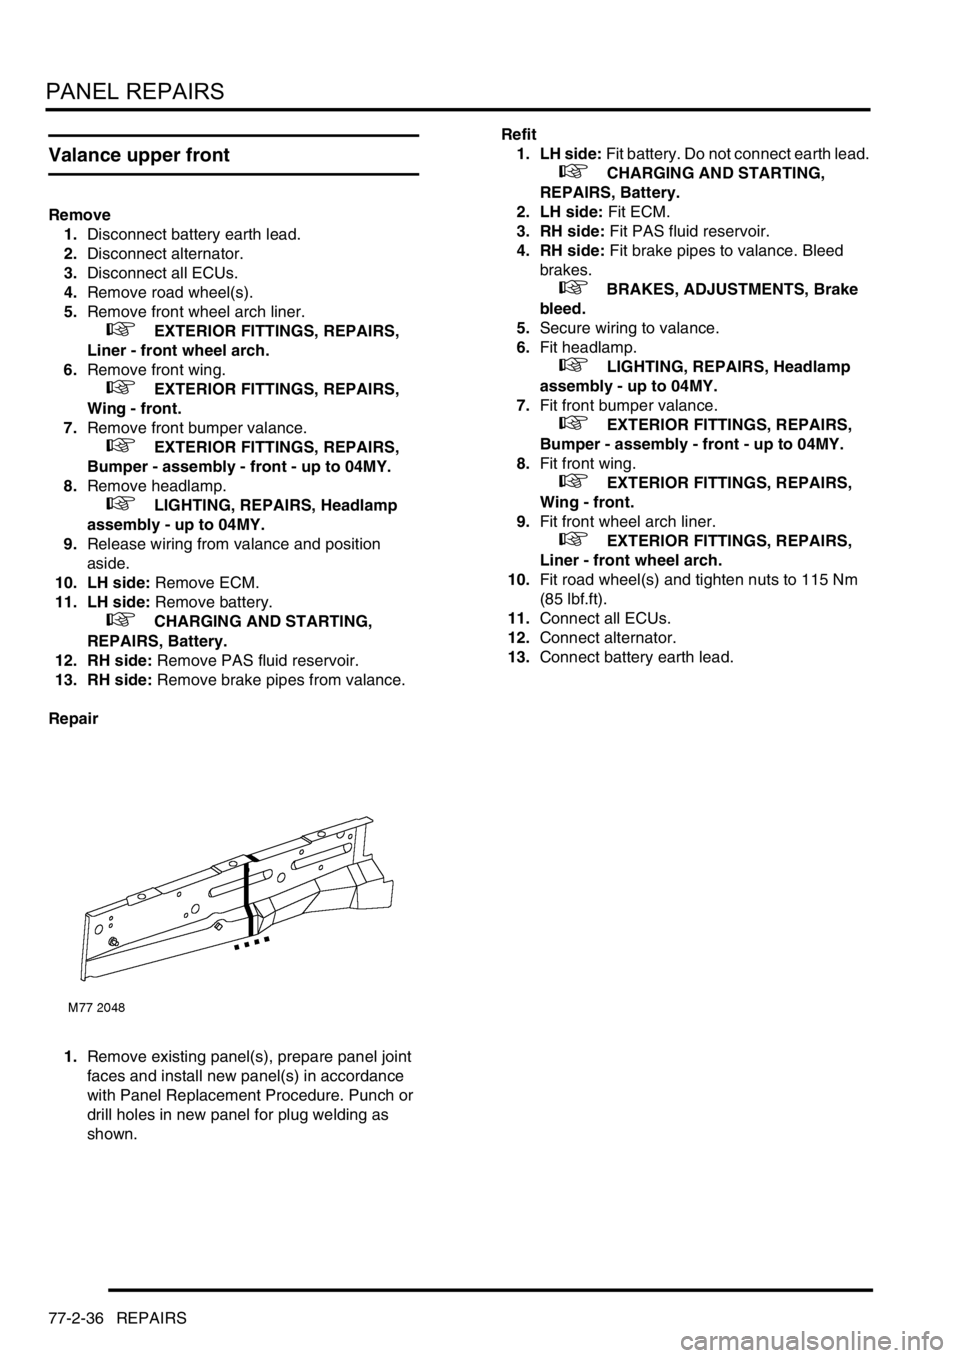
Valance upper front
Remove
1.Disconnect battery earth lead.
2.Disconnect alternator.
3.Disconnect all ECUs.
4.Remove road wheel(s).
5.Remove front wheel arch liner.
+ EXTERIOR FITTINGS, REPAIRS,
Liner - front wheel arch.
6.Remove front wing.
+ EXTERIOR FITTINGS, REPAIRS,
Wing - front.
7.Remove front bumper valance.
+ EXTERIOR FITTINGS, REPAIRS,
Bumper - assembly - front - up to 04MY.
8.Remove headlamp.
+ LIGHTING, REPAIRS, Headlamp
assembly - up to 04MY.
9.Release wiring from valance and position
aside.
10. LH side: Remove ECM.
11. LH side: Remove battery.
+ CHARGING AND STARTING,
REPAIRS, Battery.
12. RH side: Remove PAS fluid reservoir.
13. RH side: Remove brake pipes from valance.
Repair
1.Remove existing panel(s), prepare panel joint
faces and install new panel(s) in accordance
with Panel Replacement Procedure. Punch or
drill holes in new panel for plug welding as
shown. Refit
1. LH side: Fit battery. Do not connect earth lead.
+ CHARGING AND STARTING,
REPAIRS, Battery.
2. LH side: Fit ECM.
3. RH side: Fit PAS fluid reservoir.
4. RH side: Fit brake pipes to valance. Bleed
brakes.
+ BRAKES, ADJUSTMENTS, Brake
bleed.
5.Secure wiring to valance.
6.Fit headlamp.
+ LIGHTING, REPAIRS, Headlamp
assembly - up to 04MY.
7.Fit front bumper valance.
+ EXTERIOR FITTINGS, REPAIRS,
Bumper - assembly - front - up to 04MY.
8.Fit front wing.
+ EXTERIOR FITTINGS, REPAIRS,
Wing - front.
9.Fit front wheel arch liner.
+ EXTERIOR FITTINGS, REPAIRS,
Liner - front wheel arch.
10.Fit road wheel(s) and tighten nuts to 115 Nm
(85 lbf.ft).
11.Connect all ECUs.
12.Connect alternator.
13.Connect battery earth lead.
Page 792 of 1007
PANEL REPAIRS
REPAIRS 77-2-37
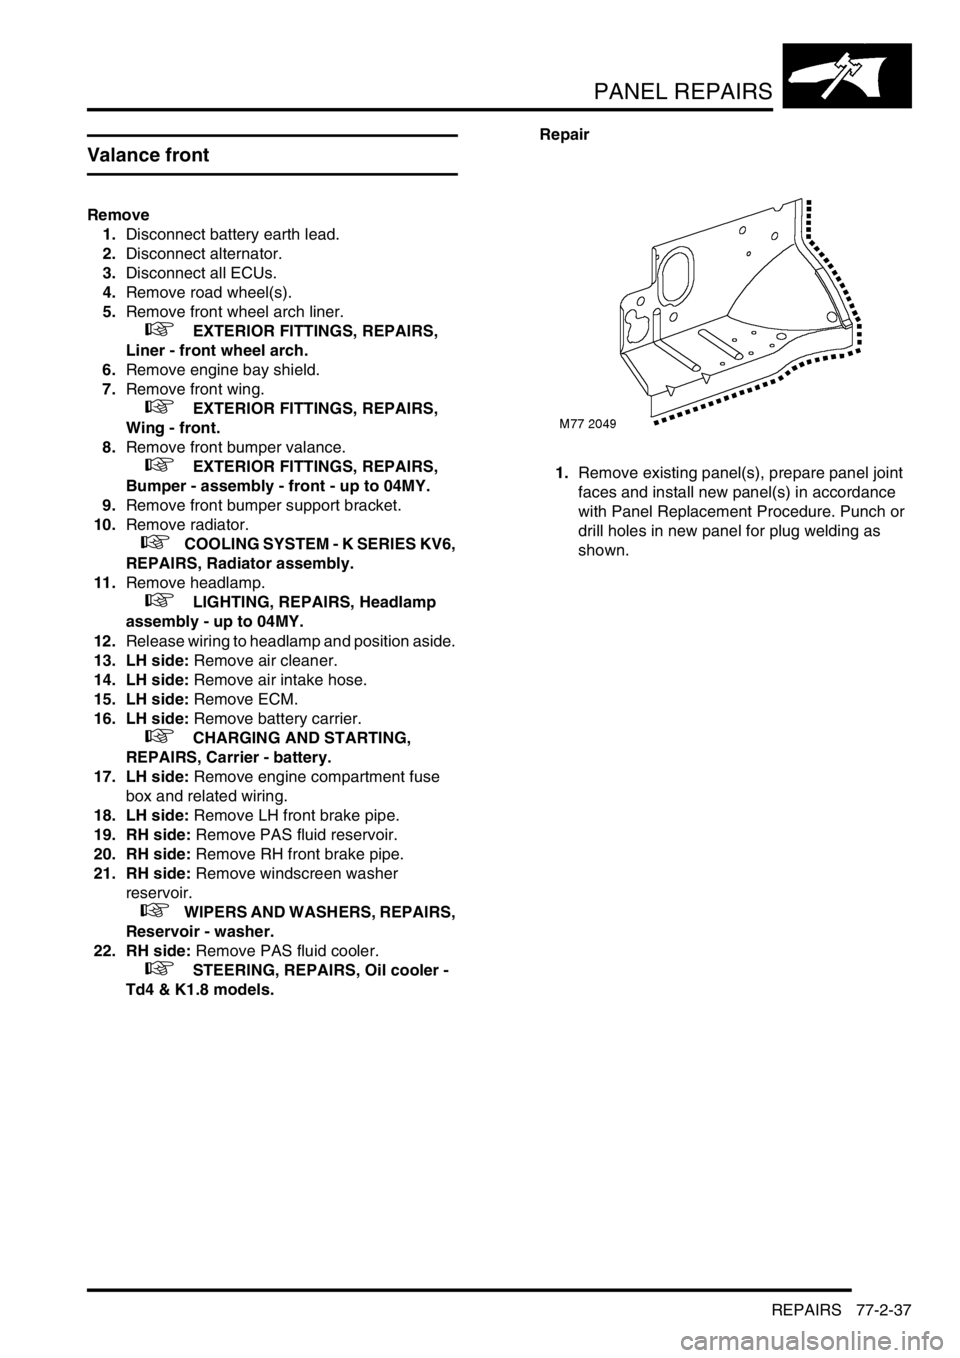
Valance front
Remove
1.Disconnect battery earth lead.
2.Disconnect alternator.
3.Disconnect all ECUs.
4.Remove road wheel(s).
5.Remove front wheel arch liner.
+ EXTERIOR FITTINGS, REPAIRS,
Liner - front wheel arch.
6.Remove engine bay shield.
7.Remove front wing.
+ EXTERIOR FITTINGS, REPAIRS,
Wing - front.
8.Remove front bumper valance.
+ EXTERIOR FITTINGS, REPAIRS,
Bumper - assembly - front - up to 04MY.
9.Remove front bumper support bracket.
10.Remove radiator.
+ COOLING SYSTEM - K SERIES KV6,
REPAIRS, Radiator assembly.
11.Remove headlamp.
+ LIGHTING, REPAIRS, Headlamp
assembly - up to 04MY.
12.Release wiring to headlamp and position aside.
13. LH side: Remove air cleaner.
14. LH side: Remove air intake hose.
15. LH side: Remove ECM.
16. LH side: Remove battery carrier.
+ CHARGING AND STARTING,
REPAIRS, Carrier - battery.
17. LH side: Remove engine compartment fuse
box and related wiring.
18. LH side: Remove LH front brake pipe.
19. RH side: Remove PAS fluid reservoir.
20. RH side: Remove RH front brake pipe.
21. RH side: Remove windscreen washer
reservoir.
+ WIPERS AND WASHERS, REPAIRS,
Reservoir - washer.
22. RH side: Remove PAS fluid cooler.
+ STEERING, REPAIRS, Oil cooler -
Td4 & K1.8 models.Repair
1.Remove existing panel(s), prepare panel joint
faces and install new panel(s) in accordance
with Panel Replacement Procedure. Punch or
drill holes in new panel for plug welding as
shown.
Page 793 of 1007
PANEL REPAIRS
77-2-38 REPAIRS
Refit
1. LH side: Fit LH front brake pipe. Bleed brake
system.
+ BRAKES, ADJUSTMENTS, Brake
bleed.
2. LH side: Fit engine compartment fuse box and
related wiring.
3. LH side: Fit battery carrier. Do not connect
battery earth lead.
+ CHARGING AND STARTING,
REPAIRS, Carrier - battery.
4. LH side: Fit ECM.
5. LH side: Fit air intake hose.
6. LH side: Fit air cleaner.
7. RH side: Fit PAS fluid cooler.
+ STEERING, REPAIRS, Oil cooler -
Td4 & K1.8 models.
8. RH side: Fit windscreen washer reservoir.
+ WIPERS AND WASHERS, REPAIRS,
Reservoir - washer.
9. RH side: Fit RH front brake pipe. Bleed brake
system.
+ BRAKES, ADJUSTMENTS, Brake
bleed.
10. RH side: Fit PAS fluid reservoir.
11.Fit headlamp.
+ LIGHTING, REPAIRS, Headlamp
assembly - up to 04MY.
12.Secure headlamp wiring.
13.Fit PAS fluid cooler.
+ STEERING, REPAIRS, Oil cooler -
Td4 & K1.8 models.
14.Fit radiator.
+ COOLING SYSTEM - K SERIES KV6,
REPAIRS, Radiator assembly.
15.Fit front bumper support bracket.
16.Fit front bumper valance.
+ EXTERIOR FITTINGS, REPAIRS,
Bumper - assembly - front - up to 04MY.
17.Fit front wing.
+ EXTERIOR FITTINGS, REPAIRS,
Wing - front.
18.Fit front wheel arch liner.
+ EXTERIOR FITTINGS, REPAIRS,
Liner - front wheel arch.
19.Fit road wheel(s) and tighten nuts to 115 Nm
(85 lbf.ft).
20.Connect all ECUs.
21.Connect alternator.
22.Connect battery earth lead.
Page 794 of 1007
PANEL REPAIRS
REPAIRS 77-2-39
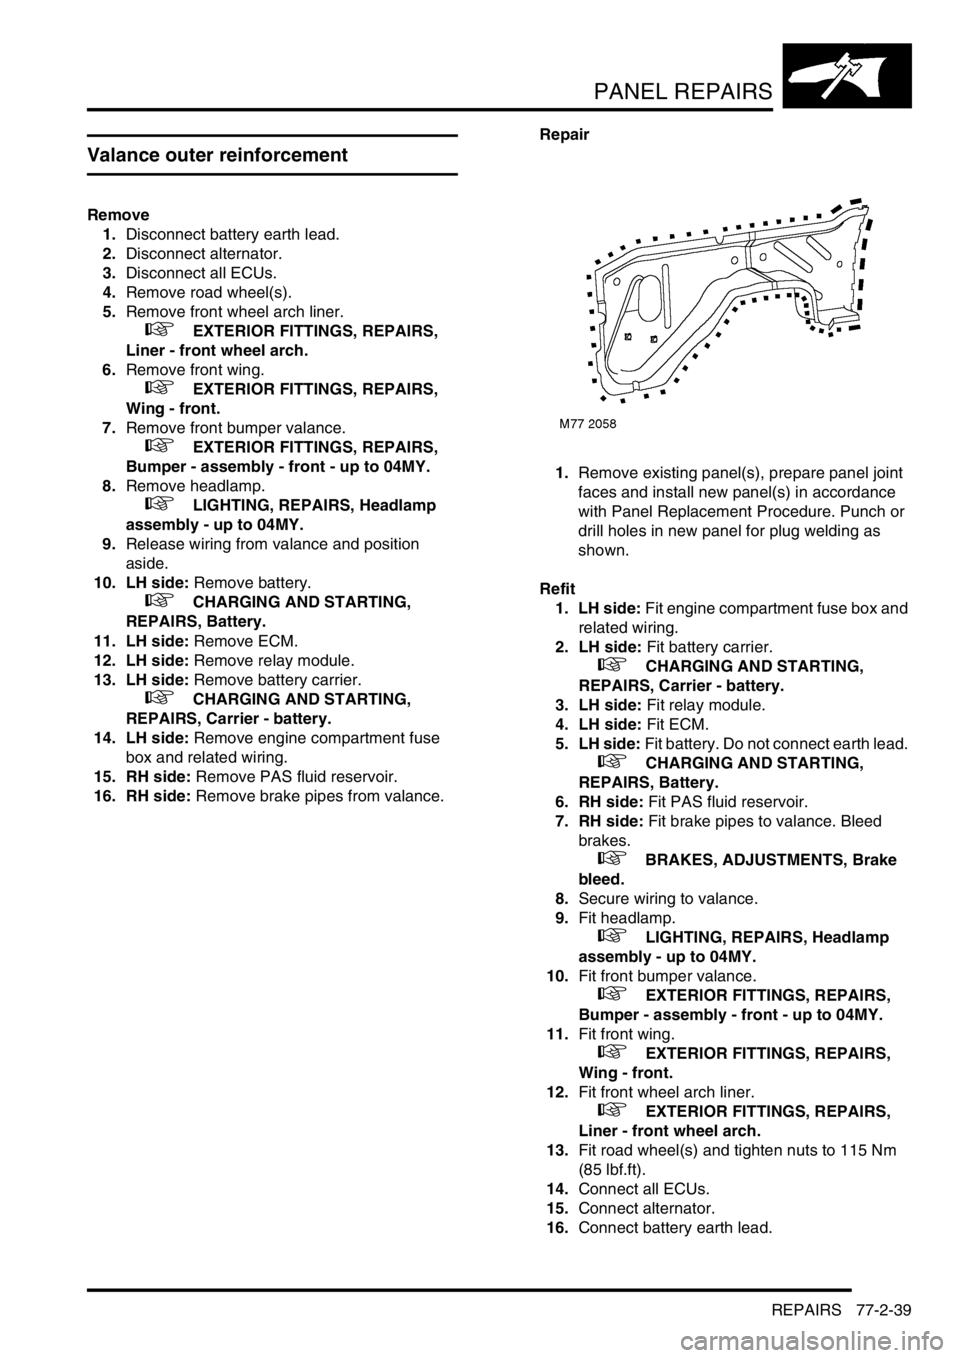
Valance outer reinforcement
Remove
1.Disconnect battery earth lead.
2.Disconnect alternator.
3.Disconnect all ECUs.
4.Remove road wheel(s).
5.Remove front wheel arch liner.
+ EXTERIOR FITTINGS, REPAIRS,
Liner - front wheel arch.
6.Remove front wing.
+ EXTERIOR FITTINGS, REPAIRS,
Wing - front.
7.Remove front bumper valance.
+ EXTERIOR FITTINGS, REPAIRS,
Bumper - assembly - front - up to 04MY.
8.Remove headlamp.
+ LIGHTING, REPAIRS, Headlamp
assembly - up to 04MY.
9.Release wiring from valance and position
aside.
10. LH side: Remove battery.
+ CHARGING AND STARTING,
REPAIRS, Battery.
11. LH side: Remove ECM.
12. LH side: Remove relay module.
13. LH side: Remove battery carrier.
+ CHARGING AND STARTING,
REPAIRS, Carrier - battery.
14. LH side: Remove engine compartment fuse
box and related wiring.
15. RH side: Remove PAS fluid reservoir.
16. RH side: Remove brake pipes from valance. Repair
1.Remove existing panel(s), prepare panel joint
faces and install new panel(s) in accordance
with Panel Replacement Procedure. Punch or
drill holes in new panel for plug welding as
shown.
Refit
1. LH side: Fit engine compartment fuse box and
related wiring.
2. LH side: Fit battery carrier.
+ CHARGING AND STARTING,
REPAIRS, Carrier - battery.
3. LH side: Fit relay module.
4. LH side: Fit ECM.
5. LH side: Fit battery. Do not connect earth lead.
+ CHARGING AND STARTING,
REPAIRS, Battery.
6. RH side: Fit PAS fluid reservoir.
7. RH side: Fit brake pipes to valance. Bleed
brakes.
+ BRAKES, ADJUSTMENTS, Brake
bleed.
8.Secure wiring to valance.
9.Fit headlamp.
+ LIGHTING, REPAIRS, Headlamp
assembly - up to 04MY.
10.Fit front bumper valance.
+ EXTERIOR FITTINGS, REPAIRS,
Bumper - assembly - front - up to 04MY.
11.Fit front wing.
+ EXTERIOR FITTINGS, REPAIRS,
Wing - front.
12.Fit front wheel arch liner.
+ EXTERIOR FITTINGS, REPAIRS,
Liner - front wheel arch.
13.Fit road wheel(s) and tighten nuts to 115 Nm
(85 lbf.ft).
14.Connect all ECUs.
15.Connect alternator.
16.Connect battery earth lead.
Page 795 of 1007
PANEL REPAIRS
77-2-40 REPAIRS
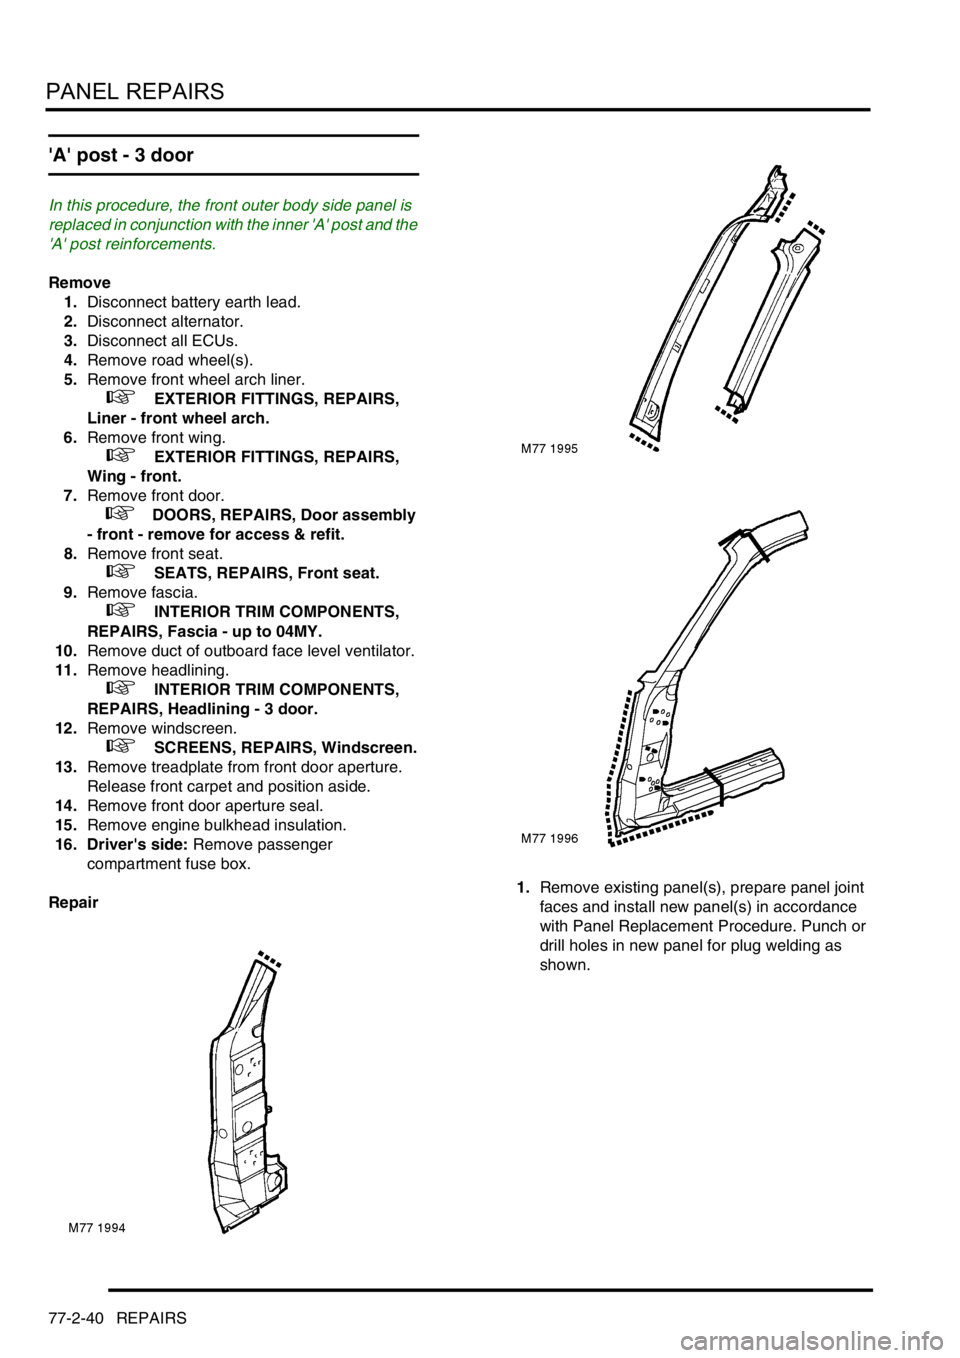
'A' post - 3 door
In this procedure, the front outer body side panel is
replaced in conjunction with the inner 'A' post and the
'A' post reinforcements.
Remove
1.Disconnect battery earth lead.
2.Disconnect alternator.
3.Disconnect all ECUs.
4.Remove road wheel(s).
5.Remove front wheel arch liner.
+ EXTERIOR FITTINGS, REPAIRS,
Liner - front wheel arch.
6.Remove front wing.
+ EXTERIOR FITTINGS, REPAIRS,
Wing - front.
7.Remove front door.
+ DOORS, REPAIRS, Door assembly
- front - remove for access & refit.
8.Remove front seat.
+ SEATS, REPAIRS, Front seat.
9.Remove fascia.
+ INTERIOR TRIM COMPONENTS,
REPAIRS, Fascia - up to 04MY.
10.Remove duct of outboard face level ventilator.
11.Remove headlining.
+ INTERIOR TRIM COMPONENTS,
REPAIRS, Headlining - 3 door.
12.Remove windscreen.
+ SCREENS, REPAIRS, Windscreen.
13.Remove treadplate from front door aperture.
Release front carpet and position aside.
14.Remove front door aperture seal.
15.Remove engine bulkhead insulation.
16. Driver's side: Remove passenger
compartment fuse box.
Repair1.Remove existing panel(s), prepare panel joint
faces and install new panel(s) in accordance
with Panel Replacement Procedure. Punch or
drill holes in new panel for plug welding as
shown.
Page 796 of 1007
PANEL REPAIRS
REPAIRS 77-2-41
Refit
1. Driver's side: Fit passenger compartment fuse
box.
2.Fit insulation pads to engine bulkhead.
3.Fit front door aperture seal.
4.Position front carpet and fit treadplate to front
door aperture.
5.Fit windscreen.
+ SCREENS, REPAIRS, Windscreen.
6.Fit headlining.
+ INTERIOR TRIM COMPONENTS,
REPAIRS, Headlining - 3 door.
7.Fit duct of outboard face level ventilator.
8.Fit fascia.
+ INTERIOR TRIM COMPONENTS,
REPAIRS, Fascia - up to 04MY.
9.Fit front seat.
+ SEATS, REPAIRS, Front seat.
10.Fit front door.
+ DOORS, REPAIRS, Door assembly
- front - remove for access & refit.
11.Fit front wing.
+ EXTERIOR FITTINGS, REPAIRS,
Wing - front.
12.Fit front wheel arch liner.
+ EXTERIOR FITTINGS, REPAIRS,
Liner - front wheel arch.
13.Fit road wheel(s) and tighten nuts to 115 Nm
(85 lbf.ft).
14.Connect all ECUs.
15.Connect alternator.
16.Connect battery earth lead.
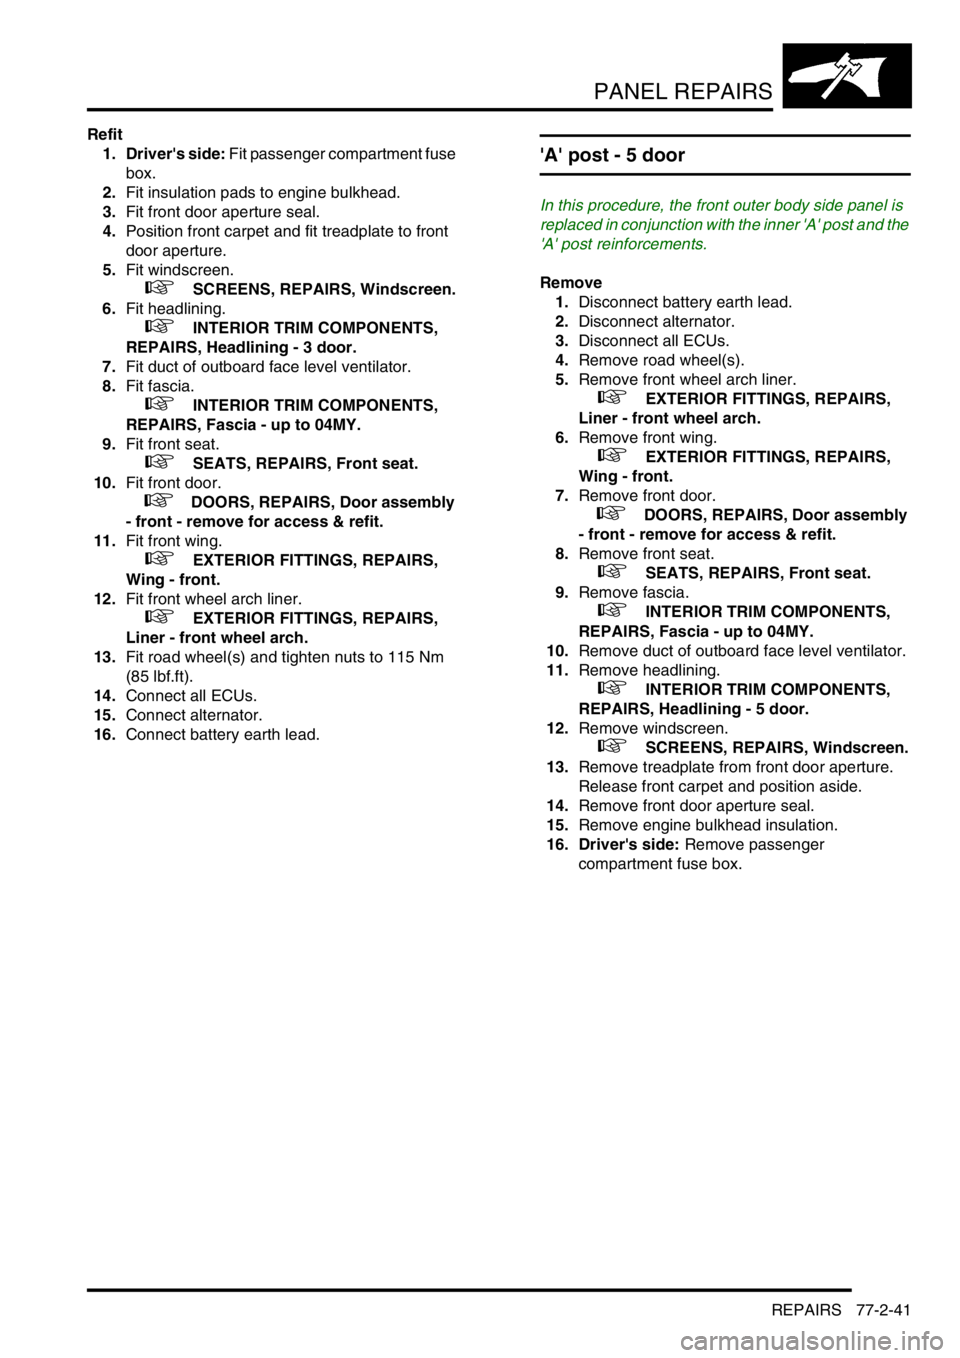
'A' post - 5 door
In this procedure, the front outer body side panel is
replaced in conjunction with the inner 'A' post and the
'A' post reinforcements.
Remove
1.Disconnect battery earth lead.
2.Disconnect alternator.
3.Disconnect all ECUs.
4.Remove road wheel(s).
5.Remove front wheel arch liner.
+ EXTERIOR FITTINGS, REPAIRS,
Liner - front wheel arch.
6.Remove front wing.
+ EXTERIOR FITTINGS, REPAIRS,
Wing - front.
7.Remove front door.
+ DOORS, REPAIRS, Door assembly
- front - remove for access & refit.
8.Remove front seat.
+ SEATS, REPAIRS, Front seat.
9.Remove fascia.
+ INTERIOR TRIM COMPONENTS,
REPAIRS, Fascia - up to 04MY.
10.Remove duct of outboard face level ventilator.
11.Remove headlining.
+ INTERIOR TRIM COMPONENTS,
REPAIRS, Headlining - 5 door.
12.Remove windscreen.
+ SCREENS, REPAIRS, Windscreen.
13.Remove treadplate from front door aperture.
Release front carpet and position aside.
14.Remove front door aperture seal.
15.Remove engine bulkhead insulation.
16. Driver's side: Remove passenger
compartment fuse box.
Page 797 of 1007
PANEL REPAIRS
77-2-42 REPAIRS
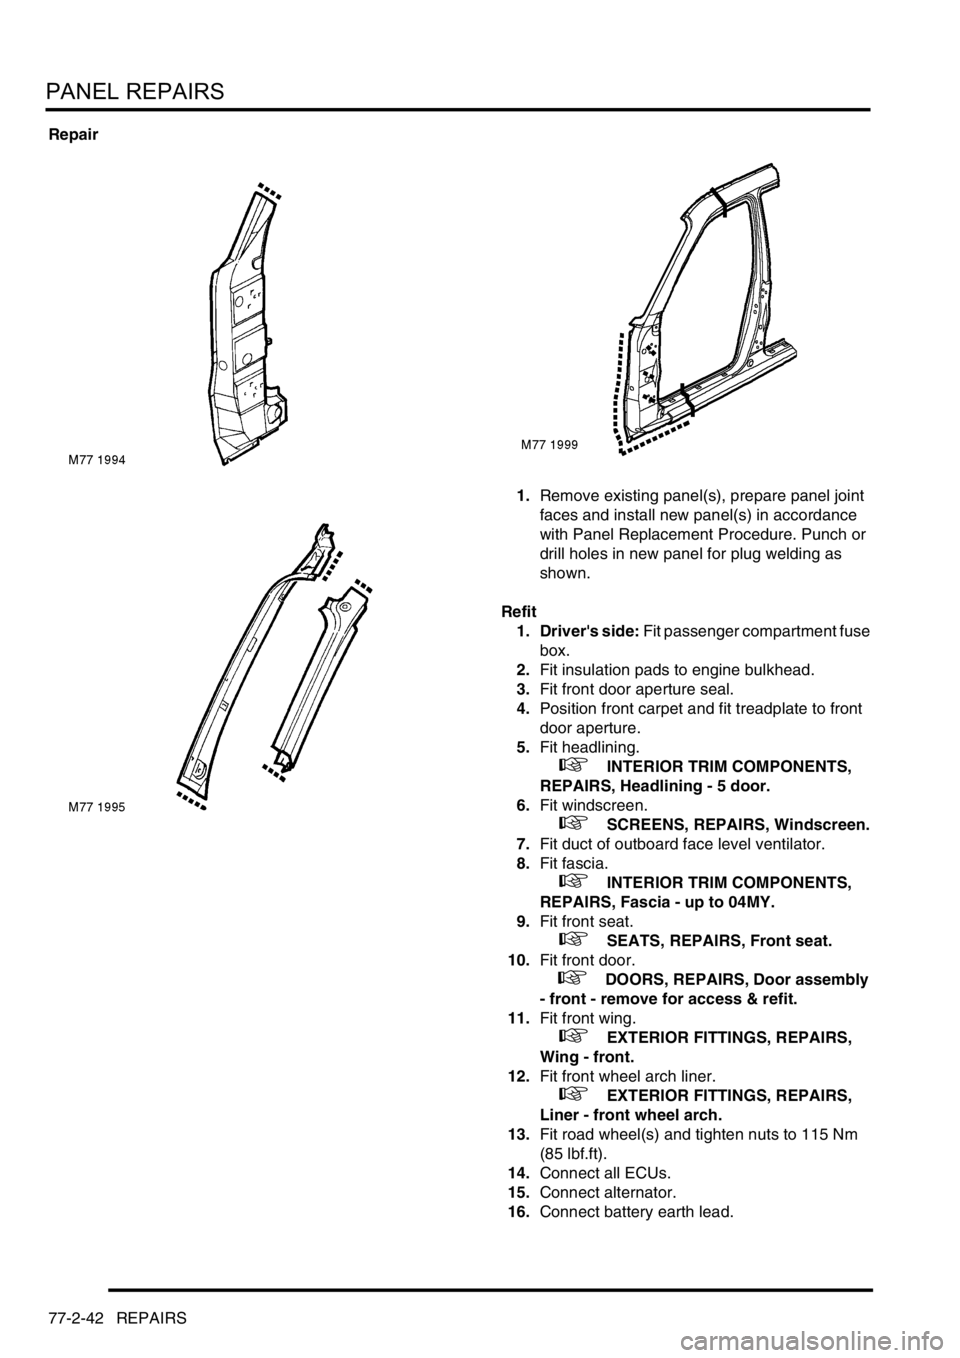
Repair
1.Remove existing panel(s), prepare panel joint
faces and install new panel(s) in accordance
with Panel Replacement Procedure. Punch or
drill holes in new panel for plug welding as
shown.
Refit
1. Driver's side: Fit passenger compartment fuse
box.
2.Fit insulation pads to engine bulkhead.
3.Fit front door aperture seal.
4.Position front carpet and fit treadplate to front
door aperture.
5.Fit headlining.
+ INTERIOR TRIM COMPONENTS,
REPAIRS, Headlining - 5 door.
6.Fit windscreen.
+ SCREENS, REPAIRS, Windscreen.
7.Fit duct of outboard face level ventilator.
8.Fit fascia.
+ INTERIOR TRIM COMPONENTS,
REPAIRS, Fascia - up to 04MY.
9.Fit front seat.
+ SEATS, REPAIRS, Front seat.
10.Fit front door.
+ DOORS, REPAIRS, Door assembly
- front - remove for access & refit.
11.Fit front wing.
+ EXTERIOR FITTINGS, REPAIRS,
Wing - front.
12.Fit front wheel arch liner.
+ EXTERIOR FITTINGS, REPAIRS,
Liner - front wheel arch.
13.Fit road wheel(s) and tighten nuts to 115 Nm
(85 lbf.ft).
14.Connect all ECUs.
15.Connect alternator.
16.Connect battery earth lead.
Page 798 of 1007
PANEL REPAIRS
REPAIRS 77-2-43
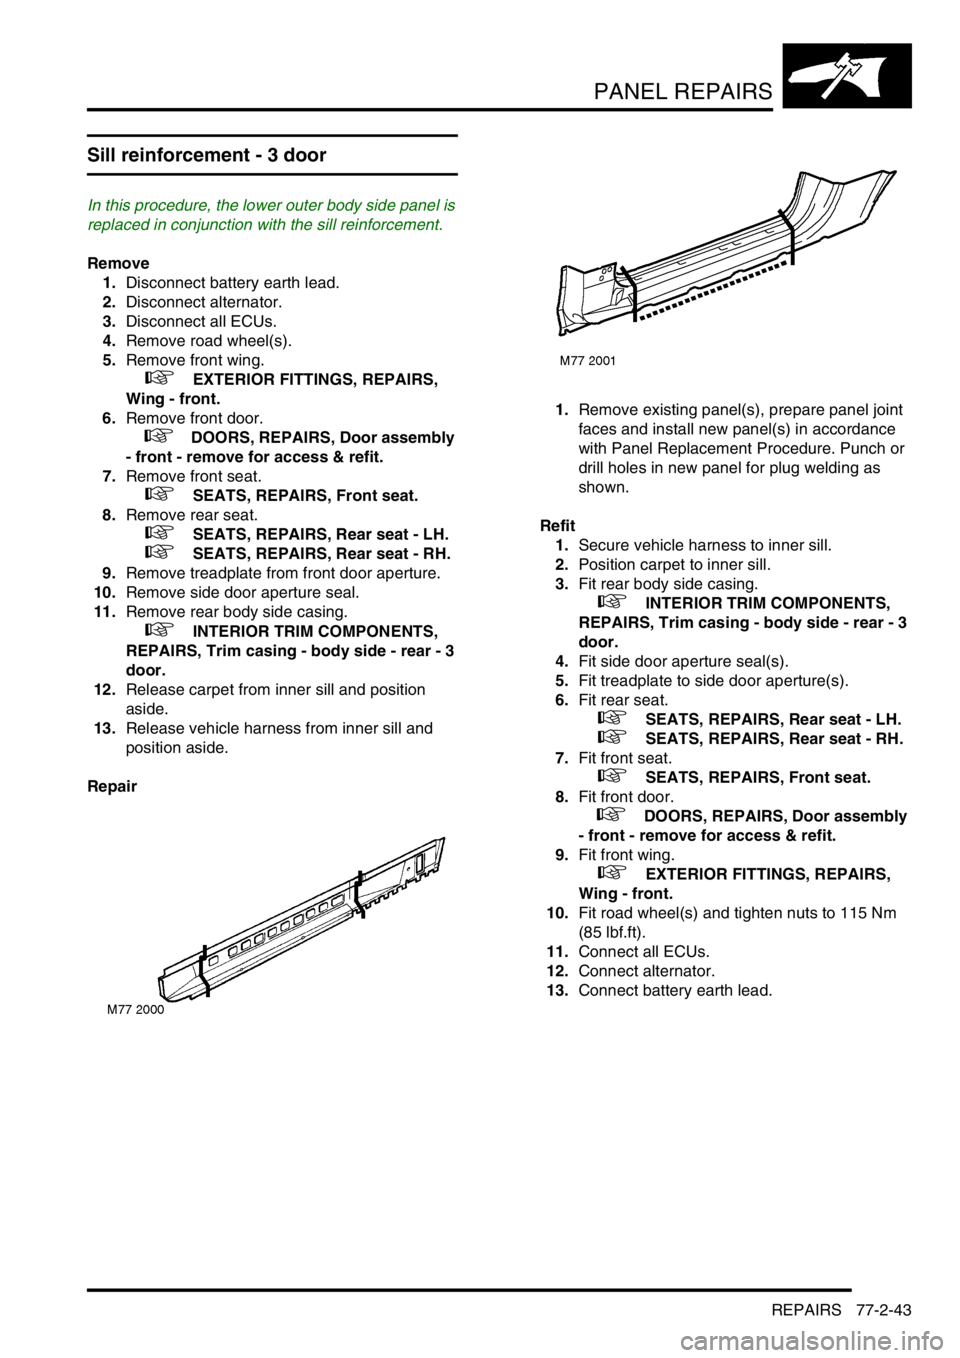
Sill reinforcement - 3 door
In this procedure, the lower outer body side panel is
replaced in conjunction with the sill reinforcement.
Remove
1.Disconnect battery earth lead.
2.Disconnect alternator.
3.Disconnect all ECUs.
4.Remove road wheel(s).
5.Remove front wing.
+ EXTERIOR FITTINGS, REPAIRS,
Wing - front.
6.Remove front door.
+ DOORS, REPAIRS, Door assembly
- front - remove for access & refit.
7.Remove front seat.
+ SEATS, REPAIRS, Front seat.
8.Remove rear seat.
+ SEATS, REPAIRS, Rear seat - LH.
+ SEATS, REPAIRS, Rear seat - RH.
9.Remove treadplate from front door aperture.
10.Remove side door aperture seal.
11.Remove rear body side casing.
+ INTERIOR TRIM COMPONENTS,
REPAIRS, Trim casing - body side - rear - 3
door.
12.Release carpet from inner sill and position
aside.
13.Release vehicle harness from inner sill and
position aside.
Repair1.Remove existing panel(s), prepare panel joint
faces and install new panel(s) in accordance
with Panel Replacement Procedure. Punch or
drill holes in new panel for plug welding as
shown.
Refit
1.Secure vehicle harness to inner sill.
2.Position carpet to inner sill.
3.Fit rear body side casing.
+ INTERIOR TRIM COMPONENTS,
REPAIRS, Trim casing - body side - rear - 3
door.
4.Fit side door aperture seal(s).
5.Fit treadplate to side door aperture(s).
6.Fit rear seat.
+ SEATS, REPAIRS, Rear seat - LH.
+ SEATS, REPAIRS, Rear seat - RH.
7.Fit front seat.
+ SEATS, REPAIRS, Front seat.
8.Fit front door.
+ DOORS, REPAIRS, Door assembly
- front - remove for access & refit.
9.Fit front wing.
+ EXTERIOR FITTINGS, REPAIRS,
Wing - front.
10.Fit road wheel(s) and tighten nuts to 115 Nm
(85 lbf.ft).
11.Connect all ECUs.
12.Connect alternator.
13.Connect battery earth lead.
Page 799 of 1007
PANEL REPAIRS
77-2-44 REPAIRS
Sill reinforcement - 5 door
In this procedure, the lower outer body side panel is
replaced in conjunction with the sill reinforcement.
Remove
1.Disconnect battery earth lead.
2.Disconnect alternator.
3.Disconnect all ECUs.
4.Remove road wheel(s).
5.Remove front wing.
+ EXTERIOR FITTINGS, REPAIRS,
Wing - front.
6.Remove front door.
+ DOORS, REPAIRS, Door assembly
- front - remove for access & refit.
7.Remove rear door.
+ DOORS, REPAIRS, Door assembly
- rear - remove for access & refit.
8.Remove 'B/C' post lower finisher.
+ INTERIOR TRIM COMPONENTS,
REPAIRS, Trim finisher - 'B' post - lower - 5
door.
9.Remove front seat.
+ SEATS, REPAIRS, Front seat.
10.Remove rear seat.
+ SEATS, REPAIRS, Rear seat - LH.
+ SEATS, REPAIRS, Rear seat - RH.
11.Remove treadplate from side door apertures.
12.Remove side door aperture seals.
13.Release carpet from inner sill and position
aside.
14.Release vehicle harness from inner sill and
position aside.
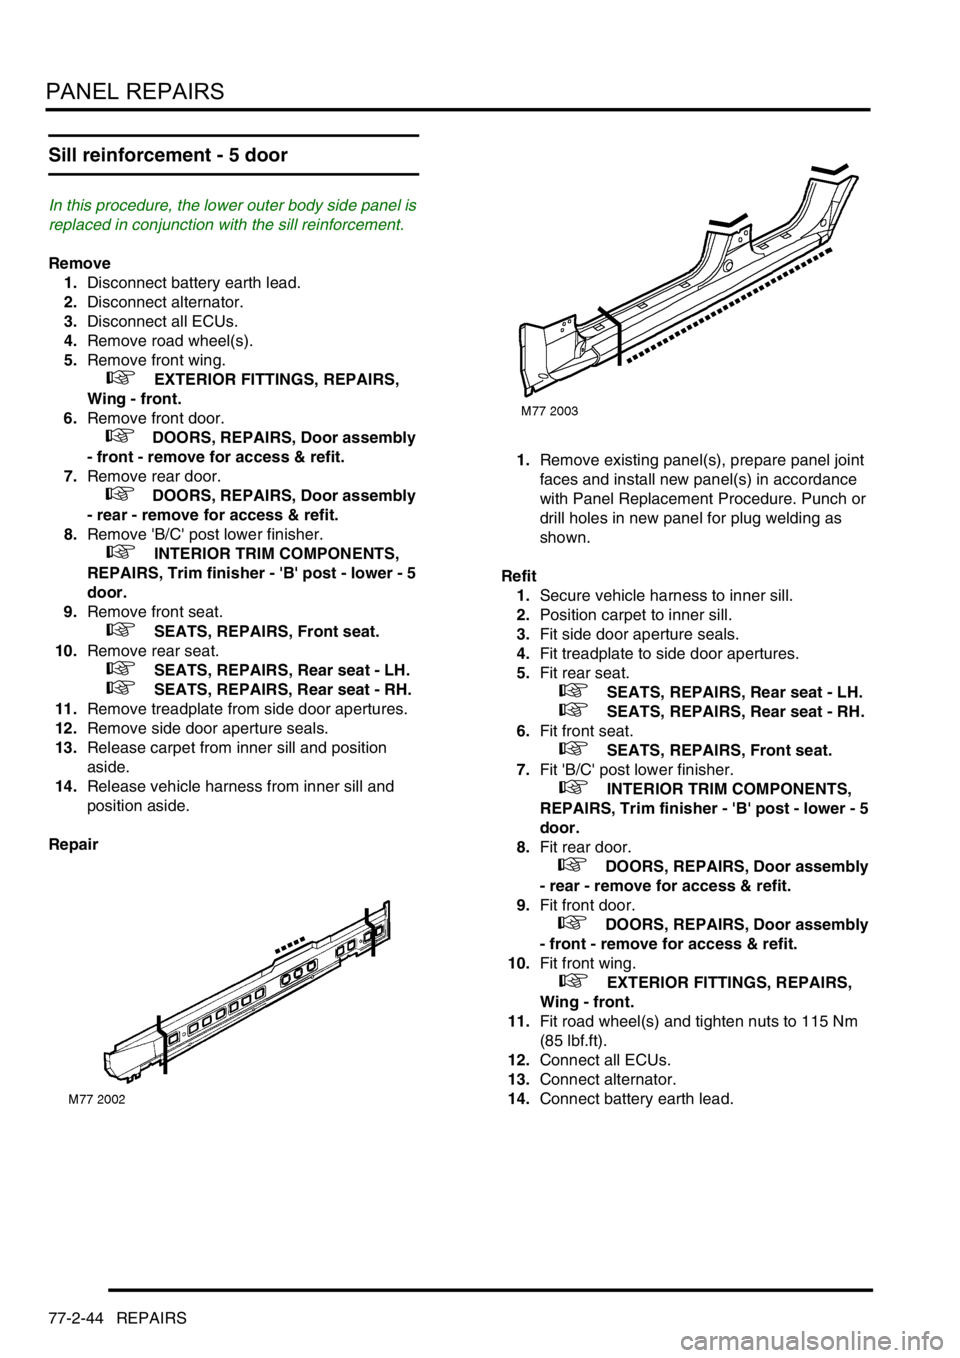
Repair1.Remove existing panel(s), prepare panel joint
faces and install new panel(s) in accordance
with Panel Replacement Procedure. Punch or
drill holes in new panel for plug welding as
shown.
Refit
1.Secure vehicle harness to inner sill.
2.Position carpet to inner sill.
3.Fit side door aperture seals.
4.Fit treadplate to side door apertures.
5.Fit rear seat.
+ SEATS, REPAIRS, Rear seat - LH.
+ SEATS, REPAIRS, Rear seat - RH.
6.Fit front seat.
+ SEATS, REPAIRS, Front seat.
7.Fit 'B/C' post lower finisher.
+ INTERIOR TRIM COMPONENTS,
REPAIRS, Trim finisher - 'B' post - lower - 5
door.
8.Fit rear door.
+ DOORS, REPAIRS, Door assembly
- rear - remove for access & refit.
9.Fit front door.
+ DOORS, REPAIRS, Door assembly
- front - remove for access & refit.
10.Fit front wing.
+ EXTERIOR FITTINGS, REPAIRS,
Wing - front.
11.Fit road wheel(s) and tighten nuts to 115 Nm
(85 lbf.ft).
12.Connect all ECUs.
13.Connect alternator.
14.Connect battery earth lead.
Page 800 of 1007
PANEL REPAIRS
REPAIRS 77-2-45
'B/C' post reinforcement - 3 door
In this procedure, the rear outer body side panel and
the rear quarter front lower reinforcement are
replaced in conjunction with the 'B/C' post
reinforcement.
Remove
1.Disconnect battery earth lead.
2.Disconnect alternator.
3.Disconnect all ECUs.
4.Remove road wheel(s).
5.Remove rear wheel arch extension.
+ EXTERIOR FITTINGS, REPAIRS,
Wheelarch extension - rear wing part.
6.Remove rear wheel arch liner.
7.Remove front seat belt.
+ RESTRAINT SYSTEMS, REPAIRS,
Automatic belt assembly - front - 3 door.
8.Remove front door striker from 'B/C' post.
9.Remove rear seat.
+ SEATS, REPAIRS, Rear seat - LH.
+ SEATS, REPAIRS, Rear seat - RH.
10.Remove rear body side casing.
+ INTERIOR TRIM COMPONENTS,
REPAIRS, Trim casing - body side - rear - 3
door.
11.Remove treadplate from side door aperture.
12.Remove side door aperture seal.
13.Release carpet from inner sill and position
aside.
14.Remove rear quarter vent and seal.
+ EXTERIOR FITTINGS, REPAIRS,
Body quarter vent assembly - 3 door.
15.Remove rear roof panel finisher.
16.Remove headlining.
+ INTERIOR TRIM COMPONENTS,
REPAIRS, Headlining - 3 door.
17.Release vehicle harness from inner sill and
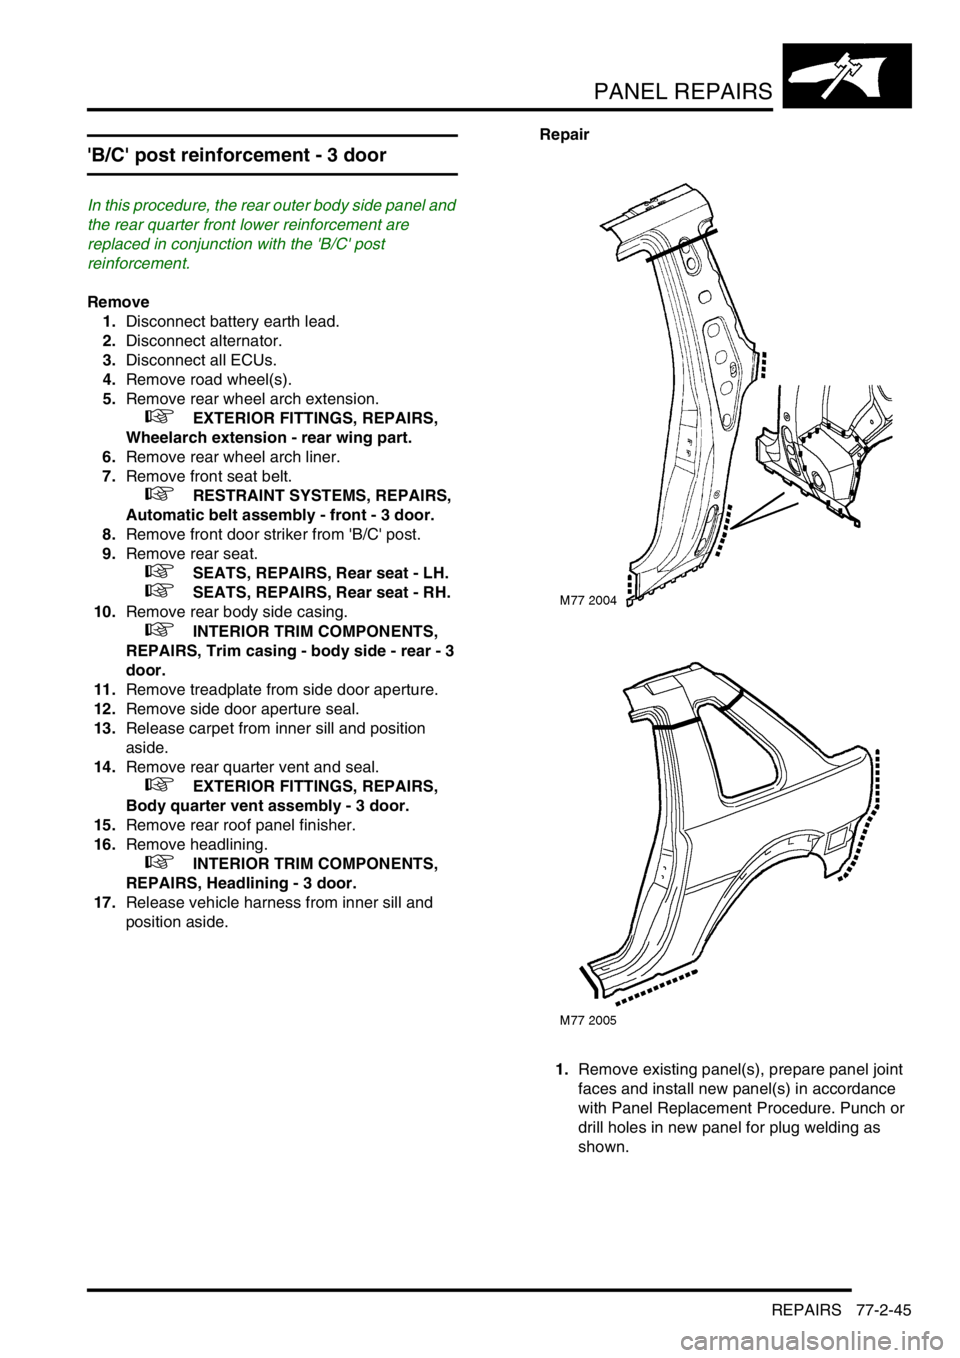
position aside. Repair
1.Remove existing panel(s), prepare panel joint
faces and install new panel(s) in accordance
with Panel Replacement Procedure. Punch or
drill holes in new panel for plug welding as
shown.