LAND ROVER FRELANDER 2 2006 Repair Manual
FRELANDER 2 2006
LAND ROVER
LAND ROVER
https://www.carmanualsonline.info/img/64/57251/w960_57251-0.png
LAND ROVER FRELANDER 2 2006 Repair Manual
Trending: lights, handbrake, coolant reservoir, jump cable, spare tire, navigation update, jacking points
Page 1721 of 3229
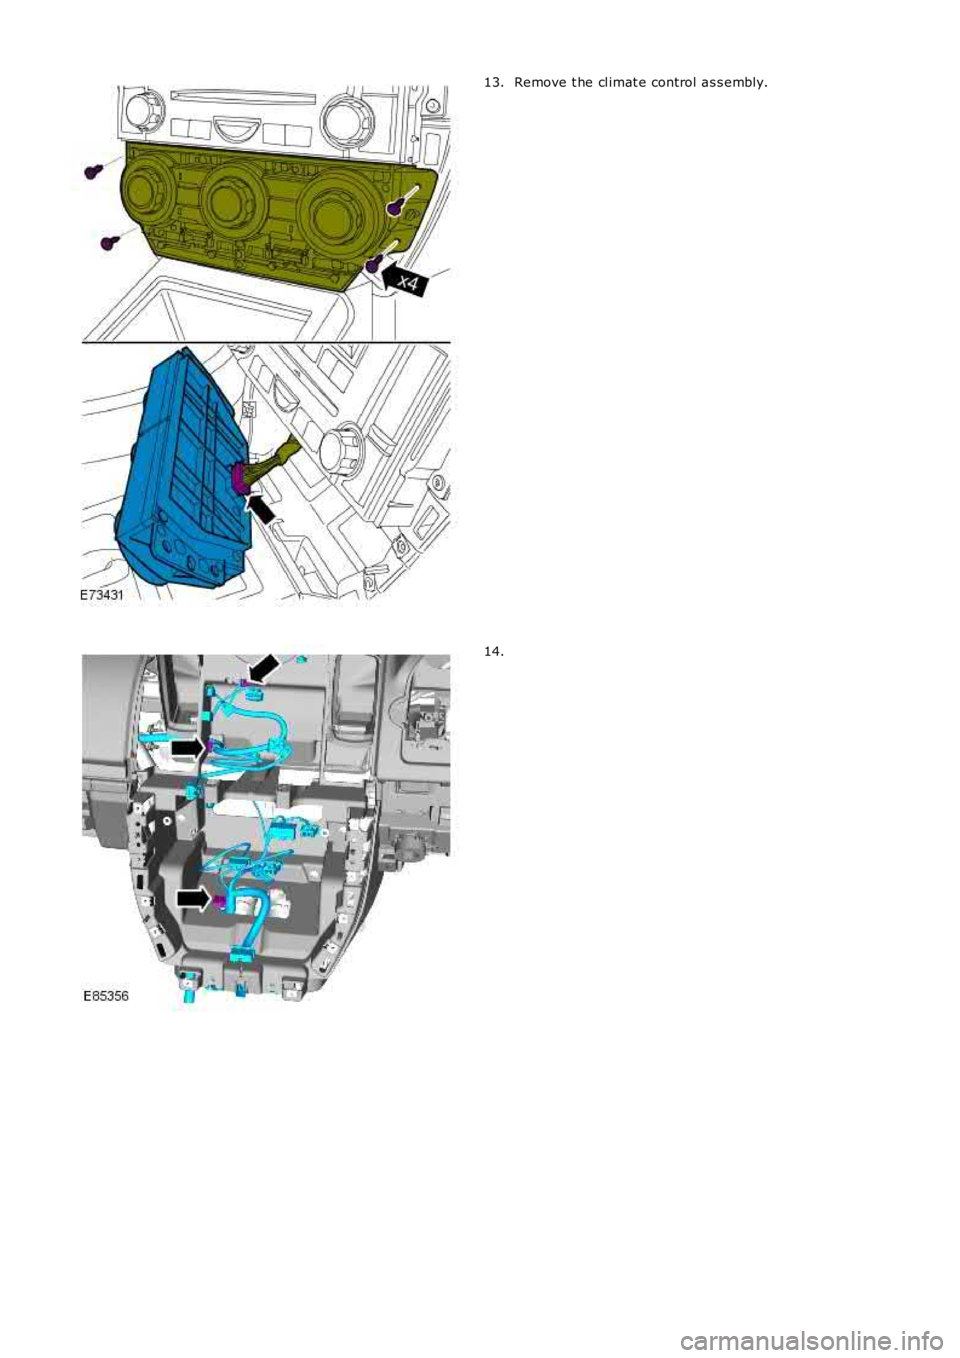
Remove t he cl imat e control as s embly.13.
14.
Page 1722 of 3229
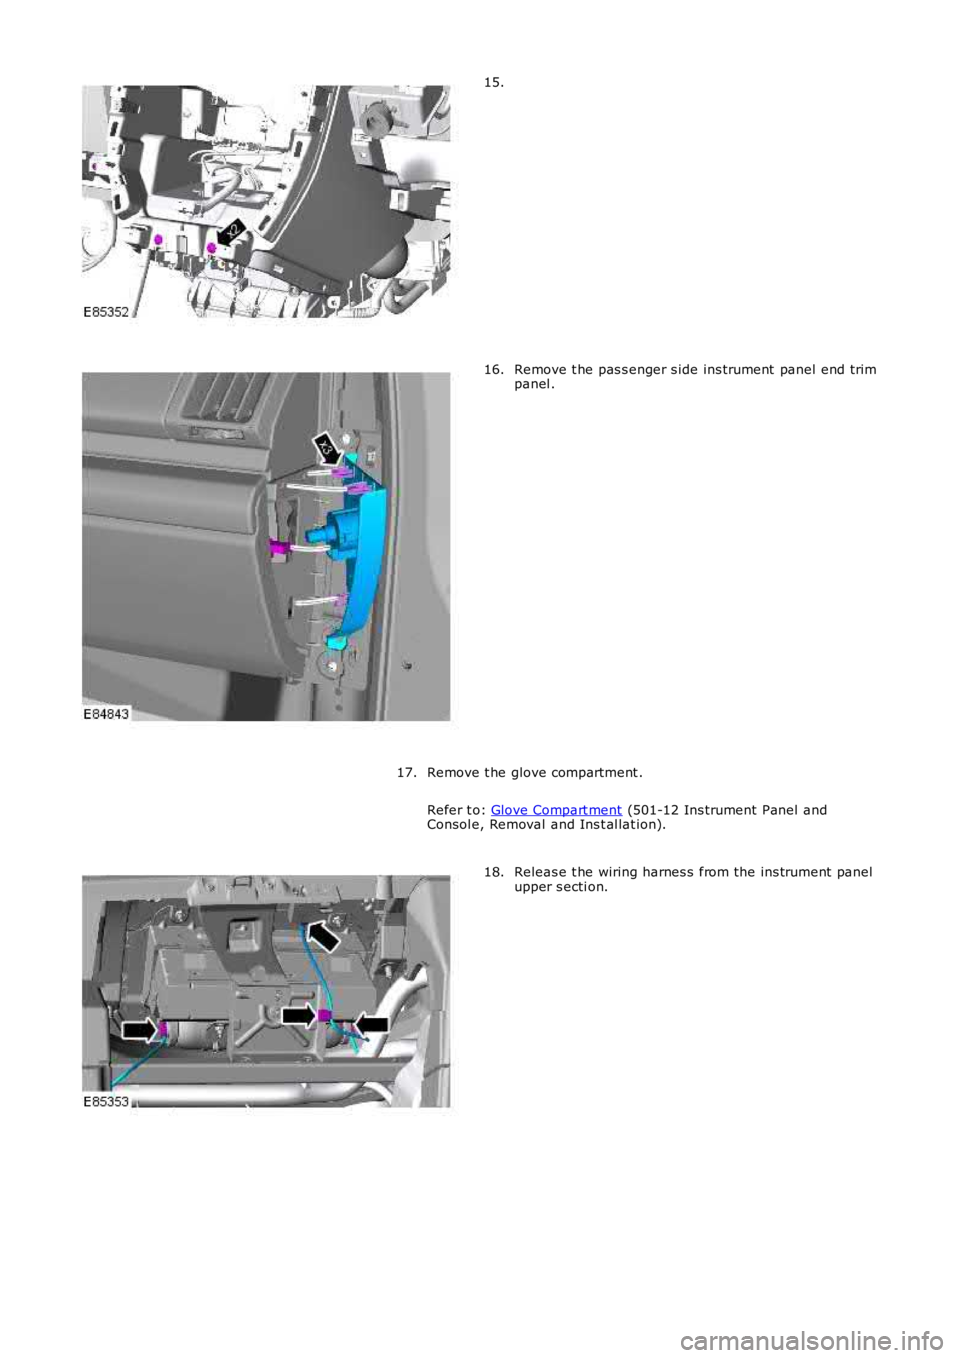
15.
Remove t he pas s enger s ide ins trument panel end trimpanel .16.
Remove t he glove compartment .
Refer t o: Glove Compart ment (501-12 Ins trument Panel andConsol e, Removal and Ins t al lat ion).
17.
Releas e t he wiring harnes s from the ins trument panelupper s ecti on.18.
Page 1723 of 3229
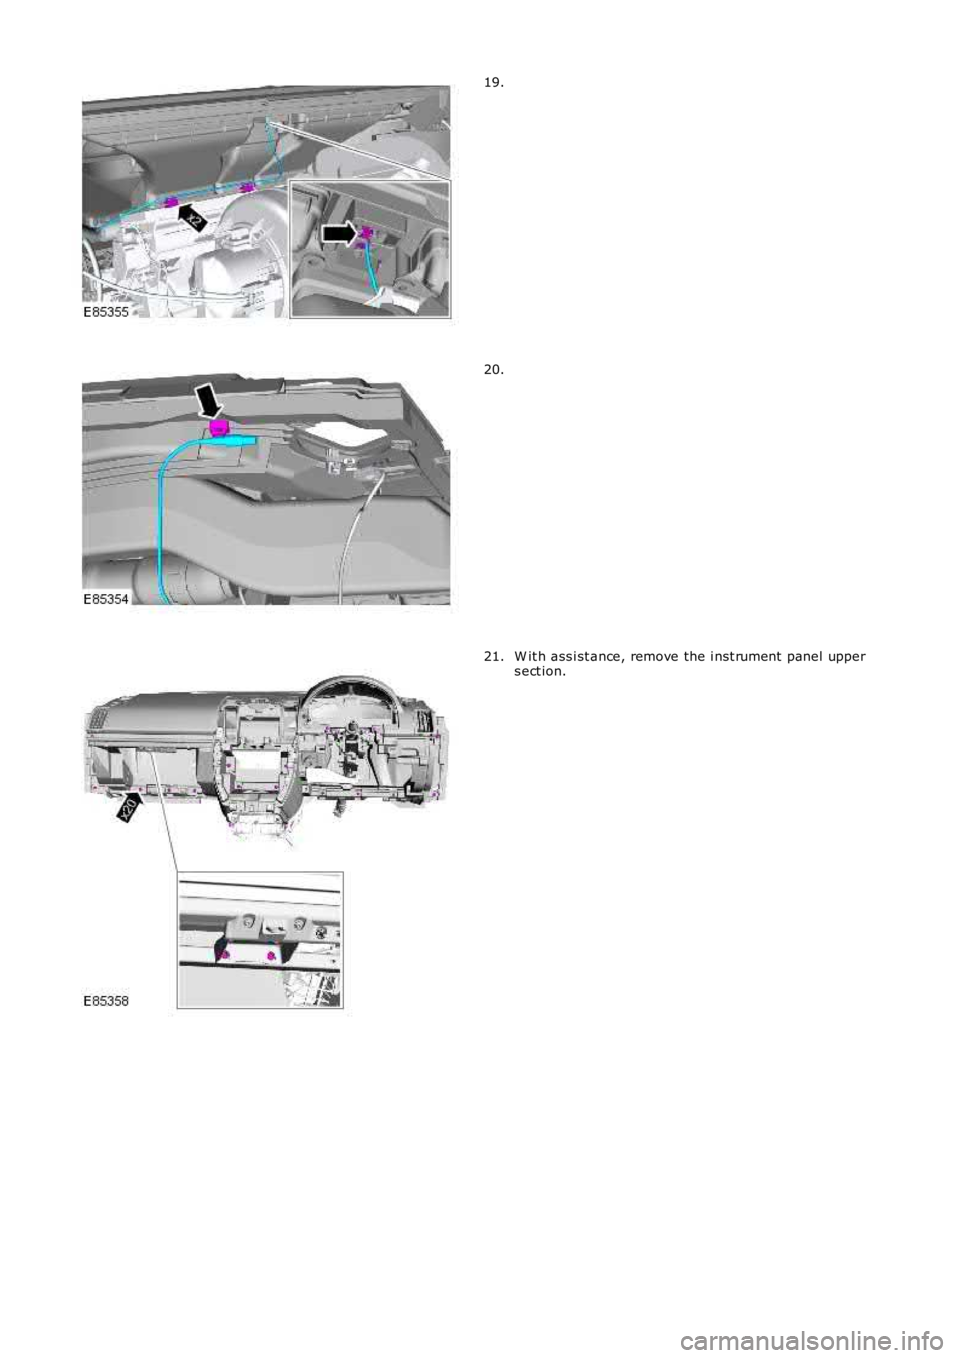
19.
20.
W it h ass i st ance, remove the i nst rument panel uppers ect ion.21.
Page 1724 of 3229
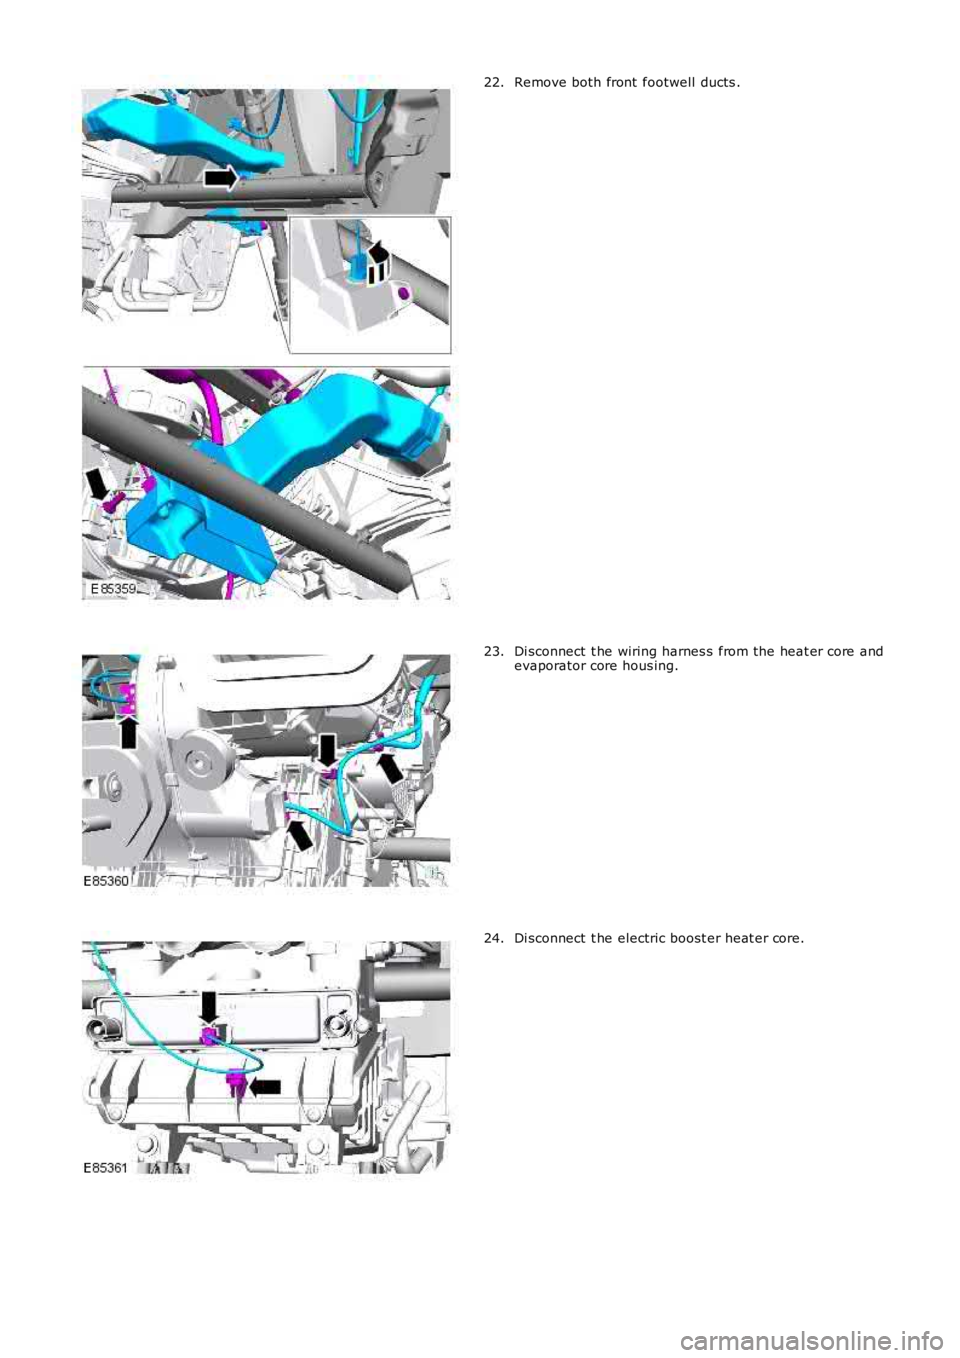
Remove both front footwell ducts .22.
Di sconnect t he wiring harnes s from the heat er core andevaporator core hous ing.23.
Di sconnect t he electric boost er heat er core.24.
Page 1725 of 3229
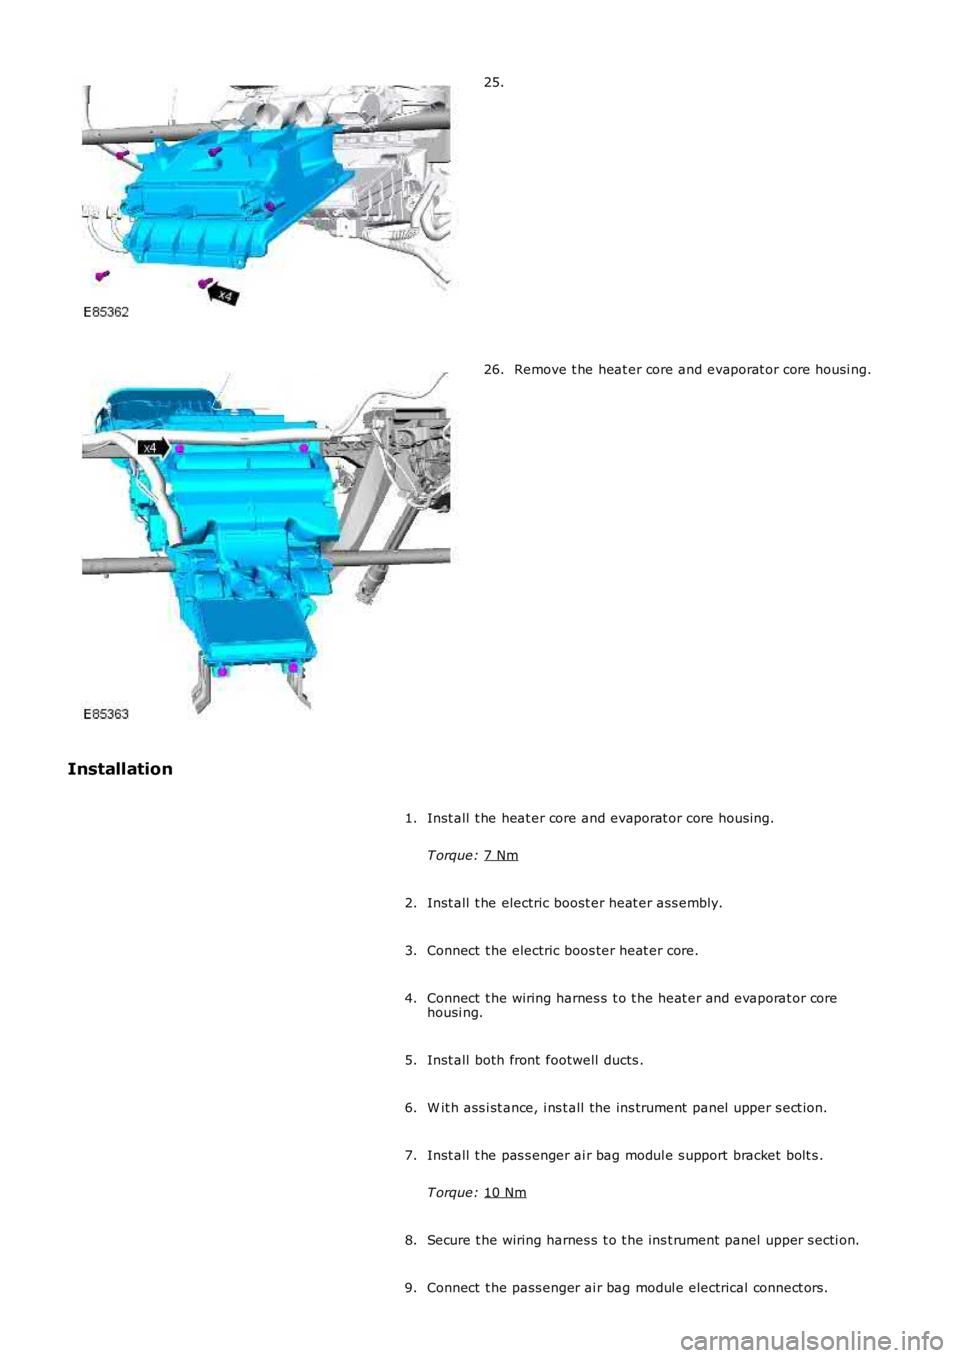
25.
Remove t he heat er core and evaporat or core housi ng.
26.
Installation Inst all t he heat er core and evaporat or core housi ng.
T orque: 7 Nm 1.
Inst all t he electric boost er heat er ass embly.
2.
Connect t he electric boos ter heat er core.
3.
Connect t he wiring harnes s t o t he heat er and evaporat or core
housi ng.
4.
Inst all both front footwell ducts .
5.
W it h ass i st ance, i ns t all the ins trument panel upper s ect ion.
6.
Inst all t he pas s enger ai r bag modul e s upport bracket bolt s .
T orque: 10 Nm 7.
Secure t he wiring harnes s t o t he ins t rument panel upper s ecti on.
8.
Connect t he pass enger ai r bag modul e electrical connect ors .
9.
Page 1726 of 3229
Inst all t he glove compartment .
Refer t o: Glove Compart ment (501-12 Ins trument Panel andConsol e, Removal and Ins t al lat ion).
10.
Inst all t he pas s enger s ide ins trument panel end trim panel .11.
Secure t he wiring harnes s s upport bracket .12.
Inst all t he cl imat e control as s embly.13.
Inst all t he audi o unit .14.
Inst all t he cent er speaker.15.
Inst all t he video dis play.
Refer t o: Video Dis play (415-01 Informati on and Entert ainmentSyst em, Removal and Ins tall ati on).
16.
Inst all both ins trument panel s peakers .17.
Inst all both upper t rim panels .18.
Connect t he in-vehi cl e t emperature s ens or electrical connect or.19.
Connect t he keyl es s s t art module elect rical connect or.20.
Inst all t he ins trument cl ust er.
Refer t o: Ins trument Clus ter (413-01 Ins t rument Clus t er, Removaland Inst all at ion).
21.
Inst all t he cl ocks pri ng.
Refer t o: Clocks pri ng (501-20B Supplement al Res t raint Sys tem,Removal and Ins tall ati on).
22.
Inst all t he ins trument panel.
Refer t o: Ins trument Panel - TD4 2.2L Dies el (501-12 Inst rumentPanel and Cons ole, Removal and Inst all at ion).Refer t o: Ins trument Panel - I6 3.2L Pet rol (501-12 Ins t rument Paneland Consol e, Removal and Ins t al lat ion).
23.
Connect t he batt ery ground cable.
Refer t o: Specificati ons (414-00 Bat tery and Charging Sys tem -General Informat ion, Specificati ons).
24.
Return t he s teeri ng col umn t o i ts original posi ti on.25.
Page 1727 of 3229
Publi s hed: 11-May-2011
Climate Control - Air Conditioning (A/C) Pressure Transducer
Removal and Inst all ati on
Removal
• NOTE: Removal s t eps in t his procedure may cont ain i nst all ati on det ail s.
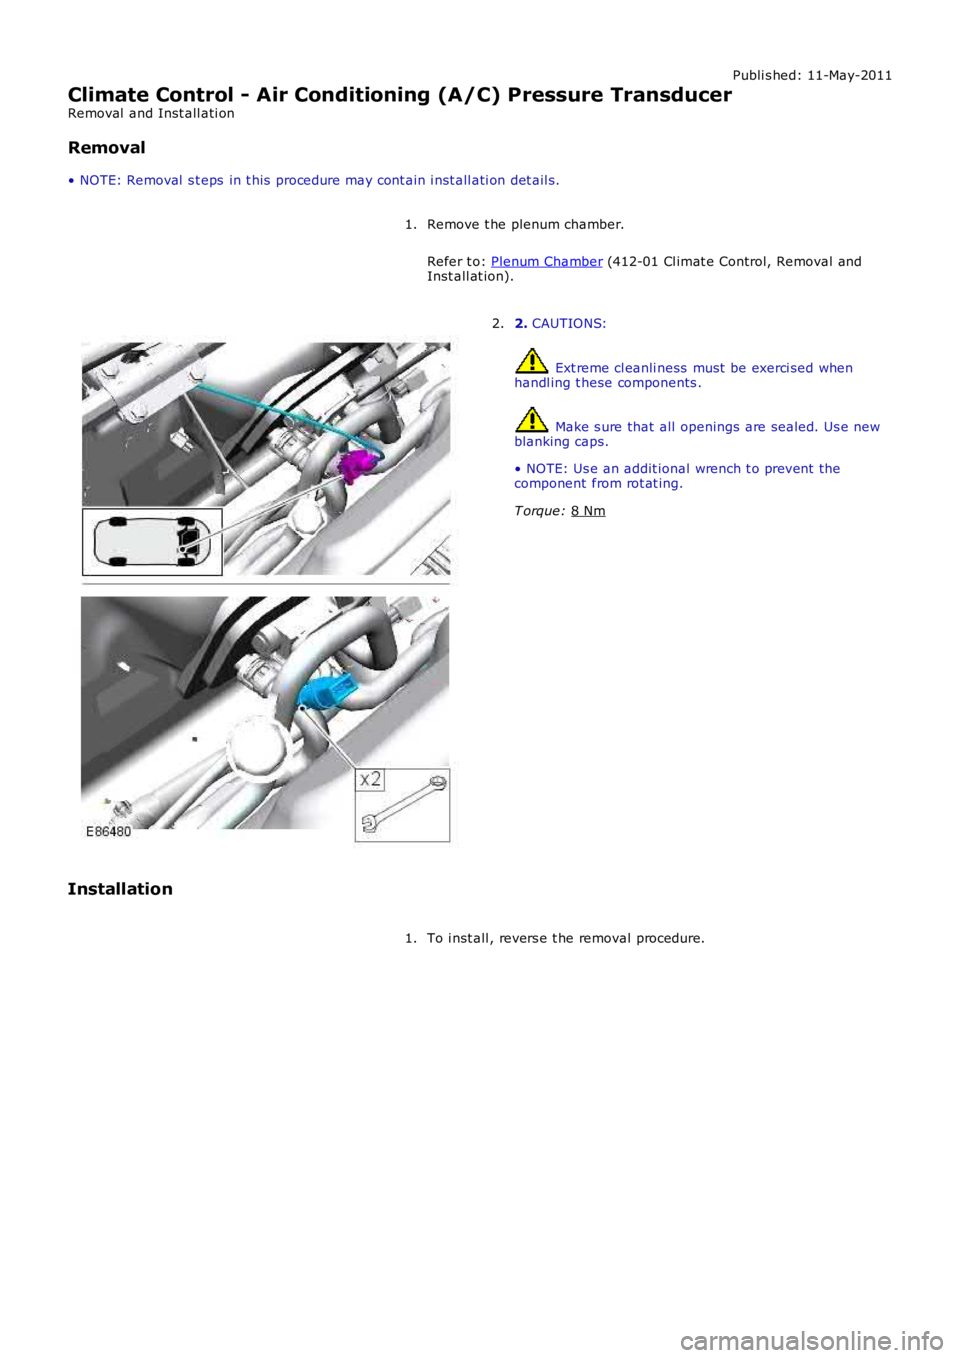
Remove t he plenum chamber.
Refer t o: Plenum Chamber (412-01 Cl imat e Control, Removal and
Inst all at ion).
1. 2.
CAUTIONS: Ext reme cl eanli ness must be exerci sed when
handl ing t hese components . Make s ure that all openings are sealed. Us e new
blanking caps.
• NOTE: Us e an addit ional wrench t o prevent the
component from rot at ing.
T orque: 8 Nm 2.
Installation To i nst all , revers e t he removal procedure.
1.
Page 1728 of 3229
Publi s hed: 11-May-2011
Climate Control - Temperature Blend Door Actuator LHRHD AWD
Removal and Inst all ati on
Removal
Remove t he glove compartment .
Refer t o: Glove Compart ment (501-12 Ins trument Panel andConsol e, Removal and Ins t al lat ion).
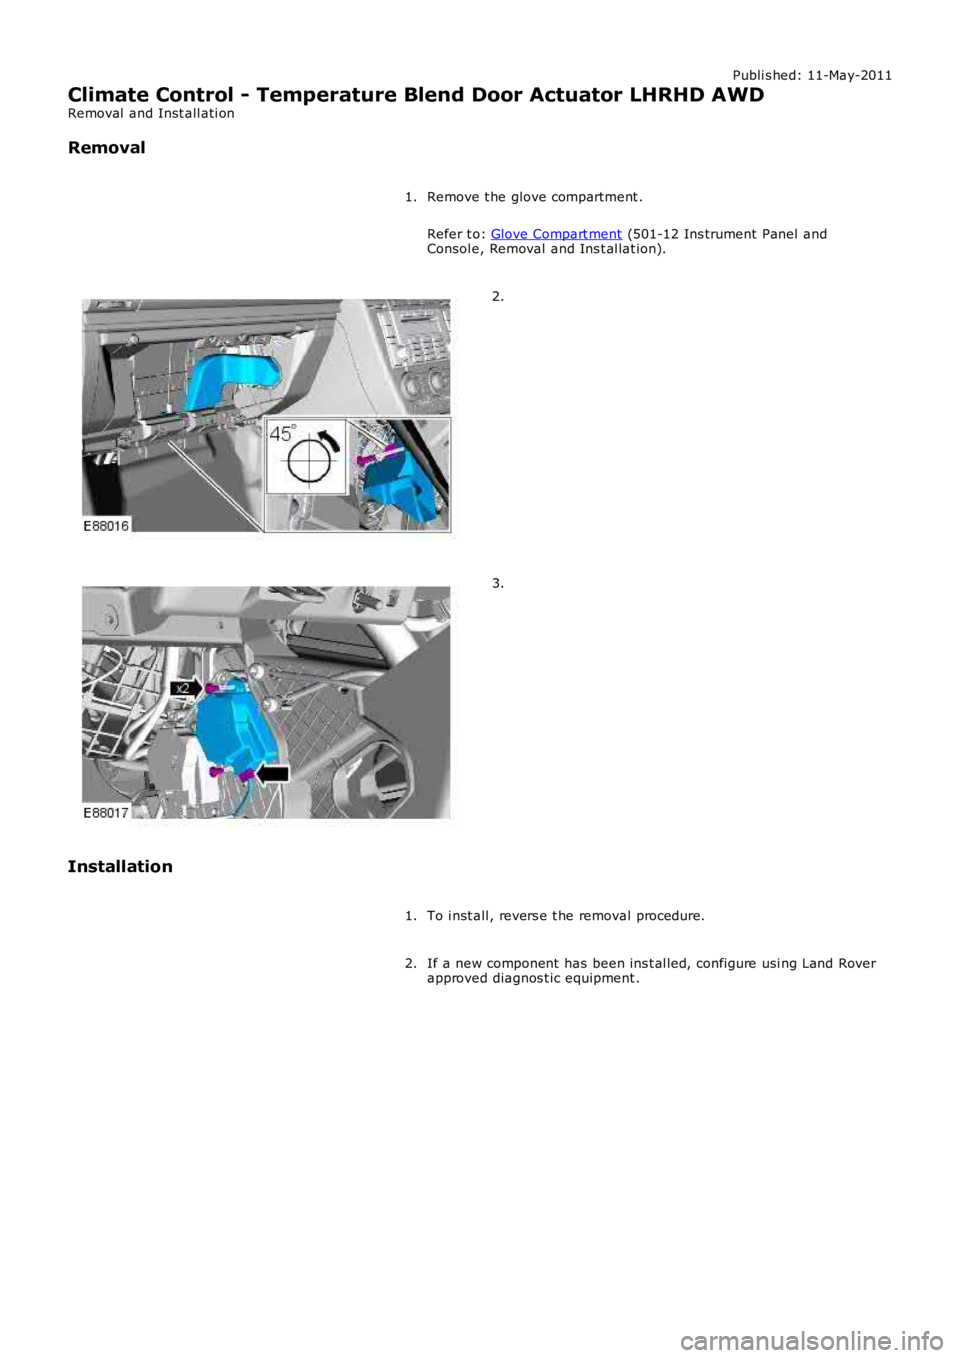
1.
2.
3.
Installation
To i nst all , revers e t he removal procedure.1.
If a new component has been ins t al led, configure usi ng Land Roverapproved diagnos t ic equipment .2.
Page 1729 of 3229
Publi s hed: 11-May-2011
Climate Control - Temperature Blend Door Actuator LHLHD AWD
Removal and Inst all ati on
Removal
• NOTE: Removal s t eps in t his procedure may cont ain i nst all ati on det ail s.
Make t he SRS s ys t em s afe.
Refer t o: Standard W orks hop Pract ices (100-00 General Informat ion,
Des cript ion and Operat ion).
1.
Remove t he s teeri ng col umn.
Refer t o: Steeri ng Column (211-04 St eering Col umn, Removal and
Inst all at ion).
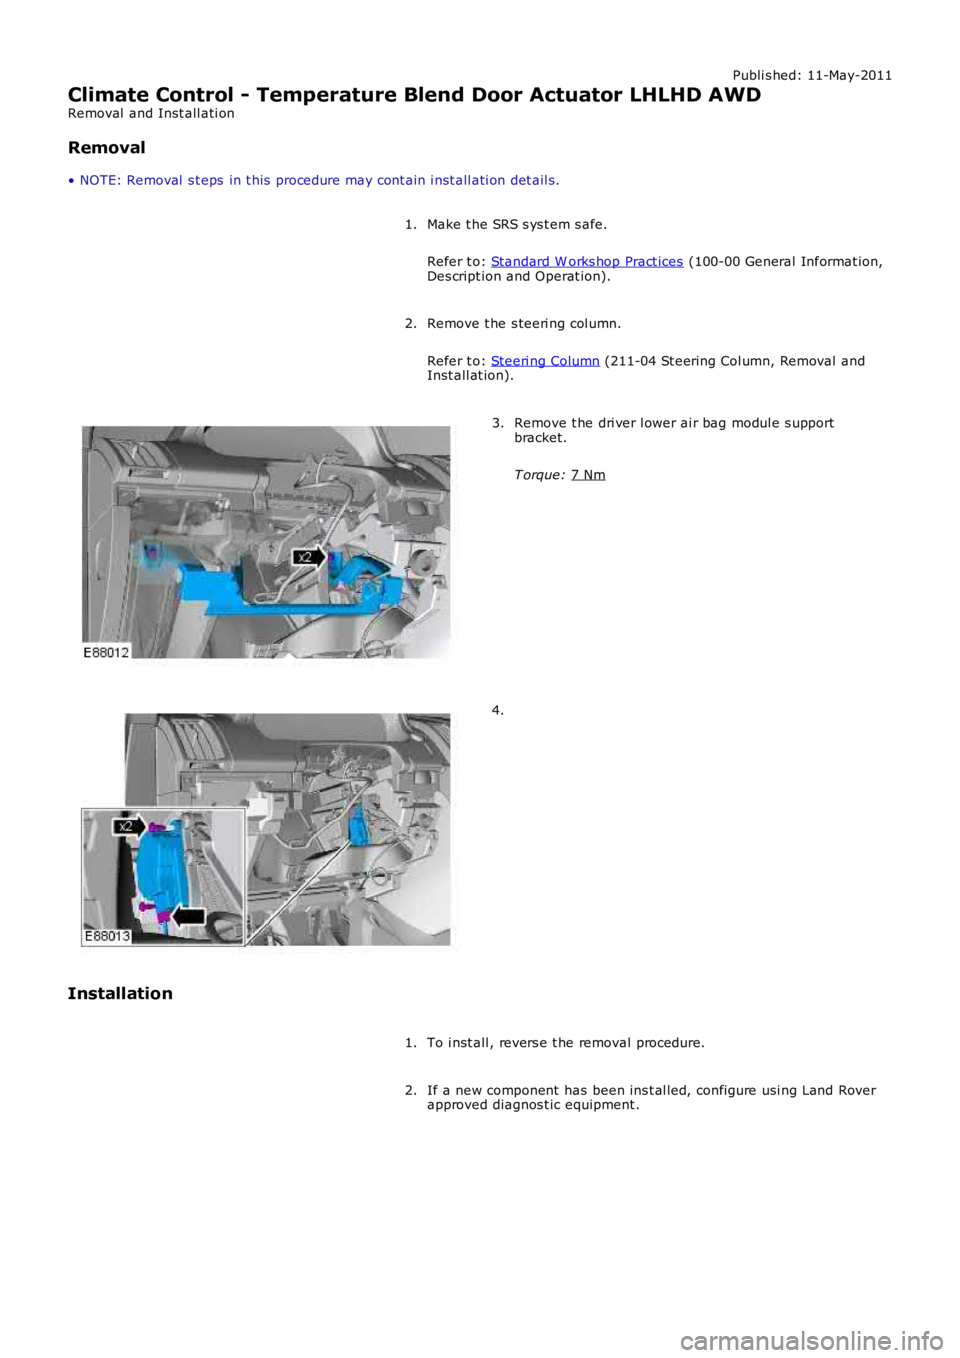
2. Remove t he dri ver l ower ai r bag modul e s upport
bracket.
T orque: 7 Nm 3.
4.
Installation To i nst all , revers e t he removal procedure.
1.
If a new component has been ins t al led, configure usi ng Land Rover
approved diagnos t ic equipment .
2.
Page 1730 of 3229
Publi s hed: 11-May-2011
Climate Control - Temperature Blend Door Actuator RHRHD AWD
Removal and Inst all ati on
Removal
• NOTE: Removal s t eps in t his procedure may cont ain i nst all ati on det ail s.
Make t he SRS s ys t em s afe.
Refer t o: Standard W orks hop Pract ices (100-00 General Informat ion,
Des cript ion and Operat ion).
1.
Remove t he s teeri ng col umn.
Refer t o: Steeri ng Column (211-04 St eering Col umn, Removal and
Inst all at ion).
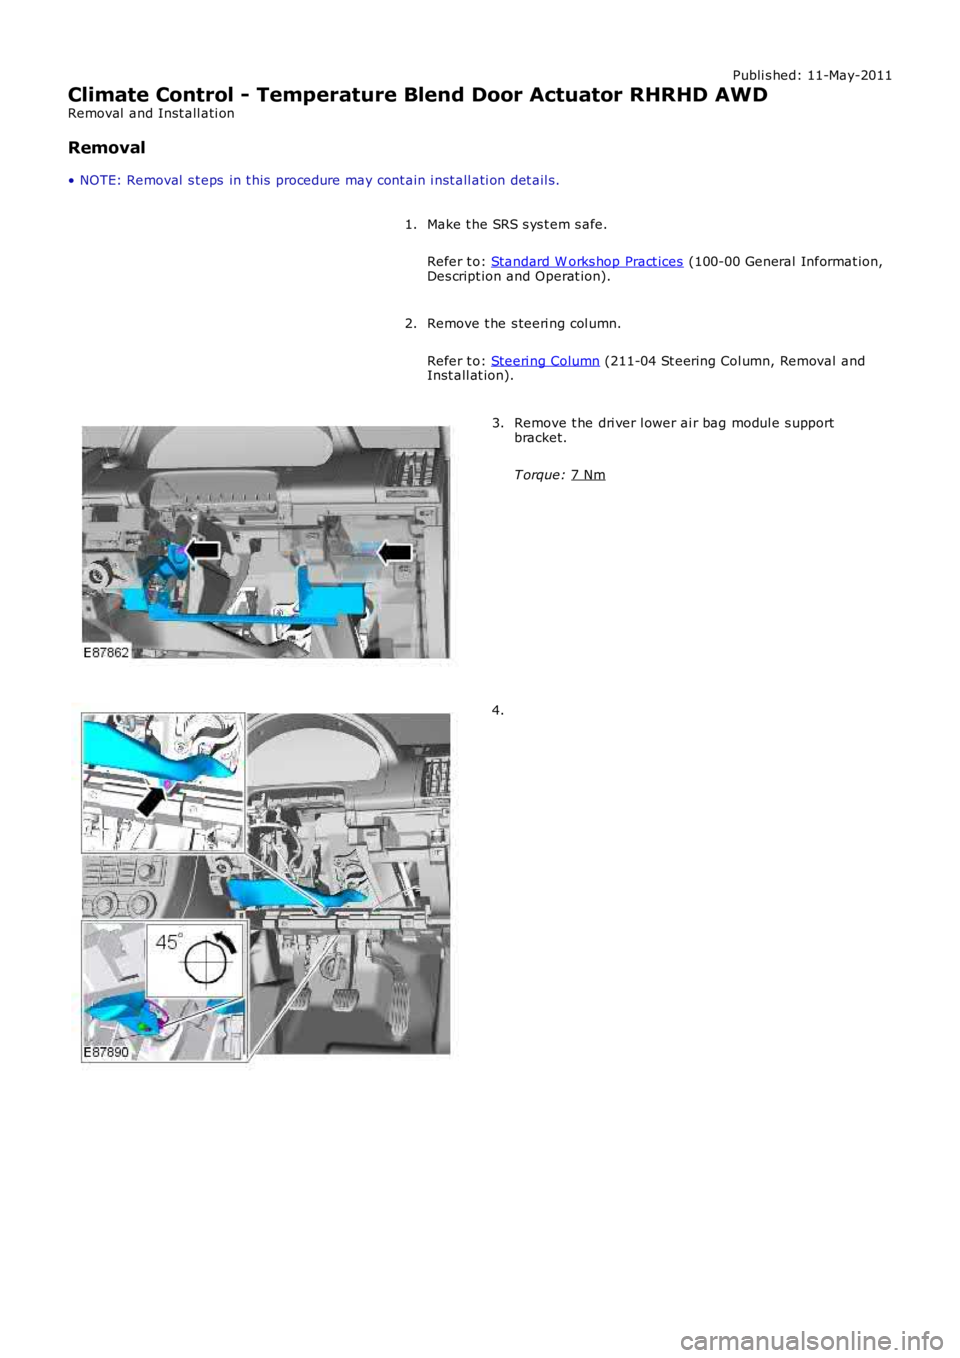
2. Remove t he dri ver l ower ai r bag modul e s upport
bracket.
T orque: 7 Nm 3.
4.
Trending: engine coolant, lumbar support, air conditioning, wiper blades, transmission fluid, phone, remove seats
