LAND ROVER FRELANDER 2 2006 Repair Manual
FRELANDER 2 2006
LAND ROVER
LAND ROVER
https://www.carmanualsonline.info/img/64/57251/w960_57251-0.png
LAND ROVER FRELANDER 2 2006 Repair Manual
Trending: boot, oil additives, fuel fill door release, warning lights, recommended oil, heating, spark plugs
Page 2001 of 3229
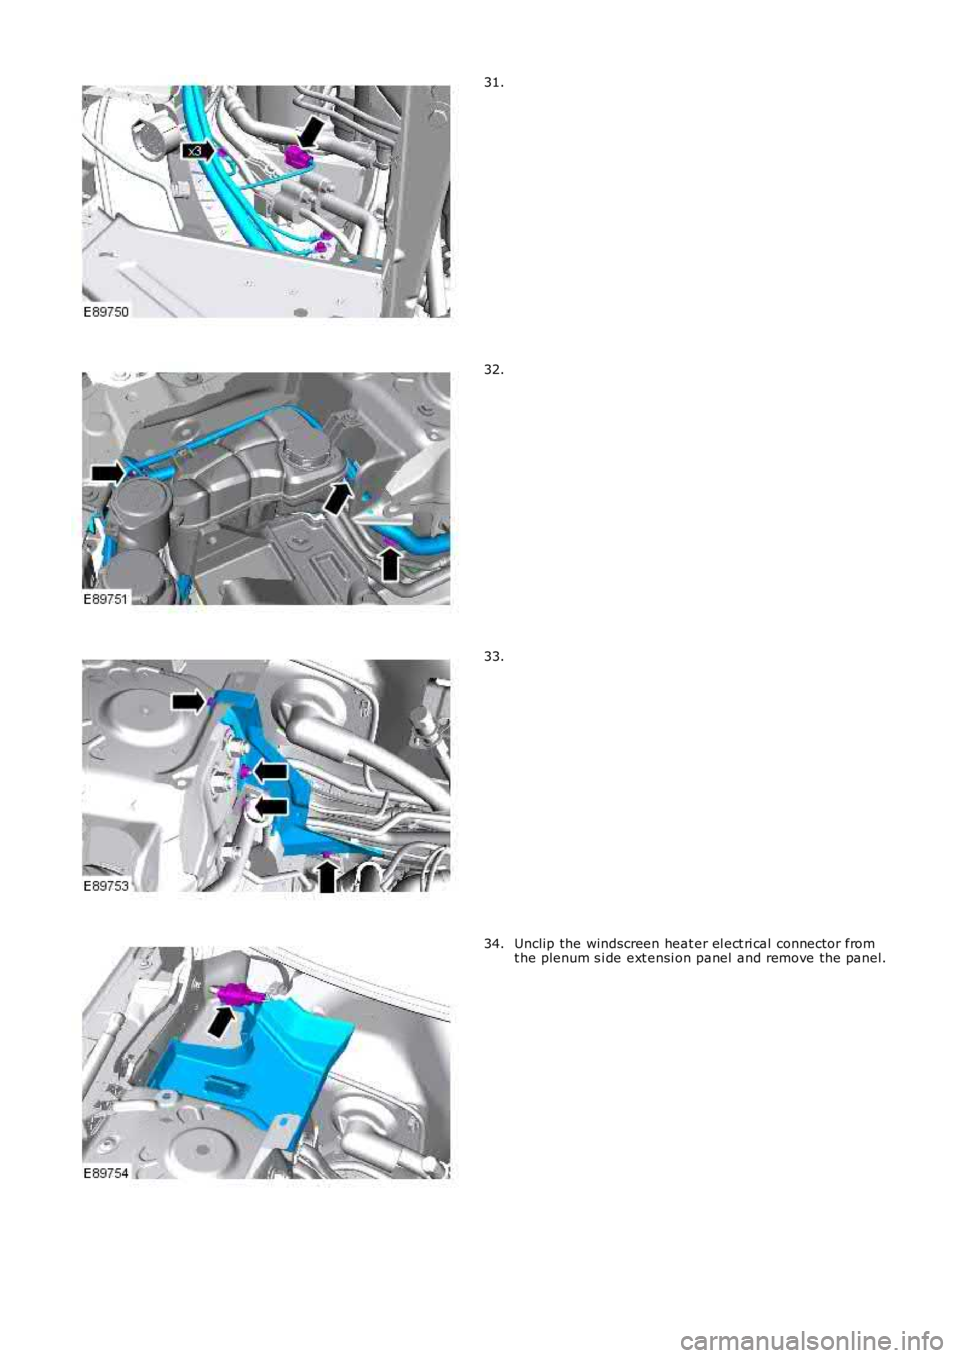
31.
32.
33.
Unclip the windscreen heat er el ect ri cal connector fromt he plenum s i de ext ensi on panel and remove the panel.34.
Page 2002 of 3229
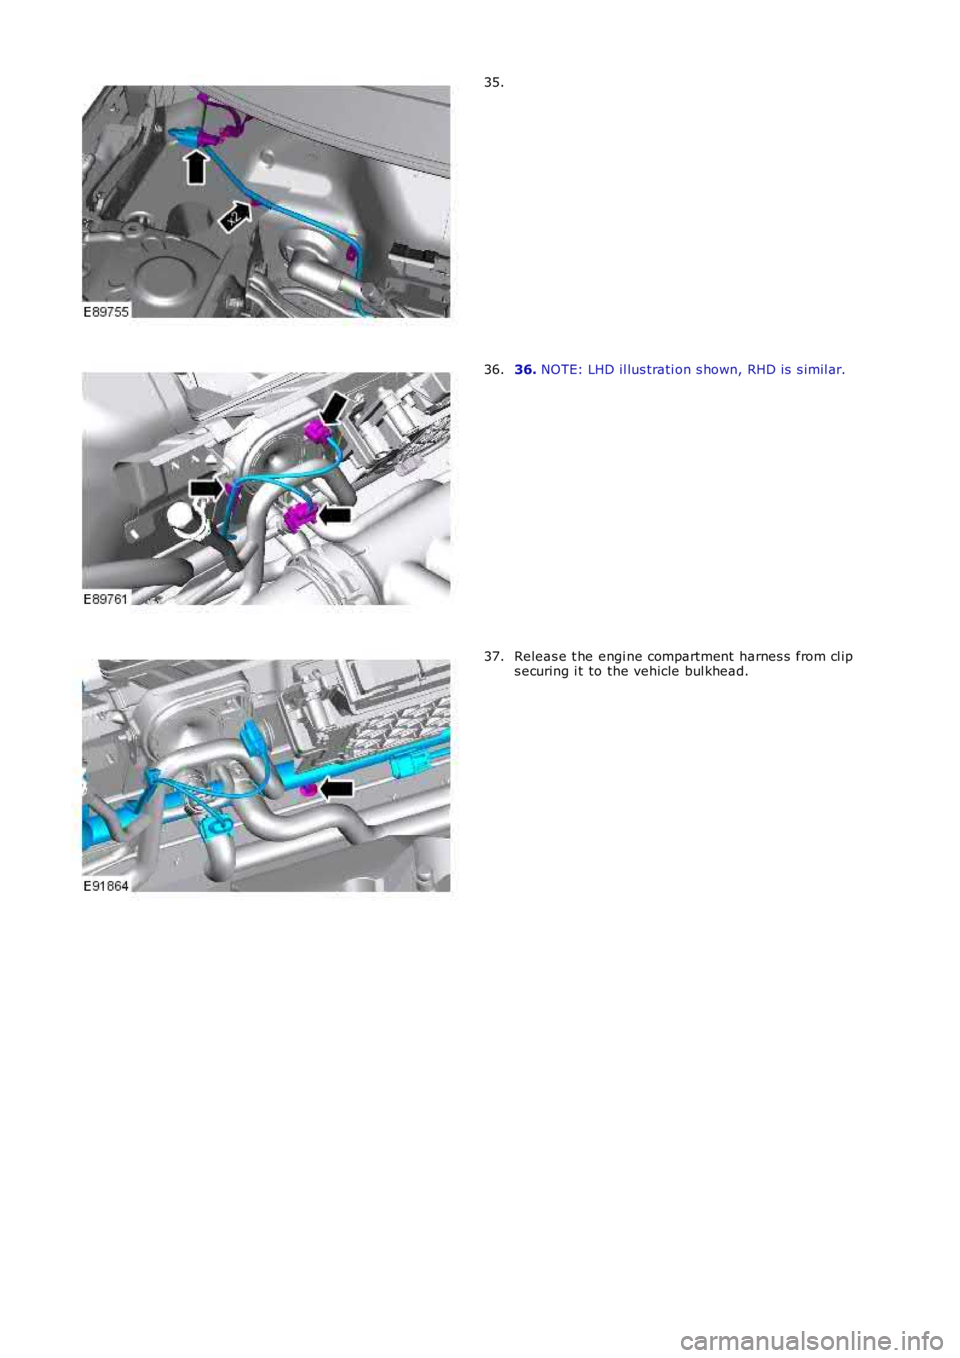
35.
36. NOTE: LHD il lus trati on s hown, RHD is s imil ar.36.
Releas e t he engi ne compartment harnes s from cl ips ecuring i t to the vehicle bul khead.37.
Page 2003 of 3229
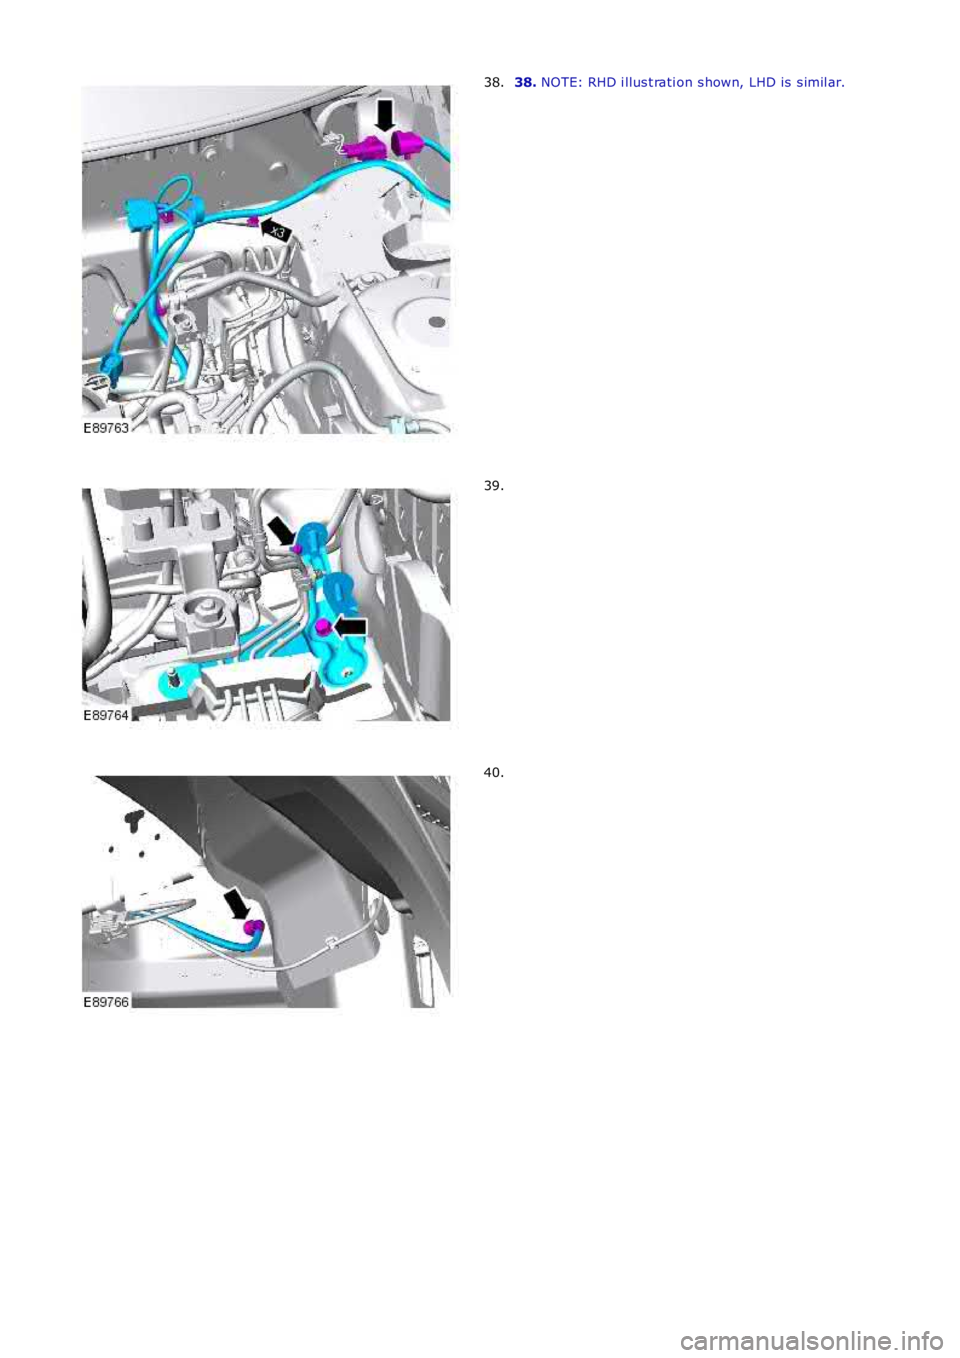
38. NOTE: RHD i llus t rati on s hown, LHD is s imil ar.38.
39.
40.
Page 2004 of 3229
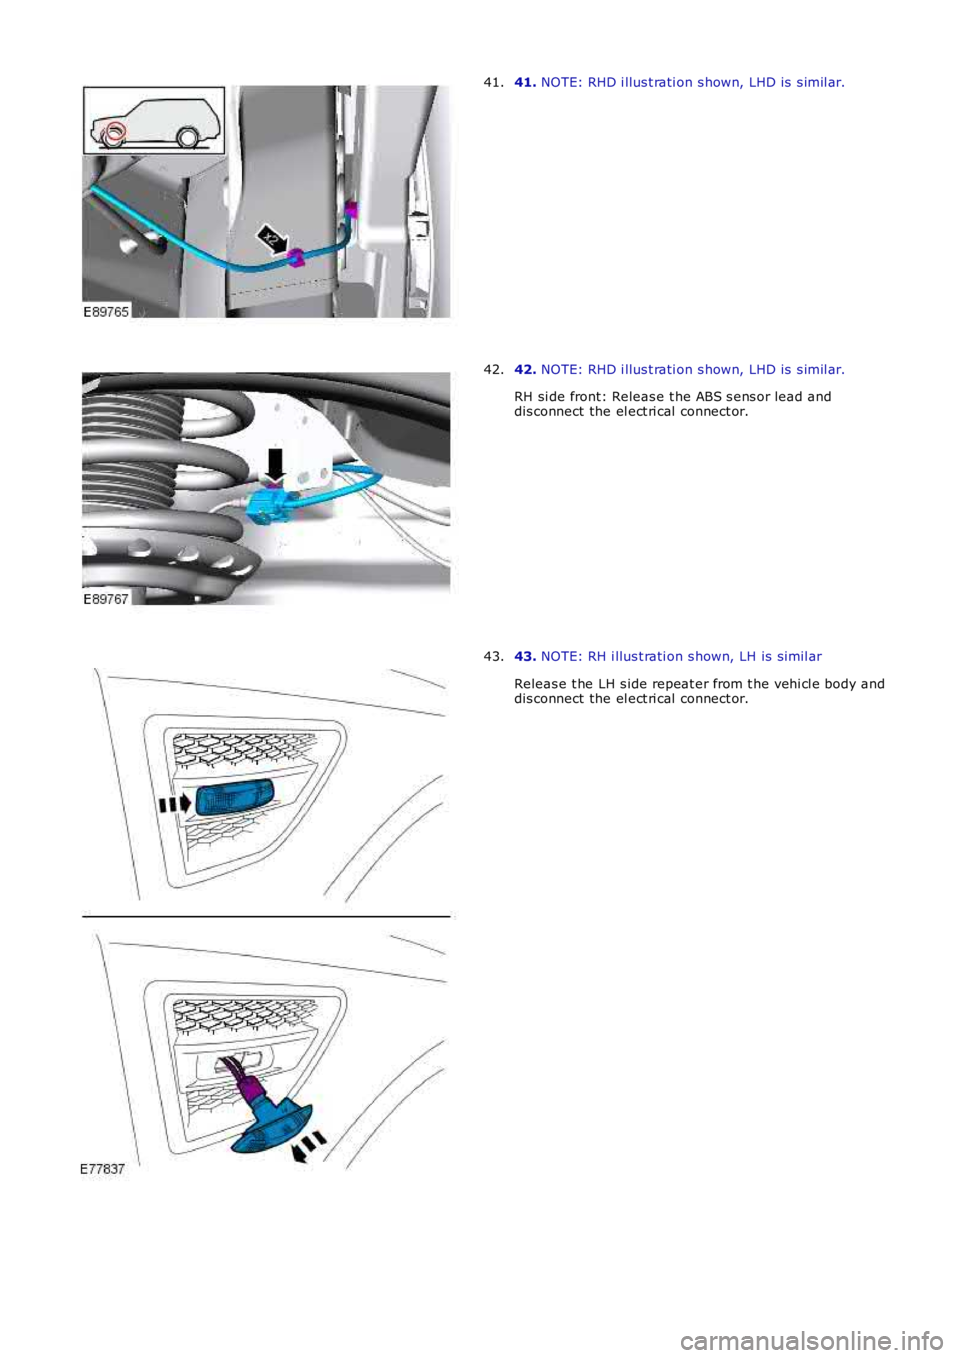
41. NOTE: RHD i llus t rati on s hown, LHD is s imil ar.41.
42. NOTE: RHD i llus t rati on s hown, LHD is s imil ar.
RH si de front: Releas e t he ABS s ens or lead anddis connect the el ect ri cal connect or.
42.
43. NOTE: RH i llus t rati on s hown, LH is s imil ar
Releas e t he LH s ide repeat er from t he vehi cl e body anddis connect the el ect ri cal connect or.
43.
Page 2005 of 3229
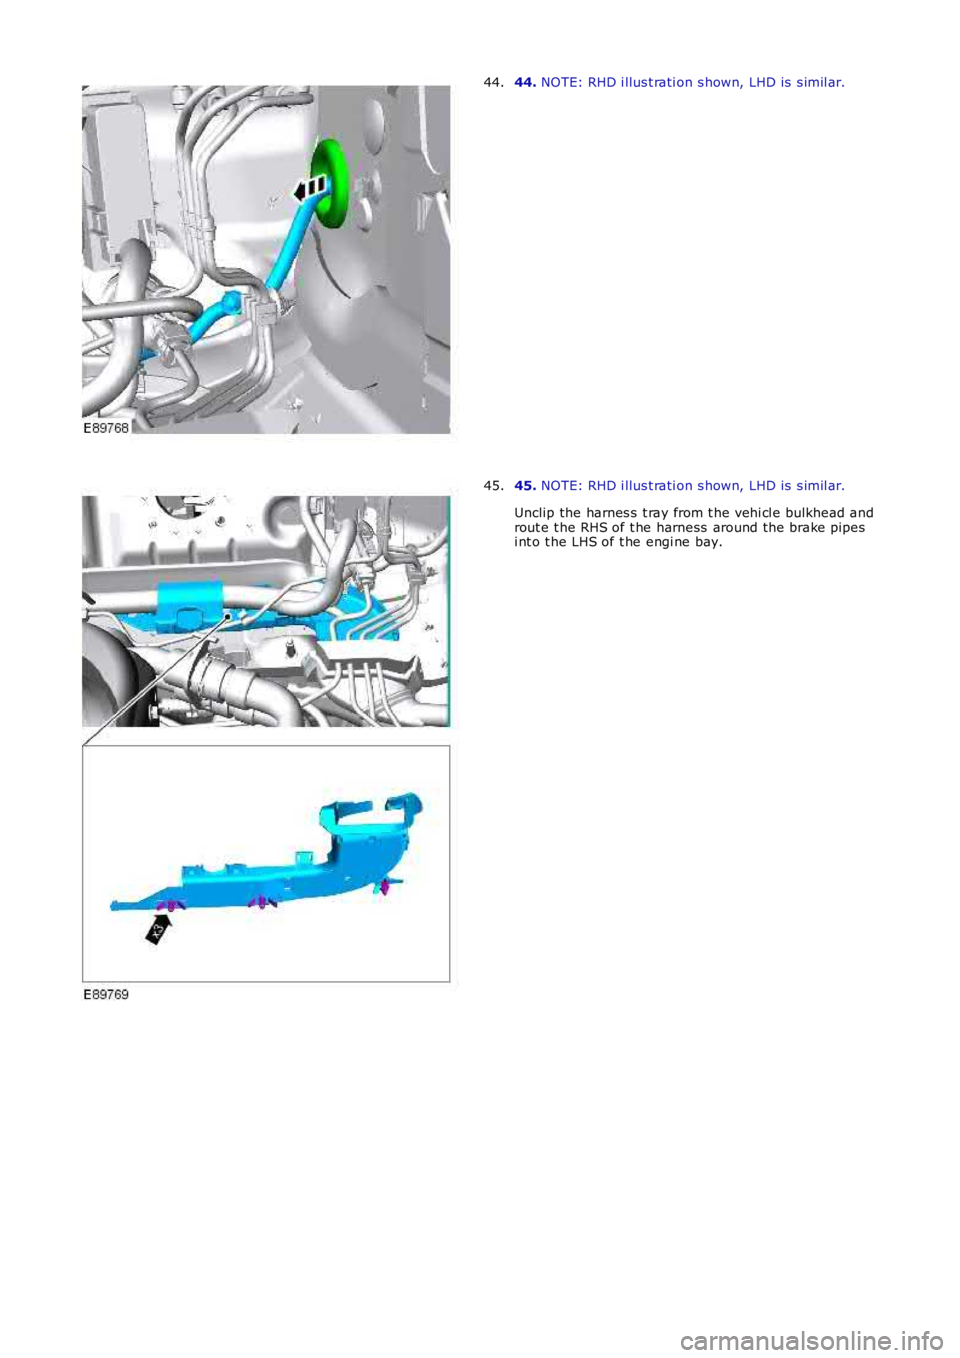
44. NOTE: RHD i llus t rati on s hown, LHD is s imil ar.44.
45. NOTE: RHD i llus t rati on s hown, LHD is s imil ar.
Unclip the harnes s t ray from t he vehi cl e bulkhead androut e t he RHS of t he harness around the brake pipesi nt o t he LHS of t he engi ne bay.
45.
Page 2006 of 3229
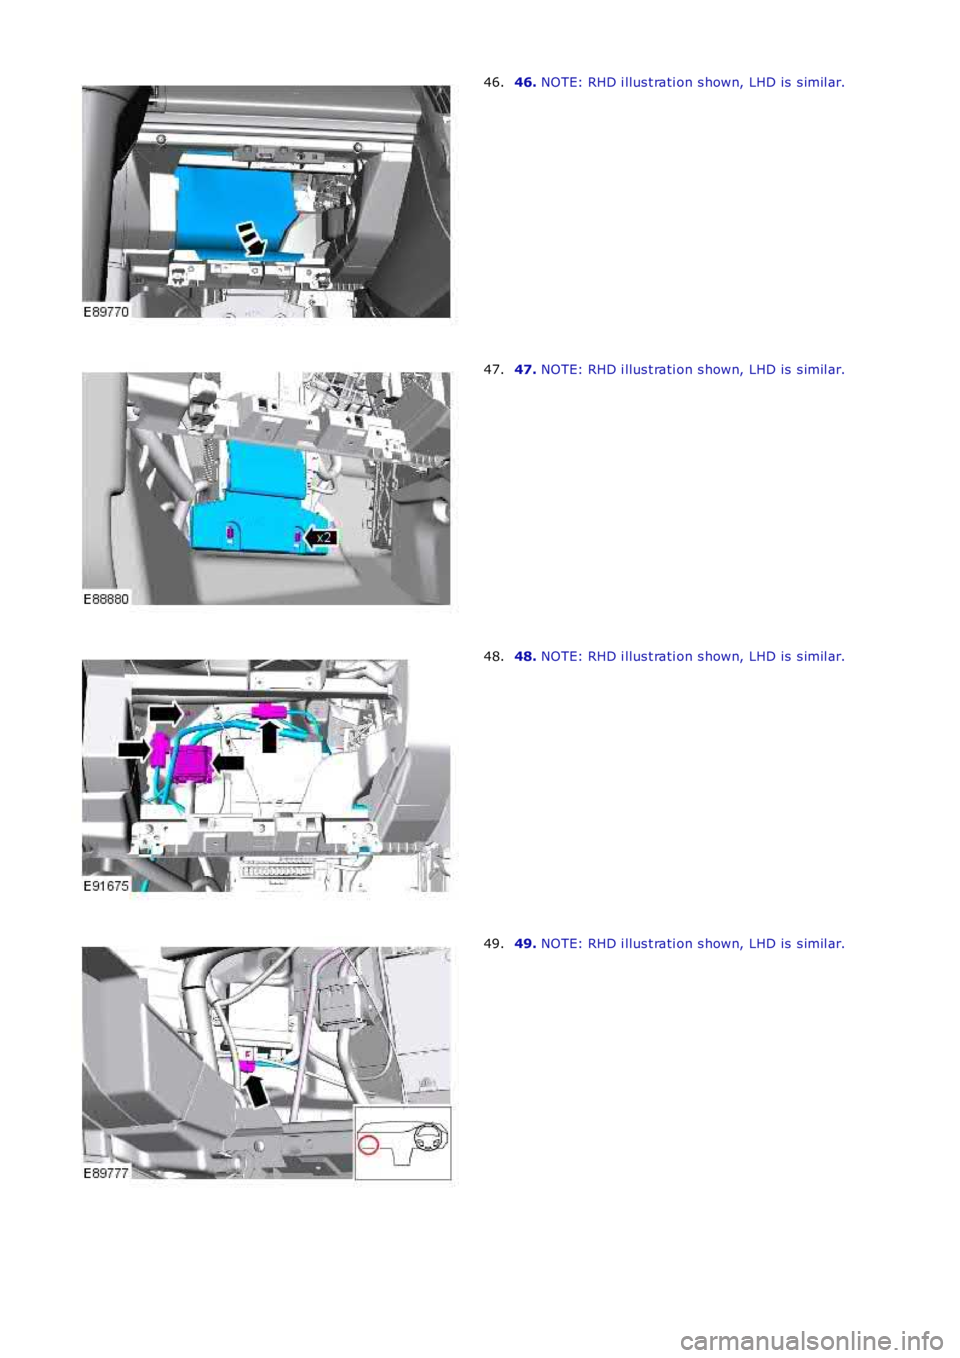
46. NOTE: RHD i llus t rati on s hown, LHD is s imil ar.46.
47. NOTE: RHD i llus t rati on s hown, LHD is s imil ar.47.
48. NOTE: RHD i llus t rati on s hown, LHD is s imil ar.48.
49. NOTE: RHD i llus t rati on s hown, LHD is s imil ar.49.
Page 2007 of 3229
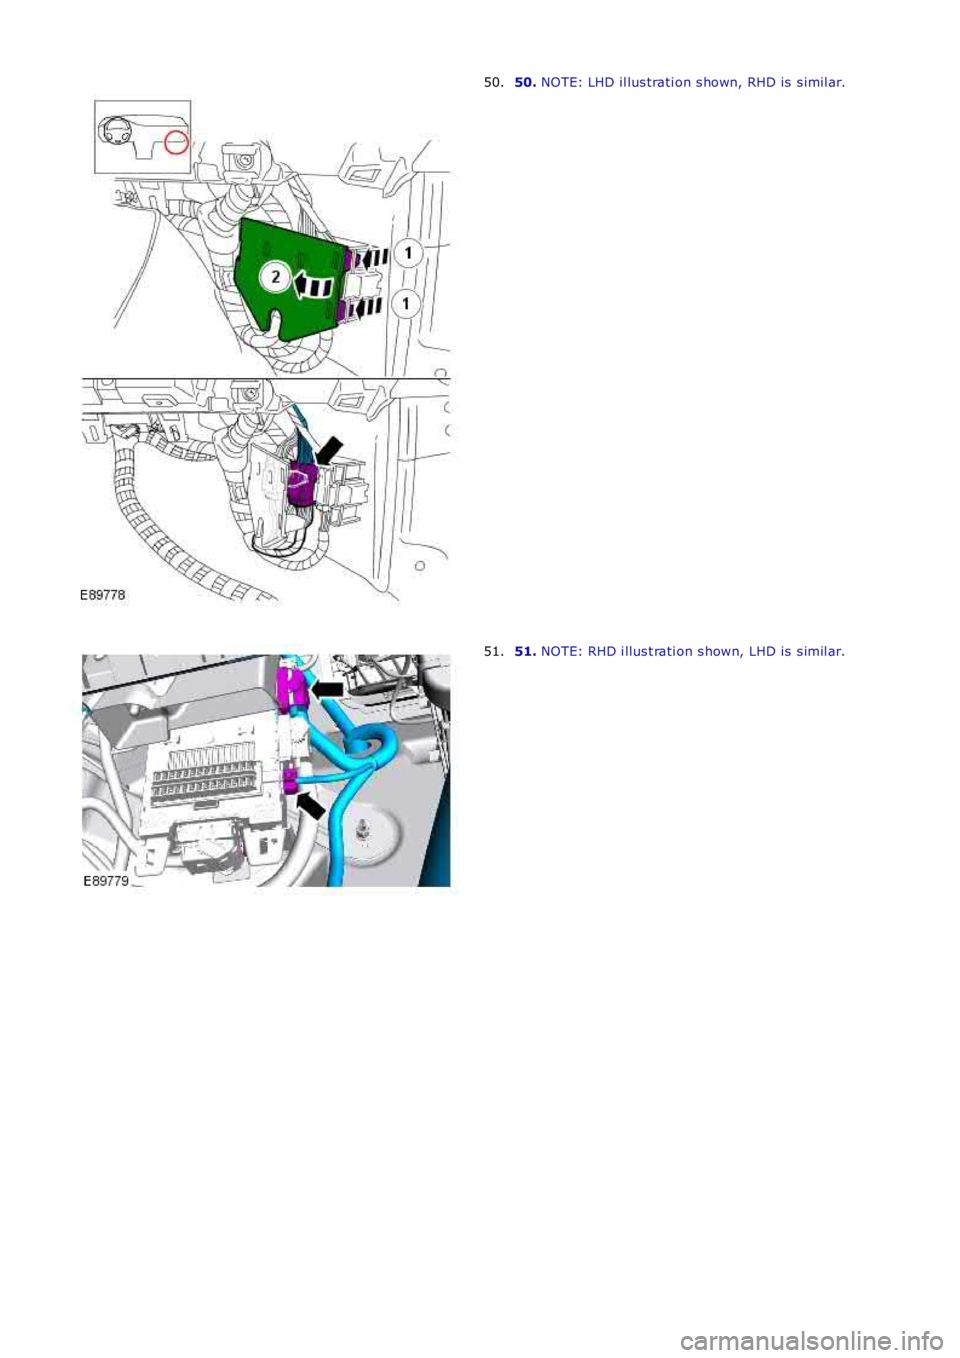
50. NOTE: LHD il lus trati on s hown, RHD is s imil ar.50.
51. NOTE: RHD i llus t rati on s hown, LHD is s imil ar.51.
Page 2008 of 3229
52.
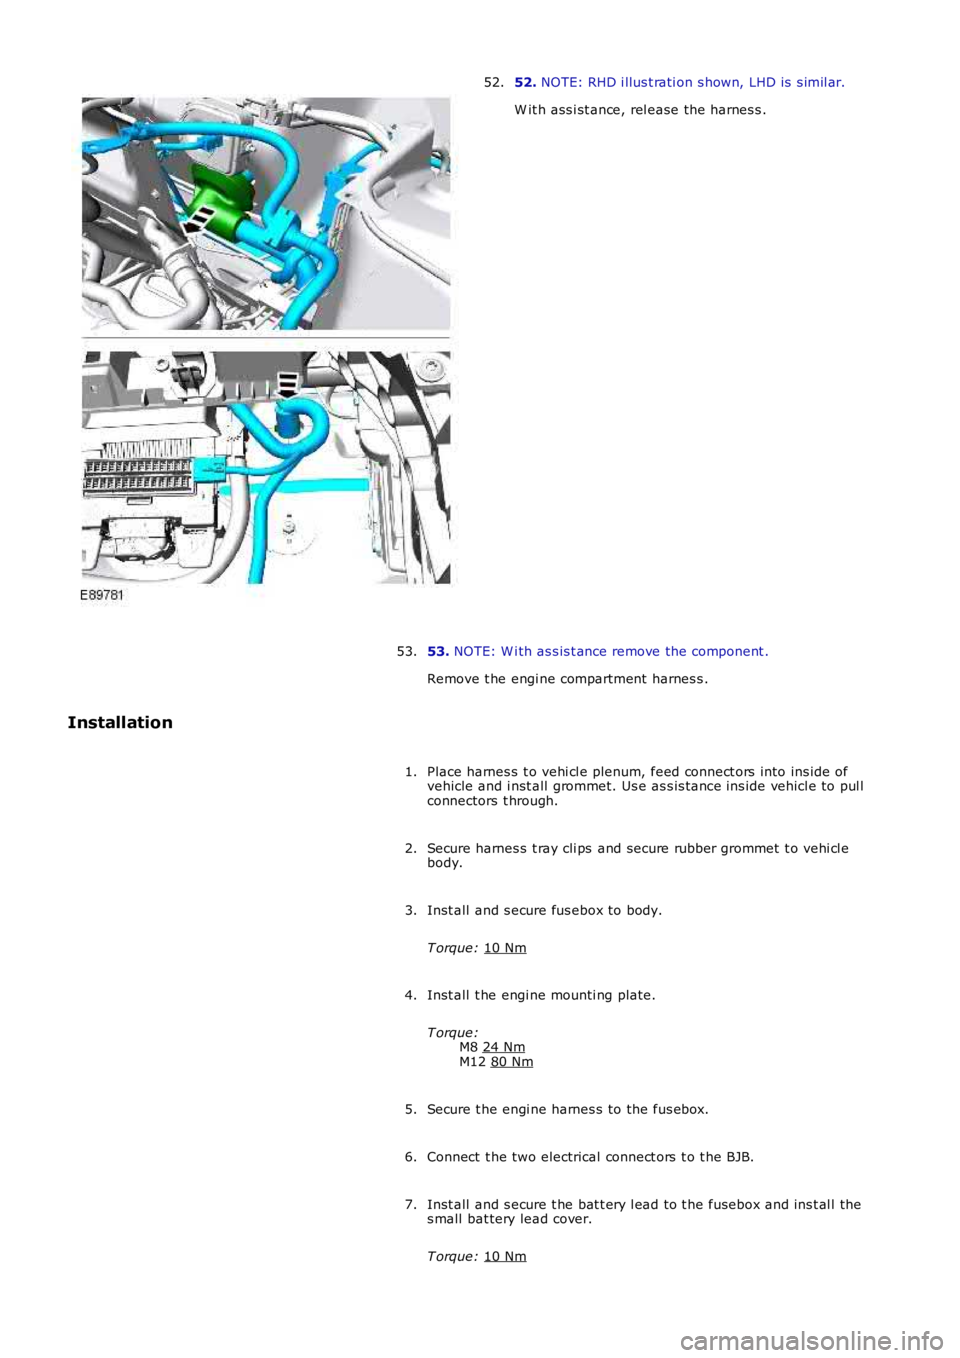
NOTE: RHD i llus t rati on s hown, LHD is s imil ar.
W it h ass i st ance, rel ease the harnes s .
52.
53. NOTE: W i th as s is t ance remove the component .
Remove t he engi ne compartment harnes s .
53.
Installation Place harnes s t o vehi cl e plenum, feed connect ors into ins ide of
vehicle and i nst all grommet. Us e as s is tance ins ide vehicl e to pul l
connectors t hrough.
1.
Secure harnes s t ray cli ps and secure rubber grommet t o vehi cl e
body.
2.
Inst all and s ecure fus ebox to body.
T orque: 10 Nm 3.
Inst all t he engi ne mounti ng plate.
T orque: M8 24 Nm M12
80 Nm 4.
Secure t he engi ne harnes s to the fus ebox.
5.
Connect t he two electrical connect ors t o t he BJB.
6.
Inst all and s ecure t he bat t ery l ead to t he fusebox and ins t al l the
s mall bat tery lead cover.
T orque: 10 Nm 7.
Page 2009 of 3229
Secure t he 3 eart h point s and s ecure t he harness cl ips t o t he vehi cl e
body.
T orque: 10 Nm 8.
Secure t he batt ery l ead to the bat tery terminal clamp.
T orque: 25 Nm 9.
Inst all t he fus e box cover.
10.
Inst all t he harness cover to the s us pens ion turret.
11.
Feed harness under t he air cleaner duct and s ecure the duct t o the
grommet.
12.
Secure headl amp and bumper harness cl ips .
13.
Connect t he height sens or elect rical connect or and s ecure t he
harnes s wit h t he cli ps .
14.
Inst all headl amp mount ing plat e.
T orque: 10 Nm 15.
Connect t he s ide repeat er el ect ri cal connector.
16.
Connect t he heat ed was her jet electrical connect ion and s ecure t he
harnes s t o the vehicl e body.
17.
Connect t he ABS s ens or and s ecure t he harness to t he vehicle body.
18.
Secure t he was her pipe to the harnes s and s ecure t he harness to the
body.
19.
Connect t he cras h s ens or electrical connect ors .
20.
Connect t he the bonnet lock electrical connect or
21.
Secure t he harness to the body and t hen secure the bonnet releas e
cabl e t o t he harness .
22.
Secure t he was her pipe to the was her bot tl e.
23.
Inst all t he washer bott le and connect t he elect rical connecti ons .
T orque: 10 Nm 24.
Secure t he 3 ground cables t o t he vehi cl e body.
T orque: 10 Nm 25.
Secure t he harness to the vehicle body.
26.
Connect t he cool ant l evel s ensor electrical connect or.
27.
Page 2010 of 3229
Inst all t he RH s econdary bul khead mount ing bracket.
T orque: 10 Nm 28.
Inst all t he inner plenum plat e and s ecure t he electrical connect or to
t he plat e.
29.
Connect t he heat ed s creen RH el ect ri cal connector.
30.
Connect t he BBUS electrical connect or.
31.
Connect t he A/C pres sure s wit ch electrical connect or.
32.
Secure t he engi ne compartment harnes s t o t he vehi cl e bulkhead.
33.
Secure t he harness tray to the LHS of t he vehicle bul khead.
34.
Connect t he LH heated s creen el ect ri cal connector and s ecure t he
harnes s t o the vehicl e body.
35.
Feed the harnes s i nto the LH wheel arch and s ecure t he grommet.
36.
Inst all t he ABS modulat or bracket.
T orque: 25 Nm 37.
Inst all t he LH s ide repeat er lamp and s ecure t he cli ps to the vehicle
body.
38.
Connect t he rear was her pi pe.
39.
Connect t he ABS s ens or electrical connect or and s ecure the harnes s
t o t he vehi cl e body.
40.
Connect t he two electrical connect ors t o t he CJB.
41.
Connect t he main engi ne compartment harnes s t o t he ins trument
panel harnes s and clos e t he cover.
42.
Connect t he main engi ne compartment harnes s t o t he headl amp
l evell ing ECU.
43.
Connect t he 3 floor harness el ect ri cal connect ions.
44.
Inst all t he fus e cover and refi t the s ound deadening sheet.
45.
Inst all t he LH fender s pl ash s hi eld.
T orque: 6 Nm 46.
Inst all t he glove compartment l id.
Refer t o: Glove Compart ment (501-12 Ins trument Panel and
Consol e, Removal and Ins t al lat ion).
47.
Inst all t he engi ne upper s upport ins ulat or.
48.
Trending: oil filter, ABS, refrigerant type, AUX, overheating, center console, trailer
