wheel LAND ROVER FRELANDER 2 2006 Repair Manual
[x] Cancel search | Manufacturer: LAND ROVER, Model Year: 2006, Model line: FRELANDER 2, Model: LAND ROVER FRELANDER 2 2006Pages: 3229, PDF Size: 78.5 MB
Page 2792 of 3229
Lighting
72
L
LightingLIGHTING CONTROL
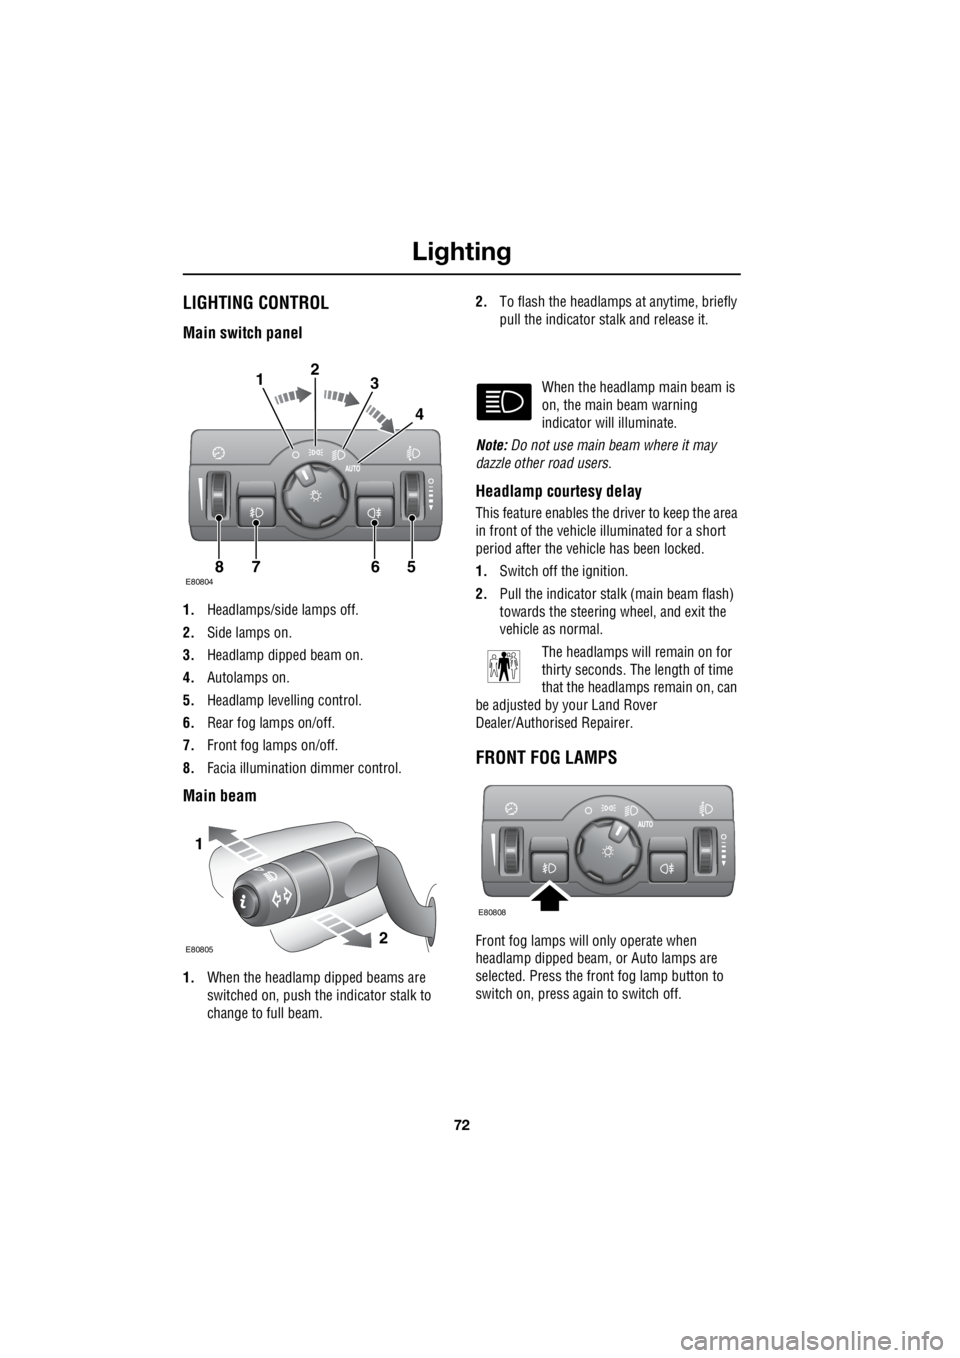
Main switch panel
1. Headlamps/side lamps off.
2. Side lamps on.
3. Headlamp dipped beam on.
4. Autolamps on.
5. Headlamp levelling control.
6. Rear fog lamps on/off.
7. Front fog lamps on/off.
8. Facia illumination dimmer control.
Main beam
1.When the headlamp dipped beams are
switched on, push the indicator stalk to
change to full beam. 2.
To flash the headlamps at anytime, briefly
pull the indicator stalk and release it.
When the headlamp main beam is
on, the main beam warning
indicator will illuminate.
Note: Do not use main beam where it may
dazzle other road users.
Headlamp courtesy delay
This feature enables the driver to keep the area
in front of the vehicle illuminated for a short
period after the vehicle has been locked.
1. Switch off the ignition.
2. Pull the indicator stalk (main beam flash)
towards the steering wheel, and exit the
vehicle as normal.
The headlamps will remain on for
thirty seconds. The length of time
that the headlamps remain on, can
be adjusted by your Land Rover
Dealer/Authorised Repairer.
FRONT FOG LAMPS
Front fog lamps will only operate when
headlamp dipped beam, or Auto lamps are
selected. Press the front fog lamp button to
switch on, press again to switch off.
E808047865
123
4
1
2E80805
E80808
Page 2843 of 3229

123
Brakes
R
BrakesPRINCIPLE OF OPERATION
Brake pads
Brake pads require a period of bedding in when
new. Drive with extra caution for the first 800
km (500 miles) to avoi d then need for heavy
braking.
Wet conditions
Driving through heavy rain or water can have
an adverse effect on braking efficiency. Under
those circumstances it is recommended that
you lightly apply the brak es intermittently to
dry the brakes.
HINTS ON DRIVING WITH ABS
ABS (Anti-Lock Braki ng System) allows
maximum brake pressure, and thus maximum
braking efficiency, to be applied, and prevents
the road wheels locking. This allows the driver
to retain steering control during heavy braking
under most road conditions.
During emergency brak ing conditions ABS
constantly monitors the speed of each wheel.
ABS varies the brake pressure to individual
wheels, according to the grip available. The
constant alteration of brake pressure can be
felt as a pulsing sensat ion through the brake
pedal. This is not a cause for concern, as it is
designed to demonstrate to the driver that ABS
is operating.
ABS warning indicator
If this amber warning indicator
illuminates, driv e with extra
caution, avoid heavy braking where
possible, and seek qualified assistance as soon
as possible.
WARNINGS
Do not rest your foot on the brake
pedal whilst the vehicle is in motion.
This may cause a light application of
the brakes, which can re sult in overheating,
reduced brake performance, and excessive
brake wear.
Never allow the vehicle to coast
(freewheel) with the engine turned off.
The engine must be running to provide
full braking assistance. The brakes will still
function with the engine off, but far more
pressure will be required to operate them.
If the red brake warning indicator
illuminates, safely bring the vehicle to
a stop, as quickly as possible. Seek
qualified assistance before proceeding.
Never place non-approved floor
matting or any ot her obstructions
under the brake pedal. This restricts
pedal travel and braking efficiency.WARNINGS
ABS cannot overcome the physical
limitations of brak ing distance. Nor
can it overcome the lack of grip on a
road surface, aquaplaning on water for
example.
Braking distance is increased on a
slippery surface. This applies to all
vehicles, even those fitted with ABS.
The driver should not be tempted to
take risks when driving, in the hope
that ABS will correct errors of
judgement. In all cases it remains the driver's
responsibility to driv e with due care and
attention, paying partic ular attention to the
effects of speed, weather, road conditions etc.
Page 2844 of 3229

Brakes
124
L
ABS and off-road driving
ABS will operate when driving off-road,
however it may be unw ise to rely on it's
assistance under some conditions.
Stopping distances will be increased when
travelling over rough, or bumpy terrain.
Soft surfaces
On soft or deep surfaces such as powdery
snow, sand, or gravel, the braking distance
required will be increased. This is because the
natural action of a lock ed wheel (which cannot
happen when ABS is operating) is to form a
wedge of surface material in front of the wheel,
which reduces the stopping distance.
Steep slopes
If the vehicle is stationary on a steep, slippery
slope, it may begin to slide even with the
brakes applied. This is because without wheel
rotation the ABS cannot determine vehicle
movement.
To counteract this, briefl y release the brakes to
allow some wheel rota tion. Then re-apply the
brakes to allow ABS to gain control.
Emergency Brake Assist (EBA)
If the driver rapidly applies the brakes, EBA
automatically boosts the braking force to it's
maximum in order to bring the vehicle to a halt
as quickly as possible. If the driver applies the
brakes slowly, but condi tions mean that ABS
operates on the front wheels, EBA will increase
the braking force in order to apply ABS control
to the rear wheels.
EBA stops operating as soon as the brake pedal
is released.
A fault with the EBA system is
indicated by the red brake warning
indicator illuminating.
Electronic Brake Distribution (EBD)
EBD controls the balanc e of braking forces
supplied to the front and rear wheels, in order
to maintain maximum braking efficiency.
If the vehicle has a light load (only the driver in
the vehicle for example) the EBD will reduce the
braking force applied to the rear wheels. If the
vehicle is heavily laden then EBD will increase
the braking force to the rear wheels.
A fault with the EBD system is
indicated by the red brake warning
indicator illuminating.
PARKING BRAKE
Parking on a slope
Facing uphill
If the vehicle is parked facing uphill, select first
gear (manual gearbox), or Park (automatic
gearbox), and turn the steering wheel so that
the front wheels face away from the kerb.
Facing downhill
If the vehicle is parked facing downhill, select
reverse gear (manual gearbox), or Park
(automatic gearbox), and turn the steering
wheel so that the front wheels face towards the
kerb.
Page 2849 of 3229

129
Driving hints
R
ECONOMICAL DRIVING
There are two main factors which influence fuel
economy, the way the vehicle is driven, and
maintenance.
Driving tips for economy
• Avoid unnecessary jour neys, especially
short stop-start trips.
• Accelerate smoothly and gently from a
stand still.
• Use the gears to avoid labouring, or
over-revving the engine.
• Allow time to brake gently and smoothly.
• Be aware of traffic and road conditions
ahead, and take action in time to avoid
hard braking or acceleration.
• When stationary apply the park brake, and
select neutral.
• Turn off the air conditioning when not
needed.
Maintenance and fuel economy
Regular servicing by a Land Rover
Dealer/Approved repairer, along with regular
checks by the driver are essential for vehicle
longevity and fuel economy.
The condition of the engine (oils, filters, spark
plugs, settings etc) tyre pressures, and wheel
alignment, will all have a bearing on fuel
economy. For this reason it is essential that the
vehicle is checked regularly by the driver, and
serviced by an approved Land Rover
Dealer/Authorised Repairer at the correct
intervals.
Note: If you are in any doubt about the
maintenance requirement s, intervals, or
checks required, contact your Land Rover
Dealer/Authorised repairer for advice.
Page 2854 of 3229

Terrain response
134
L
This program should be selected once the need
for a special program has passed. Once the
special program has been deselected, all of the
vehicle systems will retu rn to their normal
settings except HDC. HD C will remain active if
it was selected manually.
Grass-Gravel-Snow This program should be used
where a firm surface is covered
with loose, or s lippery material.
Surfaces covered in water, ice, slime, grass,
gravel, shale, pebbles, or a thin coating of sand
for example.
Note: For deep gravel it is recommended that
the Sand program is selected.
In slippery condi tions, it may be beneficial to
pull away in a higher gear than usual.
For information on the fitment and use of snow
chains. See USING SNOW CHAINS
(page 192).
For information on the fitment and use of
winter tyres. See USING WINTER TYRES
(page 183).
Note: If the vehicle is unable to gain traction in
deep snow, switching DSC off may help. DSC
should be switched on again as soon as the
difficulty is overcome. See USING TRACTION
CONTROL (page 139).
Mud-Ruts This program should be used for
crossing terrain that is muddy,
rutted, soft, or uneven.
Sand This program should be used for
terrain which is pr edominantly soft
dry sand, or deep gravel. Note:
If the vehicle is unable to gain traction in
extremely soft, dry sand, switching DSC off
may help. DSC should be switched on again as
soon as the difficulty is overcome. See USING
TRACTION CONTROL (page 139).
If the sand to be crossed is damp/wet, and
sufficiently deep to cause the wheels to sink
into the surface, the Mud-Ruts program should
be used.
System difficulties
Note: Selection of an in appropriate special
program will not endanger th e driver, nor will it
immediately damage the vehicle. However, if
continued, use of an incorrect program will
impair the vehicle's re sponse to the terrain,
and can reduce the durability of the drive
systems.
If the system becomes pa rtially inoperable for
any reason, it may not be possible to select
special programs. A wa rning will be given
when selection of a special program is
attempted. If the Te rrain response system
becomes totally inoperabl e, all of the program
indicators will be switched off, and the
message centre will display the relevant
message.
If a participating vehicle system becomes
temporarily inoperable, the General program
will be automatically selected. Once the system
returns to normal operation, the previously
active program will be re-activated unless the
ignition has been turned off in the mean time.
Terrain response messages
Messages relating to the terrain response
system are displayed on the message centre.
See INFORMATION MESSAGES (page 99).
Most of the messages th at appear will be for
information only, and require no driver
intervention, SAND PROGRAM SELECTED for
example.
Page 2857 of 3229
137
Hill descent control (HDC)
R
USING HDC
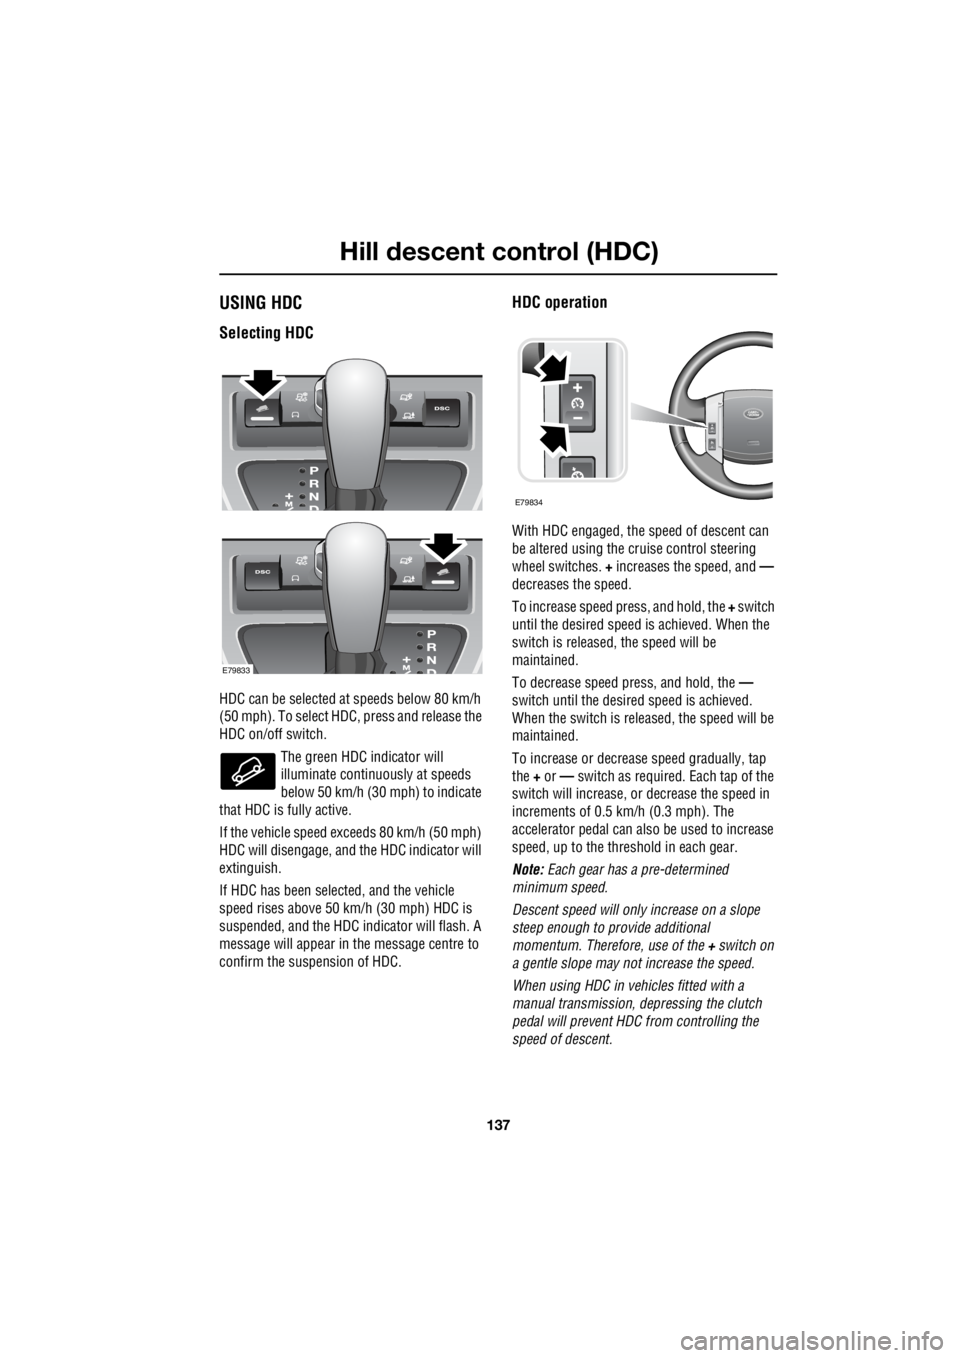
Selecting HDC
HDC can be selected at speeds below 80 km/h
(50 mph). To select HDC, press and release the
HDC on/off switch.
The green HDC indicator will
illuminate continuous ly at speeds
below 50 km/h (30 mph) to indicate
that HDC is fully active.
If the vehicle speed ex ceeds 80 km/h (50 mph)
HDC will disengage, and the HDC indicator will
extinguish.
If HDC has been selected, and the vehicle
speed rises above 50 km/h (30 mph) HDC is
suspended, and the HDC indicator will flash. A
message will appear in the message centre to
confirm the suspension of HDC.
HDC operation
With HDC engaged, the speed of descent can
be altered using the cruise control steering
wheel switches. + increases the speed, and —
decreases the speed.
To increase speed pr ess, and hold, the + switch
until the desired speed is achieved. When the
switch is released, the speed will be
maintained.
To decrease speed press, and hold, the —
switch until the desired speed is achieved.
When the switch is rele ased, the speed will be
maintained.
To increase or decrease speed gradually, tap
the + or — switch as required. Each tap of the
switch will increase, or decrease the speed in
increments of 0.5 km/h (0.3 mph). The
accelerator pedal can also be used to increase
speed, up to the threshold in each gear.
Note: Each gear has a pre-determined
minimum speed.
Descent speed will only increase on a slope
steep enough to pr ovide additional
momentum. Therefore, use of the + switch on
a gentle slope may not increase the speed.
When using HDC in vehicles fitted with a
manual transmission, depressing the clutch
pedal will prevent HDC from controlling the
speed of descent.
E79833
E79834
Page 2859 of 3229

139
Traction control
R
Traction controlUSING TRACTION CONTROL
Electronic Traction Control (ETC)
ETC operates in conjunction with Dynamic
Stability Control (DSC) and is designed to
assist when one, or more, wheels have lost
traction.
If a wheel looses tracti on, ETC will operate the
brake on that wheel until it regains traction.
Warning indicator If a fault is detected within the ETC
system the warning indicator will
illuminate.
Before driving off-road
Before venturing off-ro ad it is absolutely
essential that inexperienced drivers become
fully familiar with the vehicle's controls. In
particular, CommandShift , Hill Descent Control
(HDC), and the Terrain Response system.
Basic information a nd off-road driving
techniques can be found in the off-road driving
handbook available on-line at
http://www.ownerinfo.landrover.com
Off-road driver traini ng should be undertaken
by anyone intending to drive off-road. Training
is available at your nearest Land Rover
Experience centre. More details can be found at
http://www.landroverexperience.com
Page 2860 of 3229
Stability control
140
L
Stability controlPRINCIPLE OF OPERATION
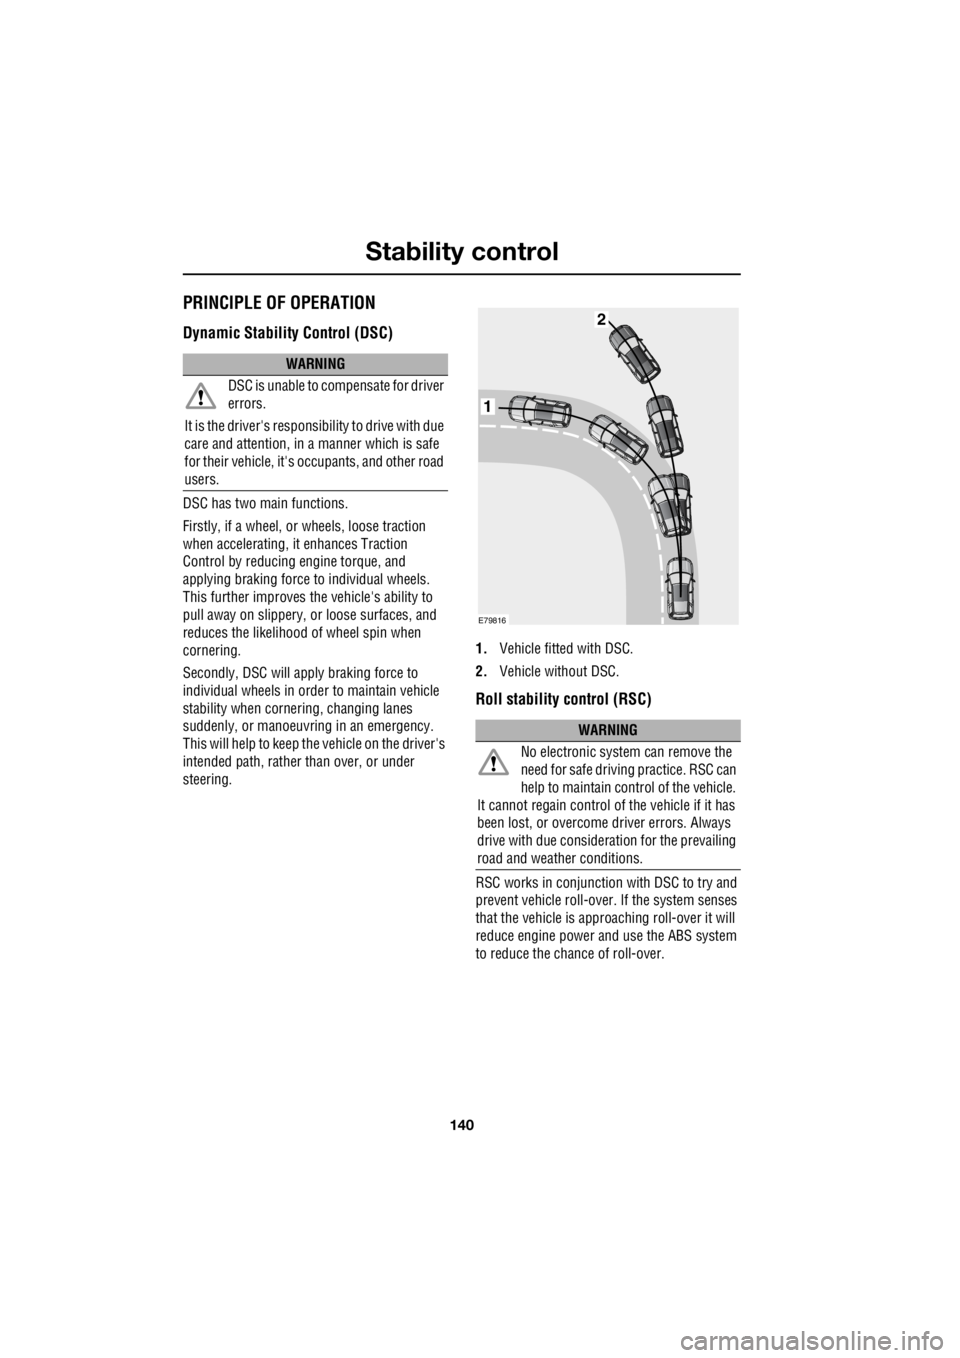
Dynamic Stability Control (DSC)
DSC has two main functions.
Firstly, if a wheel, or wheels, loose traction
when accelerating, it enhances Traction
Control by reducing engine torque, and
applying braking force to individual wheels.
This further improves the vehicle's ability to
pull away on slippery, or loose surfaces, and
reduces the likelihood of wheel spin when
cornering.
Secondly, DSC will apply braking force to
individual wheels in orde r to maintain vehicle
stability when cornering, changing lanes
suddenly, or manoeuvring in an emergency.
This will help to keep the vehicle on the driver's
intended path, rather than over, or under
steering. 1.
Vehicle fitted with DSC.
2. Vehicle without DSC.
Roll stability control (RSC)
RSC works in conjunction with DSC to try and
prevent vehicle roll-over. If the system senses
that the vehicle is approaching roll-over it will
reduce engine power and use the ABS system
to reduce the chance of roll-over.
WARNING
DSC is unable to compensate for driver
errors.
It is the driver's responsibility to drive with due
care and attention, in a manner which is safe
for their vehicle, it's oc cupants, and other road
users.
WARNING
No electronic system can remove the
need for safe drivin g practice. RSC can
help to maintain control of the vehicle.
It cannot regain control of the vehicle if it has
been lost, or overcome driver errors. Always
drive with due consideration for the prevailing
road and weather conditions.
1
2
E79816
Page 2861 of 3229
141
Stability control
R
USING STABILITY CONTROL
DSC
DSC is activated automatically each time the
engine is started, and is automatically selected
by some of the Terrain Response Special
programs.
Note: In the majority of dr iving situations, and
particularly on-road, it is recommended that
you do not turn DSC off.
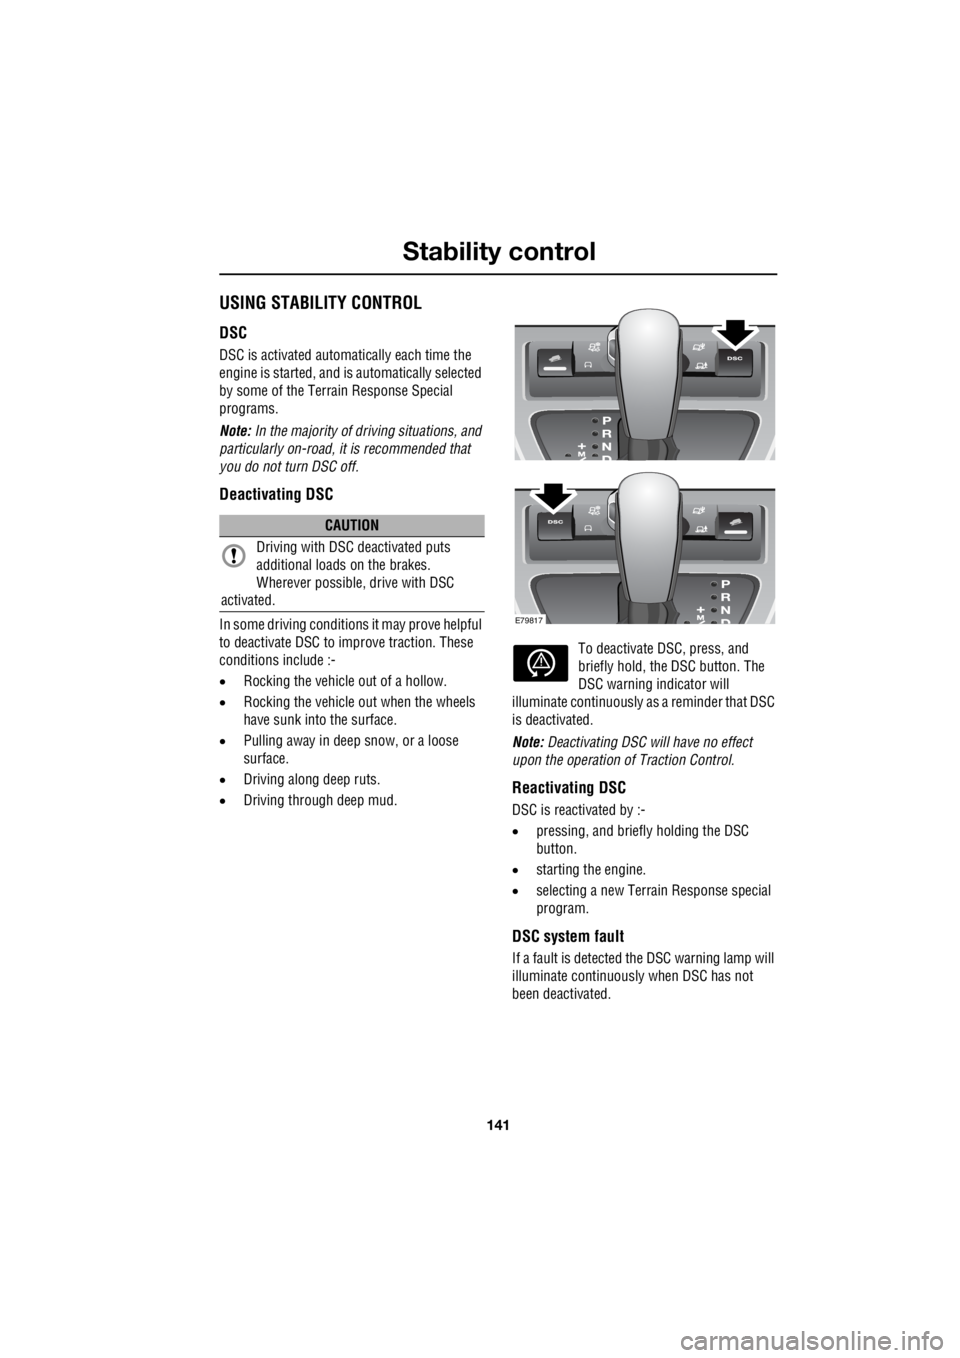
Deactivating DSC
In some driving conditions it may prove helpful
to deactivate DSC to improve traction. These
conditions include :-
• Rocking the vehicle out of a hollow.
• Rocking the vehicle out when the wheels
have sunk into the surface.
• Pulling away in deep snow, or a loose
surface.
• Driving along deep ruts.
• Driving through deep mud. To deactivate DS
C, press, and
briefly hold, the DSC button. The
DSC warning indicator will
illuminate continuously as a reminder that DSC
is deactivated.
Note: Deactivating DSC will have no effect
upon the operation of Traction Control.
Reactivating DSC
DSC is reactivated by :-
• pressing, and briefly holding the DSC
button.
• starting the engine.
• selecting a new Terra in Response special
program.
DSC system fault
If a fault is detected the DSC warning lamp will
illuminate continuously when DSC has not
been deactivated.
CAUTION
Driving with DSC deactivated puts
additional loads on the brakes.
Wherever possible, drive with DSC
activated.
E79817
Page 2874 of 3229
Vehicle care
154
L
Vehicle careCLEANING THE ALLOY WHEELS
Wash the wheels with soap and water, this
should be done more frequently when the
wheels are exposed to he avy dirt deposits, salt,
clay etc. If you are unsure how often to clean
the wheels in particular conditions, seek advice
from your Land Rover Dealer/Authorised
Repairer.
Land Rover approved wheel cleaner should be
used to remove heavy soiling.
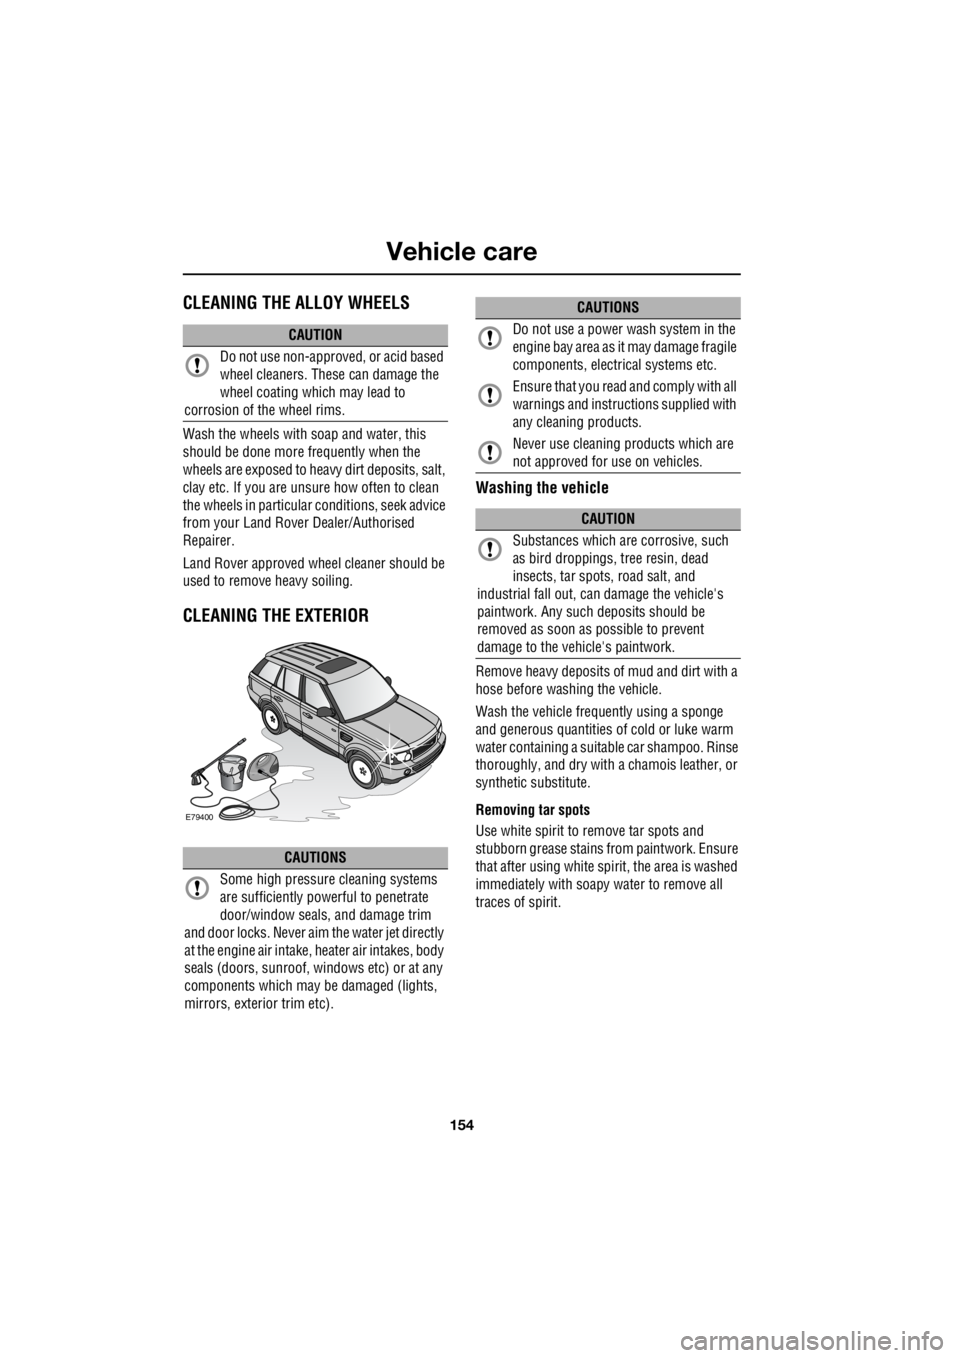
CLEANING THE EXTERIOR
Washing the vehicle
Remove heavy deposits of mud and dirt with a
hose before washing the vehicle.
Wash the vehicle frequently using a sponge
and generous quantities of cold or luke warm
water containing a suit able car shampoo. Rinse
thoroughly, and dry with a chamois leather, or
synthetic substitute.
Removing tar spots
Use white spirit to remove tar spots and
stubborn grease stains from paintwork. Ensure
that after using white spirit, the area is washed
immediately with soapy water to remove all
traces of spirit.
CAUTION
Do not use non-approved, or acid based
wheel cleaners. These can damage the
wheel coating which may lead to
corrosion of the wheel rims.
CAUTIONS
Some high pressure cleaning systems
are sufficiently pow erful to penetrate
door/window seals, and damage trim
and door locks. Never aim the water jet directly
at the engine air intake, heater air intakes, body
seals (doors, sunroof, windows etc) or at any
components which may be damaged (lights,
mirrors, exterior trim etc).
E79400
Do not use a power wash system in the
engine bay area as it may damage fragile
components, electrical systems etc.
Ensure that you read and comply with all
warnings and instruct ions supplied with
any cleaning products.
Never use cleaning products which are
not approved for use on vehicles.
CAUTION
Substances which are corrosive, such
as bird droppings, tr ee resin, dead
insects, tar spots, road salt, and
industrial fall out, can damage the vehicle's
paintwork. Any such deposits should be
removed as soon as possible to prevent
damage to the vehicle's paintwork.
CAUTIONS