wheel LAND ROVER FRELANDER 2 2006 Repair Manual
[x] Cancel search | Manufacturer: LAND ROVER, Model Year: 2006, Model line: FRELANDER 2, Model: LAND ROVER FRELANDER 2 2006Pages: 3229, PDF Size: 78.5 MB
Page 2879 of 3229
159
Maintenance
R
In addition, engine se ttings must not be
tampered with. These have been established to
ensure that your vehicle complies with
stringent exhaust em ission regulations.
Incorrect engine settings may adversely affect
exhaust emissions, engi ne performance and
fuel consumption. The y may also cause high
temperatures, which will result in damage to
the catalytic converter and the vehicle.
Road testing dynamometers (rolling
roads)
Because your vehicle is equipped with anti-lock
brakes and four wheel drive, it is essential that
any dynamometer testing is carried out only by
a qualified person, familiar with the
dynamometer testing an d safety procedures
practised by Land Rove r Dealers/Authorised
Repairers.
Safety in the garage
Fuel system
Poisonous fluids
Fluids used in motor vehicles are poisonous
and should not be consumed or brought into
contact with open wounds. These include;
battery acid, antifreeze, brake, clutch and
power steering fluid, petr ol, diesel, engine oil
and windscreen washer additives.
For your own safety, al ways read and obey all
instructions printed on labels and containers.
Used engine oil
Prolonged contact with engine oil may cause
serious skin disorders, including dermatitis
and cancer of the skin. Always wash
thoroughly after contact.
It is illegal to pollute drains, water
courses or soil. Use authorised
waste disposal sites to dispose of
used oil and toxic chemicals.
WARNINGS
If the vehicle has been driven recently,
do not touch exhaust and cooling
system components un til the engine has
cooled.
Never leave the engine running in an
unventilated area - exhaust gases are
poisonous and extremely dangerous.
Do not work beneath the vehicle with
the wheel changing jack as the only
means of support.
Keep your hands and clothing away
from drive belt s and pulleys.
Remove metal wr ist bands and
jewellery, before working in the engine
compartment.
Do not touch electrical leads or
components while the engine is
running, or with the starter switch turned on.
Do not allow tools or metal parts of the
vehicle to make contact with the battery
leads or terminals.
WARNINGS
Under no circumstances should any
part of the fuel system be dismantled or
replaced by anyone other than a suitably
qualified vehicle technician. Failure to comply
with this instruction, may result in fuel spillage
with a consequent serious risk of fire.
Ensure sparks and naked lights are kept
away from the engine compartment.
Wear protective cl othing, including,
where practicable, gloves made from
an impervious material.
WARNINGS
Page 2886 of 3229
Maintenance
166
L
3. Clean the filler cap before removing to
prevent dirt from entering the reservoir.
4. Remove the filler cap.
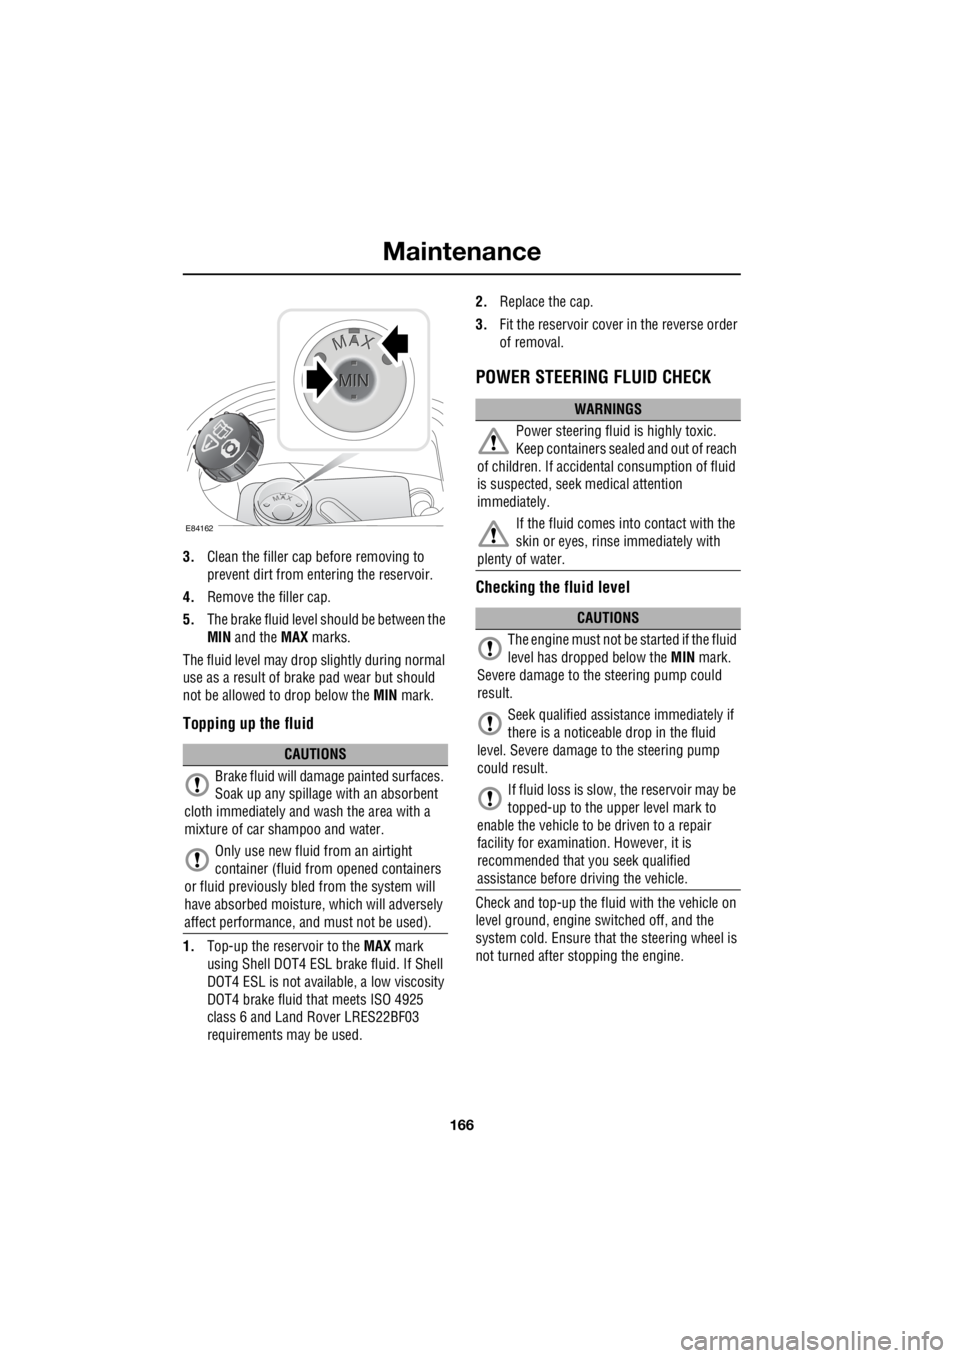
5. The brake fluid level should be between the
MIN and the MAX marks.
The fluid level may drop slightly during normal
use as a result of brake pad wear but should
not be allowed to drop below the MIN mark.
Topping up the fluid
1.Top-up the reservoir to the MAX mark
using Shell DOT4 ESL brake fluid. If Shell
DOT4 ESL is not availa ble, a low viscosity
DOT4 brake fluid that meets ISO 4925
class 6 and Land Rover LRES22BF03
requirements ma y be used. 2.
Replace the cap.
3. Fit the reservoir cover in the reverse order
of removal.
POWER STEERING FLUID CHECK
Checking the fluid level
Check and top-up the fluid with the vehicle on
level ground, engine switched off, and the
system cold. Ensure that the steering wheel is
not turned after stopping the engine.
CAUTIONS
Brake fluid will damage painted surfaces.
Soak up any spillage with an absorbent
cloth immediately and wash the area with a
mixture of car sh ampoo and water.
Only use new fluid from an airtight
container (fluid from opened containers
or fluid previously bled from the system will
have absorbed moisture, which will adversely
affect performance, and must not be used).
E84162
WARNINGS
Power steering fluid is highly toxic.
Keep containers sealed and out of reach
of children. If accidental consumption of fluid
is suspected, seek medical attention
immediately.
If the fluid comes into contact with the
skin or eyes, rinse immediately with
plenty of water.
CAUTIONS
The engine must not be started if the fluid
level has dropped below the MIN mark.
Severe damage to th e steering pump could
result.
Seek qualified assistance immediately if
there is a noticeable drop in the fluid
level. Severe damage to the steering pump
could result.
If fluid loss is slow, the reservoir may be
topped-up to the uppe r level mark to
enable the vehicle to be driven to a repair
facility for examinatio n. However, it is
recommended that you seek qualified
assistance before driving the vehicle.
Page 2896 of 3229
Wheels and tyres
176
L
Wheels and tyresGENERAL INFORMATION
Tyre markings
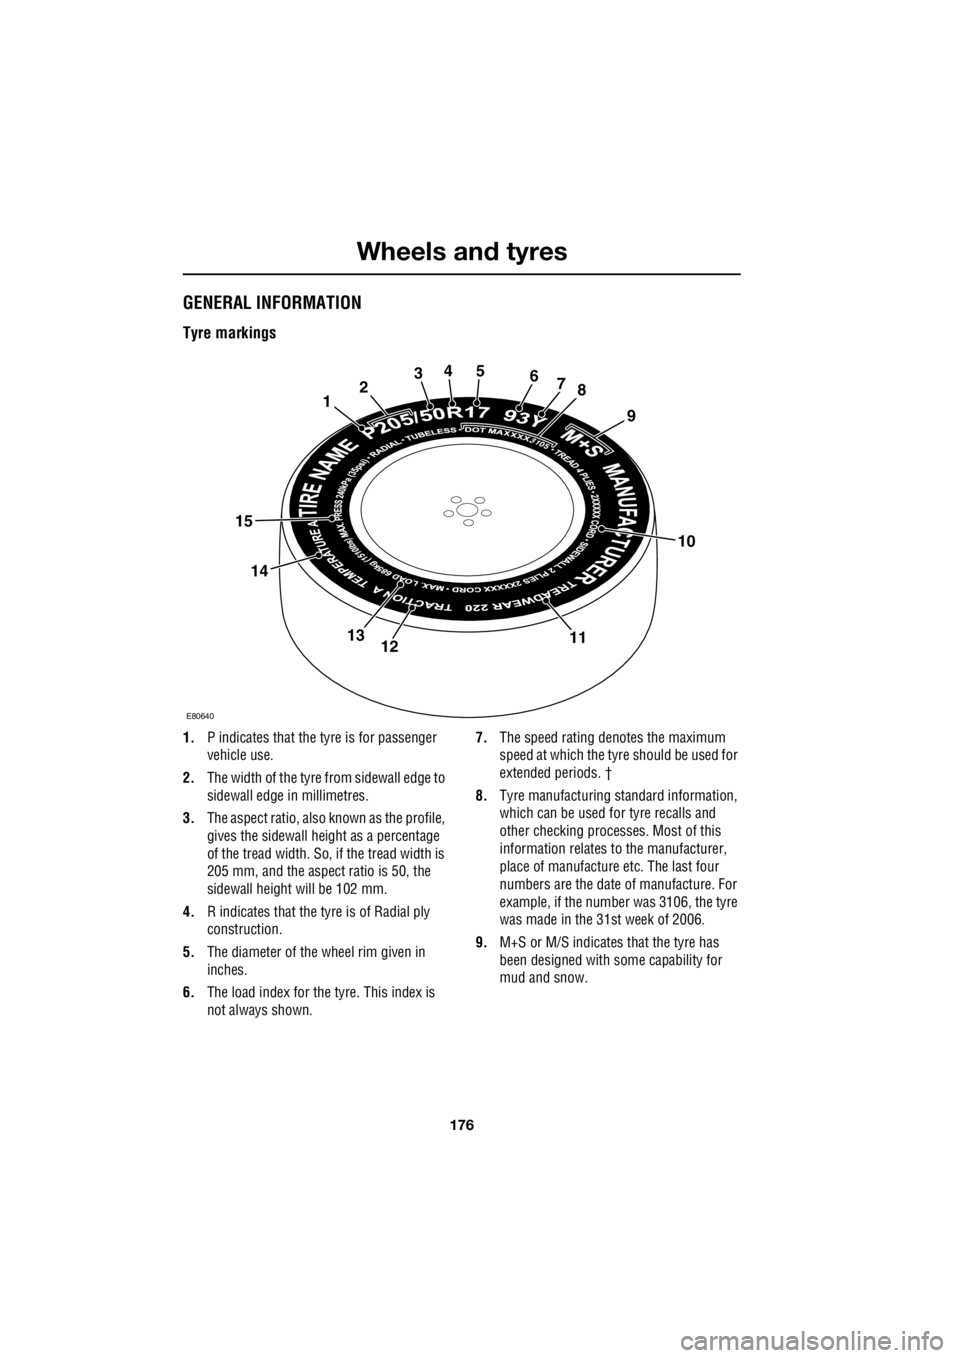
1. P indicates that the tyre is for passenger
vehicle use.
2. The width of the tyre fr om sidewall edge to
sidewall edge in millimetres.
3. The aspect ratio, also known as the profile,
gives the sidewall height as a percentage
of the tread width. So, if the tread width is
205 mm, and the aspect ratio is 50, the
sidewall height will be 102 mm.
4. R indicates that the ty re is of Radial ply
construction.
5. The diameter of the wheel rim given in
inches.
6. The load index for the tyre. This index is
not always shown. 7.
The speed rating de notes the maximum
speed at which the tyre should be used for
extended periods. †
8. Tyre manufacturing standard information,
which can be used for tyre recalls and
other checking processe s. Most of this
information relates to the manufacturer,
place of manufacture etc. The last four
numbers are the date of manufacture. For
example, if the number was 3106, the tyre
was made in the 31st week of 2006.
9. M+S or M/S indicates that the tyre has
been designed with some capability for
mud and snow.
10
12345678
9
111213
14
15
E80640
Page 2897 of 3229

177
Wheels and tyres
R
10. The number of plies in both the tread area,
and the sidewall area, indicates how many
layers of rubber coat ed material make up
the structure of the tyre. Information is
also provided on the type of materials
used.
11. Wear rate indicator. A tyre rated at 400 for
example, will last twice as long as a tyre
rated at 200.
12. The traction rating grades a tyres
performance when stopping on a wet road
surface. The higher the grade the better the
braking performance. The grades from
highest to lowest are, AA, A, B, and C.
13. The maximum load which can be carried
by the tyre.
14. Heat resistance grading. The tyre's
resistance to heat is grade A, B, or C, with
A indicating the greatest resistance to heat.
This grading is provided for a correctly
inflated tyre, which is being used within its
speed and loading limits.
15. The maximum inflation pressure for the
tyre. This pressure should not be used for
normal driving. See TECHNICAL
SPECIFICATIONS (page 194). † Speed ratings
TYRE CARE
Note:
Tyre condition should be checked after
the vehicle has been used off-road. As soon as
the vehicle returns to a normal, hard, road
surface stop the vehicle and check for damage
to the tyres. Rating Speed kmh (mph)
Q 160 (99)
R 170 (106) S 180 (112)
T 190 (118)
U 200 (124)
H 210 (130)
V 240 (149)
W 270 (168) Y 300 (186)
WARNINGS
Defective tyres are dangerous. Do not
drive the vehicle if a tyre is damaged,
excessively worn, or incorrectly inflated.
Doing so may lead to premature tyre failure.
Avoid contaminating the tyres with
vehicle fluids as they may cause
damage to the tyre.
Avoid spinning the wheels. The forces
released can damage the structure of
the tyre, and cause it to fail. Doing so may lead
to premature tyre failure.
If wheel spin is unavoidable due to a
loss of traction (in deep snow for
example) do not exceed the 50 km/h (30 mph)
point on the speedometer. Doing so may lead
to premature tyre failure.
Page 2898 of 3229
Wheels and tyres
178
L
All of the vehicle's tyres (including the spare)
should be checked regularly for damage, wear
and distortion. If you ar e in any doubt about the
condition of a tyre, have it checked immediately
by a tyre repair centre, or your Land Rover
Dealer/Authorised repairer.
Tyre wear
Good driving practise w ill improve the mileage
you obtain from your tyres, and avoid
unnecessary damage.
• Always ensure that the tyre pressures are
correctly adjusted.
• Always observe the posted speed limits,
and advisory speeds for bends.
• Avoid pulling away quickly, or hard
acceleration.
• Avoid making fast turns or braking
sharply.
• Wherever possible, avoid potholes, or
obstacles on the road.
• Do not drive up kerbs, or rub the tyres
against them when parking.
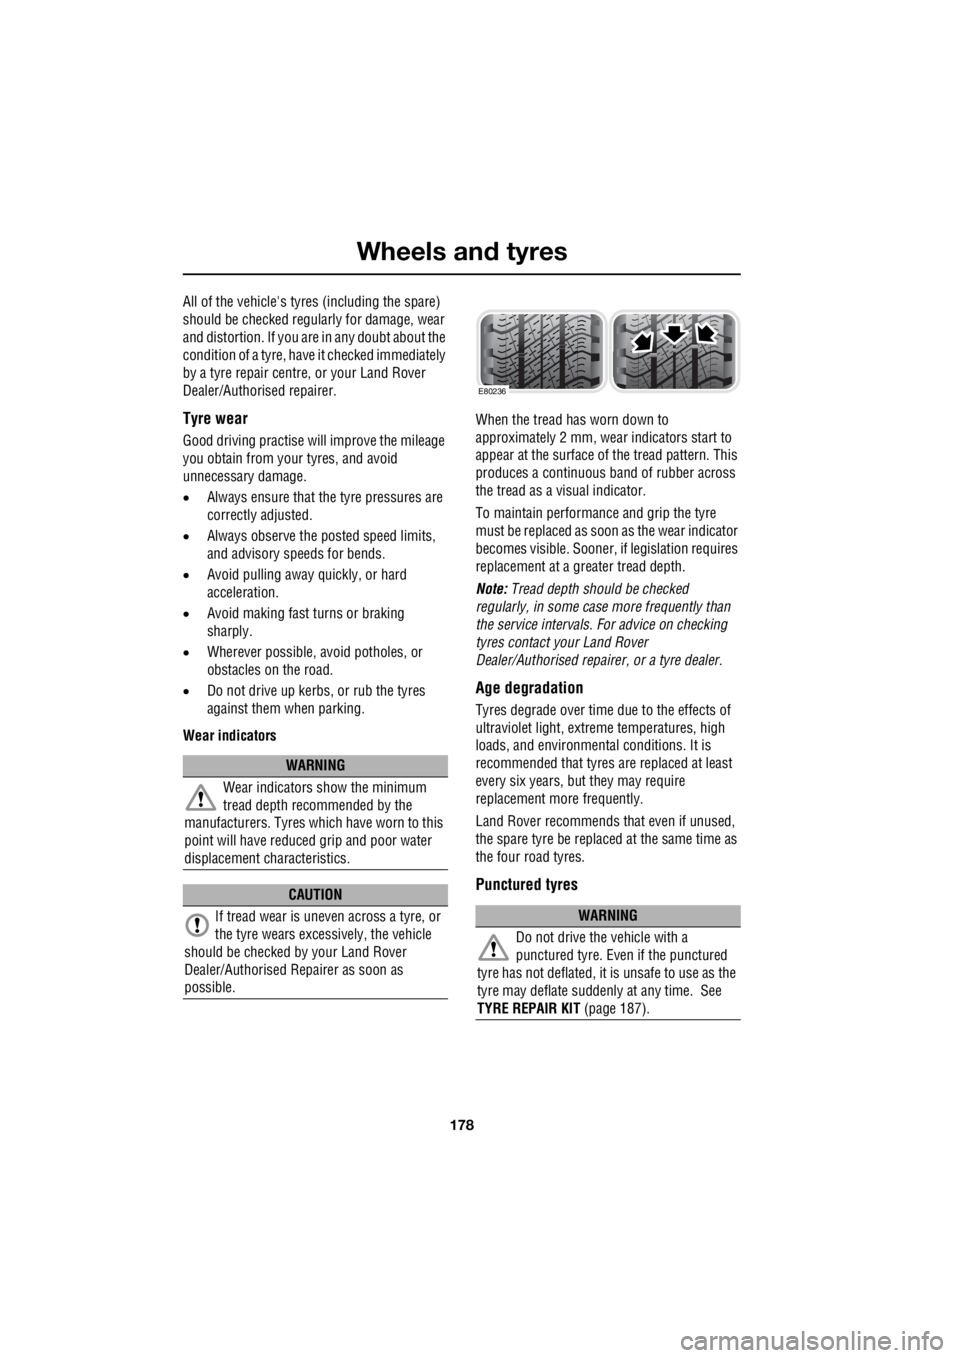
Wear indicators When the tread has worn down to
approximately 2 mm, wear indicators start to
appear at the surface of the tread pattern. This
produces a continuous ba nd of rubber across
the tread as a visual indicator.
To maintain performance and grip the tyre
must be replaced as s oon as the wear indicator
becomes visible. Sooner, if legislation requires
replacement at a greater tread depth.
Note: Tread depth should be checked
regularly, in some case more frequently than
the service intervals. For advice on checking
tyres contact your Land Rover
Dealer/Authorised repairer, or a tyre dealer.
Age degradation
Tyres degrade over time due to the effects of
ultraviolet light, extreme temperatures, high
loads, and environmen tal conditions. It is
recommended that tyres are replaced at least
every six years, but they may require
replacement more frequently.
Land Rover recommends that even if unused,
the spare tyre be replaced at the same time as
the four road tyres.
Punctured tyres
WARNING
Wear indicators show the minimum
tread depth recommended by the
manufacturers. Tyres whic h have worn to this
point will have reduced grip and poor water
displacement characteristics.
CAUTION
If tread wear is uneve n across a tyre, or
the tyre wears excessively, the vehicle
should be checked by your Land Rover
Dealer/Authorised Repairer as soon as
possible.
WARNING
Do not drive the vehicle with a
punctured tyre. Even if the punctured
tyre has not deflated, it is unsafe to use as the
tyre may deflat e suddenly at an y time. See
TYRE REPAIR KIT (page 187).
E80236
Page 2899 of 3229

179
Wheels and tyres
R
Tyre checks
Not all punctures result in the tyre deflating
immediately. Therefore, it is important to check
the tyres for damage and foreign objects,
regularly.
When driving, if a sudden vibration, or change
to the vehicle's handling is noticed, reduce
speed immediately. Do not brake hard, or make
any sudden manoeuvres or direction changes.
Drive slowly to an area off of the main highway
and stop the vehicle.
Note: Driving the vehicle to a safe area may
cause damage to the punctured tyre, but
occupant safety is far more important.
Inspect the tyres for signs of punctures,
damage, or under inflat ion. If any damage or
deformity is detected, the tyre should be
replaced. If a spare tyre is not available, then
the vehicle should be recovered to a tyre repair
centre, or Land Rover Dealer/Approved
repairer.
Note: The tyres should be checked
immediately after any off -road use, and prior to
using the vehicle on a public highway.
Replacement tyres
Ideally, tyres should be re placed in sets of four.
If this is not po ssible, replace the tyres in pairs
(front and rear). When tyres are replaced, the
wheels should always be re-balanced, and
alignment checked.
The correct tyre specific ation for your vehicle
can be found on the tyre information label.
WARNINGS
Do not fit cross-ply tyres.
Do not fit tubed tyres.
Do not swap tyres around the vehicle.
Tyres bed in to the specific
characteristics of each wheel position.
Swapping them around may affect the
vehicle's handli ng and traction.
Always fit replacement tyres of the
same type, and wher ever possible of
the same make and tread pattern.
Replacement wheels should be genuine
Land Rover parts. This will maintain the
designed driving charac teristics both on and
off road.
If the use of tyres not recommended by
Land Rover is unavoidable, ensure that
you read, and fully comply with the tyre
manufacturers instructi ons. Failure to do so
may lead to tyre failure due to incorrect fitment
or use.
WARNINGS
Page 2900 of 3229
Wheels and tyres
180
L
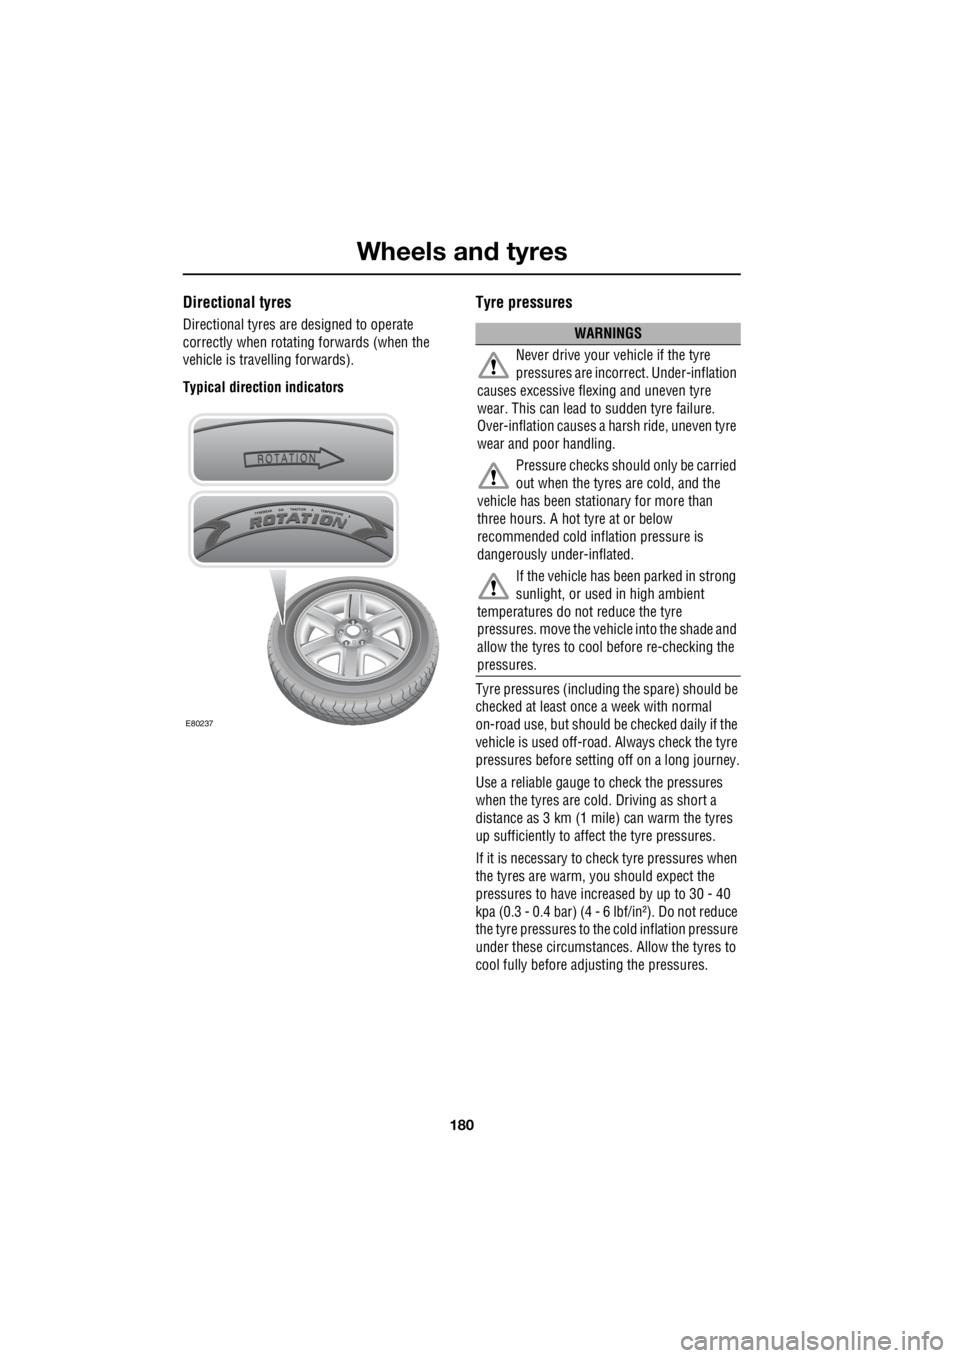
Directional tyres
Directional tyres are designed to operate
correctly when rotati ng forwards (when the
vehicle is travelling forwards).
Typical direction indicators
Tyre pressures
Tyre pressures (including the spare) should be
checked at least once a week with normal
on-road use, but should be checked daily if the
vehicle is used off-road. Always check the tyre
pressures before setti ng off on a long journey.
Use a reliable gauge to check the pressures
when the tyres are cold. Driving as short a
distance as 3 km (1 mile) can warm the tyres
up sufficiently to affect the tyre pressures.
If it is necessary to check tyre pressures when
the tyres are warm, you should expect the
pressures to have incr eased by up to 30 - 40
kpa (0.3 - 0.4 bar) (4 - 6 lbf/in²). Do not reduce
the tyre pressures to the cold inflation pressure
under these circumstances. Allow the tyres to
cool fully before ad justing the pressures.
E80237
WARNINGS
Never drive your vehicle if the tyre
pressures are incorrect. Under-inflation
causes excessive flex ing and uneven tyre
wear. This can lead to sudden tyre failure.
Over-inflation causes a ha rsh ride, uneven tyre
wear and poor handling.
Pressure checks shoul d only be carried
out when the tyres are cold, and the
vehicle has been stationary for more than
three hours. A hot tyre at or below
recommended cold inflation pressure is
dangerously under-inflated.
If the vehicle has been parked in strong
sunlight, or used in high ambient
temperatures do not reduce the tyre
pressures. move the vehicle into the shade and
allow the tyres to cool before re-checking the
pressures.
Page 2901 of 3229
181
Wheels and tyres
R
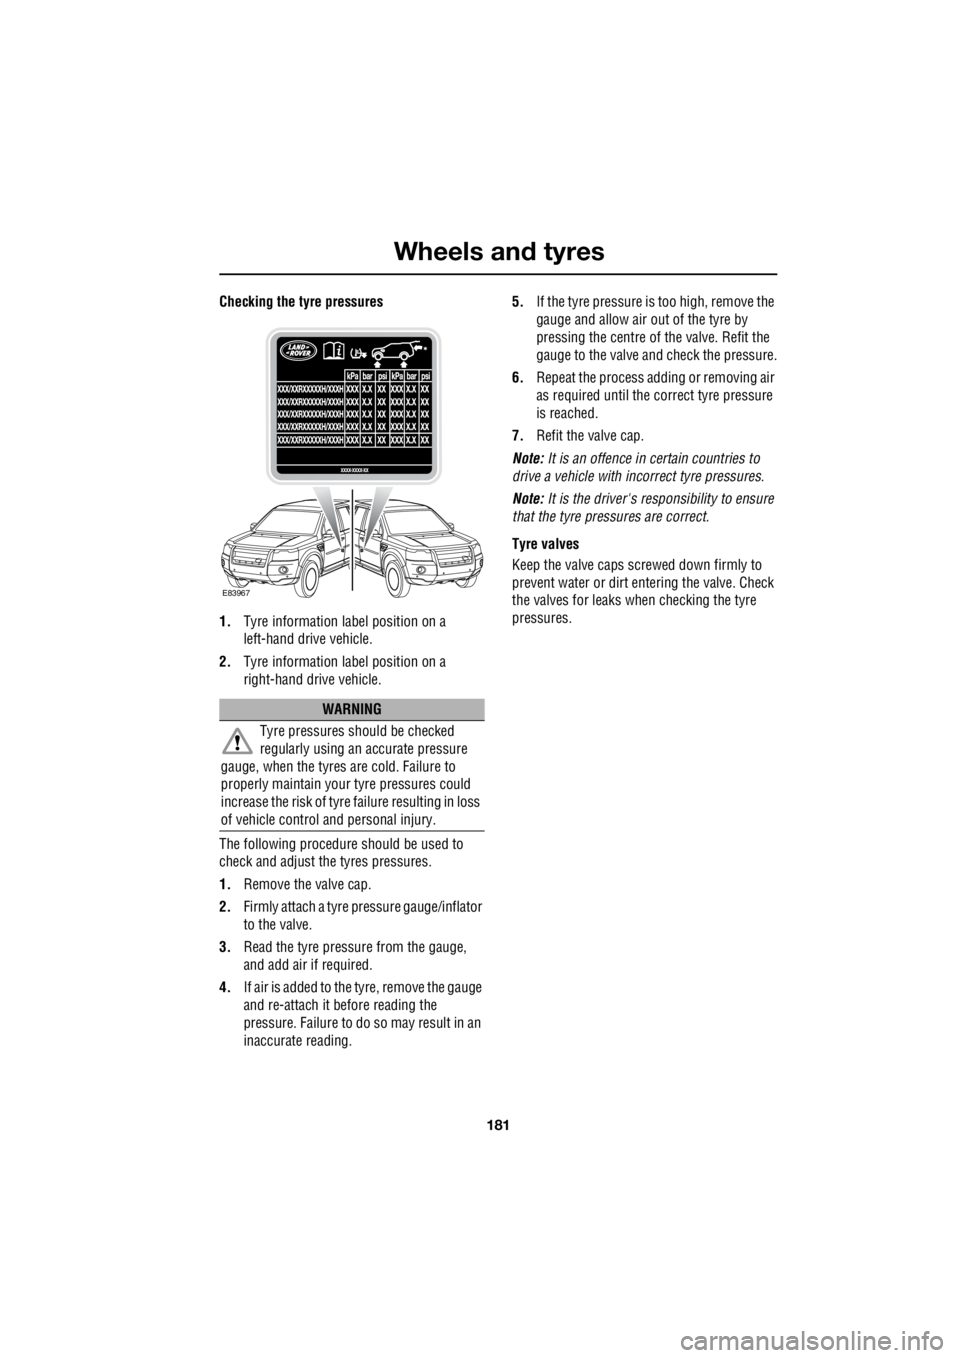
Checking the tyre pressures
1. Tyre information label position on a
left-hand drive vehicle.
2. Tyre information label position on a
right-hand drive vehicle.
The following procedure should be used to
check and adjust the tyres pressures.
1. Remove the valve cap.
2. Firmly attach a tyre pressure gauge/inflator
to the valve.
3. Read the tyre pressure from the gauge,
and add air if required.
4. If air is added to the tyre, remove the gauge
and re-attach it be fore reading the
pressure. Failure to do so may result in an
inaccurate reading. 5.
If the tyre pressure is too high, remove the
gauge and allow air out of the tyre by
pressing the centre of the valve. Refit the
gauge to the valve and check the pressure.
6. Repeat the process a dding or removing air
as required until the co rrect tyre pressure
is reached.
7. Refit the valve cap.
Note: It is an offence in certain countries to
drive a vehicle with incorrect tyre pressures.
Note: It is the driver's responsibility to ensure
that the tyre pressures are correct.
Tyre valves
Keep the valve caps screwed down firmly to
prevent water or dirt entering the valve. Check
the valves for leaks when checking the tyre
pressures.
WARNING
Tyre pressures should be checked
regularly using an accurate pressure
gauge, when the tyres are cold. Failure to
properly maintain your tyre pressures could
increase the risk of tyre failure resulting in loss
of vehicle control and personal injury.
E83967
Page 2902 of 3229

Wheels and tyres
182
L
Pressure compensation for ambient
temperature changes
If the ambient temperature drops, the tyre
pressures will decrease, which may cause
under inflation. This should be borne in mind
when travelling to, or through, areas of lower
temperature.
Under inflation causes th e tyre side wall height
to reduce, which in turn results in uneven tyre
wear, and a risk of tyre failure.
Tyre pressures may be adjusted before setting
off on a journey to, or through, areas of low
temperature. Alternatively, the tyre pressures
can be adjusted when low temperature areas
are reached.
Note: If the tyre pressures are to be adjusted in
the lower temperature area, the vehicle should
be left standing for at least one hour prior to
adjustment.
Tyre pressures should be increased by 0.14
bar/14 kPa (2 lbf/in²) for each 10 °C (20 °F)
temperature decrease.
Flat spots
If the vehicle is stationary for a long period
when the ambient temperature is high, the
tyres may form flat spots. When the vehicle is
driven these flat spots will cause a vibration
which will steadily disappear as the tyres warm
up and regain their original shape.
In order to minimise fl at spotting, the tyre
pressures can be increased.
Tyre pressures should be increased by 0.14
bar/14 kPa (2 lbf/in²) for each 10 °C (20 °F)
temperature increase above 20 °C (68 °F).
Long term storage
Flat spotting can be minimised during long
term storage by increasing the tyre pressures
to the maximum indicated on the tyre sidewall.
Note: The tyre pressures s hould be reduced to
the correct pressure before the vehicle is
driven.
E80321
E80322
Page 2903 of 3229
183
Wheels and tyres
R
USING WINTER TYRES
If winter tyres are fitted to the vehicle, the tyre
manufacturers instructions should be
followed. Pay particular attention to
instructions regarding the maximum speed
that the vehicle can be driven, and the correct
pressures for the tyres.
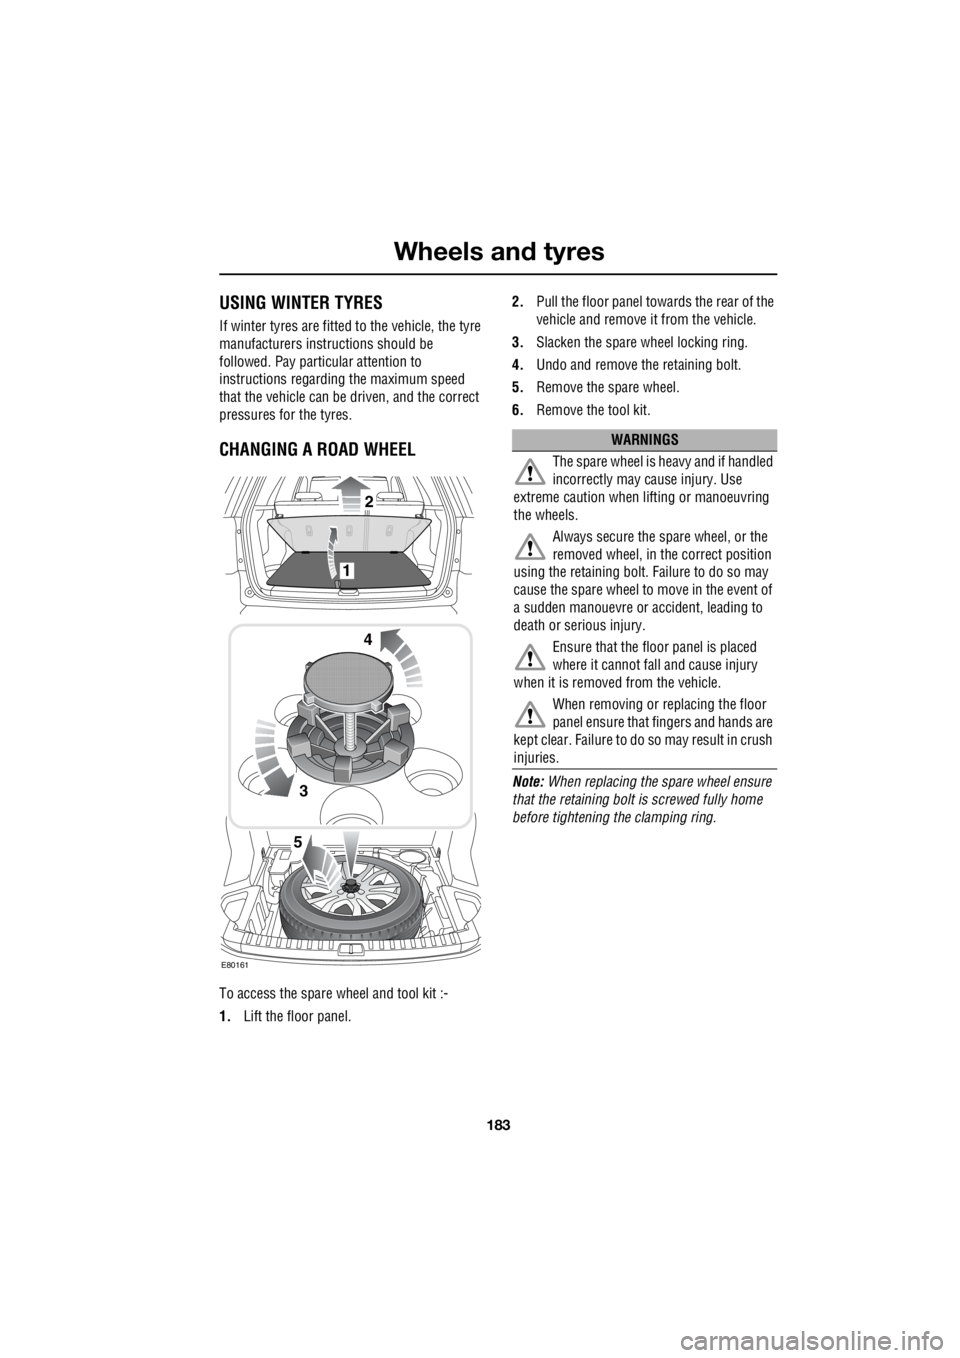
CHANGING A ROAD WHEEL
To access the spare wheel and tool kit :-
1. Lift the floor panel. 2.
Pull the floor panel towards the rear of the
vehicle and remove it from the vehicle.
3. Slacken the spare wheel locking ring.
4. Undo and remove the retaining bolt.
5. Remove the spare wheel.
6. Remove the tool kit.
Note: When replacing the spare wheel ensure
that the retaining bolt is screwed fully home
before tightening the clamping ring.
3
4
1
2
5
E80161
WARNINGS
The spare wheel is heavy and if handled
incorrectly may cause injury. Use
extreme caution when lifting or manoeuvring
the wheels.
Always secure the spare wheel, or the
removed wheel, in the correct position
using the retaining bolt. Failure to do so may
cause the spare wheel to move in the event of
a sudden manouevre or accident, leading to
death or serious injury.
Ensure that the floo r panel is placed
where it cannot fall and cause injury
when it is removed from the vehicle.
When removing or replacing the floor
panel ensure that fingers and hands are
kept clear. Failure to do so may result in crush
injuries.