LAND ROVER FRELANDER 2 2006 Repair Manual
FRELANDER 2 2006
LAND ROVER
LAND ROVER
https://www.carmanualsonline.info/img/64/57251/w960_57251-0.png
LAND ROVER FRELANDER 2 2006 Repair Manual
Trending: spare tire, clock, washer fluid, cabin filter, low beam, change language, fuses
Page 461 of 3229
Publi s hed: 11-May-2011
Parking Brake and Actuation - Parking Brake Rear Cables
Removal and Inst all ati on
Removal
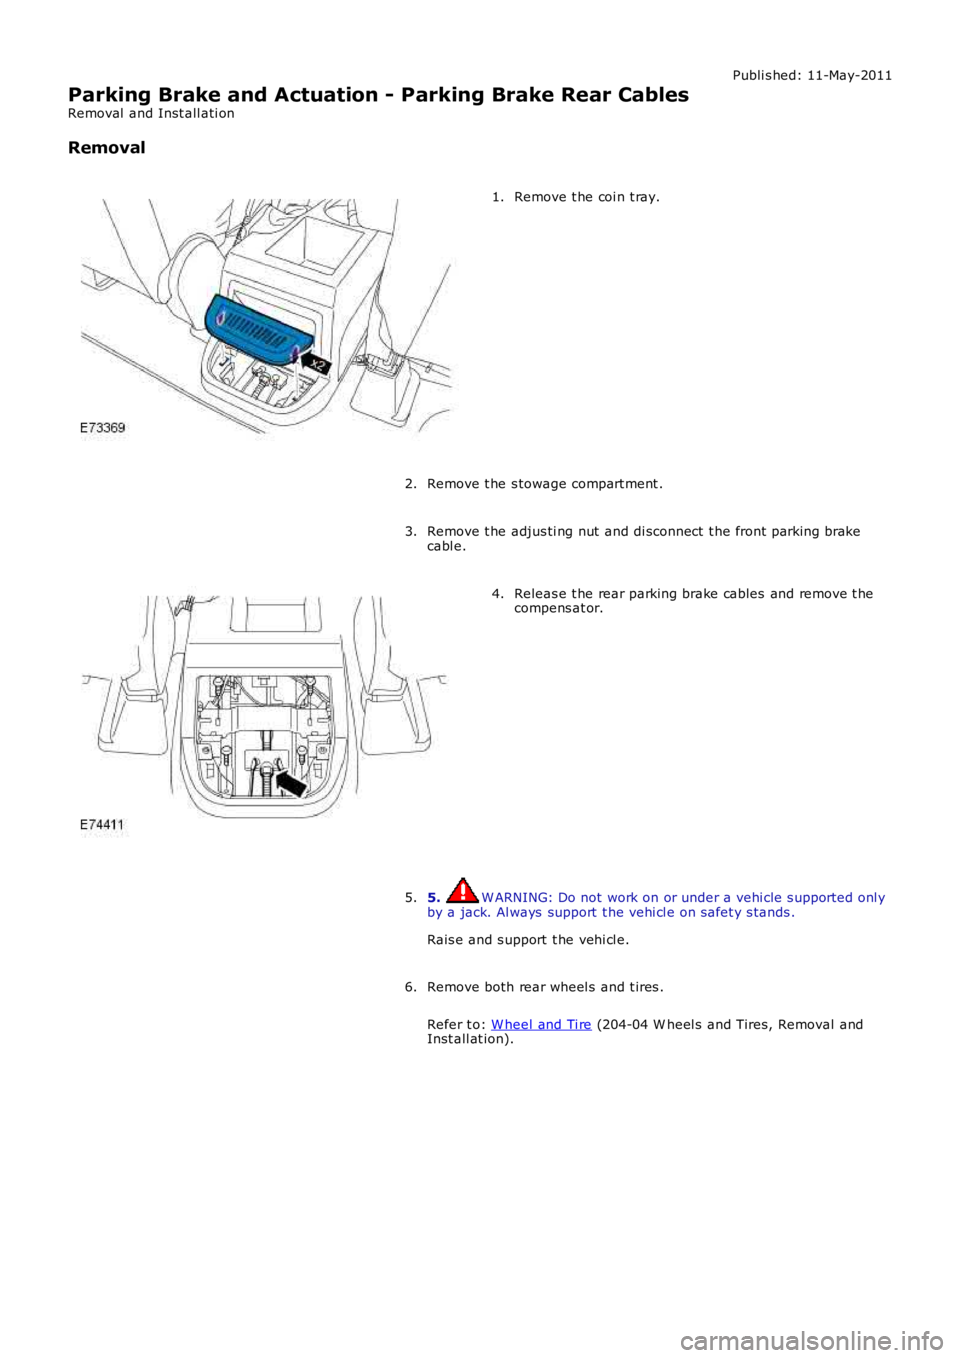
Remove t he coi n t ray.1.
Remove t he s towage compart ment .2.
Remove t he adjus ti ng nut and di sconnect t he front parking brakecabl e.3.
Releas e t he rear parking brake cables and remove t hecompens at or.4.
5. W ARNING: Do not work on or under a vehi cle s upported onl yby a jack. Al ways support t he vehi cl e on s afet y s tands .
Rais e and s upport t he vehi cl e.
5.
Remove both rear wheel s and t ires .
Refer t o: W heel and Ti re (204-04 W heel s and Tires, Removal andInst all at ion).
6.
Page 462 of 3229
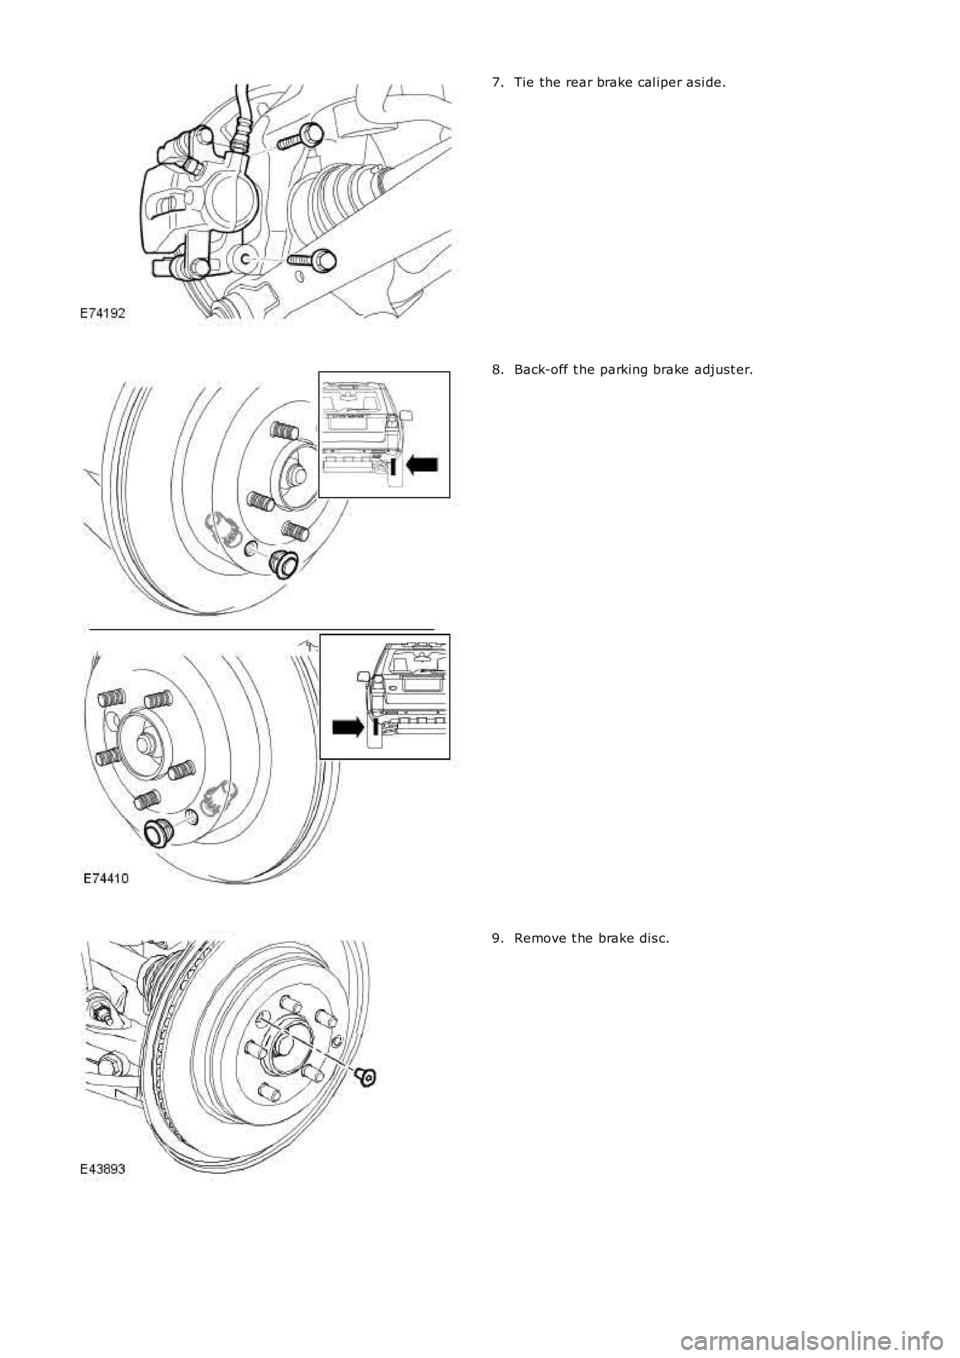
Tie the rear brake cal iper asi de.7.
Back-off t he parking brake adjust er.8.
Remove t he brake dis c.9.
Page 463 of 3229
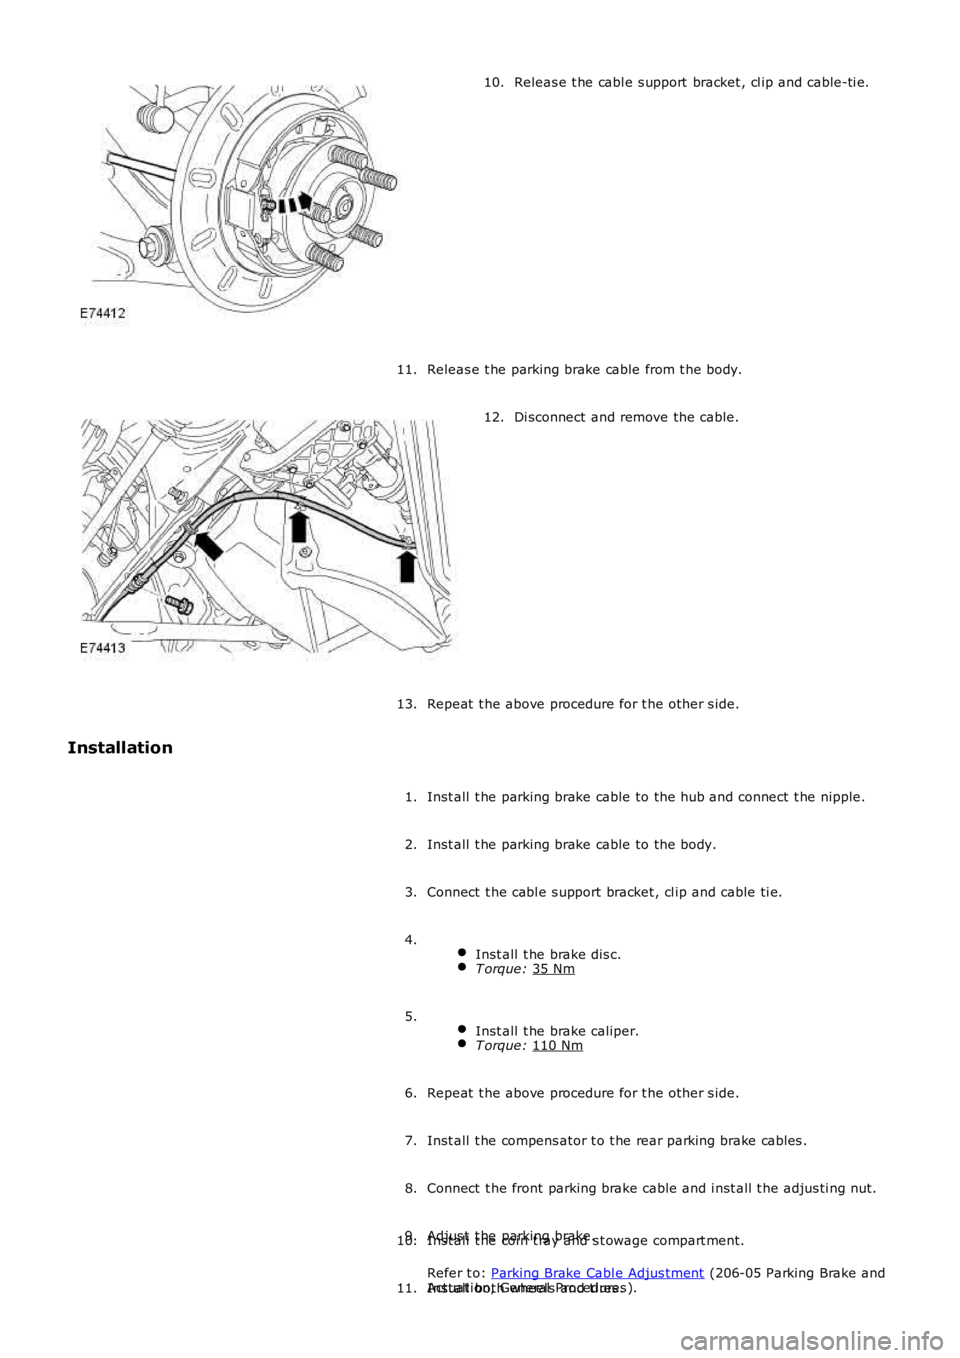
Releas e t he cabl e s upport bracket , cl ip and cable-ti e.
10.
Releas e t he parking brake cable from t he body.
11. Di sconnect and remove the cable.
12.
Repeat t he above procedure for t he other s ide.
13.
Installation
Inst all t he parking brake cable to the hub and connect t he nipple.
1.
Inst all t he parking brake cable to the body.
2.
Connect t he cabl e s upport bracket , cl ip and cable ti e.
3.
Inst all t he brake dis c. T orque:
35 Nm 4.
Inst all t he brake caliper. T orque:
110 Nm 5.
Repeat t he above procedure for t he other s ide.
6.
Inst all t he compens ator t o t he rear parking brake cables .
7.
Connect t he front parking brake cable and i nst all t he adjus ti ng nut.
8.
Adjus t t he parking brake.
Refer t o: Parking Brake Cabl e Adjus tment (206-05 Parking Brake and
Actuat ion, General Procedures ).
9.
Inst all t he coi n t ray and s t owage compart ment.
10.
Inst all both wheel s and ti res .
11.
Page 464 of 3229
Refer t o: W heel and Ti re (204-04 W heel s and Tires, Removal andInst all at ion).
Page 465 of 3229
Publi s hed: 11-May-2011
Parking Brake and Actuation - Parking Brake Shoes
Removal and Inst all ati on
Removal
• NOTE: If the parki ng brake s hoes or t he brake di scs have been removed for access to ot her components t hen DO NOTcarry out t he bedding i n procedure.
1. W ARNING: Do not work on or under a vehi cle s upported onl yby a jack. Al ways support t he vehi cl e on s afet y s tands .
Rais e and s upport t he vehi cl e.
1.
Remove t he wheel s and t ires .
Refer t o: W heel and Ti re (204-04 W heel s and Tires, Removal andInst all at ion).
2.
Remove both rear brake dis cs.
Refer t o: Brake Dis c (206-04 Rear Dis c Brake, Removal andInst all at ion).
3.
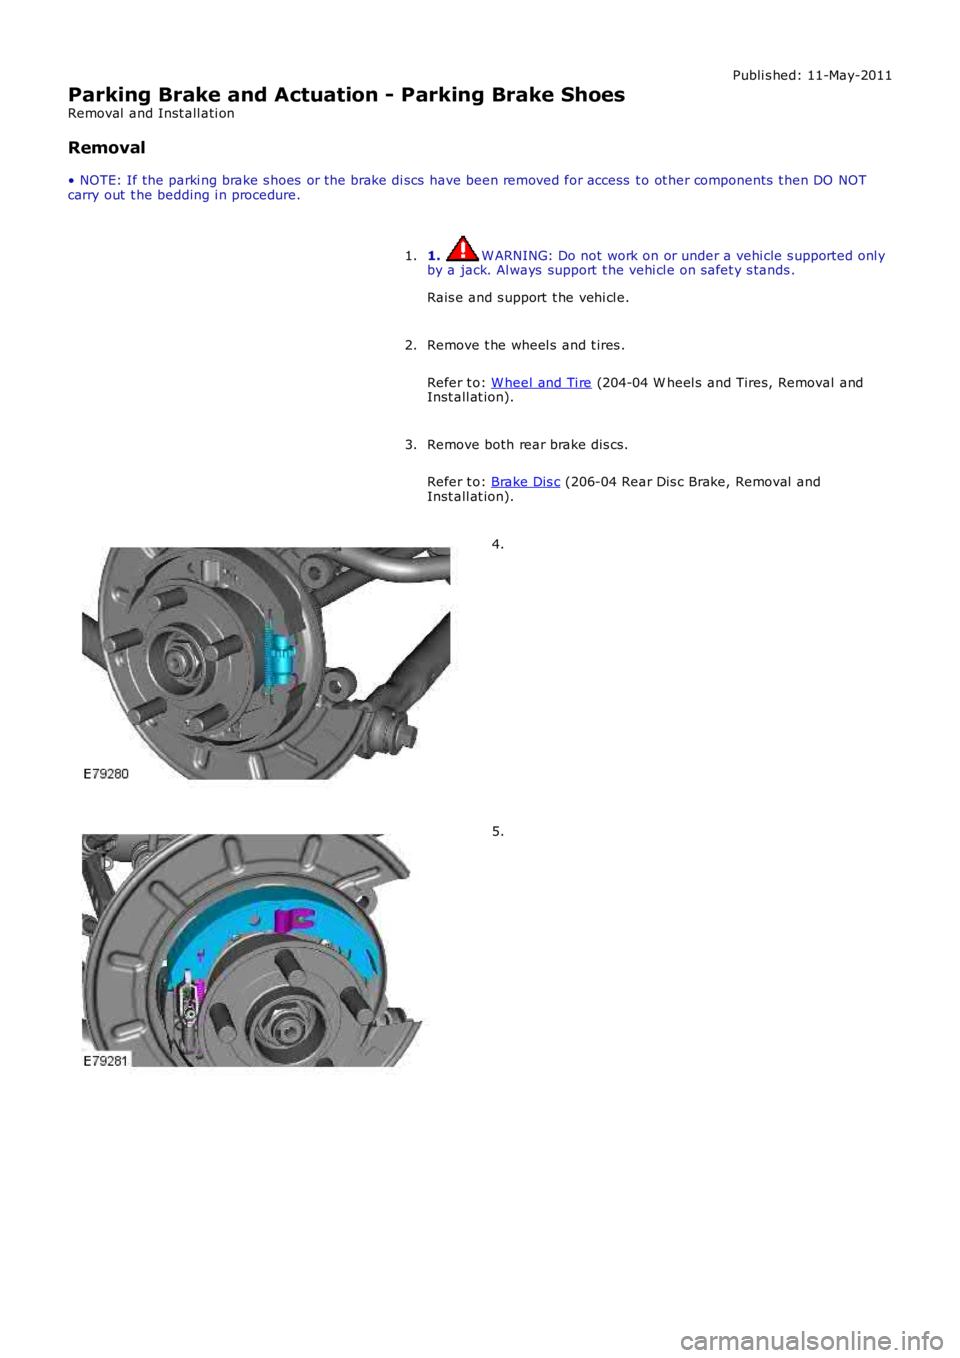
4.
5.
Page 466 of 3229
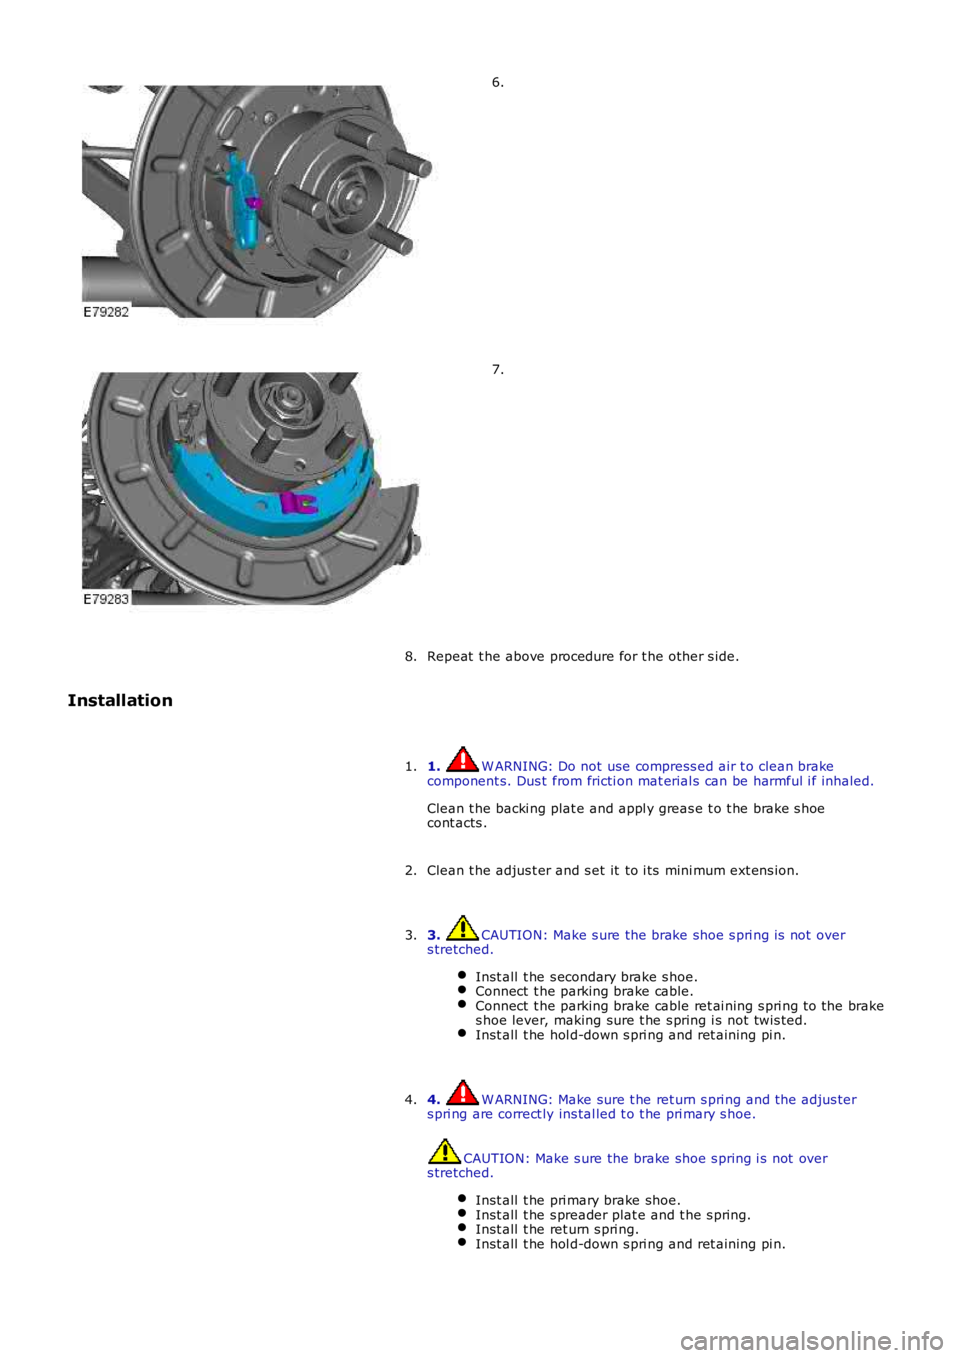
6.
7.
Repeat t he above procedure for t he other s ide.8.
Installation
1. W ARNING: Do not use compress ed air t o clean brakecomponent s. Dus t from fricti on mat erial s can be harmful i f inhaled.
Clean t he backi ng plat e and appl y greas e t o t he brake s hoecont acts .
1.
Clean t he adjus t er and s et it to i ts mini mum ext ens ion.2.
3. CAUTION: Make s ure the brake shoe s pri ng is not overs tretched.
Inst all t he s econdary brake s hoe.Connect t he parking brake cable.Connect t he parking brake cable ret ai ning s pri ng t o the brakes hoe lever, making sure t he s pring i s not twis ted.Inst all t he hol d-down s pri ng and ret aining pi n.
3.
4. W ARNING: Make sure t he ret urn s pri ng and t he adjus ters pri ng are correct ly ins tal led t o t he pri mary s hoe.
CAUTION: Make s ure the brake shoe s pring i s not overs tretched.
Inst all t he pri mary brake shoe.Inst all t he s preader plat e and t he s pring.Inst all t he ret urn s pri ng.Inst all t he hol d-down s pri ng and ret aining pi n.
4.
Page 467 of 3229
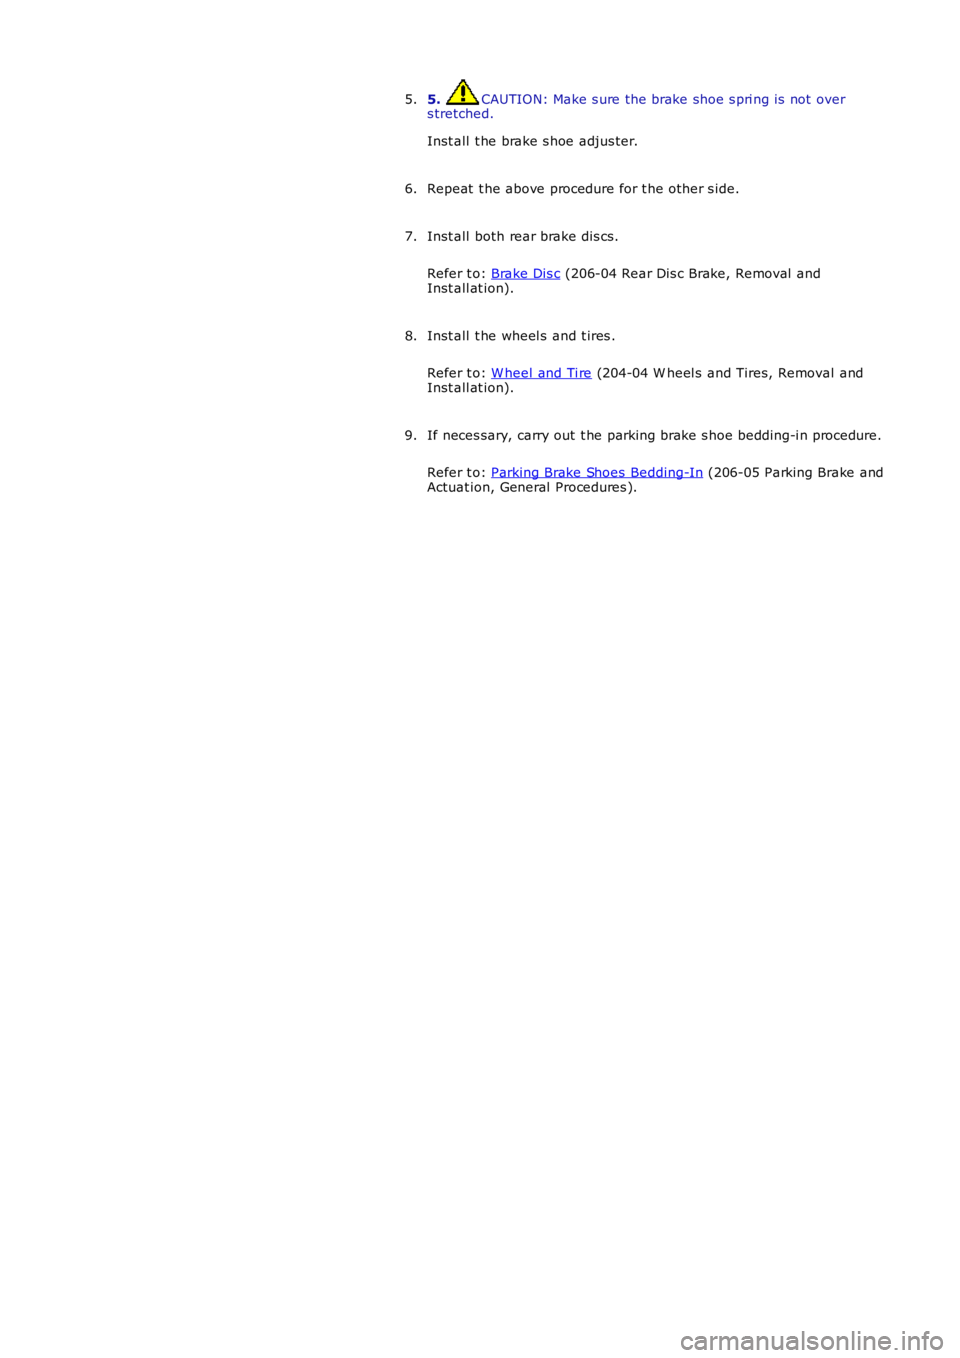
5. CAUTION: Make s ure the brake shoe s pri ng is not overs tretched.
Inst all t he brake s hoe adjus ter.
5.
Repeat t he above procedure for t he other s ide.6.
Inst all both rear brake dis cs.
Refer t o: Brake Dis c (206-04 Rear Dis c Brake, Removal andInst all at ion).
7.
Inst all t he wheel s and t ires .
Refer t o: W heel and Ti re (204-04 W heel s and Tires, Removal andInst all at ion).
8.
If neces sary, carry out t he parking brake s hoe bedding-i n procedure.
Refer t o: Parking Brake Shoes Bedding-In (206-05 Parking Brake andActuat ion, General Procedures ).
9.
Page 468 of 3229
Publi s hed: 11-May-2011
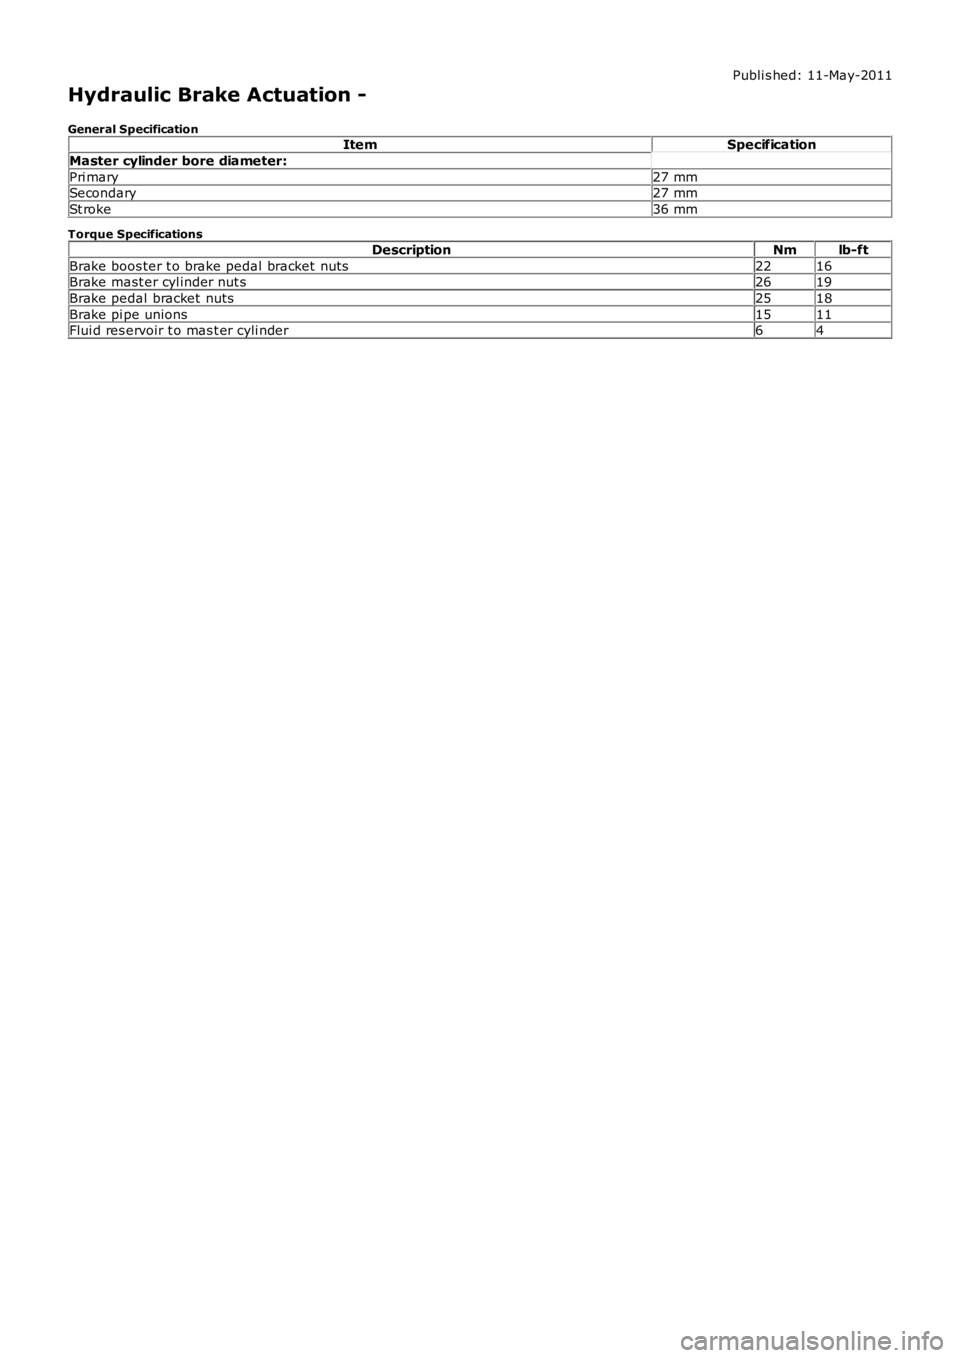
Hydraulic Brake Actuation -
General SpecificationItemSpecification
Master cylinder bore diameter:
Pri mary27 mmSecondary27 mm
St roke36 mm
Torque Specifications
DescriptionNmlb-ft
Brake boos ter t o brake pedal bracket nuts2216Brake mast er cyl inder nut s2619
Brake pedal bracket nuts2518
Brake pi pe unions1511Flui d res ervoir t o mas t er cyli nder64
Page 469 of 3229
Publi s hed: 11-May-2011
Hydraulic Brake Actuation - Hydraulic Brake Actuation
Des cript ion and Operat ion
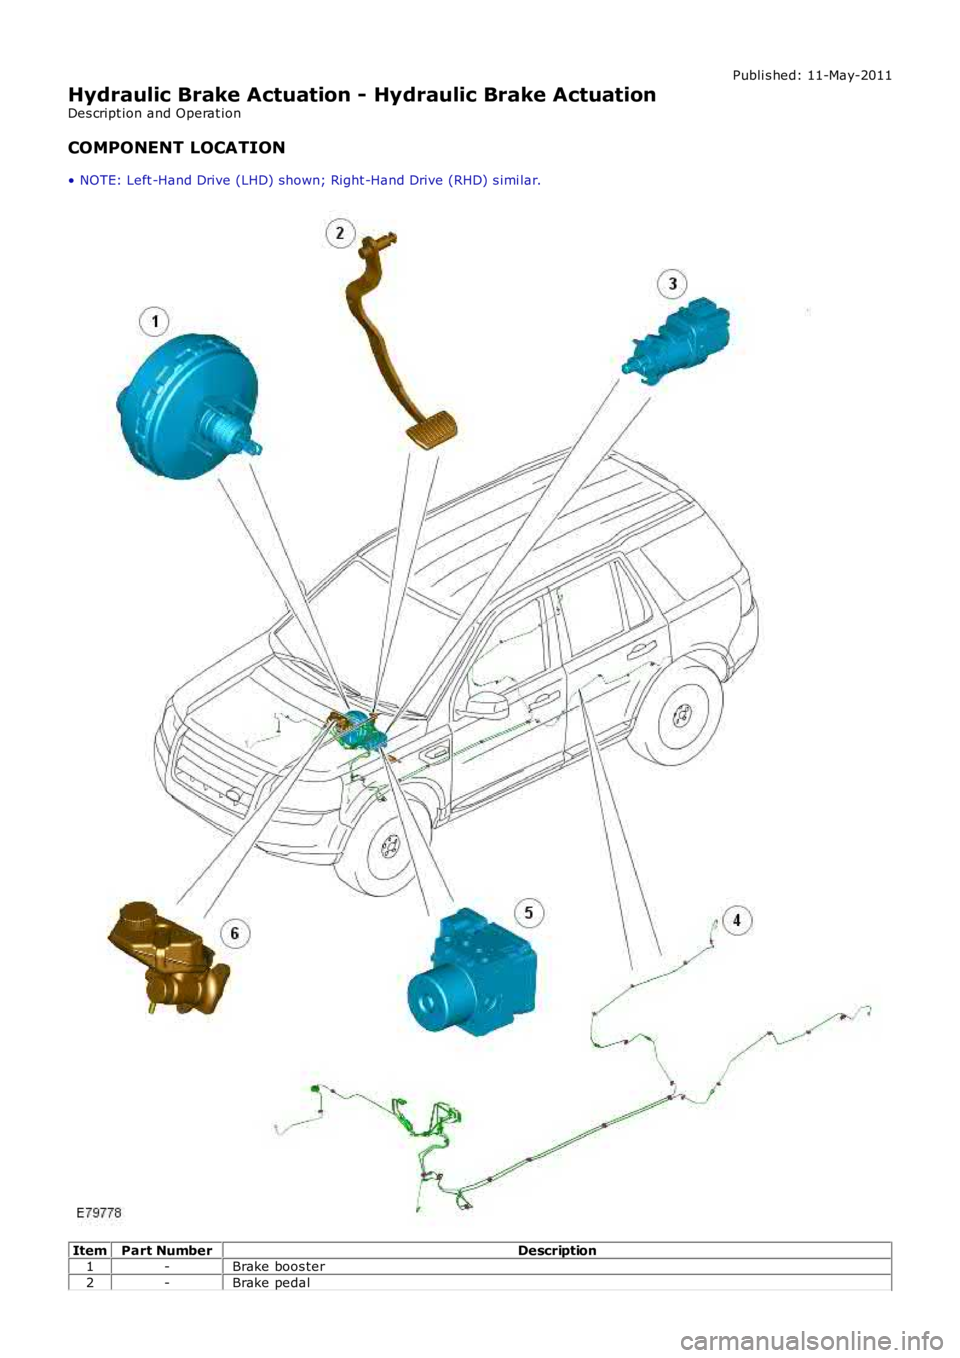
COMPONENT LOCATION
• NOTE: Left -Hand Drive (LHD) shown; Right -Hand Drive (RHD) s imi lar.
ItemPart NumberDescription1-Brake boos ter
2-Brake pedal
Page 470 of 3229
3-St opl amp s wit ch
4-Hydrauli c pipes
5-Integrat ed Hydrauli c Cont rol Unit (HCU) and Anti -l ock Brake Sys t em (ABS) modul e6-Brake mast er cyl inder and flui d res ervoir
OVERVIEW
The hydraulic brake s ys t em i s a diagonally spl it dual ci rcuit s yst em and cons is ts of the brake pedal, brake mast er cyl inder,HCU and t he hydrauli c pipes and hoses . The s ys t em al so features a non-acti ve brake boost er.For addit ional informat ion, refer t o: Brake Boos ter (206-07 Power Brake Act uati on, Des cript ion and Operat ion).
The preformed rigi d brake pipes di st ri but e press ure from t he mas ter cyli nder t o t he 4 brake cali pers , vi a t he int egratedHCU and ABS modul e. Fl exi ble hos es connect the rigid brake pipes t o t he front and rear cal ipers .
BRAKE PEDAL
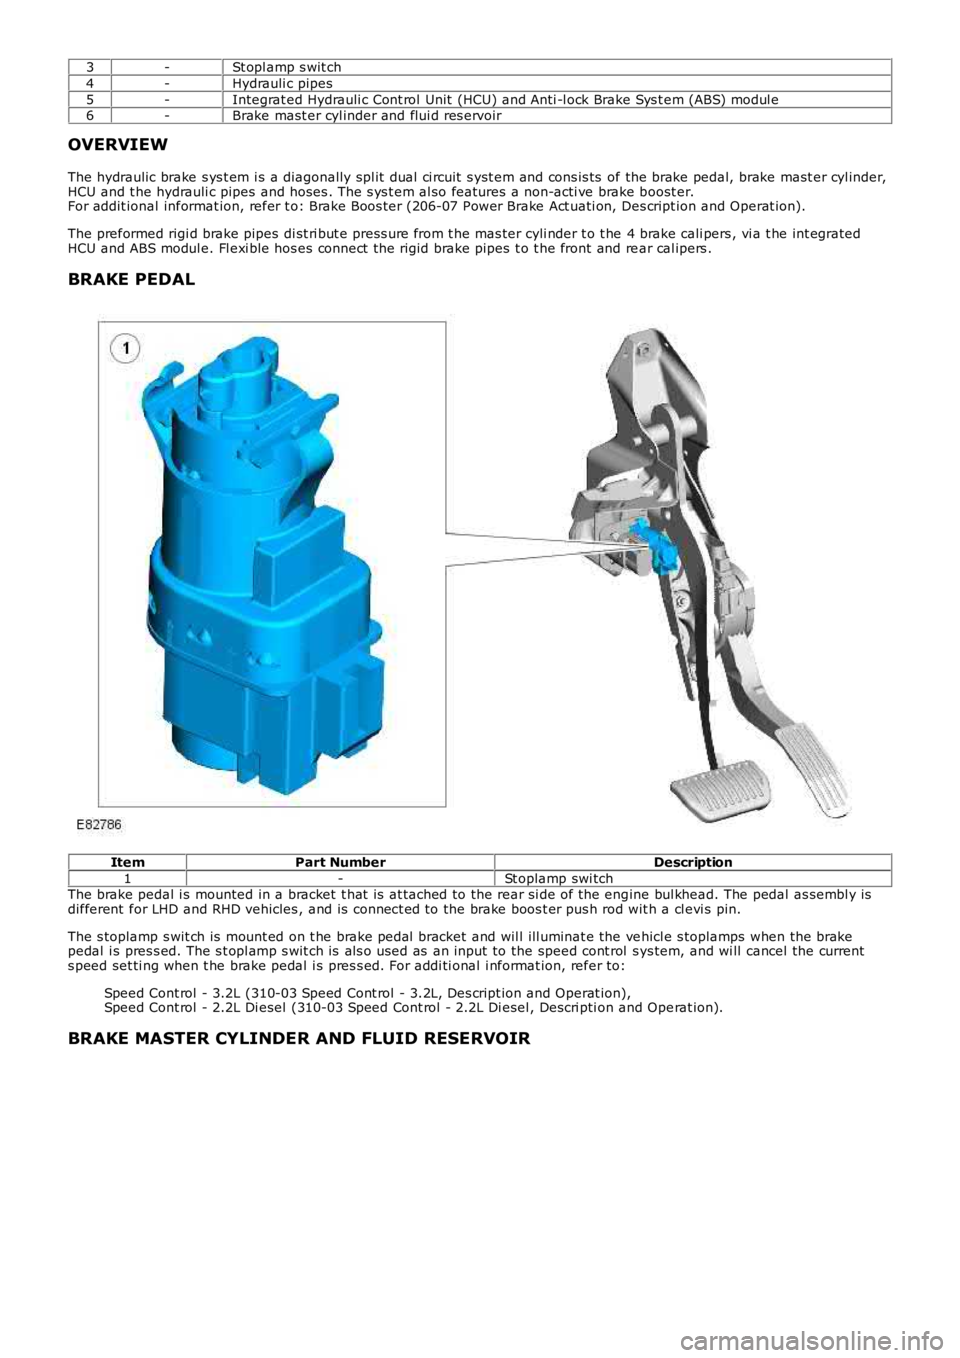
ItemPart NumberDescription
1-St oplamp swi tchThe brake pedal i s mounted in a bracket t hat is at tached to the rear si de of the engine bul khead. The pedal as sembl y isdifferent for LHD and RHD vehicles , and is connect ed to the brake boos t er pus h rod wit h a cl evi s pin.
The s toplamp s wit ch is mount ed on t he brake pedal bracket and wil l ill uminat e the vehicl e s toplamps when the brakepedal i s pres s ed. The s t opl amp s wit ch is al s o used as an input to the speed cont rol s ys tem, and wi ll cancel the currents peed set ti ng when t he brake pedal i s pres s ed. For addi ti onal i nformat ion, refer to:
Speed Cont rol - 3.2L (310-03 Speed Cont rol - 3.2L, Des cript ion and Operat ion),Speed Cont rol - 2.2L Di esel (310-03 Speed Cont rol - 2.2L Di esel , Descri pti on and Operat ion).
BRAKE MASTER CYLINDER AND FLUID RESERVOIR
Trending: oil additives, service, jack points, wipers, check engine, jump start terminals, snow chains
