radio LAND ROVER FRELANDER 2 2006 Repair Manual
[x] Cancel search | Manufacturer: LAND ROVER, Model Year: 2006, Model line: FRELANDER 2, Model: LAND ROVER FRELANDER 2 2006Pages: 3229, PDF Size: 78.5 MB
Page 26 of 3229
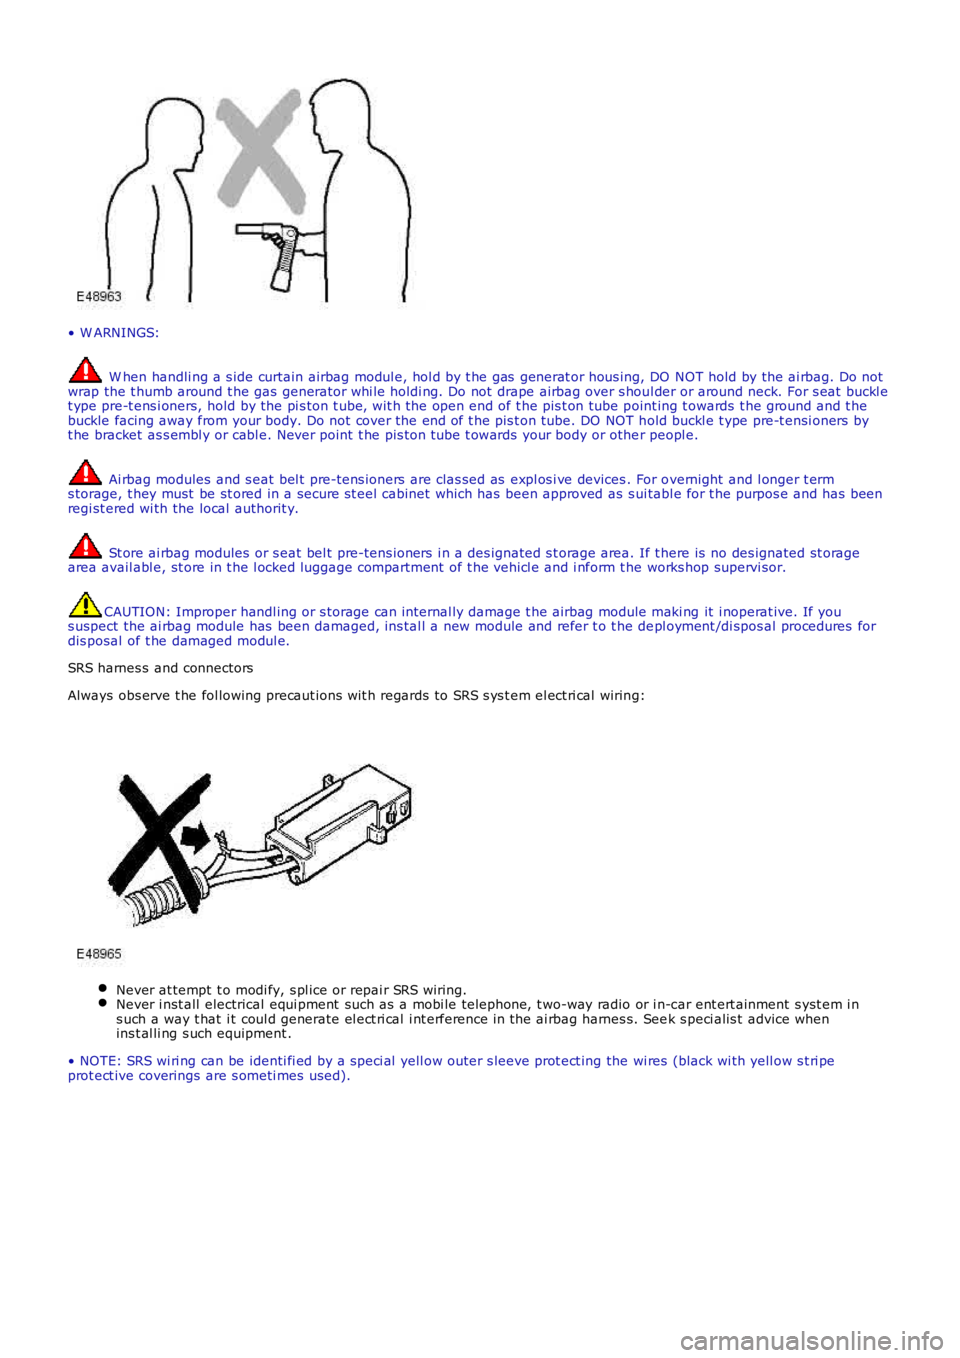
• W ARNINGS:
W hen handli ng a s ide curtain airbag modul e, hol d by t he gas generat or hous ing, DO NOT hold by the ai rbag. Do notwrap the t humb around t he gas generator whi le holdi ng. Do not drape airbag over s houl der or around neck. For s eat buckl et ype pre-t ens i oners, hold by the pi s ton t ube, wit h the open end of t he pis t on tube point ing t owards t he ground and t hebuckle facing away from your body. Do not cover the end of t he pis t on tube. DO NOT hold buckl e t ype pre-t ensi oners byt he bracket as s embl y or cabl e. Never point t he pis ton t ube t owards your body or other peopl e.
Ai rbag modules and s eat bel t pre-tens ioners are clas sed as expl os i ve devices . For overnight and l onger t erms torage, t hey must be st ored in a secure st eel cabinet which has been approved as s ui tabl e for t he purpos e and has beenregi st ered wi th the local authorit y.
St ore ai rbag modules or s eat bel t pre-tens ioners i n a des ignated s t orage area. If there is no des ignated st oragearea avail abl e, st ore in t he l ocked luggage compartment of t he vehi cl e and i nform t he works hop supervi sor.
CAUTION: Improper handl ing or s torage can i nternal ly damage t he airbag module maki ng it i noperat ive. If yous uspect the ai rbag module has been damaged, ins tal l a new module and refer t o t he depl oyment /di spos al procedures fordis posal of t he damaged modul e.
SRS harnes s and connectors
Always obs erve t he fol lowing precaut ions wit h regards to SRS s ys t em el ect ri cal wiring:
Never at tempt t o modi fy, s pl ice or repai r SRS wiring.Never i nst all electrical equi pment such as a mobi le telephone, t wo-way radio or i n-car ent ert ainment s yst em i ns uch a way t hat i t coul d generate el ect ri cal i nt erference in the ai rbag harnes s. Seek s peci alis t advice whenins t al li ng s uch equipment .
• NOTE: SRS wi ri ng can be identi fi ed by a s peci al yell ow outer s leeve prot ect ing the wi res (black wi th yell ow s t ri peprot ect ive coverings are s ometi mes used).
Page 109 of 3229
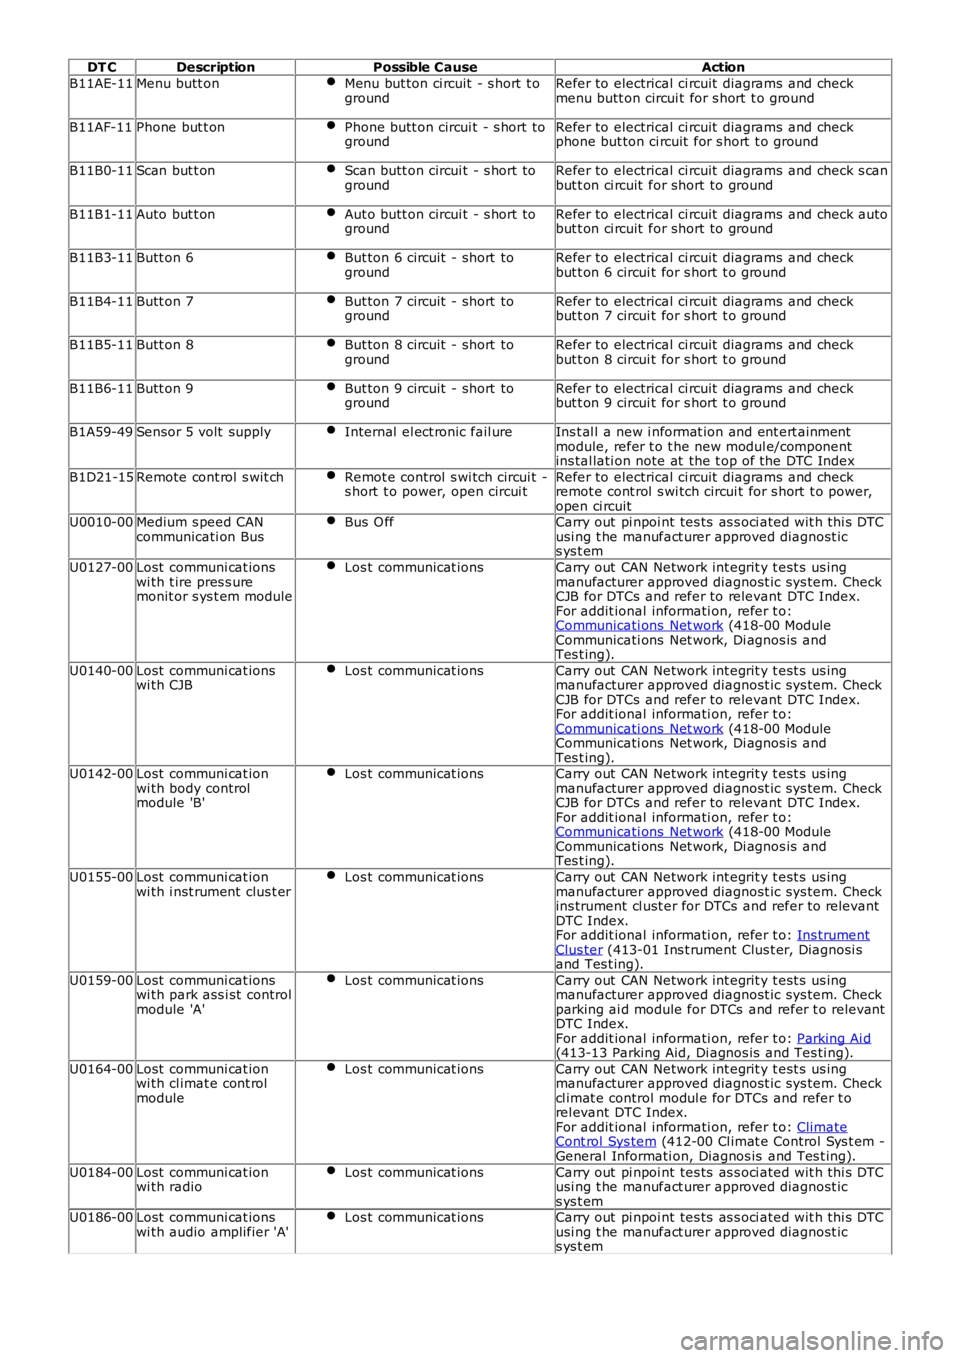
DT CDescriptionPossible CauseAction
B11AE-11Menu butt onMenu but ton ci rcuit - s hort t ogroundRefer to electrical ci rcuit diagrams and checkmenu butt on circui t for s hort t o ground
B11AF-11Phone but t onPhone butt on circui t - s hort togroundRefer to electrical ci rcuit diagrams and checkphone but ton ci rcuit for s hort t o ground
B11B0-11Scan but t onScan butt on circui t - s hort togroundRefer to electrical ci rcuit diagrams and check s canbut t on ci rcuit for short to ground
B11B1-11Auto but t onAut o butt on circui t - s hort togroundRefer to electrical ci rcuit diagrams and check autobut t on ci rcuit for short to ground
B11B3-11Butt on 6But ton 6 circuit - short togroundRefer to electrical ci rcuit diagrams and checkbut t on 6 circui t for s hort t o ground
B11B4-11Butt on 7But ton 7 circuit - short togroundRefer to electrical ci rcuit diagrams and checkbut t on 7 circui t for s hort t o ground
B11B5-11Butt on 8But ton 8 circuit - short togroundRefer to electrical ci rcuit diagrams and checkbut t on 8 circui t for s hort t o ground
B11B6-11Butt on 9But ton 9 circuit - short togroundRefer to electrical ci rcuit diagrams and checkbut t on 9 circui t for s hort t o ground
B1A59-49Sensor 5 volt supplyInternal el ect ronic fail ureIns t al l a new i nformat ion and ent ert ainmentmodule, refer t o t he new modul e/componentins tal lati on note at the t op of the DTC Index
B1D21-15Remote cont rol s wit chRemot e control s wi tch circui t -s hort t o power, open circui tRefer to electrical ci rcuit diagrams and checkremot e cont rol s wi tch circui t for s hort t o power,open ci rcuitU0010-00Medium s peed CANcommunicati on BusBus O ffCarry out pi npoi nt tes ts as s oci ated wit h thi s DTCusi ng t he manufact urer approved diagnost ics ys t em
U0127-00Lost communi cat ionswi th t ire pres s uremonit or s ys t em module
Los t communicat ionsCarry out CAN Network int egrit y t est s us ingmanufacturer approved diagnost ic sys tem. CheckCJB for DTCs and refer to relevant DTC Index.For addit ional informati on, refer t o:Communicati ons Net work (418-00 ModuleCommunicati ons Net work, Di agnos is andTes t ing).
U0140-00Lost communi cat ionswi th CJBLos t communicat ionsCarry out CAN Network int egrit y t est s us ingmanufacturer approved diagnost ic sys tem. CheckCJB for DTCs and refer to relevant DTC Index.For addit ional informati on, refer t o:Communicati ons Net work (418-00 ModuleCommunicati ons Net work, Di agnos is andTes t ing).U0142-00Lost communi cat ionwi th body controlmodule 'B'
Los t communicat ionsCarry out CAN Network int egrit y t est s us ingmanufacturer approved diagnost ic sys tem. CheckCJB for DTCs and refer to relevant DTC Index.For addit ional informati on, refer t o:Communicati ons Net work (418-00 ModuleCommunicati ons Net work, Di agnos is andTes t ing).
U0155-00Lost communi cat ionwi th i nst rument clus t erLos t communicat ionsCarry out CAN Network int egrit y t est s us ingmanufacturer approved diagnost ic sys tem. Checkins trument cl ust er for DTCs and refer to relevantDTC Index.For addit ional informati on, refer t o: Ins trumentClus ter (413-01 Ins t rument Clus t er, Diagnosi sand Tes t ing).
U0159-00Lost communi cat ionswi th park ass i st controlmodule 'A'
Los t communicat ionsCarry out CAN Network int egrit y t est s us ingmanufacturer approved diagnost ic sys tem. Checkparking ai d module for DTCs and refer t o relevantDTC Index.For addit ional informati on, refer t o: Parking Ai d(413-13 Parking Aid, Di agnos is and Tes ti ng).
U0164-00Lost communi cat ionwi th cl imat e cont rolmodule
Los t communicat ionsCarry out CAN Network int egrit y t est s us ingmanufacturer approved diagnost ic sys tem. Checkcl imat e control modul e for DTCs and refer t orel evant DTC Index.For addit ional informati on, refer t o: ClimateCont rol Sys tem (412-00 Cl imat e Control Sys t em -General Informati on, Diagnos is and Tes t ing).
U0184-00Lost communi cat ionwi th radioLos t communicat ionsCarry out pi npoi nt tes ts as s oci ated wit h thi s DTCusi ng t he manufact urer approved diagnost ics ys t emU0186-00Lost communi cat ionswi th audio amplifier 'A'Los t communicat ionsCarry out pi npoi nt tes ts as s oci ated wit h thi s DTCusi ng t he manufact urer approved diagnost ics ys t em
Page 140 of 3229
Publ is hed: 28-Apr-2011
General Information - Diagnostic Trouble Code (DTC) IndexDTC: Satellite
Digital Audio Radio System Module (SARM)
Des cript ion and Operat ion
• NOTE: If a cont rol module or component i s s uspect and the vehicl e remai ns under ma nufacturer warrant y, refer t o t he
W arranty Pol icy and Procedures manual (s ect ion B1.2), or determine i f any pri or appr oval program is i n operat ion, before
t he replacement of a component.
• NOTE: Generic scan t ool s may not read the codes li st ed, or may read only 5-digi t c odes . Match t he 5 digi ts from t he s can
t ool t o t he fi rs t 5 di gi ts of the 7-digit code li s ted t o i dent ify the fault (the las t 2 digi ts gi ve ext ra informati on read by the
manufacturer-approved di agnos ti c s ys t em).
• NOTE: W hen performing volt age or res is t ance t est s , always use a digi tal mult imeter (DMM) accurat e t o t hree deci mal
places, and wi th an up-t o-date cal ibrat ion cert ificate. W hen tes ti ng res is t ance al wa ys take t he res is t ance of t he DMM
leads i nt o account .
• NOTE: Check and recti fy bas ic faul ts before beginni ng diagnos t ic rout ines i nvol vi n g pinpoint t es t s.
• NOTE: Ins pect connect ors for s igns of water ingres s , and pins for damage and/or co rros ion.
• NOTE: If DTCs are recorded and, aft er performi ng the pi npoi nt tes ts , a fault is no t present , an int ermi tt ent concern may
be t he caus e. Always check for loose connect ions and corroded terminals .
Des cript ion And Operat ion
For a detail ed descripti on of the sat elli te radio sys tem, refer t o t he rel evant Des c ript ion and Operat ion s ecti on in the
works hop manual .
For addit ional informat ion, refer t o: Audi o Sys tem (415-01 Informati on and Entertainment Sys tem, Des cript ion and
Operat ion).
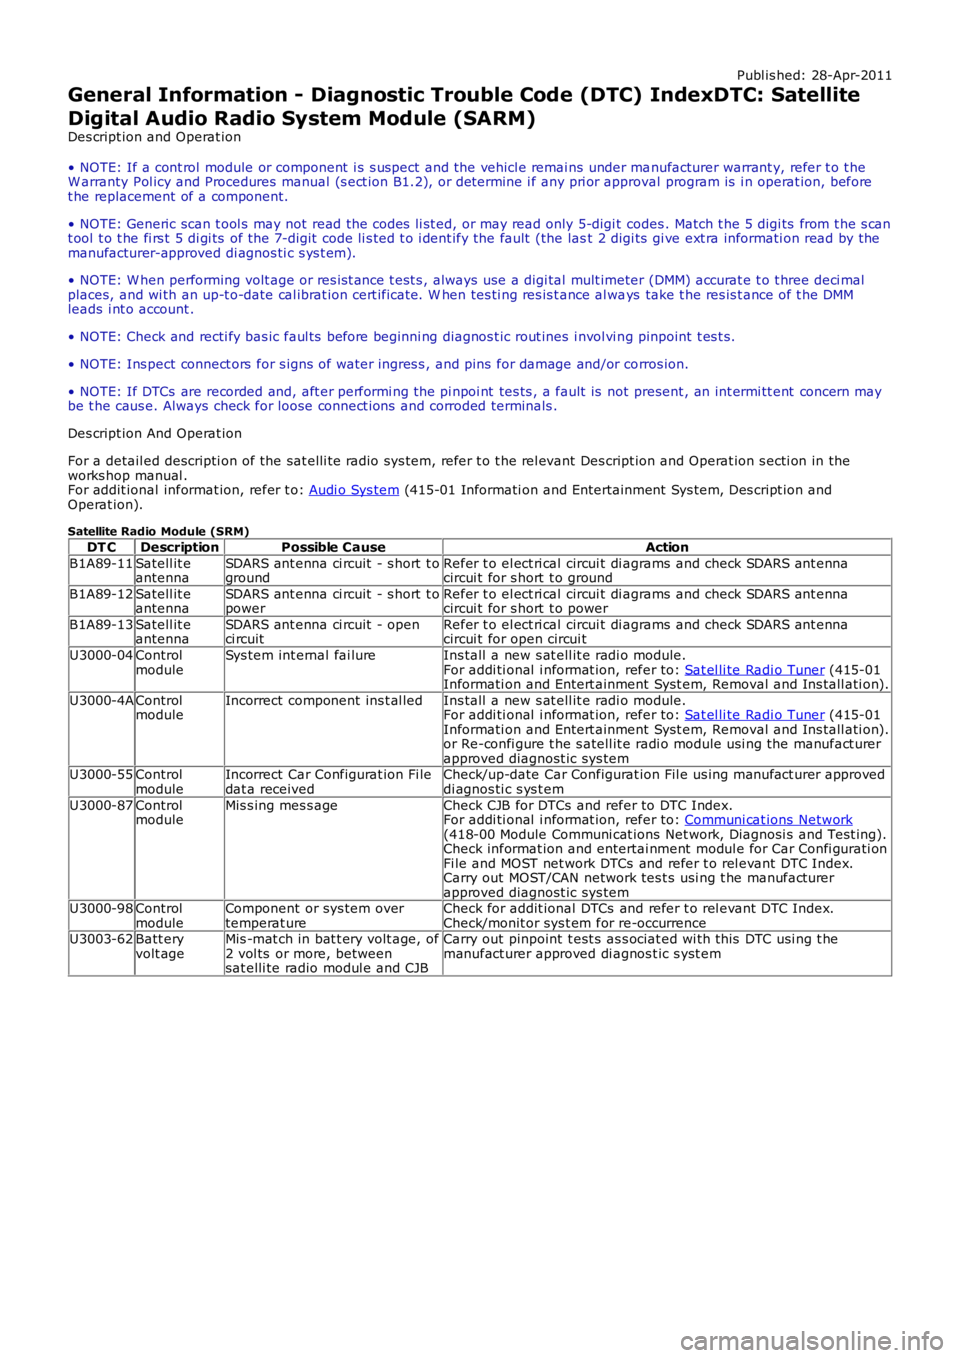
Satellite Radio Module (SRM) DT C Description Possible Cause Action
B1A89-11 Satell it e
antenna SDARS ant enna ci rcuit - s hort t o
ground Refer t o el ect ri cal circui t di agrams and check SDARS ant enna
circui t for s hort t o ground
B1A89-12 Satell it e
antenna SDARS ant enna ci rcuit - s hort t o
power Refer t o el ect ri cal circui t di agrams and check SDARS ant enna
circui t for s hort t o power
B1A89-13 Satell it e
antenna SDARS ant enna ci rcuit - open
ci rcuit Refer t o el ect ri cal circui t di agrams and check SDARS ant enna
circui t for open circui t
U3000-04 Control
module Sys tem int ernal fai lure
Ins tall a new s at ell it e radi o module.
For addi ti onal i nformat ion, refer to: Sat el li te Radi o Tuner (415-01
Informati on and Entert ainment Syst em, Removal and Ins tall ati on).
U3000-4A Control
module Incorrect component ins t al led
Ins tall a new s at ell it e radi o module.
For addi ti onal i nformat ion, refer to: Sat el li te Radi o Tuner (415-01
Informati on and Entert ainment Syst em, Removal and Ins tall ati on).
or Re-confi gure t he s atell it e radi o module us i ng the manufact urer
approved diagnost ic sys tem
U3000-55 Control
module Incorrect Car Configurat ion Fi le
dat a received Check/up-date Car Configurat ion Fil e us ing manufact urer approved
di agnos ti c s ys t em
U3000-87 Control
module Mis s ing mes s age
Check CJB for DTCs and refer to DTC Index.
For addi ti onal i nformat ion, refer to: Communi cat ions Network (418-00 Module Communi cat ions Net work, Diagnosi s and Test ing).
Check informat ion and entertai nment modul e for Car Confi gurati on
Fi le and MOST net work DTCs and refer t o rel evant DTC Index.
Carry out MOST/CAN network tes t s usi ng t he manufact urer
approved diagnost ic sys tem
U3000-98 Control
module Component or sys tem over
temperat ure Check for addit ional DTCs and refer t o rel evant DTC Index.
Check/monit or sys t em for re-occurrence
U3003-62 Batt ery
volt age Mis -mat ch in bat t ery volt age, of
2 vol ts or more, between
sat elli te radio modul e and CJB Carry out pinpoint t est s as s ociat ed wi th t his DTC usi ng t he
manufact urer approved di agnos t ic s yst em
Page 153 of 3229
Publ is hed: 26-Oct -2011
General Information - Diagnostic Trouble Code (DTC) IndexDTC: High
Definition Radio Module (HDR)
Des cript ion and Operat ion
• NOTE: If a cont rol module or component i s s uspect and the vehicl e remai ns under manufacturer warrant y, refer t o t heW arranty Pol icy and Procedures manual (s ect ion B1.2), or determine i f any pri or approval program is i n operat ion, beforet he replacement of a component.
• NOTE: Generic scan t ool s may not read the codes li st ed, or may read only 5-digi t codes . Match t he 5 digi ts from t he s cant ool t o t he fi rs t 5 di gi ts of the 7-digit code li s ted t o i dent ify the fault (the last 2 digi ts gi ve ext ra informati on read by themanufacturer-approved di agnos ti c s ys t em).
• NOTE: W hen performing volt age or res is t ance t est s , always use a digi tal mult imeter (DMM) accurat e t o t hree deci malplaces, and wi th an up-t o-date cal ibrat ion cert ificate. W hen tes ti ng res is t ance al ways take t he res is t ance of t he DMMleads i nt o account .
• NOTE: Check and recti fy bas ic faul ts before beginni ng diagnos t ic rout ines i nvol vi ng pinpoint t es t s.
• NOTE: Ins pect connect ors for s igns of water ingres s , and pins for damage and/or corros ion.
• NOTE: If DTCs are recorded and, aft er performi ng the pi npoi nt tes ts , a fault is not present , an int ermi tt ent concern maybe t he caus e. Always check for loose connect ions and corroded terminals .
Des cript ion And Operat ion
For a detail ed descripti on of the cell ular phone sys tem, refer t o t he rel evant Des cript ion and Operat ion s ecti on in theworks hop manual . For addit ional informat ion, refer t o: Audi o Syst em (415-01 Informati on and Entertainment Sys tem,Des cript ion and Operat ion).
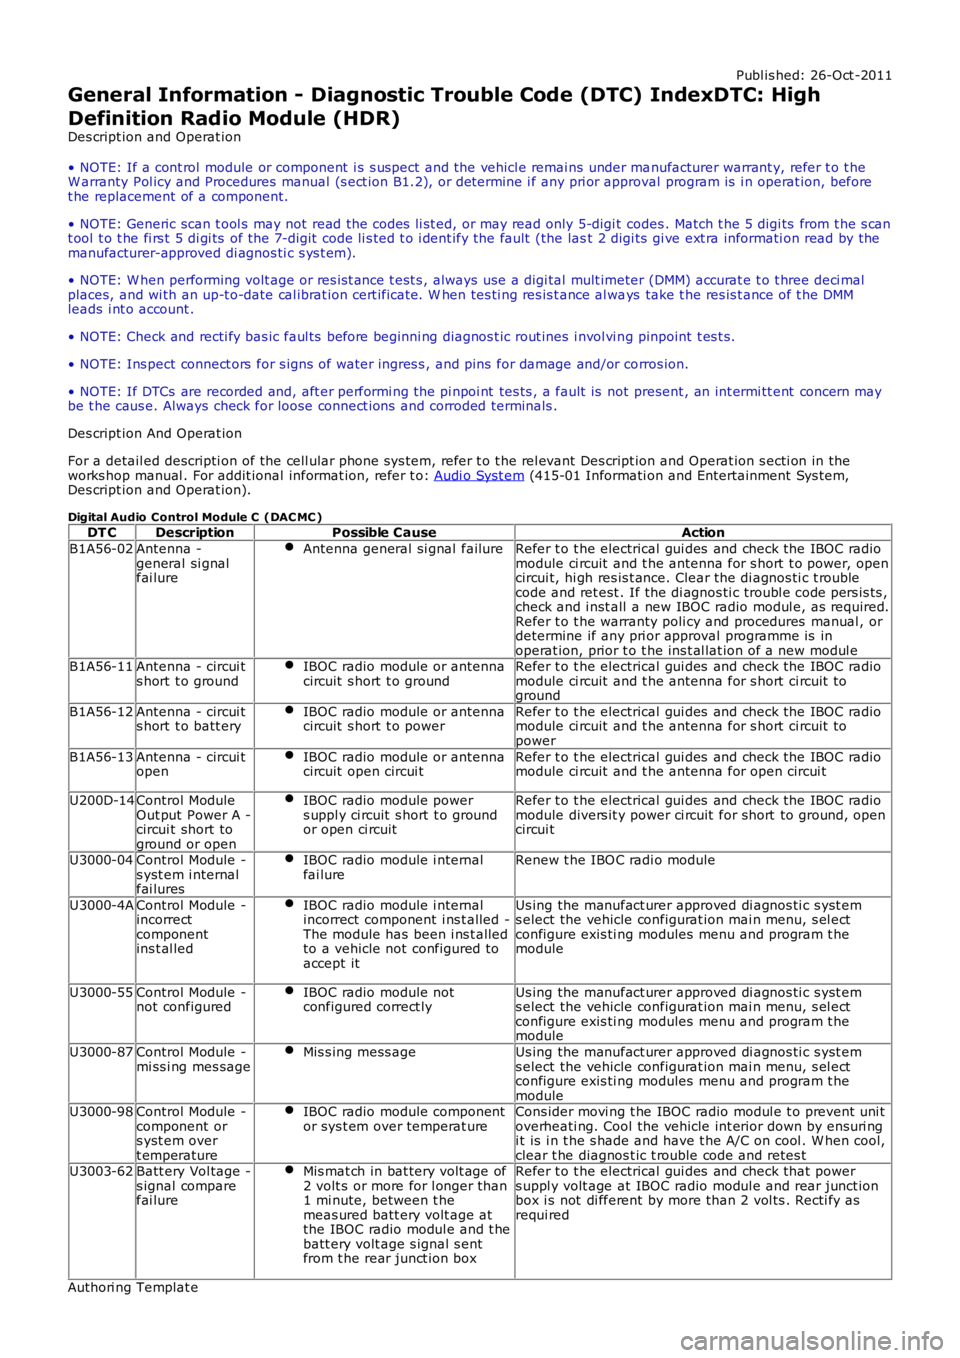
Digital Audio Control Module C (DAC MC )DT CDescriptionPossible CauseAction
B1A56-02Antenna -general si gnalfai lure
Antenna general si gnal failureRefer t o t he electrical gui des and check the IBOC radiomodule ci rcuit and t he antenna for s hort t o power, opencircui t, hi gh res is t ance. Clear the di agnos ti c t roublecode and ret est . If the di agnos ti c troubl e code pers is ts ,check and i nst all a new IBOC radio modul e, as required.Refer t o t he warranty poli cy and procedures manual , ordetermine if any pri or approval programme is inoperat ion, prior t o t he ins t al lat ion of a new modul eB1A56-11Antenna - circui ts hort t o groundIBOC radio module or antennacircuit s hort t o groundRefer t o t he electrical gui des and check the IBOC radiomodule ci rcuit and t he antenna for s hort ci rcuit t oground
B1A56-12Antenna - circui ts hort t o batt eryIBOC radio module or antennacircuit s hort t o powerRefer t o t he electrical gui des and check the IBOC radiomodule ci rcuit and t he antenna for s hort ci rcuit t opower
B1A56-13Antenna - circui topenIBOC radio module or antennacircuit open circui tRefer t o t he electrical gui des and check the IBOC radiomodule ci rcuit and t he antenna for open circui t
U200D-14Control ModuleOut put Power A -circui t short toground or open
IBOC radio module powers uppl y ci rcuit s hort t o groundor open ci rcuit
Refer t o t he electrical gui des and check the IBOC radiomodule divers it y power ci rcuit for short to ground, opencircui t
U3000-04Control Module -s yst em i nternalfai lures
IBOC radio module i nternalfai lureRenew t he IBO C radi o module
U3000-4AControl Module -incorrectcomponentins t al led
IBOC radio module i nternalincorrect component i ns t alled -The module has been i ns t alledto a vehicle not configured toaccept it
Us ing the manufact urer approved di agnos ti c s yst ems elect the vehicle configurat ion mai n menu, s el ectconfigure exis ti ng modules menu and program t hemodule
U3000-55Control Module -not configuredIBOC radio module notconfigured correct lyUs ing the manufact urer approved di agnos ti c s yst ems elect the vehicle configurat ion mai n menu, s el ectconfigure exis ti ng modules menu and program t hemodule
U3000-87Control Module -mi ss i ng mes sageMis s ing mess ageUs ing the manufact urer approved di agnos ti c s yst ems elect the vehicle configurat ion mai n menu, s el ectconfigure exis ti ng modules menu and program t hemoduleU3000-98Control Module -component ors yst em overt emperature
IBOC radio module componentor sys t em over temperat ureCons ider movi ng t he IBOC radio modul e t o prevent uni toverheati ng. Cool the vehicle int erior down by ens uri ngi t is i n t he s hade and have t he A/C on cool . W hen cool,clear t he diagnos t ic t rouble code and retes tU3003-62Batt ery Vol tage -s ignal comparefai lure
Mis mat ch in bat tery volt age of2 volt s or more for l onger than1 mi nute, between t hemeas ured batt ery volt age atthe IBOC radio modul e and t hebatt ery volt age s ignal s entfrom t he rear junct ion box
Refer t o t he electrical gui des and check that powers uppl y volt age at IBOC radio modul e and rear junct ionbox i s not di fferent by more than 2 vol ts . Recti fy asrequi red
Authori ng Templat e
Page 276 of 3229
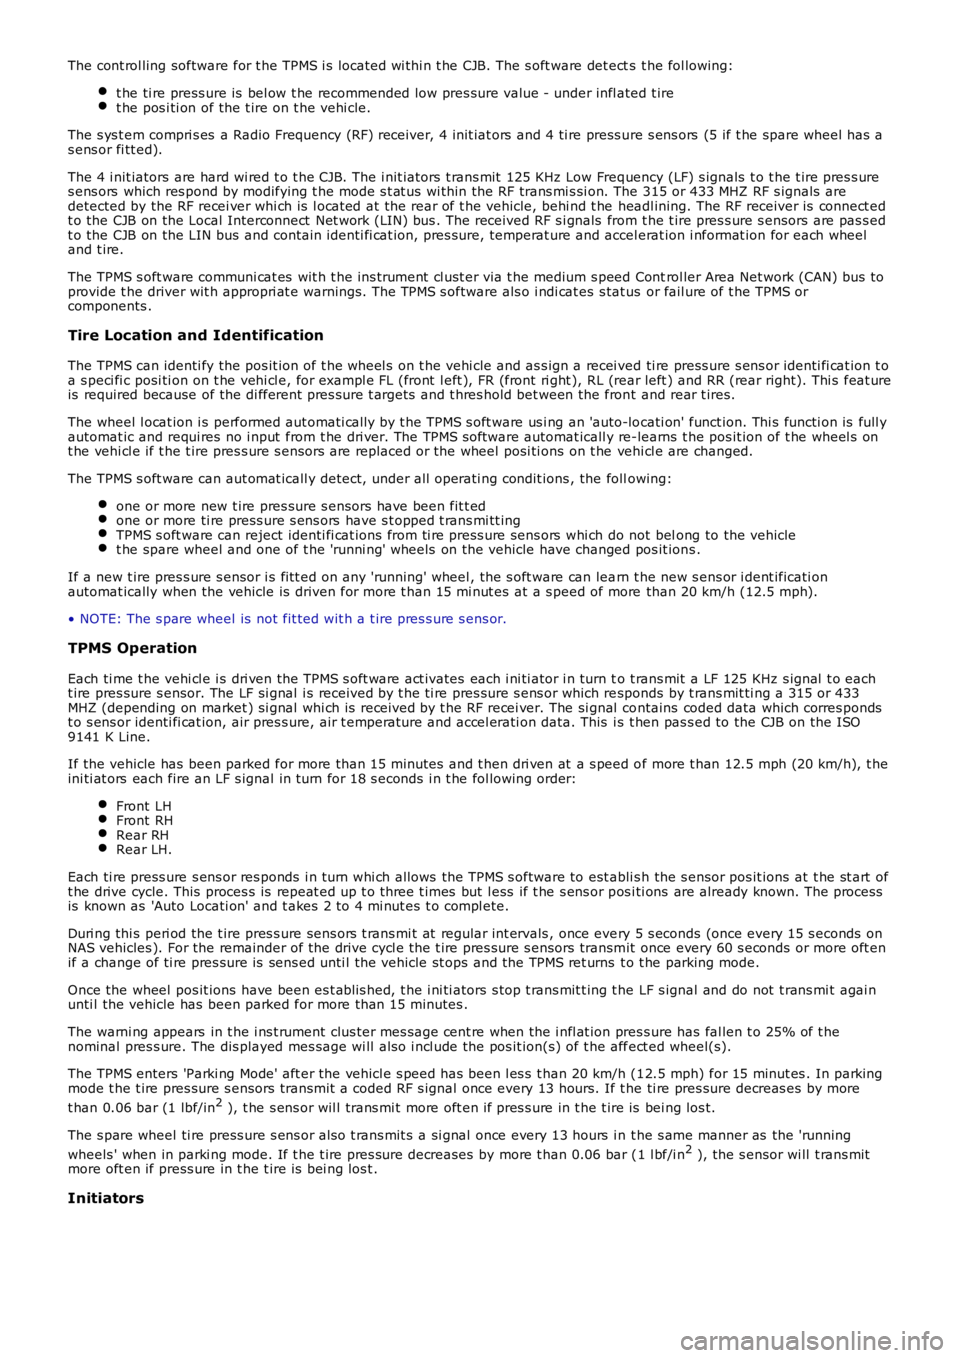
The cont rol ling software for t he TPMS i s located wi thi n t he CJB. The s oft ware det ects t he fol lowing:
t he ti re press ure is bel ow t he recommended low pres sure value - under infl ated t iret he pos i ti on of the t ire on t he vehi cle.
The s ys t em compri s es a Radio Frequency (RF) receiver, 4 init iat ors and 4 ti re press ure s ens ors (5 if t he spare wheel has as ens or fi tt ed).
The 4 i nit iators are hard wi red t o t he CJB. The i nit iators t rans mit 125 KHz Low Frequency (LF) s ignals t o t he t ire pres s ures ens ors which res pond by modifying t he mode s t at us wi thin the RF trans mi s si on. The 315 or 433 MHZ RF s ignals aredetected by the RF recei ver whi ch is l ocat ed at the rear of t he vehicle, behi nd t he headl ining. The RF receiver is connect edt o the CJB on the Local Interconnect Net work (LIN) bus . The received RF s i gnals from t he t ire pres s ure s ensors are pas s edt o the CJB on the LIN bus and contain identi fi cat ion, pres sure, temperat ure and accel erat ion i nformat ion for each wheeland t ire.
The TPMS s oft ware communi cat es wit h t he ins trument cl ust er via t he medium s peed Control ler Area Net work (CAN) bus toprovide t he driver wit h appropri at e warnings. The TPMS s oftware als o i ndi cat es s tat us or fail ure of t he TPMS orcomponents .
Tire Location and Identification
The TPMS can identi fy the pos it ion of t he wheel s on t he vehi cle and as s ign a recei ved ti re press ure s ens or identi fi cat ion t oa s peci fi c posi ti on on t he vehi cl e, for exampl e FL (front l eft ), FR (front ri ght ), RL (rear left ) and RR (rear right). Thi s feat ureis required because of the di fferent pres sure t argets and t hres hold bet ween the front and rear t ires.
The wheel l ocat ion i s performed aut omati cal ly by t he TPMS s oft ware us i ng an 'auto-locati on' funct ion. Thi s functi on is full yautomat ic and requi res no i nput from t he dri ver. The TPMS software automat icall y re-learns t he pos it ion of t he wheel s ont he vehi cl e if t he t ire pres s ure s ensors are replaced or the wheel posi ti ons on t he vehi cl e are changed.
The TPMS s oft ware can aut omat icall y detect, under all operati ng condit ions , the following:
one or more new t ire pres sure s ensors have been fit t edone or more ti re press ure s ens ors have s t opped t rans mi tt ingTPMS s oft ware can reject identi fi cat ions from ti re press ure sens ors whi ch do not belong to the vehiclet he spare wheel and one of t he 'runni ng' wheels on the vehicle have changed pos it ions .
If a new t ire pres s ure s ensor i s fi tt ed on any 'running' wheel , the s oft ware can learn t he new s ens or i dent ificati onautomat ically when the vehicle is driven for more t han 15 mi nut es at a s peed of more than 20 km/h (12.5 mph).
• NOTE: The s pare wheel is not fit ted wit h a t ire pres s ure s ens or.
TPMS Operation
Each ti me t he vehi cl e i s dri ven the TPMS s oft ware act ivates each i ni ti ator i n turn to t rans mit a LF 125 KHz s ignal t o eacht ire pres sure s ensor. The LF si gnal i s received by t he ti re pres sure s ens or which responds by t rans mit ti ng a 315 or 433MHZ (depending on market ) si gnal whi ch is received by t he RF recei ver. The si gnal contains coded data which corres pondst o s ens or identi fi cat ion, air pres s ure, air t emperature and accel erati on data. This i s t hen pas s ed to the CJB on the ISO9141 K Line.
If the vehicle has been parked for more than 15 minutes and t hen dri ven at a s peed of more t han 12.5 mph (20 km/h), t heini ti at ors each fire an LF s ignal in turn for 18 s econds i n t he fol lowing order:
Front LHFront RHRear RHRear LH.
Each ti re press ure s ens or res ponds i n t urn whi ch allows the TPMS s oftware to est ablis h the s ensor pos it ions at t he st art oft he drive cycle. This proces s is repeat ed up t o t hree t imes but l ess if t he s ens or pos i ti ons are already known. The processis known as 'Auto Locati on' and t akes 2 to 4 mi nut es t o compl ete.
Duri ng thi s peri od the t ire pres s ure sens ors t rans mi t at regular int ervals , once every 5 s econds (once every 15 s econds onNAS vehicles ). For the remainder of the drive cycl e t he t ire pres sure s ensors transmit once every 60 s econds or more oft enif a change of ti re pres sure is sens ed unti l the vehicle st ops and the TPMS ret urns t o t he parking mode.
Once the wheel pos it ions have been es t abl is hed, t he i ni ti ators s top t rans mit t ing t he LF s ignal and do not t rans mi t agai nunti l the vehicle has been parked for more than 15 minutes .
The warni ng appears in t he i ns t rument clus ter mes s age cent re when the i nfl at ion press ure has fal len t o 25% of t henominal pres s ure. The dis played mes sage wi ll als o i ncl ude the pos it ion(s) of t he affect ed wheel(s).
The TPMS enters 'Parki ng Mode' aft er the vehicl e s peed has been l es s t han 20 km/h (12.5 mph) for 15 minut es . In parkingmode t he t ire pres sure s ensors transmit a coded RF s ignal once every 13 hours. If t he ti re pres sure decreas es by more
t han 0.06 bar (1 lbf/in2 ), t he s ens or wil l trans mi t more oft en if pres s ure in t he t ire is bei ng los t.
The s pare wheel ti re press ure s ens or als o t rans mit s a si gnal once every 13 hours i n t he s ame manner as the 'running
wheels ' when in parki ng mode. If t he t ire pres sure decreases by more t han 0.06 bar (1 l bf/i n2 ), the s ensor wi ll t rans mitmore oft en if press ure in t he t ire is bei ng los t .
Initiators
Page 589 of 3229
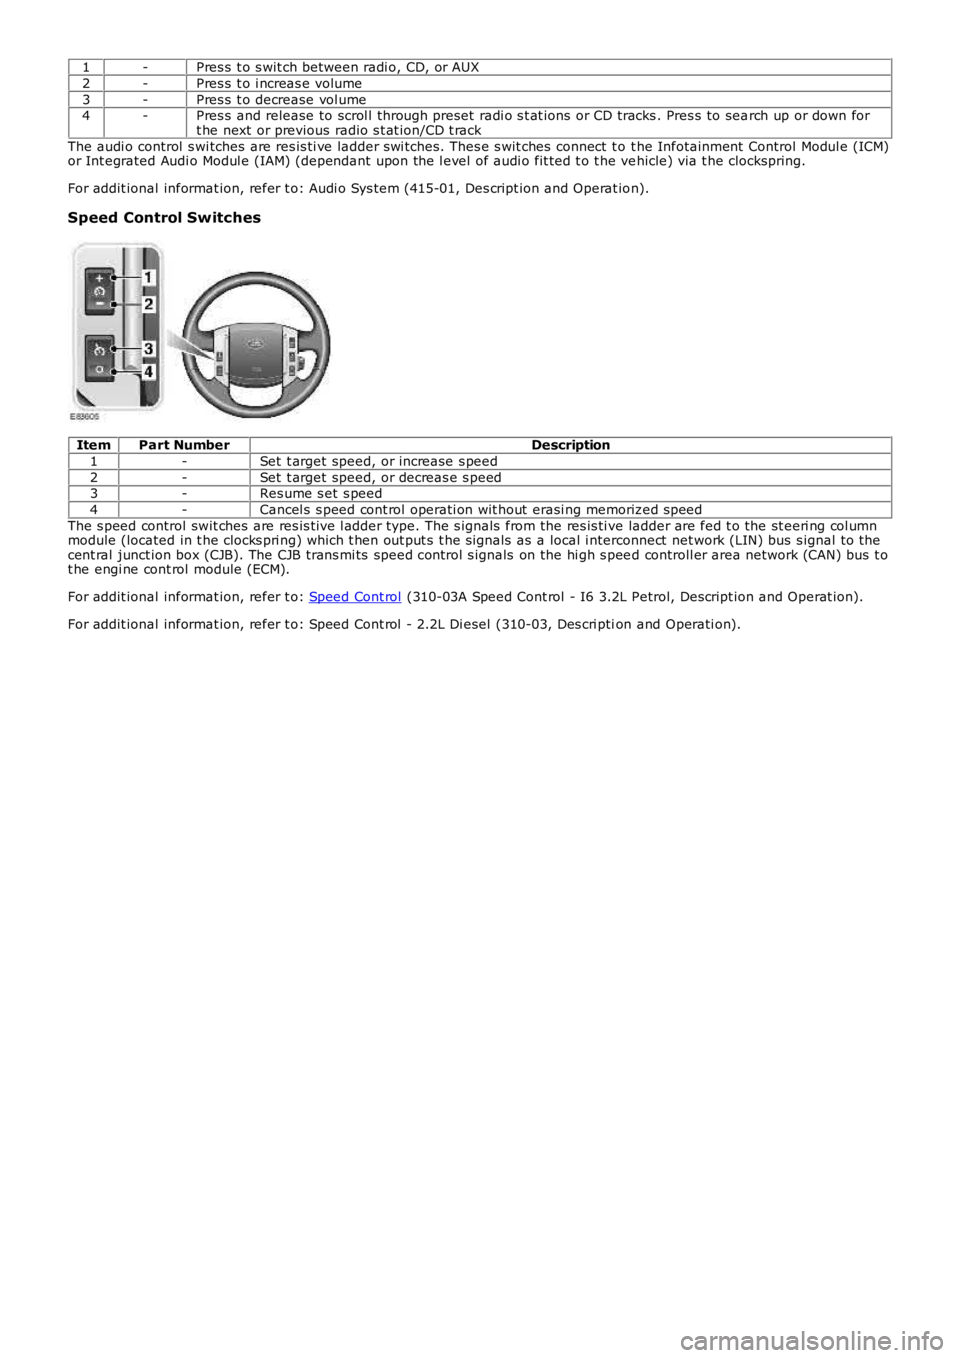
1-Pres s t o s wit ch between radi o, CD, or AUX
2-Pres s t o i ncreas e volume
3-Pres s t o decrease vol ume4-Pres s and release to scrol l through preset radi o s t at ions or CD tracks . Pres s to search up or down fort he next or previous radio s t at ion/CD t rack
The audi o control s wi tches are res is ti ve ladder swi tches. Thes e s wit ches connect t o t he Infotainment Control Modul e (ICM)or Int egrated Audi o Modul e (IAM) (dependant upon the l evel of audi o fit ted t o t he vehicle) via t he clockspring.
For addit ional informat ion, refer t o: Audi o Sys tem (415-01, Des cript ion and Operat ion).
Speed Control Switches
ItemPart NumberDescription
1-Set t arget speed, or increase s peed
2-Set t arget speed, or decreas e s peed3-Res ume s et s peed
4-Cancel s s peed cont rol operati on wit hout erasi ng memorized s peed
The s peed control swit ches are res is t ive l adder type. The s ignals from the res is ti ve ladder are fed t o the st eeri ng col umnmodule (located in t he clocks pri ng) which t hen out put s t he s ignals as a local i nterconnect net work (LIN) bus s ignal to thecent ral junct ion box (CJB). The CJB trans mi ts speed cont rol s ignals on the hi gh s peed controll er area network (CAN) bus t ot he engi ne cont rol module (ECM).
For addit ional informat ion, refer t o: Speed Cont rol (310-03A Speed Cont rol - I6 3.2L Petrol, Des cript ion and Operat ion).
For addit ional informat ion, refer t o: Speed Cont rol - 2.2L Di esel (310-03, Des cri ption and Operati on).
Page 1825 of 3229
1
2
1
2
3
4
5
6
1
1
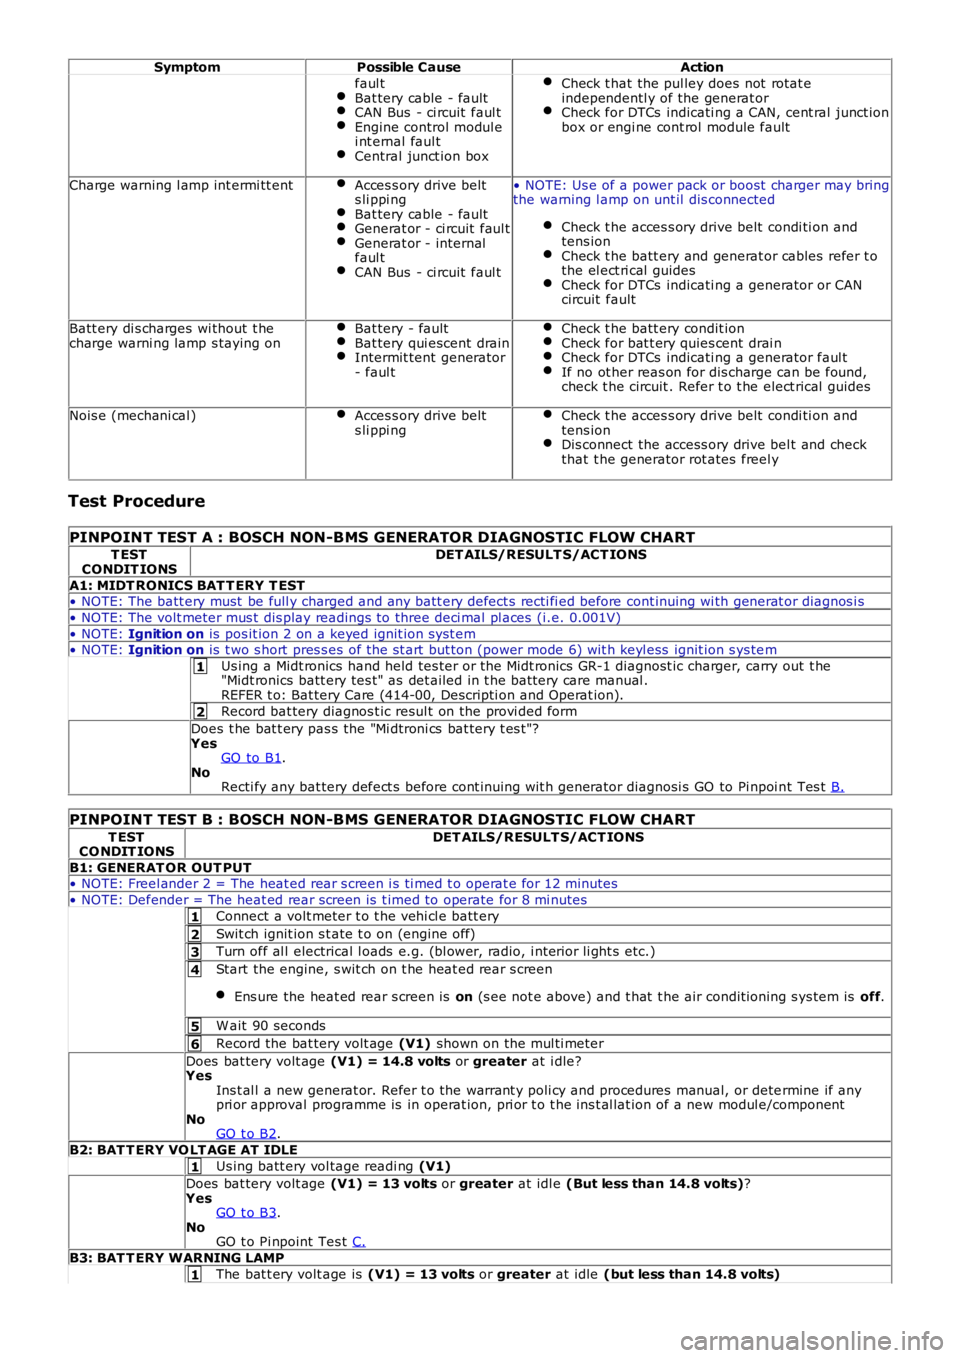
SymptomPossible CauseAction
faul tBat tery cable - faultCAN Bus - ci rcuit faul tEngine control modul ei nt ernal faul tCentral junct ion box
Check t hat the pul ley does not rotat eindependentl y of the generat orCheck for DTCs indicati ng a CAN, cent ral junct ionbox or engi ne cont rol module fault
Charge warning l amp int ermi tt entAcces s ory drive belts li ppi ngBat tery cable - faultGenerat or - ci rcuit faul tGenerat or - internalfaul tCAN Bus - ci rcuit faul t
• NOTE: Us e of a power pack or boost charger may bringthe warning l amp on unt il dis connected
Check t he acces s ory drive belt condi ti on andtens ionCheck t he batt ery and generat or cables refer t othe el ect ri cal guidesCheck for DTCs indicati ng a generator or CANcircuit fault
Batt ery di s charges wi thout t hecharge warni ng lamp s taying onBat tery - faultBat tery qui escent drainIntermit tent generator- faul t
Check t he batt ery condit ionCheck for bat t ery quies cent drai nCheck for DTCs indicati ng a generator faul tIf no ot her reas on for dis charge can be found,check t he circuit . Refer t o t he elect rical guides
Nois e (mechani cal )Acces s ory drive belts li ppi ngCheck t he acces s ory drive belt condi ti on andtens ionDis connect the access ory drive bel t and checkthat t he generator rot ates freel y
Test Procedure
PINPOINT TEST A : BOSCH NON-BMS GENERATOR DIAGNOSTIC FLOW CHART
T ESTCONDIT IONSDET AILS/RESULT S/ACT IONS
A1: MIDT RONICS BAT T ERY T EST• NOTE: The batt ery must be full y charged and any batt ery defect s recti fi ed before cont inuing wi th generat or diagnos i s
• NOTE: The volt meter mus t dis play readings to three deci mal pl aces (i.e. 0.001V)
• NOTE: Ignition on is pos it ion 2 on a keyed ignit ion s yst em• NOTE: Ignition on is t wo s hort pres s es of the st art but ton (power mode 6) wit h keyl ess ignit ion s ys tem
Us ing a Midt ronics hand held tes ter or t he Midt ronics GR-1 diagnost ic charger, carry out t he"Midt ronics batt ery tes t" as det ailed in t he batt ery care manual .REFER t o: Bat tery Care (414-00, Descripti on and Operat ion).
Record bat tery diagnos t ic resul t on the provi ded form
Does t he bat t ery pas s the "Mi dtroni cs bat tery t es t "?YesGO to B1.NoRecti fy any bat tery defect s before cont inuing wit h generator diagnosi s GO to Pi npoi nt Tes t B.
PINPOINT TEST B : BOSCH NON-BMS GENERATOR DIAGNOSTIC FLOW CHART
T ESTCO NDIT IONSDET AILS/RESULT S/ACT IONS
B1: GENERAT OR OUT PUT• NOTE: Freel ander 2 = The heat ed rear s creen i s ti med t o operat e for 12 minutes
• NOTE: Defender = The heat ed rear s creen is t imed to operate for 8 mi nutes
Connect a volt meter t o t he vehi cl e batt ery
Swit ch ignit ion s t ate t o on (engine off)
Turn off al l electrical l oads e.g. (bl ower, radio, i nteri or li ght s etc.)
Start the engine, s wit ch on t he heat ed rear s creen
Ens ure the heat ed rear s creen is on (s ee not e above) and t hat t he air condit ioning s ys tem is off.
W ait 90 seconds
Record the bat tery volt age (V1) shown on the mul ti meter
Does bat tery volt age (V1) = 14.8 volts or greater at i dle?YesIns t al l a new generat or. Refer t o the warrant y poli cy and procedures manual, or determine if anypri or approval programme is in operat ion, pri or t o t he ins t al lat ion of a new modul e/componentNoGO t o B2.
B2: BAT T ERY VO LT AGE AT IDLE
Us ing batt ery vol tage readi ng (V1)
Does bat tery volt age (V1) = 13 volts or greater at idl e (But less than 14.8 volts)?YesGO t o B3.NoGO t o Pi npoint Tes t C.
B3: BAT T ERY WARNING LAMP
The bat t ery volt age is (V1) = 13 volts or greater at idle (but less than 14.8 volts)
Page 1826 of 3229
1
2
1
2
3
4
5
1
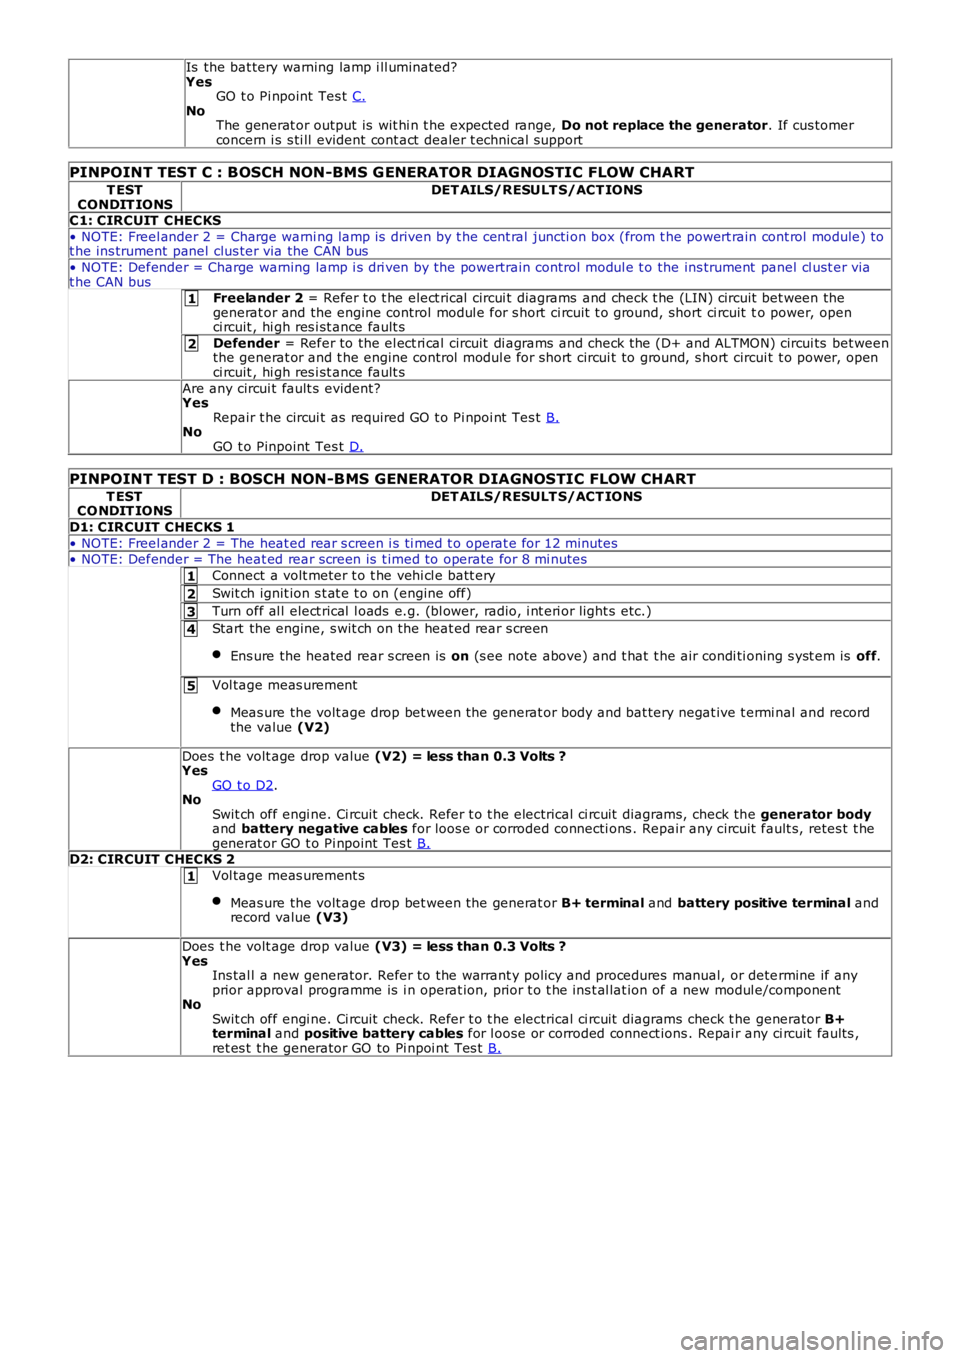
Is the bat tery warning lamp i ll uminated?YesGO t o Pi npoint Tes t C.NoThe generat or output is wit hi n t he expected range, Do not replace the generator. If cus tomerconcern i s s ti ll evident cont act dealer t echnical support
PINPOINT TEST C : BOSCH NON-BMS G ENERATOR DIAG NOSTIC FLOW CHART
T ESTCONDIT IONSDET AILS/RESULT S/ACT IONS
C1: CIRCUIT CHECKS
• NOTE: Freel ander 2 = Charge warni ng lamp is driven by t he cent ral juncti on box (from t he powert rain cont rol module) tot he ins trument panel clus ter via the CAN bus
• NOTE: Defender = Charge warning lamp i s dri ven by the powertrain control modul e t o the ins trument panel cl ust er viat he CAN busFreelander 2 = Refer t o t he elect rical circui t diagrams and check t he (LIN) ci rcuit bet ween thegenerat or and the engine control modul e for s hort ci rcuit t o ground, short ci rcuit to power, openci rcuit , hi gh res i st ance fault s
Defender = Refer to the el ect ri cal circuit di agrams and check the (D+ and ALTMON) circui ts bet weenthe generat or and t he engine control modul e for s hort circui t to ground, s hort circui t t o power, openci rcuit , hi gh res i st ance fault s
Are any circui t fault s evident?YesRepair t he circui t as required GO t o Pi npoi nt Tes t B.NoGO t o Pinpoint Tes t D.
PINPOINT TEST D : BOSCH NON-BMS GENERATOR DIAGNOSTIC FLOW CHART
T ESTCO NDIT IONSDET AILS/RESULT S/ACT IONS
D1: CIRCUIT CHECKS 1
• NOTE: Freel ander 2 = The heat ed rear s creen i s ti med t o operat e for 12 minutes• NOTE: Defender = The heat ed rear s creen is t imed to operate for 8 mi nutes
Connect a volt meter t o t he vehi cl e batt ery
Swit ch ignit ion s t at e t o on (engine off)
Turn off al l elect rical l oads e.g. (bl ower, radio, i nt eri or light s etc.)
Start the engine, s wit ch on the heat ed rear s creen
Ens ure the heated rear s creen is on (s ee note above) and t hat t he air condi ti oning s yst em is off.
Vol tage meas urement
Meas ure the volt age drop bet ween the generat or body and bat tery negat ive t ermi nal and recordthe value (V2)
Does t he volt age drop value (V2) = less than 0.3 Volts ?YesGO t o D2.NoSwit ch off engi ne. Ci rcuit check. Refer t o t he electrical ci rcuit diagrams, check the generator bodyand battery negative cables for loos e or corroded connecti ons . Repair any circuit fault s, retes t t hegenerat or GO t o Pi npoint Tes t B.D2: CIRCUIT CHECKS 2
Vol tage meas urement s
Meas ure the volt age drop bet ween the generat or B+ terminal and battery positive terminal andrecord value (V3)
Does t he volt age drop value (V3) = less than 0.3 Volts ?YesIns tal l a new generator. Refer to the warrant y policy and procedures manual, or determine if anyprior approval programme is i n operat ion, prior t o t he ins t al lat ion of a new modul e/componentNoSwit ch off engi ne. Ci rcuit check. Refer t o t he electrical ci rcuit diagrams check t he generator B+terminal and positive battery cables for l oose or corroded connect ions . Repai r any ci rcuit faul ts ,ret es t t he generator GO to Pi npoi nt Tes t B.
Page 1827 of 3229
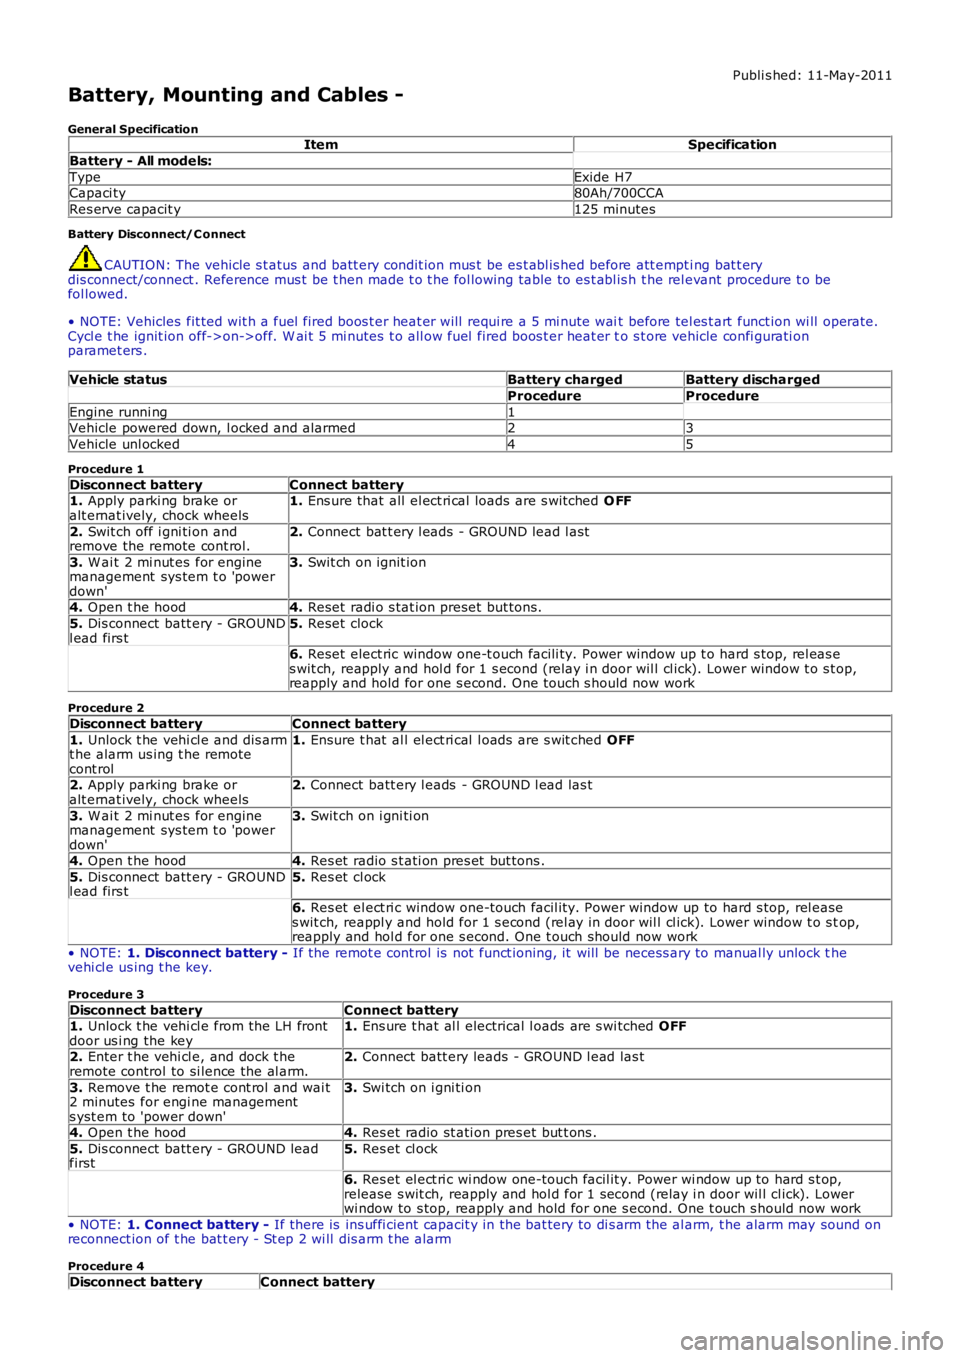
Publi s hed: 11-May-2011
Battery, Mounting and Cables -
General SpecificationItemSpecification
Battery - All models:
TypeExide H7Capaci ty80Ah/700CCA
Res erve capacit y125 minutes
Battery Disconnect/C onnect
CAUTION: The vehicle s t atus and batt ery condit ion mus t be es t abl is hed before att empti ng bat t erydis connect/connect . Reference mus t be t hen made t o t he fol lowing table to es t abl is h t he rel evant procedure t o befol lowed.
• NOTE: Vehicles fit ted wit h a fuel fired boos t er heat er will requi re a 5 mi nute wait before tel es t art funct ion wi ll operate.Cycl e t he ignit ion off->on->off. W ai t 5 mi nutes t o all ow fuel fired boos t er heat er to s t ore vehicle confi gurati onparamet ers .
Vehicle statusBattery chargedBattery discharged
ProcedureProcedure
Engine runni ng1Vehicle powered down, l ocked and alarmed23
Vehicle unl ocked45
Procedure 1
Disconnect batteryConnect battery1. Apply parki ng brake oralt ernat ively, chock wheels1. Ens ure that all el ect ri cal loads are s wit ched O FF
2. Swit ch off i gni ti on andremove the remote cont rol.2. Connect bat t ery l eads - GROUND lead l ast
3. W ai t 2 mi nut es for enginemanagement sys tem t o 'powerdown'
3. Swit ch on ignit ion
4. Open t he hood4. Reset radi o s tat ion preset but tons .
5. Dis connect batt ery - GROUNDl ead firs t5. Reset clock
6. Reset elect ric window one-t ouch facili ty. Power window up t o hard s top, rel eas es wit ch, reapply and hol d for 1 s econd (relay i n door wil l cl ick). Lower window t o s top,reapply and hold for one s econd. One t ouch s hould now work
Procedure 2
Disconnect batteryConnect battery
1. Unlock t he vehi cl e and dis armt he alarm us ing t he remotecont rol
1. Ensure t hat al l el ect ri cal l oads are s wit ched OFF
2. Apply parki ng brake oralt ernat ively, chock wheels2. Connect batt ery l eads - GROUND l ead las t
3. W ai t 2 mi nut es for enginemanagement sys tem t o 'powerdown'
3. Swit ch on i gni ti on
4. Open t he hood4. Res et radio s t ati on pres et but tons .
5. Dis connect batt ery - GROUNDl ead firs t5. Res et cl ock
6. Res et el ect ri c window one-touch facil it y. Power window up to hard s top, rel eases wit ch, reappl y and hold for 1 s econd (rel ay in door wil l cl ick). Lower window t o s top,reapply and hol d for one s econd. One t ouch should now work
• NOTE: 1. Disconnect battery - If the remot e cont rol is not funct ioning, it will be necess ary to manual ly unlock thevehi cl e us ing t he key.
Procedure 3
Disconnect batteryConnect battery1. Unlock t he vehi cl e from the LH frontdoor us i ng the key1. Ens ure t hat al l electrical l oads are s wi tched OFF
2. Enter t he vehi cl e, and dock t heremote control to si lence the al arm.2. Connect batt ery leads - GROUND l ead las t
3. Remove t he remot e cont rol and wai t2 minutes for engi ne managements yst em to 'power down'
3. Swi tch on i gni ti on
4. Open t he hood4. Res et radio st ati on pres et but t ons .
5. Dis connect batt ery - GROUND leadfirst5. Res et cl ock
6. Res et el ect ri c wi ndow one-touch facil it y. Power wi ndow up to hard s t op,release s wit ch, reapply and hol d for 1 second (relay i n door wil l cl ick). Lowerwi ndow to s top, reapply and hold for one s econd. One t ouch s hould now work
• NOTE: 1. Connect battery - If there is ins uffi cient capacit y in the bat tery to di s arm the al arm, t he alarm may sound onreconnect ion of t he bat t ery - St ep 2 wi ll dis arm t he alarm
Procedure 4
Disconnect batteryConnect battery
Page 1828 of 3229
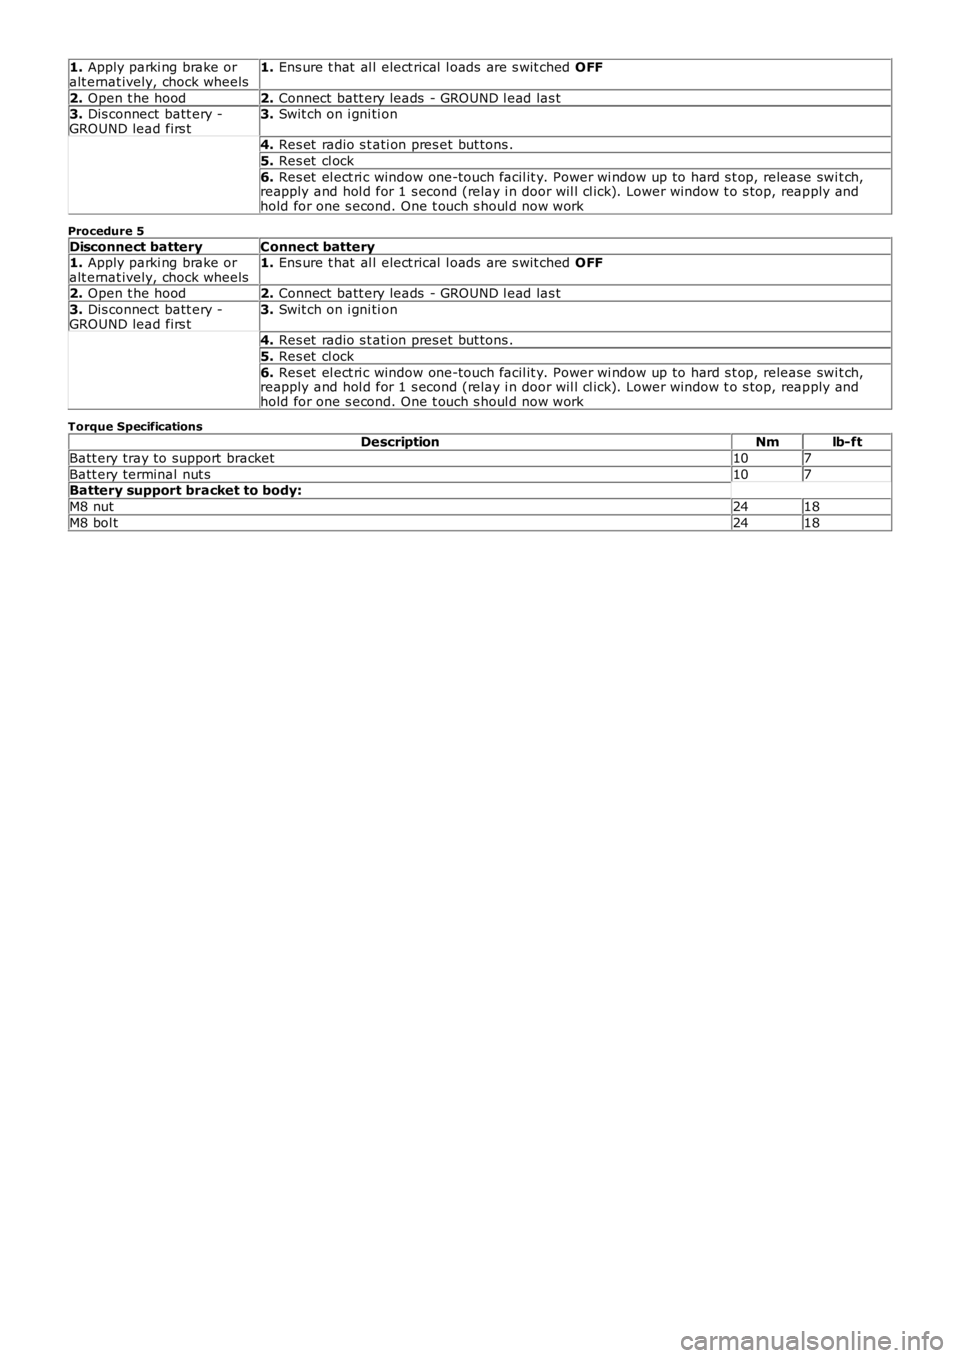
1. Apply parki ng brake oralt ernat ively, chock wheels1. Ens ure t hat al l elect rical l oads are s wit ched OFF
2. Open t he hood2. Connect batt ery leads - GROUND l ead las t3. Dis connect batt ery -GROUND lead firs t3. Swit ch on i gni ti on
4. Res et radio s t ati on pres et but tons .
5. Res et cl ock
6. Res et el ect ri c window one-touch facil it y. Power wi ndow up to hard s t op, release swit ch,reapply and hol d for 1 s econd (relay i n door wil l cl ick). Lower window t o s top, reapply andhold for one s econd. One t ouch s houl d now work
Procedure 5
Disconnect batteryConnect battery1. Apply parki ng brake oralt ernat ively, chock wheels1. Ens ure t hat al l elect rical l oads are s wit ched OFF
2. Open t he hood2. Connect batt ery leads - GROUND l ead las t
3. Dis connect batt ery -GROUND lead firs t3. Swit ch on i gni ti on
4. Res et radio s t ati on pres et but tons .
5. Res et cl ock
6. Res et el ect ri c window one-touch facil it y. Power wi ndow up to hard s t op, release swit ch,reapply and hol d for 1 s econd (relay i n door wil l cl ick). Lower window t o s top, reapply andhold for one s econd. One t ouch s houl d now work
Torque SpecificationsDescriptionNmlb-ft
Batt ery tray to support bracket107
Batt ery terminal nut s107Battery support bracket to body:
M8 nut2418
M8 bol t2418