CD player LAND ROVER FRELANDER 2 2006 Repair Manual
[x] Cancel search | Manufacturer: LAND ROVER, Model Year: 2006, Model line: FRELANDER 2, Model: LAND ROVER FRELANDER 2 2006Pages: 3229, PDF Size: 78.5 MB
Page 1858 of 3229
Publi shed: 26-Jul-2011
Information and Entertainment System - General Information - Information
and Entertainment System
Diagnosi s and Tes ti ng
Principles of Operation
For a detail ed descripti on of the Informati on and Entertainment s ys tems , refer to the relevant Des cri pt ion and Operati ons ect ion i n t he works hop manual . REFER to:
Audi o Syst em (415-01 Informati on and Entert ainment Syst em, Des cript ion and Operat ion),Speakers (415-01 Informati on and Ent ert ainment Syst em, Des cript ion and Operat ion),Navi gat ion Sys tem (415-01 Informat ion and Ent ert ai nment Sys t em, Des cri pti on and Operati on),Ant enna (415-02 Ant enna, Des cri pt ion and Operati on).
Inspection and Verification
CAUTION: Di agnos is by s ubs ti tut ion from a donor vehicle is NO T acceptabl e. Subs ti tut ion of cont rol modules doesnot guarant ee confirmat ion of a faul t, and may als o caus e addit ional fault s i n t he vehi cl e being t est ed and/or t he donorvehi cl e.
1. Verify t he cus t omer concern.1.
2. Vis ually ins pect for obvious s igns of mechani cal or electrical damage and sys tem integrit y.2.
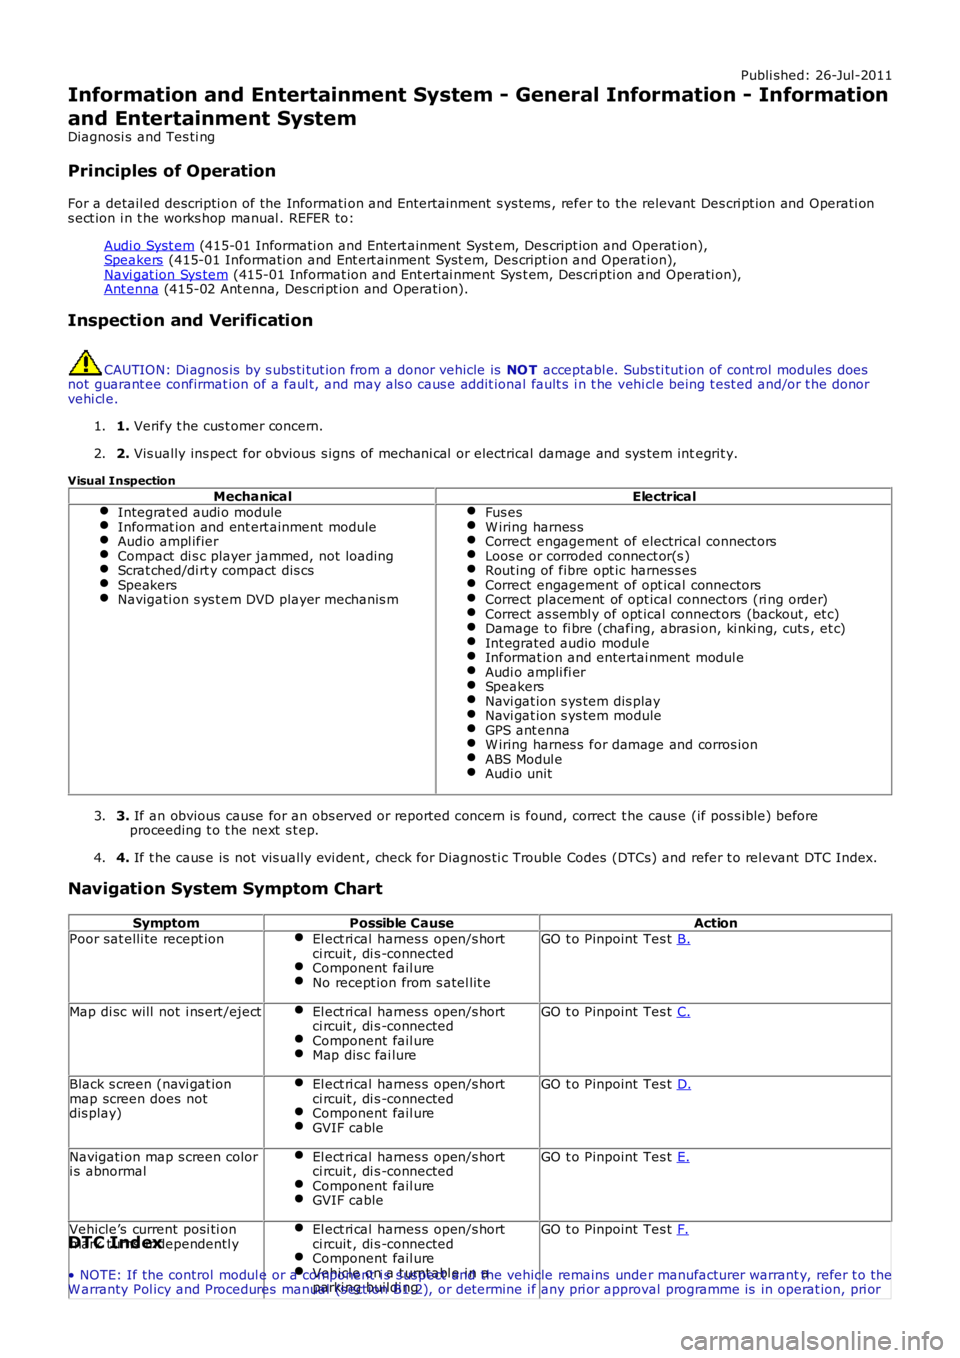
Visual Inspection
MechanicalElectricalIntegrat ed audi o moduleInformat ion and ent ert ainment moduleAudio ampl ifierCompact di s c player jammed, not loadingScrat ched/di rt y compact dis csSpeakersNavigati on s ys t em DVD player mechanis m
Fus esW iring harnes sCorrect engagement of electrical connect orsLoos e or corroded connect or(s )Rout ing of fibre opt ic harnes s esCorrect engagement of opt ical connectorsCorrect placement of opt ical connect ors (ri ng order)Correct as sembl y of opt ical connect ors (backout , et c)Damage to fi bre (chafing, abrasi on, ki nki ng, cuts , et c)Int egrated audio modul eInformat ion and entertai nment modul eAudi o ampli fi erSpeakersNavi gat ion s ys tem dis playNavi gat ion s ys tem moduleGPS ant ennaW iring harnes s for damage and corros ionABS Modul eAudi o unit
3. If an obvious cause for an obs erved or report ed concern is found, correct t he caus e (if pos s ible) beforeproceeding t o t he next s t ep.3.
4. If t he caus e is not vis ually evi dent , check for Di agnos ti c Trouble Codes (DTCs) and refer t o rel evant DTC Index.4.
Navigation System Symptom Chart
SymptomPossible CauseActionPoor sat elli te recept ionEl ect ri cal harnes s open/s hortci rcuit , di s -connectedComponent fail ureNo recept ion from s atel lit e
GO t o Pinpoint Tes t B.
Map di sc will not i ns ert /ejectEl ect ri cal harnes s open/s hortci rcuit , di s -connectedComponent fail ureMap dis c fai lure
GO t o Pinpoint Tes t C.
Black s creen (navi gat ionmap screen does notdis play)
El ect ri cal harnes s open/s hortci rcuit , di s -connectedComponent fail ureGVIF cable
GO t o Pinpoint Tes t D.
Navigati on map s creen colori s abnormalEl ect ri cal harnes s open/s hortci rcuit , di s -connectedComponent fail ureGVIF cable
GO t o Pinpoint Tes t E.
Vehicle’s current posi ti onmark t urns independentl yEl ect ri cal harnes s open/s hortci rcuit , di s -connectedComponent fail ureVehicl e on a t urnt abl e i n aparki ng buildi ng
GO t o Pinpoint Tes t F.DTC Index
• NOTE: If the control modul e or a component i s s us pect and the vehicle remains under manufacturer warrant y, refer t o theW arranty Pol icy and Procedures manual (s ect ion B1.2), or determine i f any pri or approval programme is in operat ion, pri or
Page 1869 of 3229
The audi o s yst em is avail abl e in 2 vers ions , Standard and Premium.
The Standard audio s ys t em us es an int ernal ampli fier whi ch di rectl y dri ves the s ys tem s peakers and contai ns a s ingle di s cCompact Di s c (CD) pl ayer. The St andard audio s ys tem is controlled purely from the head uni t and the remote st eeri ngwheel controls . The head uni t is connect ed t o the vehicl e on t he medium speed Controll er Area Network (CAN) bus . Thisall ows the uni t to be int errogat ed for diagnost ic purpos es .
The Premi um audio sys tem compri ses t he fol lowi ng components :
Int egrat ed Audi o Module (IAM)Infotai nment Cont rol Modul e (ICM)Separate audio ampli fierRear seat audio control modul es wit h head phone socket sSurround s ound s peaker s ys t em
Control of t he Premi um audio sys tem is vi a t he ICM located in t he cent er of the i nstrument panel. Control s i gnal s from t heICM are sent t o t he res t of the audi o s ys t em on t he Media Ori ent ated Sys tem Trans port (MOST) ring. The ICM i s the ti mingmas ter for the MOST ri ng and als o host s a gat eway functi on between t he medium s peed CAN bus and the MOST ri ng.Audio s ignals are s ent on t he MOST ring from the Integrat ed Audio Modul e to the amplifier.
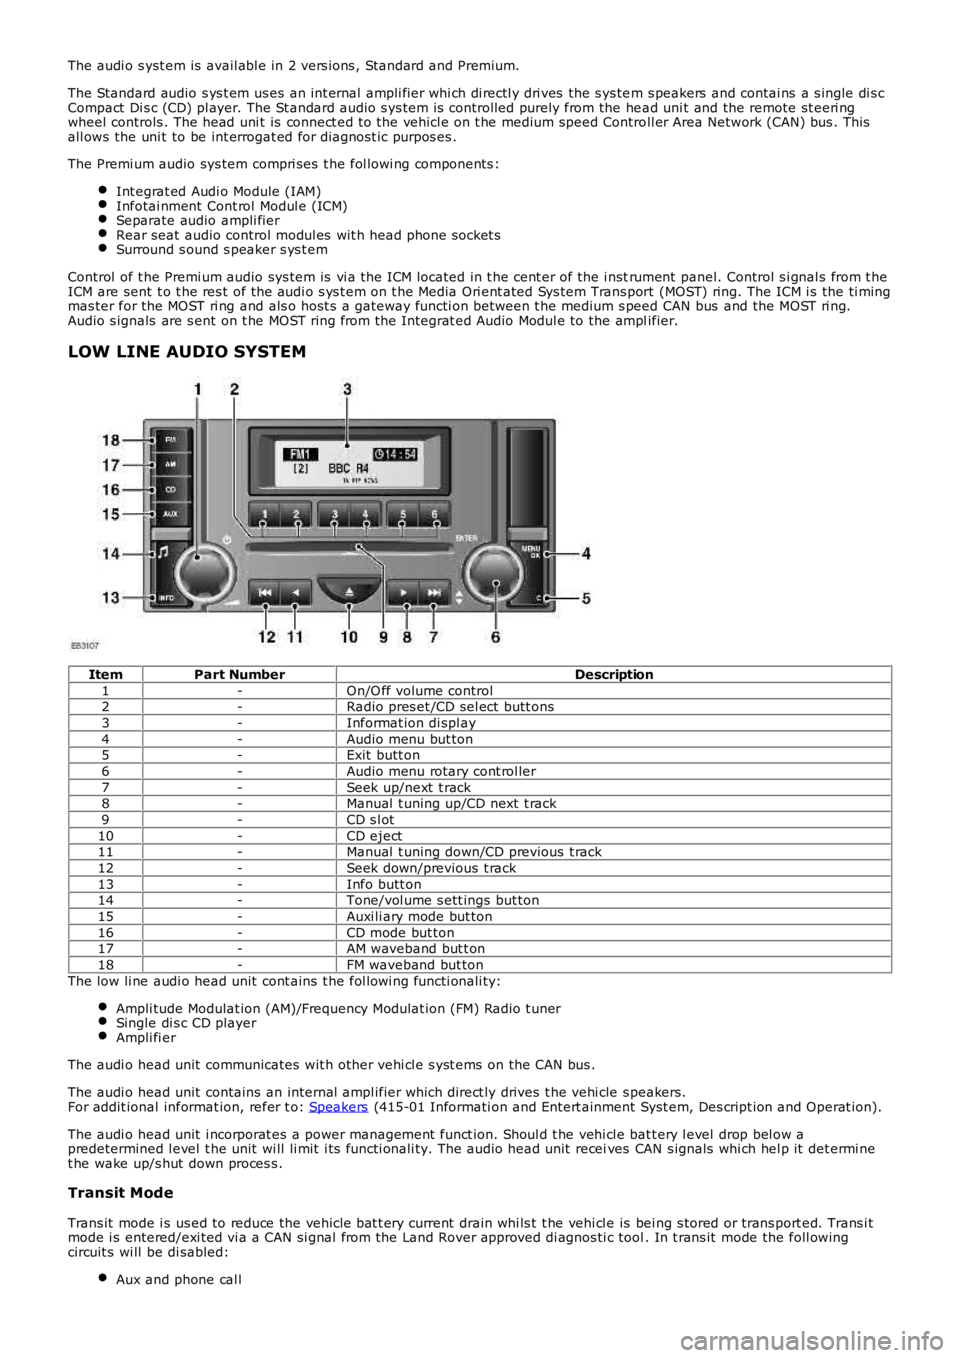
LOW LINE AUDIO SYSTEM
ItemPart NumberDescription
1-On/O ff volume control2-Radio pres et /CD sel ect butt ons
3-Informat ion di spl ay
4-Audio menu but ton5-Exit butt on
6-Audio menu rotary cont rol ler
7-Seek up/next t rack8-Manual t uning up/CD next t rack
9-CD s l ot
10-CD eject11-Manual t uning down/CD previous t rack
12-Seek down/previous t rack
13-Info butt on14-Tone/vol ume s ett ings but ton
15-Auxi li ary mode but ton
16-CD mode but ton17-AM waveband but t on
18-FM waveband but ton
The low li ne audi o head unit cont ains t he fol lowi ng functi onali ty:
Ampli tude Modulat ion (AM)/Frequency Modulat ion (FM) Radio t unerSingle di s c CD playerAmpli fi er
The audi o head unit communicates wit h other vehi cl e s yst ems on the CAN bus .
The audi o head unit contains an internal ampl ifier which direct ly drives t he vehi cle s peakers.For addit ional informat ion, refer t o: Speakers (415-01 Informati on and Entert ainment Syst em, Des cript ion and Operat ion).
The audi o head unit i ncorporat es a power management funct ion. Shoul d t he vehi cl e batt ery l evel drop bel ow apredetermined l evel t he unit wi ll li mit i ts functi onali ty. The audio head unit receives CAN s ignals whi ch hel p it det ermi net he wake up/s hut down proces s .
Transit Mode
Trans it mode i s us ed to reduce the vehicle bat t ery current drain whi ls t t he vehi cl e is bei ng s tored or trans port ed. Trans i tmode i s entered/exi ted vi a a CAN si gnal from the Land Rover approved di agnos ti c tool. In t rans it mode the foll owingcircuit s wi ll be di sabled:
Aux and phone cal l
Page 1871 of 3229
are di s abl ed.
CD PLAYER
The IAM CD pl ayer i s a 6 di sc mult i changer l ocat ed in the center of t he ins trument panel. The CD mult i changer is capabl eof playing commerci al CDs , CDRs , CDRW s and MP3 di scs .
Random Play
The random pl ay feat ure works in t wo di fferent ways :
Random play of t racks on a CDRandom play of all t racks on any CD i n t he autochanger
The s ingle di s c random feat ure plays all t he tracks on t he s elected CD in a random order. All t he t racks on that dis c wi ll beplayed before a new random s equence is pl ayed. If a new CD is s elected whi le in random mode, the random mode wi ll becancell ed and play wi ll commence from t he fi rs t t rack.
In mult i dis c mode t he IAM us es the current track as the firs t random t rack and wi ll t hen pl ay a furt her 2 tracks (ifavai lable) from thi s CD. The IAM wil l then randoml y s elect anot her CD, and pl ay 3 random tracks . Thi s s equence cont inuesunti l al l tracks from all CD's are played back.
MP3 Function
The CD pl ayer has t he capabil it y to play MP3 fil es . The MP3 di scs foll ow a format of fol ders and fil es wit hin t he fol der. It isals o pos si ble t o pl ace al l the fil es in the root di rectory on t he CD.
The random and repeat features foll ow t he normal CD random and repeat feat ure funct ions .
Automatic Volume Control (AVC)
AVC control s t he audi o volume in relati on t o vehi cl e s peed. As vehicle speed i ncreases t he audi o l evel is adjust ed t ocompens ate for extra road and vehicle noi s e. There are 4 s et t ings for AVC:
OffLowMediumHigh
The default s ett ing is medi um.
Changi ng the AVC level is acces s ed by a l ong pres s of the TONE but t on and sel ect ion of t he AVC us ing t he rot ary encodert o change t he level.
The vehi cl e s peed s ignal i s us ed to enable the ICM to calculat e t he vol ume adjus t ment required. The vehicle s peed s ignalis recei ved over t he medium s peed CAN. The s ignal is an average of t he four wheel s peed s ens or s i gnal s. Should an inval ids peed si gnal be recei ved t he AVC will not alt er the out put volume.
AVC i s cont rol led by t he audi o ampl ifi er.
CD Error Messages
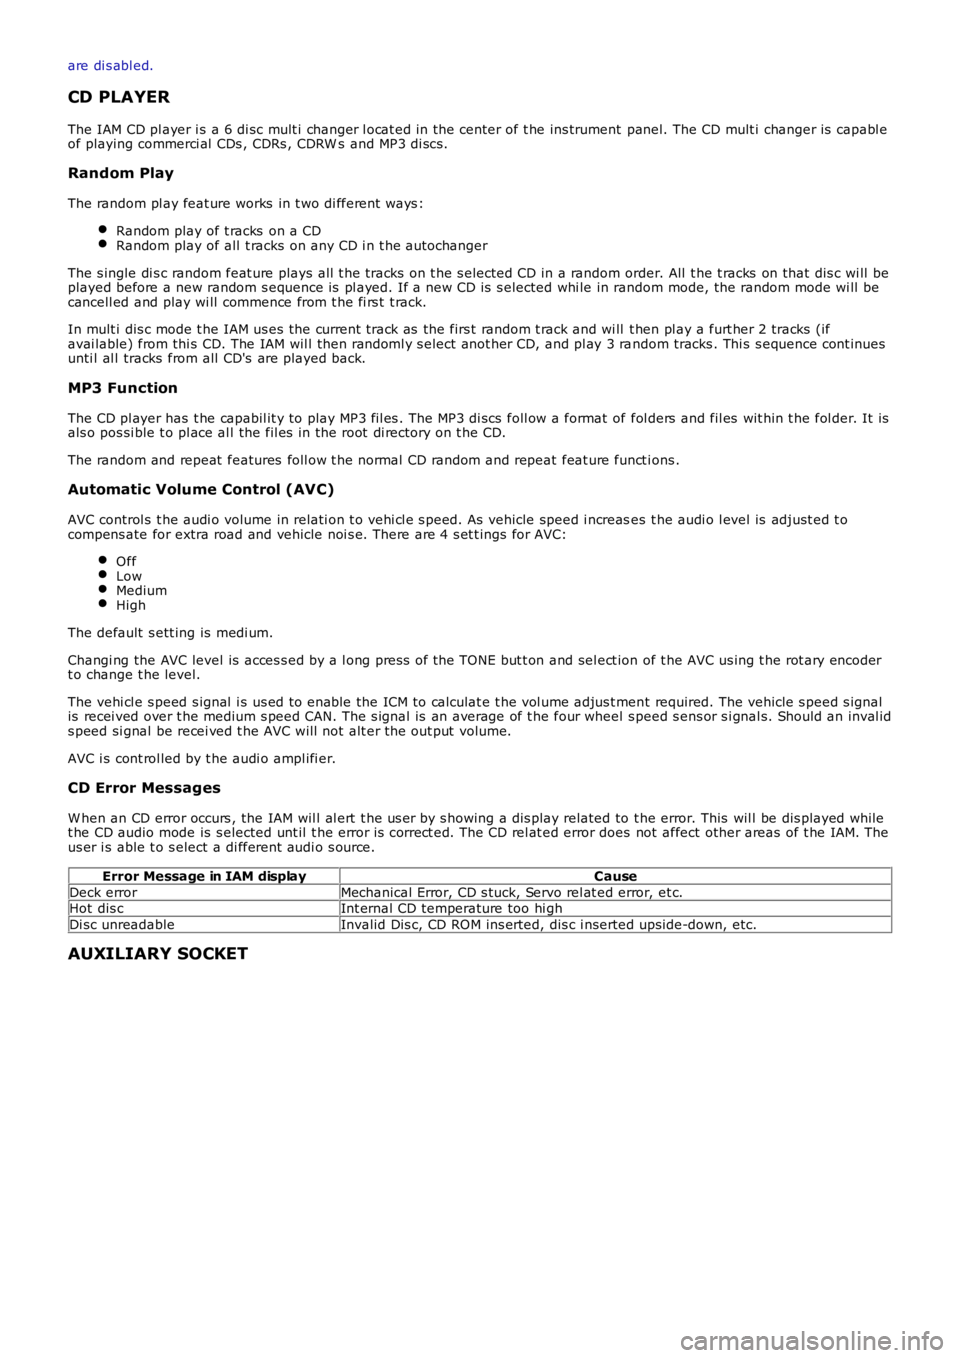
W hen an CD error occurs , the IAM wil l al ert t he us er by s howing a dis play related to t he error. This wil l be dis played whilet he CD audio mode is s elected unt il t he error is correct ed. The CD rel at ed error does not affect other areas of t he IAM. Theus er i s able t o s elect a di fferent audi o s ource.
Error Message in IAM displayCause
Deck errorMechanical Error, CD s tuck, Servo rel at ed error, et c.Hot dis cInt ernal CD temperature too hi gh
Di sc unreadableInvalid Dis c, CD ROM ins erted, dis c i nserted ups ide-down, etc.
AUXILIARY SOCKET
Page 1872 of 3229
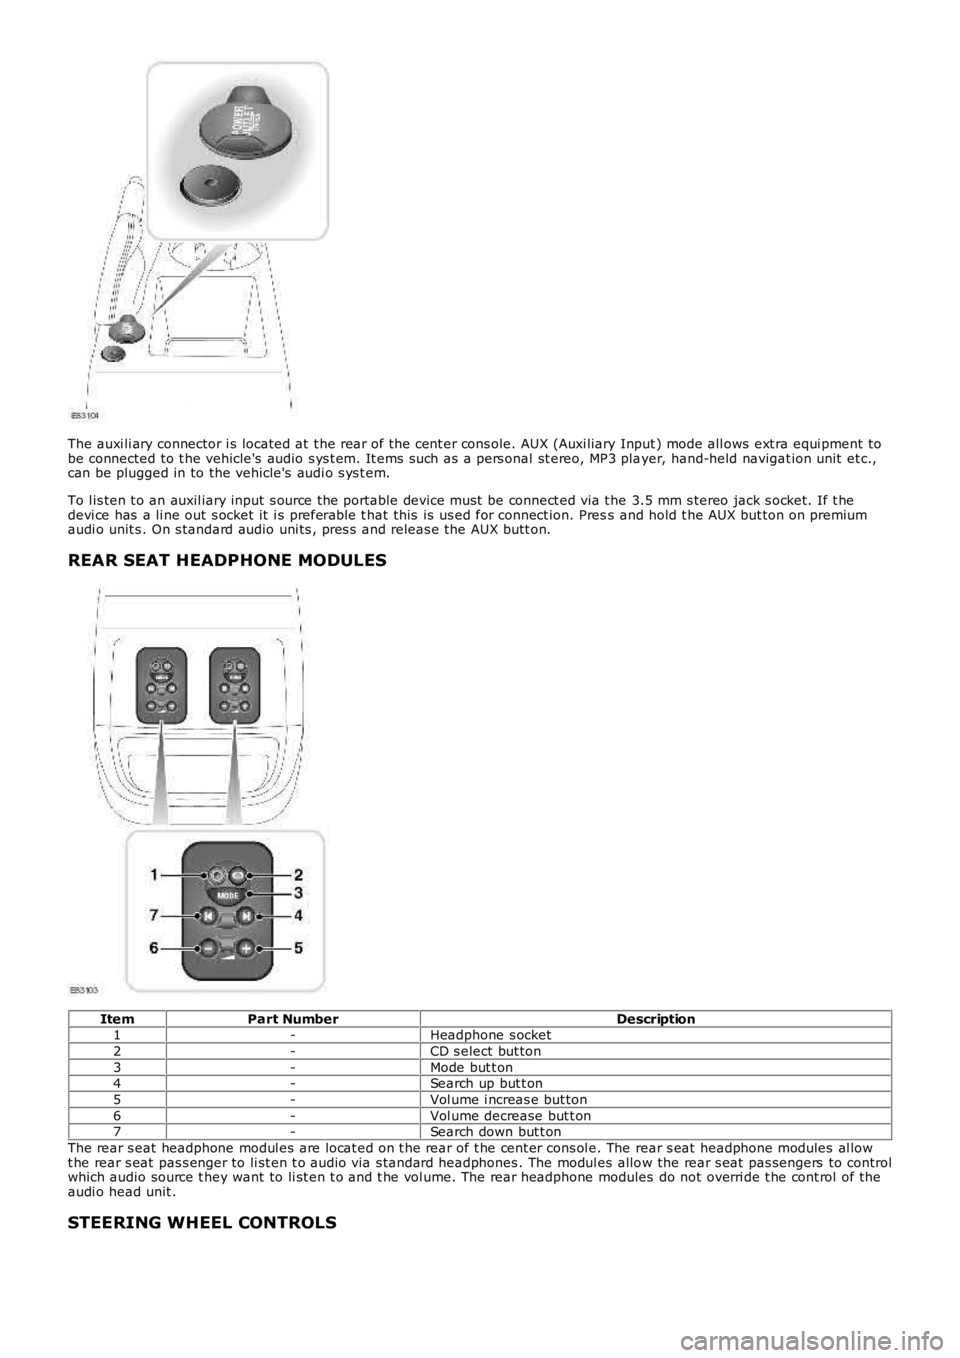
The auxi li ary connector i s located at t he rear of t he cent er cons ole. AUX (Auxi liary Input ) mode all ows ext ra equi pment tobe connected to t he vehicle's audio s ys t em. It ems s uch as a pers onal st ereo, MP3 player, hand-held navigat ion unit et c.,can be plugged in to the vehicle's audi o s ys t em.
To l is ten t o an auxil iary input s ource the portable device must be connect ed via t he 3.5 mm s tereo jack s ocket. If t hedevi ce has a li ne out s ocket it i s preferable t hat this is us ed for connect ion. Press and hold t he AUX but ton on premiumaudi o unit s . On s tandard audio uni ts , pres s and releas e the AUX butt on.
REAR SEAT HEADPHONE MODULES
ItemPart NumberDescription1-Headphone s ocket
2-CD s elect but ton
3-Mode but t on4-Search up but t on
5-Vol ume i ncreas e but ton
6-Vol ume decrease but t on7-Search down but t on
The rear s eat headphone modul es are locat ed on t he rear of t he cent er cons ol e. The rear s eat headphone modules al lowt he rear s eat pas s enger to li st en t o audio via s tandard headphones . The modul es allow the rear s eat pas sengers to controlwhich audio source t hey want to li st en t o and t he vol ume. The rear headphone modules do not overri de t he cont rol of theaudi o head unit .
STEERING WHEEL CONTROLS
Page 2725 of 3229

Contents
5
R
ENGINE COOLANT CHECK ............................ 163
BRAKE AND CLUTCH FLUID CHECK ............. 165
POWER STEERING FLUID CHECK ................ 166
WASHER FLUID CHECK ................................ 167
TECHNICAL SPECIFICATIONS ...................... 169
Vehicle battery
BATTERY WARNING SYMBOLS ................... 171
BATTERY CARE ............................................ 171
USING BOOSTER CABLES ............................ 173
CHARGING THE VE HICLE BATTERY ............. 174
CHANGING THE VE HICLE BATTERY ............. 174
Wheels and tyres
GENERAL INFORMATION ............................. 176
TYRE CARE ................................................... 177
USING WINTER TYRES................................. 183
CHANGING A ROAD WHEEL ......................... 183
TYRE REPAIR KIT ......................................... 187
USING SNOW CHAINS.................................. 192
TYRE GLOSSARY.......................................... 193
TECHNICAL SPECIFICATIONS ...................... 194
Fuses
FUSE BOX LOCATIONS ................................. 195
CHANGING A FUSE ....................................... 195
FUSE SPECIFICATION CHART....................... 196
Emergency equipment
HAZARD WARNING FLASHERS .................... 204
WARNING TRIANGLE ................................... 204
Status after a collision
DRIVING AFTER A COLLISION...................... 205
INSPECTING SAFETY SYSTEM COMPONENTS ...
206
Vehicle recovery
TOWING POINTS .......................................... 207
LASHING POINTS ......................................... 208
TRANSPORTING THE VEHICLE..................... 208
TOWING THE VEHICLE ON FOUR WHEELS .. 208
Vehicle identification
VEHICLE IDENTIFICATION PLATE................. 210
VEHICLE IDENTIFI CATION NUMBER (VIN) ... 210
VEHICLE BUILD DATE PLATE ....................... 210
Technical specifications
ENGINE SPECIFICATIONS ............................ 211
WEIGHTS...................................................... 212
DIMENSIONS................................................ 213
Type approval
Declarations of conformity ........................... 215
Audio introduction
RADIO RECEPTION....................................... 218
Audio unit overview
AUDIO UNIT OVERVIEW............................... 219
Audio unit operation
ON OR OFF CONTROL .................................. 223
VOLUME CONTROL ...................................... 223
AUDIO CONTROL ......................................... 223
WAVEBAND BUTTON ................................... 224
AUTOSTORE CONTROL ................................ 225
STATION PRESET BUTTONS ........................ 226
TRAFFIC INFORMATION CONTROL .............. 226
Audio unit menus
RADIO DATA SYSTEM (RDS) ....................... 228
REGIONAL MODE (REG) .............................. 228
ENHANCED OTHER NETWORK (RDS-EON).. 229
ALTERNATIVE FREQUENCIES ...................... 229
NEWS BROADCASTS ................................... 230
PRIORITY PROGRAMME TYPE (PTY) .......... 231
RESETTING THE AUDIO UNIT ...................... 233
Digital audio broadcasting
GENERAL INFORMATION ............................. 234
AUDIO CONTROLS ....................................... 235
DISPLAY OPTIONS ....................................... 236
CHANNEL AUTOMATIC TUNING................... 236
CHANNEL OPTIONS ..................................... 236
PRESET BUTTONS ....................................... 238
SETTINGS..................................................... 240
Compact disc player
LOADING COMPACT DISCS ......................... 245
EJECTING COMPACT DISCS ........................ 246
EJECTING MULTIPLE CO MPACT DISCS....... 246
COMPACT DISC SELECTION ........................ 246
COMPACT DISC PLAYBACK ......................... 246
Page 2750 of 3229
30
Quick start
L
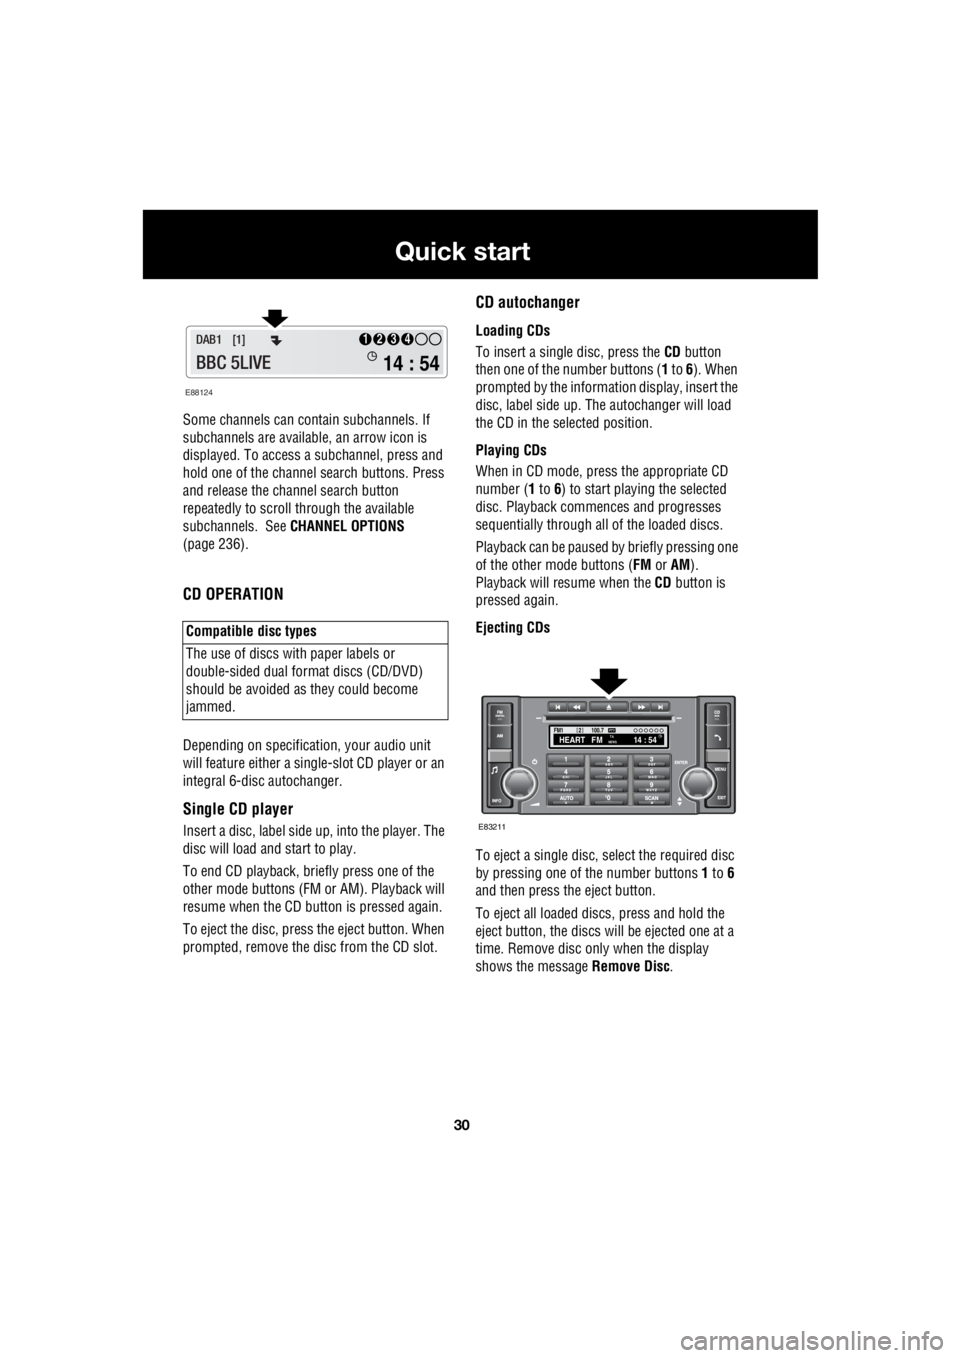
Some channels can co ntain subchannels. If
subchannels are availabl e, an arrow icon is
displayed. To access a subchannel, press and
hold one of the channel search buttons. Press
and release the channel search button
repeatedly to scroll through the available
subchannels. See CHANNEL OPTIONS
(page 236).
CD OPERATION
Depending on specification, your audio unit
will feature either a single- slot CD player or an
integral 6-disc autochanger.
Single CD player
Insert a disc, label side up, into the player. The
disc will load and start to play.
To end CD play back, briefly press one of the
other mode buttons (FM or AM). Playback will
resume when the CD button is pressed again.
To eject the disc, press the eject button. When
prompted, remove the disc from the CD slot.
CD autochanger
Loading CDs
To insert a single disc, press the CD button
then one of the number buttons ( 1 to 6). When
prompted by the information display, insert the
disc, label side up. The autochanger will load
the CD in the selected position.
Playing CDs
When in CD mode, press the appropriate CD
number ( 1 to 6) to start playing the selected
disc. Playback commences and progresses
sequentially through all of the loaded discs.
Playback can be paused by briefly pressing one
of the other mode buttons ( FM or AM).
Playback will re sume when the CD button is
pressed again.
Ejecting CDs
To eject a single disc, select the required disc
by pressing one of the number buttons 1 to 6
and then press the eject button.
To eject all loaded discs, press and hold the
eject button, the discs will be ejected one at a
time. Remove disc only when the display
shows the message Remove Disc.
Compatible disc types
The use of discs with paper labels or
double-sided dual format discs (CD/DVD)
should be avoided as they could become
jammed.
E88124
14 : 54
1234DAB1 [1]
BBC 5LIVE
100.7
2FM114 : 54TA
NEWSHEART FMPTY
E83211
Page 2862 of 3229
Fuel and refuelling
142
L
Fuel and refuellingSAFETY PRECAUTIONS FUEL QUALITY
Petrol engined vehicles
Octane rating
The minimum octane rating for fuel used is 91
RON. The vehicle will run on lower ratings, but
it may cause pronounced engine knock or
pinking. If the pinking is severe it can cause
damage to the engine, fuel, and emission
control systems.
Note: Occasional, light , engine knock
experienced while accelera ting or climbing hills
is acceptable.
WARNINGS
Petroleum gasses are highly
flammable, have a low flash point, and
are explosive, especially in confined
spaces. Avoid exposing the gasses to any
potential sources of ignition as the resulting
fire and explosion may cause serious injuries
and/or death.
Only use containe rs specifically
designed for carrying fuel, and alway
remove them from the vehicle to fill
them. Failure to do so may result in spillage,
and cause a fire.
Switch off the engine when refuelling,
as it is both a source of extreme
temperatures, and electrical sparks.
The resulting fire a nd explosion may cause
serious injury and death.
Switch off any personal electronic
devices such as mobile phones, or
music players. They have the potential
to cause electrical sparks. The resulting fire
and explosion may caus e serious injury and
death.
Do not smoke, use a naked flame, or
cause sparks. The resulting fire and
explosion may caus e serious injury
and death.
Do not overfill the fuel tank. Overfilling
may cause spillage when the vehicle is
driven. Spillage may also occur if the
fuel expands in high ambient temperatures.
CAUTIONS
Do not use leaded fuels, lead
substitutes, or fuel additives. Doing so
can cause damage to the engine, fuel,
and emission control systems.
Only use high quality petrol, as using
lower quality fuels ca n cause damage to
the engine, fuel, and emission control
systems.
Fuel system cleaning agents should not
be used, unless approved by Land
Rover. Unapproved products may be
harmful to fuel system components on your
vehicle.
Page 2939 of 3229
219
Audio unit overview
R
Audio unit overviewAUDIO UNIT OVERVIEW
Premium audio overview
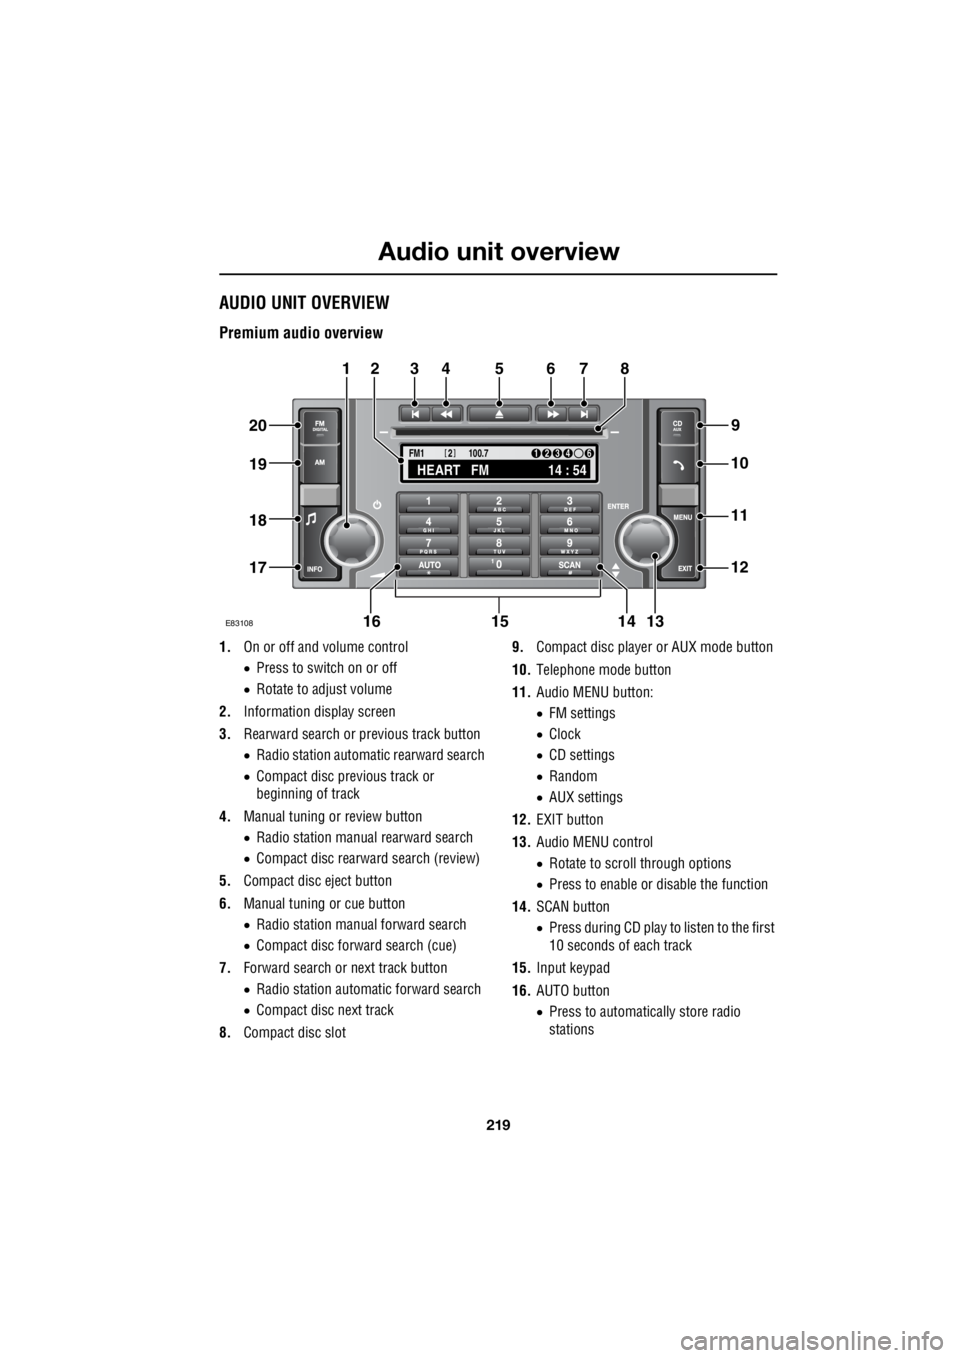
1. On or off and volume control
• Press to switch on or off
• Rotate to adjust volume
2. Information display screen
3. Rearward search or previous track button
• Radio station automatic rearward search
• Compact disc previous track or
beginning of track
4. Manual tuning or review button
• Radio station manual rearward search
• Compact disc rearward search (review)
5. Compact disc eject button
6. Manual tuning or cue button
• Radio station manual forward search
• Compact disc forward search (cue)
7. Forward search or next track button
• Radio station automatic forward search
• Compact disc next track
8. Compact disc slot 9.
Compact disc player or AUX mode button
10. Telephone mode button
11. Audio MENU button:
• FM settings
• Clock
• CD settings
• Random
• AUX settings
12. EXIT button
13. Audio MENU control
• Rotate to scroll through options
• Press to enable or disable the function
14. SCAN button
• Press during CD play to listen to the first
10 seconds of each track
15. Input keypad
16. AUTO button
• Press to automatically store radio
stations
TA
NEWSPTY100.7
FM1
14 : 54
HEART FM
1234 6
2
E83108
34567
9
21
11
12
10
13141516
17
18
19
20
8
Page 2941 of 3229
221
Audio unit overview
R
Standard audio overview
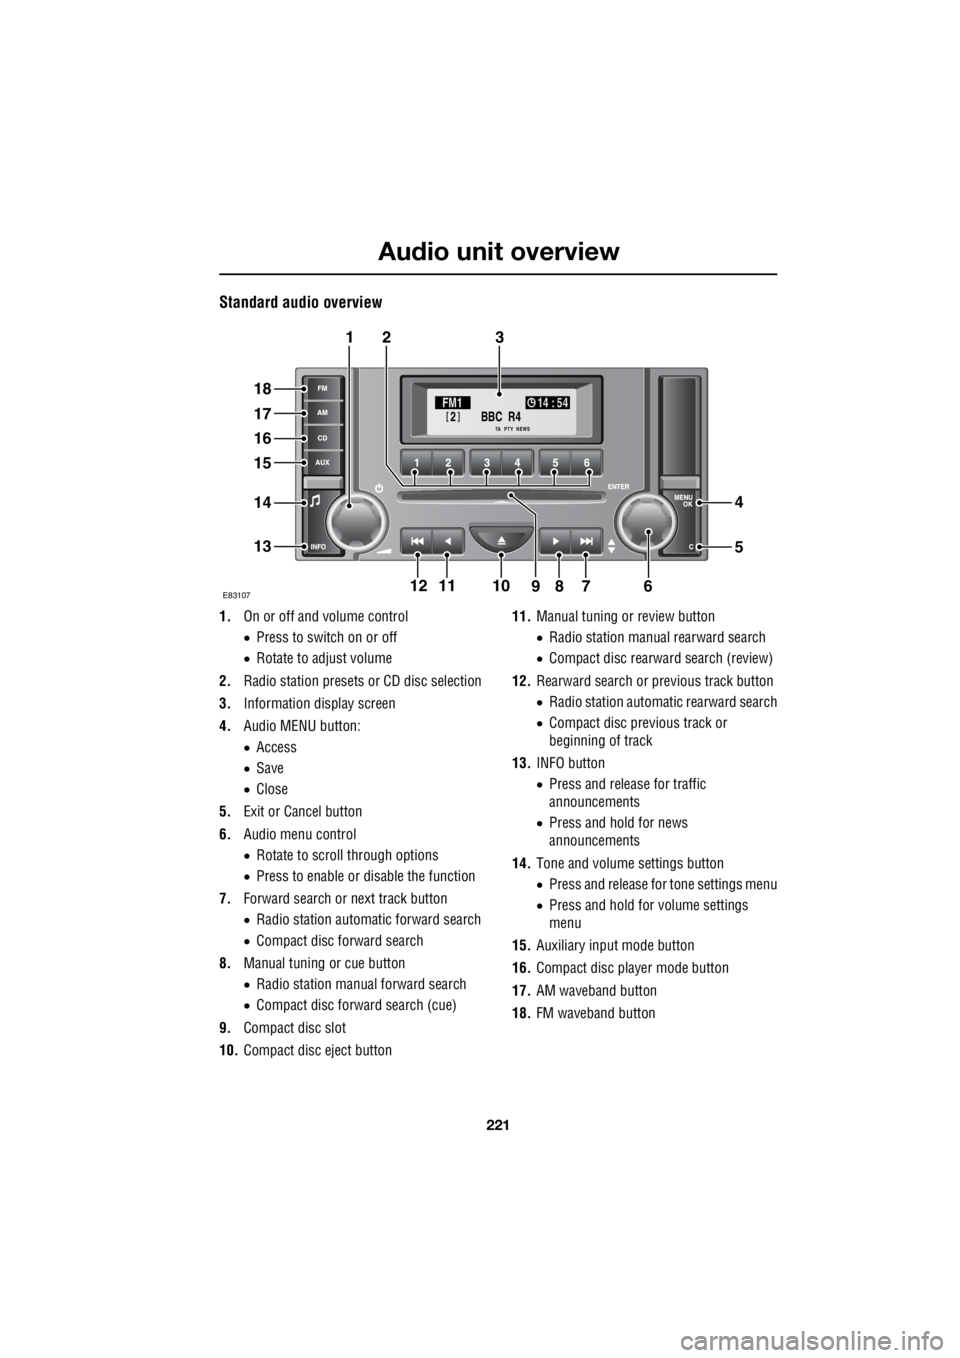
1. On or off and volume control
• Press to switch on or off
• Rotate to adjust volume
2. Radio station presets or CD disc selection
3. Information display screen
4. Audio MENU button:
• Access
• Save
• Close
5. Exit or Cancel button
6. Audio menu control
• Rotate to scroll through options
• Press to enable or disable the function
7. Forward search or next track button
• Radio station automatic forward search
• Compact disc forward search
8. Manual tuning or cue button
• Radio station manual forward search
• Compact disc forward search (cue)
9. Compact disc slot
10. Compact disc eject button 11.
Manual tuning or review button
• Radio station manua l rearward search
• Compact disc rearward search (review)
12. Rearward search or previous track button
• Radio station automatic rearward search
• Compact disc previous track or
beginning of track
13. INFO button
• Press and release for traffic
announcements
• Press and hold for news
announcements
14. Tone and volume settings button
• Press and release for tone settings menu
• Press and hold for volume settings
menu
15. Auxiliary input mode button
16. Compact disc player mode button
17. AM waveband button
18. FM waveband button
BBC R4
2FM1 14 : 54
TA NEWSPTY
E8310711
321
18
17
16
15
14
13
4
5
67891210
Page 2965 of 3229
245
Compact disc player
R
Compact disc playerLOADING COMPACT DISCS
Note: Some music CD manufacturers are
using data encryption to copy-protect their
recordings and prevent the production of
counterfeit copies. These CDs differ from the
internationally agreed CD audio standard,
RedBook, a standard that serves as the
operating basis for all CD players and
changers. Copy-pro tected CDs may fail to play
in your CD changer or ma y be played subject to
various limitations, e. g. sound quality may be
impaired. If you do ex perience a problem, try
the CD in other player s before contacting the
CD vendor.
Loading a CD - Single disc player
To insert a disc into the player, make sure that
the label side of the di sc is facing upwards and
present the disc to the slot. Ease the disc into
the slot until the mech anism takes over and
draws the disc in fully.
Loading a CD - Six disc player
Press the CD mode button, then press the
numbered button of the position in which the
compact disc is to be stored ( 1 to 6). Make sure that the label side of the disc is
facing upwards then, when prompted, partially
insert the disc. The play er mechanism will draw
the disc in automatica lly and the disc number
will appear on the display.
Note: If there is a problem with a disc that has
been loaded (inserted upside down, wrong
format etc.), Disc unreadable or Disc error will
appear in the information display, and the disc
will be ejected. If the problem can be corrected
(disc upside down for example), then re-insert
the disc in the correct manner. If the problem
cannot be rectified, do not re-insert the disc.
There will be a pause while the player reads
information from the disc, then play will start at
the first track.
To load another CD, pr ess another numbered
button ( 1 to 6) and repeat the loading
procedure.
Note: The six circles in the top right-hand side
of the information display of the premium unit,
represent the six available CD positions. As
soon as a CD is loaded, its number will appear
in the circle.
Load all
This feature is only available on the standard
audio, six disc CD player.
1. Press and hold the CD button until Load
All appears on the display.
2. When prompted, partia lly insert the first
disc. The player mechanism will draw the
disc in automatically.
3. When prompted, conti nue to insert discs
until all six discs have been loaded. When
fully loaded, the CD player will commence
playing CD1.
CAUTION
Do not force the disc into the slot.
CAUTION
Do not use discs with paper labels, Dual
Discs or DVDPlus discs. The front
loading CD player may load and play this
type of disc, however, it is likely that the disc
will not eject and will block the CD mechanism.
Such damage to a CD player will not be
covered under warranty.