Lexus CT200h 2012 Navigation Manual (in English)
Manufacturer: LEXUS, Model Year: 2012, Model line: CT200h, Model: Lexus CT200h 2012Pages: 436, PDF Size: 28.25 MB
Page 41 of 436
41
1. BASIC INFORMATION BEFORE OPERATION
2
BASIC FUNCTION
CT200h_Navi_OM76078E_(EE)
14.02.06 12:29
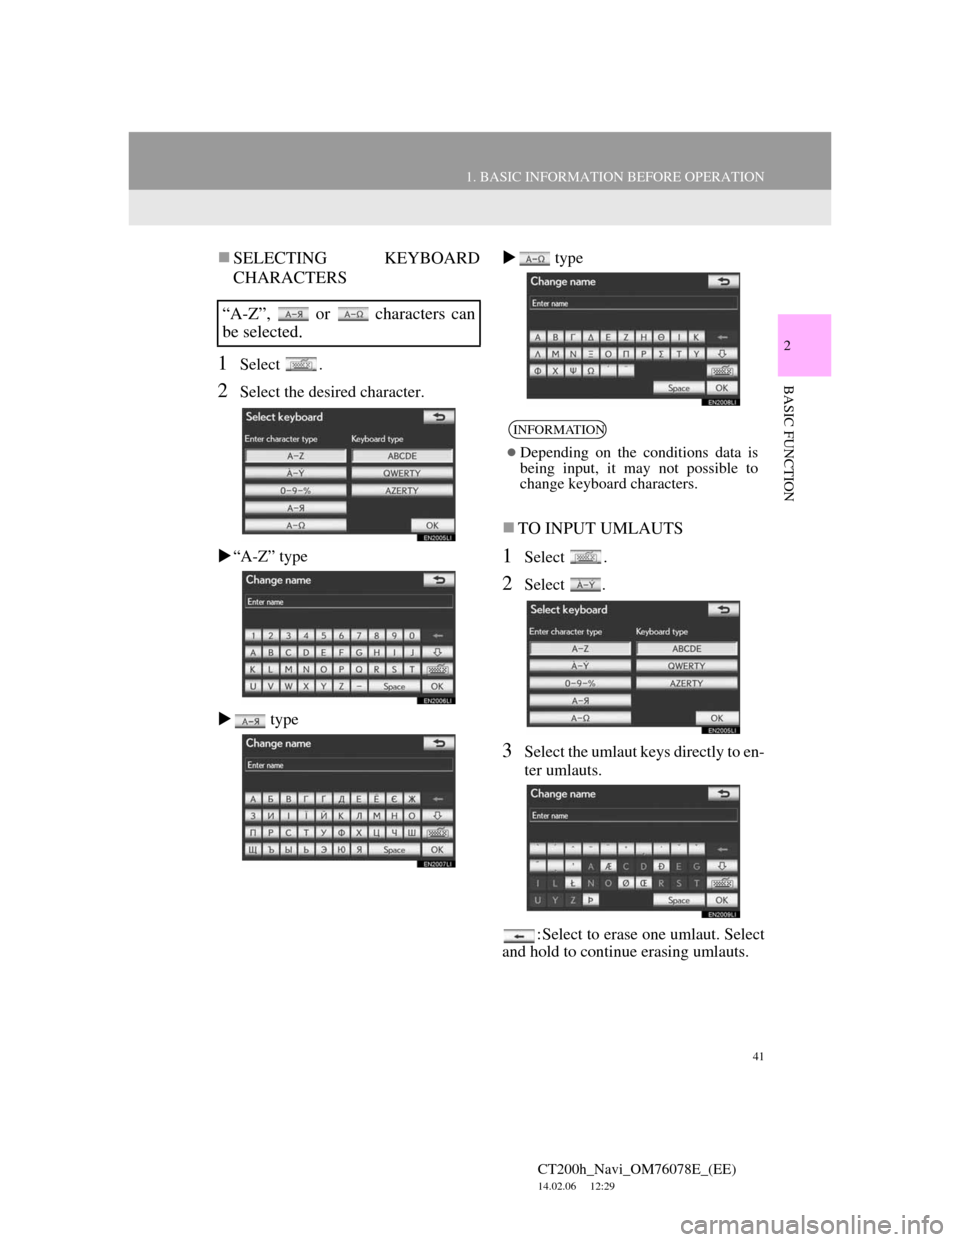
SELECTING KEYBOARD
CHARACTERS
1Select .
2Select the desired character.
“A-Z” type
type type
TO INPUT UMLAUTS
1Select .
2Select .
3Select the umlaut keys directly to en-
ter umlauts.
: Select to erase one umlaut. Select
and hold to continue erasing umlauts.
“A-Z”, or characters can
be selected.
INFORMATION
Depending on the conditions data is
being input, it may not possible to
change keyboard characters.
Page 42 of 436
42
1. BASIC INFORMATION BEFORE OPERATION
CT200h_Navi_OM76078E_(EE)
14.02.06 12:29
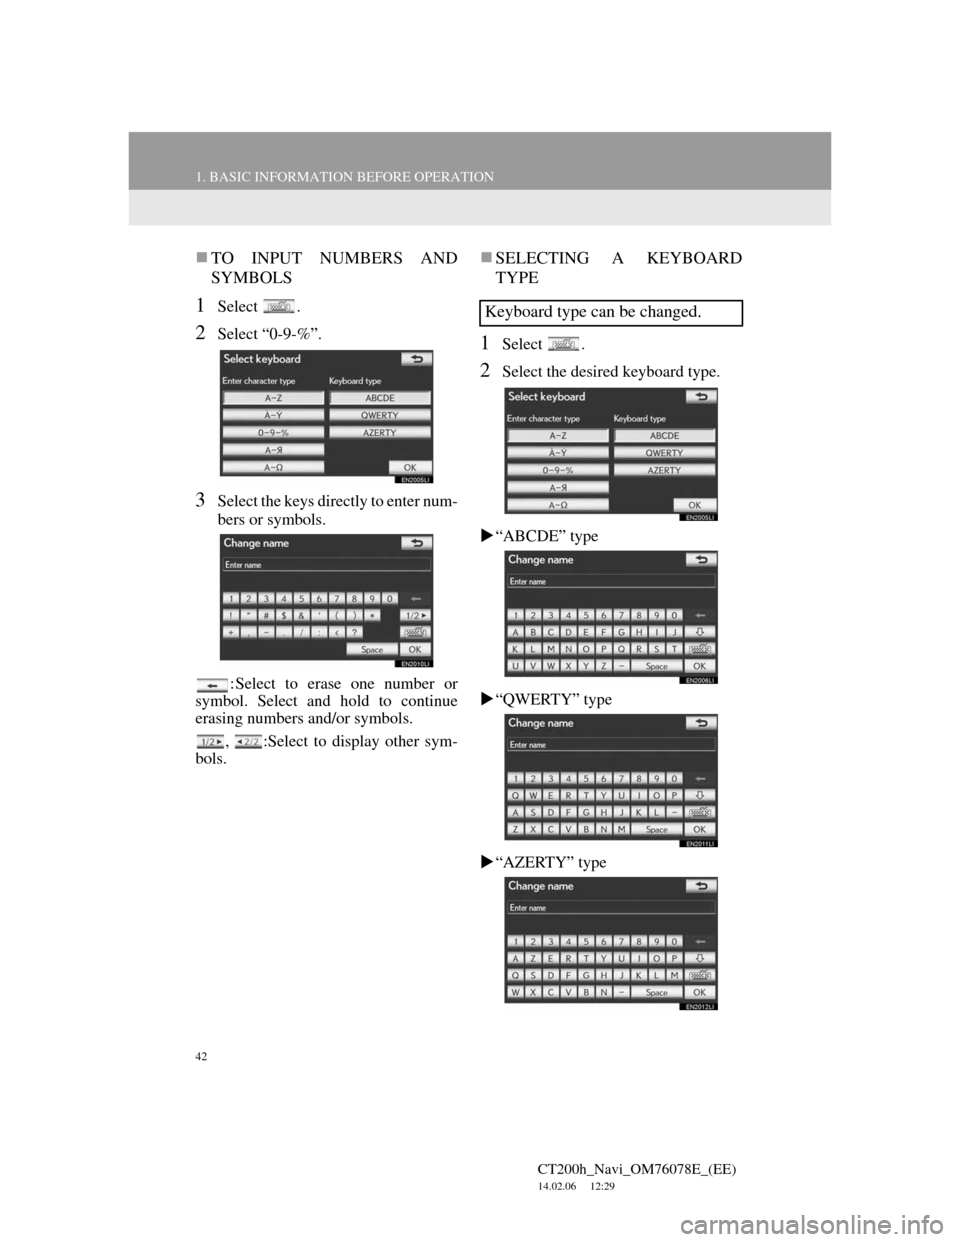
TO INPUT NUMBERS AND
SYMBOLS
1Select .
2Select “0-9-%”.
3Select the keys directly to enter num-
bers or symbols.
: Select to erase one number or
symbol. Select and hold to continue
erasing numbers and/or symbols.
, :Select to display other sym-
bols.
SELECTING A KEYBOARD
TYPE
1Select .
2Select the desired keyboard type.
“ABCDE” type
“QWERTY” type
“AZERTY” type
Keyboard type can be changed.
Page 43 of 436
43
1. BASIC INFORMATION BEFORE OPERATION
2
BASIC FUNCTION
CT200h_Navi_OM76078E_(EE)
14.02.06 12:29
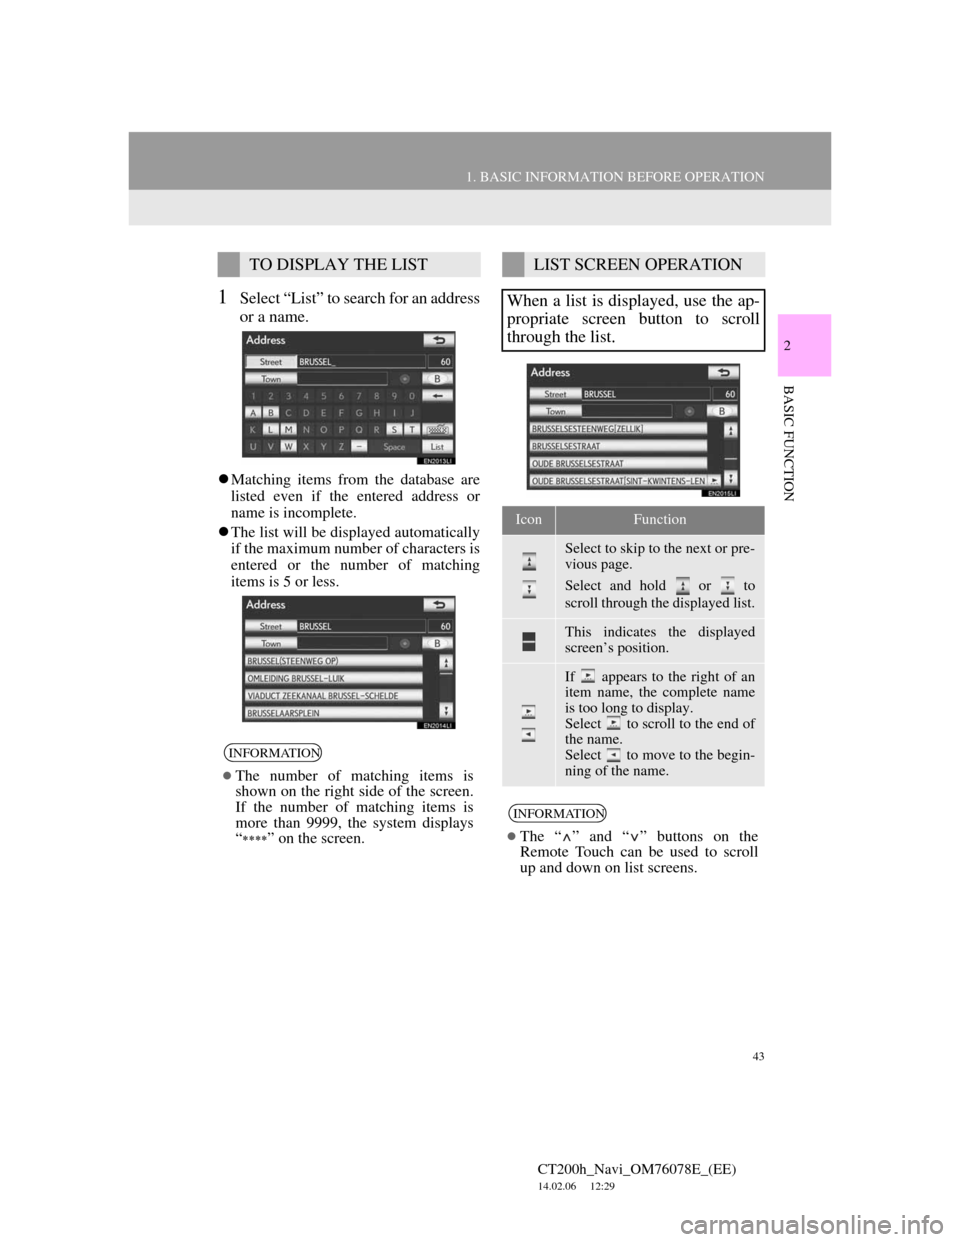
1Select “List” to search for an address
or a name.
Matching items from the database are
listed even if the entered address or
name is incomplete.
The list will be displayed automatically
if the maximum number of characters is
entered or the number of matching
items is 5 or less.
TO DISPLAY THE LIST
INFORMATION
The number of matching items is
shown on the right side of the screen.
If the number of matching items is
more than 9999, the system displays
“
” on the screen.
LIST SCREEN OPERATION
When a list is displayed, use the ap-
propriate screen button to scroll
through the list.
IconFunction
Select to skip to the next or pre-
vious page.
Select and hold or to
scroll through the displayed list.
This indicates the displayed
screen’s position.
If appears to the right of an
item name, the complete name
is too long to display.
Select to scroll to the end of
the name.
Select to move to the begin-
ning of the name.
INFORMATION
The “ ” and “ ” buttons on the
Remote Touch can be used to scroll
up and down on list screens.
Page 44 of 436
44
1. BASIC INFORMATION BEFORE OPERATION
CT200h_Navi_OM76078E_(EE)
14.02.06 12:29
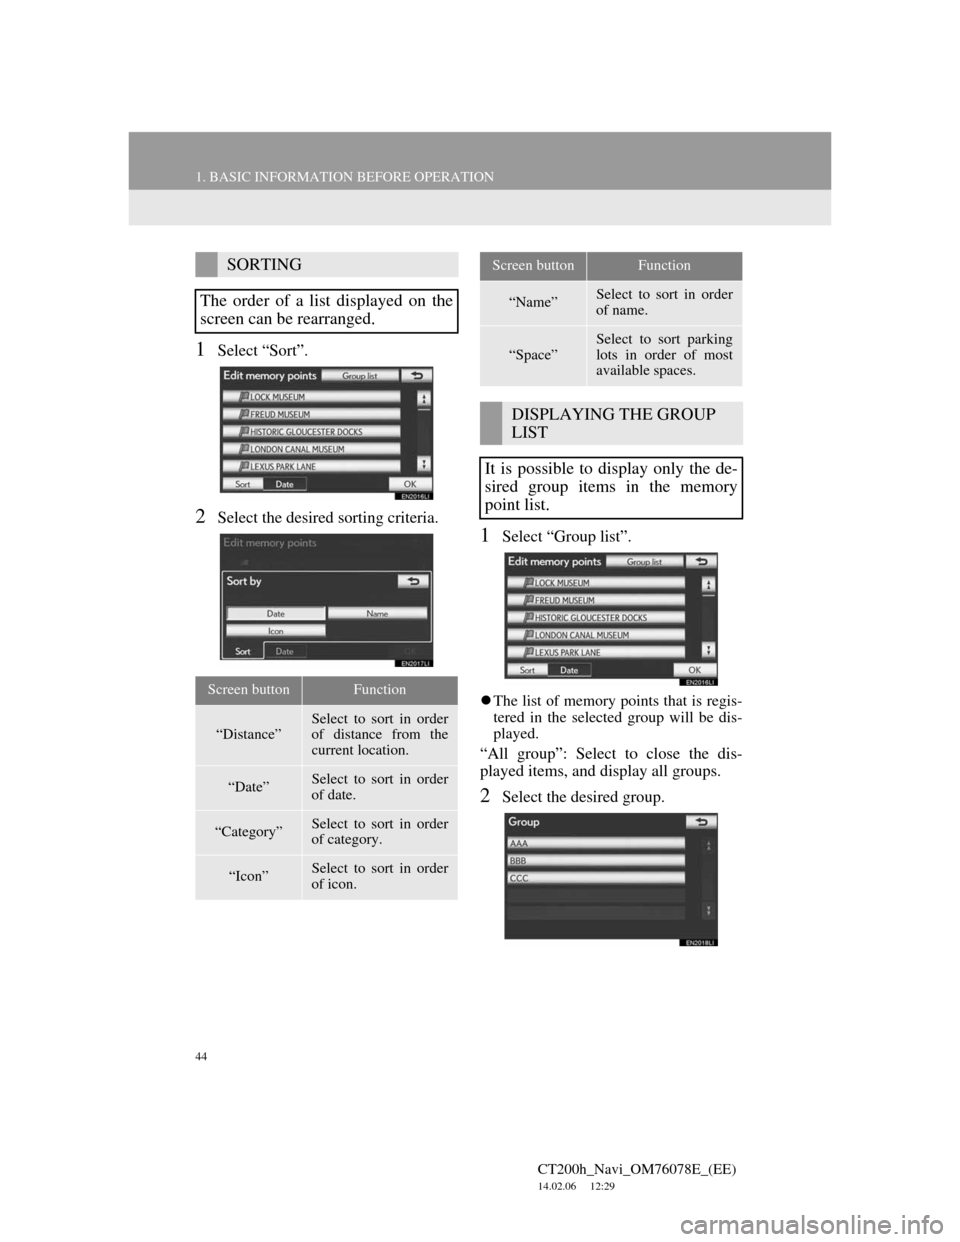
1Select “Sort”.
2Select the desired sorting criteria.
1Select “Group list”.
The list of memory points that is regis-
tered in the selected group will be dis-
played.
“All group”: Select to close the dis-
played items, and display all groups.
2Select the desired group.
SORTING
The order of a list displayed on the
screen can be rearranged.
Screen buttonFunction
“Distance”Select to sort in order
of distance from the
current location.
“Date”Select to sort in order
of date.
“Category”Select to sort in order
of category.
“Icon”Select to sort in order
of icon.
“Name”Select to sort in order
of name.
“Space”
Select to sort parking
lots in order of most
available spaces.
DISPLAYING THE GROUP
LIST
It is possible to display only the de-
sired group items in the memory
point list.
Screen buttonFunction
Page 45 of 436
45
1. BASIC INFORMATION BEFORE OPERATION
CT200h_Navi_OM76078E_(EE)
14.02.06 12:29
2
BASIC FUNCTION
5. SCREEN ADJUSTMENT
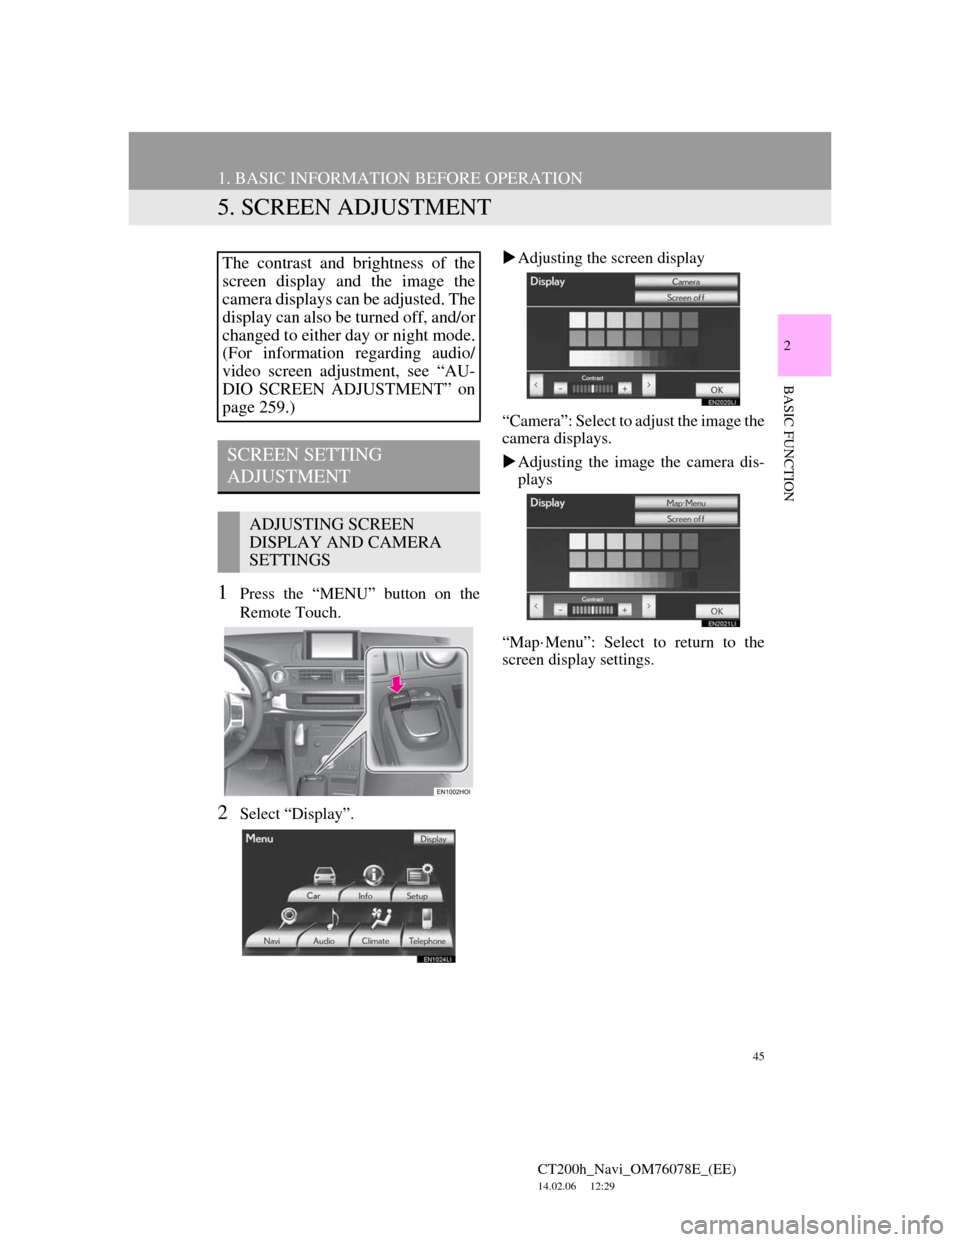
1Press the “MENU” button on the
Remote Touch.
2Select “Display”.Adjusting the screen display
“Camera”: Select to adjust the image the
camera displays.
Adjusting the image the camera dis-
plays
“Map·Menu”: Select to return to the
screen display settings.
The contrast and brightness of the
screen display and the image the
camera displays can be adjusted. The
display can also be turned off, and/or
changed to either day or night mode.
(For information regarding audio/
video screen adjustment, see “AU-
DIO SCREEN ADJUSTMENT” on
page 259.)
SCREEN SETTING
ADJUSTMENT
ADJUSTING SCREEN
DISPLAY AND CAMERA
SETTINGS
Page 46 of 436
46
1. BASIC INFORMATION BEFORE OPERATION
CT200h_Navi_OM76078E_(EE)
14.02.06 12:29
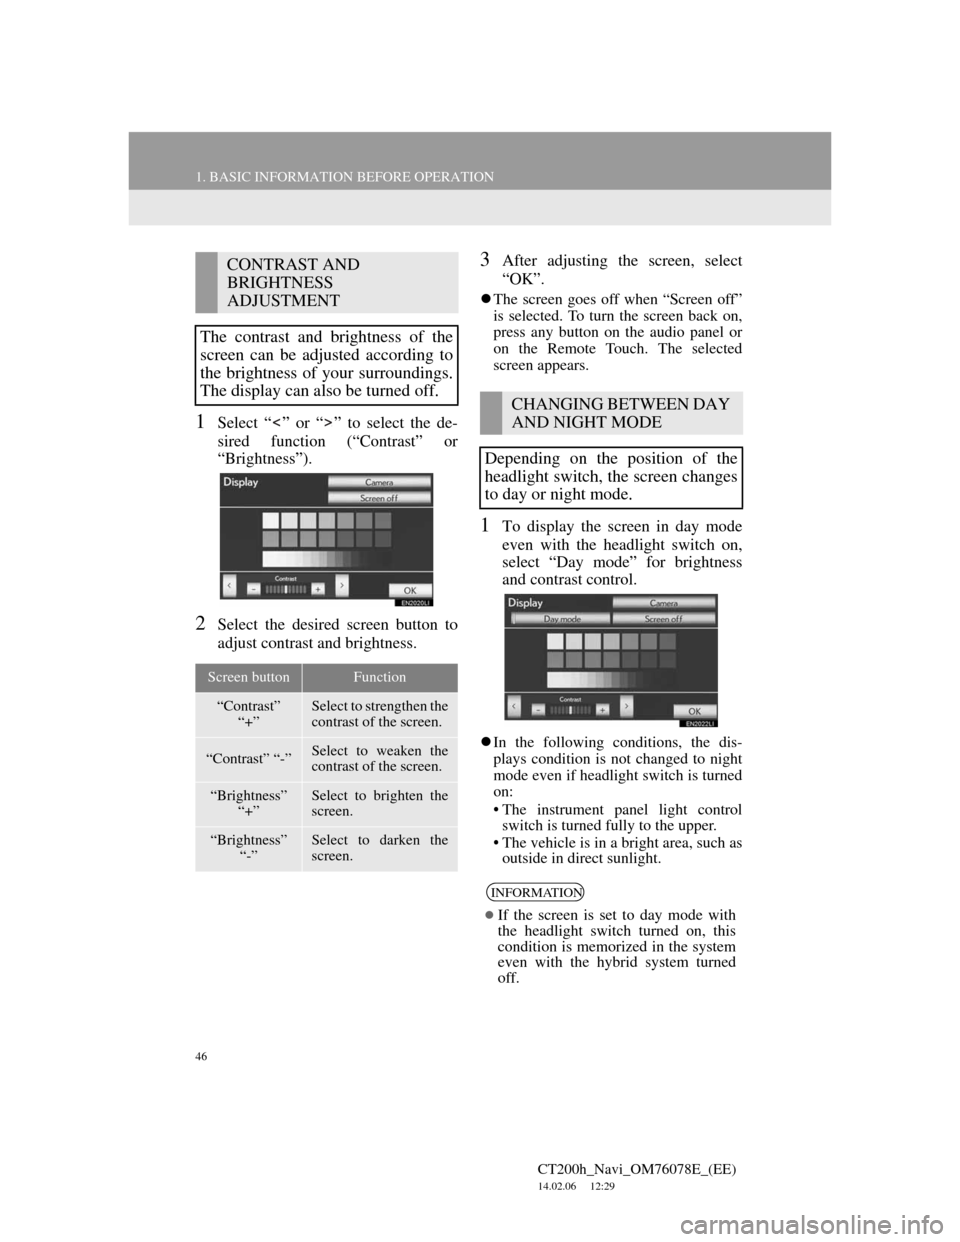
1Select “ ” or “ ” to select the de-
sired function (“Contrast” or
“Brightness”).
2Select the desired screen button to
adjust contrast and brightness.
3After adjusting the screen, select
“OK”.
The screen goes off when “Screen off”
is selected. To turn the screen back on,
press any button on the audio panel or
on the Remote Touch. The selected
screen appears.
1To display the screen in day mode
even with the headlight switch on,
select “Day mode” for brightness
and contrast control.
In the following conditions, the dis-
plays condition is not changed to night
mode even if headlight switch is turned
on:
• The instrument panel light control
switch is turned fully to the upper.
• The vehicle is in a bright area, such as
outside in direct sunlight.
CONTRAST AND
BRIGHTNESS
ADJUSTMENT
The contrast and brightness of the
screen can be adjusted according to
the brightness of your surroundings.
The display can also be turned off.
Screen buttonFunction
“Contrast”
“+”Select to strengthen the
contrast of the screen.
“Contrast” “-”Select to weaken the
contrast of the screen.
“Brightness”
“+”Select to brighten the
screen.
“Brightness”
“-”Select to darken the
screen.
CHANGING BETWEEN DAY
AND NIGHT MODE
Depending on the position of the
headlight switch, the screen changes
to day or night mode.
INFORMATION
If the screen is set to day mode with
the headlight switch turned on, this
condition is memorized in the system
even with the hybrid system turned
off.
Page 47 of 436
47
1. BASIC INFORMATION BEFORE OPERATION
CT200h_Navi_OM76078E_(EE)
14.02.06 12:29
2
BASIC FUNCTION
6. MAP SCREEN OPERATION
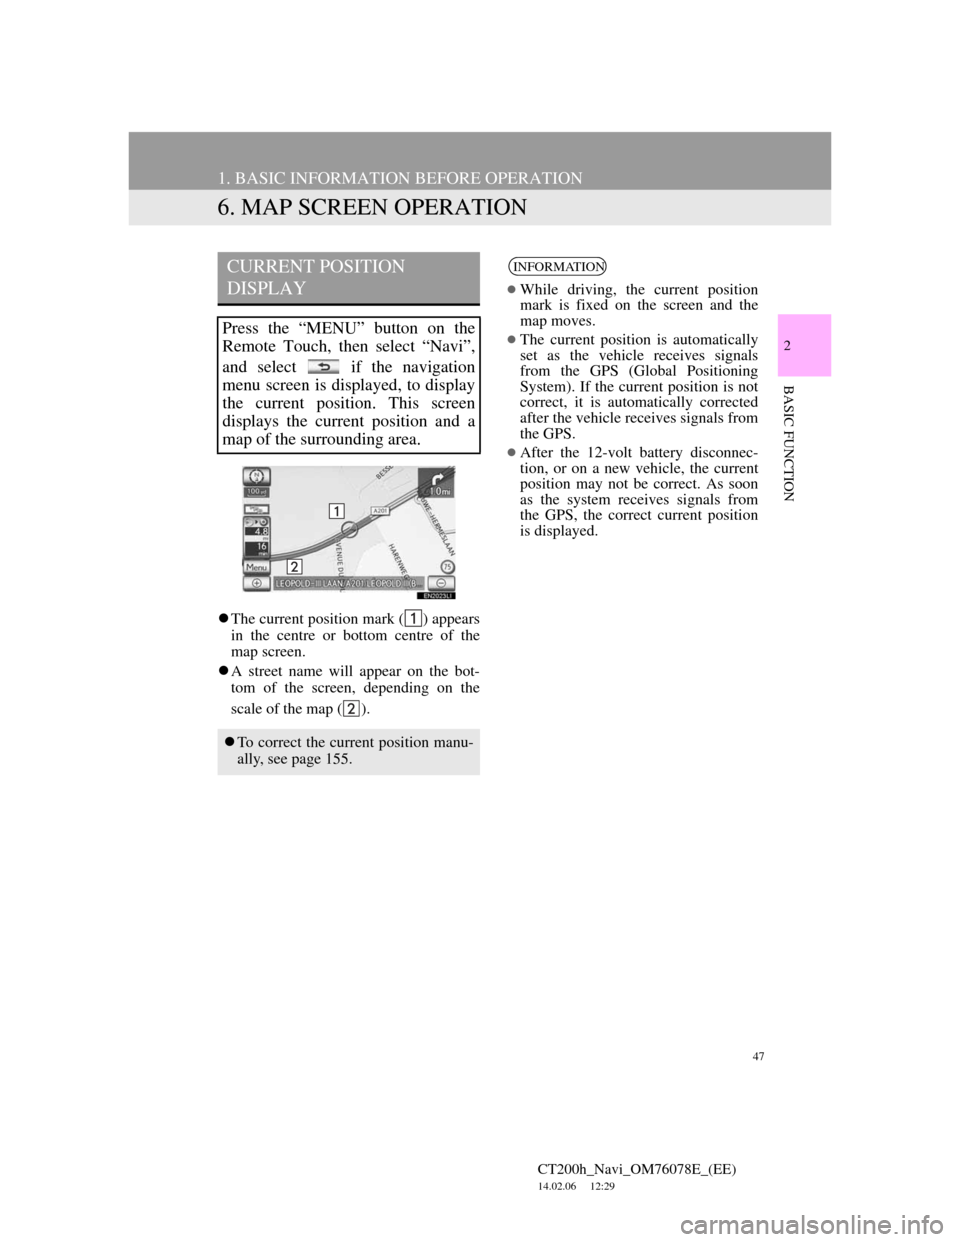
The current position mark ( ) appears
in the centre or bottom centre of the
map screen.
A street name will appear on the bot-
tom of the screen, depending on the
scale of the map ( ).
CURRENT POSITION
DISPLAY
Press the “MENU” button on the
Remote Touch, then select “Navi”,
and select if the navigation
menu screen is displayed, to display
the current position. This screen
displays the current position and a
map of the surrounding area.
To correct the current position manu-
ally, see page 155.
INFORMATION
While driving, the current position
mark is fixed on the screen and the
map moves.
The current position is automatically
set as the vehicle receives signals
from the GPS (Global Positioning
System). If the current position is not
correct, it is automatically corrected
after the vehicle receives signals from
the GPS.
After the 12-volt battery disconnec-
tion, or on a new vehicle, the current
position may not be correct. As soon
as the system receives signals from
the GPS, the correct current position
is displayed.
Page 48 of 436
48
1. BASIC INFORMATION BEFORE OPERATION
CT200h_Navi_OM76078E_(EE)
14.02.06 12:29
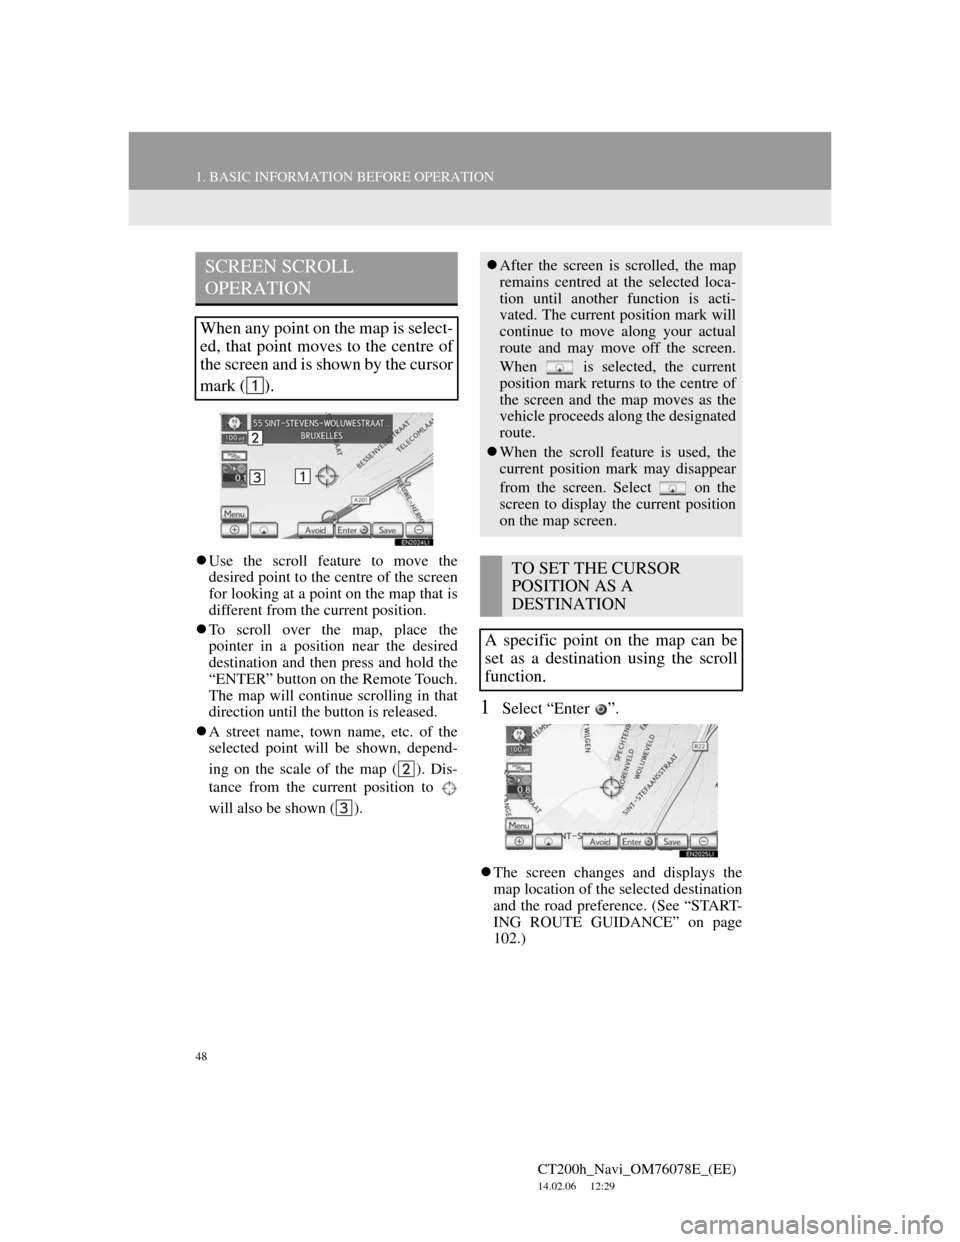
Use the scroll feature to move the
desired point to the centre of the screen
for looking at a point on the map that is
different from the current position.
To scroll over the map, place the
pointer in a position near the desired
destination and then press and hold the
“ENTER” button on the Remote Touch.
The map will continue scrolling in that
direction until the button is released.
A street name, town name, etc. of the
selected point will be shown, depend-
ing on the scale of the map ( ). Dis-
tance from the current position to
will also be shown ( ).
1Select “Enter ”.
The screen changes and displays the
map location of the selected destination
and the road preference. (See “START-
ING ROUTE GUIDANCE” on page
102.)
SCREEN SCROLL
OPERATION
When any point on the map is select-
ed, that point moves to the centre of
the screen and is shown by the cursor
mark ( ).
After the screen is scrolled, the map
remains centred at the selected loca-
tion until another function is acti-
vated. The current position mark will
continue to move along your actual
route and may move off the screen.
When is selected, the current
position mark returns to the centre of
the screen and the map moves as the
vehicle proceeds along the designated
route.
When the scroll feature is used, the
current position mark may disappear
from the screen. Select on the
screen to display the current position
on the map screen.
TO SET THE CURSOR
POSITION AS A
DESTINATION
A specific point on the map can be
set as a destination using the scroll
function.
Page 49 of 436
49
1. BASIC INFORMATION BEFORE OPERATION
2
BASIC FUNCTION
CT200h_Navi_OM76078E_(EE)
14.02.06 12:29
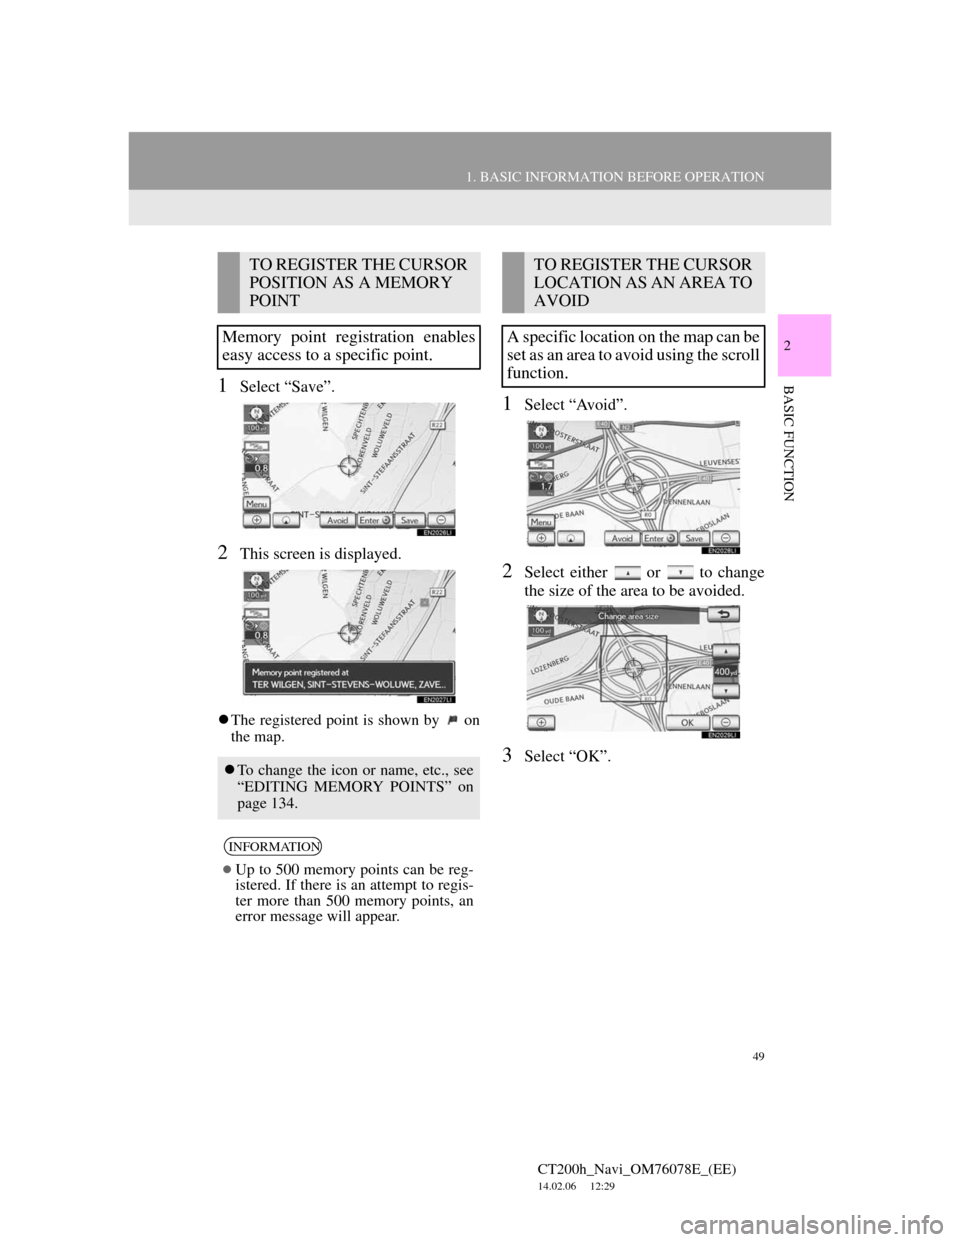
1Select “Save”.
2This screen is displayed.
The registered point is shown by on
the map.
1Select “Avoid”.
2Select either or to change
the size of the area to be avoided.
3Select “OK”.
TO REGISTER THE CURSOR
POSITION AS A MEMORY
POINT
Memory point registration enables
easy access to a specific point.
To change the icon or name, etc., see
“EDITING MEMORY POINTS” on
page 134.
INFORMATION
Up to 500 memory points can be reg-
istered. If there is an attempt to regis-
ter more than 500 memory points, an
error message will appear.
TO REGISTER THE CURSOR
LOCATION AS AN AREA TO
AVOID
A specific location on the map can be
set as an area to avoid using the scroll
function.
Page 50 of 436
50
1. BASIC INFORMATION BEFORE OPERATION
CT200h_Navi_OM76078E_(EE)
14.02.06 12:29
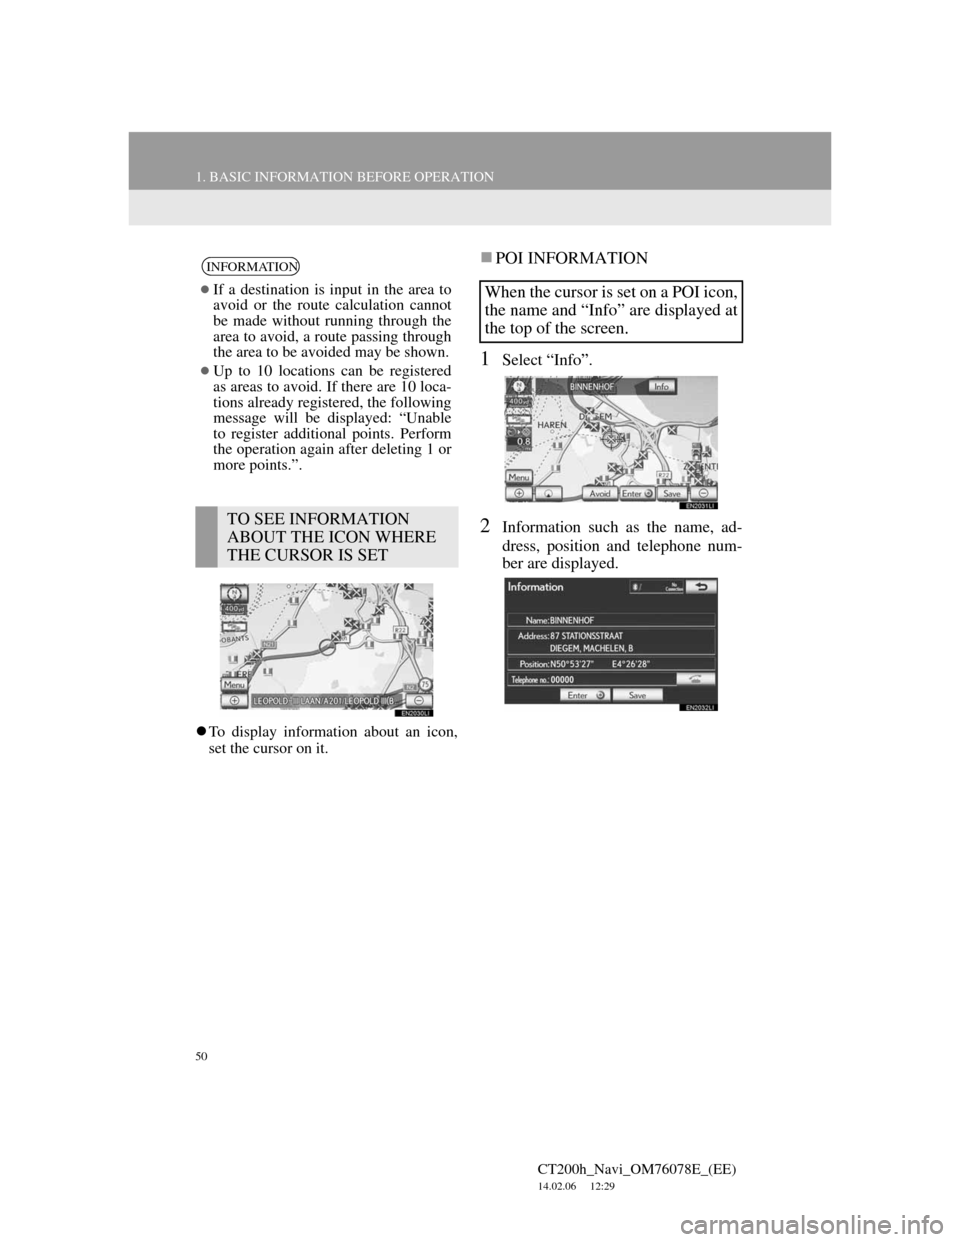
To display information about an icon,
set the cursor on it.
POI INFORMATION
1Select “Info”.
2Information such as the name, ad-
dress, position and telephone num-
ber are displayed.
INFORMATION
If a destination is input in the area to
avoid or the route calculation cannot
be made without running through the
area to avoid, a route passing through
the area to be avoided may be shown.
Up to 10 locations can be registered
as areas to avoid. If there are 10 loca-
tions already registered, the following
message will be displayed: “Unable
to register additional points. Perform
the operation again after deleting 1 or
more points.”.
TO SEE INFORMATION
ABOUT THE ICON WHERE
THE CURSOR IS SET
When the cursor is set on a POI icon,
the name and “Info” are displayed at
the top of the screen.