tow Lexus CT200h 2014 Owner's Manual (in English)
[x] Cancel search | Manufacturer: LEXUS, Model Year: 2014, Model line: CT200h, Model: Lexus CT200h 2014Pages: 622
Page 3 of 622
3
1
8 7
6
5
4
3
2
CT200h_OM_OM76135E_(EE)
9
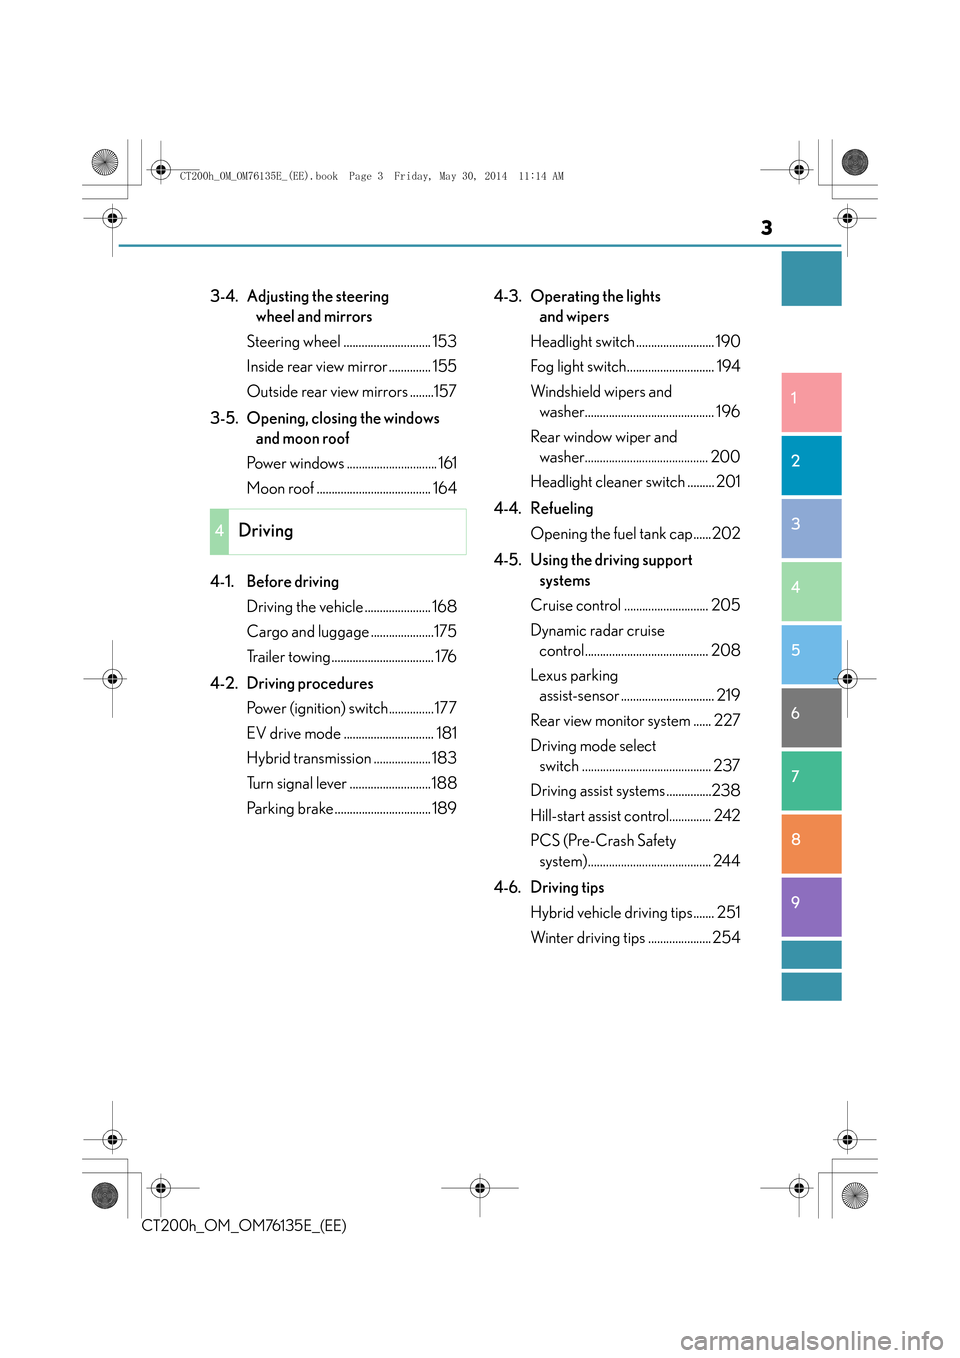
3-4. Adjusting the steering wheel and mirrors
Steering wheel ............................. 153
Inside rear view mirror .............. 155
Outside rear view mirrors ........157
3-5. Opening, closing the windows and moon roof
Power windows .............................. 161
Moon roof ...................................... 164
4-1. Before driving Driving the vehicle ...................... 168
Cargo and luggage .....................175
Trailer towing.................................. 176
4-2. Driving procedures Power (ignition) switch...............177
EV drive mode .............................. 181
Hybrid transmission ................... 183
Turn signal lever ...........................188
Parking brake ................................ 189 4-3. Operating the lights
and wipers
Headlight switch .......................... 190
Fog light switch............................. 194
Windshield wipers and washer........................................... 196
Rear window wiper and washer......................................... 200
Headlight cleaner switch ......... 201
4-4. Refueling Opening the fuel tank cap......202
4-5. Using the driving support systems
Cruise control ............................ 205
Dynamic radar cruise control......................................... 208
Lexus parking assist-sensor ............................... 219
Rear view monitor system ...... 227
Driving mode select switch ........................................... 237
Driving assist systems ...............238
Hill-start assist control.............. 242
PCS (Pre-Crash Safety system)......................................... 244
4-6. Driving tips Hybrid vehicle driving tips....... 251
Winter driving tips ..................... 254
4Driving
CT200h_OM_OM76135E_(EE).book Page 3 Friday, May 30, 2014 11: 14 AM
Page 8 of 622
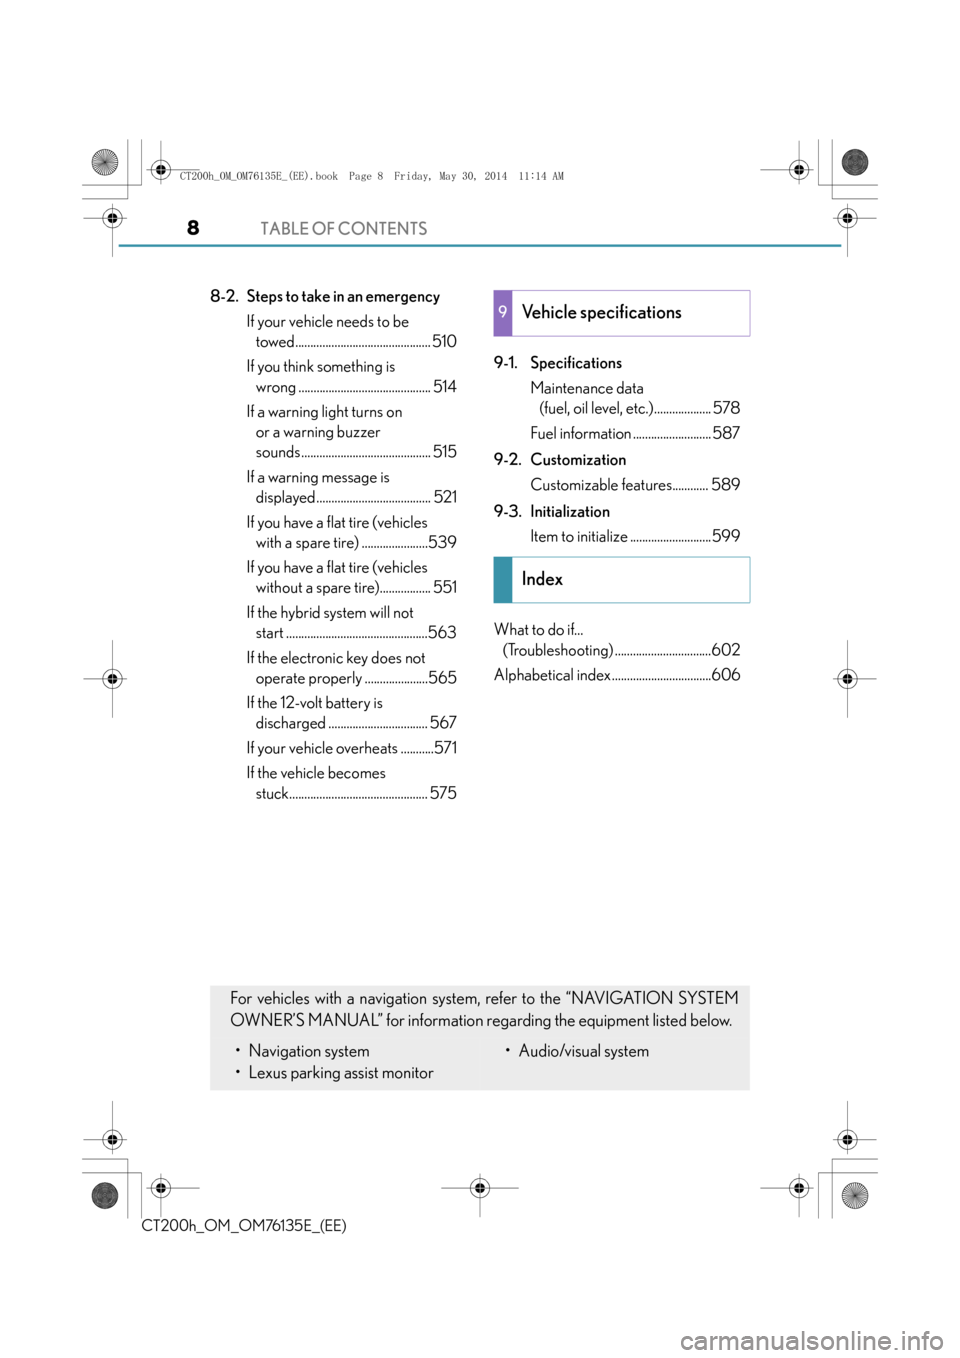
TABLE OF CONTENTS8
CT200h_OM_OM76135E_(EE)
8-2. Steps to take in an emergencyIf your vehicle needs to be towed............................................. 510
If you think something is wrong ............................................ 514
If a warning light turns on or a warning buzzer
sounds........................................... 515
If a warning message is displayed ...................................... 521
If you have a flat tire (vehicles with a spare tire) ......................539
If you have a flat tire (vehicles without a spare tire)................. 551
If the hybrid system will not start ...............................................563
If the electronic key does not operate properly .....................565
If the 12-volt battery is discharged ................................. 567
If your vehicle overheats ...........571
If the vehicle becomes stuck.............................................. 575 9-1. Specifications
Maintenance data (fuel, oil level, etc.)................... 578
Fuel information .......................... 587
9-2. Customization Customizable features............ 589
9-3. Initialization Item to initialize ...........................599
What to do if... (Troubleshooting) ................................602
Alphabetical index .................................6069Vehicle specifications
Index
For vehicles with a navigation system, refer to the “NAVIGATION SYSTEM
OWNER’S MANUAL” for information regarding the equipment listed below.
• Navigation system
• Lexus parking assist monitor• Audio/visual system
CT200h_OM_OM76135E_(EE).book Page 8 Friday, May 30, 2014 11: 14 AM
Page 16 of 622
16Pictorial index
CT200h_OM_OM76135E_(EE)
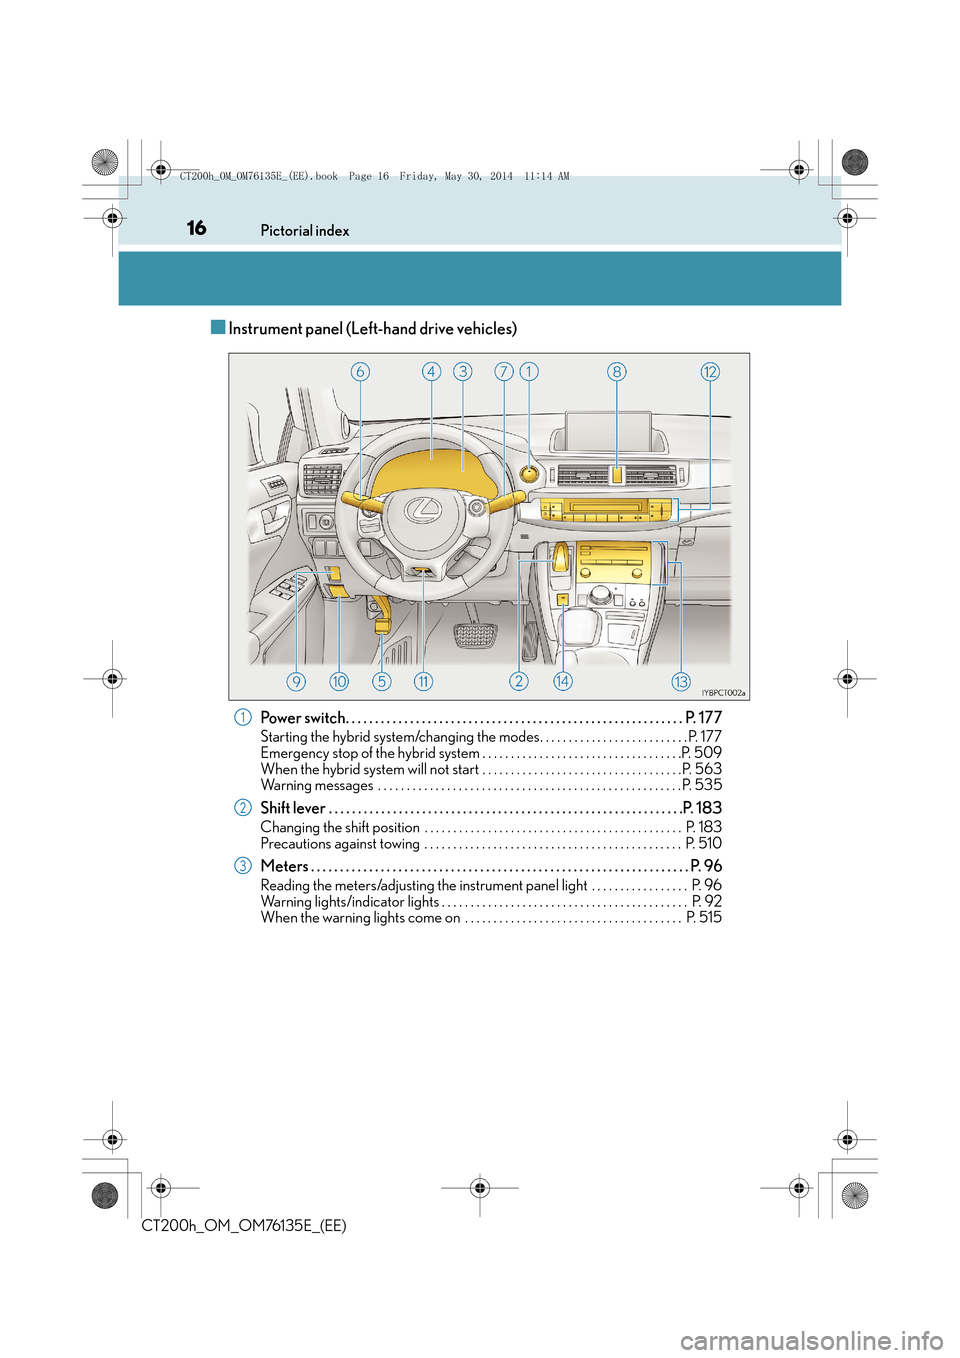
■Instrument panel (Left-hand drive vehicles)
Power switch. . . . . . . . . . . . . . . . . . . . . . . . . . . . . . . . . . . . . . . . . . . . . . . . . . . . . . . . . . P. 1 7 7
Starting the hybrid system/changing the modes. . . . . . . . . . . . . . . . . . . . . . . . . . P. 177
Emergency stop of the hybrid system . . . . . . . . . . . . . . . . . . . . . . . . . . . . . . . . . . .P. 509
When the hybrid system will not start . . . . . . . . . . . . . . . . . . . . . . . . . . . . . . . . . . .P. 563
Warning messages . . . . . . . . . . . . . . . . . . . . . . . . . . . . . . . . . . . . . . . . . . . . . . . . . . . . . P. 53 5
Shift lever . . . . . . . . . . . . . . . . . . . . . . . . . . . . . . . . . . . . . . . . . . . . . . . . . . . . . . . . . . . . .P. 183
Changing the shift position . . . . . . . . . . . . . . . . . . . . . . . . . . . . . . . . . . . . . . . . . . . . . P. 183
Precautions against towing . . . . . . . . . . . . . . . . . . . . . . . . . . . . . . . . . . . . . . . . . . . . . P. 510
Meters . . . . . . . . . . . . . . . . . . . . . . . . . . . . . . . . . . . . . . . . . . . . . . . . . . . . . . . . . . . . . . . . . P. 96
Reading the meters/adjusting the instrument panel light . . . . . . . . . . . . . . . . . P. 96
Warning lights/indicator lights . . . . . . . . . . . . . . . . . . . . . . . . . . . . . . . . . . . . . . . . . . . P. 92
When the warning lights come on . . . . . . . . . . . . . . . . . . . . . . . . . . . . . . . . . . . . . . P. 515
1
2
3
CT200h_OM_OM76135E_(EE).book Page 16 Friday, May 30, 2014 11 :14 AM
Page 24 of 622
24Pictorial index
CT200h_OM_OM76135E_(EE)
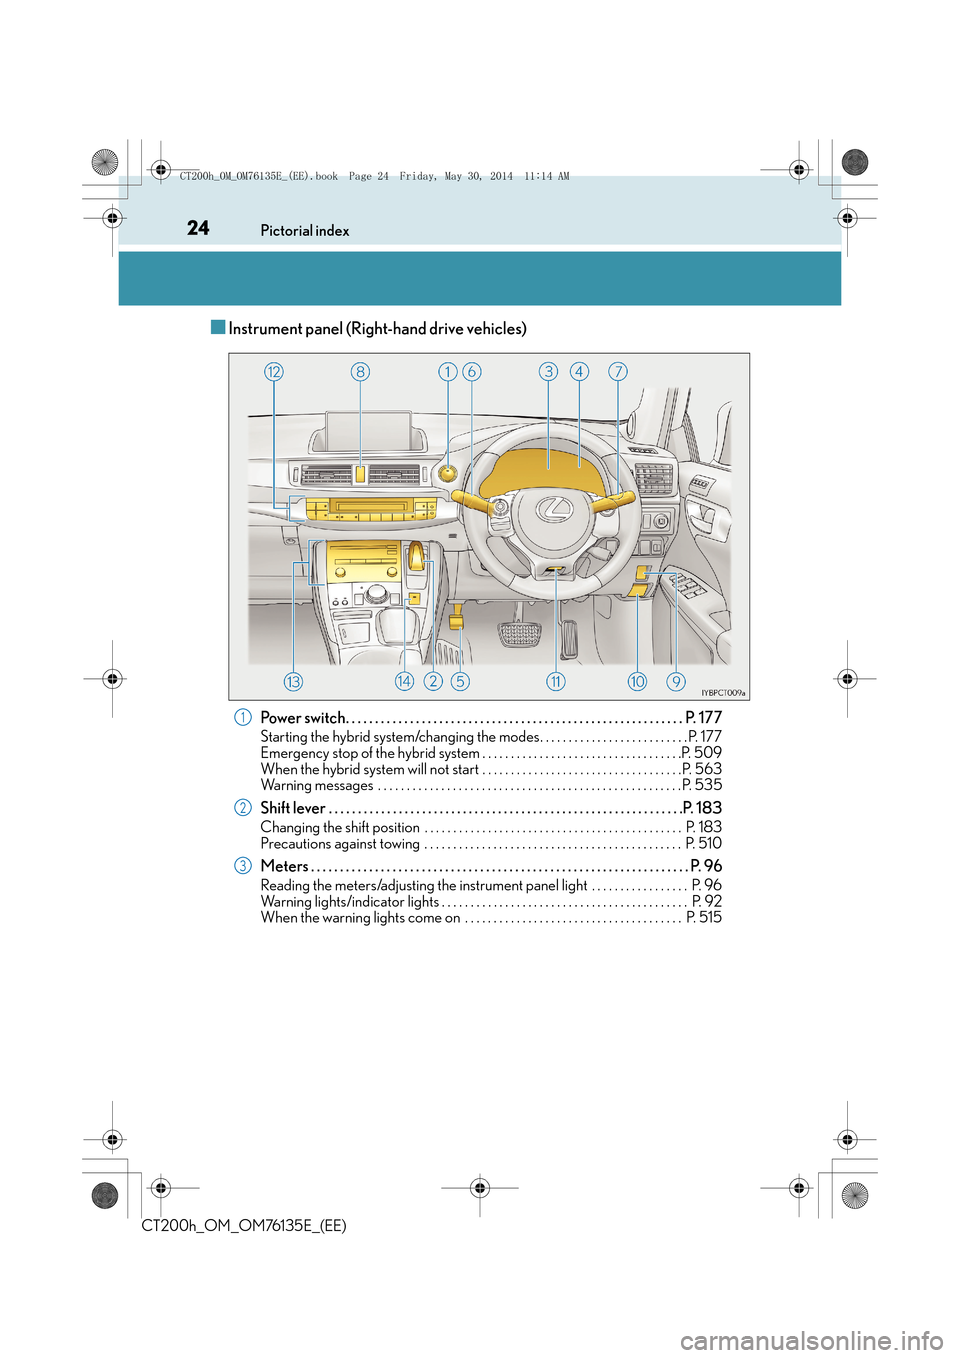
■Instrument panel (Right-hand drive vehicles)
Power switch. . . . . . . . . . . . . . . . . . . . . . . . . . . . . . . . . . . . . . . . . . . . . . . . . . . . . . . . . . P. 1 7 7
Starting the hybrid system/changing the modes. . . . . . . . . . . . . . . . . . . . . . . . . . P. 177
Emergency stop of the hybrid system . . . . . . . . . . . . . . . . . . . . . . . . . . . . . . . . . . .P. 509
When the hybrid system will not start . . . . . . . . . . . . . . . . . . . . . . . . . . . . . . . . . . .P. 563
Warning messages . . . . . . . . . . . . . . . . . . . . . . . . . . . . . . . . . . . . . . . . . . . . . . . . . . . . . P. 53 5
Shift lever . . . . . . . . . . . . . . . . . . . . . . . . . . . . . . . . . . . . . . . . . . . . . . . . . . . . . . . . . . . . .P. 183
Changing the shift position . . . . . . . . . . . . . . . . . . . . . . . . . . . . . . . . . . . . . . . . . . . . . P. 183
Precautions against towing . . . . . . . . . . . . . . . . . . . . . . . . . . . . . . . . . . . . . . . . . . . . . P. 510
Meters . . . . . . . . . . . . . . . . . . . . . . . . . . . . . . . . . . . . . . . . . . . . . . . . . . . . . . . . . . . . . . . . . P. 96
Reading the meters/adjusting the instrument panel light . . . . . . . . . . . . . . . . . P. 96
Warning lights/indicator lights . . . . . . . . . . . . . . . . . . . . . . . . . . . . . . . . . . . . . . . . . . . P. 92
When the warning lights come on . . . . . . . . . . . . . . . . . . . . . . . . . . . . . . . . . . . . . . P. 515
1
2
3
CT200h_OM_OM76135E_(EE).book Page 24 Friday, May 30, 2014 11 :14 AM
Page 44 of 622
441-1. For safe use
CT200h_OM_OM76135E_(EE)
WA R N I N G
■SRS airbag precautions
Observe the following precautions regarding the SRS airbags.
Failure to do so may cause death or serious injury.
●The driver and all passengers in the vehicle must wear their seat belts properly.
The SRS airbags are supplemental devices to be used with the seat belts.
●The SRS driver airbag deploys with considerable force, and can cause death or seri-
ous injury especially if the driver is very close to the airbag.
Since the risk zone for the driver’s airbag is the first 50 - 75 mm (2 - 3 in.) of inflation,
placing yourself 250 mm (10 in.) from your driver airbag provides you with a clear
margin of safety. This distance is measured from the center of the steering wheel to
your breastbone. If you sit less than 250 mm (10 in.) away now, you can change your
driving position in several ways:
• Move your seat to the rear as far as you can while still reaching the pedals com-
fortably.
• Slightly recline the back of the seat. Although vehicle designs vary, many drivers
can achieve the 250 mm (10 in.) distance, even with the driver seat all the way for-
ward, simply by reclining the back of th e seat somewhat. If reclining the back of
your seat makes it hard to see the road, raise yourself by using a firm, non-slippery
cushion, or raise the seat if your vehicle has that feature.
• If your steering wheel is adjustable, tilt it downward. This points the airbag toward
your chest instead of your head and neck.
The seat should be adjusted as recommend ed above, while still maintaining control
of the foot pedals, steering wheel, and yo ur view of the instrument panel controls.
●The SRS front passenger airbag also deploys with considerable force, and can cause
death or serious injury especially if the front passenger is very close to the airbag. The
front passenger seat should be as far from the airbag as possible with the seatback
adjusted, so the front passenger sits upright.
●Improperly seated and/or restrained infa nts and children can be killed or seriously
injured by a deploying airbag. An infant or child who is too small to use a seat belt
should be properly secured using a child restraint system. Lexus strongly recom-
mends that all infants and children be placed in the rear seats of the vehicle and prop-
erly restrained. The rear seats are safer for infants and children than the front
passenger seat. ( →P. 5 4 )
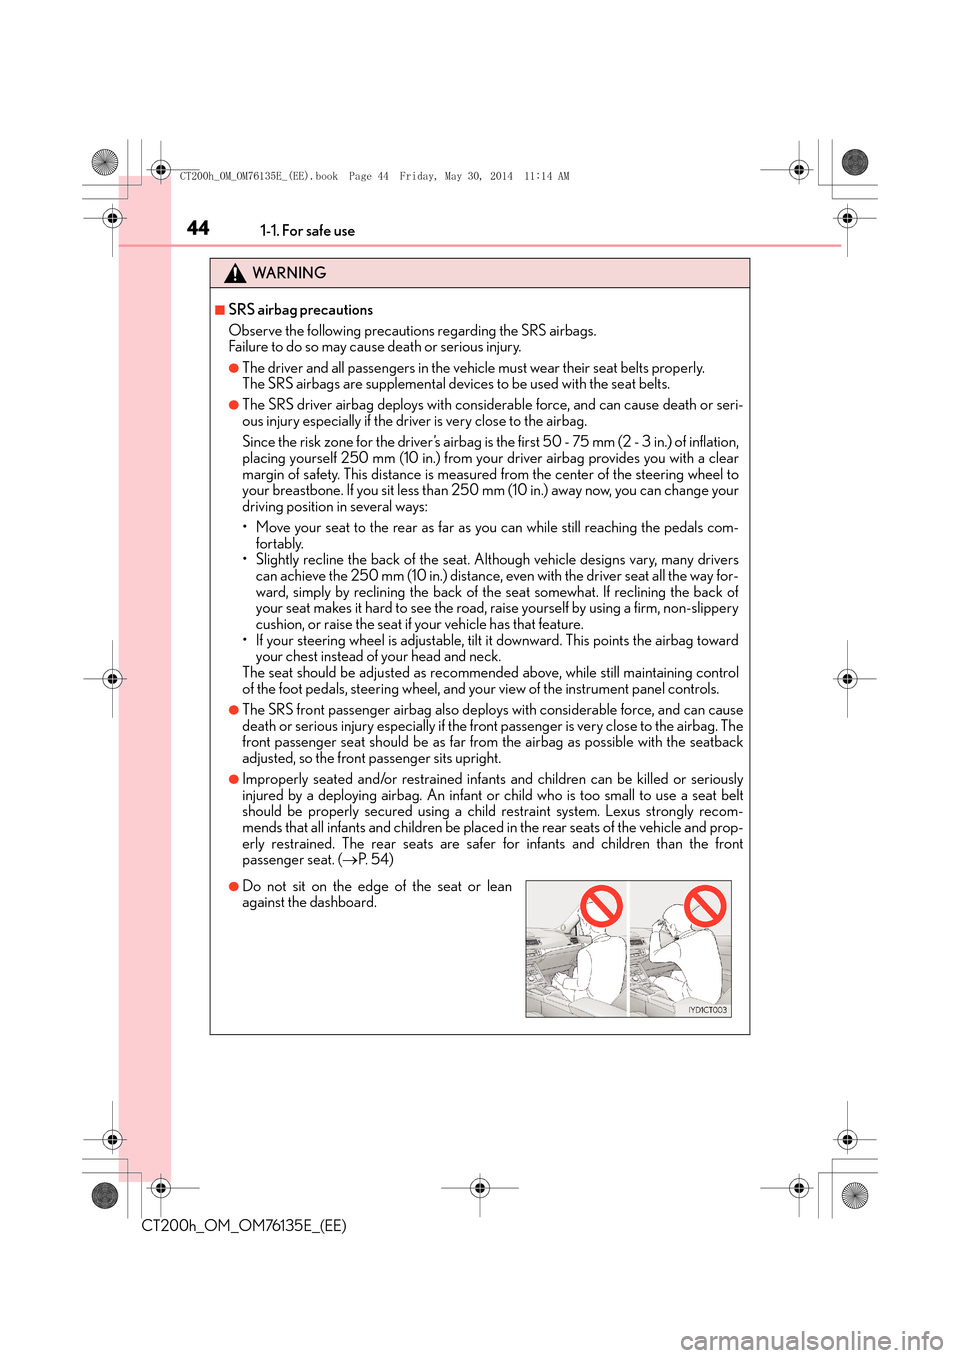
●Do not sit on the edge of the seat or lean
against the dashboard.
CT200h_OM_OM76135E_(EE).book Page 44 Friday, May 30, 2014 11 :14 AM
Page 45 of 622
451-1. For safe use
1
CT200h_OM_OM76135E_(EE)
For safety and security
WA R N I N G
■SRS airbag precautions
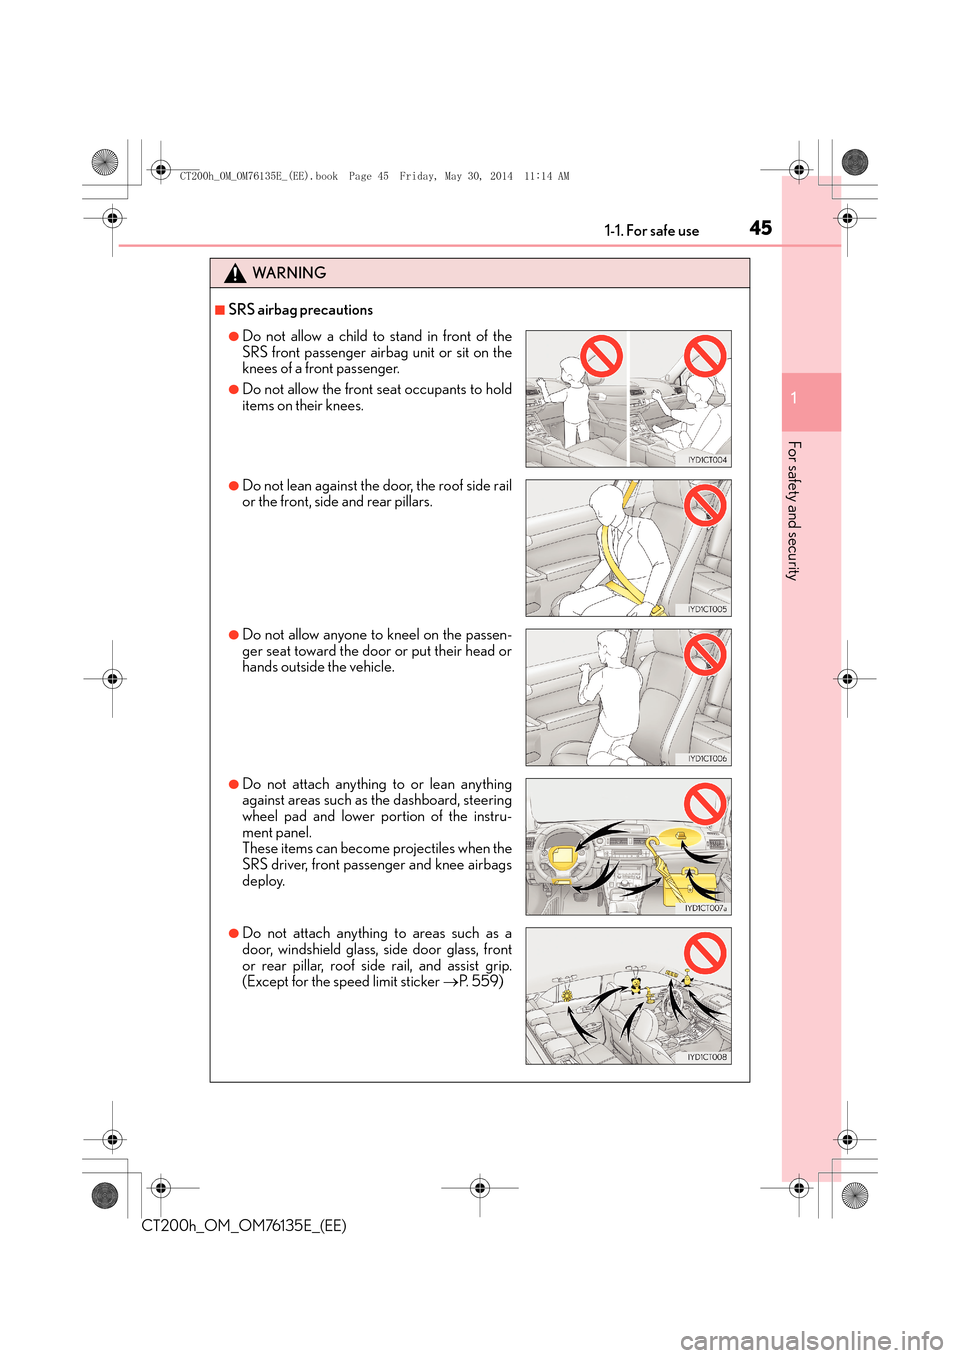
●Do not allow a child to stand in front of the
SRS front passenger airbag unit or sit on the
knees of a front passenger.
●Do not allow the front seat occupants to hold
items on their knees.
●Do not lean against the door, the roof side rail
or the front, side and rear pillars.
●Do not allow anyone to kneel on the passen-
ger seat toward the door or put their head or
hands outside the vehicle.
●Do not attach anything to or lean anything
against areas such as the dashboard, steering
wheel pad and lower portion of the instru-
ment panel.
These items can become projectiles when the
SRS driver, front passenger and knee airbags
deploy.
●Do not attach anything to areas such as a
door, windshield glass, side door glass, front
or rear pillar, roof side rail, and assist grip.
(Except for the speed limit sticker →P. 559)
CT200h_OM_OM76135E_(EE).book Page 45 Friday, May 30, 2014 11 :14 AM
Page 77 of 622
771-2. Hybrid system
1
CT200h_OM_OM76135E_(EE)
For safety and security
WA R N I N G
■Road accident cautions
Observe the following precautions to reduce the risk of death or serious injury:
●Stop the vehicle in a safe place to prevent subsequent accidents. While depressing
the brake pedal, apply the parking brake and shift the shift position to P to stop the
hybrid system. Then, slowly release the brake pedal.
●Do not touch the high voltage parts, cables and connectors.
●If electric wires are exposed inside or outside your vehicle, an electric shock may
occur. Never touch exposed electric wires.
●If a fluid leak occurs, do not touch the fluid as it may be strong alkaline electrolyte
from the hybrid battery (traction battery). If it comes into contact with your skin or
eyes, wash it off immediately with a large amount of water or, if possible, boric acid
solution. Seek immediate medical attention.
●If a fire occurs in the hybrid vehicle, leave the vehicle as soon as possible. Never use a
fire extinguisher that is not meant for electric fires. Using even a small amount of
water may be dangerous.
●If your vehicle needs to be towed, do so with front wheels raised. If the wheels con-
nected to the electric motor (traction motor) are on the ground when towing, the
motor may continue to generate electricity. This may cause an electricity leakage
leading to a fire. (
→P. 5 1 0 )
●Carefully inspect the ground under the vehicl e. If you find that liquid has leaked onto
the ground, the fuel system may have been damaged. Leave the vehicle as soon as
possible.
■Hybrid battery (traction battery)
●Never resell, hand over or modify the hybrid battery. To prevent accidents, hybrid
batteries that have been removed from a disposed vehicle are collected through
Lexus dealer. Do not dispose of the battery yourself.
Unless the battery is properly collected, th e following may occur, resulting in death
or serious injury:
• The hybrid battery may be illegally dispos ed of or dumped, and it is hazardous to
the environment or someone may touch a high voltage part, resulting in an electric
shock.
• The hybrid battery is intended to be used exclusively with your hybrid vehicle. If the hybrid battery is used outside of your vehicle or modified in any way, accidents
such as electric shock, heat generation, smoke generation, an explosion and elec-
trolyte leakage may occur.
When reselling or handing over your vehi cle, the possibility of an accident is
extremely high because the person receiving the vehicle may not be aware of these
dangers.
●If your vehicle is disposed of without the hybrid battery having been removed, there is
a danger of serious electric shock if high voltage parts, cables and their connectors
are touched. In the event that your vehicle must be disposed of, the hybrid battery
must be disposed of by any authorized Lexus dealer or repairer, or another duly qual-
ified and equipped professional or a qualified service shop. If the hybrid battery is not
disposed of properly, it may cause electric shock that can result in death or serious
injury.
CT200h_OM_OM76135E_(EE).book Page 77 Friday, May 30, 2014 11 :14 AM
Page 87 of 622

871-3. Theft deterrent system
1
CT200h_OM_OM76135E_(EE)
For safety and security●The intrusion sensor detects intruders or movement in the vehicle.
●The tilt sensor detects changes in vehicle inclination, such as when the vehicle
is towed away.
This system is designed to deter and pr event vehicle theft but does not guarantee
absolute security against all intrusions.
■Setting the intrusion sensor and tilt sensor
The intrusion sensor and tilt sensor will be set automatically when the alarm is
set. ( →P. 8 5 )
■Canceling the intrusion sensor and tilt sensor
If you are leaving pets or other moving things inside the vehicle, make sure to
disable the intrusion sensor and tilt sensor before setting the alarm, as they will
respond to movement inside the vehicle.
Turn the power switch off.
Press the intrusion sensor and tilt
sensor cancel switch.
A message will be shown on the
multi-information display in the
instrument cluster.
The intrusion sensor and tilt sensor
will revert to on each time the power
switch is turned to ON mode.
■Canceling and automatic re-enabling of the intrusion sensor and tilt sensor
●The alarm will still be set even when the intr usion sensor and tilt sensor are canceled.
●After the intrusion sensor and tilt sensor are canceled, pressing the power switch or
unlocking the doors using the entry function or wireless remote control will re-enable
the intrusion sensor and tilt sensor.
●The intrusion sensor and tilt sensor will au tomatically be re-enabled when the alarm
system is deactivated.
NOTICE
■To ensure the system operates correctly
Do not modify or remove the system. If modified or removed, the proper operation of
the system cannot be guaranteed.
Intrusion sensor and tilt sensor (if equipped)
1
2
CT200h_OM_OM76135E_(EE).book Page 87 Friday, May 30, 2014 11 :14 AM
Page 130 of 622
1303-2. Opening, closing and locking the doors
CT200h_OM_OM76135E_(EE)
■Alarms and warning messages
An alarm sounds and warning message displays shown on the multi-information display
are used to protect against unexpected accidents or theft of the vehicle resulting from
erroneous operation. When a warning message is displayed, take appropriate measures
based on the displayed message. ( →P. 5 2 1 )
When only an alarm sounds, circumstances and correction procedures are as follows.
■Battery-saving function (vehicles with entry function)
The battery-saving function will be activated in order to prevent the electronic key bat-
tery and the 12-volt battery from being discha rged while the vehicle is not in operation
for a long time.
●In the following situations, the smart entry & start system may take some time to unlock
the doors.
• The electronic key has been left in an area of approximately 2 m (6 ft.) of the outside
of the vehicle for 10 minutes or longer.
• The smart entry & start system has not been used for 5 days or longer.
●If the smart entry & start system has not been used for 14 days or longer, the doors can-
not be unlocked at any doors except the driver’s door. In this case, take hold of the
driver’s door handle, or use the wireless remote control or the mechanical key, to
unlock the doors.
■Conditions affecting operation
The smart entry & start system, wireless re mote control and immobilizer system use
weak radio waves. In the following situations, the communication between the electronic
key and the vehicle may be affected, preventing the smart entry & start system, wireless
remote control and immobilizer sy stem from operating properly.
(Ways of coping: →P. 565)
●When the electronic key battery is depleted
●Near a TV tower, electric power plant, gas station, radio station, large display, airport or
other facility that generates strong radio waves or electrical noise
●When carrying a portable radio, cellular ph one, cordless phone or other wireless com-
munication devices
AlarmSituationCorrection procedure
Exterior alarm
sounds once for 5
seconds (vehicles
with entry function)An attempt was made to lock
the vehicle while a door was
open.Close all of the doors and
lock the doors again.
Interior alarm pings
repeatedly
The power switch was turned to
ACCESSORY mode while the
driver’s door was open (The
driver’s door was opened when
the power switch was in
ACCESSORY mode).
Turn the power switch off
and close the driver’s door.
CT200h_OM_OM76135E_(EE).book Page 130 Friday, May 30, 2014 1 1:14 AM
Page 152 of 622
1523-3. Adjusting the seats
CT200h_OM_OM76135E_(EE)
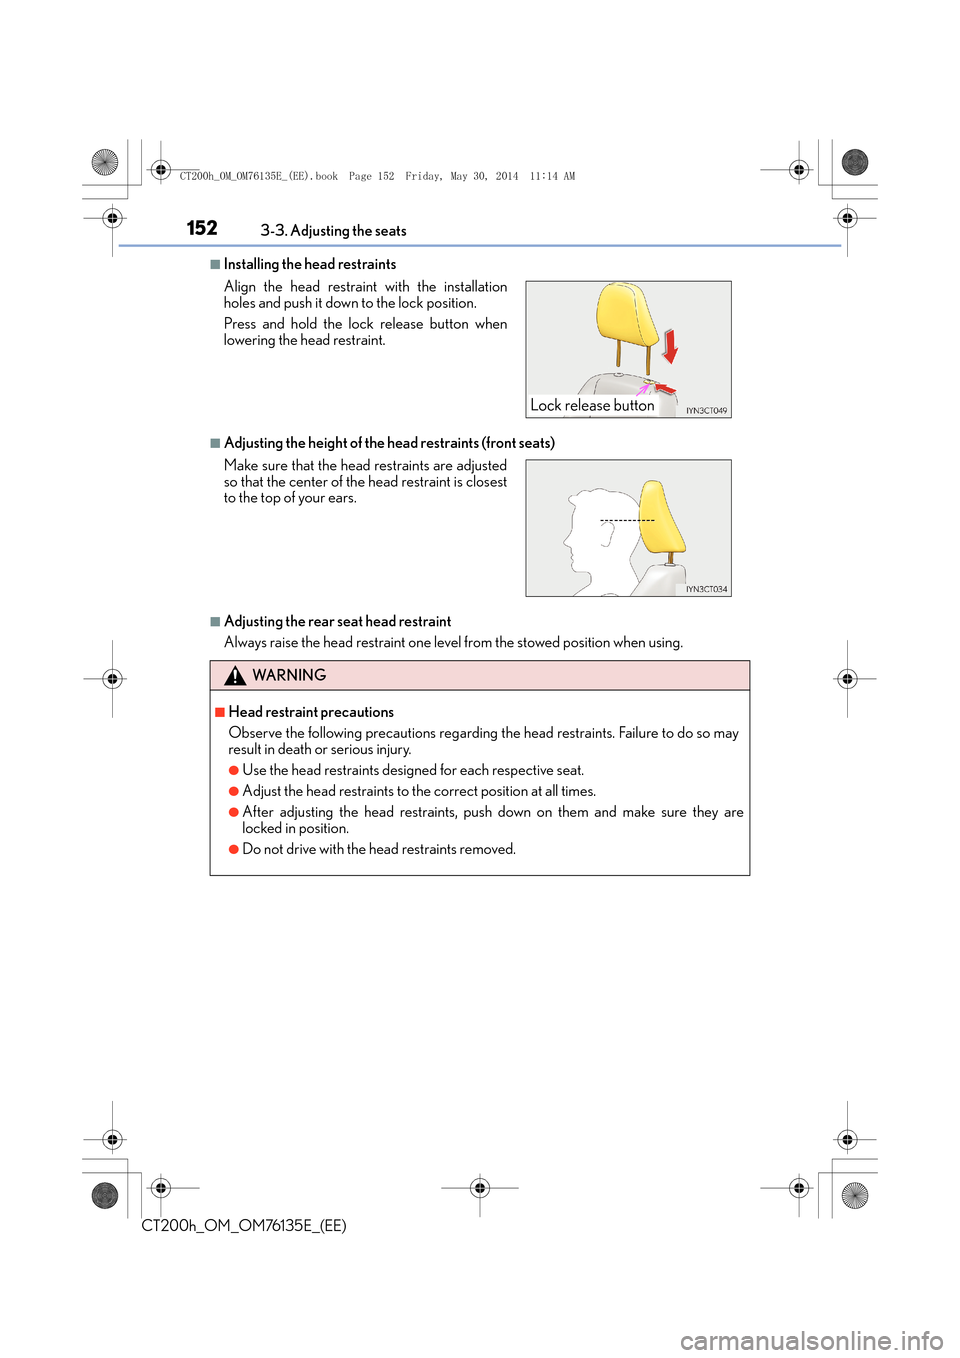
■Installing the head restraints
■Adjusting the height of the head restraints (front seats)
■Adjusting the rear seat head restraint
Always raise the head restraint one level from the stowed position when using. Align the head restraint with the installation
holes and push it down to the lock position.
Press and hold the lock release button when
lowering the head restraint.
Make sure that the head restraints are adjusted
so that the center of the head restraint is closest
to the top of your ears.
WA R N I N G
■Head restraint precautions
Observe the following precautions regarding the head restraints. Failure to do so may
result in death or serious injury.
●Use the head restraints designed for each respective seat.
●Adjust the head restraints to the correct position at all times.
●After adjusting the head restraints, push down on them and make sure they are
locked in position.
●Do not drive with the head restraints removed.
Lock release button
CT200h_OM_OM76135E_(EE).book Page 152 Friday, May 30, 2014 1 1:14 AM