Lexus GS350 2013 Navigation manual
Manufacturer: LEXUS, Model Year: 2013, Model line: GS350, Model: Lexus GS350 2013Pages: 256, PDF Size: 30.05 MB
Page 131 of 256
131
3. MEMORY POINTS
GS450h_300h_350_250_NAVI_OM30D64E_(EE)
13.10.23 11:07
3
NAVIGATION SYSTEM
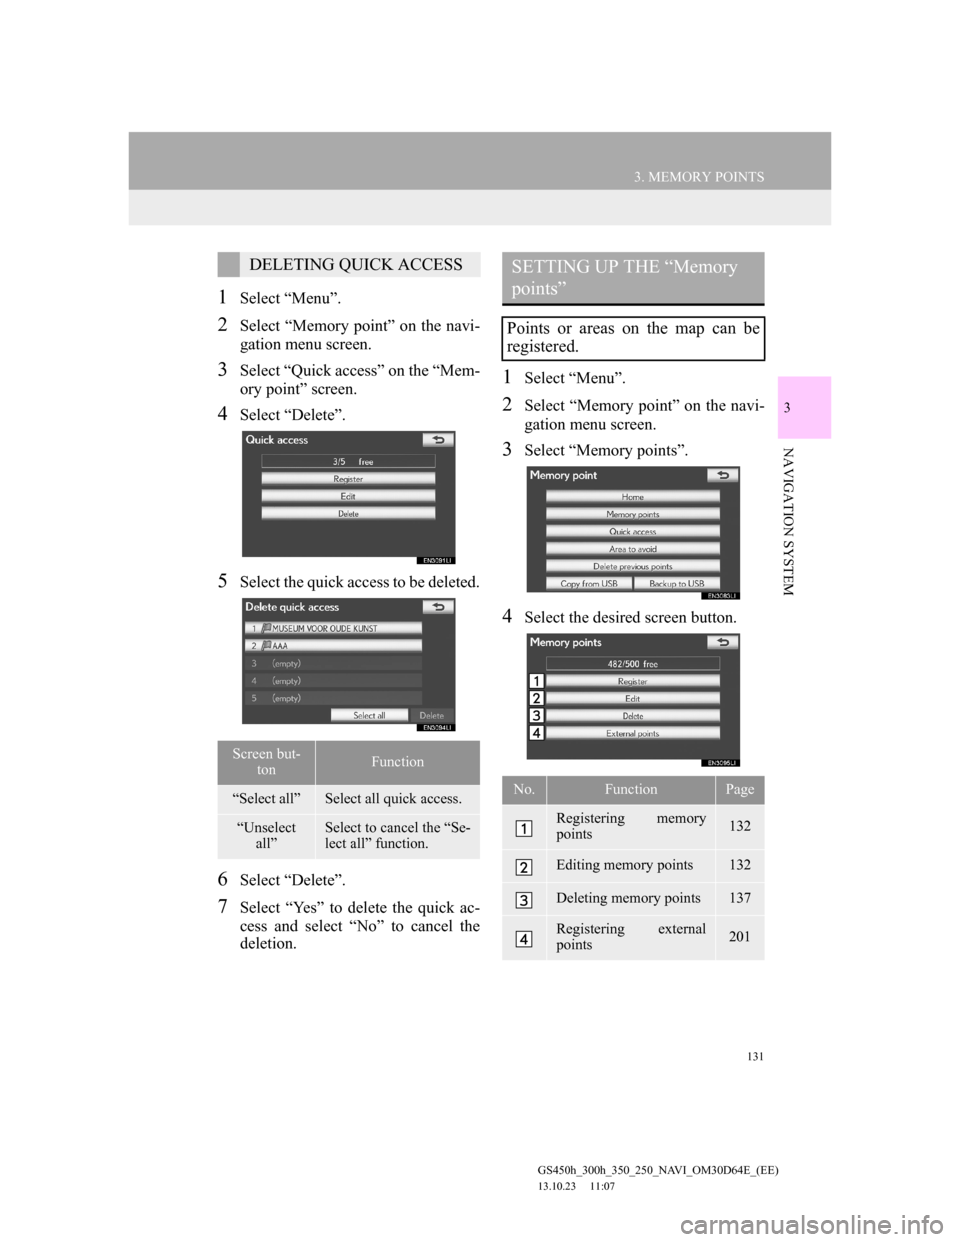
1Select “Menu”.
2Select “Memory point” on the navi-
gation menu screen.
3Select “Quick access” on the “Mem-
ory point” screen.
4Select “Delete”.
5Select the quick access to be deleted.
6Select “Delete”.
7Select “Yes” to delete the quick ac-
cess and select “No” to cancel the
deletion.
1Select “Menu”.
2Select “Memory point” on the navi-
gation menu screen.
3Select “Memory points”.
4Select the desired screen button.
DELETING QUICK ACCESS
Screen but-
tonFunction
“Select all”Select all quick access.
“Unselect
all”Select to cancel the “Se-
lect all” function.
SETTING UP THE “Memory
points”
Points or areas on the map can be
registered.
No.FunctionPage
Registering memory
points132
Editing memory points132
Deleting memory points137
Registering external
points201
Page 132 of 256
132
3. MEMORY POINTS
GS450h_300h_350_250_NAVI_OM30D64E_(EE)
13.10.23 11:07
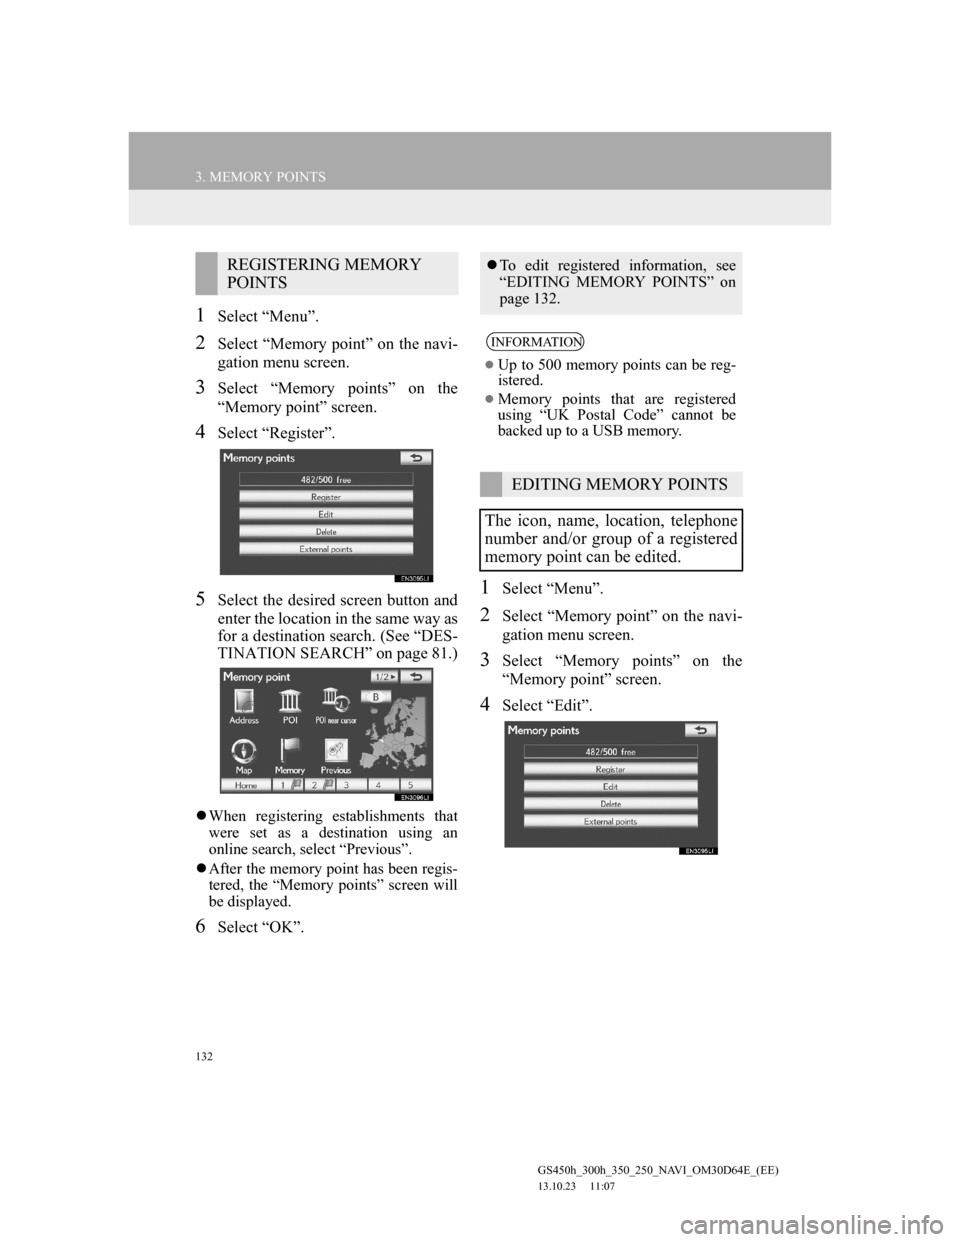
1Select “Menu”.
2Select “Memory point” on the navi-
gation menu screen.
3Select “Memory points” on the
“Memory point” screen.
4Select “Register”.
5Select the desired screen button and
enter the location in the same way as
for a destination search. (See “DES-
TINATION SEARCH” on page 81.)
When registering establishments that
were set as a destination using an
online search, select “Previous”.
After the memory point has been regis-
tered, the “Memory points” screen will
be displayed.
6Select “OK”.
1Select “Menu”.
2Select “Memory point” on the navi-
gation menu screen.
3Select “Memory points” on the
“Memory point” screen.
4Select “Edit”.
REGISTERING MEMORY
POINTSTo edit registered information, see
“EDITING MEMORY POINTS” on
page 132.
INFORMATION
Up to 500 memory points can be reg-
istered.
Memory points that are registered
using “UK Postal Code” cannot be
backed up to a USB memory.
EDITING MEMORY POINTS
The icon, name, location, telephone
number and/or group of a registered
memory point can be edited.
Page 133 of 256
133
3. MEMORY POINTS
GS450h_300h_350_250_NAVI_OM30D64E_(EE)
13.10.23 11:07
3
NAVIGATION SYSTEM
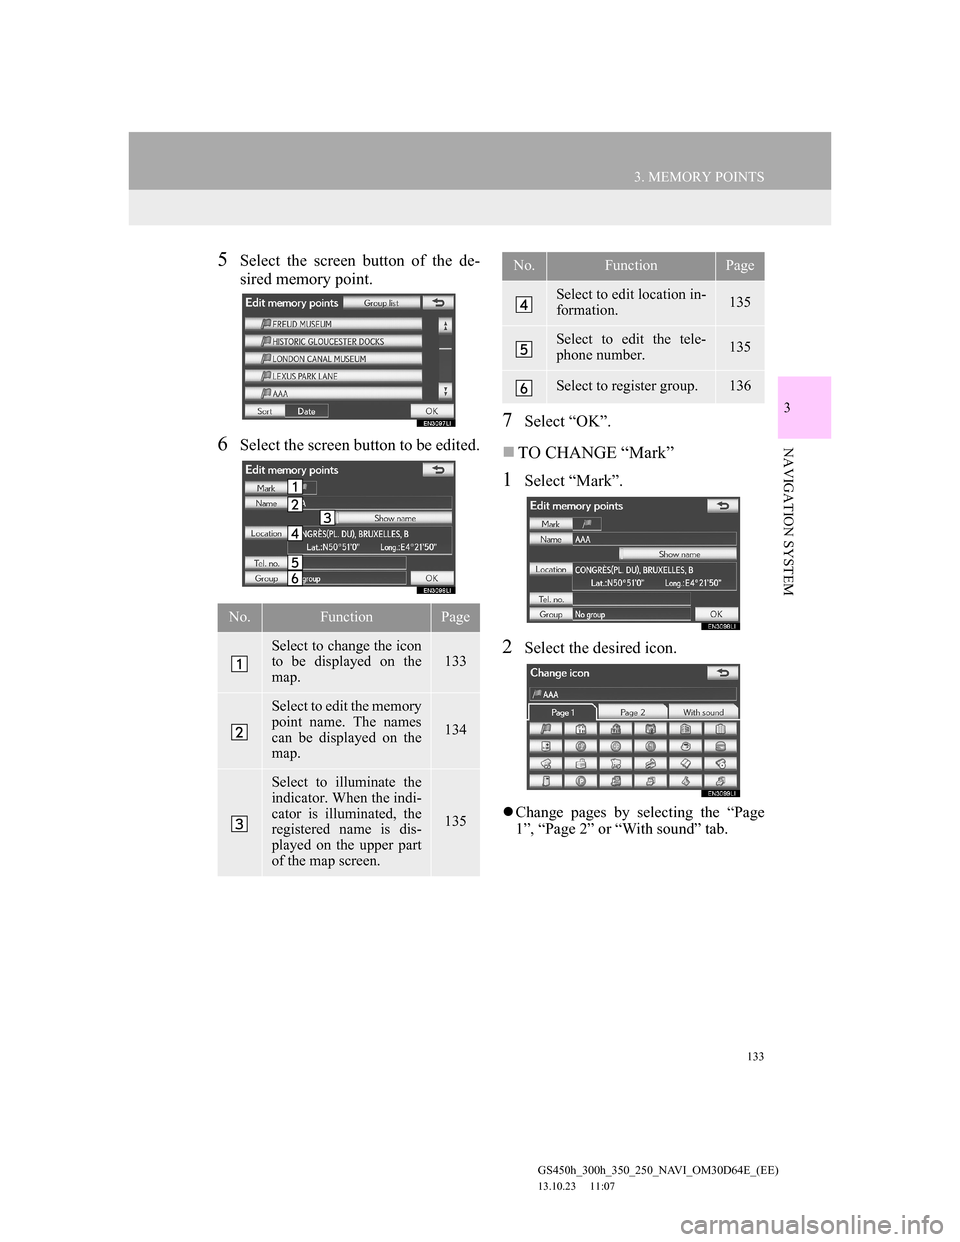
5Select the screen button of the de-
sired memory point.
6Select the screen button to be edited.
7Select “OK”.
TO CHANGE “Mark”
1Select “Mark”.
2Select the desired icon.
Change pages by selecting the “Page
1”, “Page 2” or “With sound” tab.
No.FunctionPage
Select to change the icon
to be displayed on the
map. 133
Select to edit the memory
point name. The names
can be displayed on the
map.
134
Select to illuminate the
indicator. When the indi-
cator is illuminated, the
registered name is dis-
played on the upper part
of the map screen.
135
Select to edit location in-
formation. 135
Select to edit the tele-
phone number. 135
Select to register group. 136
No.FunctionPage
Page 134 of 256
134
3. MEMORY POINTS
GS450h_300h_350_250_NAVI_OM30D64E_(EE)
13.10.23 11:07
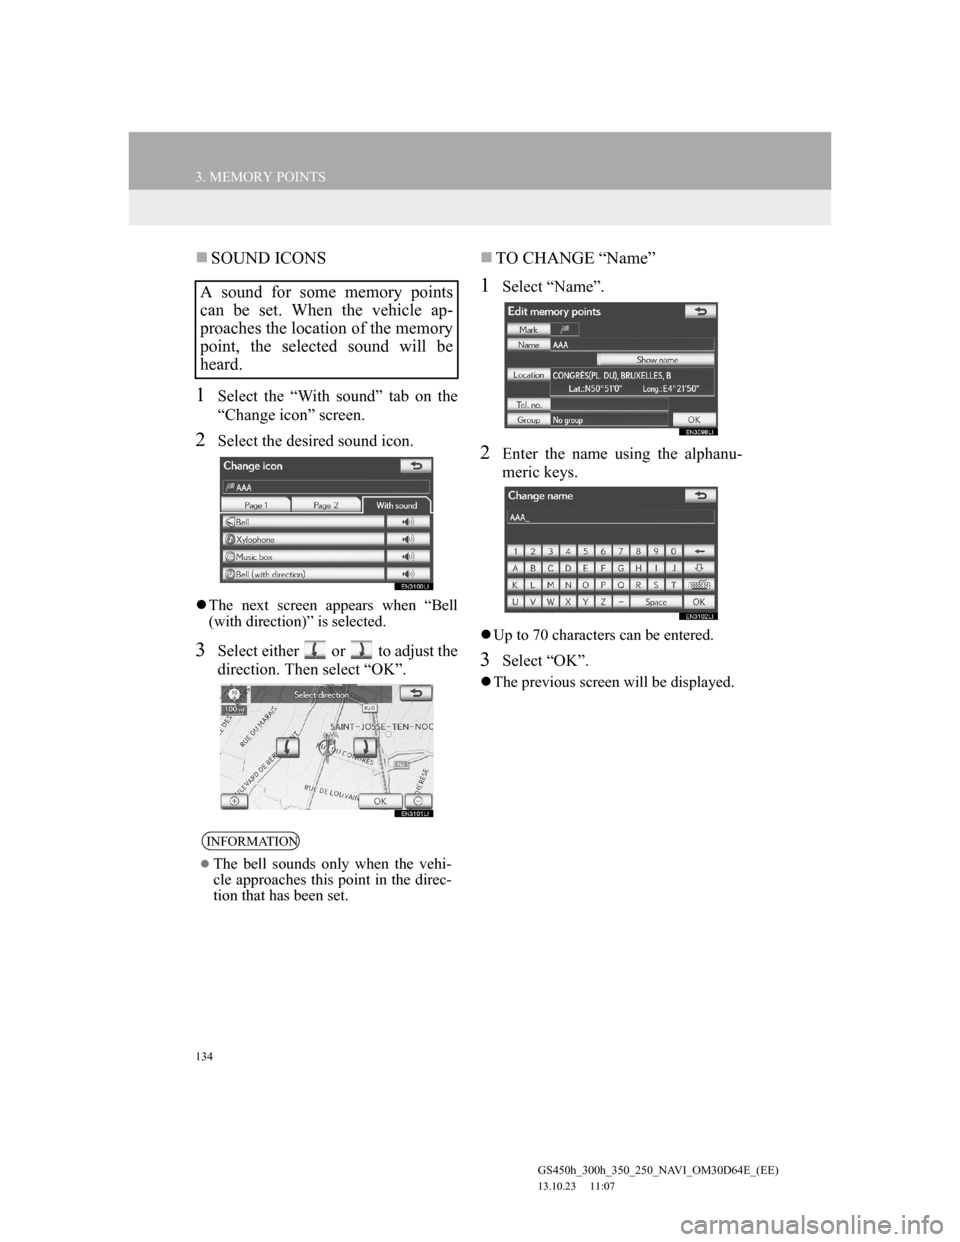
SOUND ICONS
1Select the “With sound” tab on the
“Change icon” screen.
2Select the desired sound icon.
The next screen appears when “Bell
(with direction)” is selected.
3Select either or to adjust the
direction. Then select “OK”.
TO CHANGE “Name”
1Select “Name”.
2Enter the name using the alphanu-
meric keys.
Up to 70 characters can be entered.
3Select “OK”.
The previous screen will be displayed.
A sound for some memory points
can be set. When the vehicle ap-
proaches the location of the memory
point, the selected sound will be
heard.
INFORMATION
The bell sounds only when the vehi-
cle approaches this point in the direc-
tion that has been set.
Page 135 of 256
135
3. MEMORY POINTS
GS450h_300h_350_250_NAVI_OM30D64E_(EE)
13.10.23 11:07
3
NAVIGATION SYSTEM
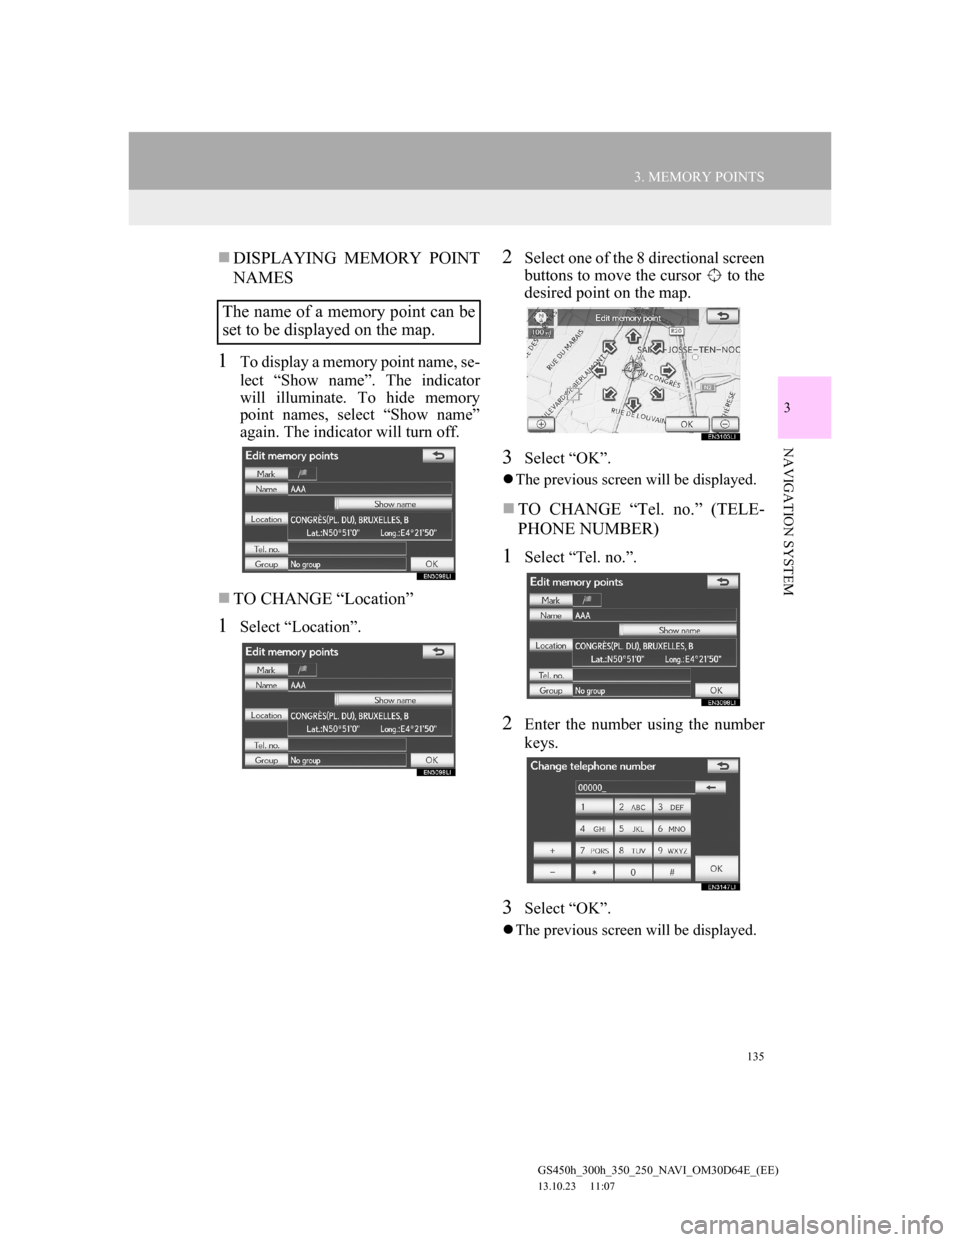
DISPLAYING MEMORY POINT
NAMES
1To display a memory point name, se-
lect “Show name”. The indicator
will illuminate. To hide memory
point names, select “Show name”
again. The indicator will turn off.
TO CHANGE “Location”
1Select “Location”.
2Select one of the 8 directional screen
buttons to move the cursor to the
desired point on the map.
3Select “OK”.
The previous screen will be displayed.
TO CHANGE “Tel. no.” (TELE-
PHONE NUMBER)
1Select “Tel. no.”.
2Enter the number using the number
keys.
3Select “OK”.
The previous screen will be displayed.
The name of a memory point can be
set to be displayed on the map.
Page 136 of 256
136
3. MEMORY POINTS
GS450h_300h_350_250_NAVI_OM30D64E_(EE)
13.10.23 11:07
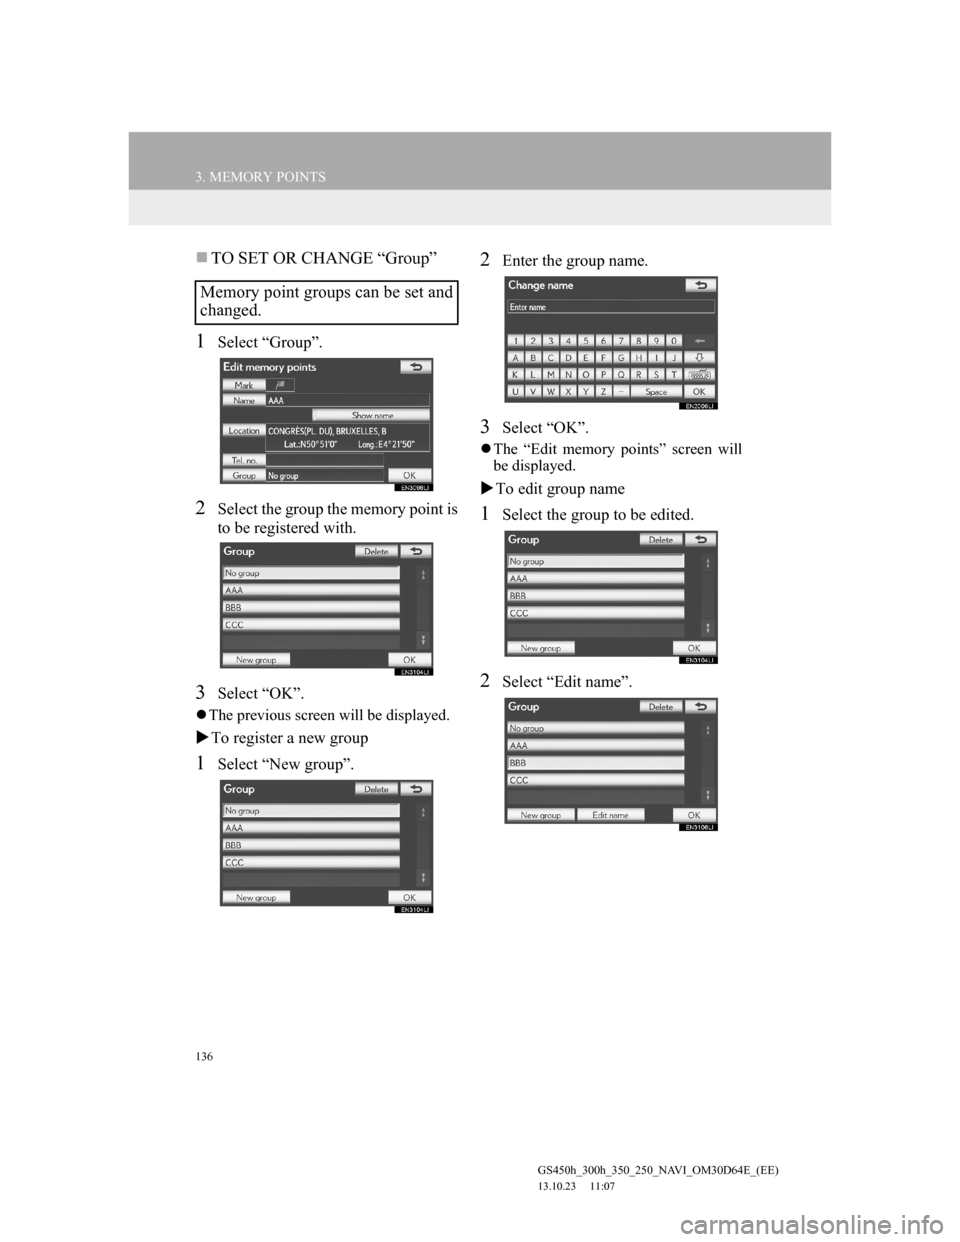
TO SET OR CHANGE “Group”
1Select “Group”.
2Select the group the memory point is
to be registered with.
3Select “OK”.
The previous screen will be displayed.
To register a new group
1Select “New group”.
2Enter the group name.
3Select “OK”.
The “Edit memory points” screen will
be displayed.
To edit group name
1Select the group to be edited.
2Select “Edit name”.
Memory point groups can be set and
changed.
Page 137 of 256
137
3. MEMORY POINTS
GS450h_300h_350_250_NAVI_OM30D64E_(EE)
13.10.23 11:07
3
NAVIGATION SYSTEM
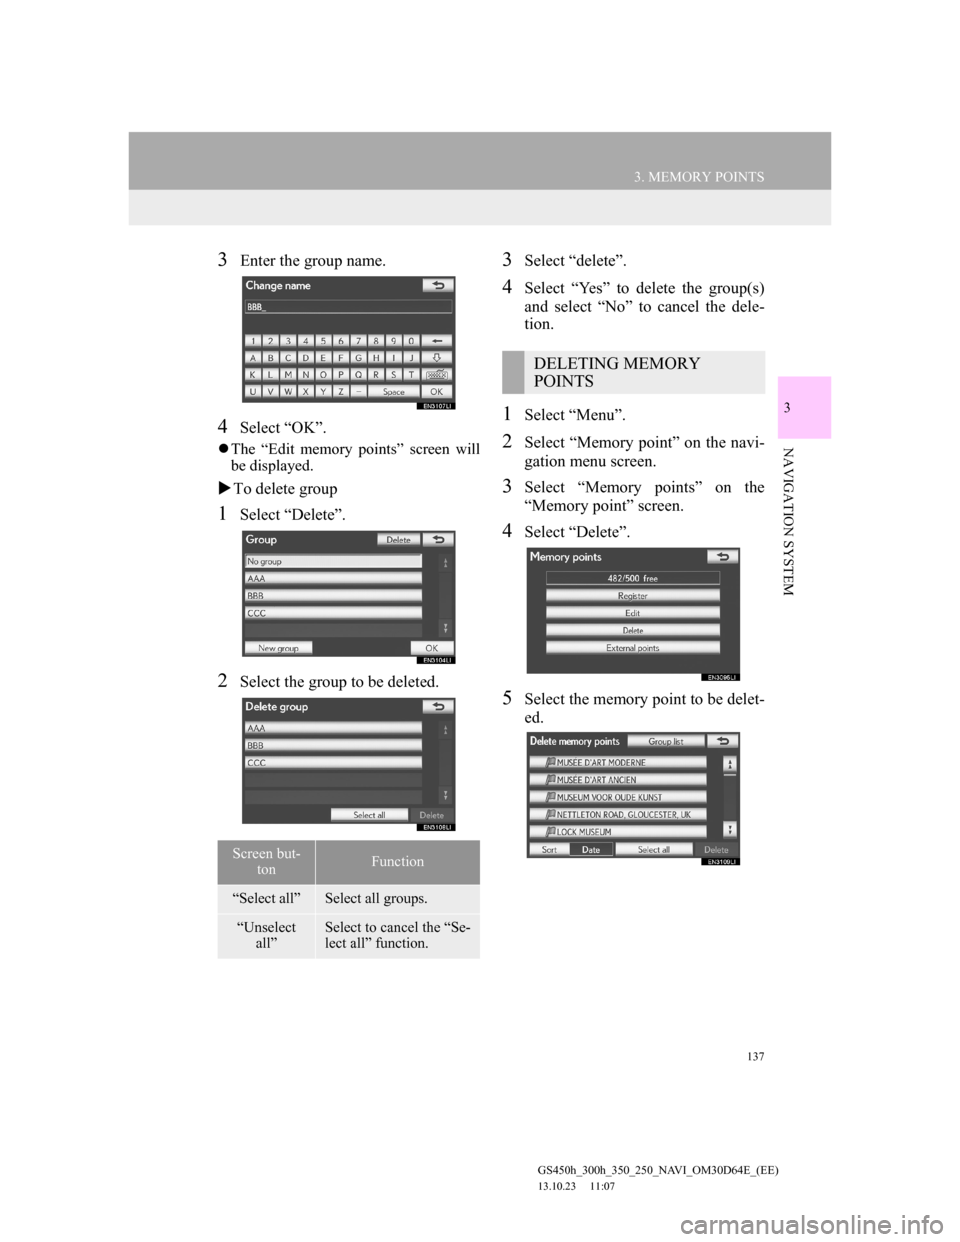
3Enter the group name.
4Select “OK”.
The “Edit memory points” screen will
be displayed.
To delete group
1Select “Delete”.
2Select the group to be deleted.
3Select “delete”.
4Select “Yes” to delete the group(s)
and select “No” to cancel the dele-
tion.
1Select “Menu”.
2Select “Memory point” on the navi-
gation menu screen.
3Select “Memory points” on the
“Memory point” screen.
4Select “Delete”.
5Select the memory point to be delet-
ed.
Screen but-
tonFunction
“Select all”Select all groups.
“Unselect
all”Select to cancel the “Se-
lect all” function.
DELETING MEMORY
POINTS
Page 138 of 256
138
3. MEMORY POINTS
GS450h_300h_350_250_NAVI_OM30D64E_(EE)
13.10.23 11:07
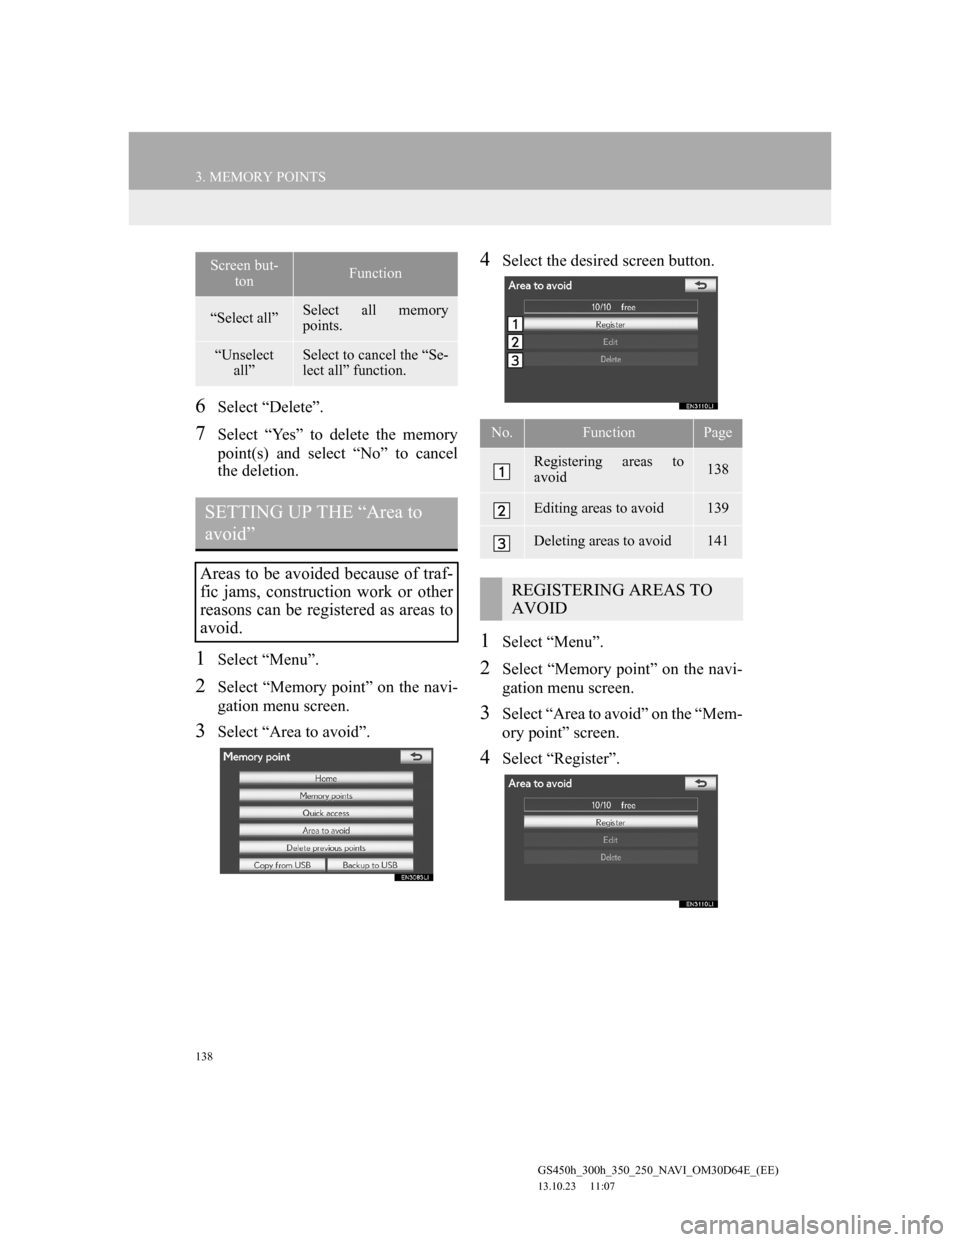
6Select “Delete”.
7Select “Yes” to delete the memory
point(s) and select “No” to cancel
the deletion.
1Select “Menu”.
2Select “Memory point” on the navi-
gation menu screen.
3Select “Area to avoid”.
4Select the desired screen button.
1Select “Menu”.
2Select “Memory point” on the navi-
gation menu screen.
3Select “Area to avoid” on the “Mem-
ory point” screen.
4Select “Register”.
Screen but-
tonFunction
“Select all”Select all memory
points.
“Unselect
all”Select to cancel the “Se-
lect all” function.
SETTING UP THE “Area to
avoid”
Areas to be avoided because of traf-
fic jams, construction work or other
reasons can be registered as areas to
avoid.
No.FunctionPage
Registering areas to
avoid138
Editing areas to avoid139
Deleting areas to avoid141
REGISTERING AREAS TO
AVOID
Page 139 of 256
139
3. MEMORY POINTS
GS450h_300h_350_250_NAVI_OM30D64E_(EE)
13.10.23 11:07
3
NAVIGATION SYSTEM
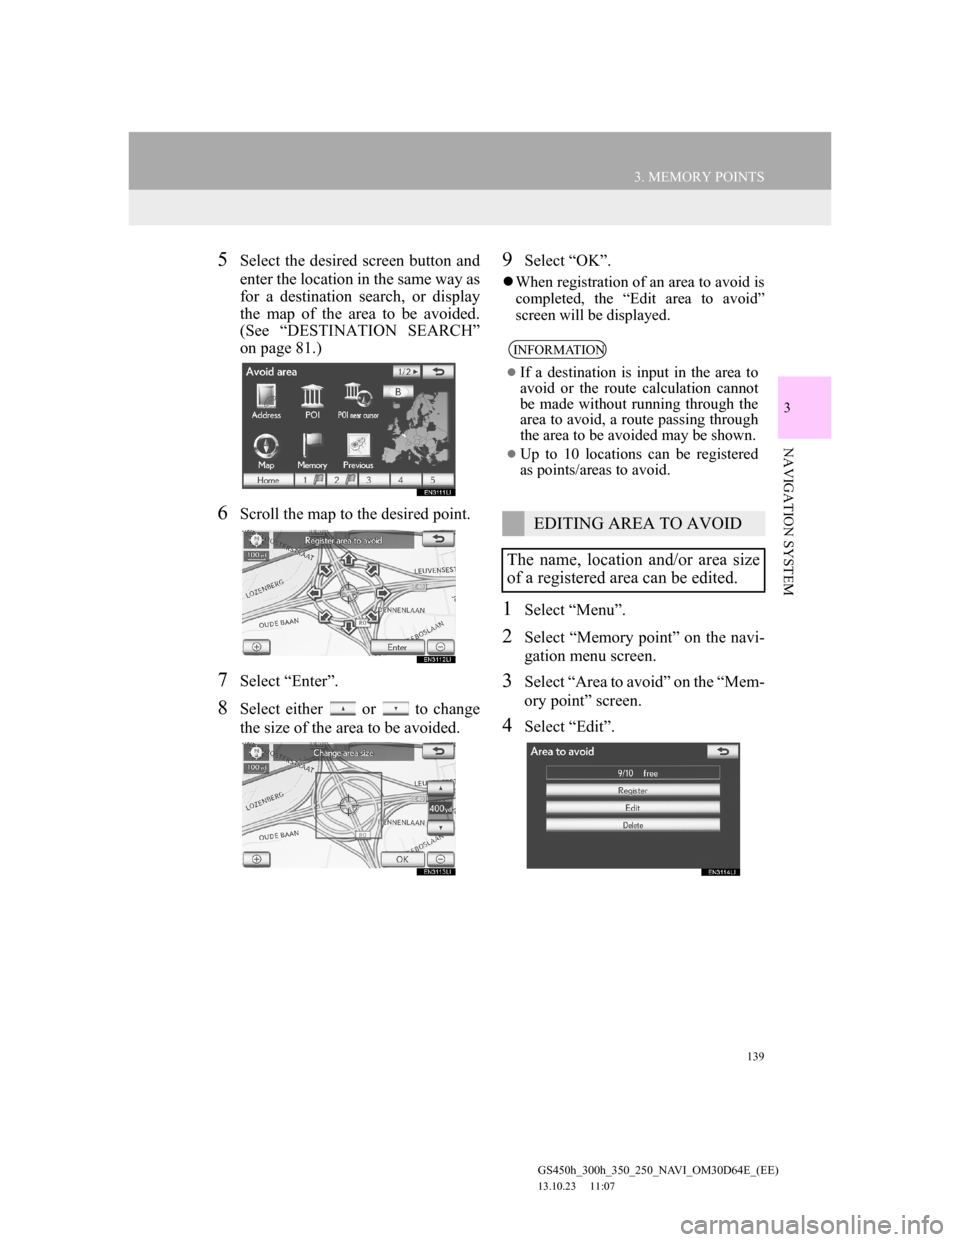
5Select the desired screen button and
enter the location in the same way as
for a destination search, or display
the map of the area to be avoided.
(See “DESTINATION SEARCH”
on page 81.)
6Scroll the map to the desired point.
7Select “Enter”.
8Select either or to change
the size of the area to be avoided.
9Select “OK”.
When registration of an area to avoid is
completed, the “Edit area to avoid”
screen will be displayed.
1Select “Menu”.
2Select “Memory point” on the navi-
gation menu screen.
3Select “Area to avoid” on the “Mem-
ory point” screen.
4Select “Edit”.
INFORMATION
If a destination is input in the area to
avoid or the route calculation cannot
be made without running through the
area to avoid, a route passing through
the area to be avoided may be shown.
Up to 10 locations can be registered
as points/areas to avoid.
EDITING AREA TO AVOID
The name, location and/or area size
of a registered area can be edited.
Page 140 of 256
140
3. MEMORY POINTS
GS450h_300h_350_250_NAVI_OM30D64E_(EE)
13.10.23 11:07
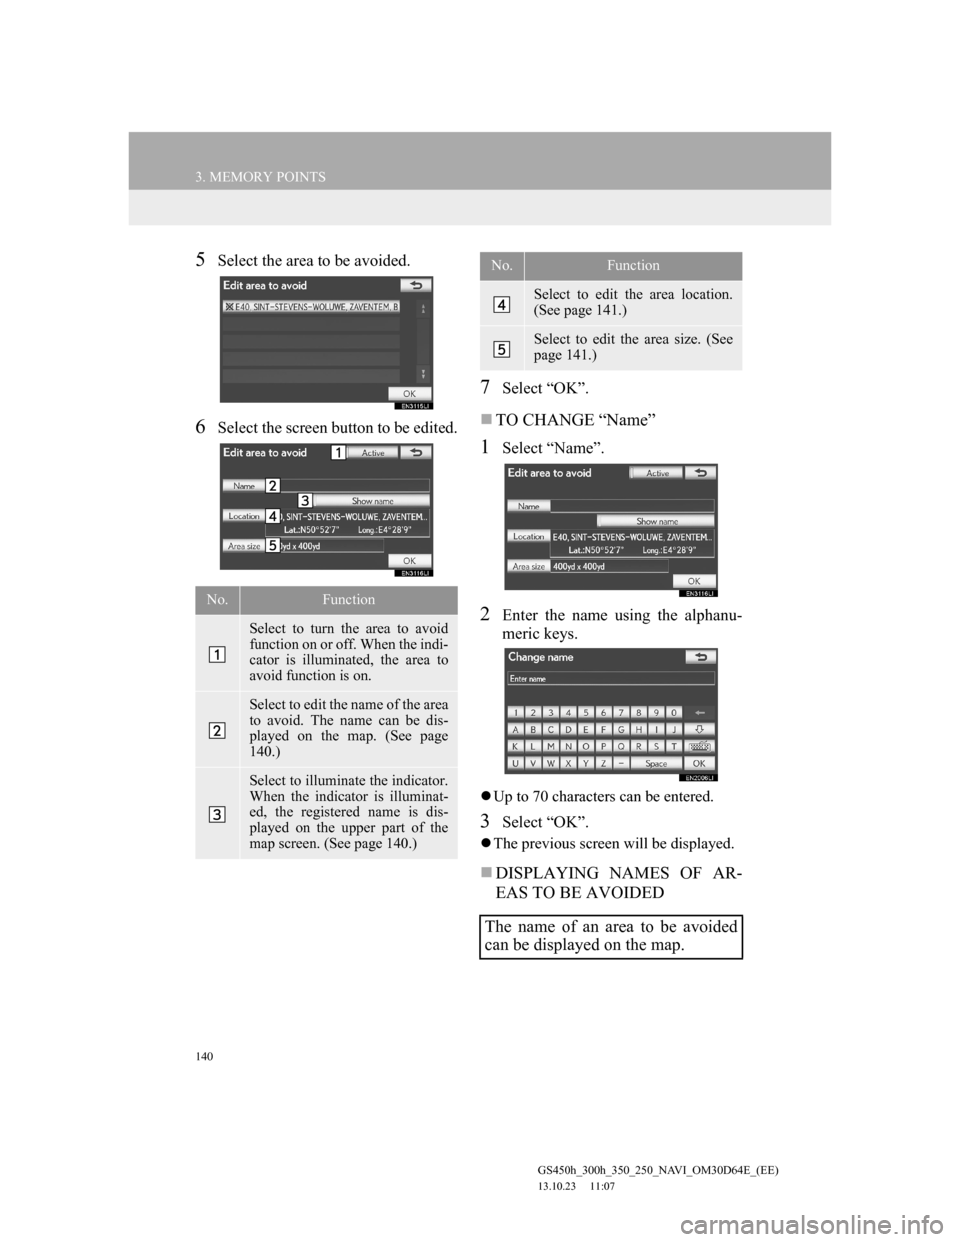
5Select the area to be avoided.
6Select the screen button to be edited.
7Select “OK”.
TO CHANGE “Name”
1Select “Name”.
2Enter the name using the alphanu-
meric keys.
Up to 70 characters can be entered.
3Select “OK”.
The previous screen will be displayed.
DISPLAYING NAMES OF AR-
EAS TO BE AVOIDED
No.Function
Select to turn the area to avoid
function on or off. When the indi-
cator is illuminated, the area to
avoid function is on.
Select to edit the name of the area
to avoid. The name can be dis-
played on the map. (See page
140.)
Select to illuminate the indicator.
When the indicator is illuminat-
ed, the registered name is dis-
played on the upper part of the
map screen. (See page 140.)
Select to edit the area location.
(See page 141.)
Select to edit the area size. (See
page 141.)
The name of an area to be avoided
can be displayed on the map.
No.Function