Lexus GS350 2017 Quick Guide
Manufacturer: LEXUS, Model Year: 2017, Model line: GS350, Model: Lexus GS350 2017Pages: 100, PDF Size: 3.95 MB
Page 71 of 100

70
GS350_200t_QG_OM30G01U_(U)
Seat Heaters/Seat Ventilators (if equipped)
■Front seat heaters and ventilators (if equipped)/rear seat heaters (if
equipped)
Seat heater switches
The indicator light (yellow) on the switch co mes on when the seat heater is operating.
Seat ventilator switches (front seats only)
The indicator light (green) on the switch come s on when the seat ventilator is operating.
Level indicator lights
The seat heater temperature level or the seat ventilator fan speed level (for front seats
only) is displayed.
“AUTO” indicator lights
Seat heaters heat the side grips of the seats, respectively. Seat ventilators maintain good
airflow by blowing air from the seats.
Front seats Rear seats
1
2
3
4
Page 72 of 100

71
GS350_200t_QG_OM30G01U_(U)
●Modes and indicators
The mode can be changed by pressing the switch.
*: When automatic mode is selected, the level automatically changes depending on the air
conditioning settings.
■Seat heaters (without seat ventilators) (if equipped)
Seat heater switches
Level indicator lights
The seat heater temperature level is
displayed.
● Modes and indicators
The mode changes each time the switch is pressed as follows:
*: The mode changes automatically depending on the amount of time that has elapsed.
The amount of time until the mode changes varies depending on the interior tempera-
ture when the seat heater was operated and other factors.
Mode“AUTO” indicator lightLevel indicator lights
OffOffOff
Automatic*On3 to 1, or off
HiOff3
MidOff2
LoOff1
1
2
ModeLevel indicator lightsAutomatic operation*
OffOff
Hi3Hi Mid Lo
Mid2Mid Lo
Lo1Lo
Page 73 of 100

72
GS350_200t_QG_OM30G01U_(U)
■Seat ventilators (without seat heaters) (if equipped)
Seat ventilator switches
Level indicator lights
The seat ventilator fan speed level is
displayed.
● Modes and indicators
The mode changes each time the switch is pressed as follows:1
2
ModeLevel indicator lights
OffOff
Hi3
Mid2
Lo1
If the driving mode select switch is switched to Eco drive mode in cold temperatures, the
seat heater may be automatically operated to assist heating performance. ( P.43)
Page 74 of 100
73
GS350_200t_QG_OM30G01U_(U)
Voice Command System
■Basic operation
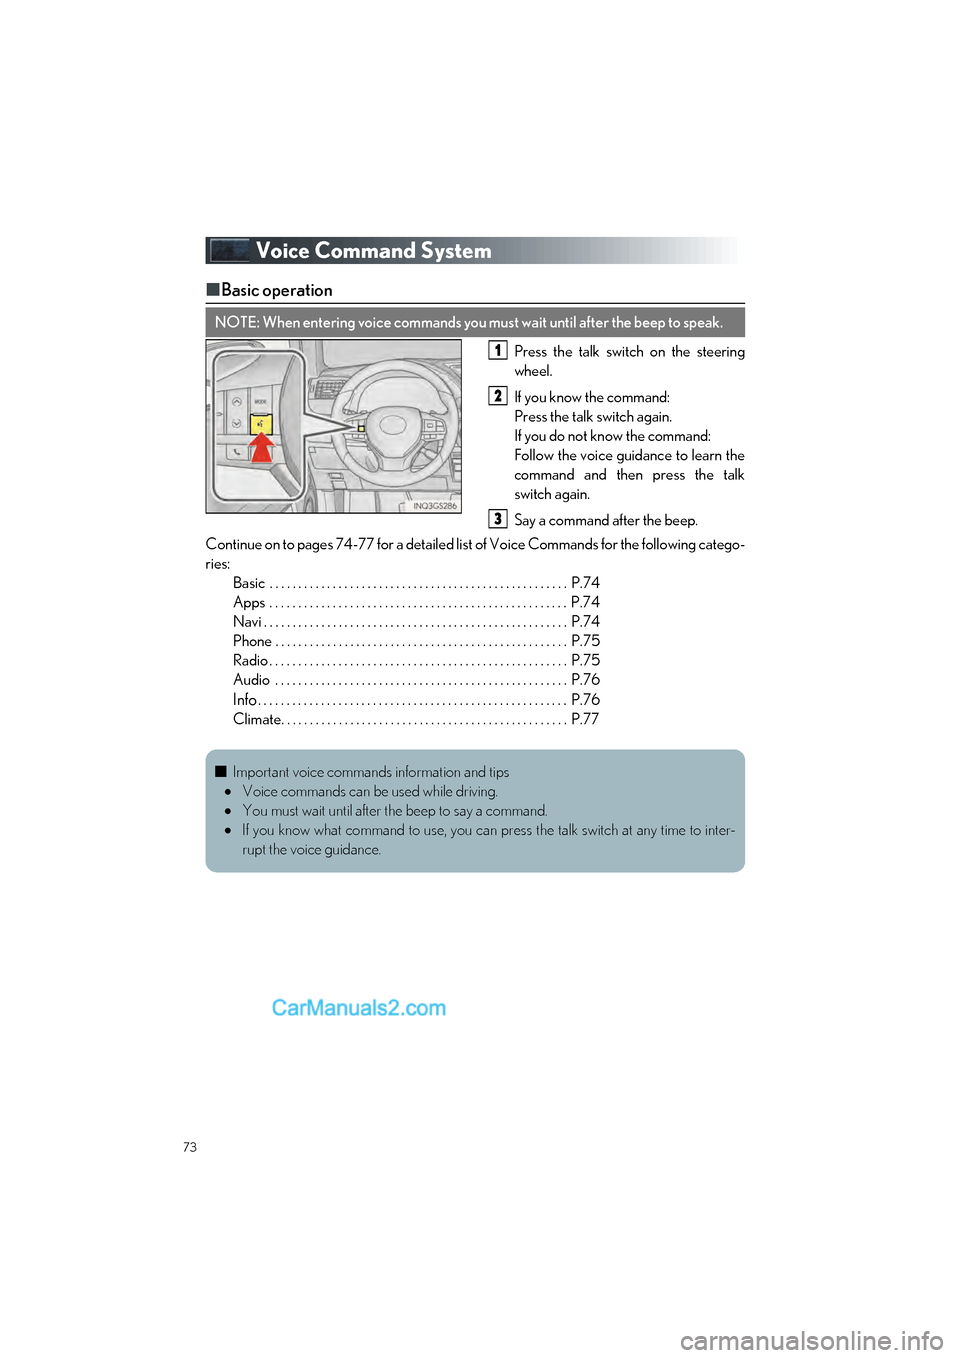
Press the talk switch on the steering
wheel.
If you know the command:
Press the talk switch again.
If you do not know the command:
Follow the voice guidance to learn the
command and then press the talk
switch again.
Say a command after the beep.
Continue on to pages 74-77 for a detailed lis t of Voice Commands for the following catego-
ries: Basic . . . . . . . . . . . . . . . . . . . . . . . . . . . . . . . . . . . . . . . . . . . . . . . . . . . . P.74
Apps . . . . . . . . . . . . . . . . . . . . . . . . . . . . . . . . . . . . . . . . . . . . . . . . . . . . P.74
Navi . . . . . . . . . . . . . . . . . . . . . . . . . . . . . . . . . . . . . . . . . . . . . . . . . . . . . P.74
Phone . . . . . . . . . . . . . . . . . . . . . . . . . . . . . . . . . . . . . . . . . . . . . . . . . . . P.75
Radio . . . . . . . . . . . . . . . . . . . . . . . . . . . . . . . . . . . . . . . . . . . . . . . . . . . . P.75
Audio . . . . . . . . . . . . . . . . . . . . . . . . . . . . . . . . . . . . . . . . . . . . . . . . . . . P.76
Info. . . . . . . . . . . . . . . . . . . . . . . . . . . . . . . . . . . . . . . . . . . . . . . . . . . . . . P.76
Climate. . . . . . . . . . . . . . . . . . . . . . . . . . . . . . . . . . . . . . . . . . . . . . . . . . P.77
NOTE: When entering voice commands you must wait until after the beep to speak.
1
2
3
■ Important voice commands information and tips
Voice commands can be used while driving.
You must wait until after the beep to say a command.
If you know what command to use, you can press the talk switch at any time to inter-
rupt the voice guidance.
Page 75 of 100
74
GS350_200t_QG_OM30G01U_(U)
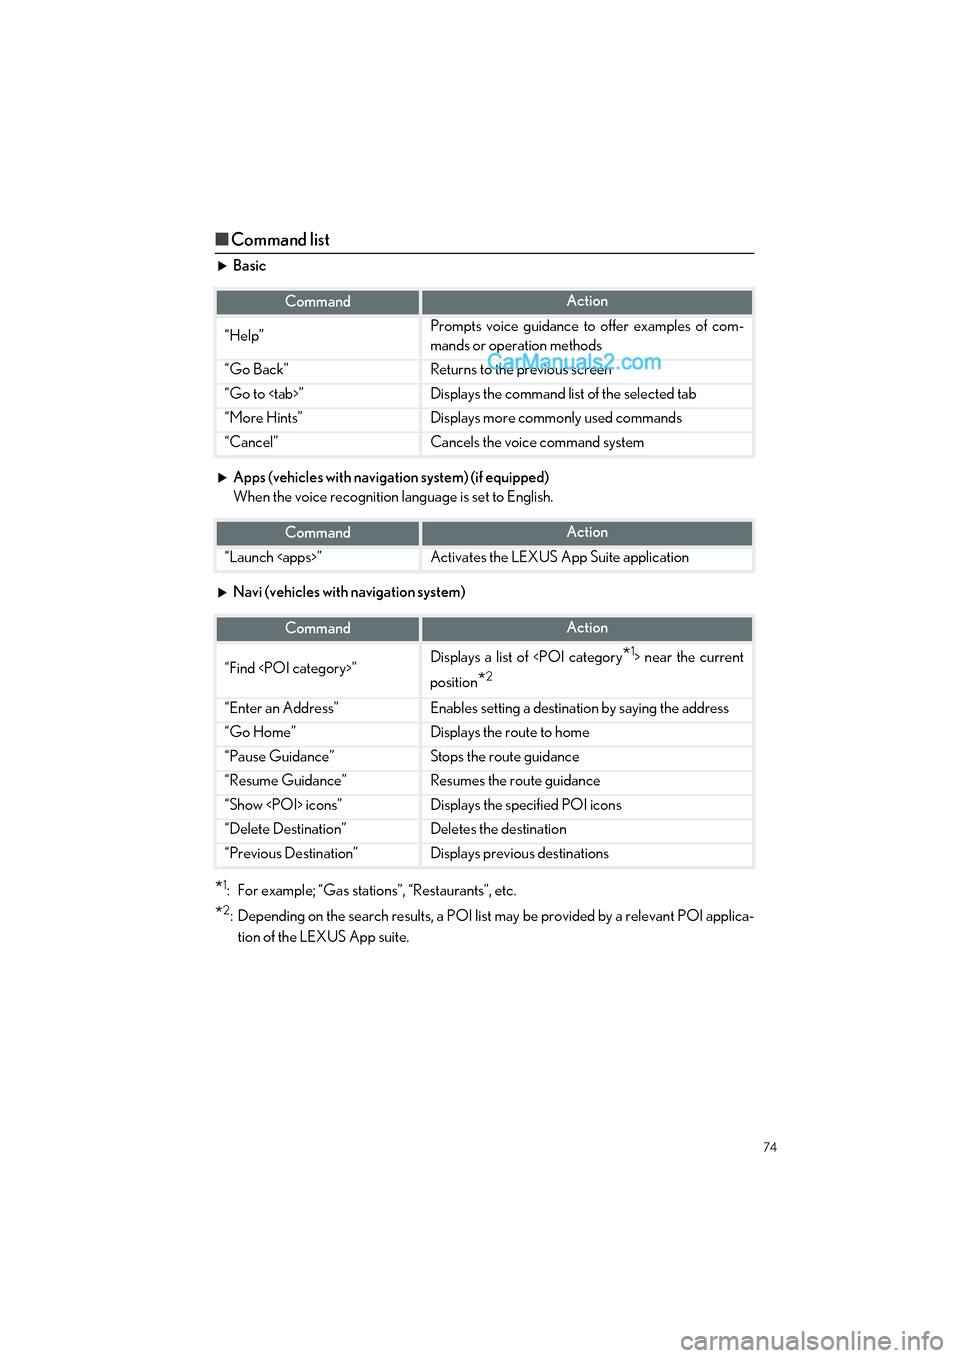
■Command list
Basic
Apps (vehicles with navigation system) (if equipped)
When the voice recognition language is set to English.
Navi (vehicles with navigation system)
*1: For example; “Gas stations”, “Restaurants”, etc.
*2: Depending on the search results, a POI list may be provided by a relevant POI applica-
tion of the LEXUS App suite.
CommandAction
“Help”Prompts voice guidance to offer examples of com-
mands or operation methods
“Go Back”Returns to the previous screen
“Go to
“More Hints”Displays more commonly used commands
“Cancel”Cancels the voice command system
CommandAction
“Launch
CommandAction
“Find
position
*2
“Enter an Address”Enables setting a destinatio n by saying the address
“Go Home”Displays the route to home
“Pause Guidance”Stops the route guidance
“Resume Guidance”Resumes the route guidance
“Show
“Delete Destination”Deletes the destination
“Previous Destination”Displays previous destinations
Page 76 of 100

75
GS350_200t_QG_OM30G01U_(U)
Phone
Radio
CommandAction
“Redial”Places a call to the phone number of the latest outgo-
ing call
“Call Back”Places a call to the phone number of latest incoming
call
“Show Recent Calls”Displays the call history screen
“Dial
“Call
the phone book
“Mobile Assistant”Activates Apple’s Siri® Eyes Free mode
CommandAction
“Tune to
“Tune to
“Play
genre
“Tune to FM
HD
“Tune to preset
tion
“Tune to
the specified name
“Tune to channel
channel number
“Play
specified genre
“AM Radio”Selects AM radio mode
“FM Radio”Selects FM radio mode
“Sirius XM”Selects satellite radio mode
Page 77 of 100

76
GS350_200t_QG_OM30G01U_(U)
Audio
*: The Bluetooth® word mark and logos are registered trademarks owned by Bluetooth
SIG, Inc.
Info
*: Vehicles with navigation system
CommandAction
“Play Playlist
“Play Artist
“Play Song
“Play Album
“Turn Music On”Turns the audio system on
“Turn Music Off”Turns the audio system off
“Disc”Selects the selected disc mode
“USB”Selects USB audio mode
“iPod”Selects iPod audio mode
“Bluetooth* Audio”Selects Bluetooth® audio mode
“External”Selects VTR mode
“Auxiliary”Selects AUX audio mode
CommandAction
“Destination Assist”*Connects the system to the Lexus response center
“Show Forecast”Displays weather information
“Show Traffic”Displays traffic information
“Lexus Insider”*Displays the Lexus insider list
Page 78 of 100
77
GS350_200t_QG_OM30G01U_(U)
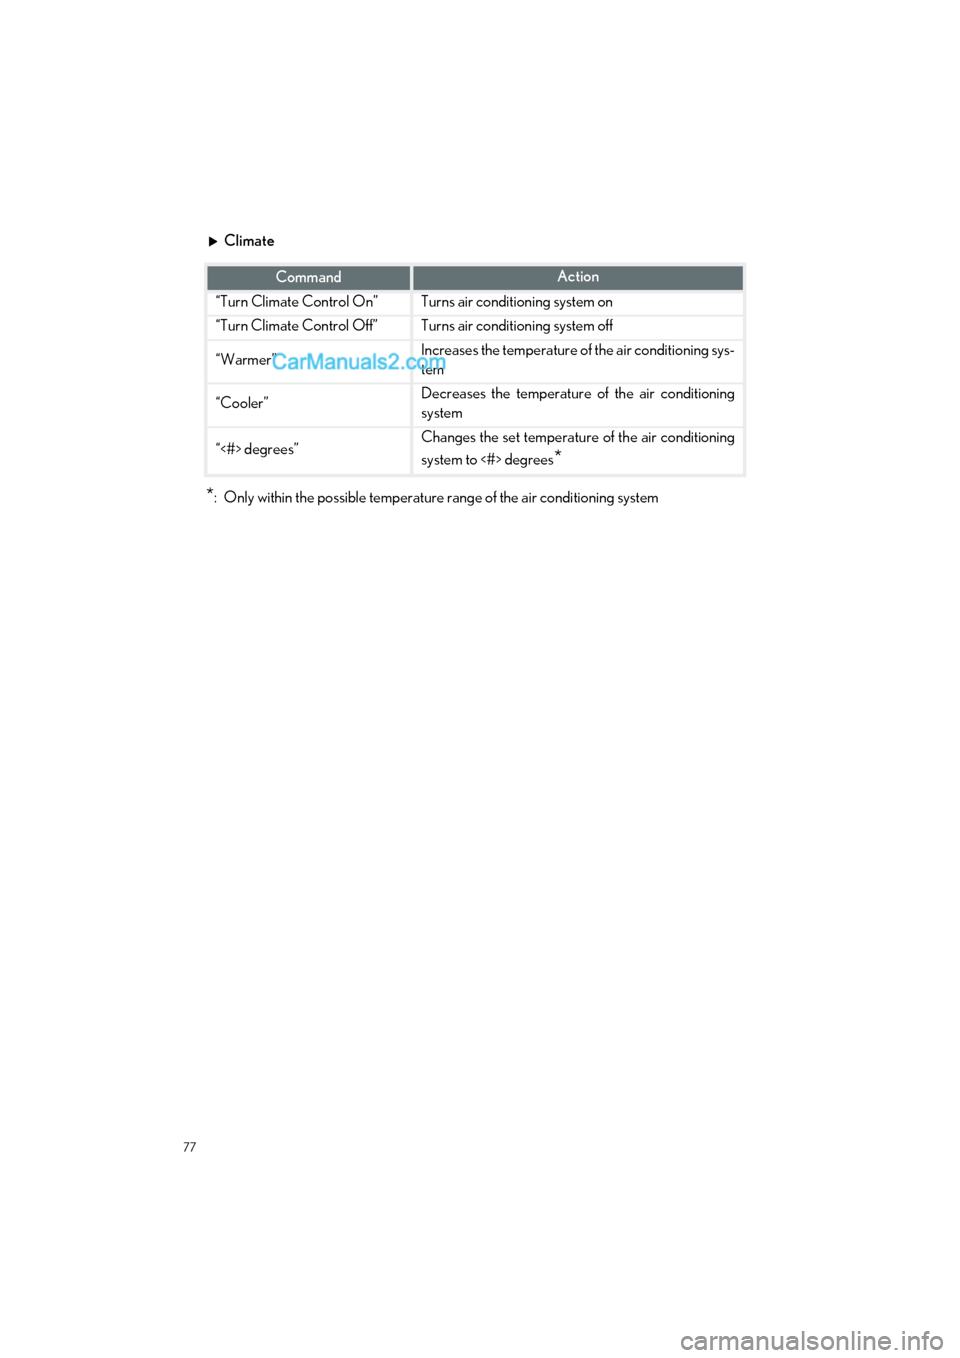
Climate
*: Only within the possible temperature range of the air conditioning system
CommandAction
“Turn Climate Control On”Turns air conditioning system on
“Turn Climate Control Off”Turns air conditioning system off
“Warmer”Increases the temperature of the air conditioning sys-
tem
“Cooler”Decreases the temperature of the air conditioning
system
“<#> degrees”Changes the set temperature of the air conditioning
system to <#> degrees
*
Page 79 of 100
78
GS350_200t_QG_OM30G01U_(U)
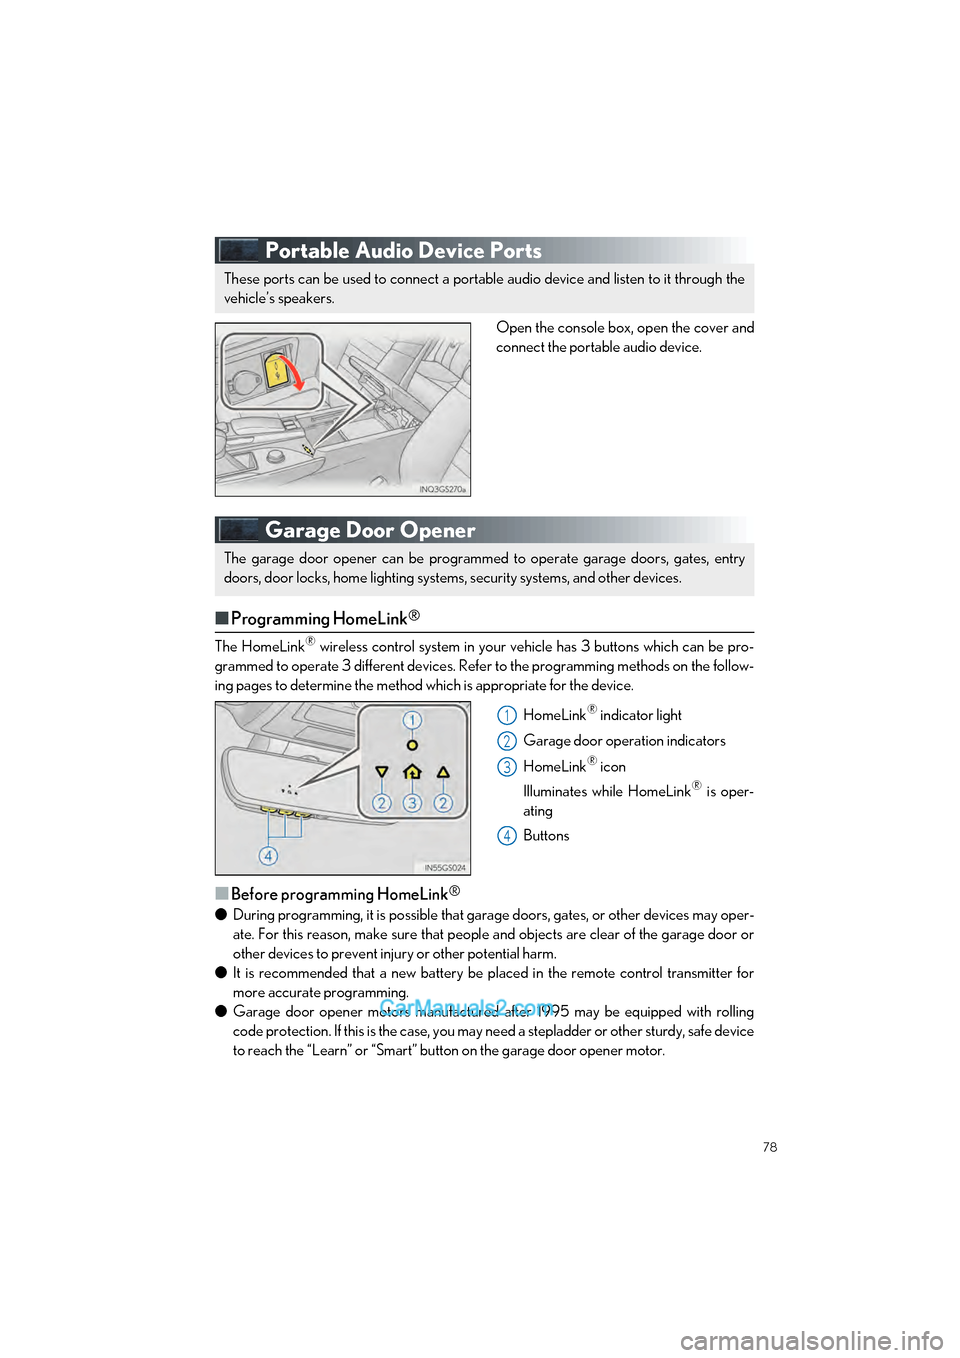
Portable Audio Device Ports
Open the console box, open the cover and
connect the portable audio device.
Garage Door Opener
■Programming HomeLink®
The HomeLink® wireless control system in your vehicle has 3 buttons which can be pro-
grammed to operate 3 different devices. Refe r to the programming methods on the follow-
ing pages to determine the method which is appropriate for the device.
HomeLink
® indicator light
Garage door operation indicators
HomeLink
® icon
Illuminates while HomeLink
® is oper-
ating
Buttons
■Before programming HomeLink®
● During programming, it is possible that garage doors, gates, or other devices may oper-
ate. For this reason, make sure that people and objects are clear of the garage door or
other devices to prevent inju ry or other potential harm.
● It is recommended that a new battery be placed in the remote control transmitter for
more accurate programming.
● Garage door opener motors manufactured after 1995 may be equipped with rolling
code protection. If this is the case, you may need a stepladder or other sturdy, safe device
to reach the “Learn” or “Smart” button on the garage door opener motor.
These ports can be used to connect a portable audio device and listen to it through the
vehicle’s speakers.
The garage door opener can be programmed to operate garage doors, gates, entry
doors, door locks, home lighting system s, security systems, and other devices.
1
2
3
4
Page 80 of 100
79
GS350_200t_QG_OM30G01U_(U)
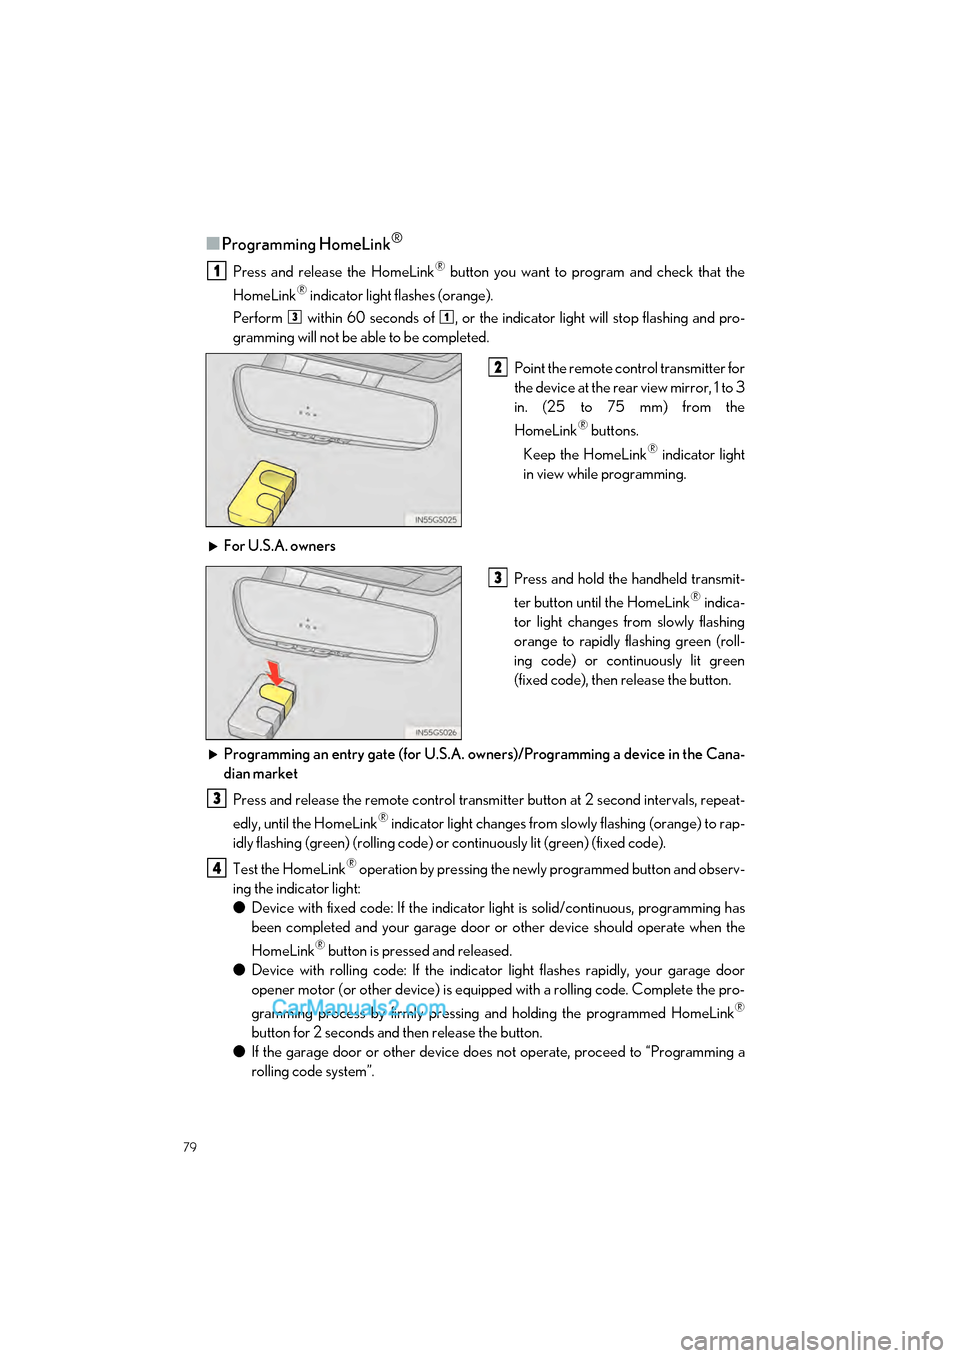
■Programming HomeLink®
Press and release the HomeLink® button you want to program and check that the
HomeLink
® indicator light flashes (orange).
Perform within 60 seconds of , or the indicator light will stop flashing and pro-
gramming will not be able to be completed.
Point the remote control transmitter for
the device at the rear view mirror, 1 to 3
in. (25 to 75 mm) from the
HomeLink
® buttons.
Keep the HomeLink
® indicator light
in view while programming.
For U.S.A. owners Press and hold the handheld transmit-
ter button until the HomeLink
® indica-
tor light changes from slowly flashing
orange to rapidly flashing green (roll-
ing code) or continuously lit green
(fixed code), then release the button.
Programming an entry gate (for U.S.A. owners)/Programming a device in the Cana-
dian market Press and release the remote control transmitter button at 2 second intervals, repeat-
edly, until the HomeLink
® indicator light changes from slowly flashing (orange) to rap-
idly flashing (green) (rolling code) or continuously lit (green) (fixed code).
Test the HomeLink
® operation by pressing the newly programmed button and observ-
ing the indicator light:
● Device with fixed code: If the indicator light is solid/continuous, programming has
been completed and your garage door or other device should operate when the
HomeLink
® button is pressed and released.
● Device with rolling code: If the indicator light flashes rapidly, your garage door
opener motor (or other device) is equipped with a rolling code. Complete the pro-
gramming process by firmly pressing and holding the programmed HomeLink
®
button for 2 seconds and then release the button.
● If the garage door or other device does not operate, proceed to “Programming a
rolling code system”.
1
31
2
3
3
4