LEXUS LS430 2003 Factory Repair Manual
Manufacturer: LEXUS, Model Year: 2003, Model line: LS430, Model: LEXUS LS430 2003Pages: 4500, PDF Size: 87.45 MB
Page 2801 of 4500
There are no foreign objects on each valve and they operate smoothly.
NG: REPAIR OR REPLACE TRANSMISSION VALVE BODY ASSY (See step 6 on
REPLACEMENT
)
OK: Go to next step
5.INSPECT TORQUE CONVERTER CLUTCH ASSY (See INSPECTION
)
OK:
The torque converter clutch operates normally.
NG: REPLACE TORQUE CONVERTER CLUTCH ASSY
OK: REPAIR OR REPLACE AUTOMATIC TRANSMISSION ASSY (See COMPONENTS
)
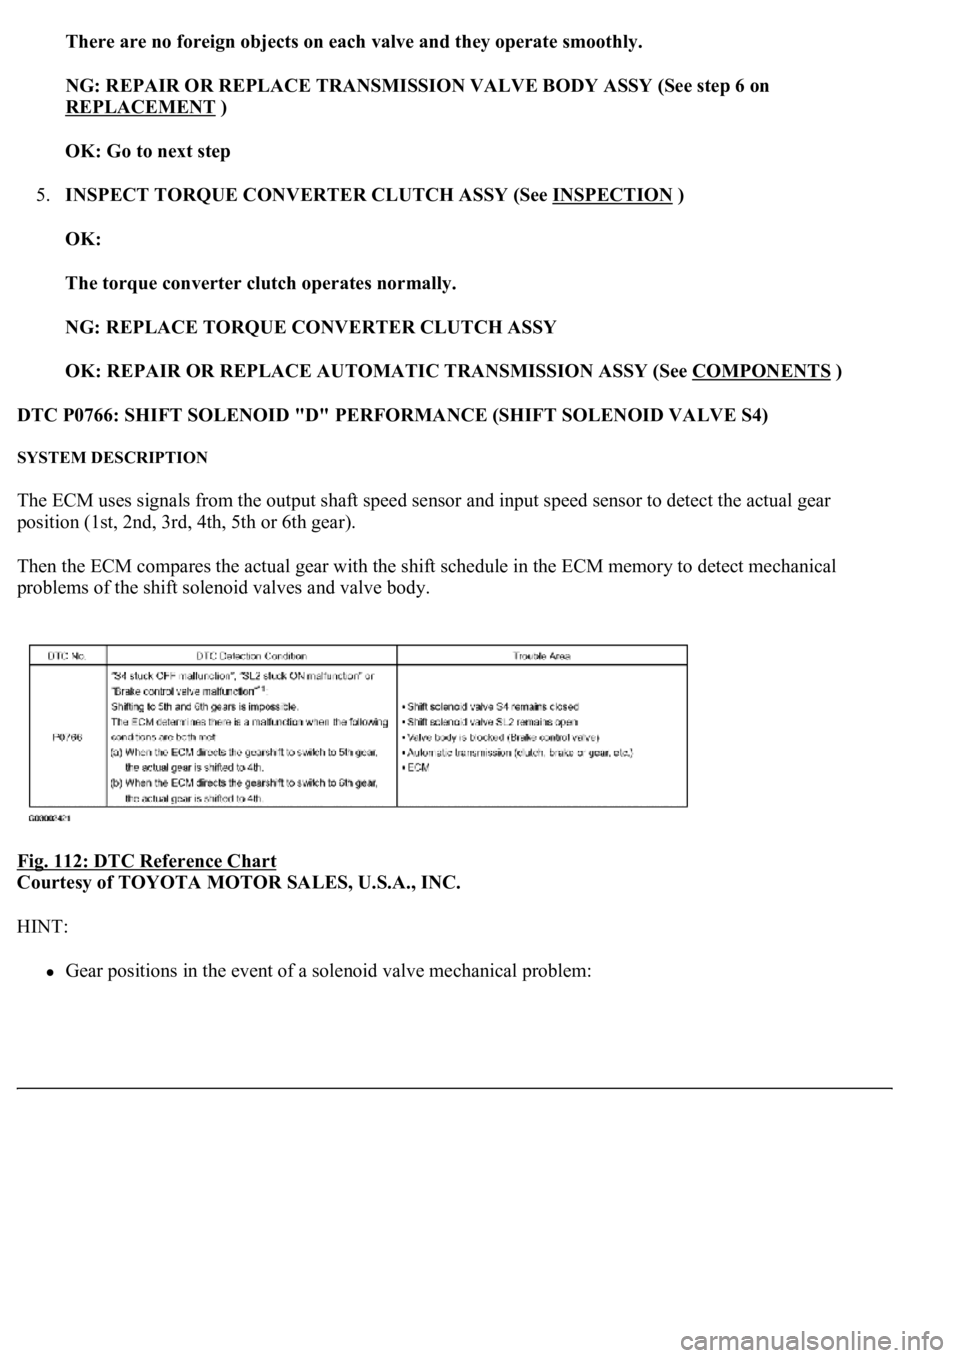
DTC P0766: SHIFT SOLENOID "D" PERFORMANCE (SHIFT SOLENOID VALVE S4)
SYSTEM DESCRIPTION
The ECM uses signals from the output shaft speed sensor and input speed sensor to detect the actual gear
position (1st, 2nd, 3rd, 4th, 5th or 6th gear).
Then the ECM compares the actual gear with the shift schedule in the ECM memory to detect mechanical
problems of the shift solenoid valves and valve body.
Fig. 112: DTC Reference Chart
Courtesy of TOYOTA MOTOR SALES, U.S.A., INC.
HINT:
Gear positions in the event of a solenoid valve mechanical problem:
Page 2802 of 4500
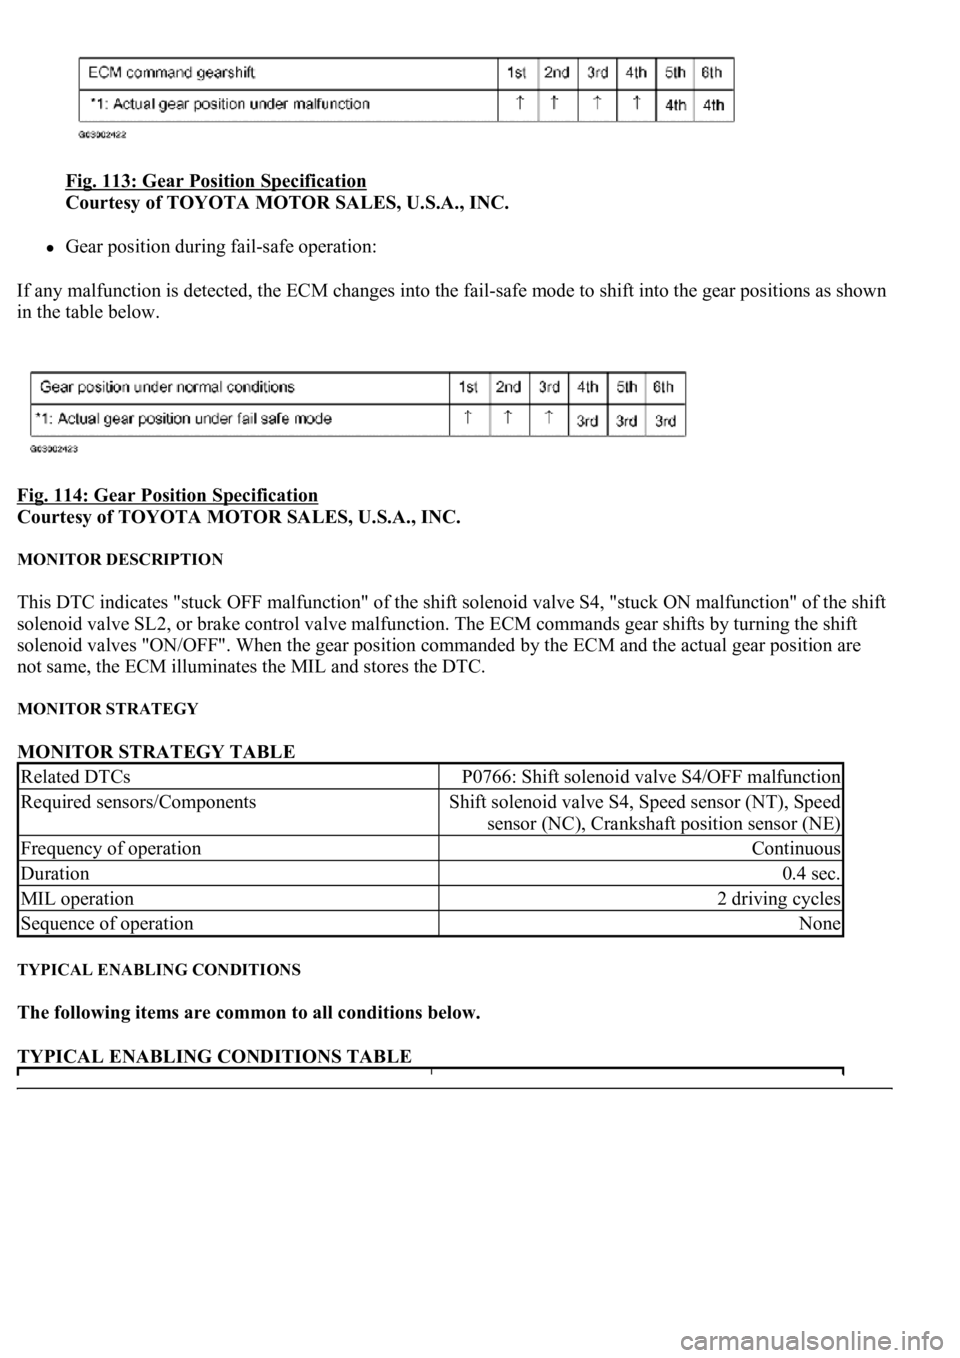
Fig. 113: Gear Position Specification
Courtesy of TOYOTA MOTOR SALES, U.S.A., INC.
Gear position during fail-safe operation:
If any malfunction is detected, the ECM changes into the fail-safe mode to shift into the gear positions as shown
in the table below.
Fig. 114: Gear Position Specification
Courtesy of TOYOTA MOTOR SALES, U.S.A., INC.
MONITOR DESCRIPTION
This DTC indicates "stuck OFF malfunction" of the shift solenoid valve S4, "stuck ON malfunction" of the shift
solenoid valve SL2, or brake control valve malfunction. The ECM commands gear shifts by turning the shift
solenoid valves "ON/OFF". When the gear position commanded by the ECM and the actual gear position are
not same, the ECM illuminates the MIL and stores the DTC.
MONITOR STRATEGY
MONITOR STRATEGY TABLE
TYPICAL ENABLING CONDITIONS
The following items are common to all conditions below.
TYPICAL ENABLING CONDITIONS TABLE
Related DTCsP0766: Shift solenoid valve S4/OFF malfunction
Required sensors/ComponentsShift solenoid valve S4, Speed sensor (NT), Speed
sensor (NC), Crankshaft position sensor (NE)
Frequency of operationContinuous
Duration0.4 sec.
MIL operation2 driving cycles
Sequence of operationNone
Page 2803 of 4500
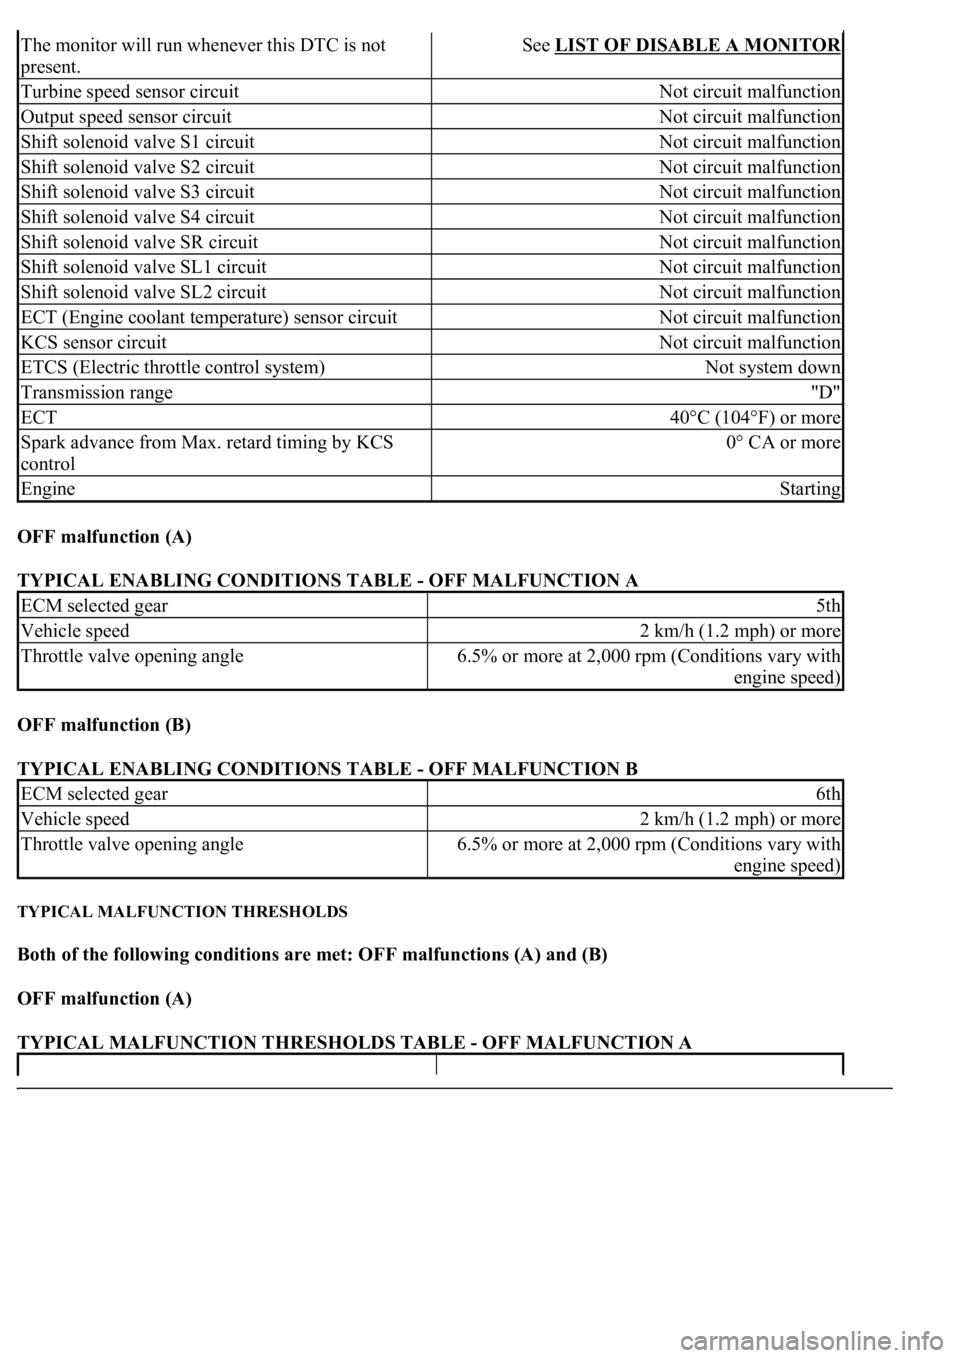
OFF malfunction (A)
TYPICAL ENABLING CONDITIONS TABLE - OFF MALFUNCTION A
OFF malfunction (B)
TYPICAL ENABLING CONDITIONS TABLE - OFF MALFUNCTION B
TYPICAL MALFUNCTION THRESHOLDS
Both of the following conditions are met: OFF malfunctions (A) and (B)
OFF malfunction (A)
TYPICAL MALFUNCTION THRESHOLDS TABLE - OFF MALFUNCTION A
The monitor will run whenever this DTC is not
present.See LIST OF DISABLE A MONITOR
Turbine speed sensor circuitNot circuit malfunction
Output speed sensor circuitNot circuit malfunction
Shift solenoid valve S1 circuitNot circuit malfunction
Shift solenoid valve S2 circuitNot circuit malfunction
Shift solenoid valve S3 circuitNot circuit malfunction
Shift solenoid valve S4 circuitNot circuit malfunction
Shift solenoid valve SR circuitNot circuit malfunction
Shift solenoid valve SL1 circuitNot circuit malfunction
Shift solenoid valve SL2 circuitNot circuit malfunction
ECT (Engine coolant temperature) sensor circuitNot circuit malfunction
KCS sensor circuitNot circuit malfunction
ETCS (Electric throttle control system)Not system down
Transmission range"D"
ECT40°C (104°F) or more
Spark advance from Max. retard timing by KCS
control0° CA or more
EngineStarting
ECM selected gear5th
Vehicle speed2 km/h (1.2 mph) or more
Throttle valve opening angle6.5% or more at 2,000 rpm (Conditions vary with
engine speed)
ECM selected gear6th
Vehicle speed2 km/h (1.2 mph) or more
Throttle valve opening angle6.5% or more at 2,000 rpm (Conditions vary with
engine speed)
Page 2804 of 4500
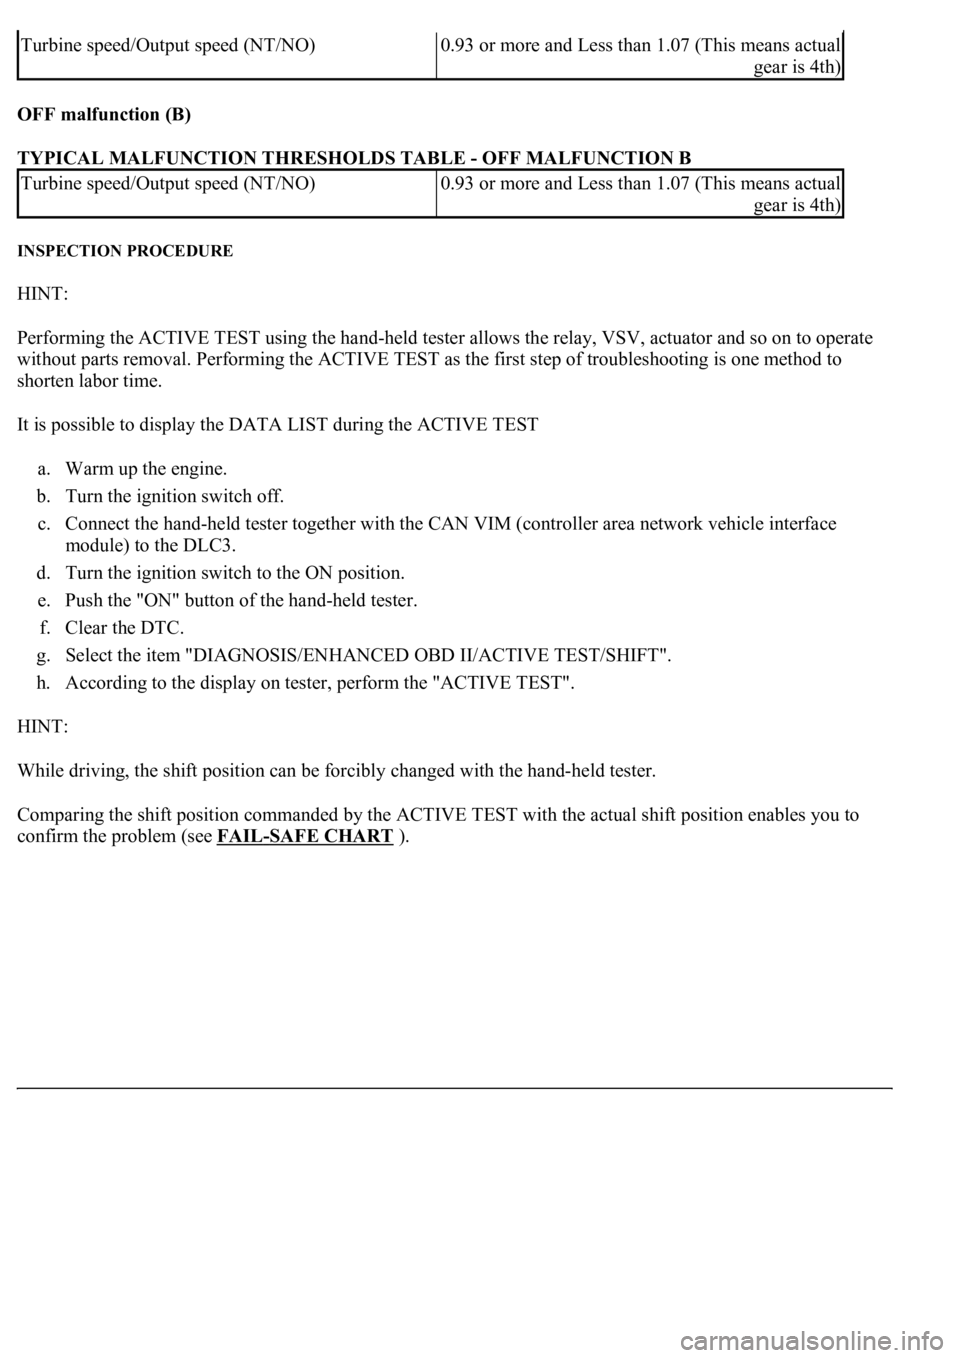
OFF malfunction (B)
TYPICAL MALFUNCTION THRESHOLDS TABLE - OFF MALFUNCTION B
INSPECTION PROCEDURE
HINT:
Performing the ACTIVE TEST using the hand-held tester allows the relay, VSV, actuator and so on to operate
without parts removal. Performing the ACTIVE TEST as the first step of troubleshooting is one method to
shorten labor time.
It is possible to display the DATA LIST during the ACTIVE TEST
a. Warm up the engine.
b. Turn the ignition switch off.
c. Connect the hand-held tester together with the CAN VIM (controller area network vehicle interface
module) to the DLC3.
d. Turn the ignition switch to the ON position.
e. Push the "ON" button of the hand-held tester.
f. Clear the DTC.
g. Select the item "DIAGNOSIS/ENHANCED OBD II/ACTIVE TEST/SHIFT".
h. According to the display on tester, perform the "ACTIVE TEST".
HINT:
While driving, the shift position can be forcibly changed with the hand-held tester.
Comparing the shift position commanded by the ACTIVE TEST with the actual shift position enables you to
confirm the problem (see FAIL
-SAFE CHART).
Turbine speed/Output speed (NT/NO)<00130011001c00160003005200550003005000520055004800030044005100470003002f00480056005600030057004b004400510003001400110013001a0003000b0037004b004c0056000300500048004400510056000300440046005700580044004f00
03[
gear is 4th)
Turbine speed/Output speed (NT/NO)<00130011001c00160003005200550003005000520055004800030044005100470003002f00480056005600030057004b004400510003001400110013001a0003000b0037004b004c0056000300500048004400510056000300440046005700580044004f00
03[
gear is 4th)
Page 2805 of 4500
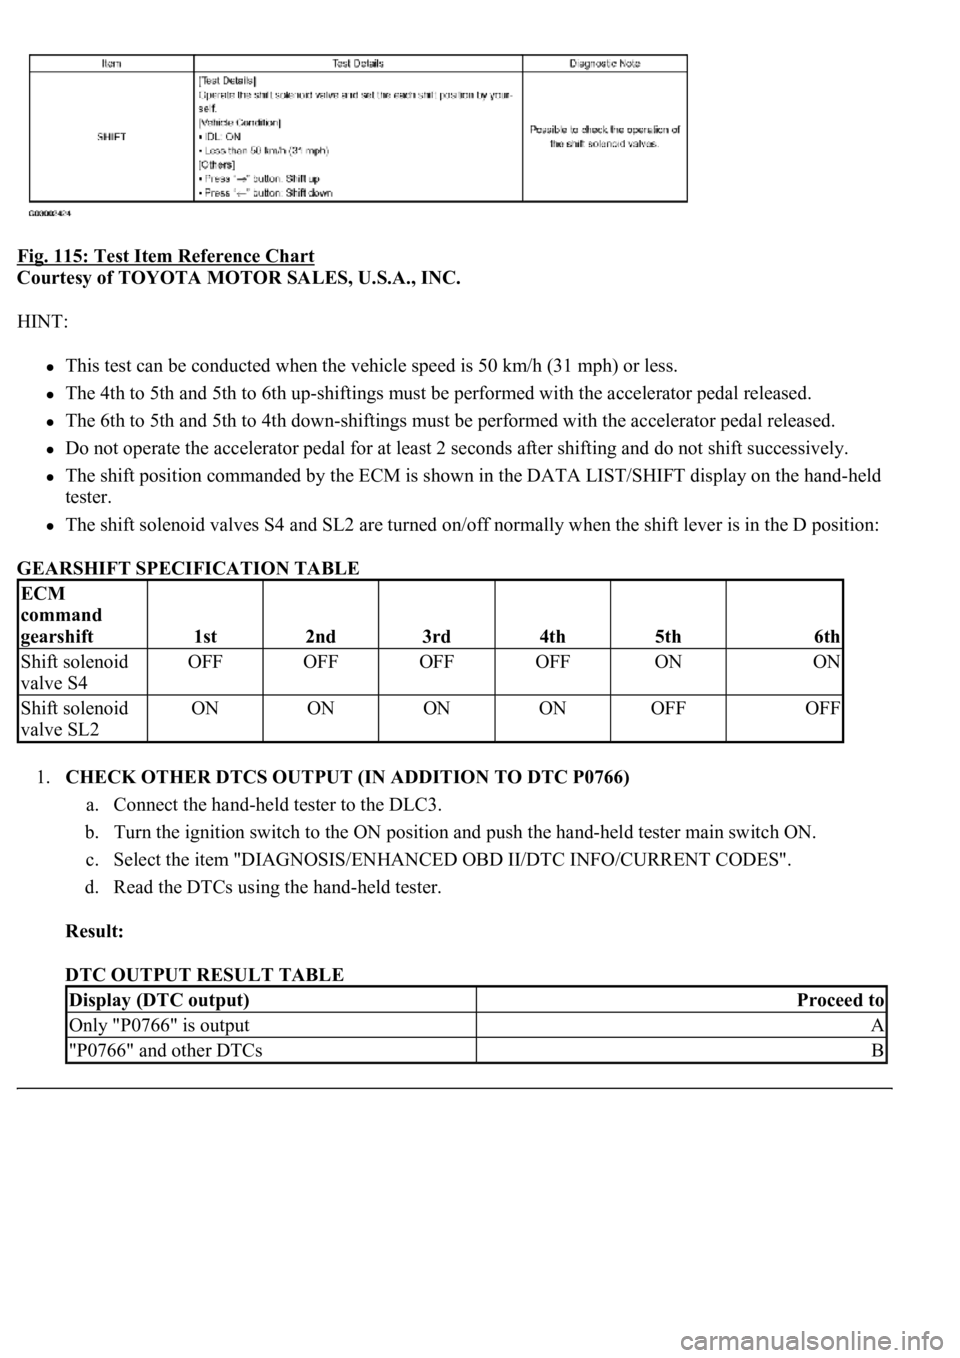
Fig. 115: Test Item Reference Chart
Courtesy of TOYOTA MOTOR SALES, U.S.A., INC.
HINT:
This test can be conducted when the vehicle speed is 50 km/h (31 mph) or less.
The 4th to 5th and 5th to 6th up-shiftings must be performed with the accelerator pedal released.
The 6th to 5th and 5th to 4th down-shiftings must be performed with the accelerator pedal released.
Do not operate the accelerator pedal for at least 2 seconds after shifting and do not shift successively.
The shift position commanded by the ECM is shown in the DATA LIST/SHIFT display on the hand-held
tester.
The shift solenoid valves S4 and SL2 are turned on/off normally when the shift lever is in the D position:
GEARSHIFT SPECIFICATION TABLE
1.CHECK OTHER DTCS OUTPUT (IN ADDITION TO DTC P0766)
a. Connect the hand-held tester to the DLC3.
b. Turn the ignition switch to the ON position and push the hand-held tester main switch ON.
c. Select the item "DIAGNOSIS/ENHANCED OBD II/DTC INFO/CURRENT CODES".
d. Read the DTCs using the hand-held tester.
Result:
DTC OUTPUT RESULT TABLE
ECM
command
gearshift
1st2nd3rd4th5th6th
Shift solenoid
valve S4OFFOFFOFFOFFONON
Shift solenoid
valve SL2ONONONONOFFOFF
Display (DTC output)Proceed to
Only "P0766" is outputA
"P0766" and other DTCsB
Page 2806 of 4500
HINT:
If any other codes besides "P0766" are output, perform troubleshooting for those DTCs first.
B: GO TO RELEVANT DTC CHART (See DIAGNOSTIC TROUBLE CODE CHART
)
A: Go to next step
2.PERFORM ACTIVE TEST BY HAND - HELD TESTER
SST 09992-00095 (09992-00231, 09992-00271)
HINT:
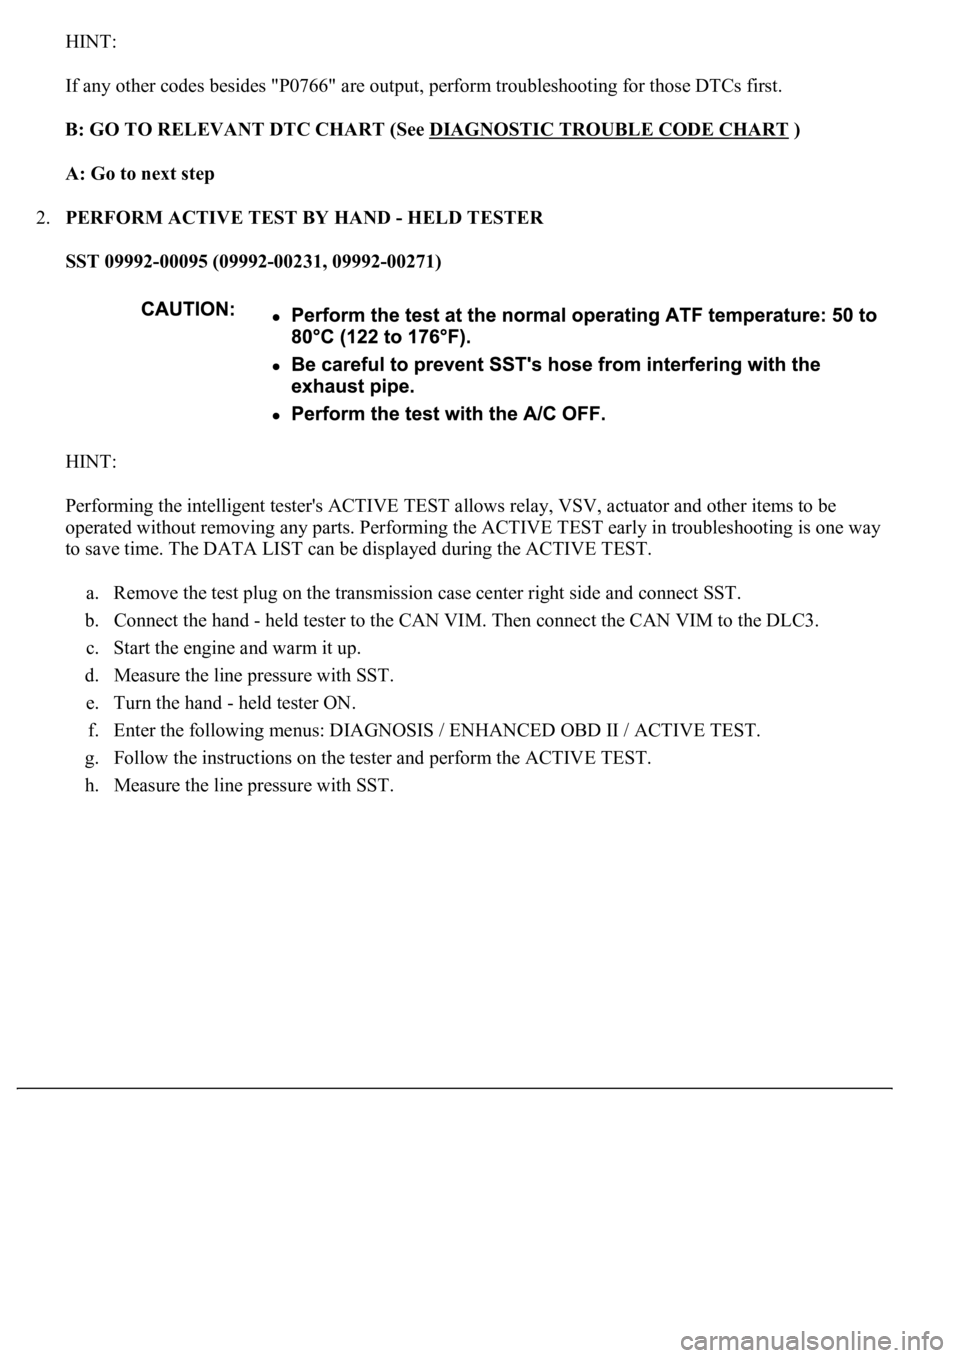
Performing the intelligent tester's ACTIVE TEST allows relay, VSV, actuator and other items to be
operated without removing any parts. Performing the ACTIVE TEST early in troubleshooting is one way
to save time. The DATA LIST can be displayed during the ACTIVE TEST.
a. Remove the test plug on the transmission case center right side and connect SST.
b. Connect the hand - held tester to the CAN VIM. Then connect the CAN VIM to the DLC3.
c. Start the engine and warm it up.
d. Measure the line pressure with SST.
e. Turn the hand - held tester ON.
f. Enter the following menus: DIAGNOSIS / ENHANCED OBD II / ACTIVE TEST.
g. Follow the instructions on the tester and perform the ACTIVE TEST.
h. Measure the line pressure with SST.
Page 2807 of 4500
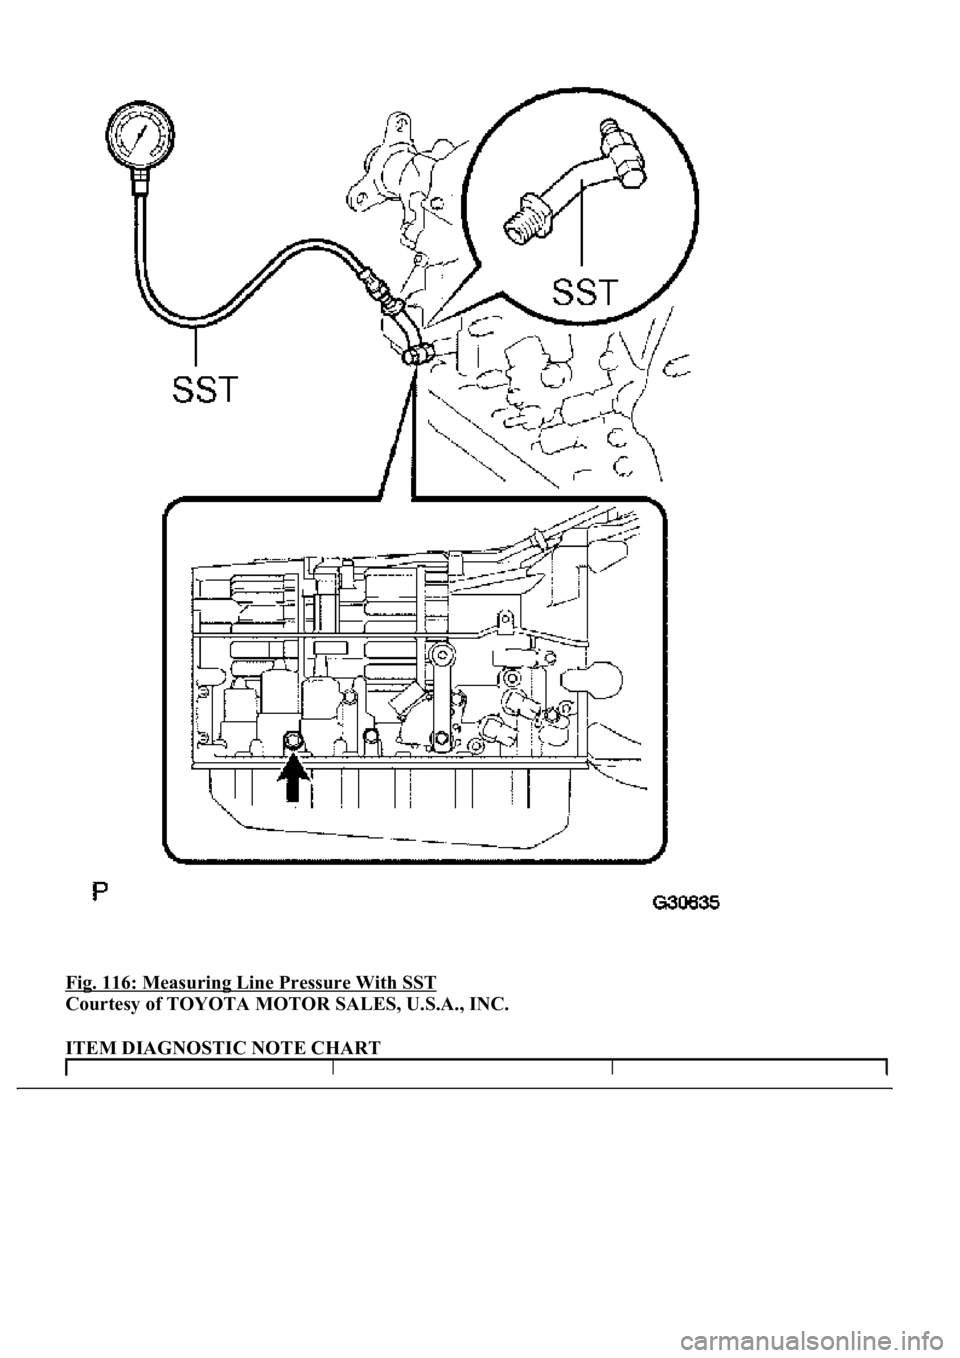
Fig. 116: Measuring Line Pressure With SST
Courtesy of TOYOTA MOTOR SALES, U.S.A., INC.
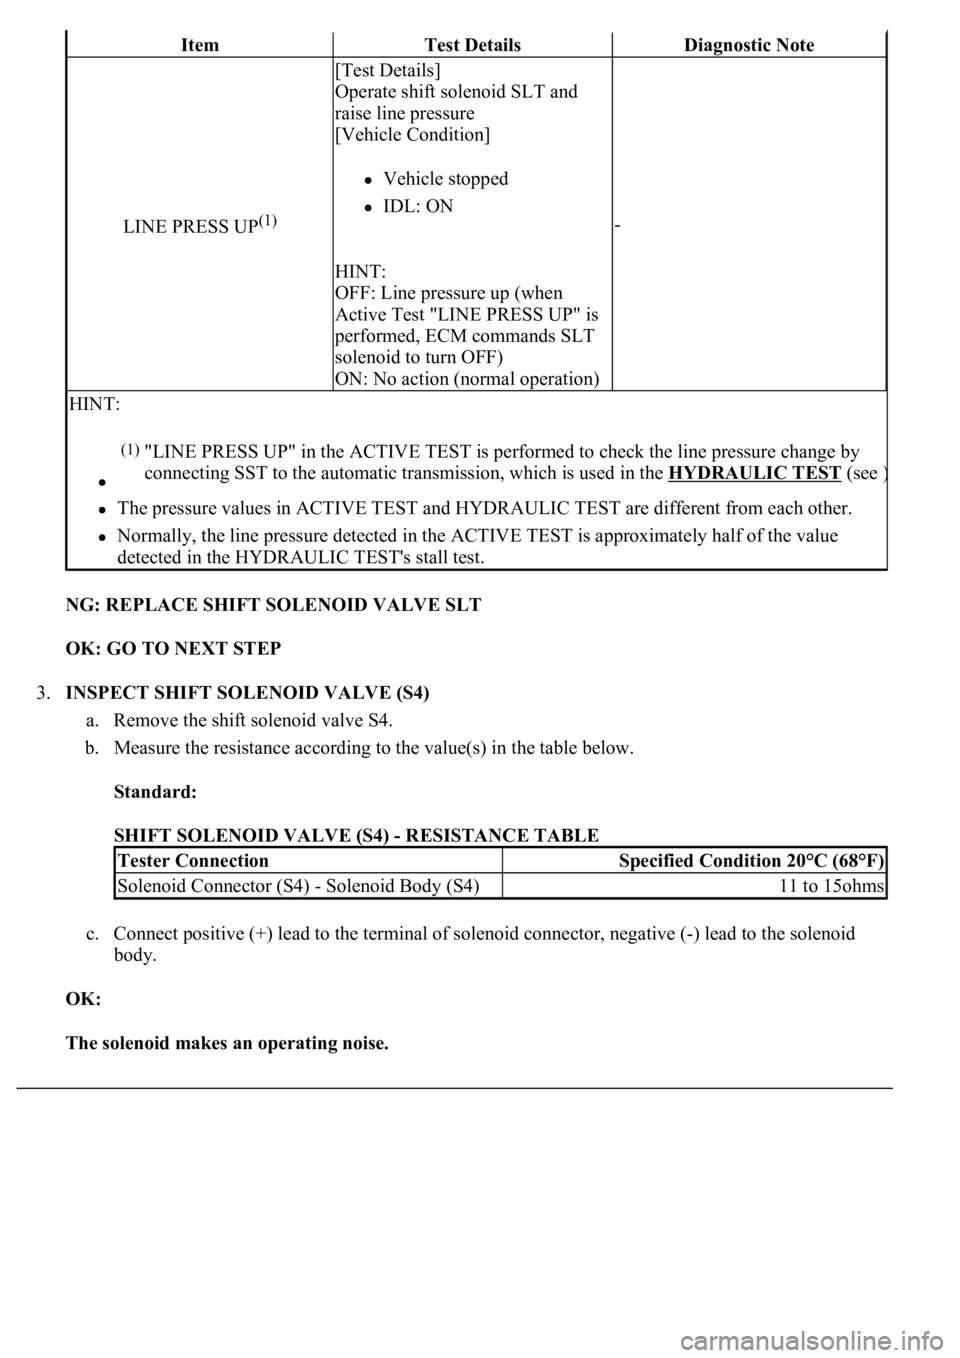
ITEM DIAGNOSTIC NOTE CHART
Page 2808 of 4500
NG: REPLACE SHIFT SOLENOID VALVE SLT
OK: GO TO NEXT STEP
3.INSPECT SHIFT SOLENOID VALVE (S4)
a. Remove the shift solenoid valve S4.
b. Measure the resistance according to the value(s) in the table below.
Standard:
SHIFT SOLENOID VALVE (S4) - RESISTANCE TABLE
c. Connect positive (+) lead to the terminal of solenoid connector, negative (-) lead to the solenoid
body.
OK:
The solenoid makes an operating noise.
ItemTest DetailsDiagnostic Note
LINE PRESS UP(1)
[Test Details]
Operate shift solenoid SLT and
raise line pressure
[Vehicle Condition]
Vehicle stopped
IDL: ON
HINT:
OFF: Line pressure up (when
Active Test "LINE PRESS UP" is
performed, ECM commands SLT
solenoid to turn OFF)
ON: No action (normal operation)
-
HINT:
The pressure values in ACTIVE TEST and HYDRAULIC TEST are different from each other.
Normally, the line pressure detected in the ACTIVE TEST is approximately half of the value
detected in the HYDRAULIC TEST's stall test.
(1)"LINE PRESS UP" in the ACTIVE TEST is performed to check the line pressure change by
connecting SST to the automatic transmission, which is used in the HYDRAULIC TEST
(see )
Tester ConnectionSpecified Condition 20°C (68°F)
Solenoid Connector (S4) - Solenoid Body (S4)11 to 15ohms
Page 2809 of 4500
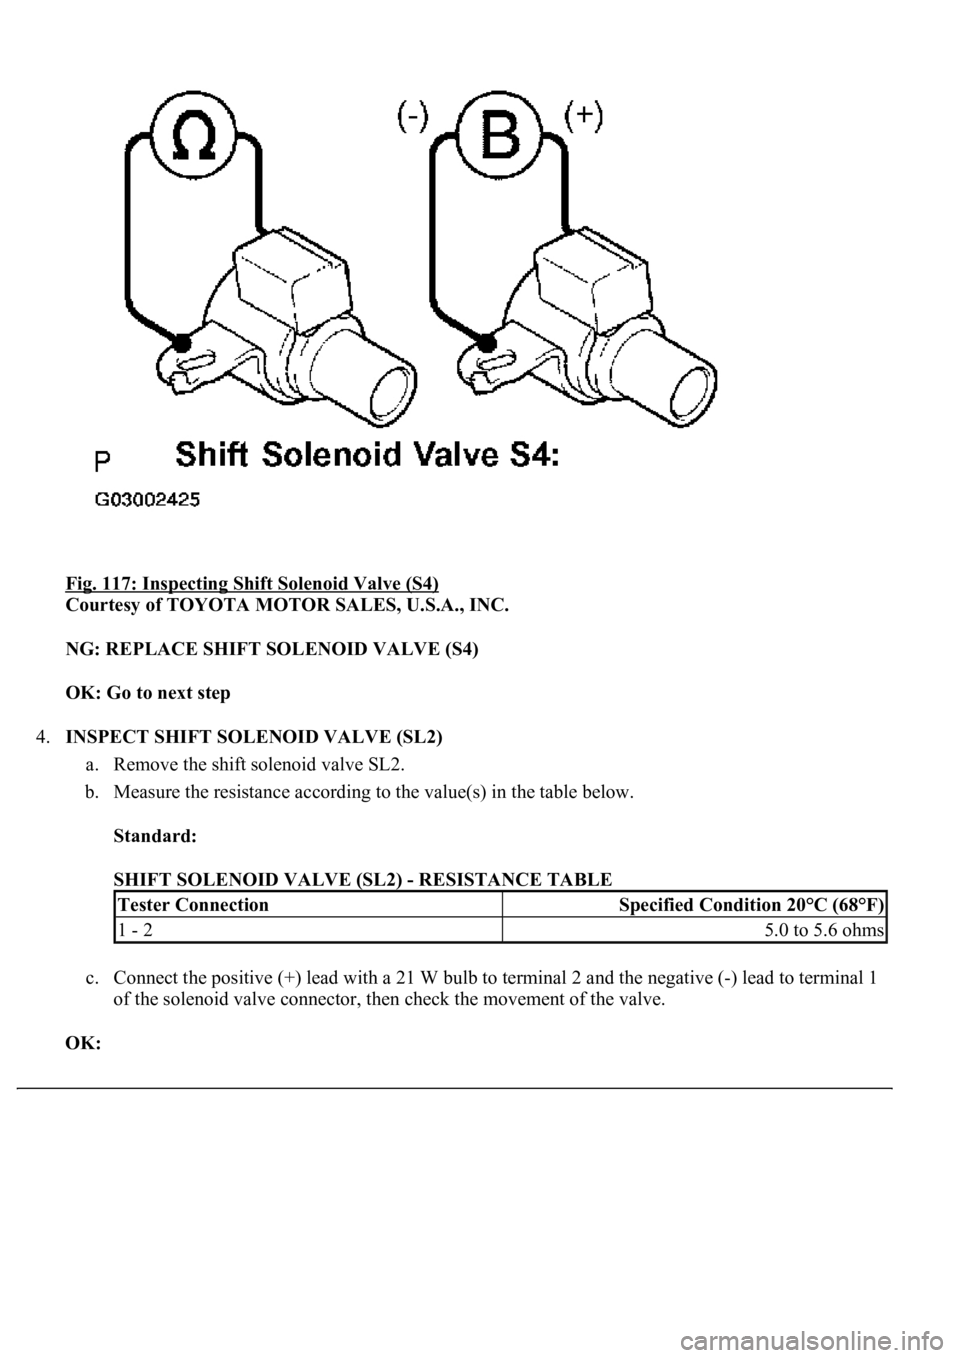
Fig. 117: Inspecting Shift Solenoid Valve (S4)
Courtesy of TOYOTA MOTOR SALES, U.S.A., INC.
NG: REPLACE SHIFT SOLENOID VALVE (S4)
OK: Go to next step
4.INSPECT SHIFT SOLENOID VALVE (SL2)
a. Remove the shift solenoid valve SL2.
b. Measure the resistance according to the value(s) in the table below.
Standard:
SHIFT SOLENOID VALVE (SL2) - RESISTANCE TABLE
c. Connect the positive (+) lead with a 21 W bulb to terminal 2 and the negative (-) lead to terminal 1
of the solenoid valve connector, then check the movement of the valve.
OK:
Tester ConnectionSpecified Condition 20°C (68°F)
1 - 25.0 to 5.6 ohms
Page 2810 of 4500
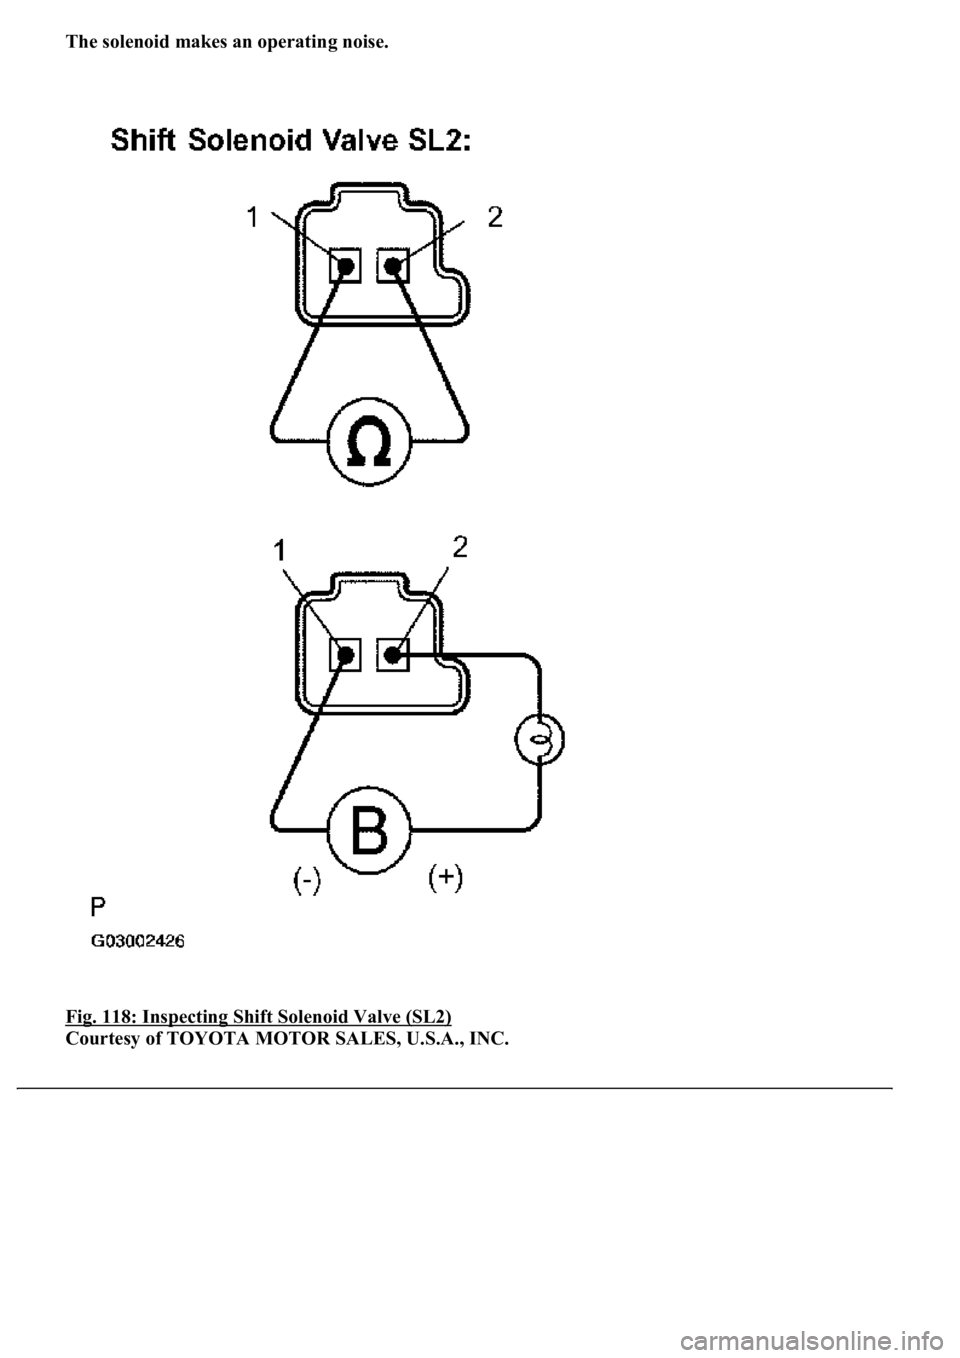
The solenoid makes an operating noise.
Fig. 118: Inspecting Shift Solenoid Valve (SL2)
Courtesy of TOYOTA MOTOR SALES, U.S.A., INC.