LEXUS LS430 2003 Factory Service Manual
LS430 2003
LEXUS
LEXUS
https://www.carmanualsonline.info/img/36/57050/w960_57050-0.png
LEXUS LS430 2003 Factory Service Manual
Page 265 of 4500
OK: REPLACE ECM (SEE REPLACEMENT)
CIRCUIT DESCRIPTION
This sensor detects the evaporator temperature and sends the appropriate signals to the A/C amplifier. It is used
for frost prevention, temperature and time-lag air flow control.
Fig. 47: DTC Detection Item Trouble Area Chart
Courtesy of TOYOTA MOTOR SALES, U.S.A., INC.
WIRING DIAGRAM
Fig. 48: Evaporator Temperature Sensor Circuit
Courtesy of TOYOTA MOTOR SALES, U.S.A., INC.
INSPECTION PROCEDURE
Page 272 of 4500
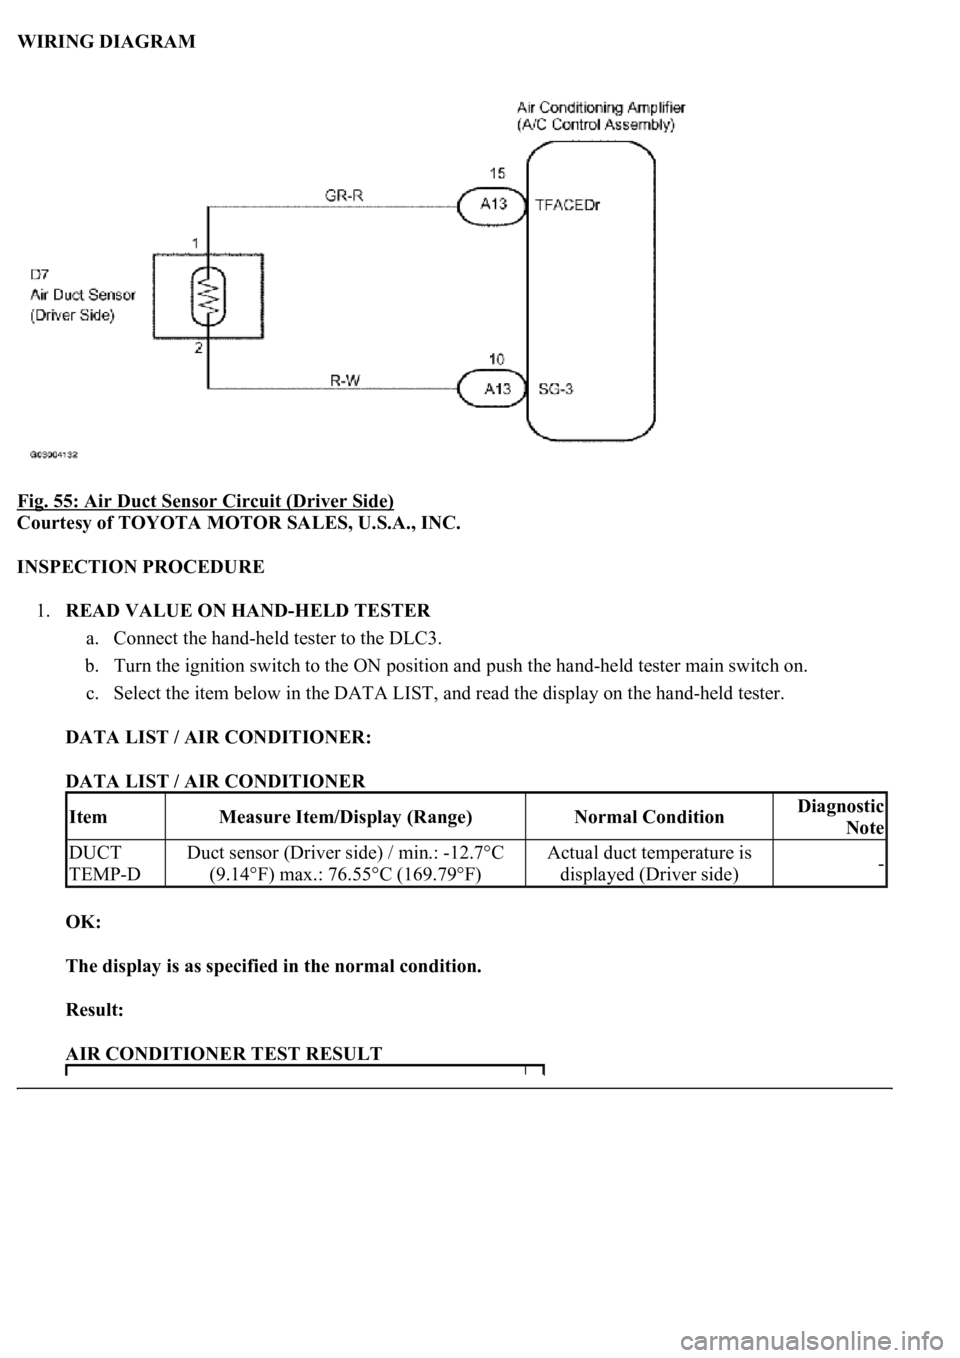
WIRING DIAGRAM
Fig. 55: Air Duct Sensor Circuit (Driver Side)
Courtesy of TOYOTA MOTOR SALES, U.S.A., INC.
INSPECTION PROCEDURE
1.READ VALUE ON HAND-HELD TESTER
a. Connect the hand-held tester to the DLC3.
b. Turn the ignition switch to the ON position and push the hand-held tester main switch on.
c. Select the item below in the DATA LIST, and read the display on the hand-held tester.
DATA LIST / AIR CONDITIONER:
DATA LIST / AIR CONDITIONER
OK:
The display is as specified in the normal condition.
Result:
AIR CONDITIONER TEST RESULT
ItemMeasure Item/Display (Range)Normal ConditionDiagnostic
Note
DUCT
TEMP-DDuct sensor (Driver side) / min.: -12.7°C
(9.14°F) max.: 76.55°C (169.79°F)Actual duct temperature is
displayed (Driver side)-
Page 278 of 4500
NG: REPAIR OR REPLACE HARNESS OR CONNECTOR
OK: REPLACE AIR CONDITIONING AMPLIFIER (SEE REPLACEMENT )
CIRCUIT DESCRIPTION
This sensor detects the register temperature and sends the appropriate signals to the A/C amplifier.
Fig. 59: DTC Detection Item Trouble Area Chart
Courtesy of TOYOTA MOTOR SALES, U.S.A., INC.
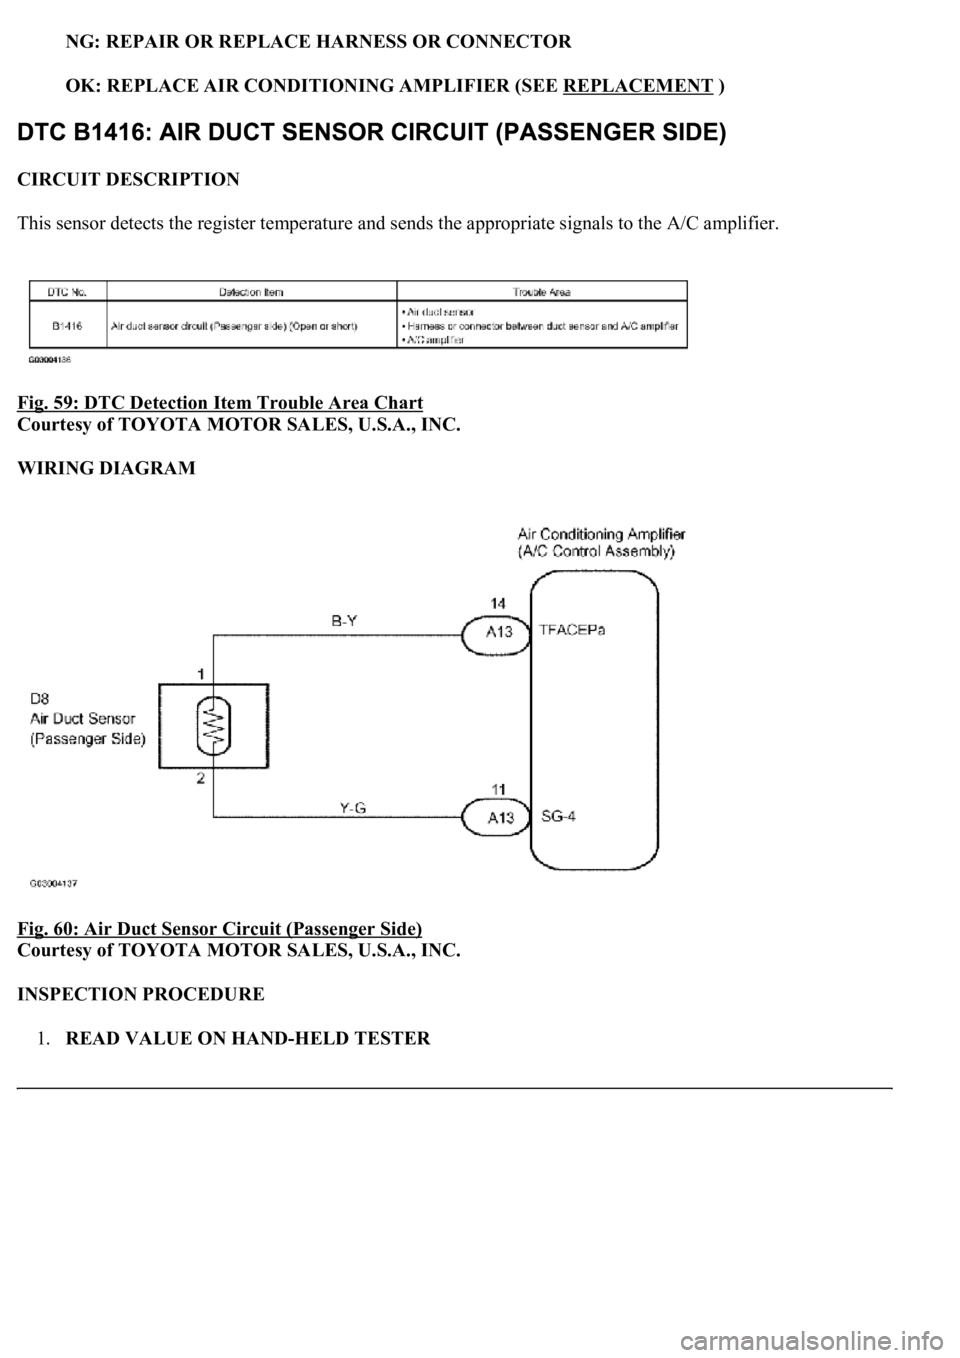
WIRING DIAGRAM
Fig. 60: Air Duct Sensor Circuit (Passenger Side)
Courtesy of TOYOTA MOTOR SALES, U.S.A., INC.
INSPECTION PROCEDURE
1.READ VALUE ON HAND-HELD TESTER
Page 284 of 4500
NG: REPAIR OR REPLACE HARNESS OR CONNECTOR
OK: REPLACE AIR CONDITIONING AMPLIFIER (SEE REPLACEMENT )
CIRCUIT DESCRIPTION
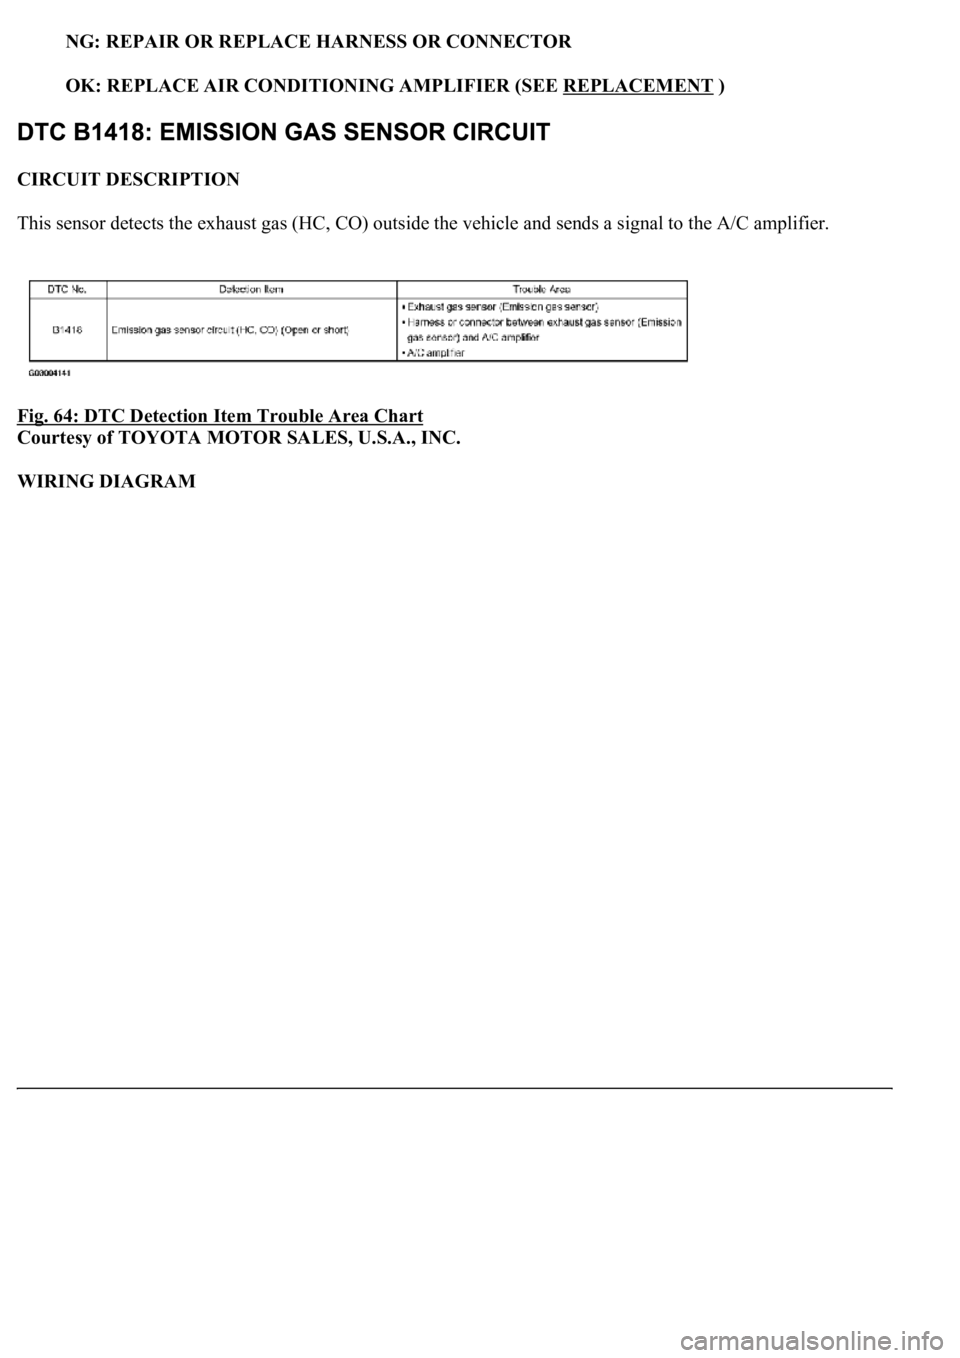
This sensor detects the exhaust gas (HC, CO) outside the vehicle and sends a signal to the A/C amplifier.
Fig. 64: DTC Detection Item Trouble Area Chart
Courtesy of TOYOTA MOTOR SALES, U.S.A., INC.
WIRING DIAGRAM
Page 292 of 4500
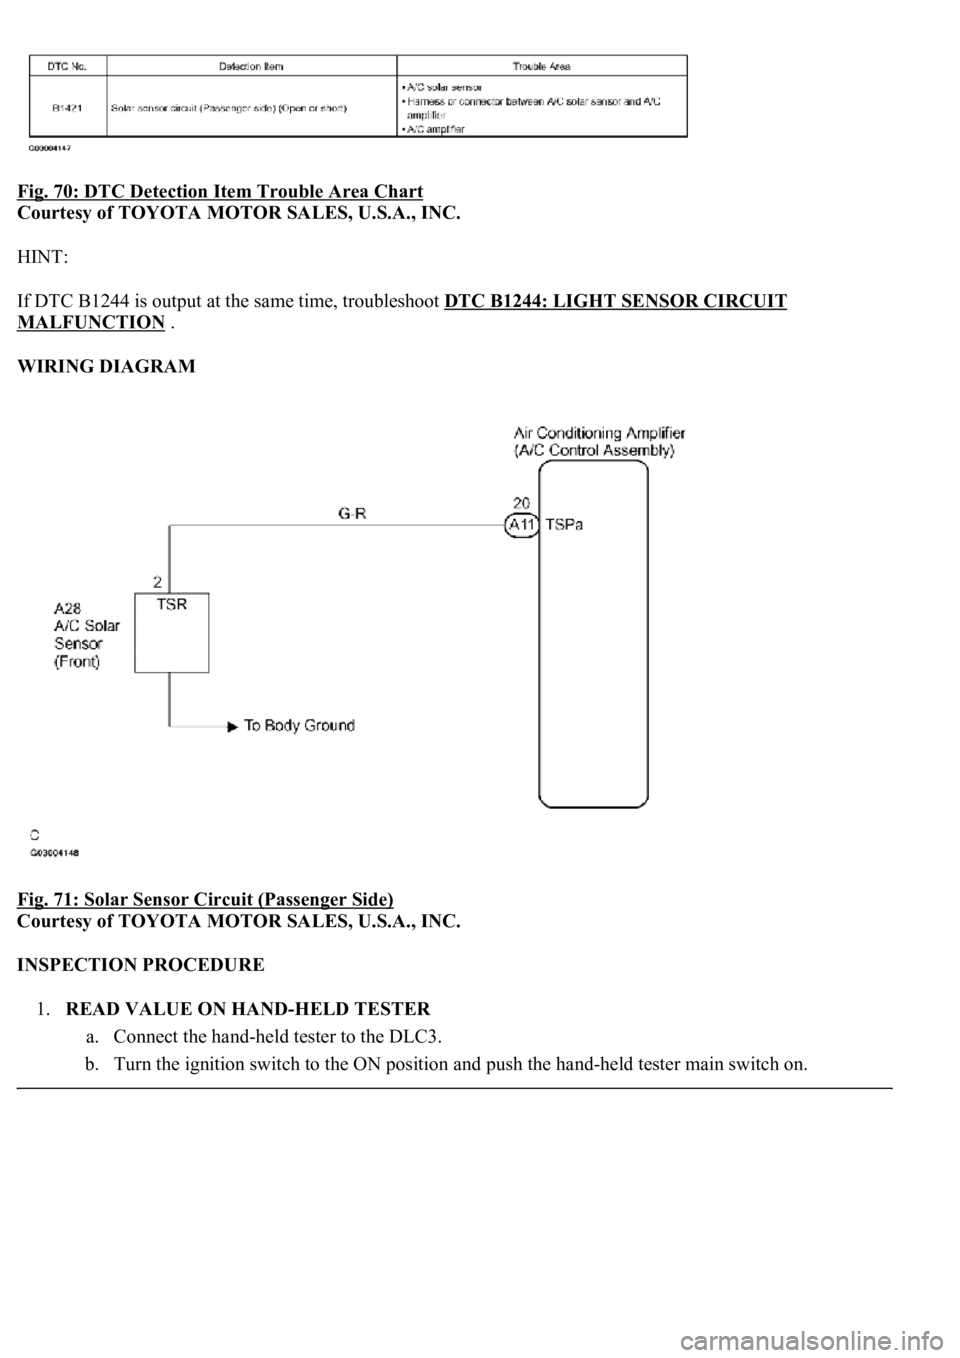
Fig. 70: DTC Detection Item Trouble Area Chart
Courtesy of TOYOTA MOTOR SALES, U.S.A., INC.
HINT:
If DTC B1244 is output at the same time, troubleshoot DTC B1244: LIGHT SENSOR CIRCUIT
MALFUNCTION .
WIRING DIAGRAM
Fig. 71: Solar Sensor Circuit (Passenger Side)
Courtesy of TOYOTA MOTOR SALES, U.S.A., INC.
INSPECTION PROCEDURE
1.READ VALUE ON HAND-HELD TESTER
a. Connect the hand-held tester to the DLC3.
b. Turn the ignition switch to the ON position and push the hand-held tester main switch on.
Page 298 of 4500
Courtesy of TOYOTA MOTOR SALES, U.S.A., INC.
NG: REPAIR OR REPLACE HARNESS OR CONNECTOR
OK: REPLACE AIR CONDITIONING AMPLIFIER (SEE REPLACEMENT
)
CIRCUIT DESCRIPTION
The pressure switch sends the appropriate signals to the A/C amplifier when the A/C refrigerant pressure drops
too low or rises too high.
When the A/C amplifier receives these signals, the compressor does not compress refrigerant.
Fig. 75: DTC Detection Item Trouble Area Chart
Courtesy of TOYOTA MOTOR SALES, U.S.A., INC.
WIRING DIAGRAM
Page 308 of 4500
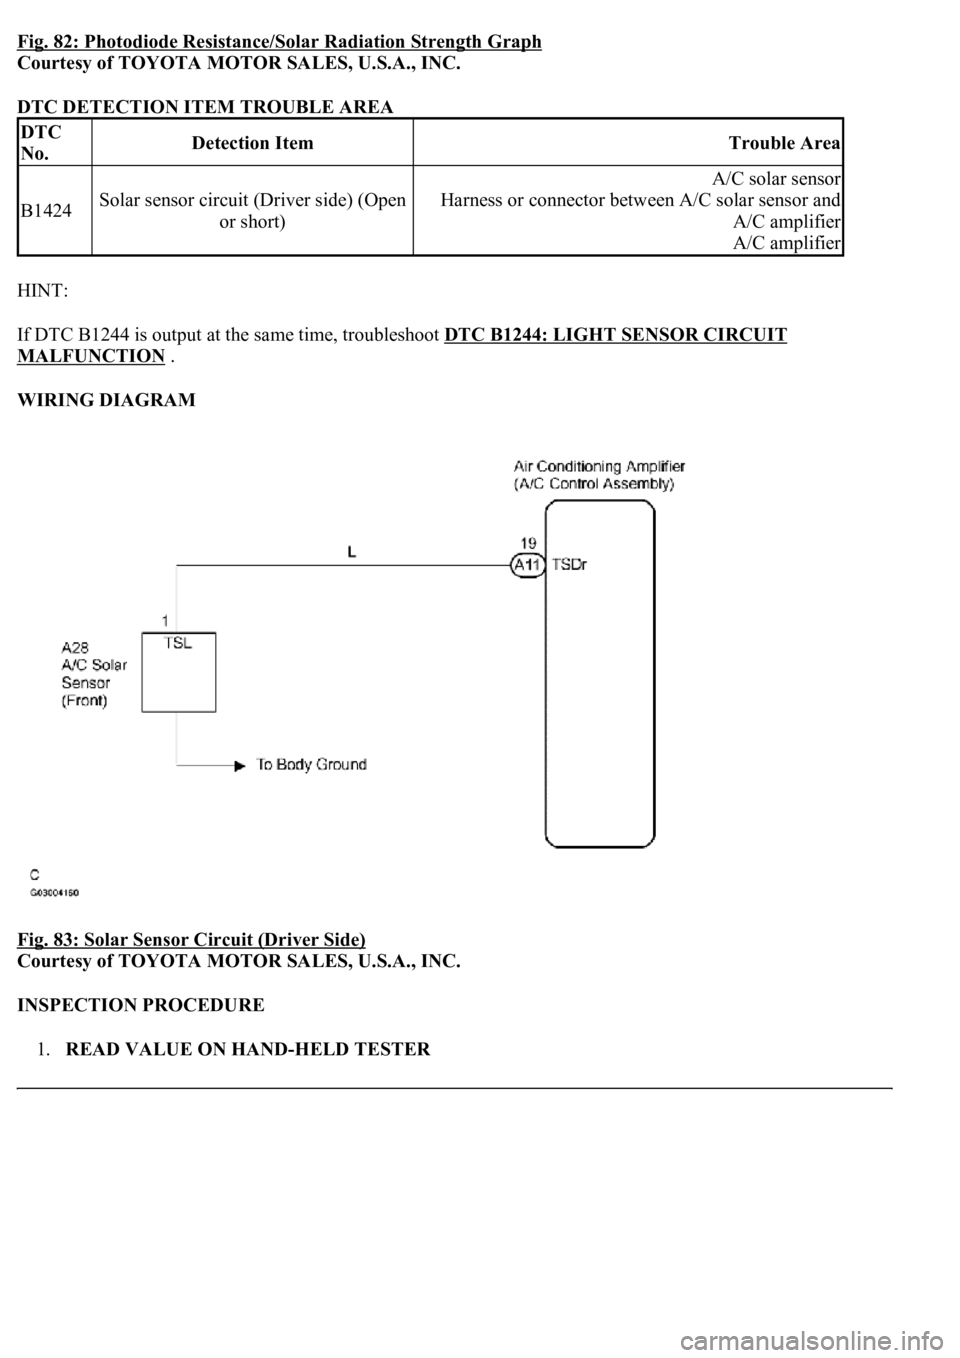
Fig. 82: Photodiode Resistance/Solar Radiation Strength Graph
Courtesy of TOYOTA MOTOR SALES, U.S.A., INC.
DTC DETECTION ITEM TROUBLE AREA
HINT:
If DTC B1244 is output at the same time, troubleshoot DTC B1244: LIGHT SENSOR CIRCUIT
MALFUNCTION .
WIRING DIAGRAM
Fig. 83: Solar Sensor Circuit (Driver Side)
Courtesy of TOYOTA MOTOR SALES, U.S.A., INC.
INSPECTION PROCEDURE
1.READ VALUE ON HAND-HELD TESTER
DTC
No.Detection ItemTrouble Area
B1424Solar sensor circuit (Driver side) (Open
or short)
A/C solar sensor
Harness or connector between A/C solar sensor and
A/C amplifier
A/C amplifier
Page 315 of 4500
Courtesy of TOYOTA MOTOR SALES, U.S.A., INC.
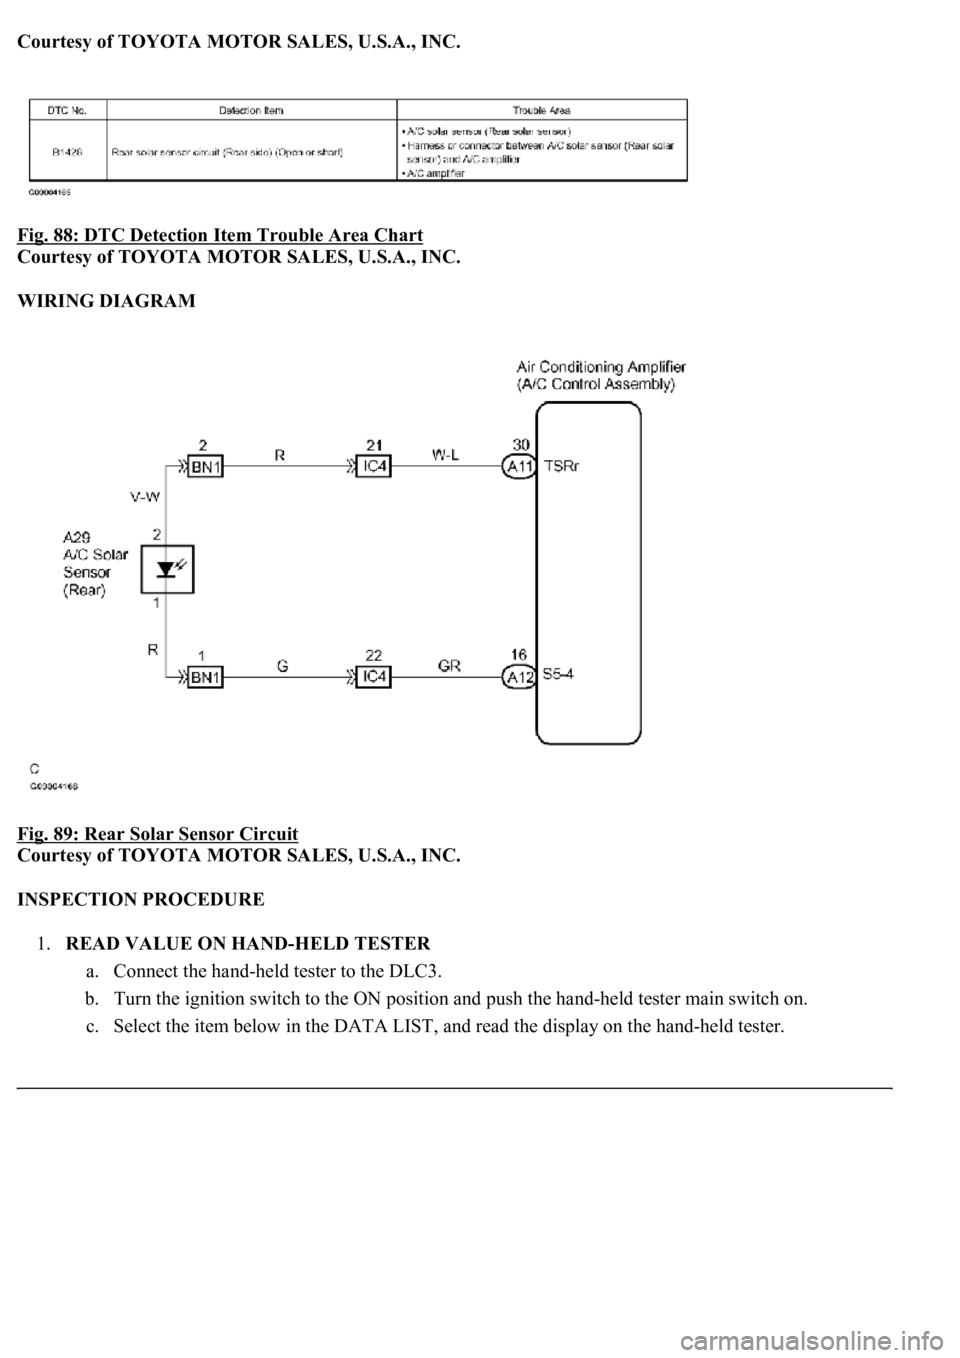
Fig. 88: DTC Detection Item Trouble Area Chart
Courtesy of TOYOTA MOTOR SALES, U.S.A., INC.
WIRING DIAGRAM
Fig. 89: Rear Solar Sensor Circuit
Courtesy of TOYOTA MOTOR SALES, U.S.A., INC.
INSPECTION PROCEDURE
1.READ VALUE ON HAND-HELD TESTER
a. Connect the hand-held tester to the DLC3.
b. Turn the ignition switch to the ON position and push the hand-held tester main switch on.
c. Select the item below in the DATA LIST, and read the displa
y on the hand-held tester.
Page 322 of 4500
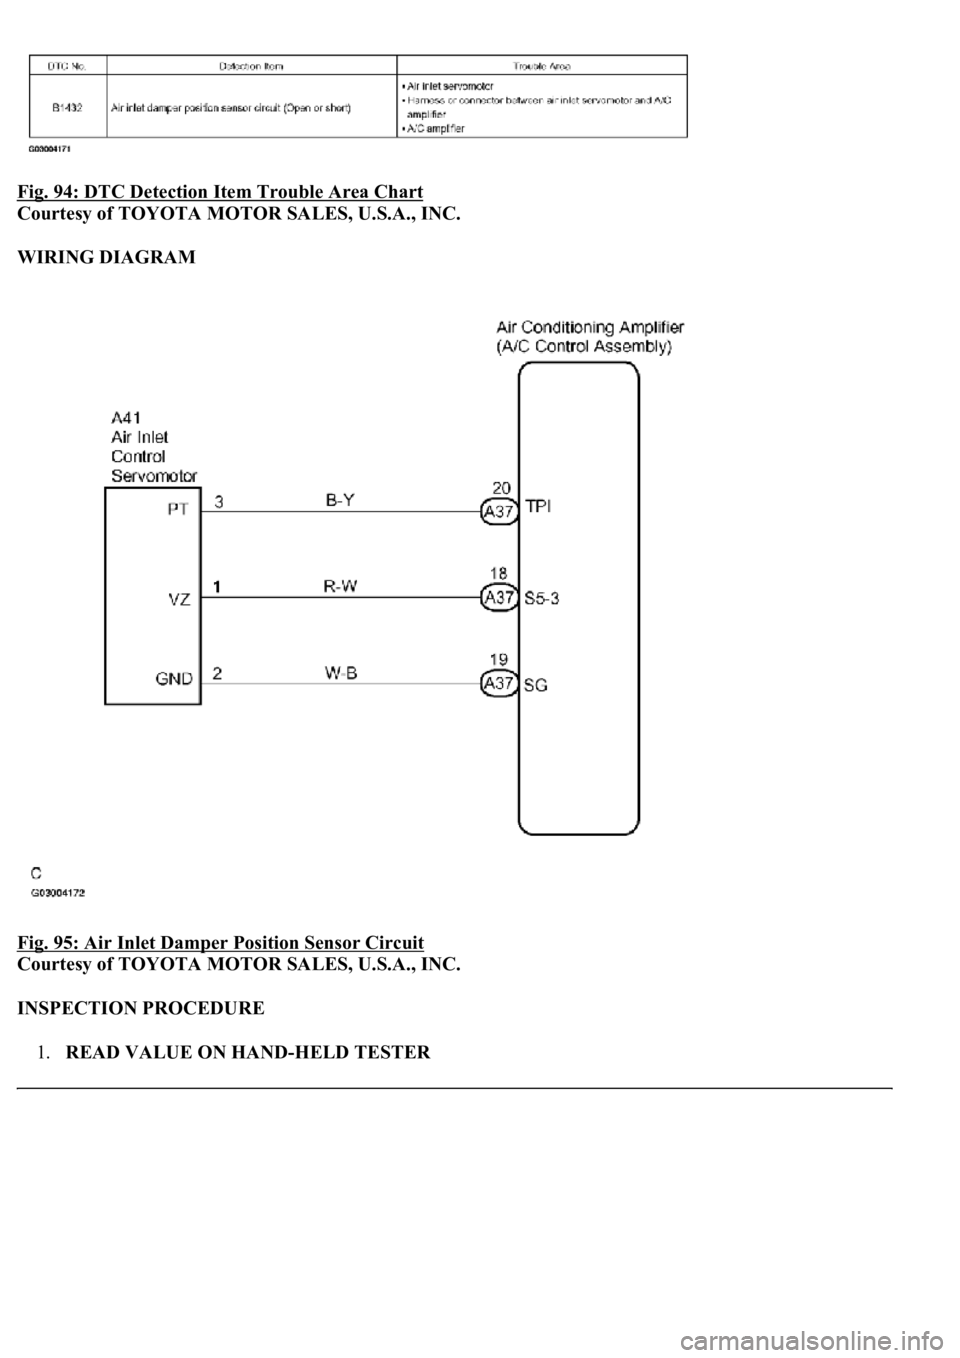
Fig. 94: DTC Detection Item Trouble Area Chart
Courtesy of TOYOTA MOTOR SALES, U.S.A., INC.
WIRING DIAGRAM
Fig. 95: Air Inlet Damper Position Sensor Circuit
Courtesy of TOYOTA MOTOR SALES, U.S.A., INC.
INSPECTION PROCEDURE
1.READ VALUE ON HAND-HELD TESTER
Page 330 of 4500
Fig. 99: TPBDR Terminal Voltage/Damper Opening Angle Graph
Courtesy of TOYOTA MOTOR SALES, U.S.A., INC.
Fig. 100: DTC Detection Item Trouble Area Chart
Courtesy of TOYOTA MOTOR SALES, U.S.A., INC.
WIRING DIAGRAM
Fig. 101: Max Cool Damper Position Sensor Circuit (Driver Side)
Courtesy of TOYOTA MOTOR SALES, U.S.A., INC.

