LEXUS LS430 2003 Factory Repair Manual
LS430 2003
LEXUS
LEXUS
https://www.carmanualsonline.info/img/36/57050/w960_57050-0.png
LEXUS LS430 2003 Factory Repair Manual
Page 3288 of 4500
Fig. 8: Removing Fan And Generator V Belt
Courtesy of TOYOTA MOTOR SALES, U.S.A., INC.
3.INSTALL FAN AND GENERATOR V BELT
a. Set the V belt to everything except the idler pulley No. 2, as shown in the illustration.
b. Loosen the V belt by turning the belt tensioner counterclockwise.
c. Then set the V belt to the idler pulle
y.
Page 3364 of 4500
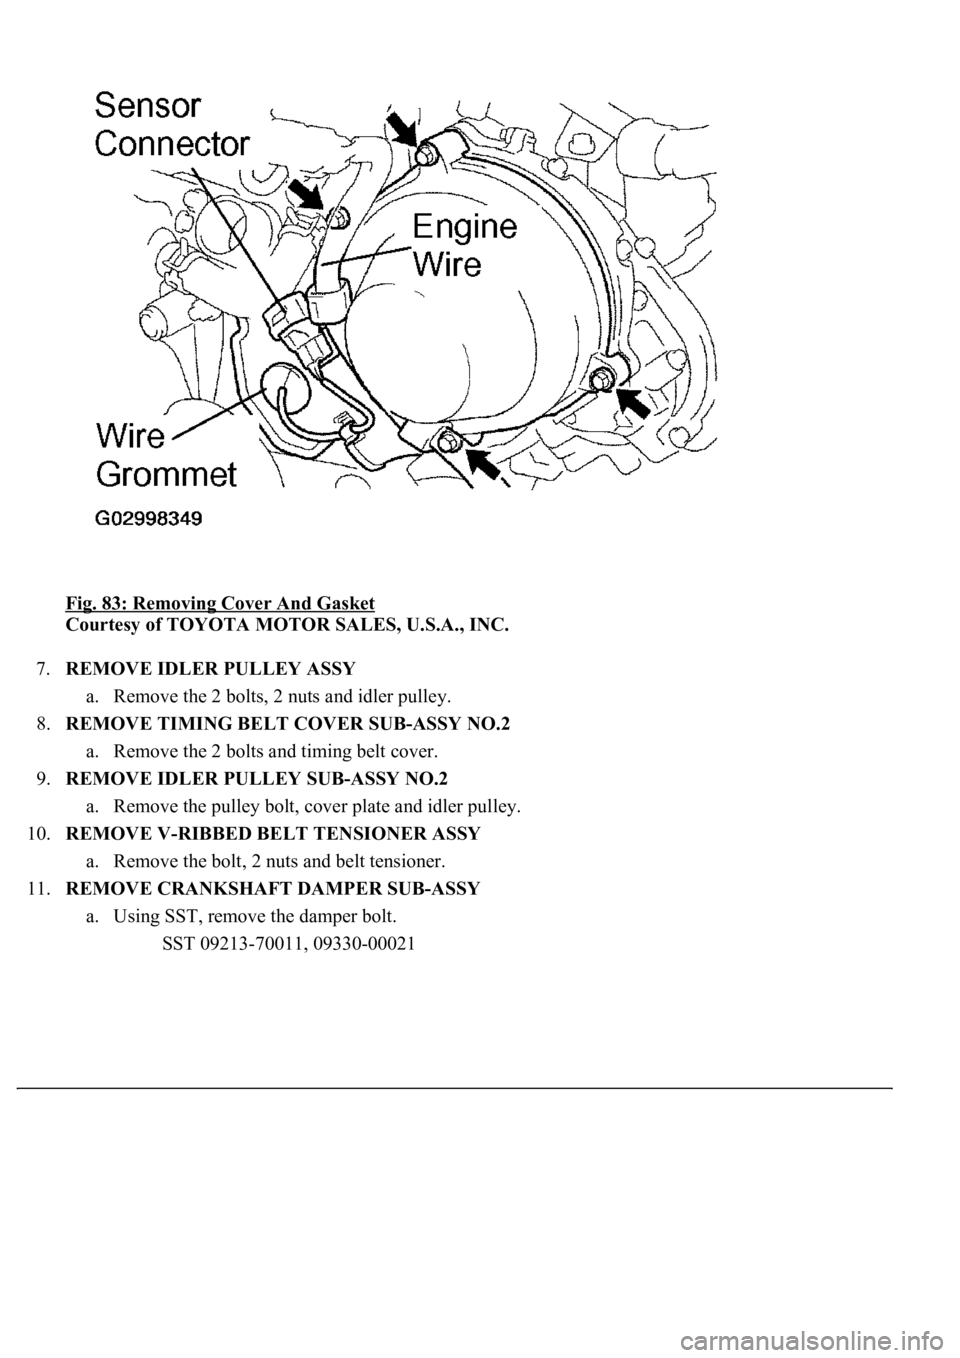
Fig. 83: Removing Cover And Gasket
Courtesy of TOYOTA MOTOR SALES, U.S.A., INC.
7.REMOVE IDLER PULLEY ASSY
a. Remove the 2 bolts, 2 nuts and idler pulley.
8.REMOVE TIMING BELT COVER SUB-ASSY NO.2
a. Remove the 2 bolts and timing belt cover.
9.REMOVE IDLER PULLEY SUB-ASSY NO.2
a. Remove the pulley bolt, cover plate and idler pulley.
10.REMOVE V-RIBBED BELT TENSIONER ASSY
a. Remove the bolt, 2 nuts and belt tensioner.
11.REMOVE CRANKSHAFT DAMPER SUB-ASSY
a. Using SST, remove the damper bolt.
SST 09213-70011, 09330-00021
Page 3370 of 4500
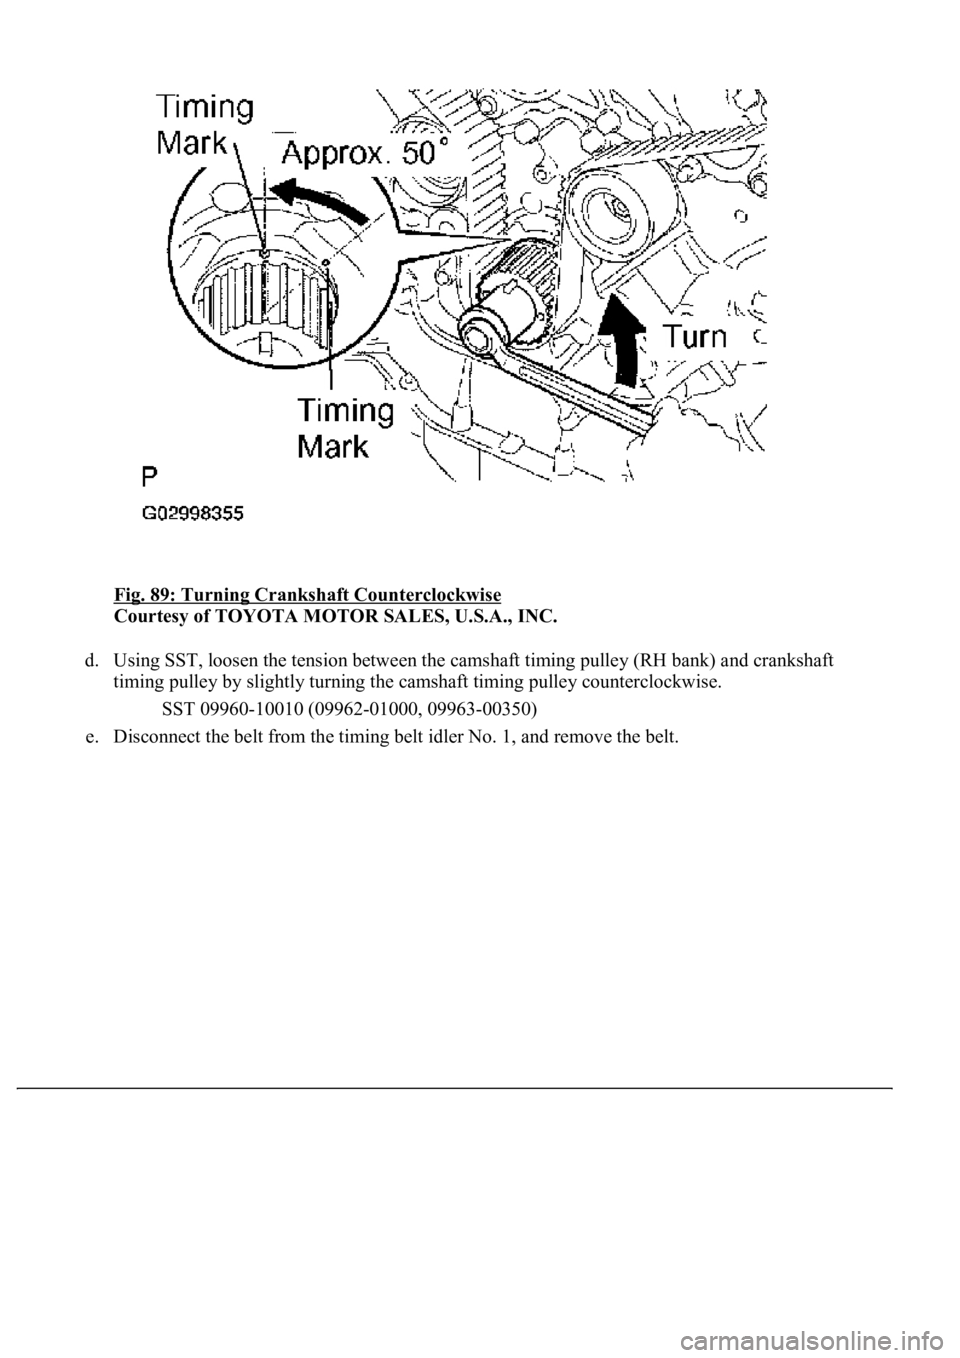
Fig. 89: Turning Crankshaft Counterclockwise
Courtesy of TOYOTA MOTOR SALES, U.S.A., INC.
d. Using SST, loosen the tension between the camshaft timing pulley (RH bank) and crankshaft
timing pulley by slightly turning the camshaft timing pulley counterclockwise.
SST 09960-10010 (09962-01000, 09963-00350)
e. Disconnect the belt from the timing belt idler No. 1, and remove the belt.
Page 3372 of 4500
Fig. 91: Checking Timing Belt
Courtesy of TOYOTA MOTOR SALES, U.S.A., INC.
c. If there is noticeable wear or cracks on the belt face, check to see if there are nicks on the side of
the idler pulley lock and water pump.
d. If there is wear or damage on only one side of the belt, check the belt guide and the alignment of
each pulley.
e. If there is noticeable wear on the belt teeth, check the timing cover for damage, check that the
gasket has been installed correctly, and check for foreign material on the pulley teeth.
If necessary, replace the timing belt.
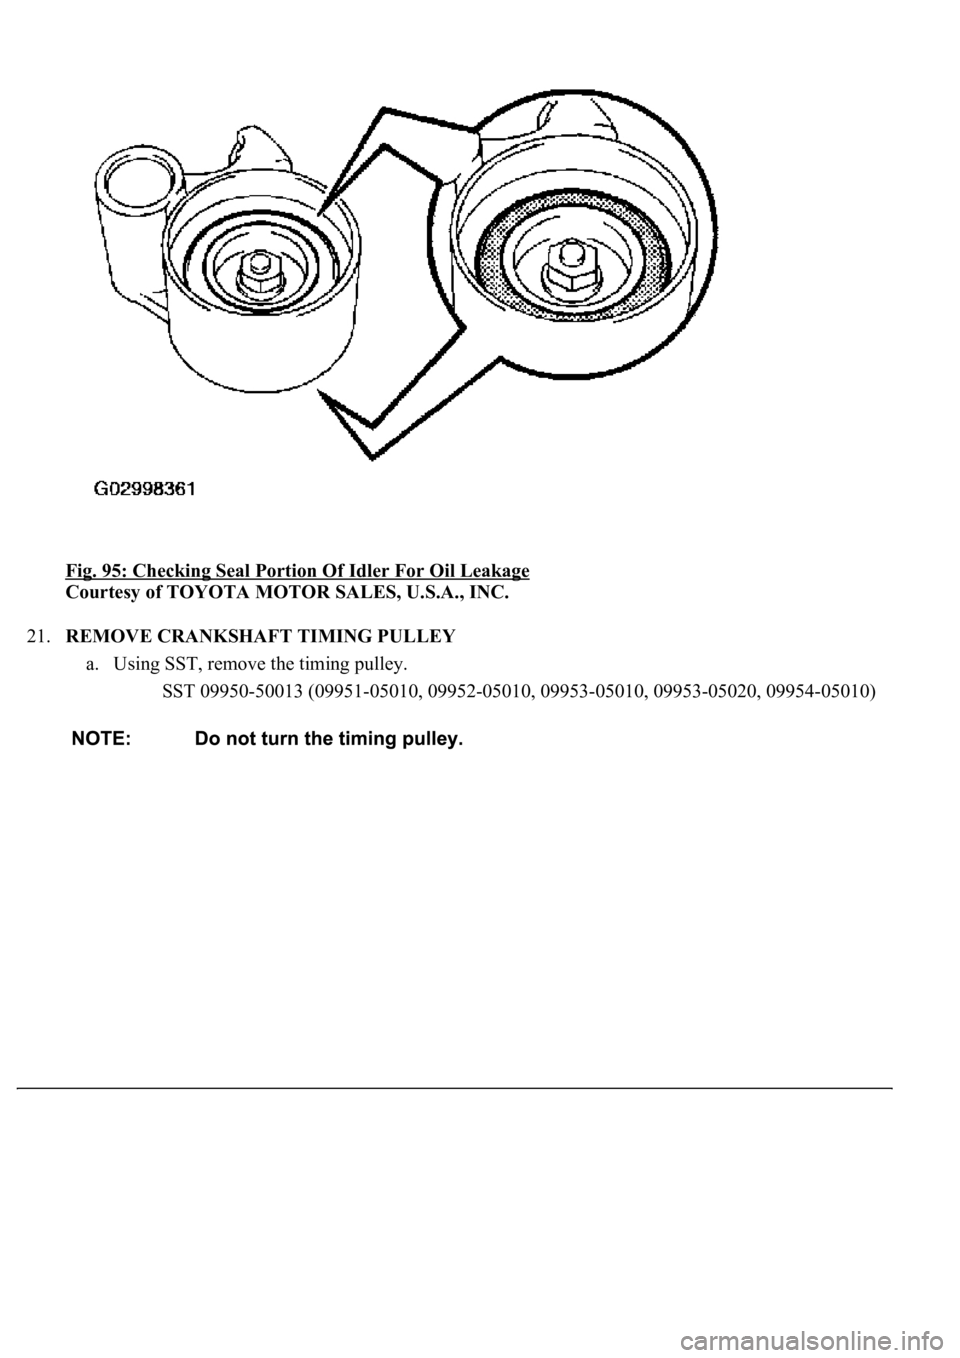
17.INSPECT TIMING BELT TENSIONER
a. Visually check the seal portion of the tensioner for oil leakage.
HINT:
If there is only the faint trace of oil on the push rod, the tensioner does not need to be replaced.
If leaka
ge is found, replace the tensioner.
Page 3376 of 4500
Fig. 95: Checking Seal Portion Of Idler For Oil Leakage
Courtesy of TOYOTA MOTOR SALES, U.S.A., INC.
21.REMOVE CRANKSHAFT TIMING PULLEY
a. Using SST, remove the timing pulley.
SST 09950-50013 (09951-05010, 09952-05010, 09953-05010, 09953-05020, 09954-05010)
Page 3448 of 4500
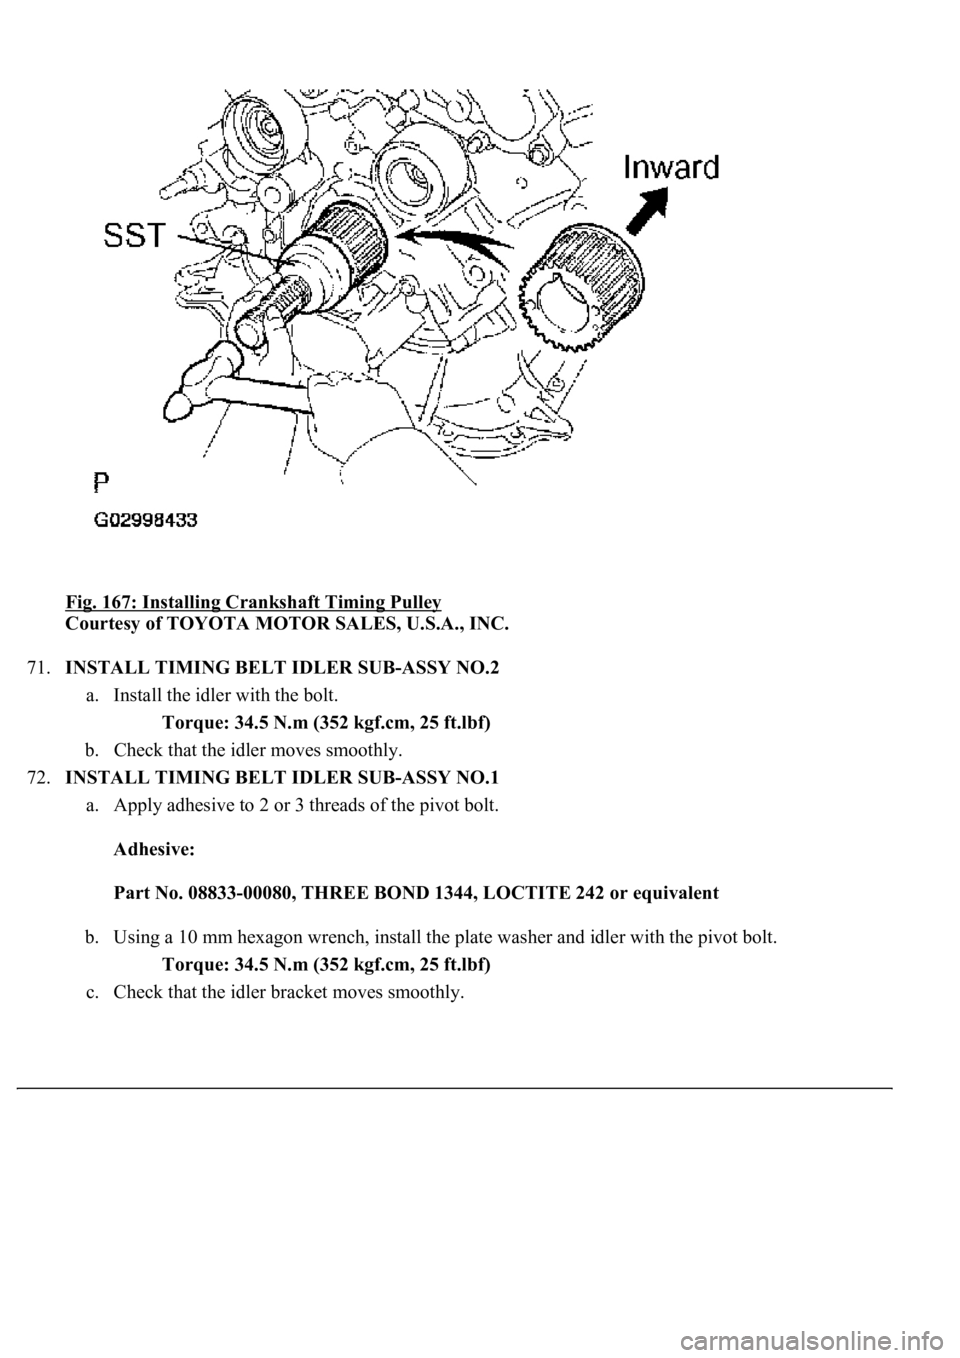
Fig. 167: Installing Crankshaft Timing Pulley
Courtesy of TOYOTA MOTOR SALES, U.S.A., INC.
71.INSTALL TIMING BELT IDLER SUB-ASSY NO.2
a. Install the idler with the bolt.
Torque: 34.5 N.m (352 kgf.cm, 25 ft.lbf)
b. Check that the idler moves smoothly.
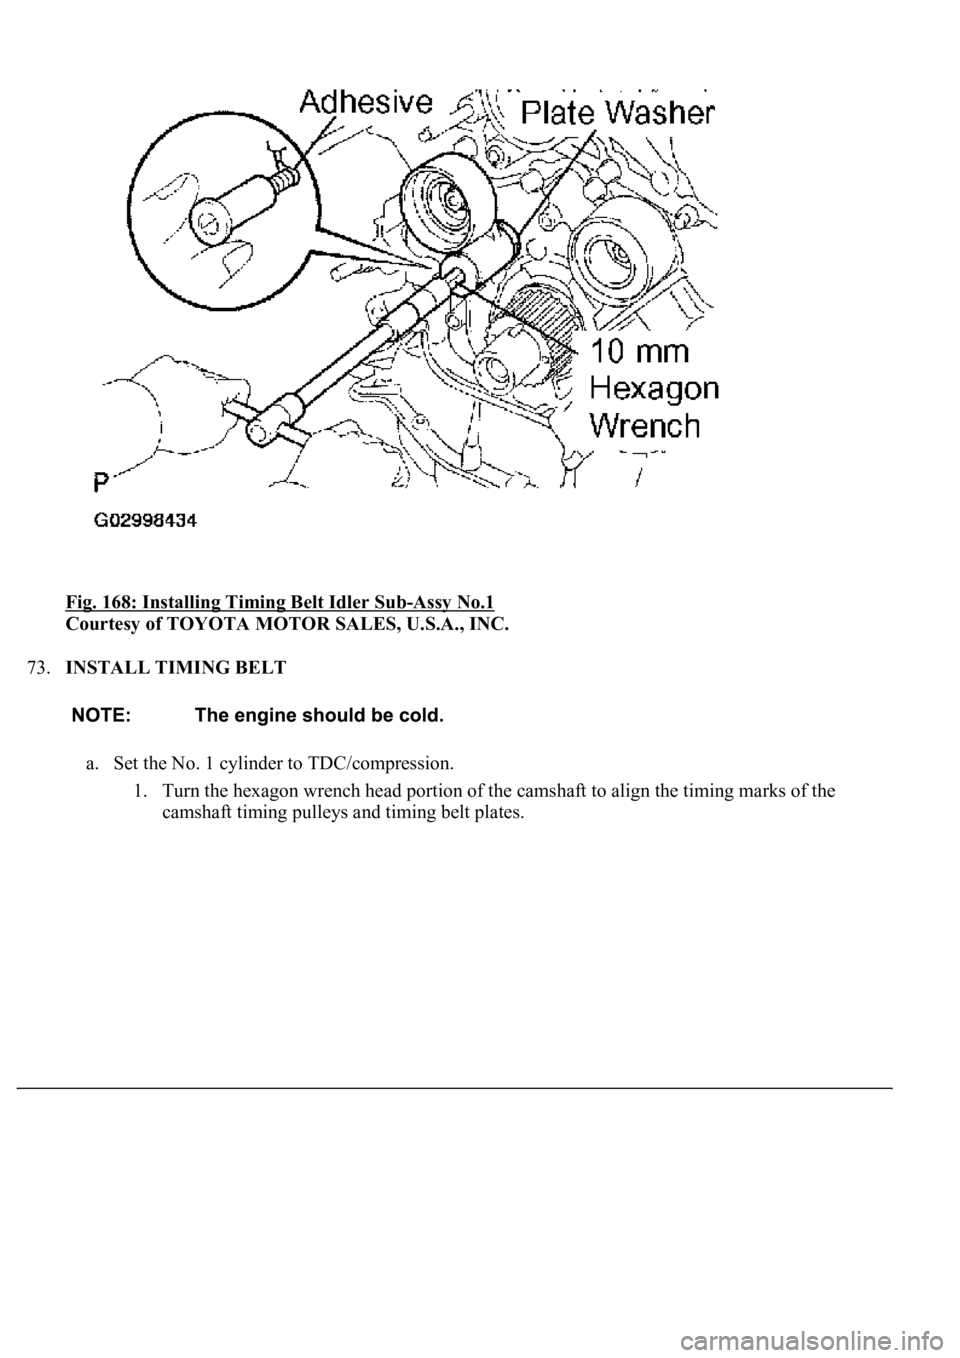
72.INSTALL TIMING BELT IDLER SUB-ASSY NO.1
a. Apply adhesive to 2 or 3 threads of the pivot bolt.
Adhesive:
Part No. 08833-00080, THREE BOND 1344, LOCTITE 242 or equivalent
b. Using a 10 mm hexagon wrench, install the plate washer and idler with the pivot bolt.
Torque: 34.5 N.m (352 kgf.cm, 25 ft.lbf)
c. Check that the idler bracket moves smoothl
y.
Page 3449 of 4500
Fig. 168: Installing Timing Belt Idler Sub-Assy No.1
Courtesy of TOYOTA MOTOR SALES, U.S.A., INC.
73.INSTALL TIMING BELT
a. Set the No. 1 cylinder to TDC/compression.
1. Turn the hexagon wrench head portion of the camshaft to align the timing marks of the
camshaft timin
g pulleys and timing belt plates.
Page 3453 of 4500
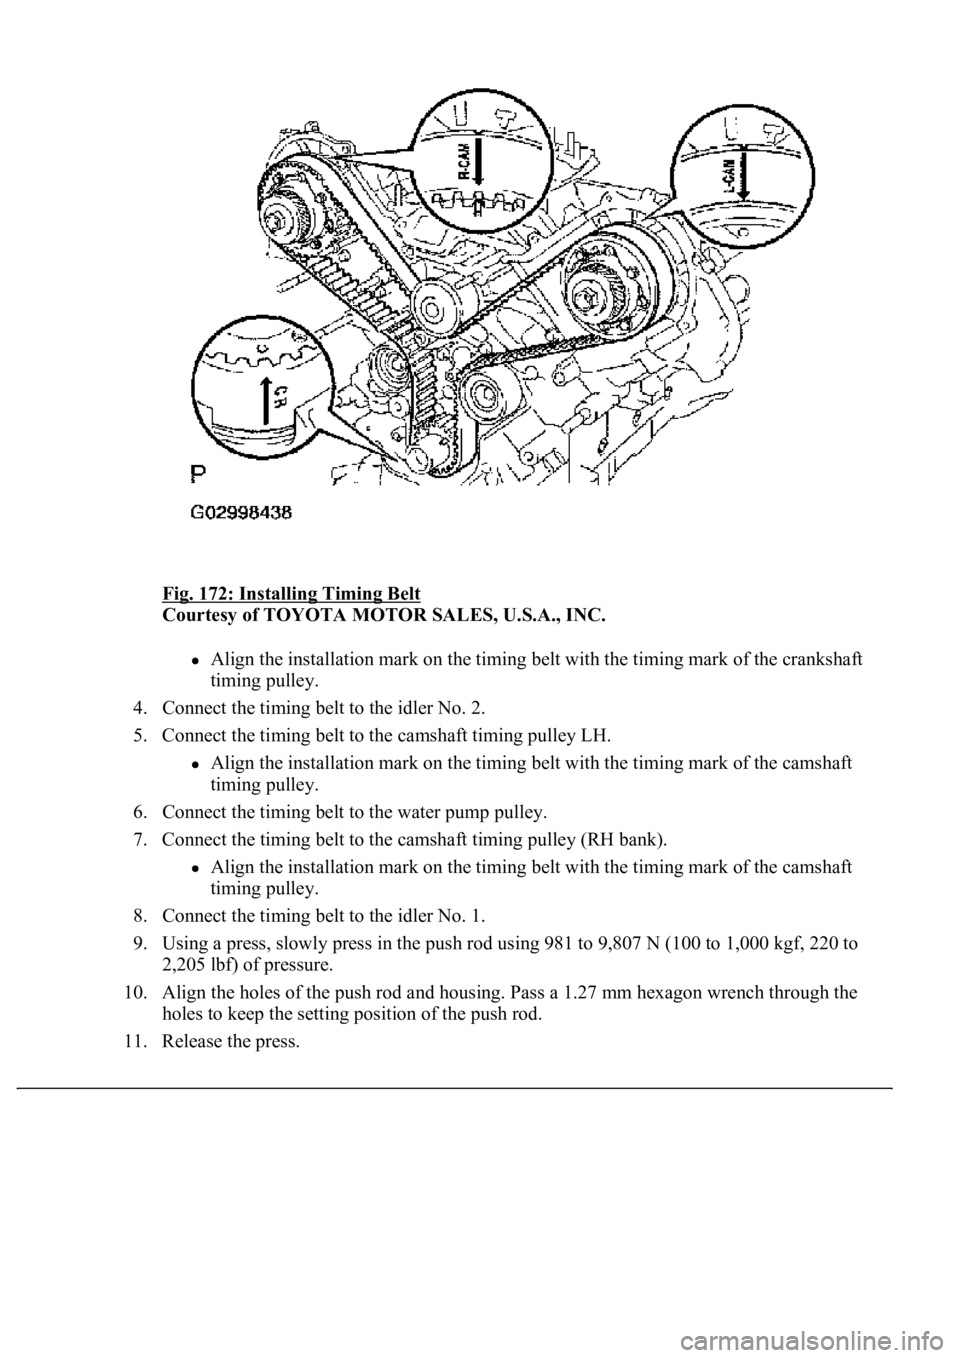
Fig. 172: Installing Timing Belt
Courtesy of TOYOTA MOTOR SALES, U.S.A., INC.
Align the installation mark on the timing belt with the timing mark of the crankshaft
timing pulley.
4. Connect the timing belt to the idler No. 2.
5. Connect the timing belt to the camshaft timing pulley LH.
Align the installation mark on the timing belt with the timing mark of the camshaft
timing pulley.
6. Connect the timing belt to the water pump pulley.
7. Connect the timing belt to the camshaft timing pulley (RH bank).
Align the installation mark on the timing belt with the timing mark of the camshaft
timing pulley.
8. Connect the timing belt to the idler No. 1.
9. Using a press, slowly press in the push rod using 981 to 9,807 N (100 to 1,000 kgf, 220 to
2,205 lbf) of pressure.
10. Align the holes of the push rod and housing. Pass a 1.27 mm hexagon wrench through the
<004b0052004f004800560003005700520003004e00480048005300030057004b004800030056004800570057004c0051004a0003005300520056004c0057004c0052005100030052004900030057004b00480003005300580056004b000300550052004700
1100030003[
11. Release the press.
Page 3458 of 4500
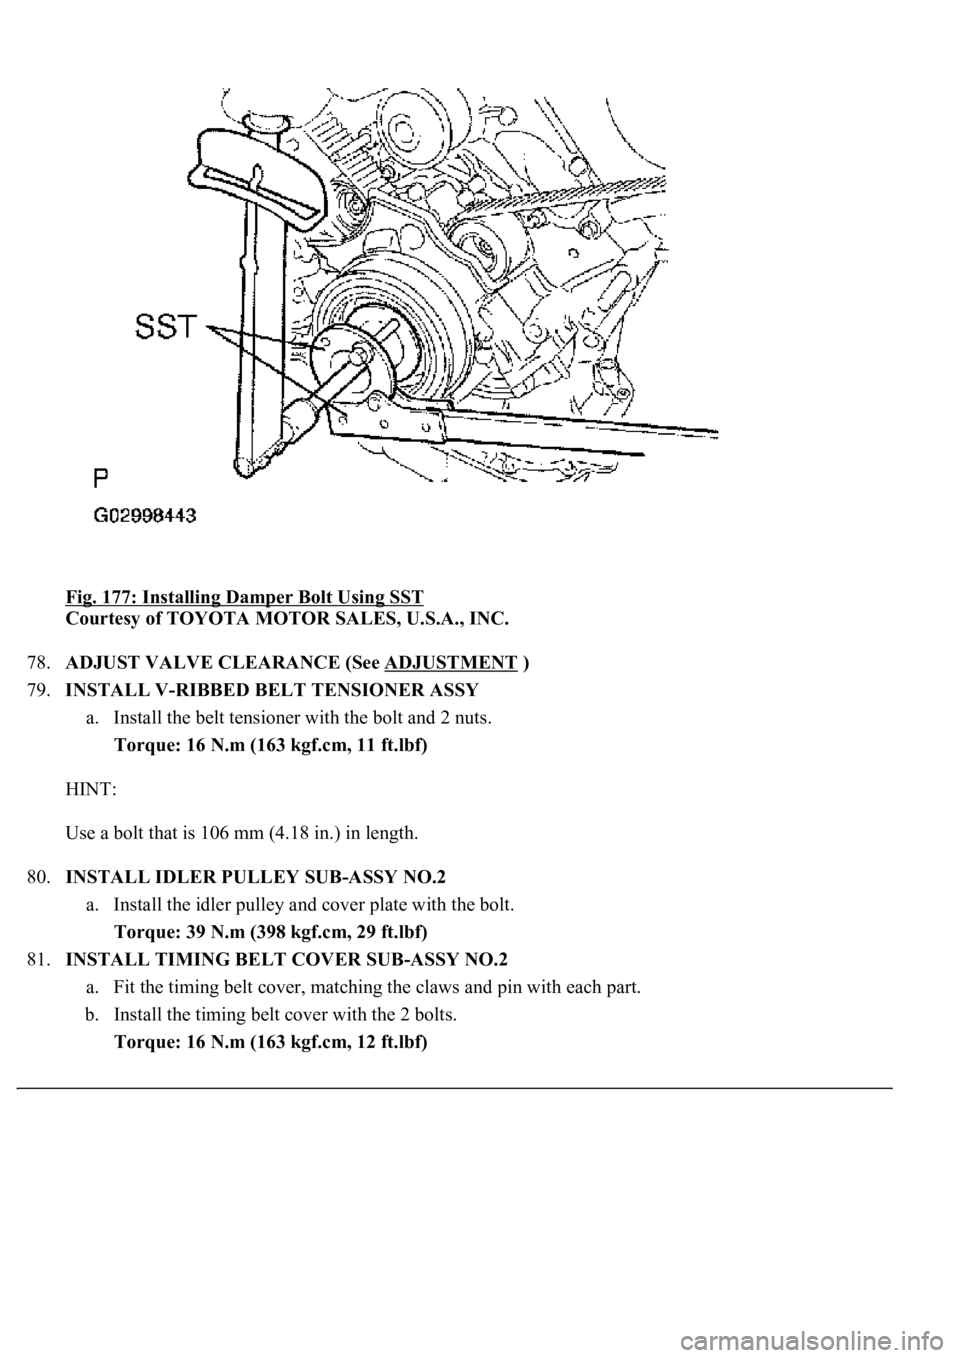
Fig. 177: Installing Damper Bolt Using SST
Courtesy of TOYOTA MOTOR SALES, U.S.A., INC.
78.ADJUST VALVE CLEARANCE (See ADJUSTMENT
)
79.INSTALL V-RIBBED BELT TENSIONER ASSY
a. Install the belt tensioner with the bolt and 2 nuts.
Torque: 16 N.m (163 kgf.cm, 11 ft.lbf)
HINT:
Use a bolt that is 106 mm (4.18 in.) in length.
80.INSTALL IDLER PULLEY SUB-ASSY NO.2
a. Install the idler pulley and cover plate with the bolt.
Torque: 39 N.m (398 kgf.cm, 29 ft.lbf)
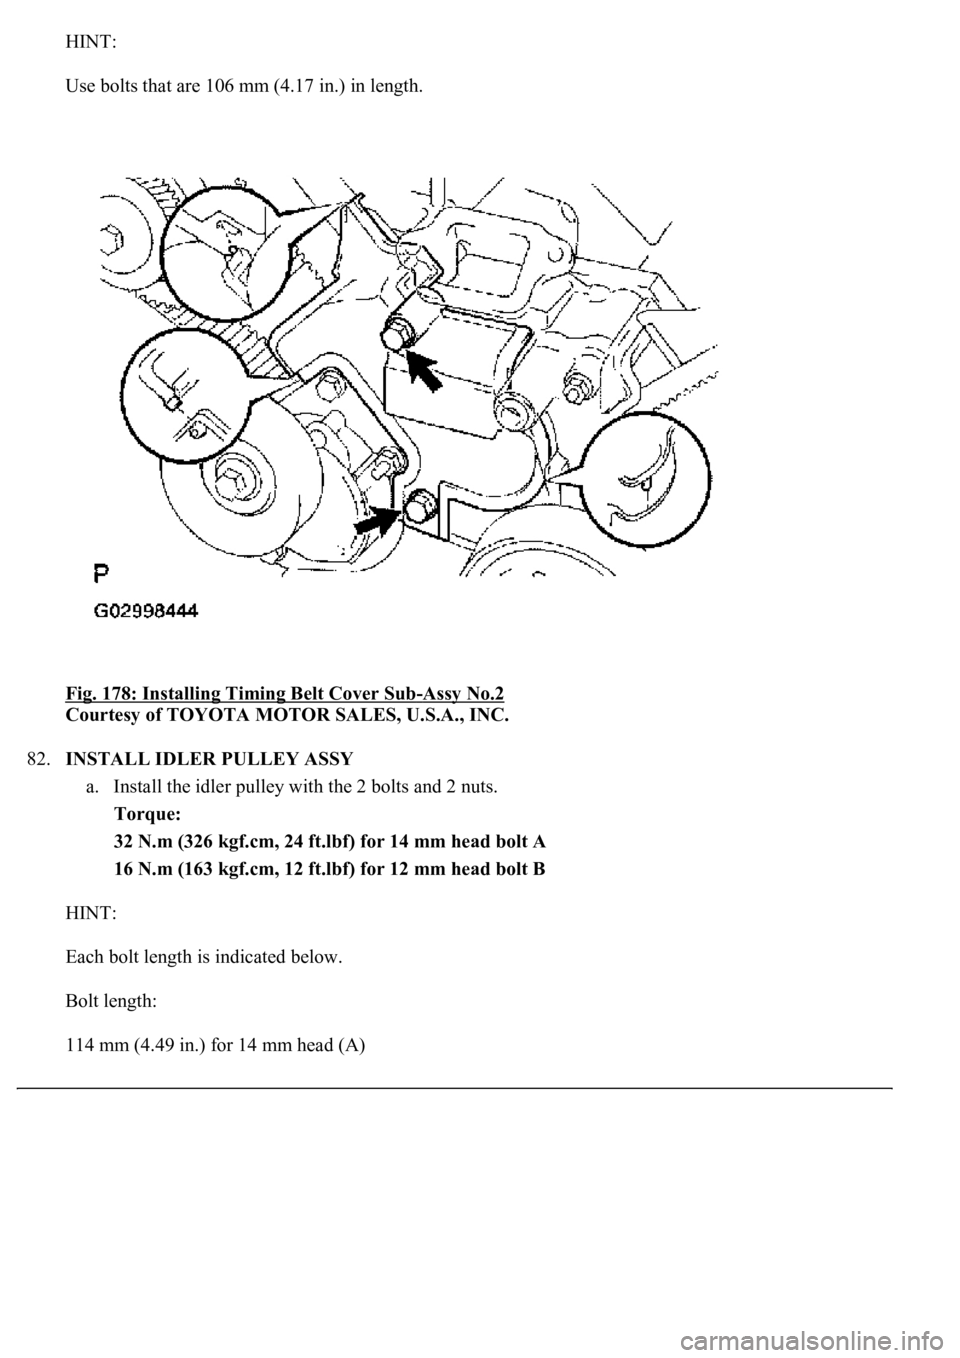
81.INSTALL TIMING BELT COVER SUB-ASSY NO.2
a. Fit the timing belt cover, matching the claws and pin with each part.
b. Install the timing belt cover with the 2 bolts.
Torque: 16 N.m (163 kgf.cm, 12 ft.lbf)
Page 3459 of 4500
HINT:
Use bolts that are 106 mm (4.17 in.) in length.
Fig. 178: Installing Timing Belt Cover Sub
-Assy No.2
Courtesy of TOYOTA MOTOR SALES, U.S.A., INC.
82.INSTALL IDLER PULLEY ASSY
a. Install the idler pulley with the 2 bolts and 2 nuts.
Torque:
32 N.m (326 kgf.cm, 24 ft.lbf) for 14 mm head bolt A
16 N.m (163 kgf.cm, 12 ft.lbf) for 12 mm head bolt B
HINT:
Each bolt length is indicated below.
Bolt length:
114 mm (4.49 in.) for 14 mm head (A)