LEXUS RX300H 2017 Owners Manual
RX300H 2017
LEXUS
LEXUS
https://www.carmanualsonline.info/img/36/58029/w960_58029-0.png
LEXUS RX300H 2017 Owners Manual
Trending: engine overheat, headlights, jacking, air suspension, brake pads, MPG, steering wheel
Page 561 of 640
5618-2. Steps to take in an emergency
8
When trouble arises
RC300h_EE(OM24740E)
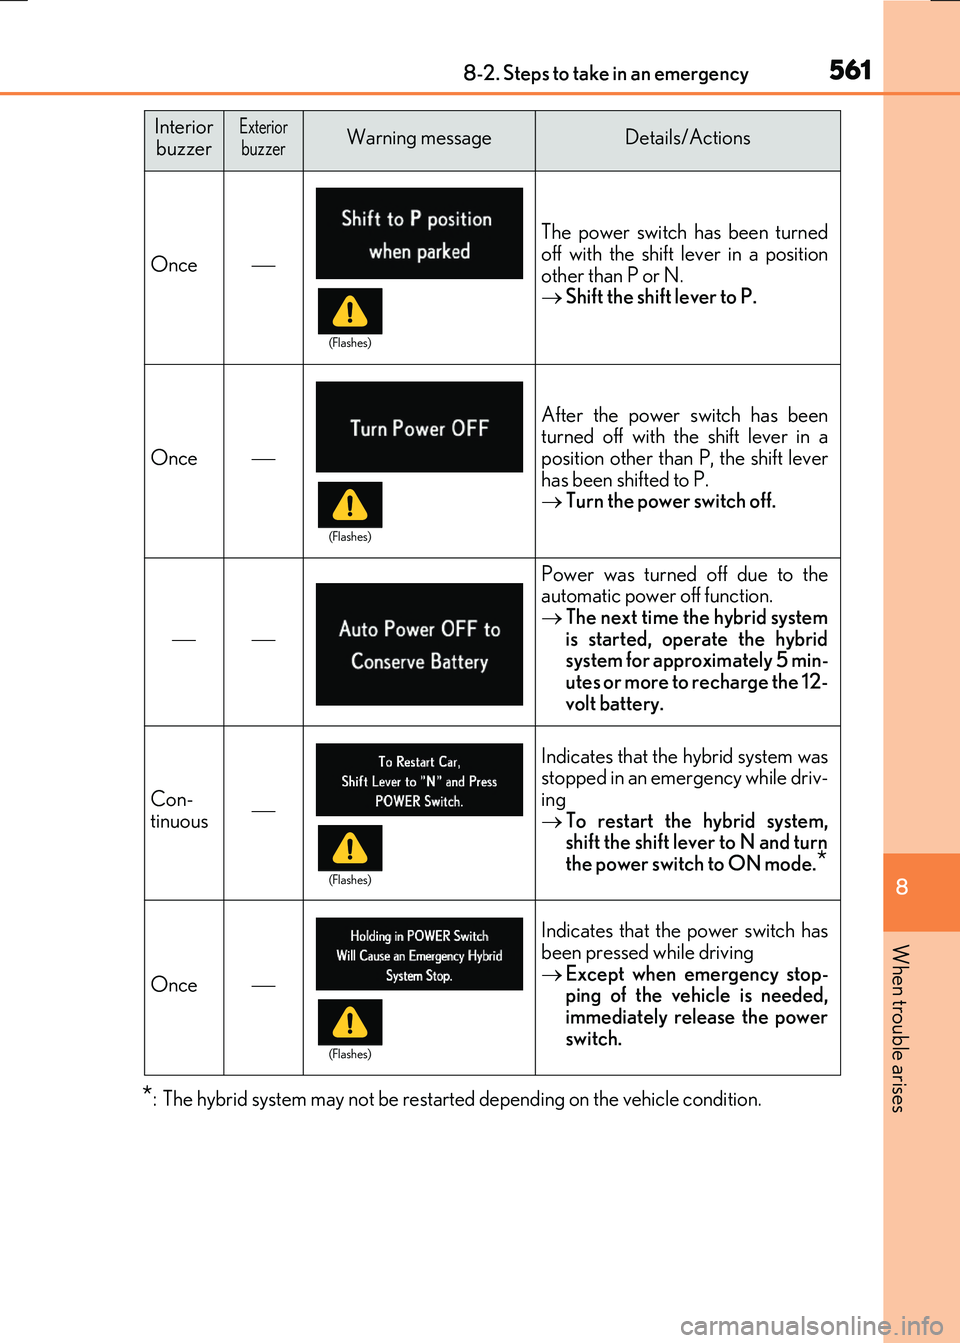
*: The hybrid system may not be restarted depending on the vehicle condition.
Once
The power switch has been turned
off with the shift lever in a position
other than P or N.
Shift the shift lever to P.
Once
After the power switch has been
turned off with the shift lever in a
position other than P, the shift lever
has been shifted to P.
Turn the power switch off.
Power was turned off due to the
automatic power off function.
The next time the hybrid system
is started, operate the hybrid
system for approximately 5 min-
utes or more to recharge the 12-
volt battery.
Con-
tinuous
Indicates that the hybrid system was
stopped in an emergency while driv-
ing
To restart the hybrid system,
shift the shift lever to N and turn
the power switch to ON mode.
*
Once
Indicates that the power switch has
been pressed while driving
Except when emergency stop-
ping of the vehicle is needed,
immediately release the power
switch.
Interior buzzerExteriorbuzzerWarning messageDetails/Actions
(Flashes)
(Flashes)
(Flashes)
(Flashes)
Page 562 of 640
5628-2. Steps to take in an emergency
RC300h_EE(OM24740E)
■Warning messages
P. 556
■Warning buzzer
P. 541
Page 563 of 640
5638-2. Steps to take in an emergency
8
When trouble arises
RC300h_EE(OM24740E)
If you have a flat tire
Your vehicle is not equipped with a spare tire, but instead is equipped with an
emergency tire puncture repair kit.
A puncture caused by a nail or screw passing through the tire tread can be
repaired temporarily with the emergency tire puncture repair kit.
WARNING
■If you have a flat tire
Do not continue driving with a flat tire.
Driving even a short distance with a flat tire can damage the tire and the wheel beyond repair. Driving with a flat tire may cause a circumferential groove on the side wall. Insuch a case, the tire may explode when using the emergency tire puncture repair kit,
resulting in death or serious injury.
Page 564 of 640
5648-2. Steps to take in an emergency
RC300h_EE(OM24740E)
●Stop the vehicle in a safe place on a hard, flat surface.
●Set the parking brake.
●Shift the shift lever to P.
●Stop the hybrid system.
●Turn on the emergency flashers. (P. 528)
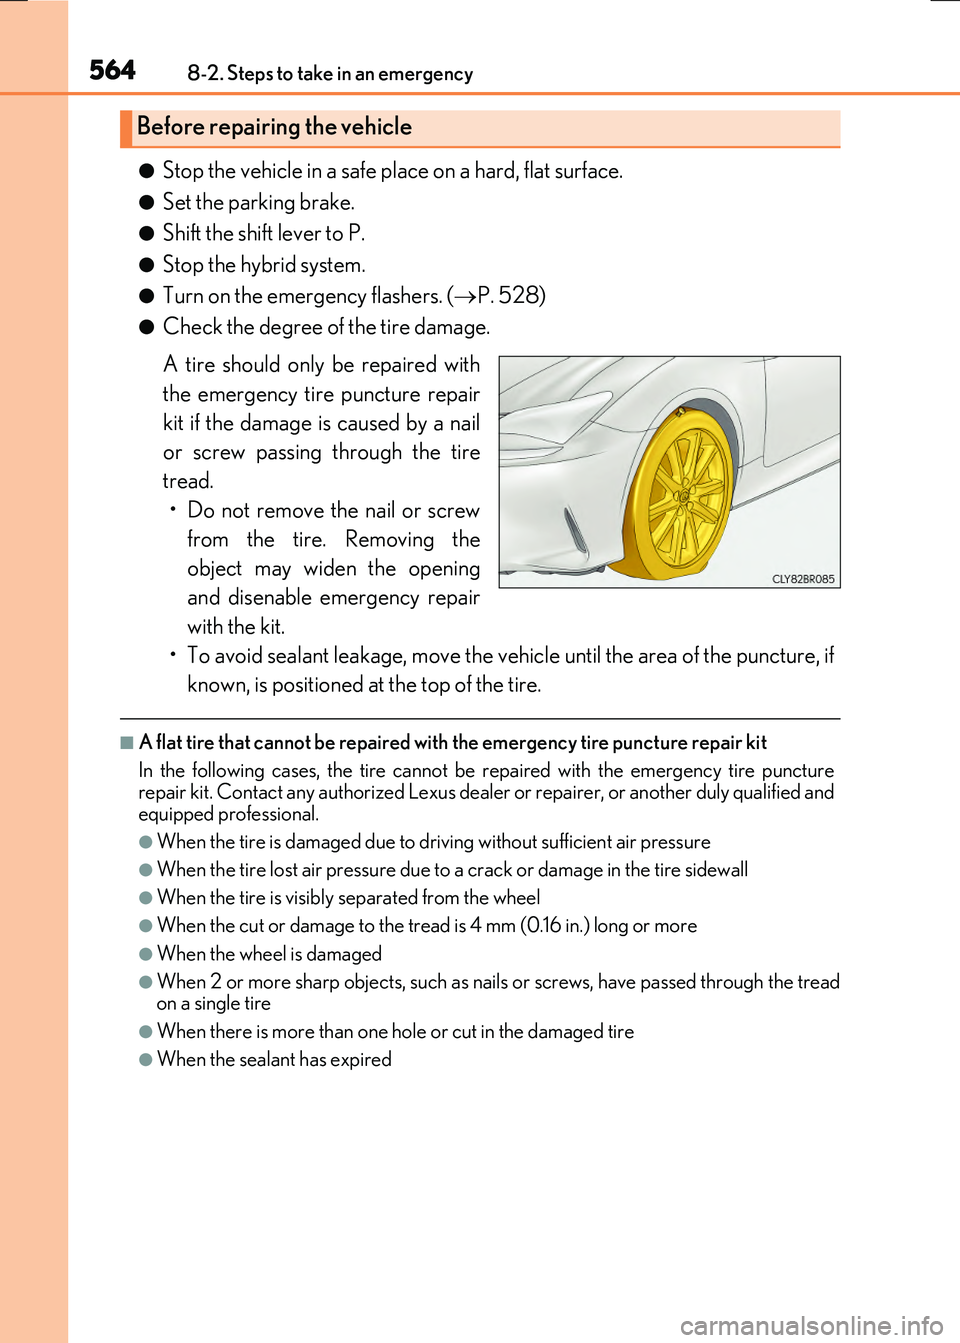
●Check the degree of the tire damage.
A tire should only be repaired with
the emergency tire puncture repair
kit if the damage is caused by a nail
or screw passing through the tire
tread.
• Do not remove the nail or screw
from the tire. Removing the
object may widen the opening
and disenable emergency repair
with the kit.
• To avoid sealant leakage, move the vehicle until the area of the puncture, if
known, is positioned at the top of the tire.
■A flat tire that cannot be repaired with the emergency tire puncture repair kit
In the following cases, the tire cannot be repaired with the emergency tire puncture
repair kit. Contact any authorized Lexus dealer or repairer, or another duly qualified and equipped professional.
●When the tire is damaged due to driving without sufficient air pressure
●When the tire lost air pressure due to a crack or damage in the tire sidewall
●When the tire is visibly separated from the wheel
●When the cut or damage to the tread is 4 mm (0.16 in.) long or more
●When the wheel is damaged
●When 2 or more sharp objects, such as nails or screws, have passed through the tread on a single tire
●When there is more than one hole or cut in the damaged tire
●When the sealant has expired
Before repairing the vehicle
Page 565 of 640
5658-2. Steps to take in an emergency
8
When trouble arises
RC300h_EE(OM24740E)
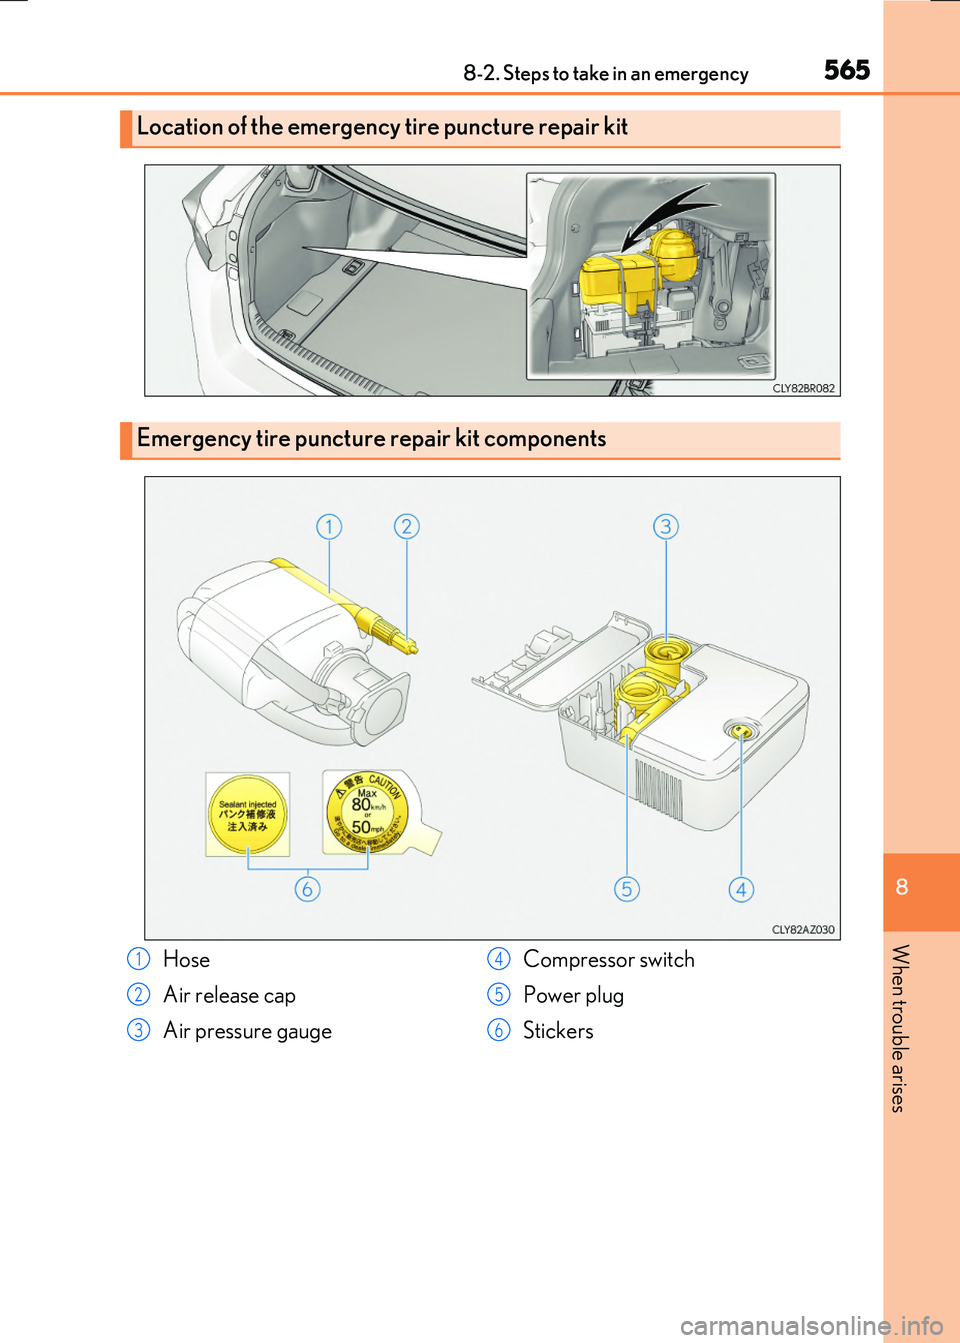
Location of the emergency tire puncture repair kit
Emergency tire puncture repair kit components
Hose
Air release cap
Air pressure gauge
Compressor switch
Power plug
Stickers
1
2
3
4
5
6
Page 566 of 640
5668-2. Steps to take in an emergency
RC300h_EE(OM24740E)
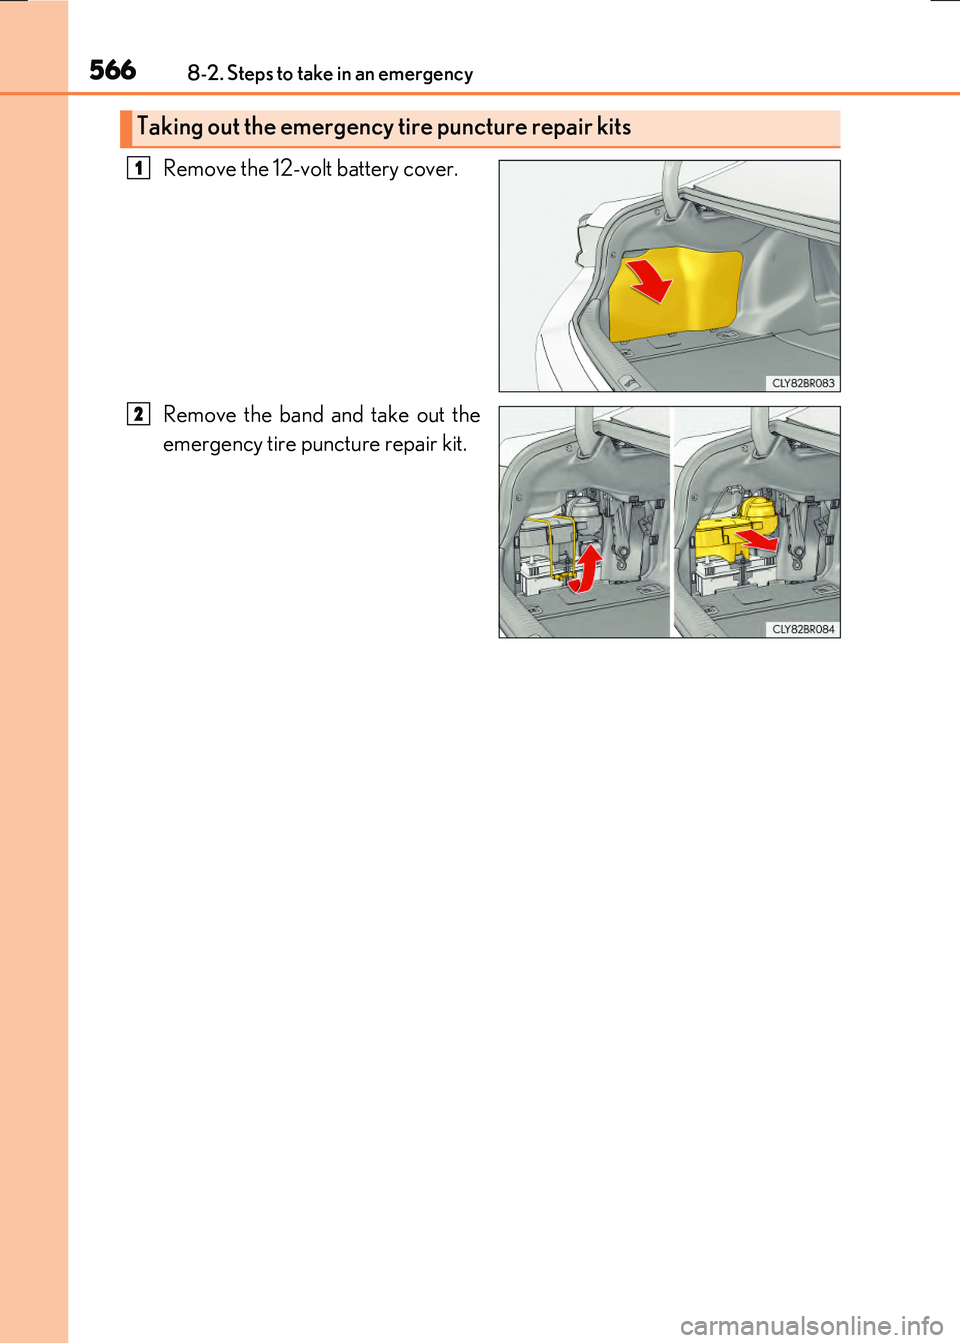
Remove the 12-volt battery cover.
Remove the band and take out the
emergency tire puncture repair kit.
Taking out the emergency tire puncture repair kits
1
2
Page 567 of 640
5678-2. Steps to take in an emergency
8
When trouble arises
RC300h_EE(OM24740E)
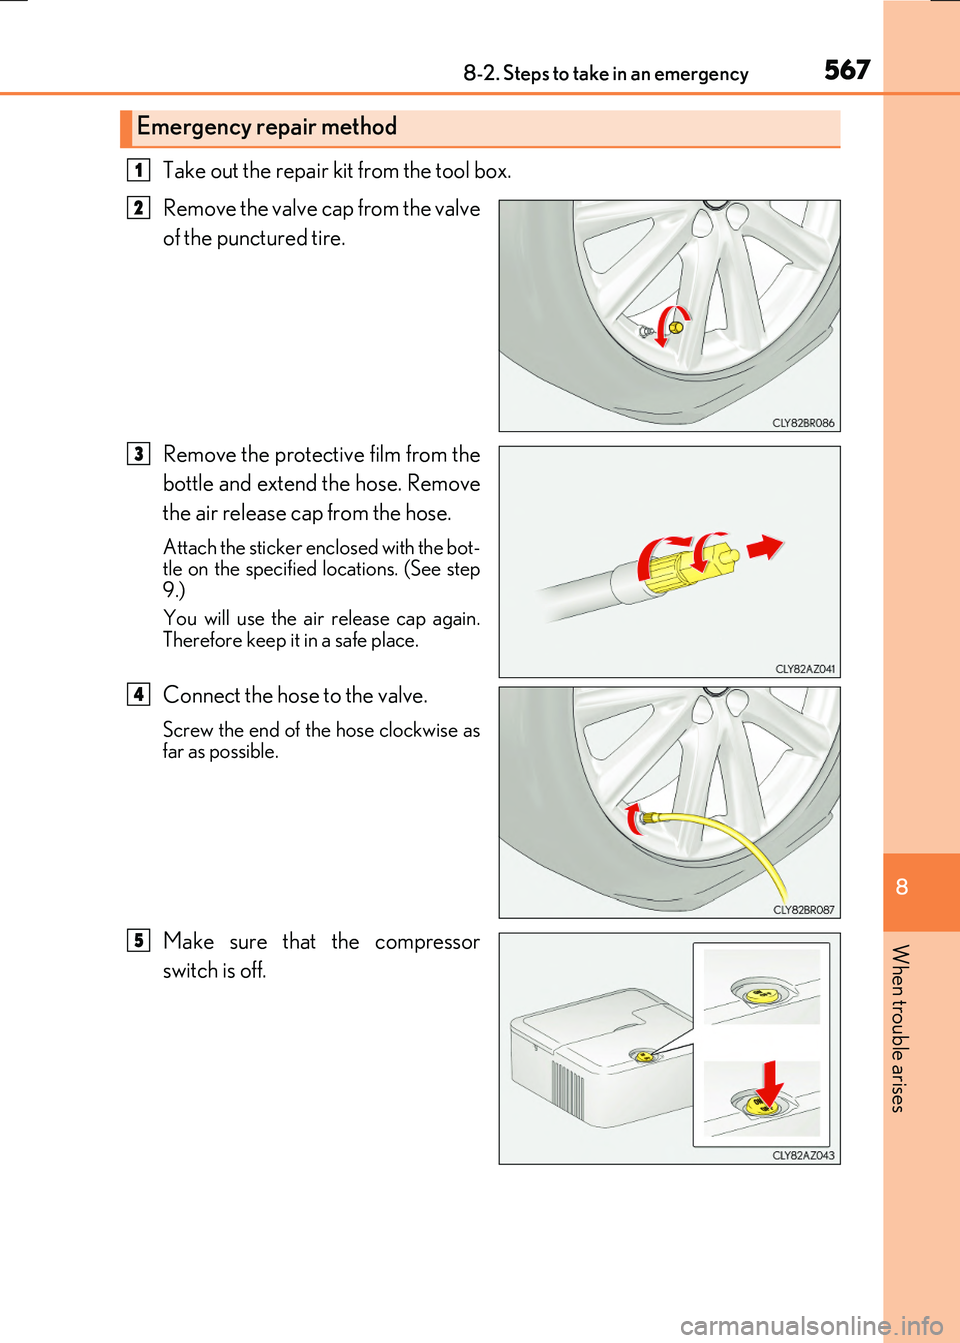
Take out the repair kit from the tool box.
Remove the valve cap from the valve
of the punctured tire.
Remove the protective film from the
bottle and extend the hose. Remove
the air release cap from the hose.
Attach the sticker enclosed with the bot- tle on the specified locations. (See step
9.)
You will use the air release cap again. Therefore keep it in a safe place.
Connect the hose to the valve.
Screw the end of the hose clockwise asfar as possible.
Make sure that the compressor
switch is off.
Emergency repair method
1
2
3
4
5
Page 568 of 640
5688-2. Steps to take in an emergency
RC300h_EE(OM24740E)
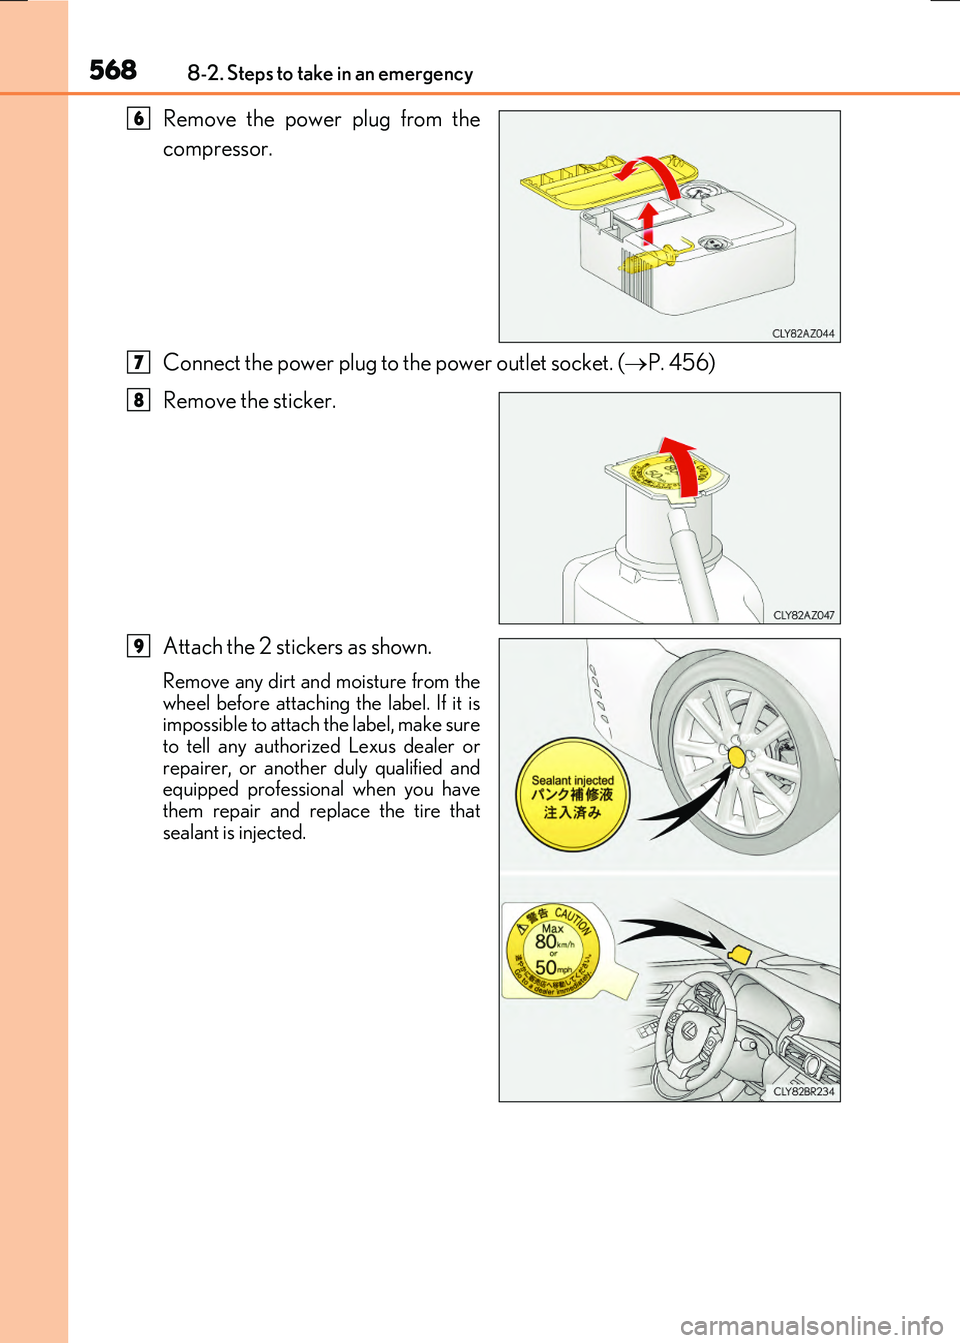
Remove the power plug from the
compressor.
Connect the power plug to the power outlet socket. ( P. 456)
Remove the sticker.
Attach the 2 stickers as shown.
Remove any dirt and moisture from the
wheel before attaching the label. If it is impossible to attach the label, make sureto tell any authorized Lexus dealer or
repairer, or another duly qualified and equipped professional when you havethem repair and replace the tire that
sealant is injected.
6
7
8
9
Page 569 of 640
5698-2. Steps to take in an emergency
8
When trouble arises
RC300h_EE(OM24740E)
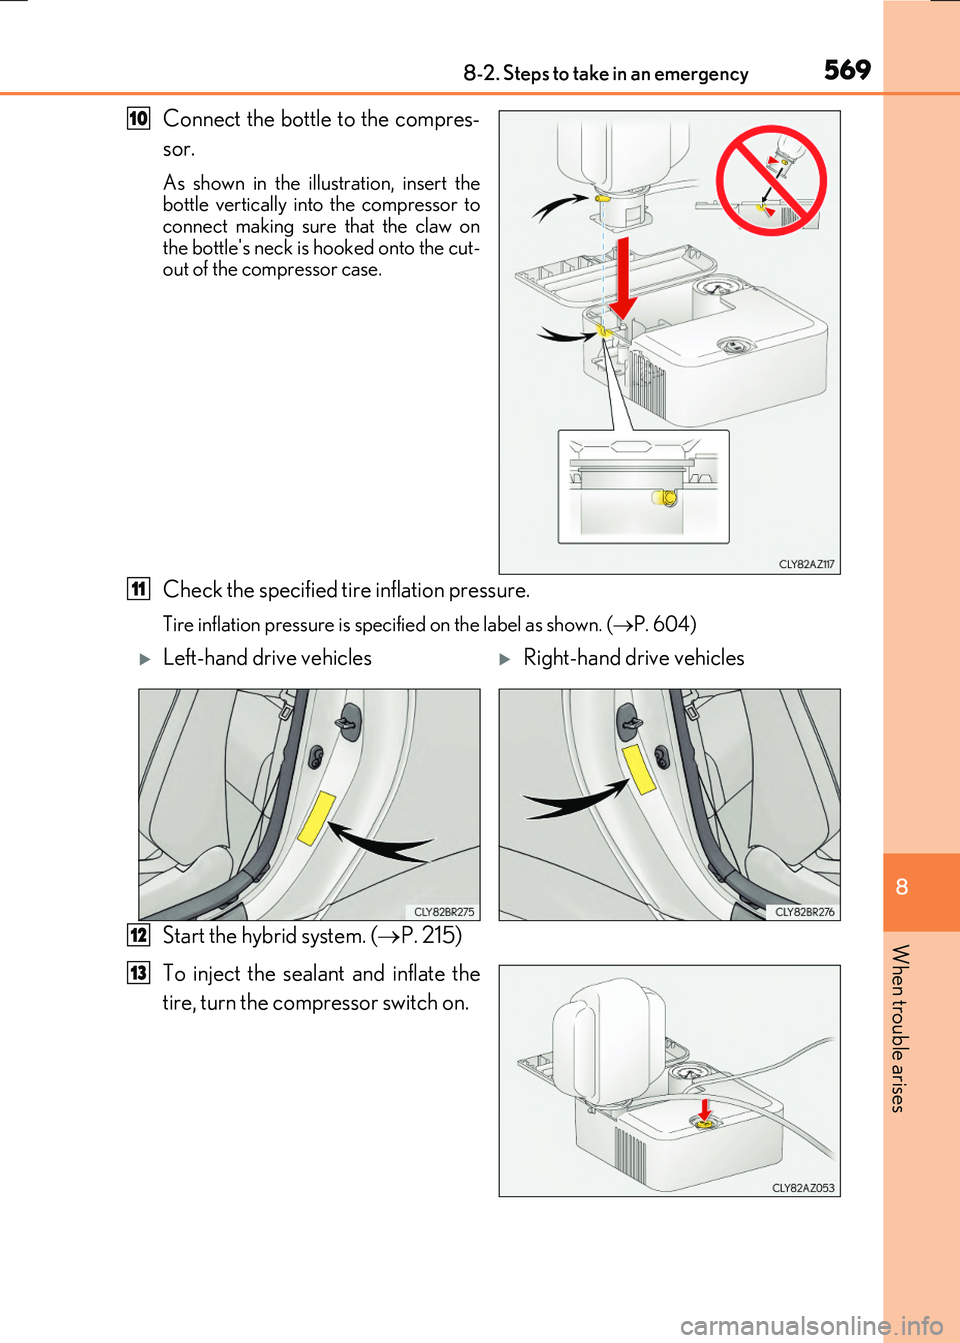
Connect the bottle to the compres-
sor.
As shown in the illustration, insert the bottle vertically into the compressor toconnect making sure that the claw on
the bottle's neck is hooked onto the cut- out of the compressor case.
Check the specified tire inflation pressure.
Tire inflation pressure is spec ified on the label as shown. (P. 604)
Start the hybrid system. (P. 215)
To inject the sealant and inflate the
tire, turn the compressor switch on.
10
11
Left-hand drive vehiclesRight-hand drive vehicles
12
13
Page 570 of 640
5708-2. Steps to take in an emergency
RC300h_EE(OM24740E)
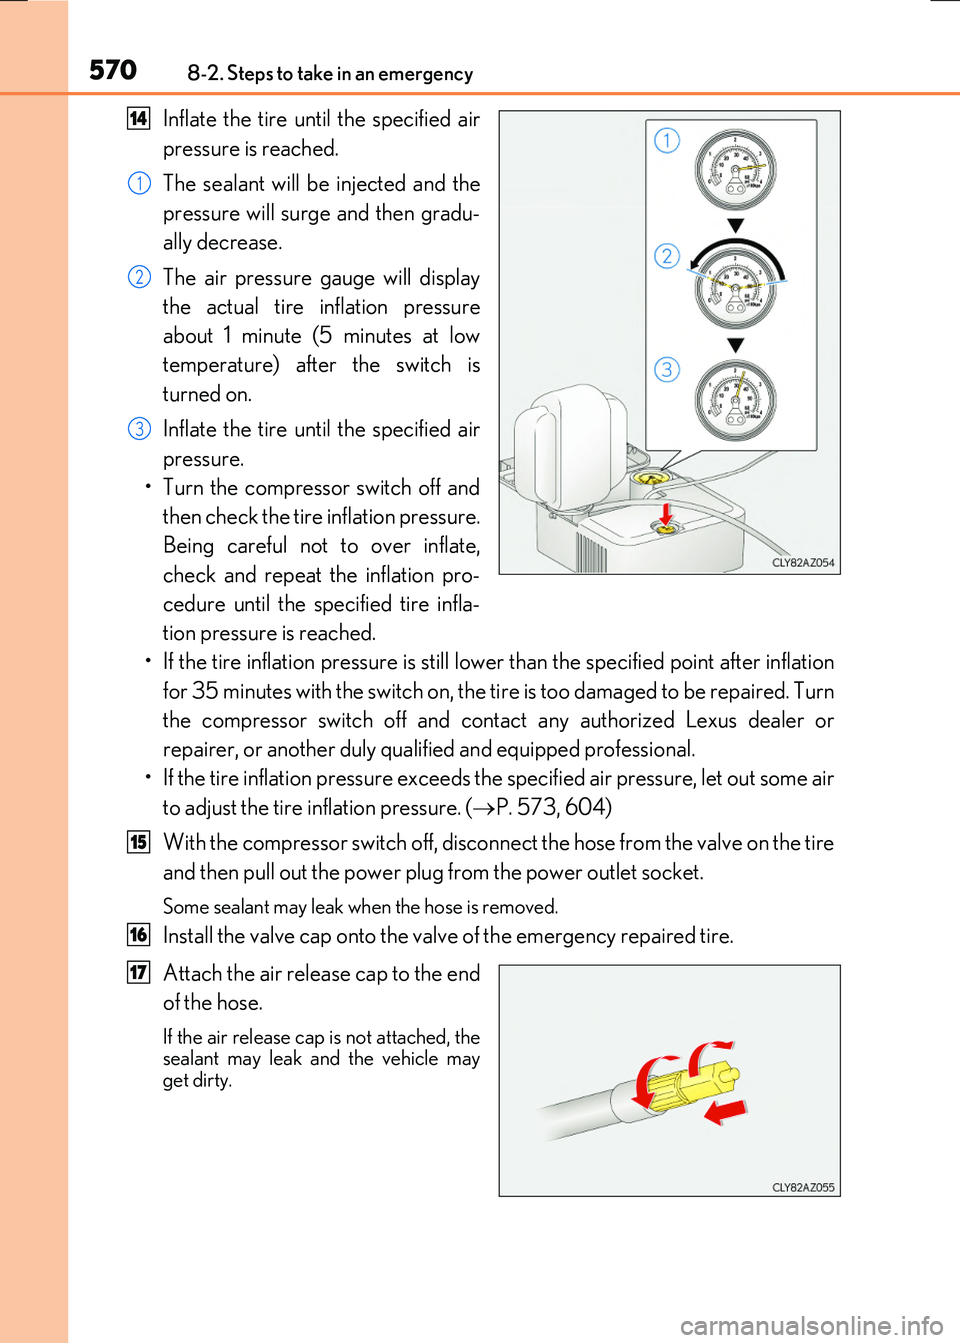
Inflate the tire until the specified air
pressure is reached.
The sealant will be injected and the
pressure will surge and then gradu-
ally decrease.
The air pressure gauge will display
the actual tire inflation pressure
about 1 minute (5 minutes at low
temperature) after the switch is
turned on.
Inflate the tire until the specified air
pressure.
• Turn the compressor switch off and
then check the tire inflation pressure.
Being careful not to over inflate,
check and repeat the inflation pro-
cedure until the specified tire infla-
tion pressure is reached.
• If the tire inflation pressure is still lower than the specified point after inflation
for 35 minutes with the switch on, the ti re is too damaged to be repaired. Turn
the compressor switch off and contact any authorized Lexus dealer or
repairer, or another duly qualified and equipped professional.
• If the tire inflation pressure exceeds th e specified air pressure, let out some air
to adjust the tire inflation pressure. ( P. 573, 604)
With the compressor switch off, disconne ct the hose from the valve on the tire
and then pull out the power plug from the power outlet socket.
Some sealant may leak wh en the hose is removed.
Install the valve cap onto the valve of the emergency repaired tire.
Attach the air release cap to the end
of the hose.
If the air release cap is not attached, the sealant may leak and the vehicle may
get dirty.
14
1
2
3
15
16
17
Trending: differential, wheelbase, set clock, fuel cap release, check engine light, language, brake fluid

