LEXUS SC400 1991 Service Repair Manual
Manufacturer: LEXUS, Model Year: 1991,
Model line: SC400,
Model: LEXUS SC400 1991
Pages: 4087, PDF Size: 75.75 MB
LEXUS SC400 1991 Service Repair Manual
SC400 1991
LEXUS
LEXUS
https://www.carmanualsonline.info/img/36/57051/w960_57051-0.png
LEXUS SC400 1991 Service Repair Manual
Trending: suspension, audio, fuse box diagram, evap, heating, odometer, oil dipstick
Page 1901 of 4087
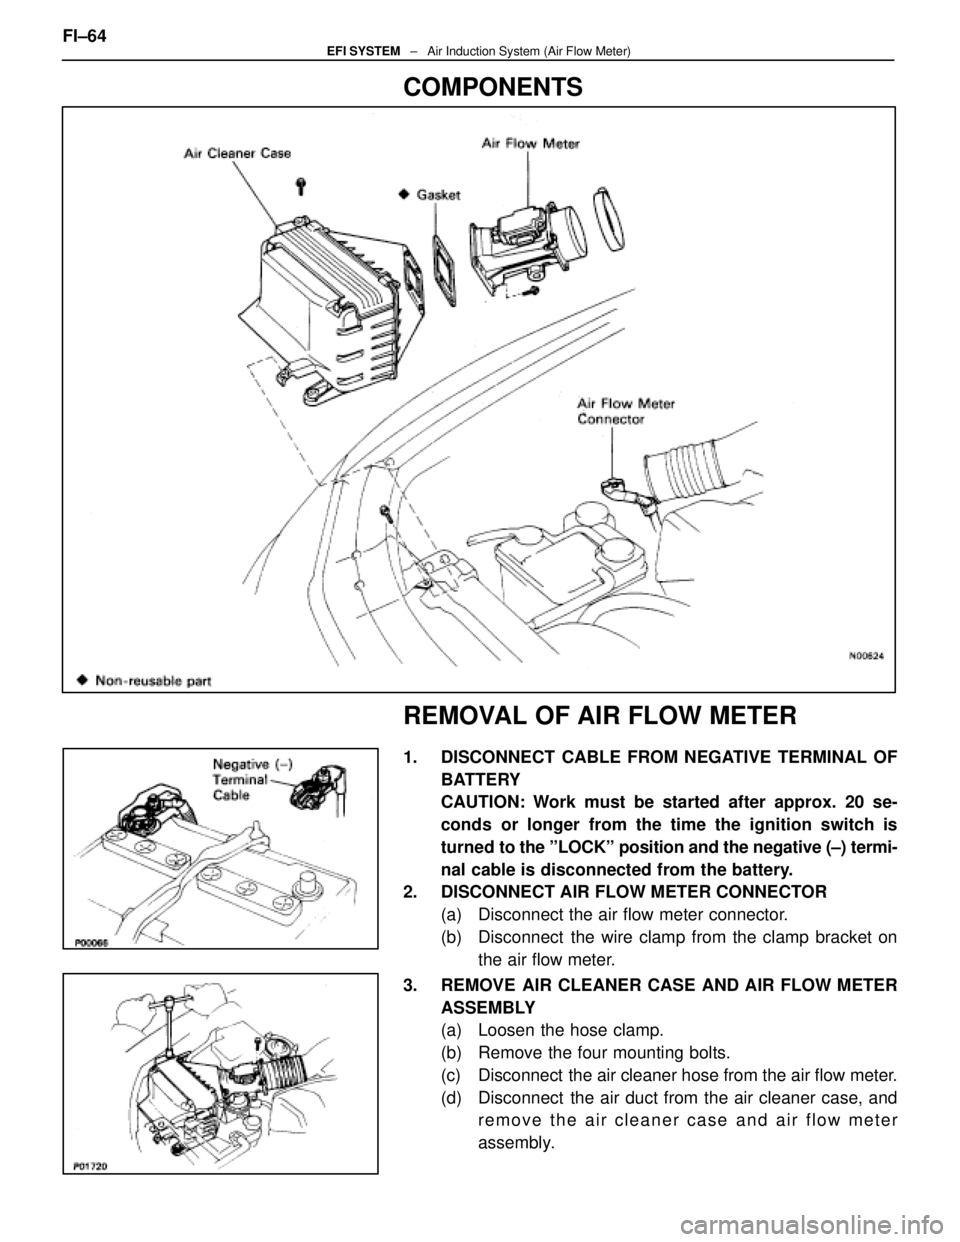
COMPONENTS
REMOVAL OF AIR FLOW METER
1. DISCONNECT CABLE FROM NEGATIVE TERMINAL OFBATTERY
CAUTION: Work must be started after approx. 20 se-
conds or longer from the time the ignition switch is
turned to the ºLOCKº position and the negative (±) termi-
nal cable is disconnected from the battery.
2. DISCONNECT AIR FLOW METER CONNECTOR
(a) Disconnect the air flow meter connector.
(b) Disconnect the wire clamp from the clamp bracket onthe air flow meter.
3. REMOVE AIR CLEANER CASE AND AIR FLOW METER ASSEMBLY
(a) Loosen the hose clamp.
(b) Remove the four mounting bolts.
(c) Disconnect the air cleaner hose from the air flow meter.
(d) Disconnect the air duct from the air cleaner case, andremove the air cleaner case and air flow meter
assembly.
FI±64
EFI SYSTEM
± Air Induction System (Air Flow Meter)
WhereEverybodyKnowsYourName
Page 1902 of 4087
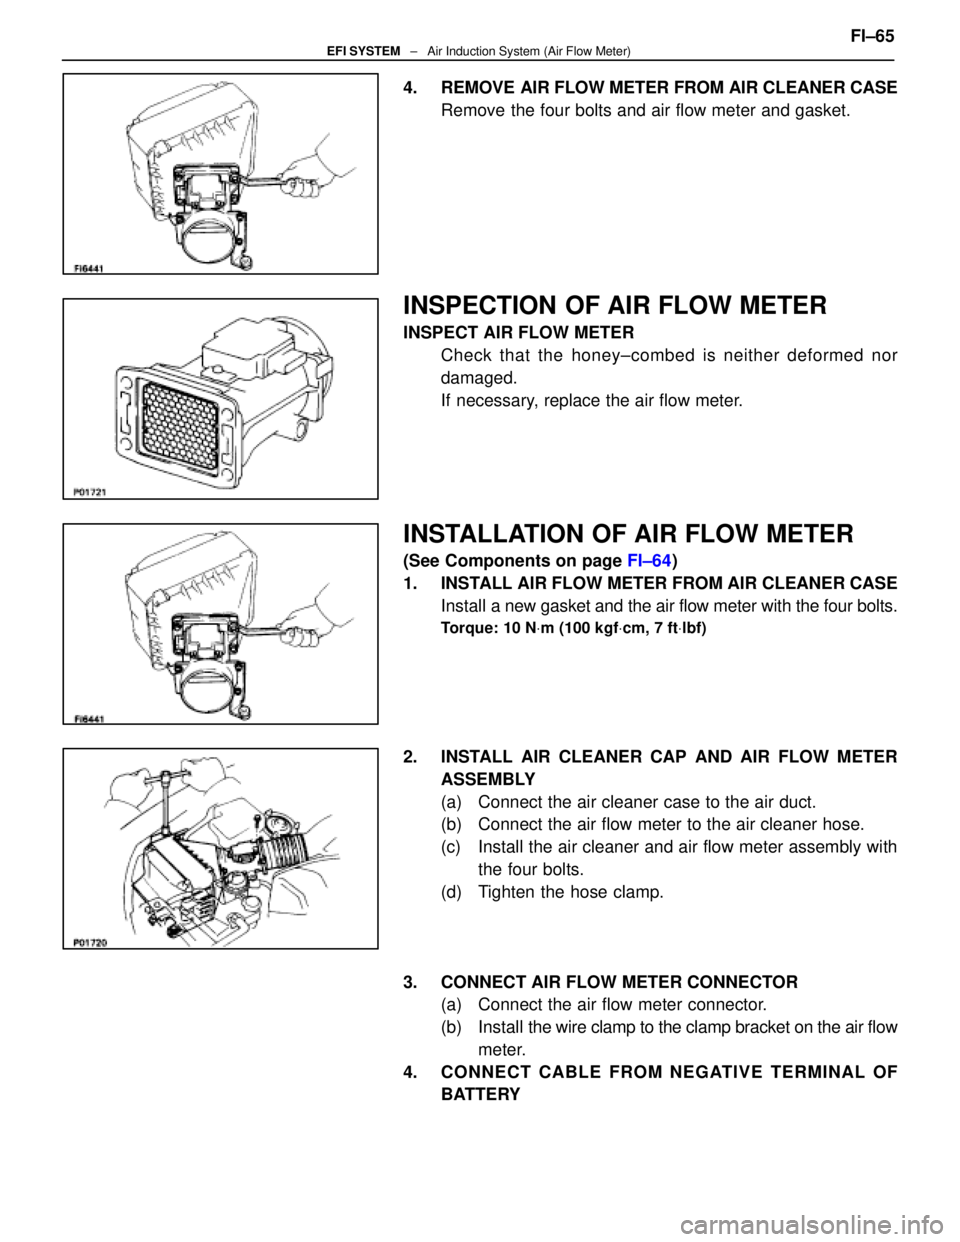
4. REMOVE AIR FLOW METER FROM AIR CLEANER CASERemove the four bolts and air flow meter and gasket.
INSPECTION OF AIR FLOW METER
INSPECT AIR FLOW METERCheck that the honey±combed is neither deformed nor
damaged.
If necessary, replace the air flow meter.
INSTALLATION OF AIR FLOW METER
(See Components on page FI±64)
1. INSTALL AIR FLOW METER FROM AIR CLEANER CASE Install a new gasket and the air flow meter with the four bolts.
Torque: 10 N Vm (100 kgf Vcm, 7 ft Vlbf)
2. INSTALL AIR CLEANER CAP AND AIR FLOW METER
ASSEMBLY
(a) Connect the air cleaner case to the air duct.
(b) Connect the air flow meter to the air cleaner hose.
(c) Install the air cleaner and air flow meter assembly withthe four bolts.
(d) Tighten the hose clamp.
3. CONNECT AIR FLOW METER CONNECTOR (a) Connect the air flow meter connector.
(b) Install the wire clamp to the clamp bracket on the air flow
meter.
4. CONNECT CABLE FROM NEGATIVE TERMINAL OF BATTERY FI±65
EFI SYSTEM
± Air Induction System (Air Flow Meter)
WhereEverybodyKnowsYourName
Page 1903 of 4087
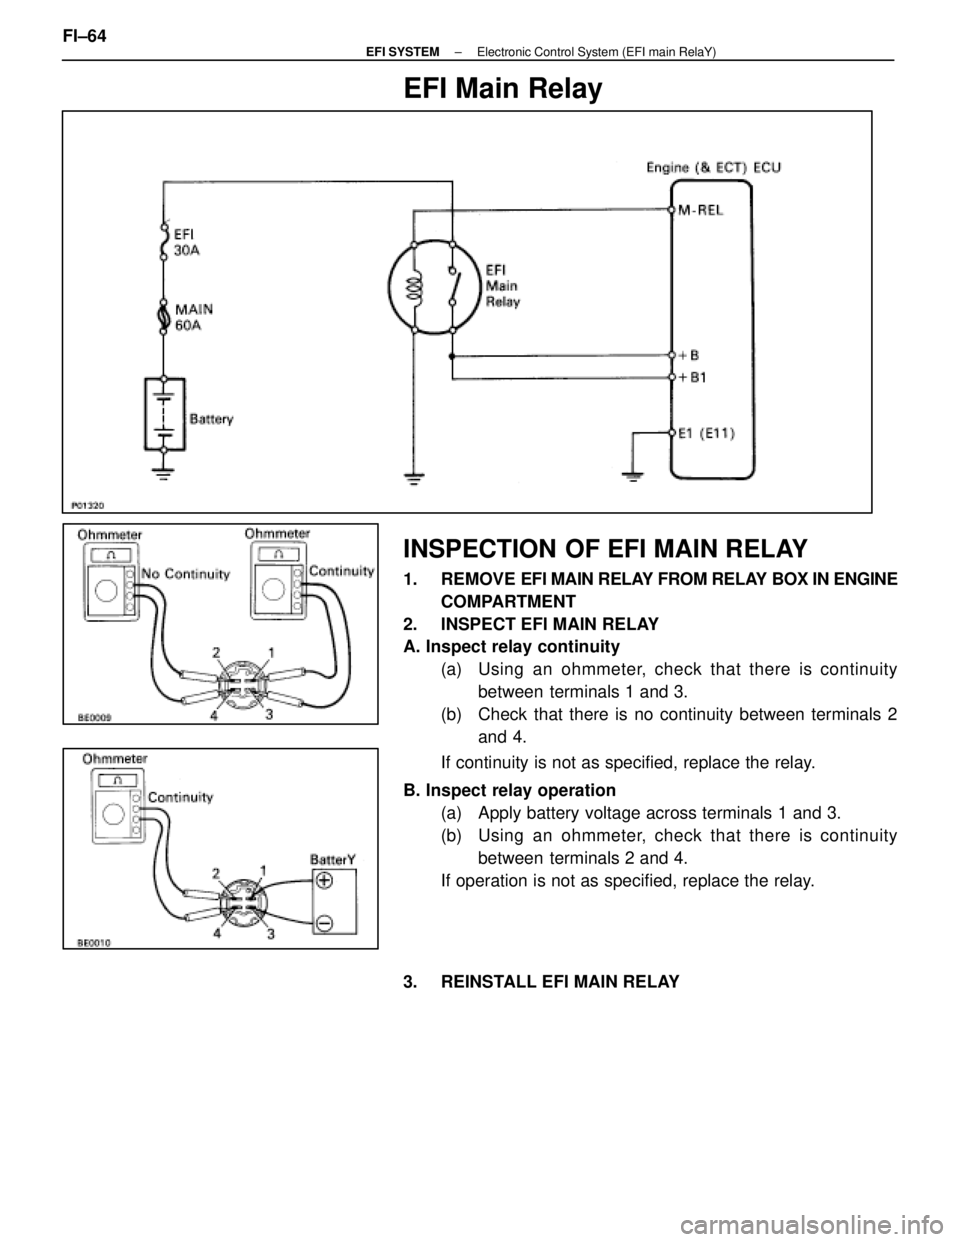
EFI Main Relay
INSPECTION OF EFI MAIN RELAY
1. REMOVE EFI MAIN RELAY FROM RELAY BOX IN ENGINE
COMPARTMENT
2. INSPECT EFI MAIN RELAY
A. Inspect relay continuity (a) Using an ohmmeter, check that there is continuitybetween terminals 1 and 3.
(b) Check that there is no continuity between terminals 2 and 4.
If continuity is not as specified, replace the relay.
B. Inspect relay operation (a) Apply battery voltage across terminals 1 and 3.
(b) Using an ohmmeter, check that there is continuitybetween terminals 2 and 4.
If operation is not as specified, replace the relay.
3. REINSTALL EFI MAIN RELAY
FI±64
±
EFI SYSTEM Electronic Control System (EFI main RelaY)
WhereEverybodyKnowsYourName
Page 1904 of 4087
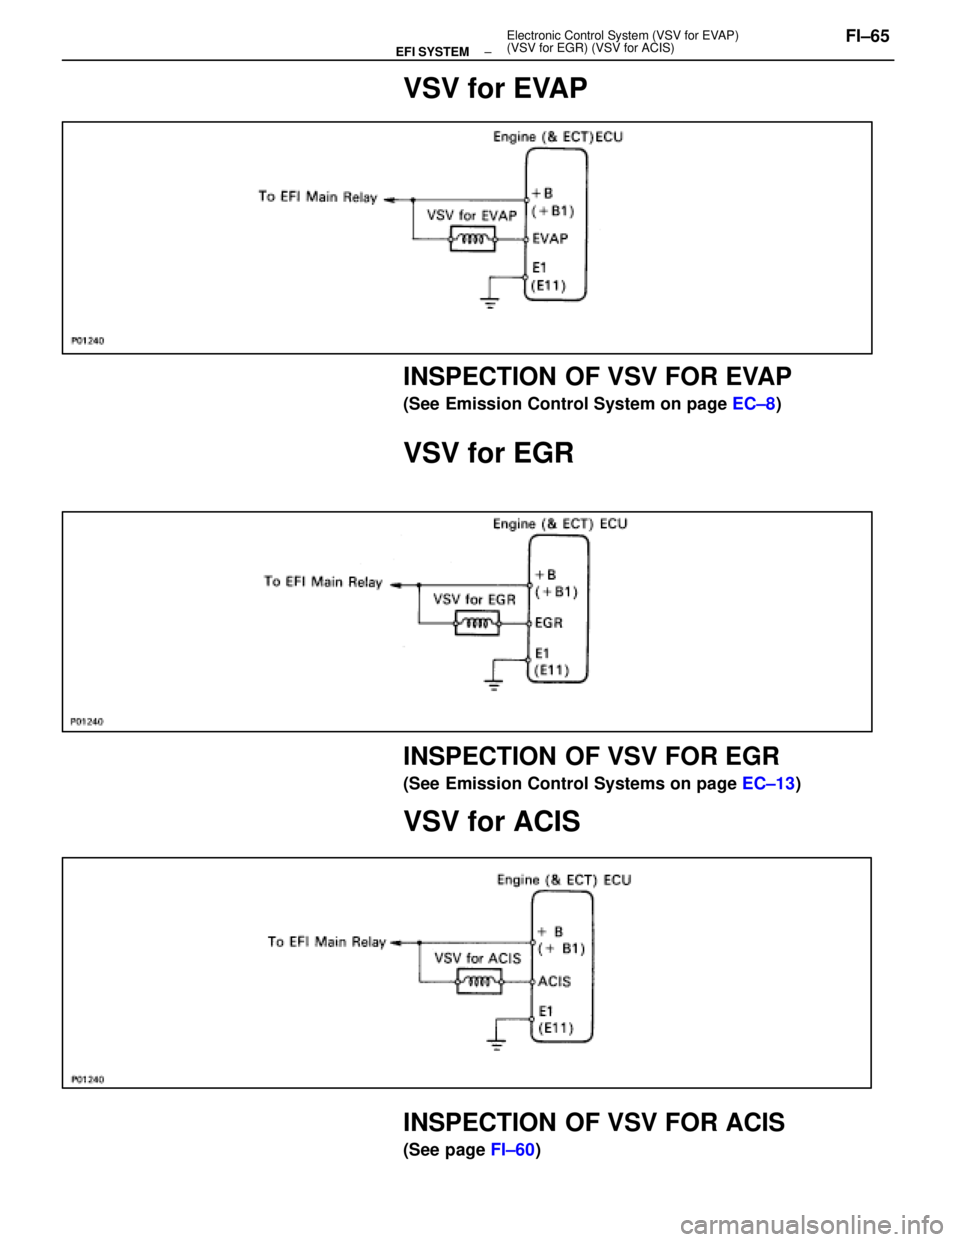
VSV for EVAP
INSPECTION OF VSV FOR EVAP
(See Emission Control System on page EC±8)
VSV for EGR
INSPECTION OF VSV FOR EGR
(See Emission Control Systems on page EC±13)
VSV for ACIS
INSPECTION OF VSV FOR ACIS
(See page FI±60)
±
EFI SYSTEM Electronic Control System (VSV for EVAP)
(VSV for EGR) (VSV for ACIS)FI±65
WhereEverybodyKnowsYourName
Page 1905 of 4087
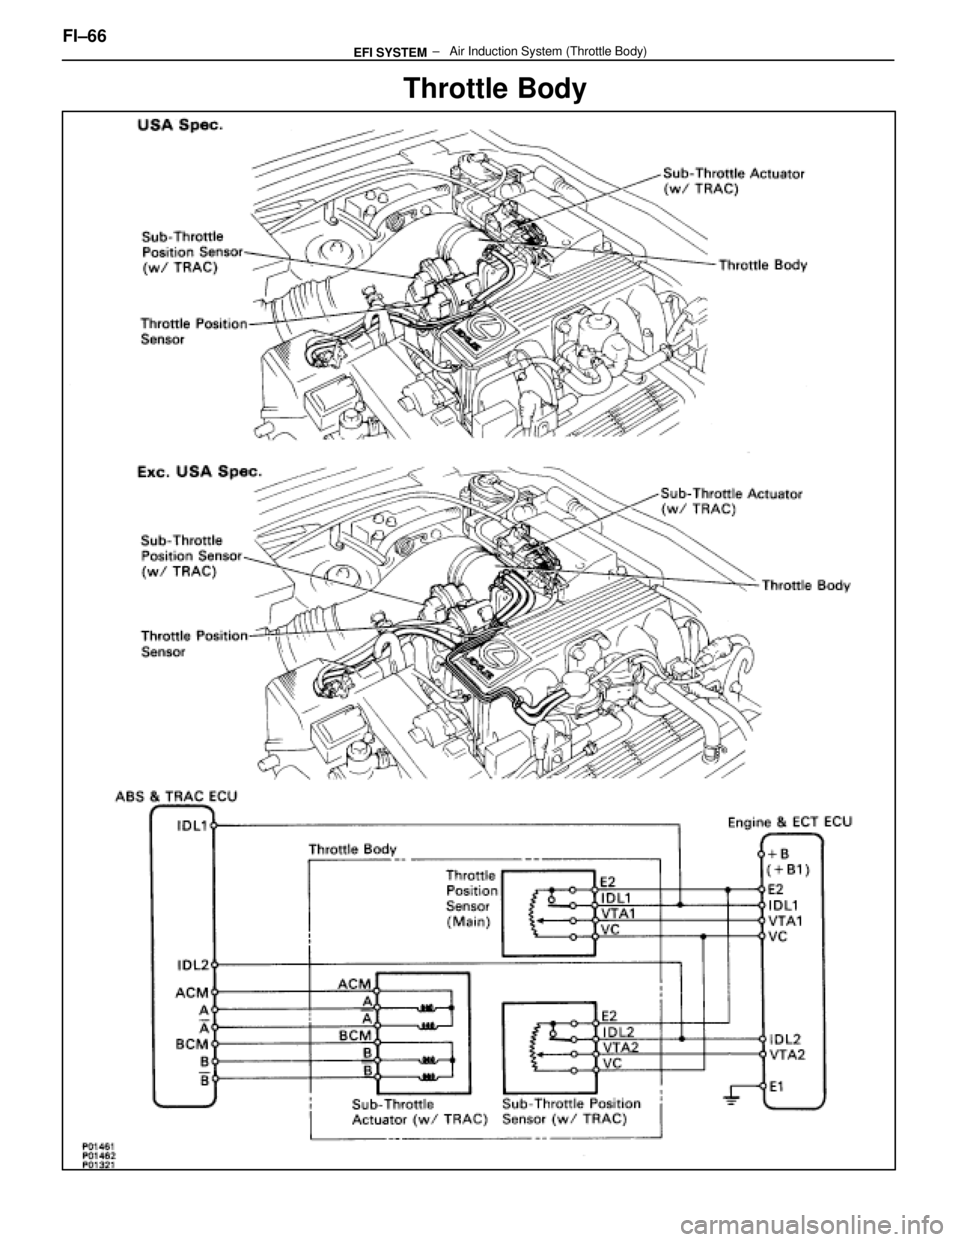
Throttle Body
FI±66 ± Air Induction System (Thrott\
le Body)EFI SYSTEM
WhereEverybodyKnowsYourName
Page 1906 of 4087
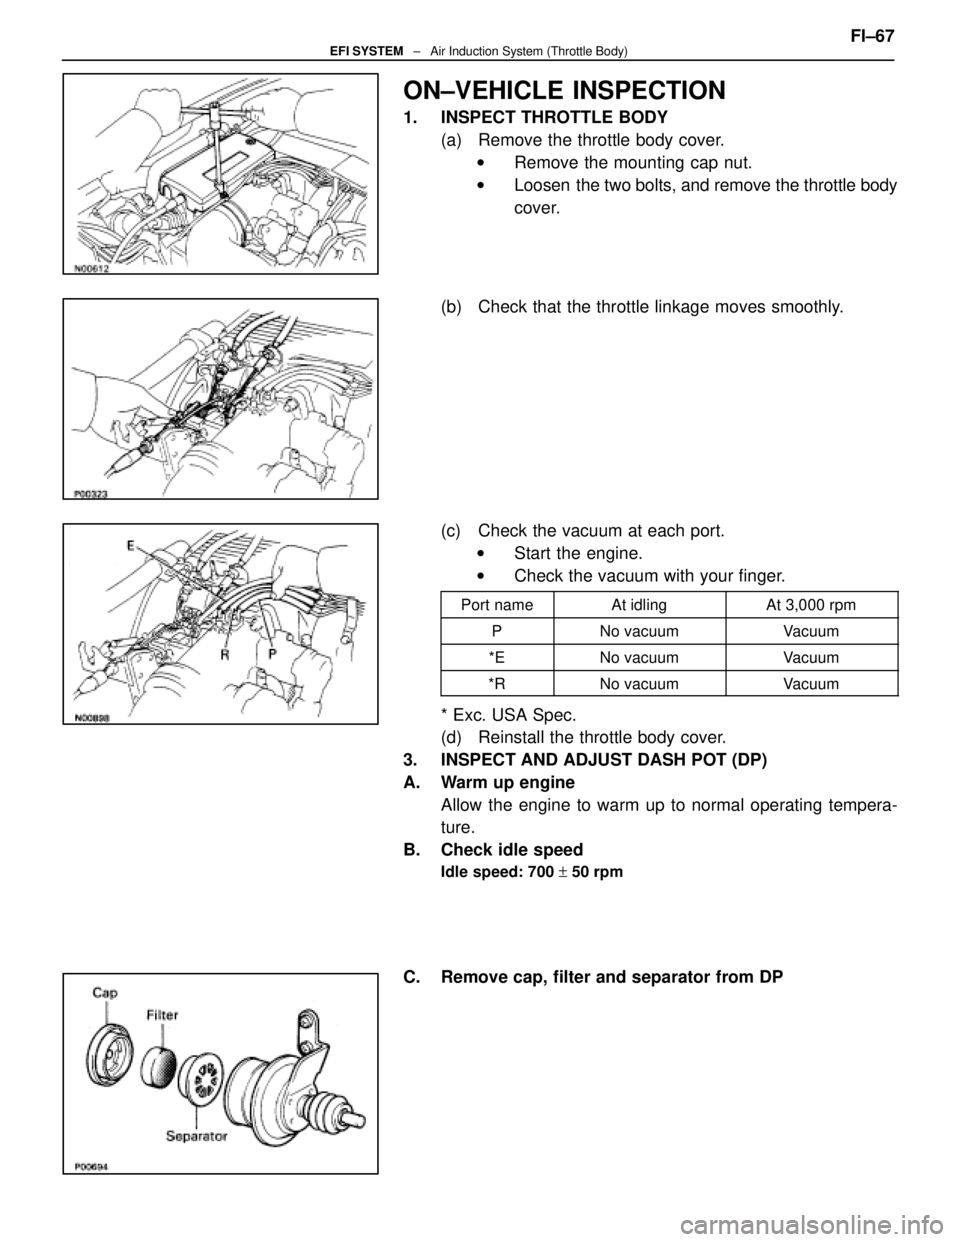
ON±VEHICLE INSPECTION
1. INSPECT THROTTLE BODY(a) Remove the throttle body cover.w Remove the mounting cap nut.
w Loosen the two bolts, and remove the throttle body
cover.
(b) Check that the throttle linkage moves smoothly.
(c) Check the vacuum at each port. w Start the engine.
w Check the vacuum with your finger.
Port nameAt idlingAt 3,000 rpm
PNo vacuumVacuum
*ENo vacuumVacuum
*RNo vacuumVacuum
* Exc. USA Spec.
(d) Reinstall the throttle body cover.
3. INSPECT AND ADJUST DASH POT (DP)
A. Warm up engine Allow the engine to warm up to normal operating tempera-
ture.
B. Check idle speed
Idle speed: 700 + 50 rpm
C. Remove cap, filter and separator from DP FI±67
EFI SYSTEM
± Air Induction System (Throttle Body)
WhereEverybodyKnowsYourName
Page 1907 of 4087
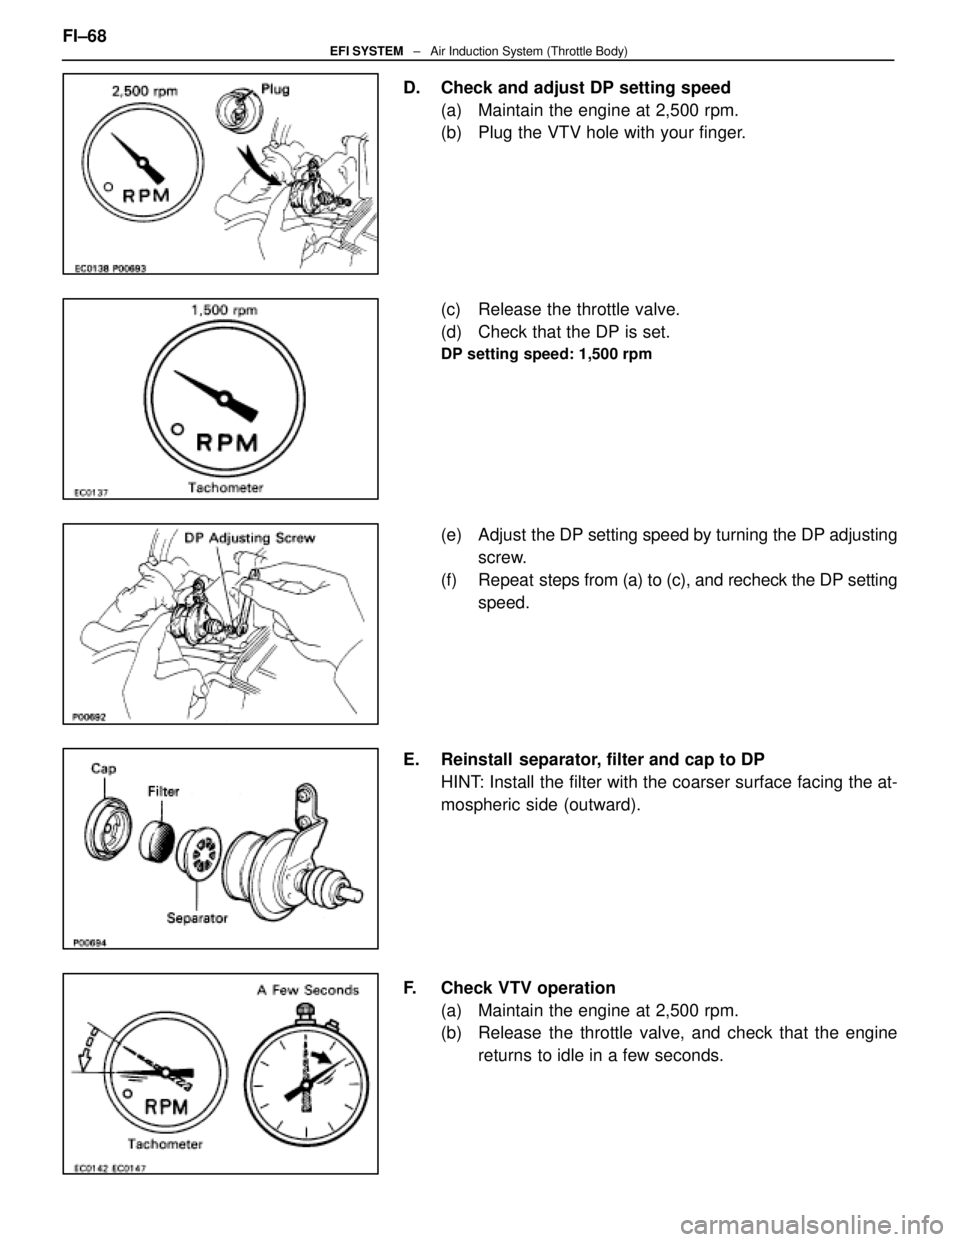
D. Check and adjust DP setting speed(a) Maintain the engine at 2,500 rpm.
(b) Plug the VTV hole with your finger.
(c) Release the throttle valve.
(d) Check that the DP is set.
DP setting speed: 1,500 rpm
(e) Adjust the DP setting speed by turning the DP adjusting
screw.
(f) Repeat steps from (a) to (c), and recheck the DP setting
speed.
E. Reinstall separator, filter and cap to DP HINT: Install the filter with the coarser surface facing the at-
mospheric side (outward).
F. Check VTV operation (a) Maintain the engine at 2,500 rpm.
(b) Release the throttle valve, and check that the enginereturns to idle in a few seconds.
FI±68
EFI SYSTEM
± Air Induction System (Throttle Body)
WhereEverybodyKnowsYourName
Page 1908 of 4087
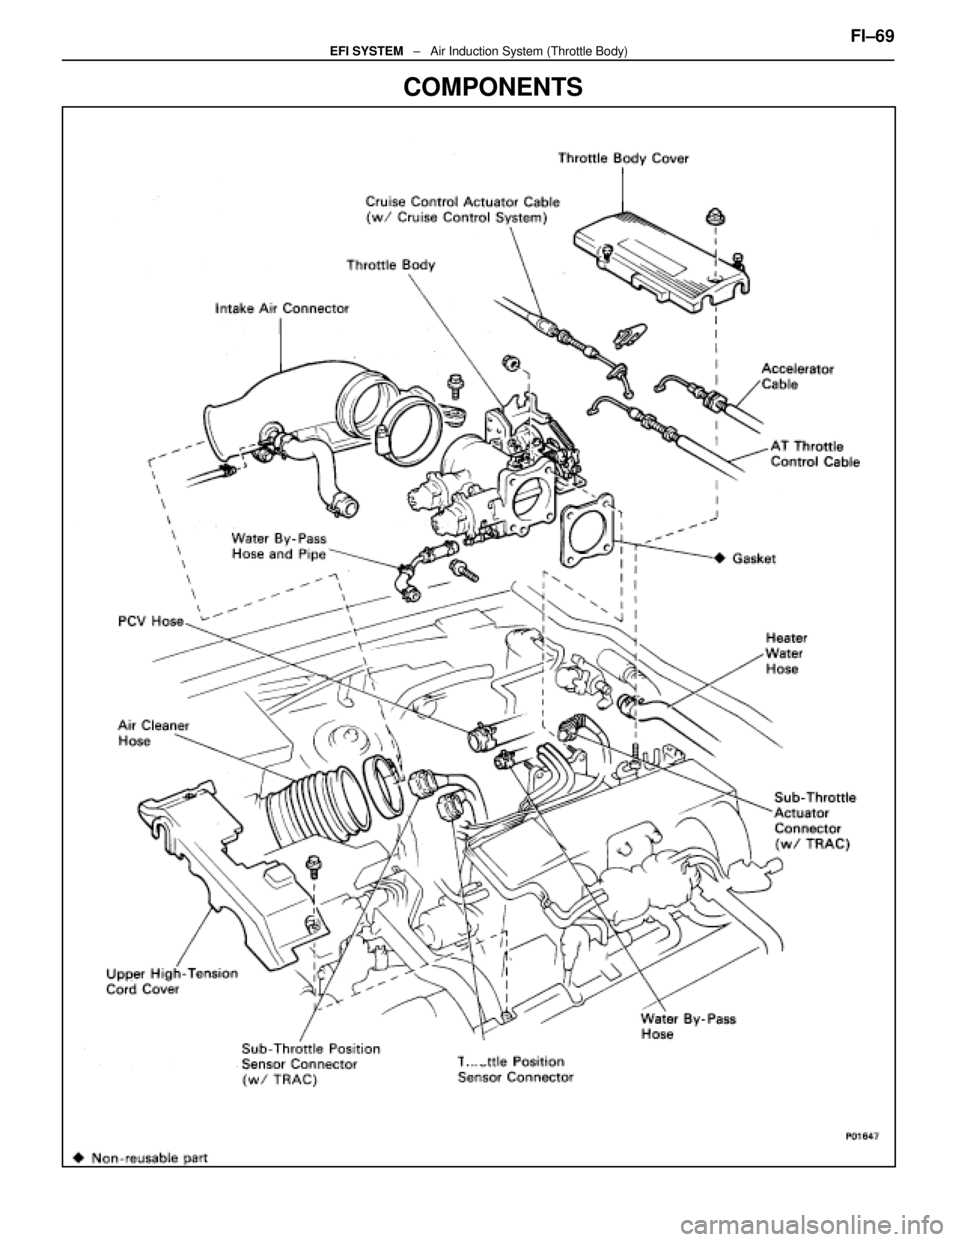
COMPONENTS
FI±69EFI SYSTEM ± Air Induction System (Throttle Body)
WhereEverybodyKnowsYourName
Page 1909 of 4087
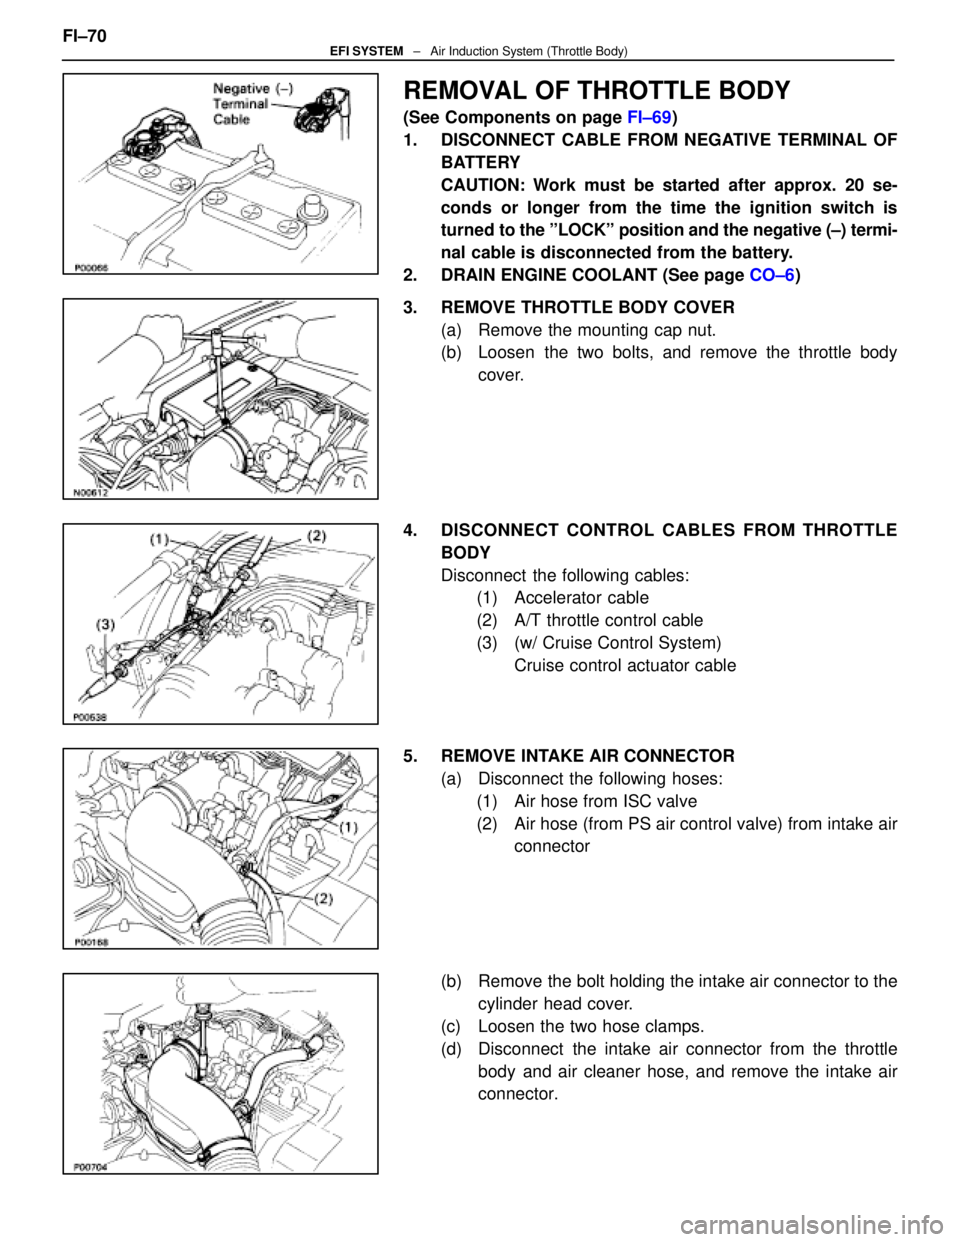
REMOVAL OF THROTTLE BODY
(See Components on page FI±69)
1. DISCONNECT CABLE FROM NEGATIVE TERMINAL OF BATTERY
CAUTION: Work must be started after approx. 20 se-
conds or longer from the time the ignition switch is
turned to the ºLOCKº position and the negative (±) termi-
nal cable is disconnected from the battery.
2. DRAIN ENGINE COOLANT (See page CO±6)
3. REMOVE THROTTLE BODY COVER (a) Remove the mounting cap nut.
(b) Loosen the two bolts, and remove the throttle bodycover.
4. DISCONNECT CONTROL CABLES FROM THROTTLE BODY
Disconnect the following cables:(1) Accelerator cable
(2) A/T throttle control cable
(3) (w/ Cruise Control System)
Cruise control actuator cable
5. REMOVE INTAKE AIR CONNECTOR (a) Disconnect the following hoses:(1) Air hose from ISC valve
(2) Air hose (from PS air control valve) from intake air connector
(b) Remove the bolt holding the intake air connector to the cylinder head cover.
(c) Loosen the two hose clamps.
(d) Disconnect the intake air connector from the throttle body and air cleaner hose, and remove the intake air
connector.
FI±70
EFI SYSTEM
± Air Induction System (Throttle Body)
WhereEverybodyKnowsYourName
Page 1910 of 4087
6. REMOVE UPPER HIGH±TENSION CORD COVER(a) Remove the two mounting bolts.
(b) Disconnect the front side claw groove of the cord coverfrom the claw of the lower cover, and remove the cord
cover.
7. REMOVE THROTTLE BODY (a) Disconnect the following connectors:(1) Throttle position sensor connector
(2) (w/ TRAC) Sub±throttle position sensor connector
(3) (w/ TRAC) Sub±throttle actuator connector
(b) Disconnect the following hoses: (1) Heater water hose from heater water valve
(2) Water by±pass hose from ISC valve
(3) (USA Spec.) Vacuum hose from throttle body
(4) (Exc. USA Spec.) Three vacuum hoses from throttle body FI±71
EFI SYSTEM
± Air Induction System (Throttle Body)
WhereEverybodyKnowsYourName
Trending: CD changer, light, overheating, washer fluid, fog light, tires, evap
