tow LINCOLN AVIATOR 2023 Owner's Manual
[x] Cancel search | Manufacturer: LINCOLN, Model Year: 2023, Model line: AVIATOR, Model: LINCOLN AVIATOR 2023Pages: 681, PDF Size: 9.33 MB
Page 165 of 681
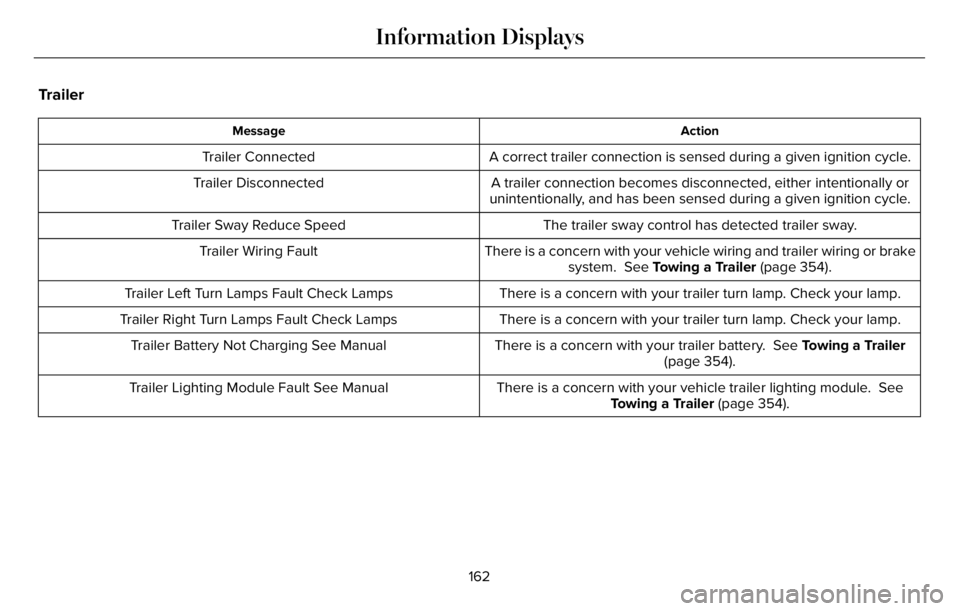
Trailer
Action Message
A correct trailer connection is sensed during a given ignition cycle. Trailer Connected
A trailer connection becomes disconnected, either intentionally or
unintentionally, and has been sensed during a given ignition cycle. Trailer Disconnected
The trailer sway control has detected trailer sway. Trailer Sway Reduce Speed
There is a concern with your vehicle wiring and trailer wiring or brake
system. See Towing a Trailer (page 354). Trailer Wiring Fault
There is a concern with your trailer turn lamp. Check your lamp. Trailer Left Turn Lamps Fault Check Lamps
There is a concern with your trailer turn lamp. Check your lamp. Trailer Right Turn Lamps Fault Check Lamps
There is a concern with your trailer battery. See Towing a Trailer
(page 354). Trailer Battery Not Charging See Manual
There is a concern with your vehicle trailer lighting module. See
Towing a Trailer (page 354). Trailer Lighting Module Fault See Manual
162
Information Displays
Page 176 of 681
WHAT IS THE CABIN AIR FILTER
The cabin air filter improves the quality of air
in your vehicle by trapping dust, pollen and
other particles.
REPLACING THE CABIN AIR FILTER
Replace the filter at regular intervals. See
Scheduled Maintenance (page 579).
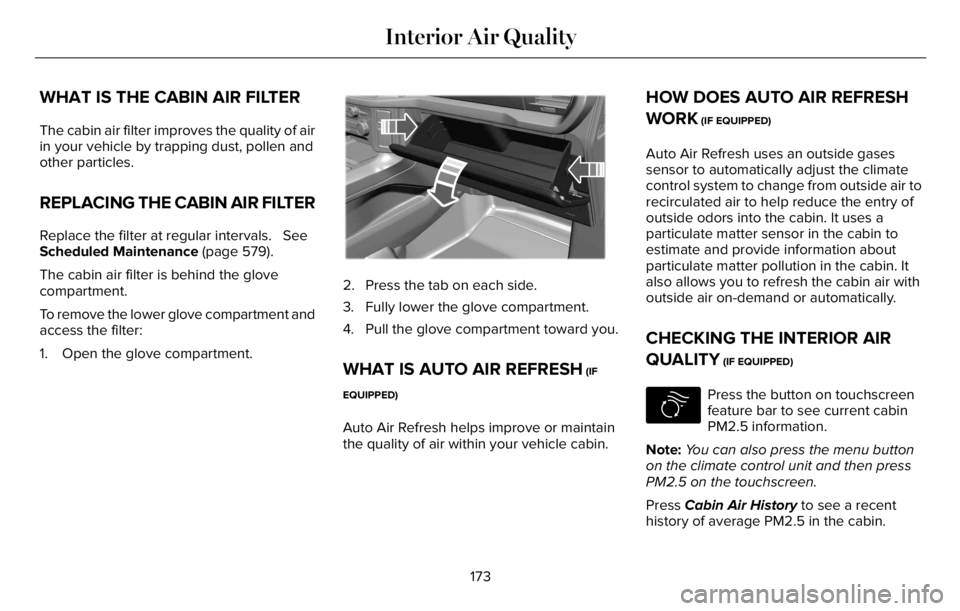
The cabin air filter is behind the glove
compartment.
To remove the lower glove compartment and
access the filter:
1. Open the glove compartment.
E31E31E31E1296129612
2. Press the tab on each side.
3. Fully lower the glove compartment.
4. Pull the glove compartment toward you.
WHAT IS AUTO AIR REFRESH (IF
EQUIPPED)
Auto Air Refresh helps improve or maintain
the quality of air within your vehicle cabin.
HOW DOES AUTO AIR REFRESH
WORK
(IF EQUIPPED)
Auto Air Refresh uses an outside gases
sensor to automatically adjust the climate
control system to change from outside air to
recirculated air to help reduce the entry of
outside odors into the cabin. It uses a
particulate matter sensor in the cabin to
estimate and provide information about
particulate matter pollution in the cabin. It
also allows you to refresh the cabin air with
outside air on-demand or automatically.
CHECKING THE INTERIOR AIR
QUALITY
(IF EQUIPPED)
E283817
Press the button on touchscreen
feature bar to see current cabin
PM2.5 information.
Note:You can also press the menu button
on the climate control unit and then press
PM2.5 on the touchscreen.
Press Cabin Air History to see a recent
history of average PM2.5 in the cabin.
173
Interior Air Quality
Page 181 of 681
E144727
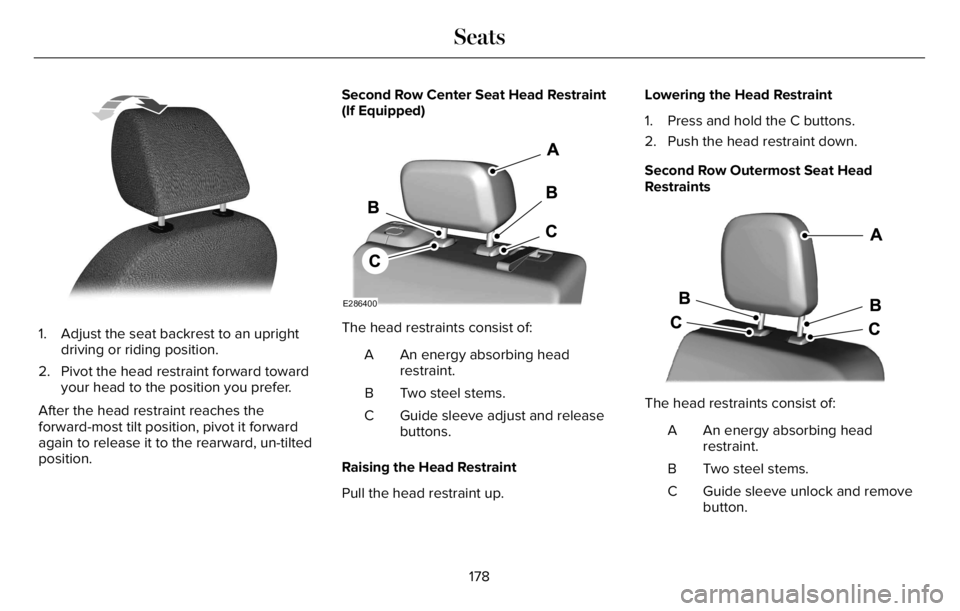
1. Adjust the seat backrest to an upright
driving or riding position.
2. Pivot the head restraint forward toward
your head to the position you prefer.
After the head restraint reaches the
forward-most tilt position, pivot it forward
again to release it to the rearward, un-tilted
position.Second Row Center Seat Head Restraint
(If Equipped)
E286400
The head restraints consist of:
An energy absorbing head
restraint. A
Two steel stems. B
Guide sleeve adjust and release
buttons. C
Raising the Head Restraint
Pull the head restraint up.Lowering the Head Restraint
1. Press and hold the C buttons.
2. Push the head restraint down.
Second Row Outermost Seat Head
Restraints
E3333322253E333332222253222222222222253222253225332253232533225333225353
The head restraints consist of:
An energy absorbing head
restraint. A
Two steel stems. B
Guide sleeve unlock and remove
button. C
178
Seats
Page 217 of 681
The heater acts as a starting aid by warming
the engine coolant. This allows the climate
control system to respond quickly. The
equipment includes a heater element
(installed in the engine block) and a wire
harness. You can connect the system to a
grounded 120-volt AC electrical source.
We recommend that you do the following for
a safe and correct operation:
• Use a 16-gauge outdoor extension cord
that is product certified by Underwriter’s
Laboratory (UL) or Canadian Standards
Association (CSA). This extension cord
must be suitable for use outdoors, in cold
temperatures, and be clearly marked
Suitable for Use with Outdoor
Appliances. Do not use an indoor
extension cord outdoors. This could
result in an electric shock or become a
fire hazard.
• Use as short an extension cord as
possible.
• Do not use multiple extension cords.• Make sure that when in operation, the
extension cord plug and heater cord plug
connections are free and clear of water.
This could cause an electric shock or fire.
• Make sure your vehicle is parked in a
clean area, clear of combustibles.
• Make sure the heater, heater cord and
extension cord are firmly connected.
• Check for heat anywhere in the electrical
hookup once the system has been
operating for approximately 30 minutes.
• Make sure the system is unplugged and
properly stowed before starting and
driving your vehicle. Make sure the
protective cover seals the prongs of the
block heater cord plug when not in use.
• Make sure the heater system is checked
for proper operation before winter.
Using the Engine Block Heater
The engine block heater receptacle terminals
are located on the left side of the engine
compartment.Make sure the receptacle terminals are clean
and dry prior to use. Clean them with a dry
cloth if necessary.
The heater uses 0.4 to 1.0 kilowatt-hours of
energy per hour of use. The system does not
have a thermostat. It achieves maximum
temperature after approximately three hours
of operation. Using the heater longer than
three hours does not improve system
performance and unnecessarily uses
electricity.
214
Starting and Stopping the Engine
Page 219 of 681
• The trailer is not connected.
• If you select Normal, Conserve, or
Slippery.
• You are not in 4H or 4L.
• You have not selected Manual shift
mode.
• Hill descent control is not active.
• You have not selected Tow haul, Excite,
Deep, or Slow Climb.
Note:When in Excite mode, Start/Stop can
be enabled by pressing the Auto-Start-Stop
button.
E121377
The green Auto-Start-Stop
indicator light on the instrument
cluster will illuminate to indicate
when the automatic engine stop occurs.
E146361
If the instrument cluster is
equipped with a grey
Auto-Start-Stop indicator light, it
illuminates when automatic engine stop is
not available due to one of the above noted
conditions not being met.Automatic Engine Restart
Any of the following conditions will result in
an automatic restart of the engine:
• You have removed your foot from the
brake pedal.
• You press the accelerator pedal.
• You press the accelerator and the brake
pedal at the same time.
• The driver safety belt becomes
unfastened or the driver door is ajar.
• Your vehicle is moving.
• The interior compartment does not meet
customer comfort when air conditioning
or heat is on.
• Fogging of the windows could occur and
the air conditioning is on.
• The battery is not within optimal
operating conditions.
• You have exceeded the maximum engine
off time.
• When you press the Auto-Start-Stop
button with the engine automatically
stopped.• The front defroster is turned to the Max
setting.
• When you shift into park (P), the engine
will restart.
Any of the following conditions may result in
an automatic restart of the engine:
• You have increased the blower fan speed
or changed the climate control
temperature.
• You have an electrical accessory turned
on or plugged in.
Note:You may notice that the climate seat
fan fluctuates during an automatic restart.
Disabling Auto-Start-Stop
E287975
Press the button on the instrument
panel to access the
Auto-Start-Stop feature on the
touchscreen. Use the touchscreen to
deactivate the feature.
Deactivating the feature lasts only 1 key
cycle. Use the touchscreen to restore
Auto-Start-Stop function.
216
Unique Driving Characteristics
Page 220 of 681
Note:If the Shift to park (P), Restart Engine
message appears and the amber
Auto-Start-Stop indicator light flashes in the
instrument cluster. This indicates automatic
restart is unavailable. You must restart the
vehicle manually. See Information Displays
(page 136).
If your vehicle is in an engine off
Auto-Start-Stop, shifting from drive (D) to
reverse (R) will not cause a restart if you do
not press the brake pedal. The message
Auto-Start-Stop Press Brake to Start Engine
appears. You must press the brake pedal
within 60 seconds or the system requires
you to shift into park (P) and manually restart
your vehicle.
HYBRID VEHICLE OPERATION
This hybrid vehicle combines electric and
gasoline propulsion to provide breakthrough
performance and improved efficiency.
Familiarizing yourself with these unique
characteristics provides an optimal driving
experience from your vehicle.
Starting
E293827
When you start your vehicle, a
green READY indicator light
appears in the instrument cluster
letting you know that your vehicle is ready
for driving.
The engine may not start because your
vehicle has a silent key start feature. This
fuel saving feature allows your vehicle to be
ready to drive without requiring the gas
engine to be running. The indicator remains
on when your vehicle is on, whether the
engine is running or not, to indicate your
vehicle is capable of movement using the
electric motor, gas engine or both. Typically,
the engine does not start unless the vehicle
is cold, a climate control change is requested
or you press the accelerator pedal.
Driving
The gas engine automatically starts and
stops to provide power when needed and
to save fuel when not needed. When
coasting at low speeds, coming to a stop, or
standing, the gas engine normally shuts
down and your vehicle operates in
electric-only mode.
Conditions that may cause the engine to start
up or remain running include:
• Considerable vehicle acceleration.
• Climbing a hill.
• Charge level of high voltage battery is
low.
• High or low outside temperatures in
order to provide system heating or
cooling.
• Engine not warm enough to provide
passenger requested cabin temperature.
• Towing a trailer.
217
Unique Driving Characteristics
Page 227 of 681
FUEL QUALITY
Choosing the Right Fuel
E161513E161513
Your vehicle is designed to operate on
regular unleaded gasoline with a minimum
pump (R+M)/2 octane rating of 87.
Some fuel stations, particularly those in high
altitude areas, offer fuels posted as regular
unleaded gasoline with an octane rating
below 87. The use of these fuels could result
in engine damage that is not covered by the
vehicle warranty.For best overall vehicle and engine
performance, premium fuel with an octane
rating of 91 or higher is recommended. The
performance gained by using premium fuel
is most noticeable in hot weather as well as
other conditions, for example when towing
a trailer. See Towing (page 354).
Do not be concerned if the engine
sometimes knocks lightly. However, if the
engine knocks heavily while using fuel with
the recommended octane rating, contact an
authorized dealer to prevent any engine
damage.
We recommend Top Tier detergent
gasolines, where available to help minimize
engine deposits and maintain optimal vehicle
and engine performance. For additional
information, refer to www.toptiergas.com.
Note:Use of any fuel for which the vehicle
was not designed can impair the emission
control system, cause loss of vehicle
performance, and cause damage to the
engine which may not be covered by the
vehicle Warranty.Do not use:
• Diesel fuel.
• Fuels containing kerosene or paraffin.
• Fuel containing more than 15% ethanol
or E85 fuel.
• Fuels containing methanol.
• Fuels containing metallic-based additives,
including manganese-based compounds.
• Fuels containing the octane booster
additive, methylcyclopentadienyl
manganese tricarbonyl (MMT).
• Leaded fuel; using leaded fuel is
prohibited by law.
The use of fuels with metallic compounds
such as methylcyclopentadienyl manganese
tricarbonyl (commonly known as MMT), which
is a manganese-based fuel additives impair
engine performance and affect the emission
control system.
FUEL FILLER FUNNEL LOCATION
The fuel filler funnel is in the spare wheel
storage tray.
224
Fuel and Refueling
Page 238 of 681
• An open or pinched sensor hose.
• Incorrect engine oil level.
• Incorrect fuel for climatic conditions.
• Incorrect engine oil viscosity for climactic
conditions.
Note:Some vehicles have a lifetime fuel filter
that is integrated with the fuel tank. Regular
maintenance or replacement is not needed.
Note:If these checks do not help you correct
the concern, have your vehicle checked as
soon as possible.
Noise Emissions Warranty, Prohibited
Tampering Acts and Maintenance
On January 1, 1978, Federal regulation
became effective governing the noise
emission on trucks over 10,000 lb (4,536 kg)
Gross Vehicle Weight Rating (GVWR). The
preceding statements concerning prohibited
tampering acts and maintenance, and the
noise warranty found in the Warranty Guide,
are applicable to complete chassis cabs over
10,000 lb (4,536 kg) GVWR.
CATALYTIC CONVERTER
WARNING: Do not park, idle or drive
your vehicle on dry grass or other dry
ground cover. The emission system heats
up the engine compartment and exhaust
system, creating the risk of fire.
WARNING: The normal operating
temperature of the exhaust system is very
high. Never work around or attempt to
repair any part of the exhaust system until
it has cooled. Use special care when
working around the catalytic converter.
The catalytic converter heats up to a very
high temperature after only a short period
of engine operation and stays hot after the
engine is switched off.
WARNING: Exhaust leaks may result
in entry of harmful and potentially lethal
fumes into the passenger compartment. If
you smell exhaust fumes inside your
vehicle, have your vehicle inspected
immediately. Do not drive if you smell
exhaust fumes.Your vehicle has various emission control
components and a catalytic converter that
enables it to comply with applicable exhaust
emission standards.
To make sure that the catalytic converter and
other emission control components continue
to work properly:
• Do not crank the engine for more than
10 seconds at a time.
• Do not run the engine with a spark plug
lead disconnected.
• Do not push-start or tow-start your
vehicle. Use booster cables. See Jump
Starting the Vehicle (page 366).
• Use only the specified fuel listed.
• Do not switch the ignition off when your
vehicle is moving.
• Avoid running out of fuel.
• Have the items listed in scheduled
maintenance information performed
according to the specified schedule.
Note:Resulting component damage may
not be covered by the vehicle Warranty.
235
Engine Emission Control
Page 250 of 681
WARNING: Do not allow charging
equipment to be immersed in water or
liquids. Failure to follow this warning could
result in fire, electric shock, or serious
personal injury or death.
WARNING: When using the charging
equipment avoid moisture, water, snow
and foreign objects at all times.
WARNING: Do not replace the plug
on the connector. There are critical safety
devices in the plug, and the charging
equipment will not operate, if the plug is
replaced. Failure to follow this instruction
could result in electric shock, personal
injury, death, or fire.
WARNING: Charging equipment
contains no user modifiable or repairable
parts. If the charging equipment plug does
not properly fit into the wall outlet, have a
qualified electrician install the correct wall
outlet. Failure to follow this instruction
could result in personal injury or death.
WARNING: High voltage is present
in your electric meter housing and power
distribution service panel. Contact with
high voltage can cause death or serious
personal injury.
WARNING: Visually inspect the
charging equipment before each use. Do
not use the charging equipment if it is
damaged.
WARNING: Keep charging equipment
inside when not in use. Stow the control
box on the hanger or all the charging
equipment in the bag after use to prevent
damage to the charging equipment and
personal injury.
WARNING: Use the charger only to
supply power to electric vehicles equipped
with an SAE J1772 or IEC 62196-2
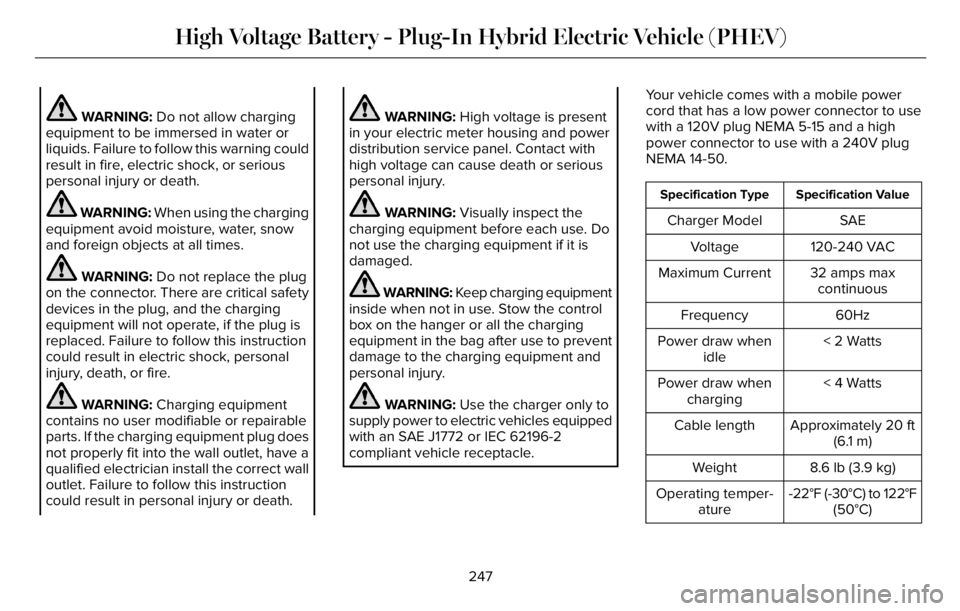
compliant vehicle receptacle.Your vehicle comes with a mobile power
cord that has a low power connector to use
with a 120V plug NEMA 5-15 and a high
power connector to use with a 240V plug
NEMA 14-50.
Specification Value Specification Type
SAE Charger Model
120-240 VAC Voltage
32 amps max
continuous Maximum Current
60Hz Frequency
< 2 Watts Power draw when
idle
< 4 Watts Power draw when
charging
Approximately 20 ft
(6.1 m) Cable length
8.6 lb (3.9 kg) Weight
-22°F (-30°C) to 122°F
(50°C) Operating temper-
ature
247
High Voltage Battery - Plug-In Hybrid Electric Vehicle (PHEV)
Page 264 of 681
Do not tow your vehicle in this mode. Failure
to follow these instructions could result in
vehicle damage not covered by the vehicle
warranty.
Entering Temporary Neutral Mode
1. Power your vehicle on.
2. Bring your vehicle to a complete stop.
3. Press and hold the brake pedal.
4. Shift into neutral (N).
Note:An instructional message appears.
5. Press the neutral (N) button.
Note:A confirmation message appears
when your vehicle enters the mode.
6. Release the brake pedal.
Note:Your vehicle is free to roll.
7. Switch your vehicle off.
Note:Do not tow your vehicle in this mode.
Note:The neutral (N) indicator on the
transmission selector may flash in this mode.
Exiting Temporary Neutral Mode
1. Press the brake pedal.2. Shift into park (P), or power your vehicle
on and shift into drive (D) or reverse (R).
Manually Shifting Gears
The instrument cluster displays the current
gear. The current gear flashes when your
vehicle cannot shift into the requested gear.
Your vehicle will not shift if the requested
gear raises or lowers the engine speed
beyond the limit.
Your vehicle could shift when you fully press
the accelerator or brake pedal.
Note:Prolonged driving with high engine
speed could cause vehicle damage not
covered by vehicle warranty.
Note:Drive modes could affect when the
vehicle shifts into the requested gear.
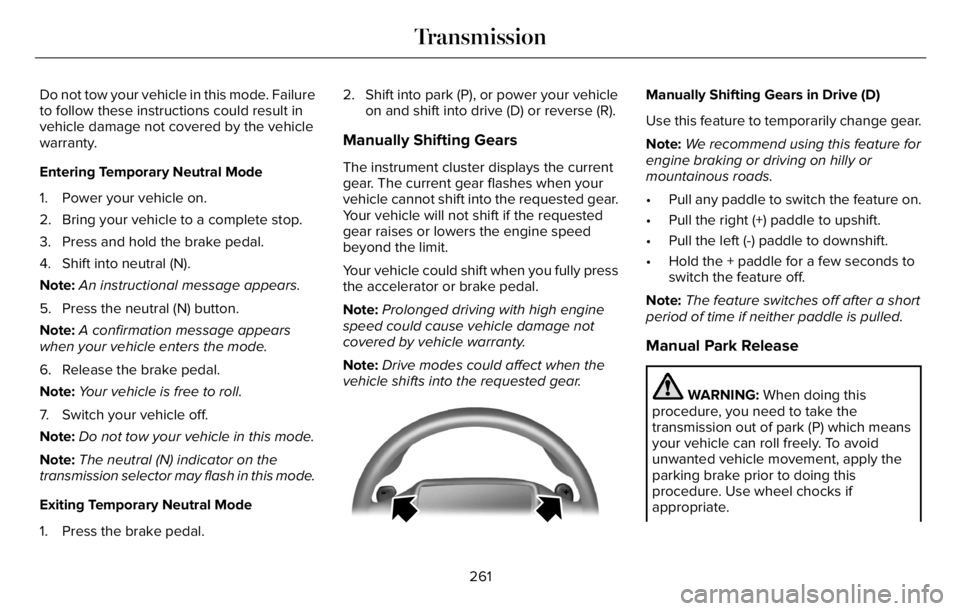
E144821
Manually Shifting Gears in Drive (D)
Use this feature to temporarily change gear.
Note:We recommend using this feature for
engine braking or driving on hilly or
mountainous roads.
• Pull any paddle to switch the feature on.
• Pull the right (+) paddle to upshift.
• Pull the left (-) paddle to downshift.
• Hold the + paddle for a few seconds to
switch the feature off.
Note:The feature switches off after a short
period of time if neither paddle is pulled.
Manual Park Release
WARNING: When doing this
procedure, you need to take the
transmission out of park (P) which means
your vehicle can roll freely. To avoid
unwanted vehicle movement, apply the
parking brake prior to doing this
procedure. Use wheel chocks if
appropriate.
261
Transmission