seats LINCOLN NAVIGATOR 2020 Workshop Manual
[x] Cancel search | Manufacturer: LINCOLN, Model Year: 2020, Model line: NAVIGATOR, Model: LINCOLN NAVIGATOR 2020Pages: 622, PDF Size: 6.47 MB
Page 363 of 622
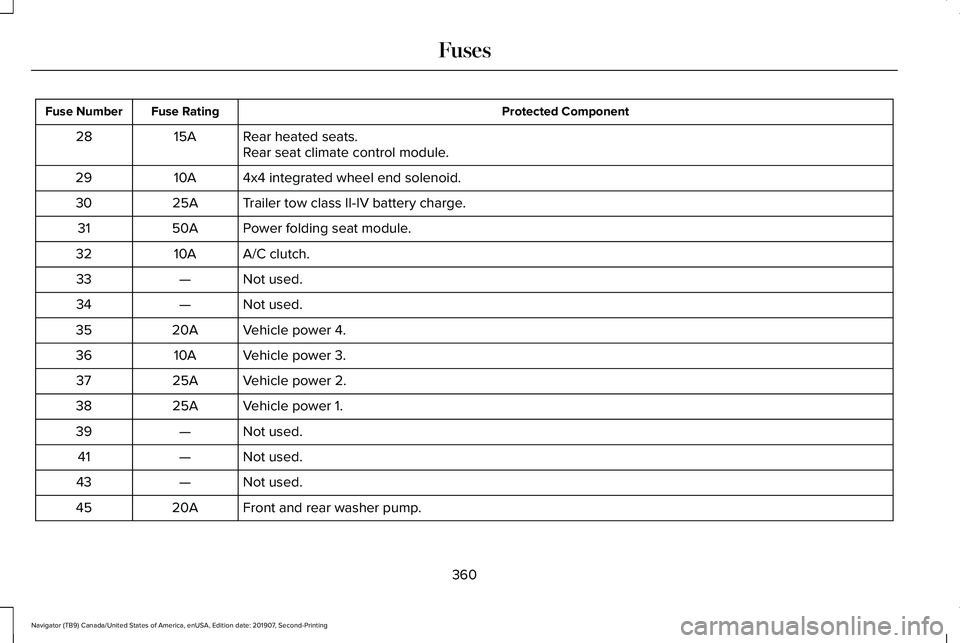
Protected Component
Fuse Rating
Fuse Number
Rear heated seats.
15A
28
Rear seat climate control module.
4x4 integrated wheel end solenoid.
10A
29
Trailer tow class II-IV battery charge.
25A
30
Power folding seat module.
50A
31
A/C clutch.
10A
32
Not used.
—
33
Not used.
—
34
Vehicle power 4.
20A
35
Vehicle power 3.
10A
36
Vehicle power 2.
25A
37
Vehicle power 1.
25A
38
Not used.
—
39
Not used.
—
41
Not used.
—
43
Front and rear washer pump.
20A
45
360
Navigator (TB9) Canada/United States of America, enUSA, Edition date: 201907, Second-Printing Fuses
Page 364 of 622
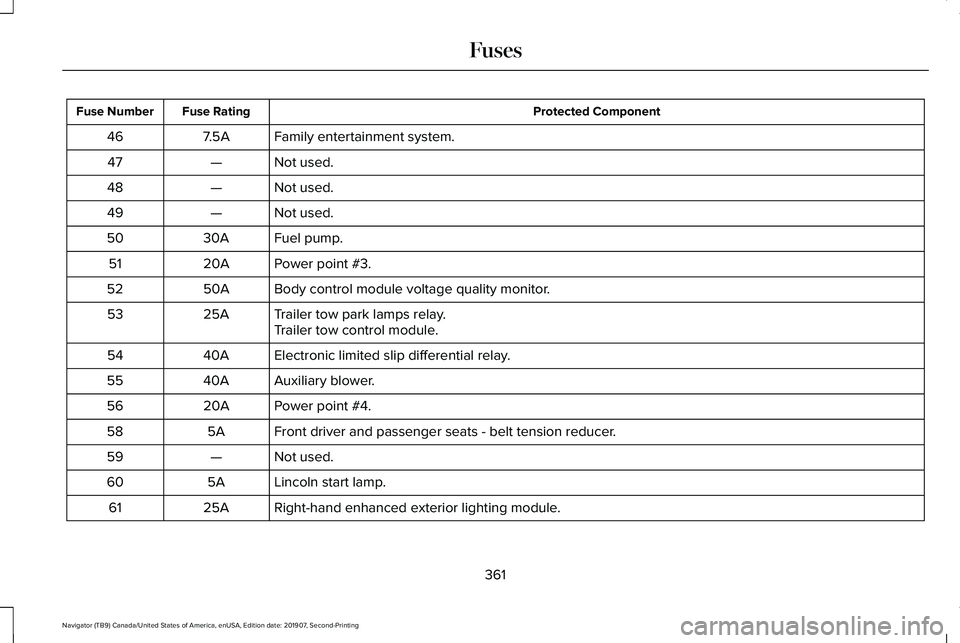
Protected Component
Fuse Rating
Fuse Number
Family entertainment system.
7.5A
46
Not used.
—
47
Not used.
—
48
Not used.
—
49
Fuel pump.
30A
50
Power point #3.
20A
51
Body control module voltage quality monitor.
50A
52
Trailer tow park lamps relay.
25A
53
Trailer tow control module.
Electronic limited slip differential relay.
40A
54
Auxiliary blower.
40A
55
Power point #4.
20A
56
Front driver and passenger seats - belt tension reducer.
5A
58
Not used.
—
59
Lincoln start lamp.
5A
60
Right-hand enhanced exterior lighting module.
25A
61
361
Navigator (TB9) Canada/United States of America, enUSA, Edition date: 201907, Second-Printing Fuses
Page 366 of 622
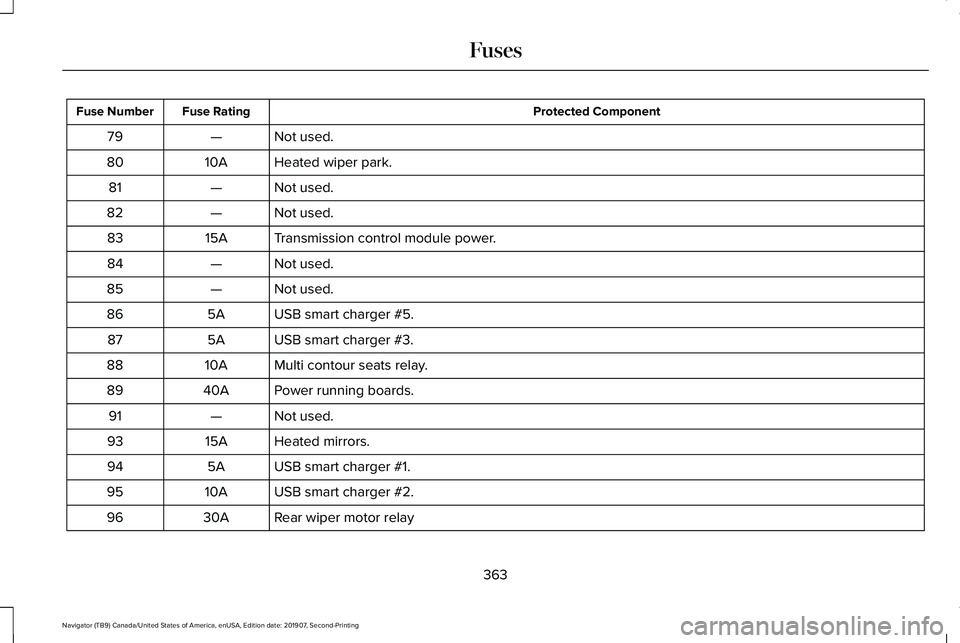
Protected Component
Fuse Rating
Fuse Number
Not used.
—
79
Heated wiper park.
10A
80
Not used.
—
81
Not used.
—
82
Transmission control module power.
15A
83
Not used.
—
84
Not used.
—
85
USB smart charger #5.
5A
86
USB smart charger #3.
5A
87
Multi contour seats relay.
10A
88
Power running boards.
40A
89
Not used.
—
91
Heated mirrors.
15A
93
USB smart charger #1.
5A
94
USB smart charger #2.
10A
95
Rear wiper motor relay
30A
96
363
Navigator (TB9) Canada/United States of America, enUSA, Edition date: 201907, Second-Printing Fuses
Page 391 of 622
If you see any corrosion on the battery or
terminals, remove the cables from the
terminals and clean with a wire brush. You
can neutralize the acid with a solution of
baking soda and water.
Because your vehicle
’s engine is
electronically controlled by a computer, some
control conditions are maintained by power
from the battery. When the battery is
disconnected or a new battery is installed,
the engine must relearn its idle and fuel trim
strategy for optimum driveability and
performance. Flexible fuel vehicles (FFV)
must also relearn the ethanol content of the
fuel for optimum driveability and
performance.
To restore the settings, do the following:
1. Apply the parking brake.
2. Shift into park (P) or neutral (N).
3. Switch off all accessories.
4. Press the brake pedal and start your vehicle. 5. Run the engine until it reaches normal
operating temperature. While the engine
is warming up, complete the following:
Reset the clock. Reset the power
windows bounce-back feature. See
Windows and Mirrors (page 118). Reset
the radio station presets. See Audio
System (page 460).
6. Allow the engine to idle for at least one minute.
7. Drive the vehicle at least 10 mi (16 km) to
completely relearn the idle trim and fuel
trim strategy.
Note: If you do not allow the engine to
relearn the idle and fuel trim strategy, the
idle quality of your vehicle may be adversely
affected until the engine computer
eventually relearns the idle trim and fuel trim
strategy.
Note: For flexible fuel vehicles, if you are
operating on E85, you may experience poor
starts or an inability to start the engine and
driveability problems until the fuel trim and
ethanol content have been relearned. Make sure that you dispose of old batteries
in an environmentally friendly way. Seek
advice from your local authority about
recycling old batteries.
If storing your vehicle for more than 30 days
without recharging the battery, we
recommend that you disconnect the negative
battery cable to maintain battery charge for
quick starting.
Battery Management System
(If Equipped)
The battery management system monitors
battery conditions and takes actions to
extend battery life. If excessive battery drain
is detected, the system temporarily disables
some electrical systems to protect the
battery.
Systems included are:
• Heated rear window.
• Heated seats.
• Climate control.
• Heated steering wheel.
• Audio unit.
• Navigation system.
388
Navigator (TB9) Canada/United States of America, enUSA, Edition date: 201907, Second-Printing Maintenance
Page 400 of 622
Note:
Do not use razor blades or other
sharp objects to clean or remove decals from
the inside of the heated rear window. The
vehicle warranty does not cover damage
caused to the heated rear window grid lines.
CLEANING THE INTERIOR WARNING: Do not use cleaning
solvents, bleach or dye on the vehicle's
seatbelts, as these actions may weaken
the belt webbing. WARNING:
On vehicles equipped
with seat-mounted airbags, do not use
chemical solvents or strong detergents.
Such products could contaminate the side
airbag system and affect performance of
the side airbag in a crash. Note:
Follow the same procedure for
cleaning leather seats when cleaning leather
interior.
See Cleaning Leather Seats (page
400).
Note: Do not use household cleaning
products or glass cleaners, which can stain
and discolor the fabric and affect the flame
retardant abilities of the seat materials.
For fabric, carpets, cloth seats, safety belts
and seats equipped with side airbags:
• Remove dust and loose dirt with a
vacuum cleaner.
• Remove light stains and soil with
Motorcraft® Professional Strength Carpet
& Upholstery Cleaner.
For grease or tar stains:
• Spot clean the area with Motorcraft® Spot
and Stain Remover. In Canada, use
Motorcraft® Multi-Purpose Cleaner.
• If a ring forms on the fabric after spot
cleaning, clean the entire area
immediately, but do not oversaturate or
the ring will set. Cleaning Black Label or Presidential
Interior
(If Equipped)
Note: Alcantara microfiber cloth fabric is
made of polyester microfiber with
micro-porous polyurethane. Using
commercially available fabric cleaners can
cause permanent damage.
Note: Do not use commercially available
leather and vinyl cleaning products on
Alcantara microfiber cloth fabric.
Note: Lincoln Black Label or Presidential
vehicles may have Alcantara microfiber cloth
fabric on the seats, headliner, floor mats and
door panels.
Depending on the type of stain, use water,
lemon juice or pure ethyl alcohol when
cleaning. For cleaning Alcantara microfiber
cloth, refer to the following chart:
397
Navigator (TB9) Canada/United States of America, enUSA, Edition date: 201907, Second-Printing Vehicle Care
Page 402 of 622
CLEANING THE INSTRUMENT
PANEL AND INSTRUMENT
CLUSTER LENS
WARNING: Do not use chemical
solvents or strong detergents when
cleaning the steering wheel or instrument
panel to avoid contamination of the airbag
system.
Note: Follow the same procedure as
cleaning leather seats for cleaning leather
instrument panels and leather interior trim
surfaces. See Cleaning Leather Seats
(page
400).
Clean the instrument panel and cluster lens
with a clean, damp and soft cloth, then use
a clean, dry and soft cloth to dry these areas. •
Avoid cleaners or polishes that increase
the gloss of the upper portion of the
instrument panel. The dull finish in this
area helps protect you from undesirable
windshield reflection.
• Do not use any household cleaning
products or glass cleaners as these may
damage the finish of the instrument
panel, interior trim and cluster lens.
• Wash or wipe your hands clean if you
have been in contact with certain
products such as insect repellent and
suntan lotion to avoid possible damage
to the interior painted surfaces.
• Do not allow air fresheners and hand
sanitizers to spill onto interior surfaces.
If a spill occurs, wipe off immediately.
Your warranty may not cover these
damages.
If a staining liquid like coffee or juice has
been spilled on the instrument panel or on
interior trim surfaces:
1. Wipe up spilled liquid using a clean, soft
cloth as quickly as possible. 2. Use Motorcraft Premium Leather and
Vinyl Cleaner or a commercially available
leather cleaning product for automotive
interiors. Test any cleaner or stain
remover on an inconspicuous area.
3. Alternatively, wipe the surface with a clean, soft cloth and a mild soap and
water solution. Dry the area with a clean,
soft cloth.
4. If necessary, apply more soap and water
solution or cleaning product to a clean,
soft cloth and press it onto the soiled
area. Allow this to set at room
temperature for 30 minutes.
5. Remove the soaked cloth, then with a clean, damp cloth, use a rubbing motion
for 60 seconds on the soiled area.
6. Dry the area with a clean, soft cloth.
399
Navigator (TB9) Canada/United States of America, enUSA, Edition date: 201907, Second-Printing Vehicle Care
Page 403 of 622
CLEANING LEATHER SEATS (IF
EQUIPPED)
Note: Follow the same procedure as
cleaning leather seats for cleaning leather
instrument panels and leather interior trim
surfaces.
For routine cleaning, wipe the surface with
a soft, damp cloth and a mild soap and water
solution. Dry the area with a clean, soft cloth.
For cleaning and removing stains such as
dye transfer, use Motorcraft Premium Leather
and Vinyl Cleaner or a commercially available
leather cleaning product for automotive
interiors.
Note: Test any cleaner or stain remover on
an inconspicuous area.
You should:
• Remove dust and loose dirt with a
vacuum cleaner.
• Clean and treat spills and stains as soon
as possible. Do not use the following products as these
may damage the leather:
•
Oil and petroleum or silicone-based
leather conditioners.
• Household cleaners.
• Alcohol solutions.
• Solvents or cleaners intended specifically
for rubber, vinyl and plastics.
REPAIRING MINOR PAINT
DAMAGE
Authorized dealers have touch-up paint to
match your vehicle ’s color. Your vehicle
color code is printed on a sticker on the front,
left-hand side door jamb. Take your color
code to your authorized dealer to make sure
you get the correct color.
Before repairing minor paint damage, use a
cleaner such as Motorcraft Bug and Tar
Remover to remove particles such as bird
droppings, tree sap, insect deposits, tar
spots, road salt and industrial fallout.
Read the instructions before using cleaning
products. CLEANING THE WHEELS
Note:
Do not apply a cleaning chemical to
warm or hot wheel rims and covers.
Note: Industrial-strength (heavy-duty)
cleaners, or cleaning chemicals, in
combination with brush agitation to remove
brake dust and dirt, could wear away the
clear coat finish over a period of time.
Note: Do not use hydrofluoric acid-based or
high caustic-based wheel cleaners, steel
wool, fuels or strong household detergent.
Note: If you intend to park your vehicle for
an extended period after cleaning the
wheels with a wheel cleaner, drive your
vehicle for a few minutes before doing so.
This reduces the risk of increased corrosion
of the brake discs, brake pads and linings.
Note: Some automatic car washes could
cause damage to the finish on your wheel
rims and covers.
400
Navigator (TB9) Canada/United States of America, enUSA, Edition date: 201907, Second-Printing Vehicle Care
Page 501 of 622
Touch the button to direct airflow
to the instrument panel air vents.
Touch the button to direct airflow
to the footwell air vents.
You can direct air through any combination
of these air vents.
Setting the Blower Motor Speed Touch up or down to increase or
decrease the volume of air that
circulates in your vehicle.
Setting the Temperature
Touch up or down on the left-hand
temperature control to set the left-hand
temperature.
Note: This control also adjusts the right-hand
side temperature when you switch off dual
zone mode.
Touch up or down on the right-hand
temperature control to set the right-hand
temperature. Switching Auto Mode On and Off Touch the button to switch on
automatic operation, then set the
temperature.
The system adjusts the blower motor speed,
air distribution, air conditioning operation,
and outside or recirculated air to reach and
maintain the temperature you have set.
Switching the Air Conditioning On and
Off A pop-up appears on the screen
to display the air conditioning
options.
MAX A/C: Touch the button to activate and
maximize cooling. The driver and passenger
temperatures are set to LO, recirculated air
flows through the instrument panel vents, air
conditioning automatically turns on and the
fan automatically adjusts to the highest
speed.
A/C: Touch to switch the air conditioning on
or off. Use A/C with recirculated air to
improve cooling performance and efficiency. Note:
In certain conditions, such as
maximum defrost, the air conditioning
compressor may continue to operate even
though you switch off the air conditioning.
Switching the Climate Control On and
Off Touch the button.
Switching the Climate Controlled Seats
On and Off Touch the button to cycle through
the various climate controlled seat
settings.
Switching Dual Zone Mode On and Off Touch the button to switch on
temperature control for the
right-hand side of the vehicle.
498
Navigator (TB9) Canada/United States of America, enUSA, Edition date: 201907, Second-Printing SYNC™ 3 E265282 E265280
Page 502 of 622
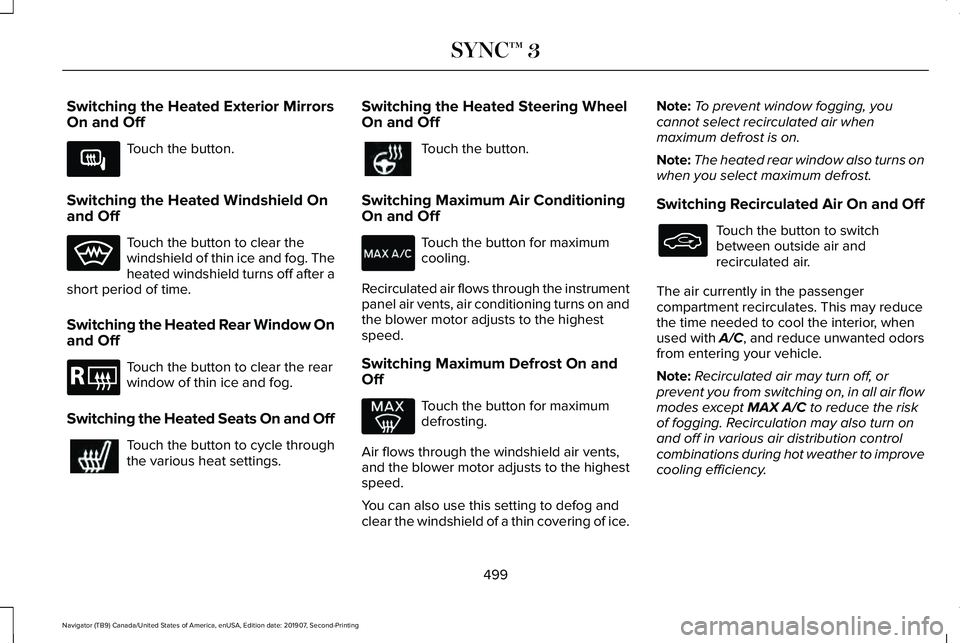
Switching the Heated Exterior Mirrors
On and Off
Touch the button.
Switching the Heated Windshield On
and Off Touch the button to clear the
windshield of thin ice and fog. The
heated windshield turns off after a
short period of time.
Switching the Heated Rear Window On
and Off Touch the button to clear the rear
window of thin ice and fog.
Switching the Heated Seats On and Off Touch the button to cycle through
the various heat settings. Switching the Heated Steering Wheel
On and Off Touch the button.
Switching Maximum Air Conditioning
On and Off Touch the button for maximum
cooling.
Recirculated air flows through the instrument
panel air vents, air conditioning turns on and
the blower motor adjusts to the highest
speed.
Switching Maximum Defrost On and
Off Touch the button for maximum
defrosting.
Air flows through the windshield air vents,
and the blower motor adjusts to the highest
speed.
You can also use this setting to defog and
clear the windshield of a thin covering of ice. Note:
To prevent window fogging, you
cannot select recirculated air when
maximum defrost is on.
Note: The heated rear window also turns on
when you select maximum defrost.
Switching Recirculated Air On and Off Touch the button to switch
between outside air and
recirculated air.
The air currently in the passenger
compartment recirculates. This may reduce
the time needed to cool the interior, when
used with A/C, and reduce unwanted odors
from entering your vehicle.
Note: Recirculated air may turn off, or
prevent you from switching on, in all air flow
modes except MAX A/C to reduce the risk
of fogging. Recirculation may also turn on
and off in various air distribution control
combinations during hot weather to improve
cooling efficiency.
499
Navigator (TB9) Canada/United States of America, enUSA, Edition date: 201907, Second-Printing SYNC™ 3E266189 E184884
Page 503 of 622
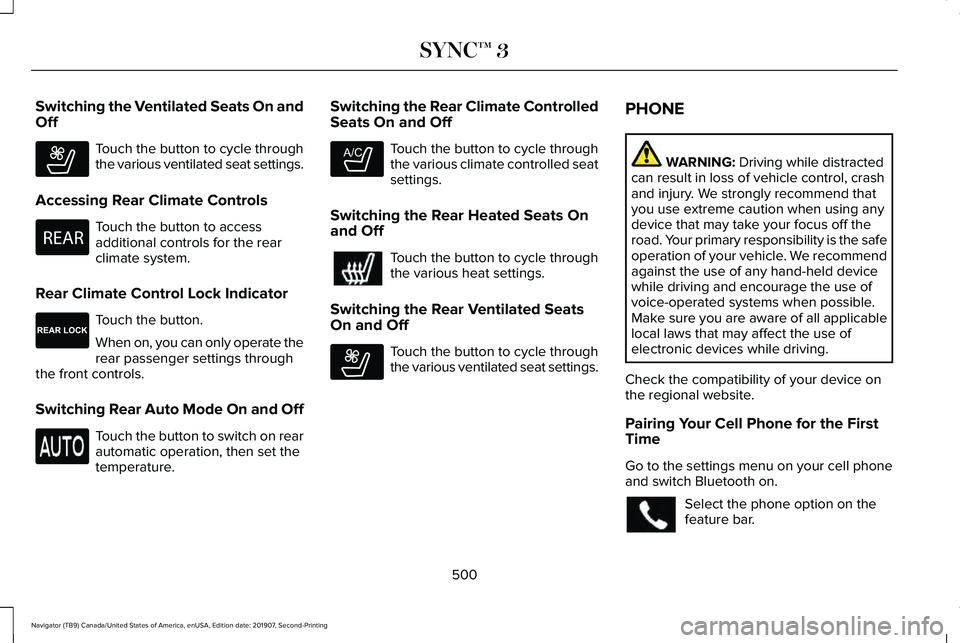
Switching the Ventilated Seats On and
Off
Touch the button to cycle through
the various ventilated seat settings.
Accessing Rear Climate Controls Touch the button to access
additional controls for the rear
climate system.
Rear Climate Control Lock Indicator Touch the button.
When on, you can only operate the
rear passenger settings through
the front controls.
Switching Rear Auto Mode On and Off Touch the button to switch on rear
automatic operation, then set the
temperature. Switching the Rear Climate Controlled
Seats On and Off Touch the button to cycle through
the various climate controlled seat
settings.
Switching the Rear Heated Seats On
and Off Touch the button to cycle through
the various heat settings.
Switching the Rear Ventilated Seats
On and Off Touch the button to cycle through
the various ventilated seat settings.PHONE WARNING: Driving while distracted
can result in loss of vehicle control, crash
and injury. We strongly recommend that
you use extreme caution when using any
device that may take your focus off the
road. Your primary responsibility is the safe
operation of your vehicle. We recommend
against the use of any hand-held device
while driving and encourage the use of
voice-operated systems when possible.
Make sure you are aware of all applicable
local laws that may affect the use of
electronic devices while driving.
Check the compatibility of your device on
the regional website.
Pairing Your Cell Phone for the First
Time
Go to the settings menu on your cell phone
and switch Bluetooth on. Select the phone option on the
feature bar.
500
Navigator (TB9) Canada/United States of America, enUSA, Edition date: 201907, Second-Printing SYNC™ 3E268558 E270447 E265289 E265282 E268558