fuel filter MAZDA 6 2002 Suplement Owner's Guide
[x] Cancel search | Manufacturer: MAZDA, Model Year: 2002, Model line: 6, Model: MAZDA 6 2002Pages: 909, PDF Size: 17.16 MB
Page 344 of 909
F2–192
TROUBLESHOOTING
End Of Sie
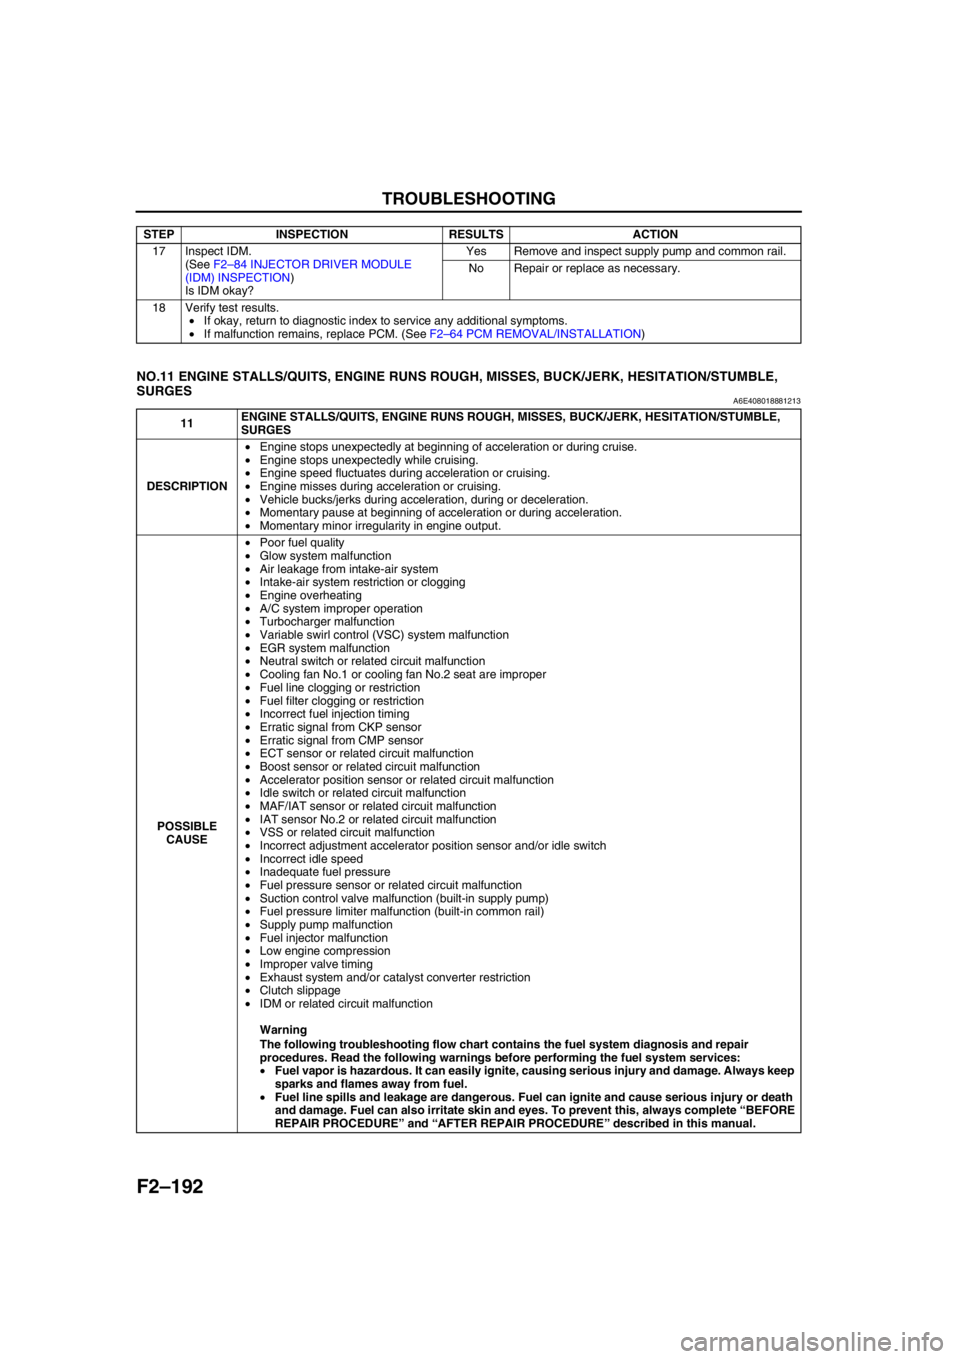
NO.11 ENGINE STALLS/QUITS, ENGINE RUNS ROUGH, MISSES, BUCK/JERK, HESITATION/STUMBLE,
SURGES
A6E408018881213
17 Inspect IDM.
(See F2–84 INJECTOR DRIVER MODULE
(IDM) INSPECTION)
Is IDM okay?Yes Remove and inspect supply pump and common rail.
No Repair or replace as necessary.
18 Verify test results.
•If okay, return to diagnostic index to service any additional symptoms.
•If malfunction remains, replace PCM. (See F2–64 PCM REMOVAL/INSTALLATION) STEP INSPECTION RESULTS ACTION
11ENGINE STALLS/QUITS, ENGINE RUNS ROUGH, MISSES, BUCK/JERK, HESITATION/STUMBLE,
SURGES
DESCRIPTION•Engine stops unexpectedly at beginning of acceleration or during cruise.
•Engine stops unexpectedly while cruising.
•Engine speed fluctuates during acceleration or cruising.
•Engine misses during acceleration or cruising.
•Vehicle bucks/jerks during acceleration, during or deceleration.
•Momentary pause at beginning of acceleration or during acceleration.
•Momentary minor irregularity in engine output.
POSSIBLE
CAUSE•Poor fuel quality
•Glow system malfunction
•Air leakage from intake-air system
•Intake-air system restriction or clogging
•Engine overheating
•A/C system improper operation
•Turbocharger malfunction
•Variable swirl control (VSC) system malfunction
•EGR system malfunction
•Neutral switch or related circuit malfunction
•Cooling fan No.1 or cooling fan No.2 seat are improper
•Fuel line clogging or restriction
•Fuel filter clogging or restriction
•Incorrect fuel injection timing
•Erratic signal from CKP sensor
•Erratic signal from CMP sensor
•ECT sensor or related circuit malfunction
•Boost sensor or related circuit malfunction
•Accelerator position sensor or related circuit malfunction
•Idle switch or related circuit malfunction
•MAF/IAT sensor or related circuit malfunction
•IAT sensor No.2 or related circuit malfunction
•VSS or related circuit malfunction
•Incorrect adjustment accelerator position sensor and/or idle switch
•Incorrect idle speed
•Inadequate fuel pressure
•Fuel pressure sensor or related circuit malfunction
•Suction control valve malfunction (built-in supply pump)
•Fuel pressure limiter malfunction (built-in common rail)
•Supply pump malfunction
•Fuel injector malfunction
•Low engine compression
•Improper valve timing
•Exhaust system and/or catalyst converter restriction
•Clutch slippage
•IDM or related circuit malfunction
Warning
The following troubleshooting flow chart contains the fuel system diagnosis and repair
procedures. Read the following warnings before performing the fuel system services:
•Fuel vapor is hazardous. It can easily ignite, causing serious injury and damage. Always keep
sparks and flames away from fuel.
•Fuel line spills and leakage are dangerous. Fuel can ignite and cause serious injury or death
and damage. Fuel can also irritate skin and eyes. To prevent this, always complete “BEFORE
REPAIR PROCEDURE” and “AFTER REPAIR PROCEDURE” described in this manual.
Page 345 of 909
TROUBLESHOOTING
F2–193
F2
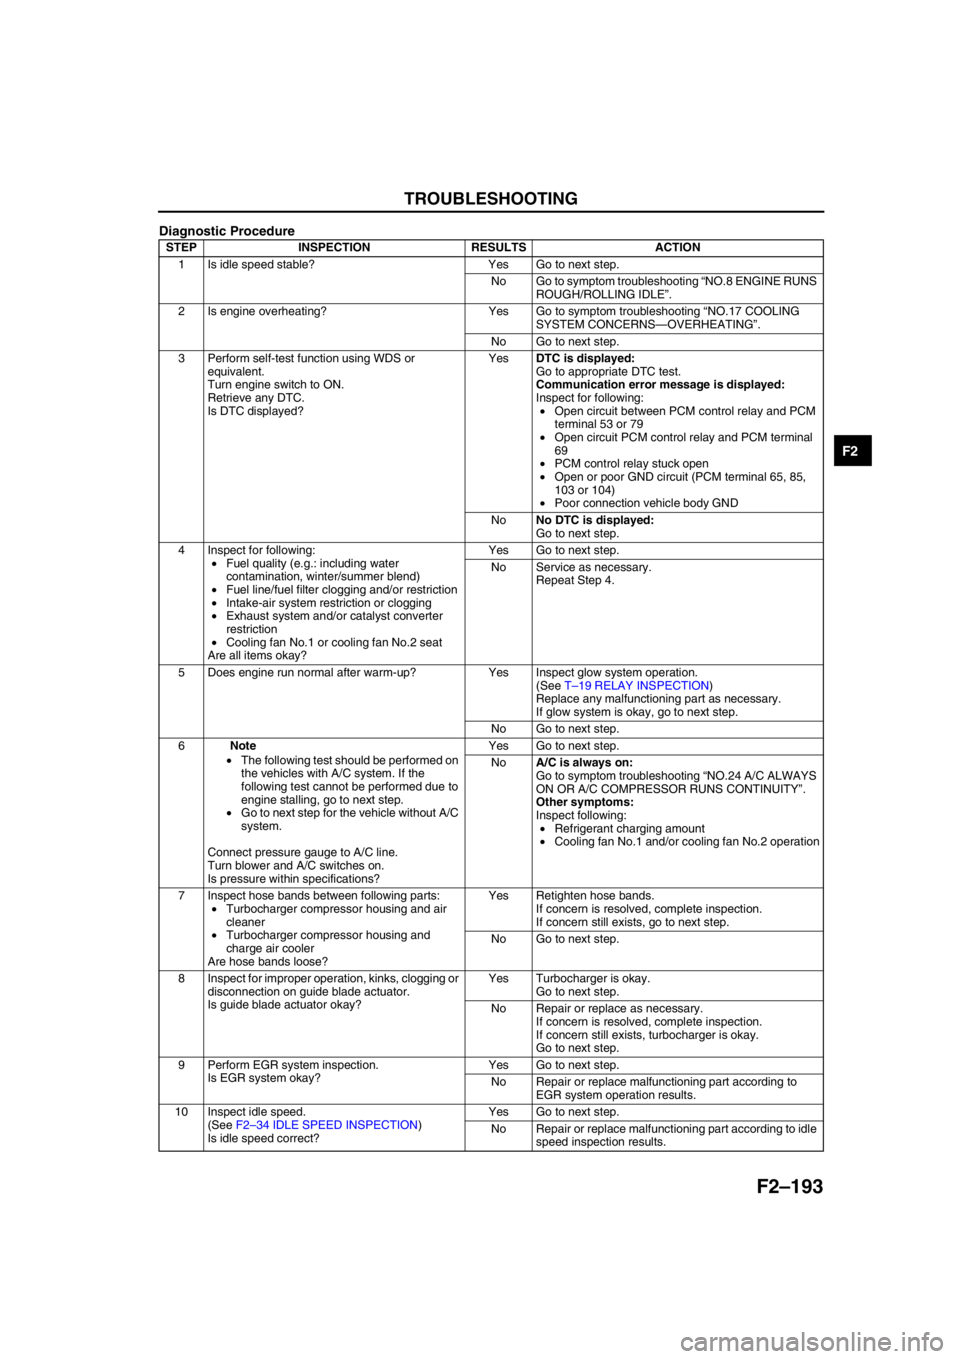
Diagnostic Procedure
STEP INSPECTION RESULTS ACTION
1 Is idle speed stable? Yes Go to next step.
No Go to symptom troubleshooting “NO.8 ENGINE RUNS
ROUGH/ROLLING IDLE”.
2 Is engine overheating? Yes Go to symptom troubleshooting “NO.17 COOLING
SYSTEM CONCERNS—OVERHEATING”.
No Go to next step.
3 Perform self-test function using WDS or
equivalent.
Turn engine switch to ON.
Retrieve any DTC.
Is DTC displayed?YesDTC is displayed:
Go to appropriate DTC test.
Communication error message is displayed:
Inspect for following:
•Open circuit between PCM control relay and PCM
terminal 53 or 79
•Open circuit PCM control relay and PCM terminal
69
•PCM control relay stuck open
•Open or poor GND circuit (PCM terminal 65, 85,
103 or 104)
•Poor connection vehicle body GND
NoNo DTC is displayed:
Go to next step.
4 Inspect for following:
•Fuel quality (e.g.: including water
contamination, winter/summer blend)
•Fuel line/fuel filter clogging and/or restriction
•Intake-air system restriction or clogging
•Exhaust system and/or catalyst converter
restriction
•Cooling fan No.1 or cooling fan No.2 seat
Are all items okay?Yes Go to next step.
No Service as necessary.
Repeat Step 4.
5 Does engine run normal after warm-up? Yes Inspect glow system operation.
(See T–19 RELAY INSPECTION)
Replace any malfunctioning part as necessary.
If glow system is okay, go to next step.
No Go to next step.
6Note
•The following test should be performed on
the vehicles with A/C system. If the
following test cannot be performed due to
engine stalling, go to next step.
•Go to next step for the vehicle without A/C
system.
Connect pressure gauge to A/C line.
Turn blower and A/C switches on.
Is pressure within specifications?Yes Go to next step.
NoA/C is always on:
Go to symptom troubleshooting “NO.24 A/C ALWAYS
ON OR A/C COMPRESSOR RUNS CONTINUITY”.
Other symptoms:
Inspect following:
•Refrigerant charging amount
•Cooling fan No.1 and/or cooling fan No.2 operation
7 Inspect hose bands between following parts:
•Turbocharger compressor housing and air
cleaner
•Turbocharger compressor housing and
charge air cooler
Are hose bands loose?Yes Retighten hose bands.
If concern is resolved, complete inspection.
If concern still exists, go to next step.
No Go to next step.
8 Inspect for improper operation, kinks, clogging or
disconnection on guide blade actuator.
Is guide blade actuator okay?Yes Turbocharger is okay.
Go to next step.
No Repair or replace as necessary.
If concern is resolved, complete inspection.
If concern still exists, turbocharger is okay.
Go to next step.
9 Perform EGR system inspection.
Is EGR system okay?Yes Go to next step.
No Repair or replace malfunctioning part according to
EGR system operation results.
10 Inspect idle speed.
(See F2–34 IDLE SPEED INSPECTION)
Is idle speed correct?Yes Go to next step.
No Repair or replace malfunctioning part according to idle
speed inspection results.
Page 347 of 909
TROUBLESHOOTING
F2–195
F2
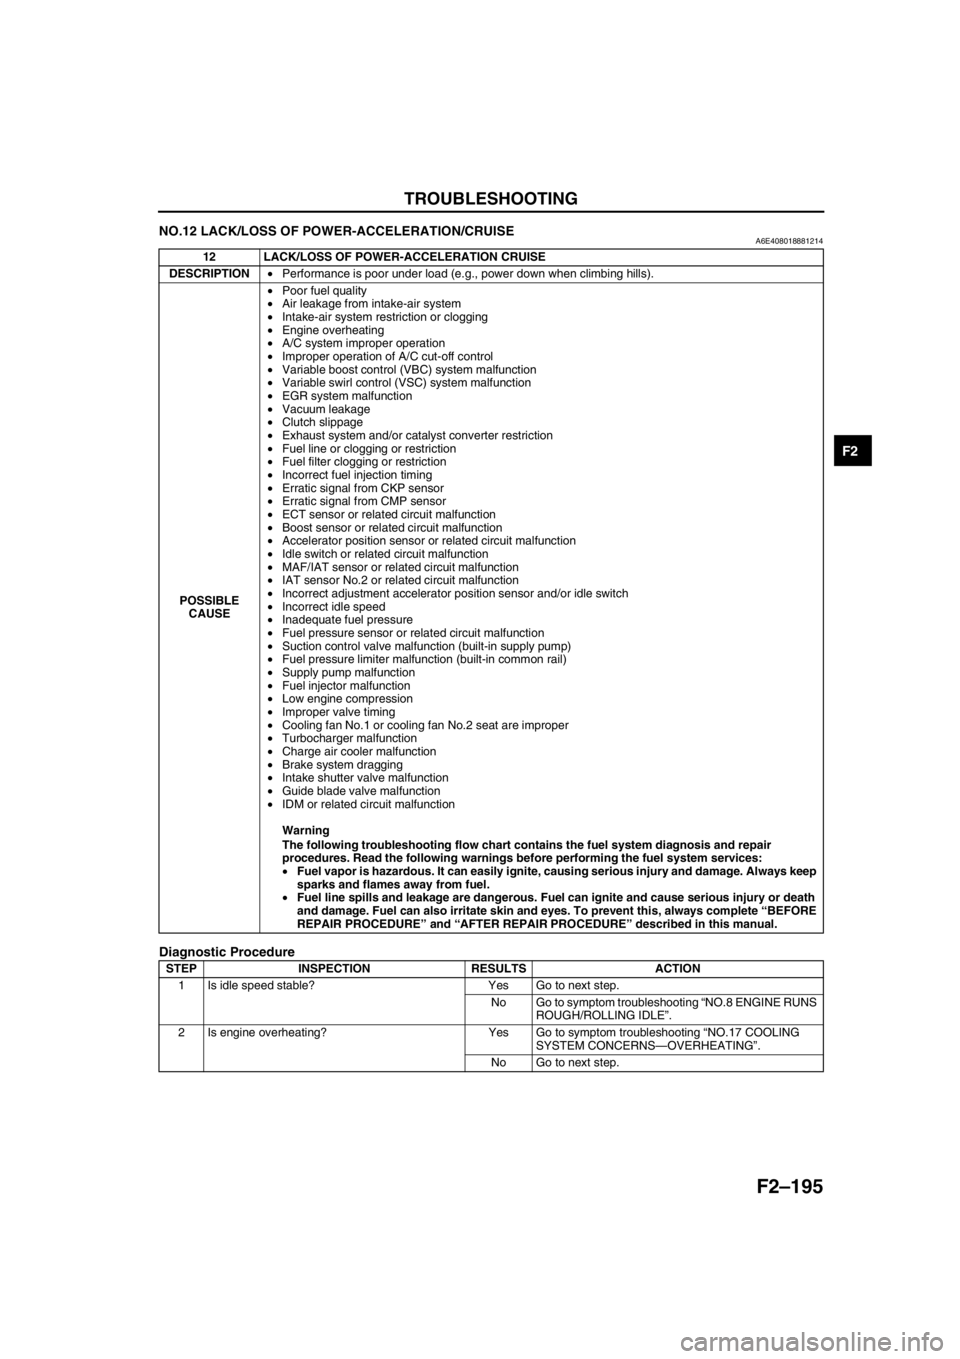
NO.12 LACK/LOSS OF POWER-ACCELERATION/CRUISEA6E408018881214
Diagnostic Procedure
12 LACK/LOSS OF POWER-ACCELERATION CRUISE
DESCRIPTION•Performance is poor under load (e.g., power down when climbing hills).
POSSIBLE
CAUSE•Poor fuel quality
•Air leakage from intake-air system
•Intake-air system restriction or clogging
•Engine overheating
•A/C system improper operation
•Improper operation of A/C cut-off control
•Variable boost control (VBC) system malfunction
•Variable swirl control (VSC) system malfunction
•EGR system malfunction
•Vacuum leakage
•Clutch slippage
•Exhaust system and/or catalyst converter restriction
•Fuel line or clogging or restriction
•Fuel filter clogging or restriction
•Incorrect fuel injection timing
•Erratic signal from CKP sensor
•Erratic signal from CMP sensor
•ECT sensor or related circuit malfunction
•Boost sensor or related circuit malfunction
•Accelerator position sensor or related circuit malfunction
•Idle switch or related circuit malfunction
•MAF/IAT sensor or related circuit malfunction
•IAT sensor No.2 or related circuit malfunction
•Incorrect adjustment accelerator position sensor and/or idle switch
•Incorrect idle speed
•Inadequate fuel pressure
•Fuel pressure sensor or related circuit malfunction
•Suction control valve malfunction (built-in supply pump)
•Fuel pressure limiter malfunction (built-in common rail)
•Supply pump malfunction
•Fuel injector malfunction
•Low engine compression
•Improper valve timing
•Cooling fan No.1 or cooling fan No.2 seat are improper
•Turbocharger malfunction
•Charge air cooler malfunction
•Brake system dragging
•Intake shutter valve malfunction
•Guide blade valve malfunction
•IDM or related circuit malfunction
Warning
The following troubleshooting flow chart contains the fuel system diagnosis and repair
procedures. Read the following warnings before performing the fuel system services:
•Fuel vapor is hazardous. It can easily ignite, causing serious injury and damage. Always keep
sparks and flames away from fuel.
•Fuel line spills and leakage are dangerous. Fuel can ignite and cause serious injury or death
and damage. Fuel can also irritate skin and eyes. To prevent this, always complete “BEFORE
REPAIR PROCEDURE” and “AFTER REPAIR PROCEDURE” described in this manual.
STEP INSPECTION RESULTS ACTION
1 Is idle speed stable? Yes Go to next step.
No Go to symptom troubleshooting “NO.8 ENGINE RUNS
ROUGH/ROLLING IDLE”.
2 Is engine overheating? Yes Go to symptom troubleshooting “NO.17 COOLING
SYSTEM CONCERNS—OVERHEATING”.
No Go to next step.
Page 348 of 909
F2–196
TROUBLESHOOTING
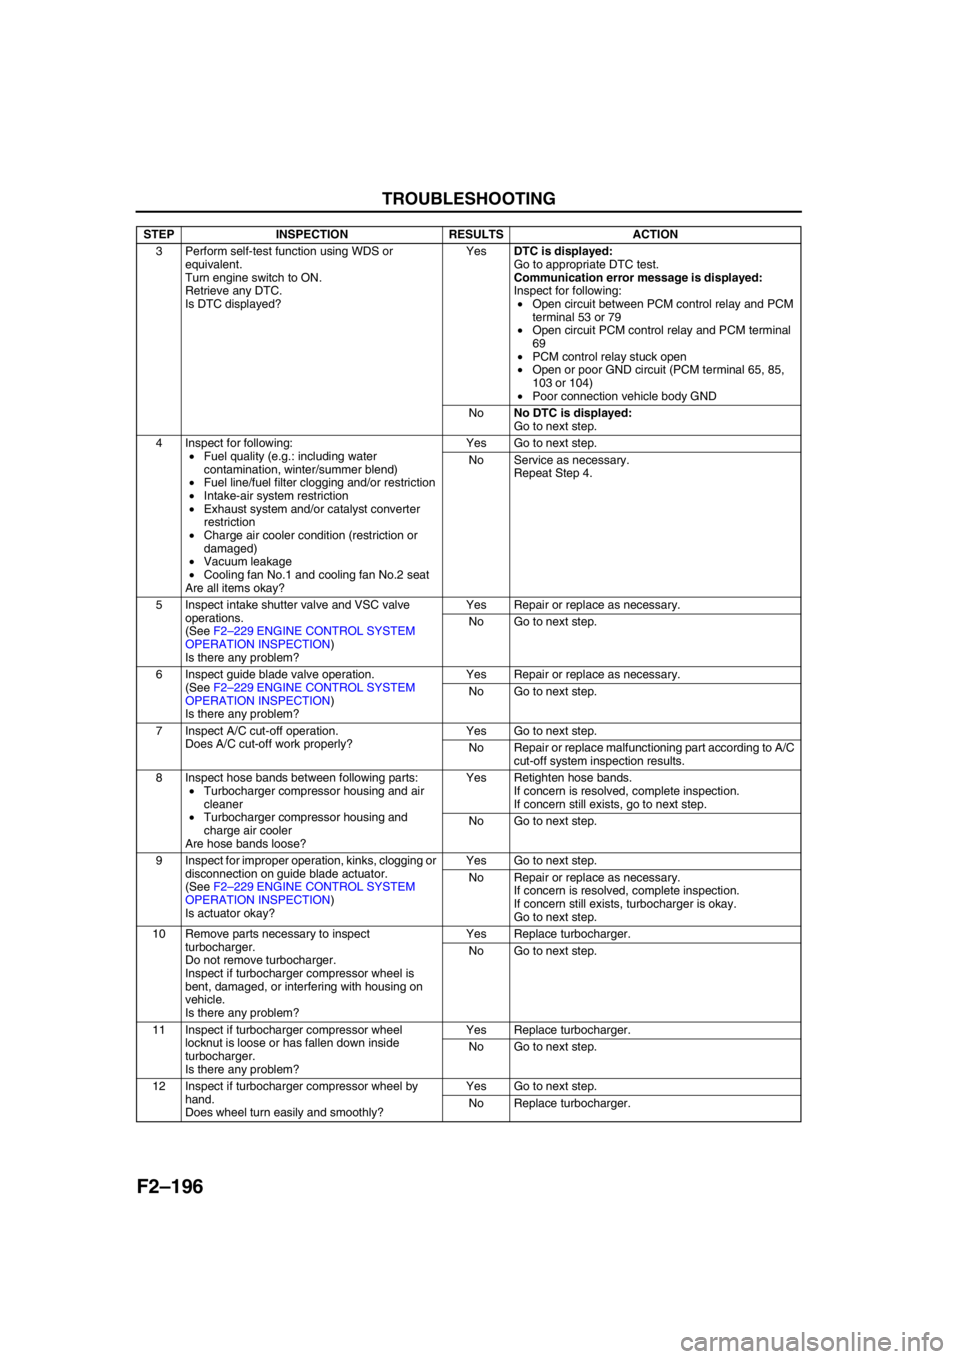
3 Perform self-test function using WDS or
equivalent.
Turn engine switch to ON.
Retrieve any DTC.
Is DTC displayed?YesDTC is displayed:
Go to appropriate DTC test.
Communication error message is displayed:
Inspect for following:
•Open circuit between PCM control relay and PCM
terminal 53 or 79
•Open circuit PCM control relay and PCM terminal
69
•PCM control relay stuck open
•Open or poor GND circuit (PCM terminal 65, 85,
103 or 104)
•Poor connection vehicle body GND
NoNo DTC is displayed:
Go to next step.
4 Inspect for following:
•Fuel quality (e.g.: including water
contamination, winter/summer blend)
•Fuel line/fuel filter clogging and/or restriction
•Intake-air system restriction
•Exhaust system and/or catalyst converter
restriction
•Charge air cooler condition (restriction or
damaged)
•Vacuum leakage
•Cooling fan No.1 and cooling fan No.2 seat
Are all items okay?Yes Go to next step.
No Service as necessary.
Repeat Step 4.
5 Inspect intake shutter valve and VSC valve
operations.
(See F2–229 ENGINE CONTROL SYSTEM
OPERATION INSPECTION)
Is there any problem?Yes Repair or replace as necessary.
No Go to next step.
6 Inspect guide blade valve operation.
(See F2–229 ENGINE CONTROL SYSTEM
OPERATION INSPECTION)
Is there any problem?Yes Repair or replace as necessary.
No Go to next step.
7 Inspect A/C cut-off operation.
Does A/C cut-off work properly?Yes Go to next step.
No Repair or replace malfunctioning part according to A/C
cut-off system inspection results.
8 Inspect hose bands between following parts:
•Turbocharger compressor housing and air
cleaner
•Turbocharger compressor housing and
charge air cooler
Are hose bands loose?Yes Retighten hose bands.
If concern is resolved, complete inspection.
If concern still exists, go to next step.
No Go to next step.
9 Inspect for improper operation, kinks, clogging or
disconnection on guide blade actuator.
(See F2–229 ENGINE CONTROL SYSTEM
OPERATION INSPECTION)
Is actuator okay?Yes Go to next step.
No Repair or replace as necessary.
If concern is resolved, complete inspection.
If concern still exists, turbocharger is okay.
Go to next step.
10 Remove parts necessary to inspect
turbocharger.
Do not remove turbocharger.
Inspect if turbocharger compressor wheel is
bent, damaged, or interfering with housing on
vehicle.
Is there any problem?Yes Replace turbocharger.
No Go to next step.
11 Inspect if turbocharger compressor wheel
locknut is loose or has fallen down inside
turbocharger.
Is there any problem?Yes Replace turbocharger.
No Go to next step.
12 Inspect if turbocharger compressor wheel by
hand.
Does wheel turn easily and smoothly?Yes Go to next step.
No Replace turbocharger. STEP INSPECTION RESULTS ACTION
Page 354 of 909

F2–202
TROUBLESHOOTING
NO.14 POOR FUEL ECONOMYA6E408018881216
Diagnostic Procedure
14 POOR FUEL ECONOMY
DESCRIPTION•Fuel economy is unsatisfactory.
POSSIBLE
CAUSE•Incorrect idle speed
•A/C system improper operation
•Intake -air system clogging or restriction
•Engine cooling system malfunction
•Poor fuel quality
•Improper coolant level
•Erratic signal from CKP sensor
•Erratic signal from CMP sensor
•Fuel pressure sensor or related circuit malfunction
•ECT sensor or related circuit malfunction
•Boost sensor or related circuit malfunction
•Accelerator position sensor or related circuit malfunction
•Incorrect adjustment idle switch
•MAF/IAT sensor or related circuit malfunction
•IAT sensor No .2 or related circuit malfunction
•VSS or related circuit malfunction
•Turbocharger malfunction
•Charge air cooler malfunction
•Low engine compression
•Improper valve timing
•Exhaust system and/or catalyst converter clogging
•Incorrect fuel injection timing
•Fuel injector malfunction
•Supply pump malfunction
•Fuel leakage
•Fuel line clogging or restriction
•Fuel filter clogging or restriction
•Brake dragging
•EGR system malfunction
•Vacuum leakage
•Clutch slippage
•Variable boost control (VBC) system malfunction
•Coolant heater system malfunction
Warning
The following troubleshooting flow chart contains the fuel system diagnosis and repair
procedures. Read the following warnings before performing the fuel system services:
•Fuel vapor is hazardous. It can easily ignite, causing serious injury and damage. Always keep
sparks and flames away from fuel.
•Fuel line spills and leakage are dangerous. Fuel can ignite and cause serious injury or death
and damage. Fuel can also irritate skin and eyes. To prevent this, always complete “BEFORE
REPAIR PROCEDURE” and “AFTER REPAIR PROCEDURE” described in this manual.
STEP INSPECTION RESULTS ACTION
1 Inspect for following:
•Fuel quality (e.g.: including water
contamination, winter/summer blend)
•Fuel line/fuel filter clogging and/or restriction
•Fuel line leakage
•Intake-air system restriction
•Exhaust system and/or catalyst converter
restriction
•Charge air cooler condition (restriction or
damaged)
•Vacuum leakage
Are all items okay?Yes Go to next step.
No Service as necessary.
Repeat Step 1.
2 Is brake system functioning properly? Yes Go to next step.
No Inspect for cause.
Page 368 of 909
F2–216
TROUBLESHOOTING
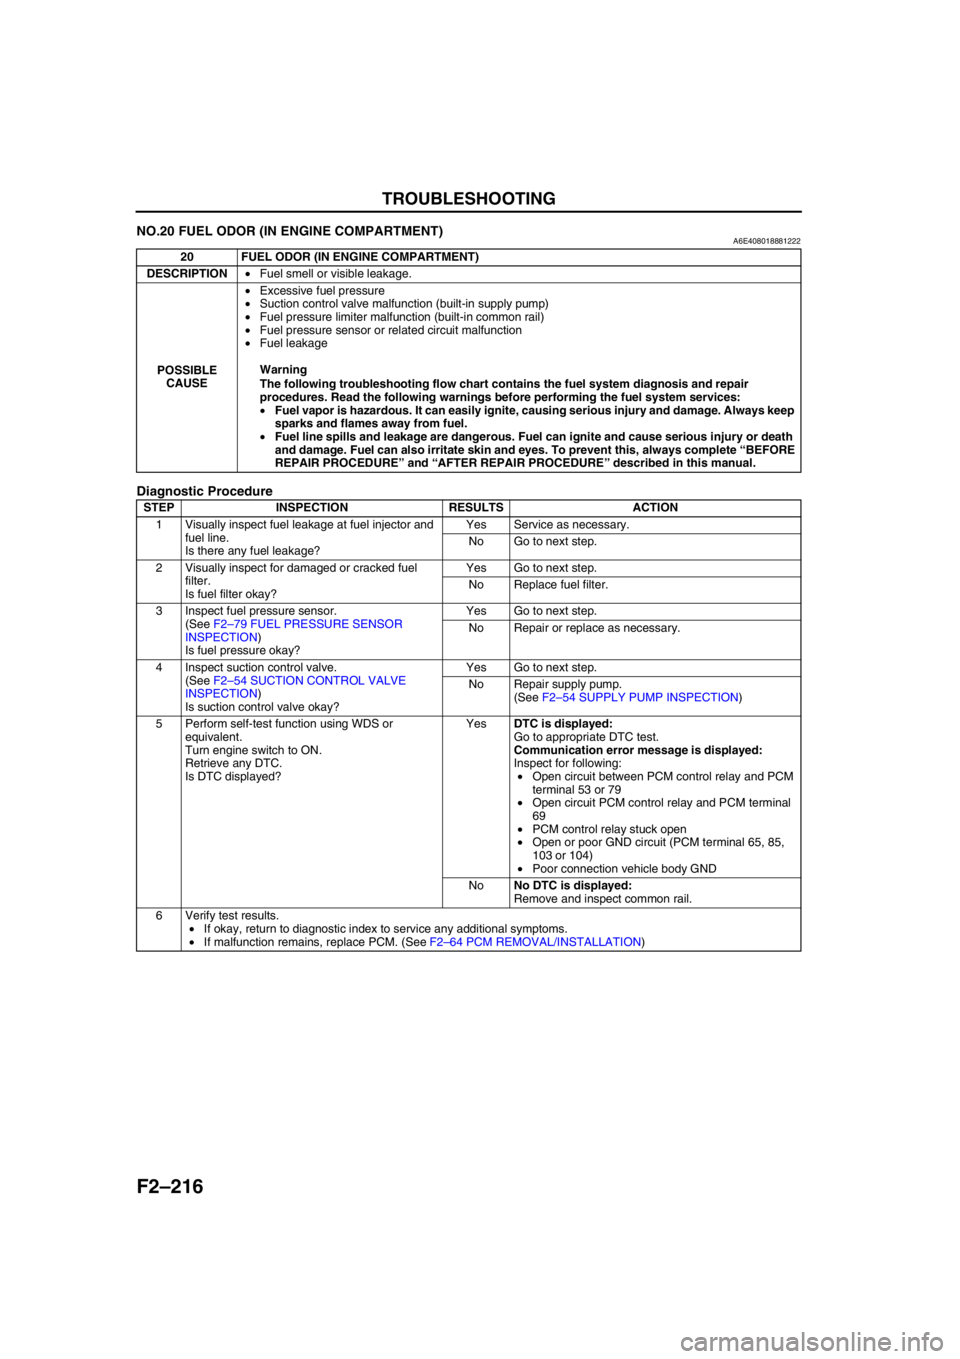
NO.20 FUEL ODOR (IN ENGINE COMPARTMENT)A6E408018881222
Diagnostic Procedure
End Of Sie
20 FUEL ODOR (IN ENGINE COMPARTMENT)
DESCRIPTION•Fuel smell or visible leakage.
POSSIBLE
CAUSE•Excessive fuel pressure
•Suction control valve malfunction (built-in supply pump)
•Fuel pressure limiter malfunction (built-in common rail)
•Fuel pressure sensor or related circuit malfunction
•Fuel leakage
Warning
The following troubleshooting flow chart contains the fuel system diagnosis and repair
procedures. Read the following warnings before performing the fuel system services:
•Fuel vapor is hazardous. It can easily ignite, causing serious injury and damage. Always keep
sparks and flames away from fuel.
•Fuel line spills and leakage are dangerous. Fuel can ignite and cause serious injury or death
and damage. Fuel can also irritate skin and eyes. To prevent this, always complete “BEFORE
REPAIR PROCEDURE” and “AFTER REPAIR PROCEDURE” described in this manual.
STEP INSPECTION RESULTS ACTION
1 Visually inspect fuel leakage at fuel injector and
fuel line.
Is there any fuel leakage?Yes Service as necessary.
No Go to next step.
2 Visually inspect for damaged or cracked fuel
filter.
Is fuel filter okay?Yes Go to next step.
No Replace fuel filter.
3 Inspect fuel pressure sensor.
(See F2–79 FUEL PRESSURE SENSOR
INSPECTION)
Is fuel pressure okay?Yes Go to next step.
No Repair or replace as necessary.
4 Inspect suction control valve.
(See F2–54 SUCTION CONTROL VALVE
INSPECTION)
Is suction control valve okay?Yes Go to next step.
No Repair supply pump.
(See F2–54 SUPPLY PUMP INSPECTION)
5 Perform self-test function using WDS or
equivalent.
Turn engine switch to ON.
Retrieve any DTC.
Is DTC displayed?YesDTC is displayed:
Go to appropriate DTC test.
Communication error message is displayed:
Inspect for following:
•Open circuit between PCM control relay and PCM
terminal 53 or 79
•Open circuit PCM control relay and PCM terminal
69
•PCM control relay stuck open
•Open or poor GND circuit (PCM terminal 65, 85,
103 or 104)
•Poor connection vehicle body GND
NoNo DTC is displayed:
Remove and inspect common rail.
6 Verify test results.
•If okay, return to diagnostic index to service any additional symptoms.
•If malfunction remains, replace PCM. (See F2–64 PCM REMOVAL/INSTALLATION)
Page 812 of 909
T–1
T
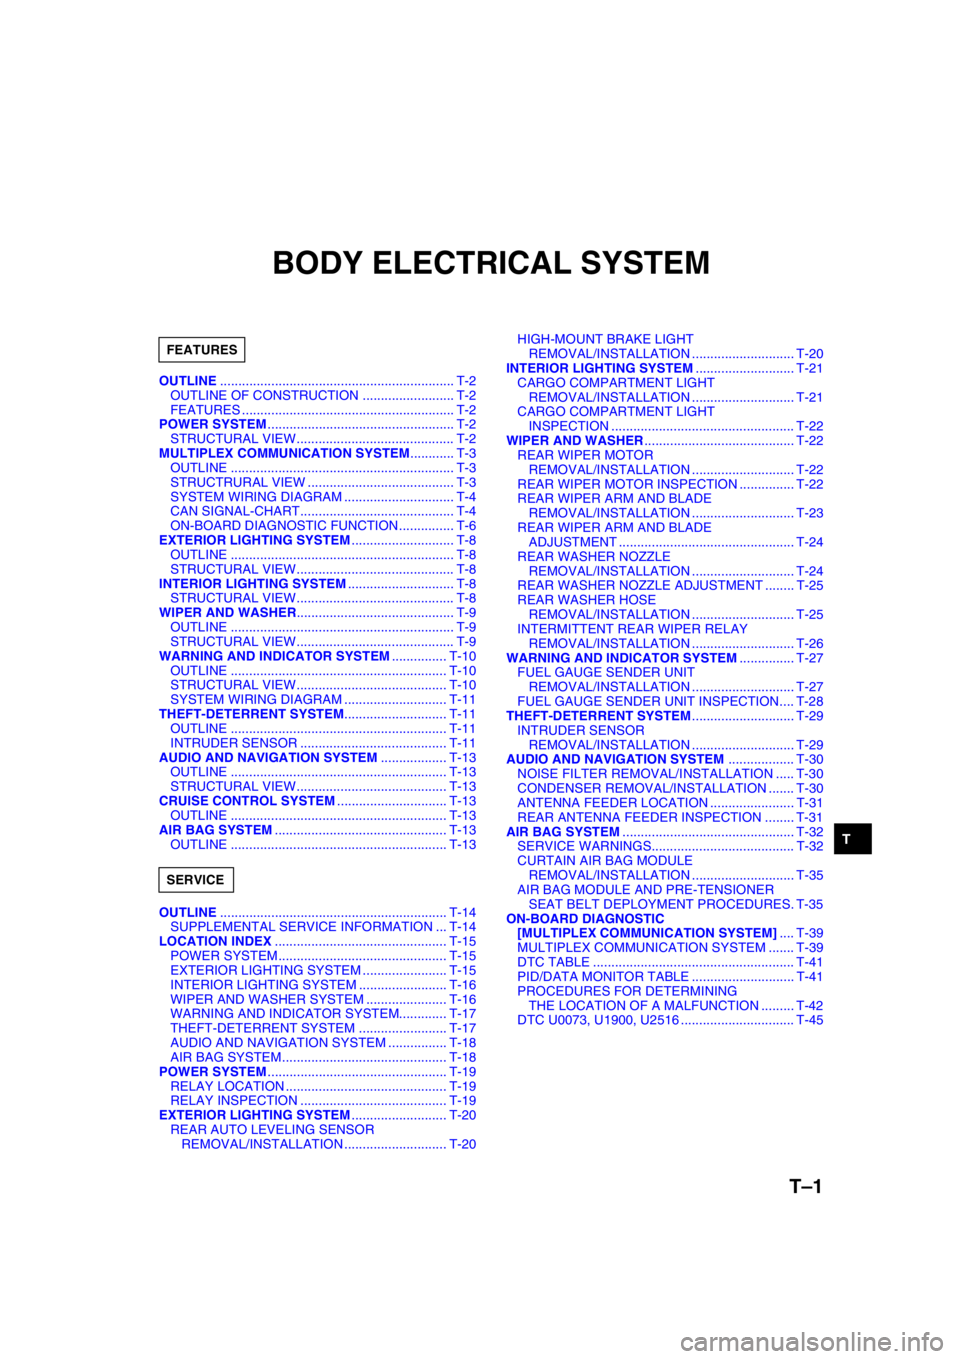
TBODY ELECTRICAL SYSTEM
OUTLINE................................................................ T-2
OUTLINE OF CONSTRUCTION ......................... T-2
FEATURES .......................................................... T-2
POWER SYSTEM................................................... T-2
STRUCTURAL VIEW........................................... T-2
MULTIPLEX COMMUNICATION SYSTEM............ T-3
OUTLINE ............................................................. T-3
STRUCTRURAL VIEW ........................................ T-3
SYSTEM WIRING DIAGRAM .............................. T-4
CAN SIGNAL-CHART.......................................... T-4
ON-BOARD DIAGNOSTIC FUNCTION............... T-6
EXTERIOR LIGHTING SYSTEM............................ T-8
OUTLINE ............................................................. T-8
STRUCTURAL VIEW........................................... T-8
INTERIOR LIGHTING SYSTEM............................. T-8
STRUCTURAL VIEW........................................... T-8
WIPER AND WASHER........................................... T-9
OUTLINE ............................................................. T-9
STRUCTURAL VIEW........................................... T-9
WARNING AND INDICATOR SYSTEM............... T-10
OUTLINE ........................................................... T-10
STRUCTURAL VIEW......................................... T-10
SYSTEM WIRING DIAGRAM ............................ T-11
THEFT-DETERRENT SYSTEM............................ T-11
OUTLINE ........................................................... T-11
INTRUDER SENSOR ........................................ T-11
AUDIO AND NAVIGATION SYSTEM.................. T-13
OUTLINE ........................................................... T-13
STRUCTURAL VIEW......................................... T-13
CRUISE CONTROL SYSTEM.............................. T-13
OUTLINE ........................................................... T-13
AIR BAG SYSTEM............................................... T-13
OUTLINE ........................................................... T-13
OUTLINE.............................................................. T-14
SUPPLEMENTAL SERVICE INFORMATION ... T-14
LOCATION INDEX............................................... T-15
POWER SYSTEM.............................................. T-15
EXTERIOR LIGHTING SYSTEM ....................... T-15
INTERIOR LIGHTING SYSTEM ........................ T-16
WIPER AND WASHER SYSTEM ...................... T-16
WARNING AND INDICATOR SYSTEM............. T-17
THEFT-DETERRENT SYSTEM ........................ T-17
AUDIO AND NAVIGATION SYSTEM ................ T-18
AIR BAG SYSTEM............................................. T-18
POWER SYSTEM................................................. T-19
RELAY LOCATION ............................................ T-19
RELAY INSPECTION ........................................ T-19
EXTERIOR LIGHTING SYSTEM.......................... T-20
REAR AUTO LEVELING SENSOR
REMOVAL/INSTALLATION ............................ T-20HIGH-MOUNT BRAKE LIGHT
REMOVAL/INSTALLATION ............................ T-20
INTERIOR LIGHTING SYSTEM........................... T-21
CARGO COMPARTMENT LIGHT
REMOVAL/INSTALLATION ............................ T-21
CARGO COMPARTMENT LIGHT
INSPECTION .................................................. T-22
WIPER AND WASHER......................................... T-22
REAR WIPER MOTOR
REMOVAL/INSTALLATION ............................ T-22
REAR WIPER MOTOR INSPECTION ............... T-22
REAR WIPER ARM AND BLADE
REMOVAL/INSTALLATION ............................ T-23
REAR WIPER ARM AND BLADE
ADJUSTMENT ................................................ T-24
REAR WASHER NOZZLE
REMOVAL/INSTALLATION ............................ T-24
REAR WASHER NOZZLE ADJUSTMENT ........ T-25
REAR WASHER HOSE
REMOVAL/INSTALLATION ............................ T-25
INTERMITTENT REAR WIPER RELAY
REMOVAL/INSTALLATION ............................ T-26
WARNING AND INDICATOR SYSTEM............... T-27
FUEL GAUGE SENDER UNIT
REMOVAL/INSTALLATION ............................ T-27
FUEL GAUGE SENDER UNIT INSPECTION.... T-28
THEFT-DETERRENT SYSTEM............................ T-29
INTRUDER SENSOR
REMOVAL/INSTALLATION ............................ T-29
AUDIO AND NAVIGATION SYSTEM.................. T-30
NOISE FILTER REMOVAL/INSTALLATION ..... T-30
CONDENSER REMOVAL/INSTALLATION ....... T-30
ANTENNA FEEDER LOCATION ....................... T-31
REAR ANTENNA FEEDER INSPECTION ........ T-31
AIR BAG SYSTEM............................................... T-32
SERVICE WARNINGS....................................... T-32
CURTAIN AIR BAG MODULE
REMOVAL/INSTALLATION ............................ T-35
AIR BAG MODULE AND PRE-TENSIONER
SEAT BELT DEPLOYMENT PROCEDURES. T-35
ON-BOARD DIAGNOSTIC
[MULTIPLEX COMMUNICATION SYSTEM].... T-39
MULTIPLEX COMMUNICATION SYSTEM ....... T-39
DTC TABLE ....................................................... T-41
PID/DATA MONITOR TABLE ............................ T-41
PROCEDURES FOR DETERMINING
THE LOCATION OF A MALFUNCTION ......... T-42
DTC U0073, U1900, U2516 ............................... T-45 FEATURES
SERVICE
Page 813 of 909
T–2
OUTLINE, POWER SYSTEM
OUTLINE OF CONSTRUCTIONA6E810201088201•The construction and operation of the body electrical system is essentially carried over from that of the current
Mazda6 (GG) model, except for the following features. (See Mazda6 Training Manual 3359-1*-02C)
End Of Sie
FEATURESA6E810201088202Improved Safety
•There are two types of high-mount brake lights. (WGN)
Improved Marketability
•A cargo compartment light has been adopted. (WGN)
•The installation positions of the rear wiper and washer components have been changed. (WGN)
•A fuel gauge sender sub-unit has been adopted. (4WD)
•A 4WD indicator light, glow indicator light and sedimentor warning light have been adopted.
•The installation positions of the condenser and the noise filter have been changed. (WGN)
•An antenna feeder has been adopted. (WGN)
•A rear auto leveling sensor especially for the 4WD has been adopted. (4WD)
Improved Security
•A rear intruder sensor has been adopted. (WGN)
End Of Sie
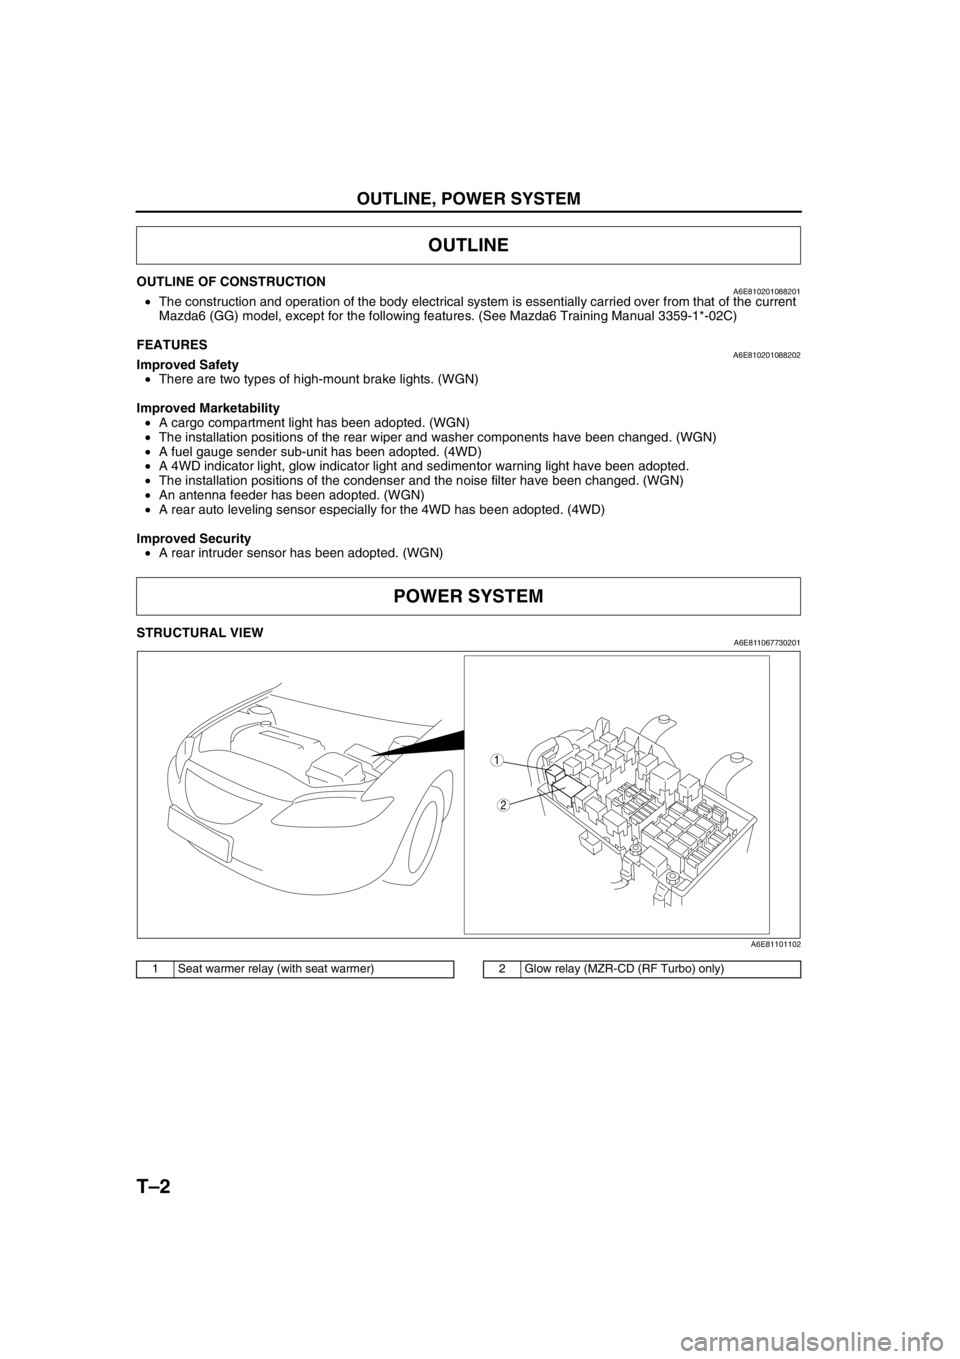
STRUCTURAL VIEWA6E811067730201
.
End Of Sie
OUTLINE
POWER SYSTEM
2
1
A6E81101102
1 Seat warmer relay (with seat warmer)2 Glow relay (MZR-CD (RF Turbo) only)
Page 825 of 909
T–14
OUTLINE
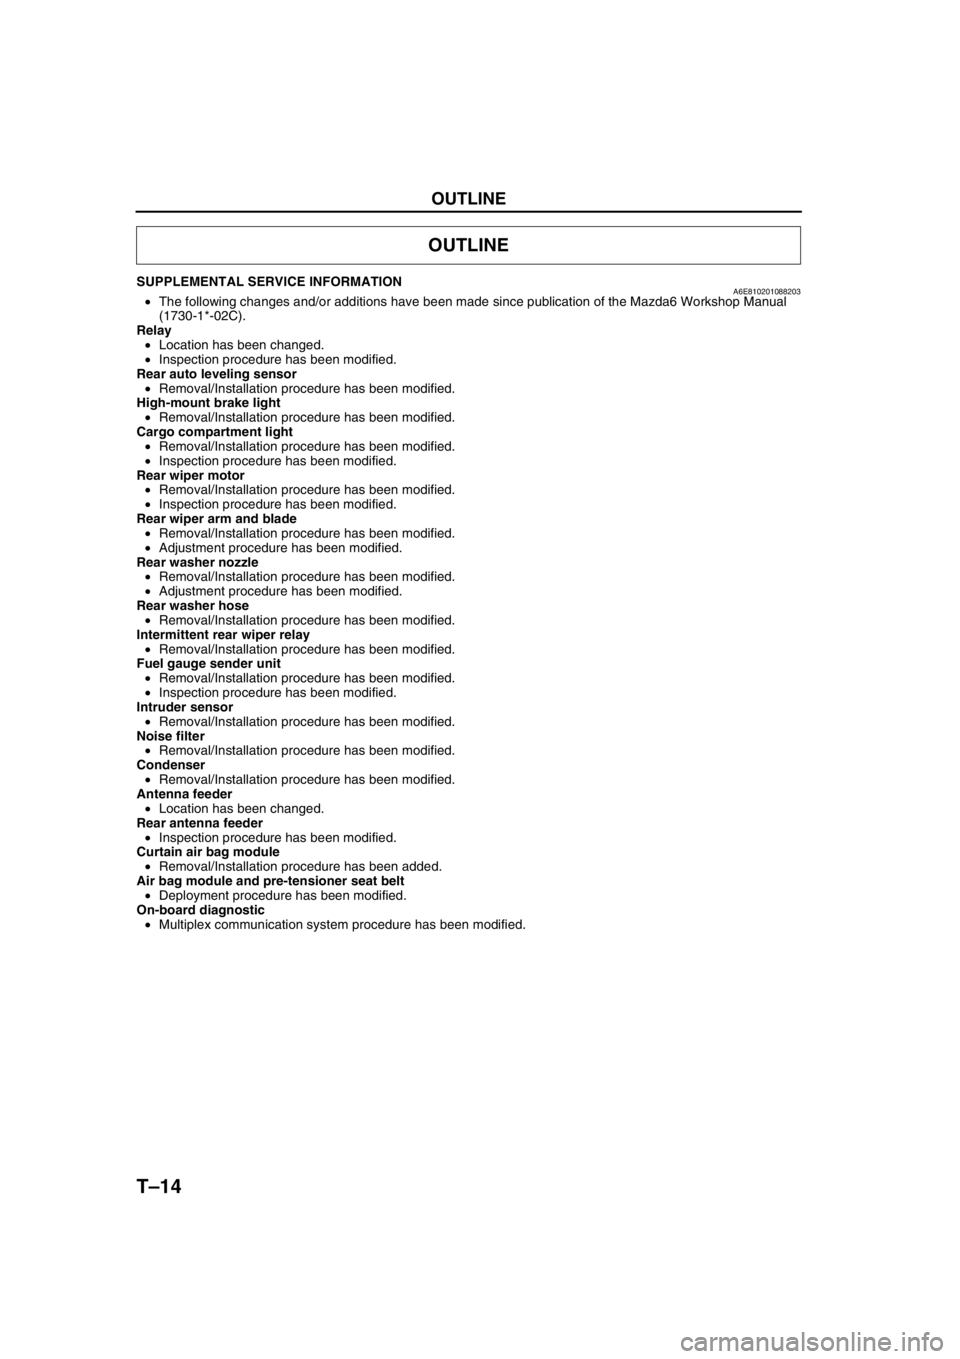
SUPPLEMENTAL SERVICE INFORMATIONA6E810201088203•The following changes and/or additions have been made since publication of the Mazda6 Workshop Manual
(1730-1*-02C).
Relay
•Location has been changed.
•Inspection procedure has been modified.
Rear auto leveling sensor
•Removal/Installation procedure has been modified.
High-mount brake light
•Removal/Installation procedure has been modified.
Cargo compartment light
•Removal/Installation procedure has been modified.
•Inspection procedure has been modified.
Rear wiper motor
•Removal/Installation procedure has been modified.
•Inspection procedure has been modified.
Rear wiper arm and blade
•Removal/Installation procedure has been modified.
•Adjustment procedure has been modified.
Rear washer nozzle
•Removal/Installation procedure has been modified.
•Adjustment procedure has been modified.
Rear washer hose
•Removal/Installation procedure has been modified.
Intermittent rear wiper relay
•Removal/Installation procedure has been modified.
Fuel gauge sender unit
•Removal/Installation procedure has been modified.
•Inspection procedure has been modified.
Intruder sensor
•Removal/Installation procedure has been modified.
Noise filter
•Removal/Installation procedure has been modified.
Condenser
•Removal/Installation procedure has been modified.
Antenna feeder
•Location has been changed.
Rear antenna feeder
•Inspection procedure has been modified.
Curtain air bag module
•Removal/Installation procedure has been added.
Air bag module and pre-tensioner seat belt
•Deployment procedure has been modified.
On-board diagnostic
•Multiplex communication system procedure has been modified.
End Of Sie
OUTLINE
Page 878 of 909
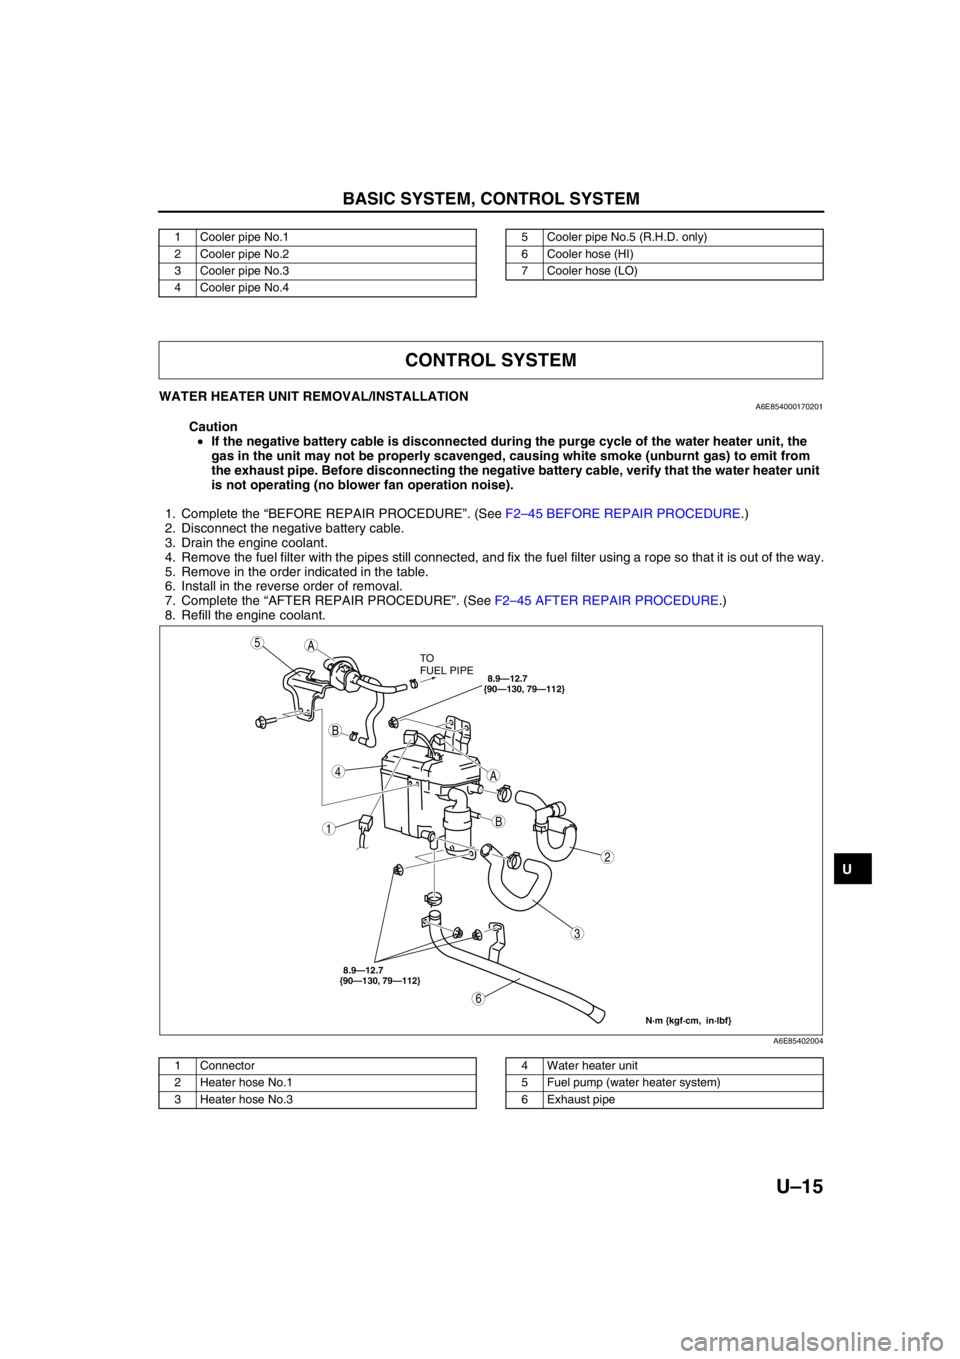
BASIC SYSTEM, CONTROL SYSTEM
U–15
U
End Of Sie
WATER HEATER UNIT REMOVAL/INSTALLATIONA6E854000170201
Caution
•If the negative battery cable is disconnected during the purge cycle of the water heater unit, the
gas in the unit may not be properly scavenged, causing white smoke (unburnt gas) to emit from
the exhaust pipe. Before disconnecting the negative battery cable, verify that the water heater unit
is not operating (no blower fan operation noise).
1. Complete the “BEFORE REPAIR PROCEDURE”. (See F2–45 BEFORE REPAIR PROCEDURE.)
2. Disconnect the negative battery cable.
3. Drain the engine coolant.
4. Remove the fuel filter with the pipes still connected, and fix the fuel filter using a rope so that it is out of the way.
5. Remove in the order indicated in the table.
6. Install in the reverse order of removal.
7. Complete the “AFTER REPAIR PROCEDURE”. (See F2–45 AFTER REPAIR PROCEDURE.)
8. Refill the engine coolant.
.
End Of Sie
1 Cooler pipe No.1
2 Cooler pipe No.2
3 Cooler pipe No.3
4 Cooler pipe No.45 Cooler pipe No.5 (R.H.D. only)
6 Cooler hose (HI)
7 Cooler hose (LO)
CONTROL SYSTEM
A
A
B
B
5
4
3
1
2
6
TO
FUEL PIPE
8.9—12.7
{90—130, 79—112}
N·m {kgf·cm, in·lbf}
8.9—12.7
{90—130, 79—112}
A6E85402004
1 Connector
2 Heater hose No.1
3 Heater hose No.34 Water heater unit
5 Fuel pump (water heater system)
6 Exhaust pipe