window MAZDA 626 1987 User Guide
[x] Cancel search | Manufacturer: MAZDA, Model Year: 1987, Model line: 626, Model: MAZDA 626 1987Pages: 1865, PDF Size: 94.35 MB
Page 1567 of 1865

1 4 FRONT DOORS
86U14X-060
86U14X-040
86U14X-041
6. Remove the beltline molding. (Refer to page
14-39)
7. Remove the door glass upward.
8. Remove the mounting bolts, and remove the regu-
lator through the service hole.
9. Remove the window motor mounting bolt, and re-
move the motor from the regulator (power window).
Removal of Outer Handle and Key Cylinder
1. Disconnect the rod from the outer handle.
69G14X-036
14—16
Page 1568 of 1865

FRONT DOORS 1 4
86U14X-042
86U14X-043
69G14X-038
2. Remove the key cylinder spring.
3. Remove the key cylinder.
4. Remove the mounting nuts and remove the outer
handle.
Removal of Door Lock Assembly
1. Remove the mounting screws.
2. Remove the door lock assembly.
INSTALLATION
Install in the reverse order of removal, noting the fol-
lowing.
Power Window
Before installing the motor, connect the leads to a bat-
tery and run the regulator down to the position shown.
63U14X-035
14—17
Page 1570 of 1865

REAR DOORS 1 4
REAR DOORS
STRUCTURAL VIEW
Sedan and Hatchback
86U14X-046
1. Regulator handle
(manual type)
2. Arm rest
3. Power window switch
4. Inner handle cover
5. Door trim
6. Belt line molding
7. Door screen
8. Door lock
9. Outer handle
10. Regulator (power type)
11. Regulator (manual type)
12. Glass guide
13. Glass
14. Weatherstrip
15. Weatherstrip
16. Door checker
17. Door
18. Weatherstrip
19. Sail inner garnish
20. Sail outer garnish
14—19
Page 1571 of 1865

1 4 REAR DOORS
86U14X-047
86U14X-048
86U14X-049
REMOVAL
Rear Door Glass and Regulator
1. Lower the door glass the way.
2. Remove the clip. (Manual type)
3. Remove the regulator handle. (Manual type)
4. Remove the inner handle cover.
5. Remove the door trim.
Note
For vehicles with power windows, disconnect
the connectors.
6. Remove the door screen.
Caution
Remove the screen carefully so that it may be
reused.
7. Position the door glass so that the mounting bolts
can be removed from the service hole.
8. Remove the mounting bolts.
86U14X-050
14—20
Page 1572 of 1865

REAR DOORS 1 4
9. Remove the door glass upward.
86U14X-051
Remove the mounting bolts, and remove the win-
dow regulator through the service hole.
Remove the window motor mounting bolts, then
remove the motor from the regulator (power
window).
86U14X052
INSTALLATION
Install in the reverse order of removal, noting the fol-
lowing.
Tightening torque:
Nm (m-kg, ft-lb)
Door lock assembly 4.22-6 18 (0 43-0 63, 3,10—4.54)
Outer handle 8.8-13 (0.9-1.3. 6.5-9.4)
Glass Quide 7.8—11 (0.8—1.1, 5.8—8.0)
Regulator Nut 8 8—13 (0.9—1.3, 6.5—9.4) Regulator Bolt 7.8-11 (0.8-1.1. 5.8-8.0)
Door lock striker 18-26 (1.8-2.7, 13-20)
Before installing the motor, connect the leads to a bat-
tery and run regulator down to the position shown.
14—21
Page 1588 of 1865

MOLDING AND GARNISH 1 4
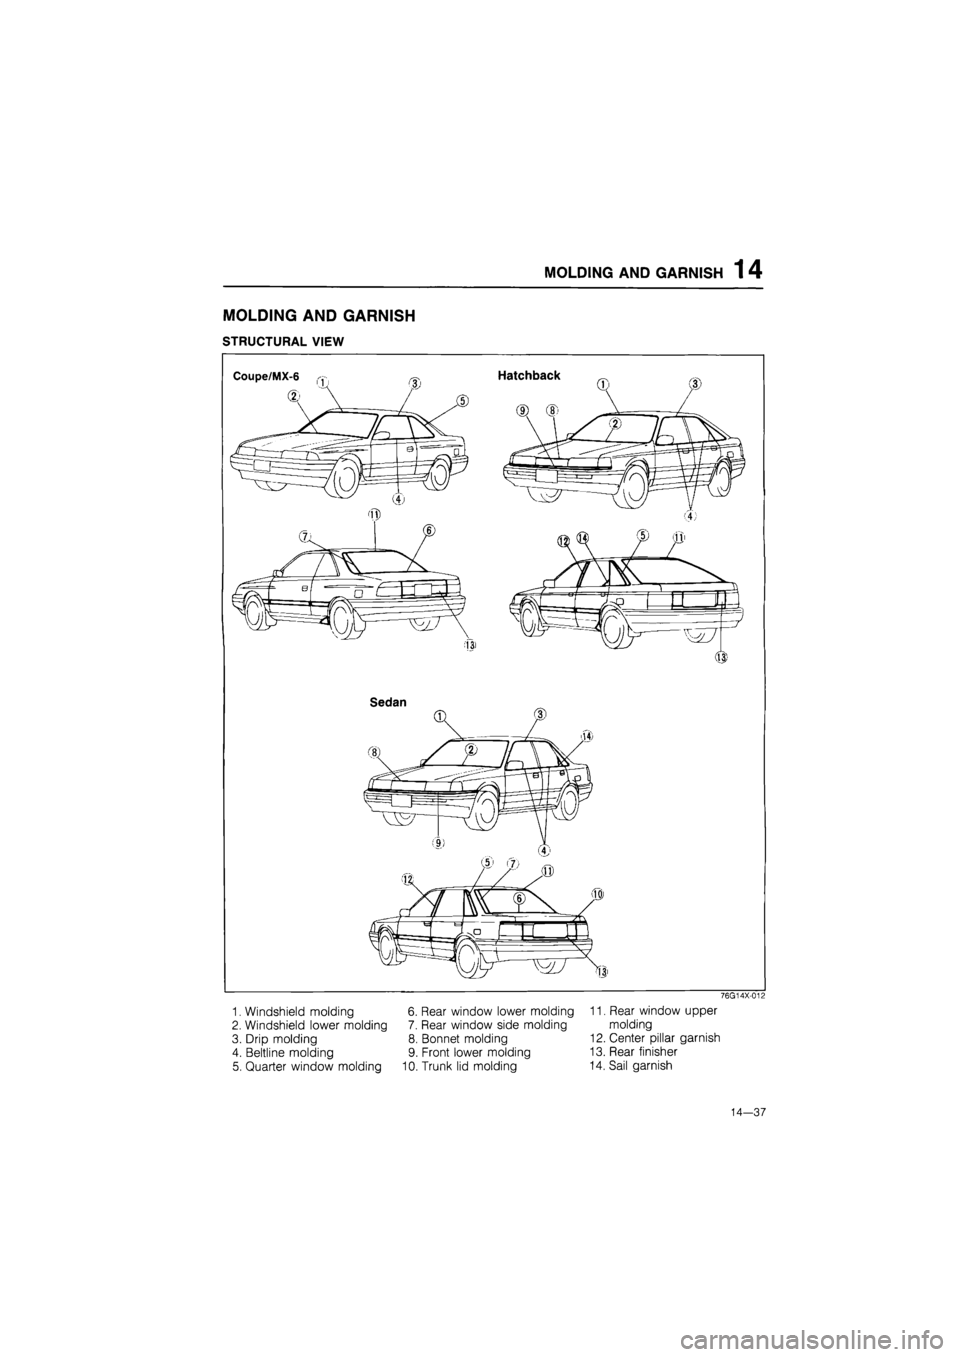
MOLDING AND GARNISH
STRUCTURAL VIEW
Coupe/MX-6
Sedan
76G14X-012
1. Windshield molding 6. Rear window lower molding 11. Rear window upper
2. Windshield lower molding 7. Rear window side molding molding
3. Drip molding 8. Bonnet molding 12. Center pillar garnish
4. Beltline molding 9. Front lower molding 13. Rear finisher
5. Quarter window molding 10. Trunk lid molding 14. Sail garnish
14—37
Page 1590 of 1865

MOLDING AND GARNISH 14
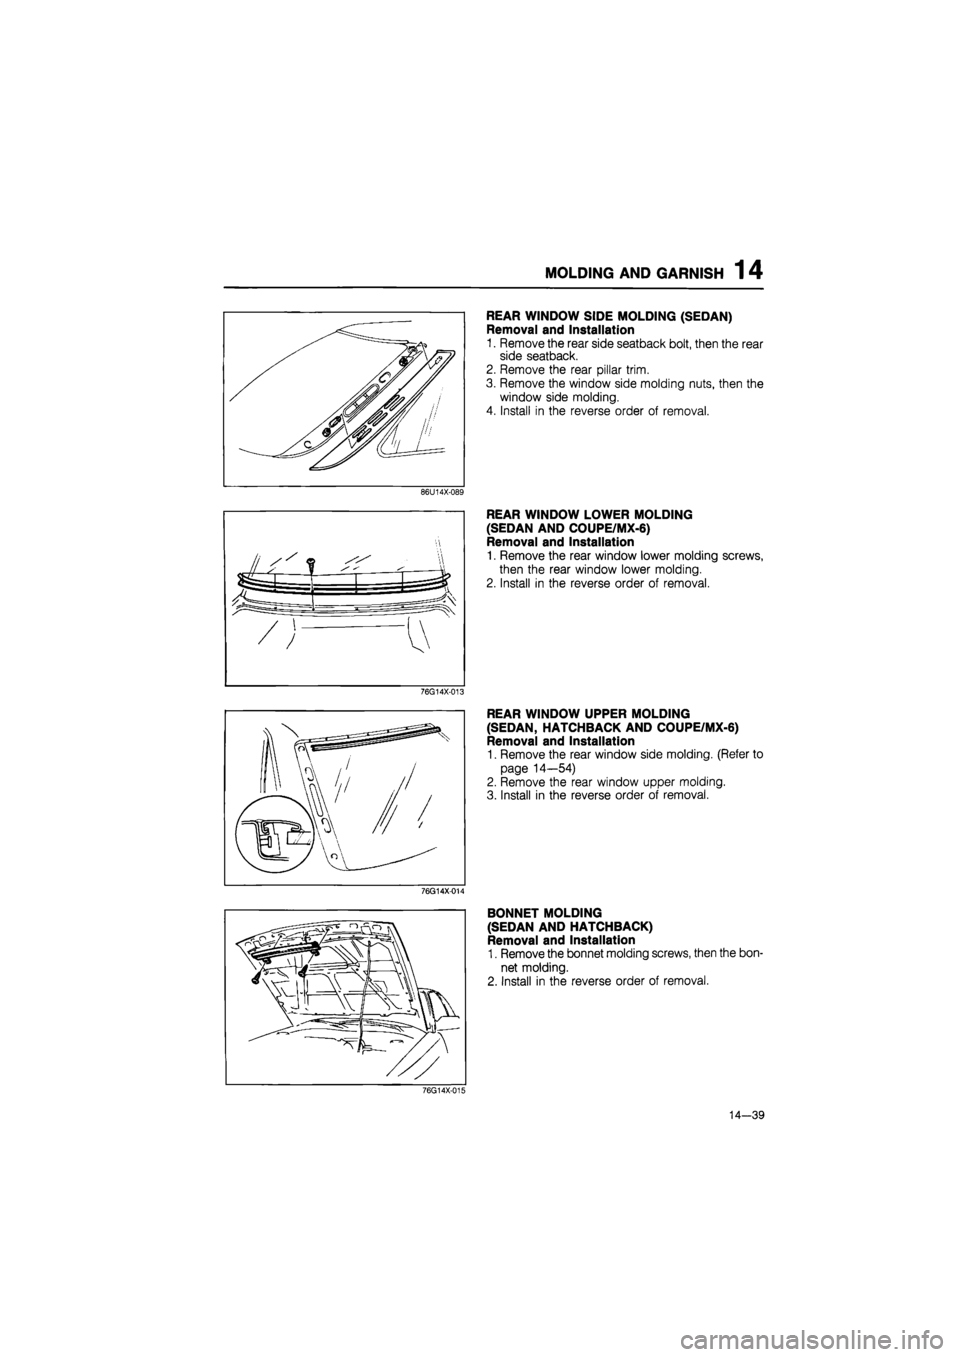
REAR WINDOW SIDE MOLDING (SEDAN)
Removal and Installation
1. Remove the rear side seatback bolt, then the rear
side seatback.
2. Remove the rear pillar trim.
3. Remove the window side molding nuts, then the
window side molding.
4. Install in the reverse order of removal.
86U14X-089
Vi
REAR WINDOW LOWER MOLDING
(SEDAN AND COUPE/MX-6)
Removal and Installation
1. Remove the rear window lower molding screws,
then the rear window lower molding.
2. Install in the reverse order of removal.
76G14X-013
REAR WINDOW UPPER MOLDING
(SEDAN, HATCHBACK AND COUPE/MX-6)
Removal and Installation
1. Remove the rear window side molding. (Refer to
page 14—54)
2. Remove the rear window upper molding.
3. Install in the reverse order of removal.
76G14X-014
BONNET MOLDING
(SEDAN AND HATCHBACK)
Removal and Installation
1. Remove the bonnet molding screws, then the bon-
net molding.
2. Install in the reverse order of removal.
76G14X-015
14-39
Page 1591 of 1865

14 MOLDING AND GARNISH
QUARTER WINDOW MOLDING (COUPE/MX-6)
Removal and Installation
1. Remove the seat belts.
2. Remove the rear header screw.
3. Remove the screws and the quarter trim.
4. Remove the screws and the center pillar trim.
5. Remove the quarter window molding mounting in-
stallation nuts.
6. Remove the screws and the quarter window
molding.
7. Install in the reverse order of removal.
76G14X-016
QUARTER WINDOW MOLDING
(HATCHBACK)
Removal and Installation
1. Remove the rear header screw.
2. Remove the bolt and the rear side seatback.
3. Remove the screws and the package side shelf.
4. Remove the screws and the rear pillar trim.
5. Remove the nuts and the quarter window molding.
6. Install in the reverse order of removal.
76G14X-017
QUARTER WINDOW MOLDING (SEDAN)
Removal and Installation
1. Remove the rear header screw.
2. Remove the bolt and the rear side seatback.
3. Remove the quarter trim.
4. Remove the nuts and the quarter window molding.
5. Install in the reverse order of removal.
86U14X-095
REAR WINDOW SIDE MOLDING (COUPE/MX-6)
Removal and Installation
1. Remove the seat belts.
2. Remove the rear header screw.
3. Remove the screws and the quarter side trim.
4. Remove the screws and the center pillar trim.
5. Remove the nuts and the rear window side
molding.
6. Install in the reverse order of removal.
76G14X-018
14-40
Page 1598 of 1865

WINDSHIELD GLASS 1 4
WINDSHIELD GLASS
STRUCTURAL VIEW
86U14X-110
1. Rear view mirror 4. Front pillar trim
2. Sunvisor 5. Wiper arm
3. Front header trim 6. Lower molding
Note
Use window tool set (49 0305 870A) to remove and install the glass.
7. Front windshield molding
8. Windshield glass
9. Spacer
14—47
Page 1599 of 1865

1 4 WINDSHIELD GLASS
REMOVAL
1. Remove the rearview mirror, sunvisors, front pillar
trim, and front header trim.
2. Remove the wiper arms and lower molding.
3. Remove the front window molding.
86U14X-111
Protective tape
Piano wire
Caution
Before removing the sealant, apply adhesive
tape to the body and instrument panel to pro-
tect them from damage.
86U14X-112
86U14X-113
4. Make a small hole through the sealant.
5. Pass the piano wire through the hole.
6. Wind each end of the wire around a bar.
7. Pull the wire to and fro, and saw through the seal-
ant around the edge of the glass. Then remove the
glass.
Caution
a) Use a long sawing action to spread the work
over the whole length of wire to prevent it
from breaking.
b) Be careful that the wire does not rub on the
body or instrument panel.
Note
If the glass is not to be reused, a tool like that
shown in the figure may be used.
Insert the blade in the sealant, and pull on the bars.
86U14X-114
14—48