ECU MAZDA 626 1987 Owner's Manual
[x] Cancel search | Manufacturer: MAZDA, Model Year: 1987, Model line: 626, Model: MAZDA 626 1987Pages: 1865, PDF Size: 94.35 MB
Page 519 of 1865

FUEL SYSTEM 4B
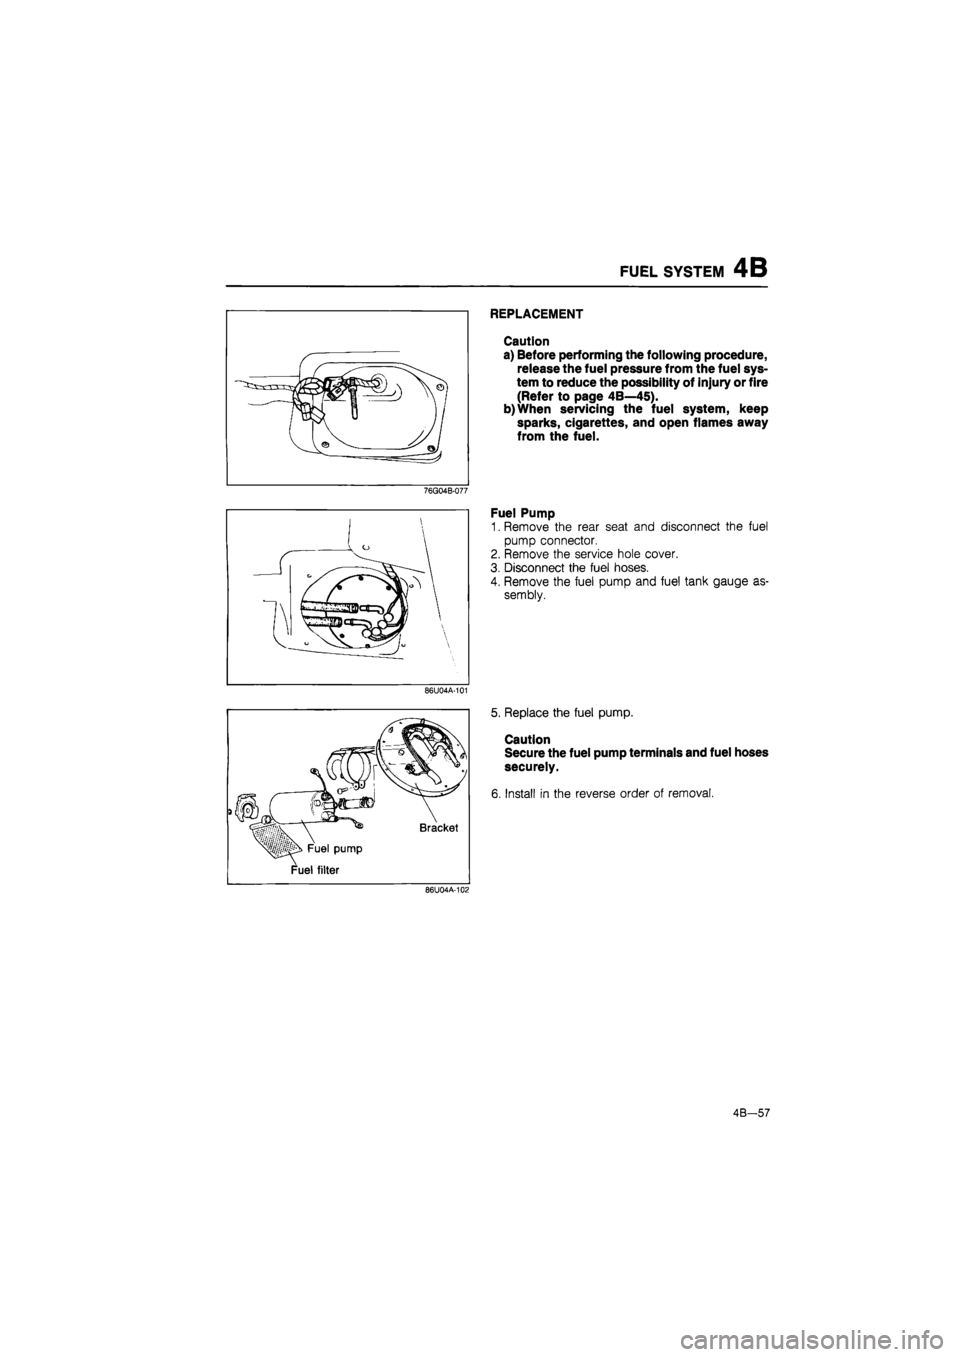
REPLACEMENT
Caution
a) Before performing the following procedure,
release the fuel pressure from the fuel sys-
tem to reduce the possibility of injury or fire
(Refer to page 4B—45).
b)When servicing the fuel system, keep
sparks, cigarettes, and open flames away
from the fuel.
76G04B-077
86U04A-101
M Fuel pump
Fuel filter
Bracket
86U04A-102
Fuel Pump
1. Remove the rear seat and disconnect the fuel
pump connector.
2. Remove the service hole cover.
3. Disconnect the fuel hoses.
4. Remove the fuel pump and fuel tank gauge as-
sembly.
5. Replace the fuel pump.
Caution
Secure the fuel pump terminals and fuel hoses
securely.
6. Install in the reverse order of removal.
4B—57
Page 522 of 1865

4B FUEL SYSTEM
Pressure Regulator
1. Disconnect the vacuum hose and fuel return hose.
2. Remove the pressure regulator.
3. Install in the reverse order of removal.
Tightening torque:
8—11 N-m (0.8—1.1 m-kg, 69—95 in-lb)
76G04B-084
Pulsation Damper
1. Loosen the pulsation damper and remove it.
2. Install in the reverse order of removal.
76G04B-085
^-Fuel hose
ML*? ^-Fuel pump
^silntank filter
ti* e
76G04B-086
h
tS
Is o
Sjfbj
Fuel Filter
Low pressure side
Refer to page 4B—57.
86U04A-116
High pressure side
The fuel filter must be replaced at the intervals out-
lined in the maintenance schedule.
Warning
Always work away from sparks or open
flames.
1. Disconnect the fuel hoses from the fuel filter.
2. Remove the fuel filter and the bracket.
3. Install a new filter and the bracket.
4. Connect the fuel hoses.
Note
When installing the filter, push the fuel hoses
fully onto the fuel filter and secure the hoses
with spring clamps.
4B-60
Page 599 of 1865

4C INTAKE AIR SYSTEM
Installation Note
Water hose spring clamps
Face the clamp end as shown in the figure.
Gasket
Use new gaskets at the intake manifold, dynamic
chamber, and throttle body.
86U04A-056
• . v 1
Engine 1 Ml' ' •-
hanger ^ •
• i::£?^Solenoid valve bracket
Air cleaner. r^I. ^jUvW;
Th V
Ground harnesses
Make sure that the ground harnesses are tightened
securely at the following positions.
(1) Air cleaner upper case
(2) Solenoid valve braket
(3) Engine hanger
76G04C-062
Solenoid valve connectors
Connect the solenoid valve connectors at the posi-
tions shown in the figure.
76G04C-063
Inspection after installation
1. After completing installation, fill up the engine with
the specified engine coolant.
2. Warm up the engine and run it at idle.
3. Check for any vacuum, coolant, or fuel leaks.
76G04C-064
4C-38
Page 621 of 1865

4C FUEL SYSTEM
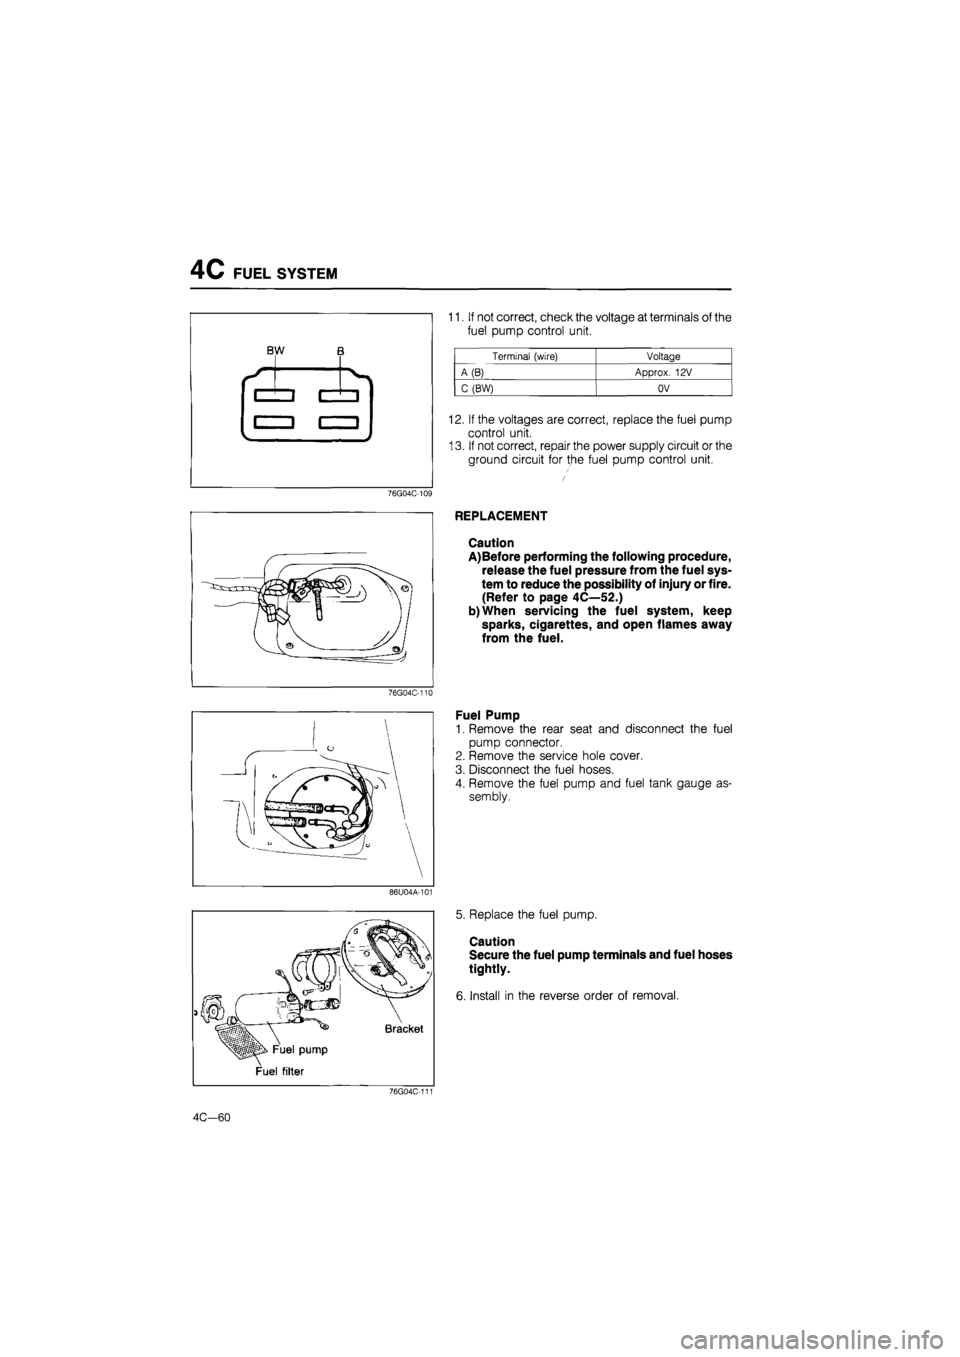
BW B
11. If not correct, check the voltage at terminals of the
fuel pump control unit.
76G04C-109
76G04C-110
86U04A-101
Fuel pump
Fuel filter
Bracket
76G04C-111
Terminal (wire) Voltage
A(B) Approx. 12V
C (BW) OV
12. If the voltages are correct, replace the fuel pump
control unit.
13. If not correct, repair the power supply circuit or the
ground circuit for the fuel pump control unit.
REPLACEMENT
Caution
A)Before performing the following procedure,
release the fuel pressure from the fuel sys-
tem to reduce the possibility of injury or fire.
(Refer to page 4C—52.)
b)When servicing the fuel system, keep
sparks, cigarettes, and open flames away
from the fuel.
Fuel Pump
1. Remove the rear seat and disconnect the fuel
pump connector.
2. Remove the service hole cover.
3. Disconnect the fuel hoses.
4. Remove the fuel pump and fuel tank gauge as-
sembly.
5. Replace the fuel pump.
Caution
Secure the fuel pump terminals and fuel hoses
tightly.
6. Install in the reverse order of removal.
4C—60
Page 625 of 1865

4C FUEL SYSTEM
^ Pulsation
damper
76G04C-121
Pulsation damper
—
Delivery pipe
76G04C-122
Fuel hose
,Fuel pump
-Intank filter
76G04C-123
Insulator
f f r—
/ 0 DM
•
II r
O - ring
Grommet
Manifold
Delivery pipe
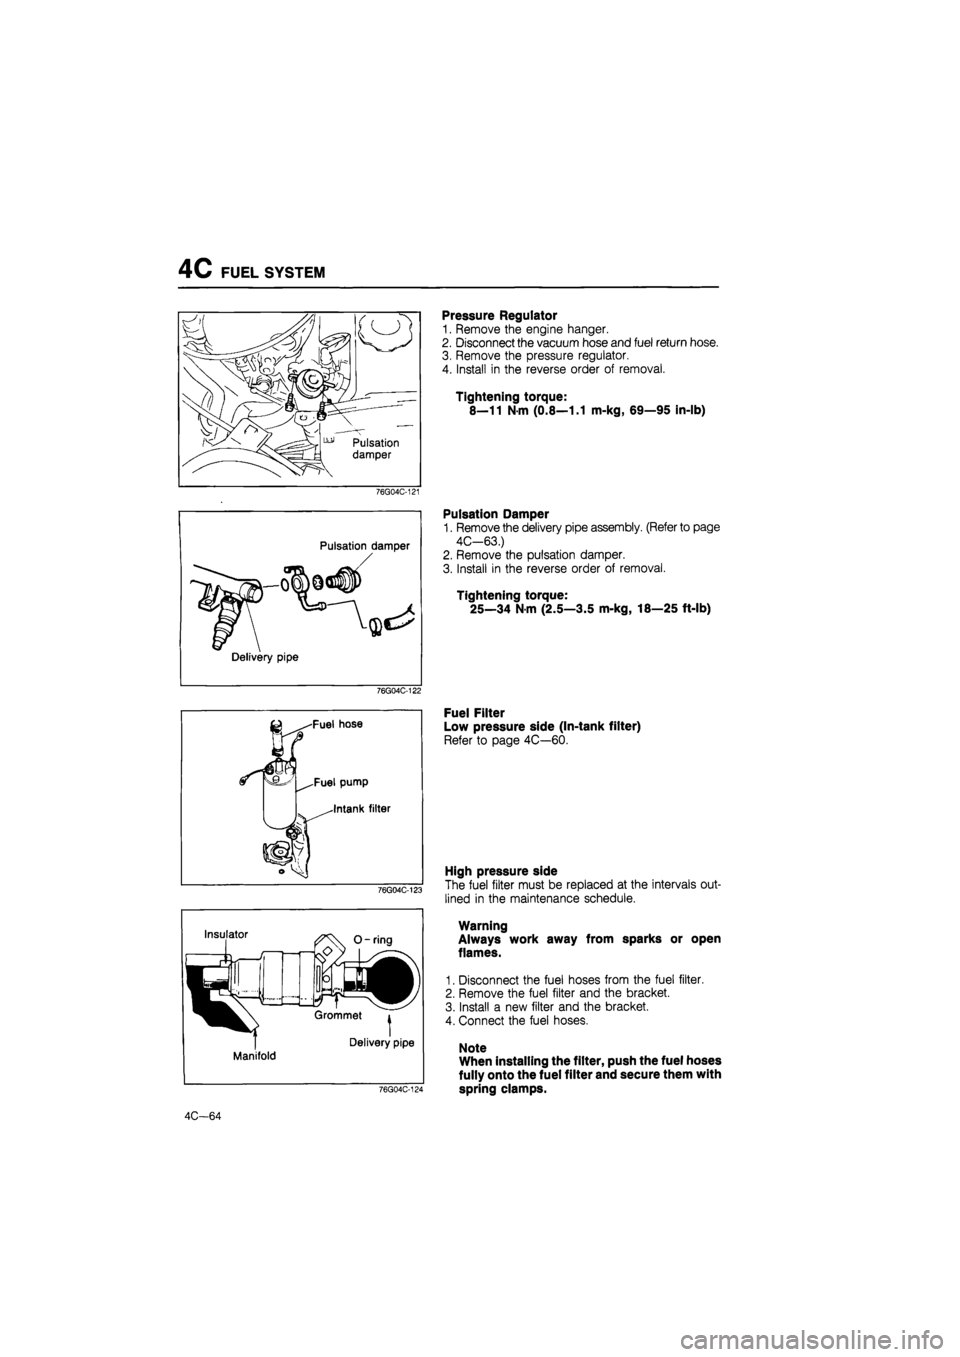
Pressure Regulator
1. Remove the engine hanger.
2. Disconnect the vacuum hose and fuel return hose.
3. Remove the pressure regulator.
4. Install in the reverse order of removal.
Tightening torque:
8—11 Nm (0.8—1.1 m-kg, 69—95 in-lb)
Pulsation Damper
1. Remove the delivery pipe assembly. (Refer to page
4C-63.)
2. Remove the pulsation damper.
3. Install in the reverse order of removal.
Tightening torque:
25—34 N m (2.5—3.5 m-kg, 18—25 ft-lb)
Fuel Filter
Low pressure side (In-tank filter)
Refer to page 4C—60.
76G04C-124
High pressure side
The fuel filter must be replaced at the intervals out-
lined in the maintenance schedule.
Warning
Always work away from sparks or open
flames.
1. Disconnect the fuel hoses from the fuel filter.
2. Remove the fuel filter and the bracket.
3. Install a new filter and the bracket.
4. Connect the fuel hoses.
Note
When installing the filter, push the fuel hoses
fully onto the fuel filter and secure them with
spring clamps.
4C-64
Page 741 of 1865

ALTERNATOR 5
Stopper spring
Rear bearing
86U05X-026
86U05X-027
86U05X-028
.
',
; i
(S) -^jJSTjT^/
ASSEMBLY
Assemble in the reverse order of disassembly, refer-
ring to assembly note.
Assembly Note
Stopper spring installation
1. Fit the stopper spring into the eccentric groove of
the rear bearing circumference.
2. Check that the protruding part of the spring is fitted
into the deepest part of the groove.
Front bracket and rotor
When assembling the front bracket and rotor, tight-
en the locknut to the specified torque.
Tightening torque:
49—88 N-m (5—9 m-kg, 36—65 ft-lb)
Brush lifting
1. Before assembly, use a finger to hold the brushes
into the brush holder; then pass a wire
(
mm,
40—50 mm, 00.08 in, 1.6—2.0 in) through the
hole shown in the figure.
2. Secure the brushes in position.
Note
Be sure to remove wire after assembly is com-
pleted.
Rear bearing installation
1. Heat the rear bracket.
2. Press the rear bearing into the rear bracket.
3. Check that the rotor turns easily.
4BG05X-054
5-35
Page 797 of 1865

CLUTCH RELEASE CYLINDER
INSTALLATION
1. Install the clutch master cylinder.
2. Tighten the mounting nuts.
Tightening torque:
19—26 Nm (1.9—2.6 m-kg, 14—19 ft-lb)
3. Tighten the clutch pipe flare nut securely with the
SST.
Tightening torque:
13—22 N m (1.3—2.2 m-kg, 9—16 ft-lb)
76G06X-021 4. Install the ABS relay box. (LHD)
After installation
1. Perform air bleeding. (Refer to page 6—14.)
2. Verify that there is no leakage.
3. Perform a road test.
CLUTCH RELEASE CYLINDER
86U06X-019
6-11
Page 800 of 1865

6 AIR BLEEDING
76U06X-031
4. Install the following parts:
(1) Push rod
(2) Boot
INSTALLATION
1. Install the release cylinder.
2. Tighten the installation bolts.
Tightening torque:
19—26 N-m (1.9—2.6 m-kg, 14—19 ft-lb)
3. Tighten the clutch pipe flare nut securely with the
SST
Tightening torque:
13—22 N-m (1.3—2.2 m-kg, 9—16 ft-lb)
After installation
1. Perform air bleeding.
2. Verify that there is no leakage from the hydraulic
circuit.
3. Perform a road test.
49 0259 770B
AIR BLEEDING
The clutch hydraulic system must be bled to remove
air that entered when the pipes were disconnected.
This bleeding is done as described below.
Note
a) The fluid in the reserve tank must be main-
tained at the 3/4 level or higher during air
bleeding.
b) Use only the specified fluid type. (Refer to
page 6—3)
c) Be careful not to spill clutch fluid onto a
painted surface.
1. Remove the bleeder cap, and attach a vinyl hose
to the bleeder screw.
2. Place the other end of the vinyl tube in a glass con-
tainer of the appropriate capacity.
3. Slowly pump the clutch pedal several times by
hand.
4. While the clutch pedal is depressed, loosen the
bleeder screw to let fluid and air escape.
Then close the bleeder screw.
5. Repeat step 3 and 4 until no more air bubbles are
in the fluid.
6. Check for correct clutch operation.
86U06X-027
86U06X-028
49 0259 770B
76G06X-023
6—14
expert22 ajia http://rutracker.org
Page 814 of 1865

7A ON-VEHICLE MAINTENANCE
86U07A-012
86U07A-013
86U07A-014
8. Tap the new oil seal into the transaxle case with
the SST.
Note
a) Tap in until the oil seal installer contacts the
case.
b)Coat the oil seal lip with transaxle oil.
9. Replace the driveshaft end clip with a new one.
Insert the clip with the gap at the top of the groove.
10. Install the driveshaft as follows:
(1) Pull the front hub outward, then
fit
the driveshaft
into the transaxle.
(2) Insert the driveshaft into the transaxle by push-
ing on the wheel hub assembly.
Note
a) Be careful not to damage the oil seal.
b) After installation is finished, pull the front
hub slowly outward to check that the
driveshaft is held securely by the clip.
11. Install the lower arm ball-joint to the knuckle, and
tighten the clinch bolt.
Tightening torque:
43—54 N-m (4.4—5.5 m-kg, 32—40 ft-lb)
12. Install the tie-rod end and new cotter pin.
Tightening torque:
29—44 N m (3.0—4.5 m-kg, 22—33 ft-lb)
86U07A-015
7 A—8
Page 861 of 1865

INSTALLATION 7A
14. Install the clutch release cylinder.
Tightening torque: 19—26 N-m
(1.9—2.6 m-kg, 14—19 ft-lb)
76G07A-060
15. Install the gusset plates.
Tightening torque: 37—52 N-m
(3.8—5.3 m-kg, 27—38 ft-lb)
76G07A-061
16. Replace the clips at the end of the driveshafts and
joint shaft with new ones.
17. Install the joint shaft and right driveshaft as follows:
(1) Install and tighten the reamer bolts (A); then in-
stall and tighten the standard bolts (§).
Tightening torque:
® :7—10 N-m
(70—100 cm-kg, 43—61 in-lb)
(B) :42—62 Nm
(4.3—6.3 m-kg, 31—46 ft-lb)
76G07A-062
(2) Remove the SST and insert the shaft into the
transaxle.
(3) Pull the front hub outward and connect the
driveshaft to the joint shaft.
(4) Push the joint at the differential side to secure-
ly connect the driveshaft to the joint shaft.
Note
a) After installation, pull the front hub outward
to confirm that the driveshaft doesn't come
out.
b)Do not damage the oil seal.
86U07A-219
7A-55