lock MAZDA MODEL 3 4-DOOR 2017 Owners Manual
[x] Cancel search | Manufacturer: MAZDA, Model Year: 2017, Model line: MODEL 3 4-DOOR, Model: MAZDA MODEL 3 4-DOOR 2017Pages: 612
Page 464 of 612
6–52
Maintenance and Care
Owner Maintenance
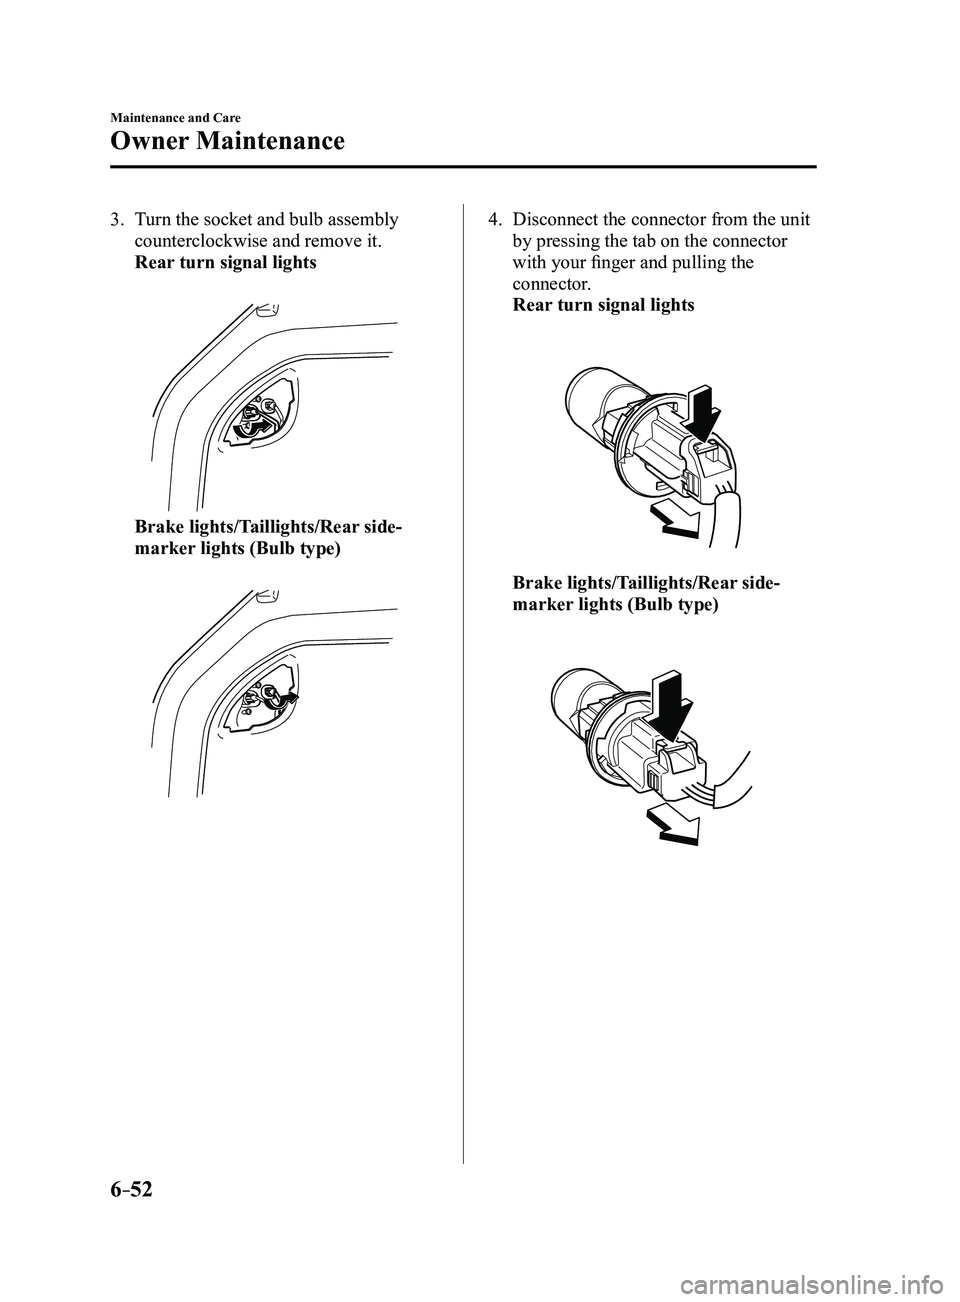
3. Turn the socket and bulb assembly
counterclockwise and remove it.
Rear turn signal lights
Brake lights/Taillights/Rear side-
marker lights (Bulb type)
4. Disconnect the connector from the unit
by pressing the tab on the connector
with your finger and pulling the
connector.
Rear turn signal lights
Brake lights/Taillights/Rear side-
marker lights (Bulb type)
Mazda3_8FL6-EA-16F_Edition2.indb 522016/08/10 17:38:54
Page 465 of 612
6–53
Maintenance and Care
Owner Maintenance
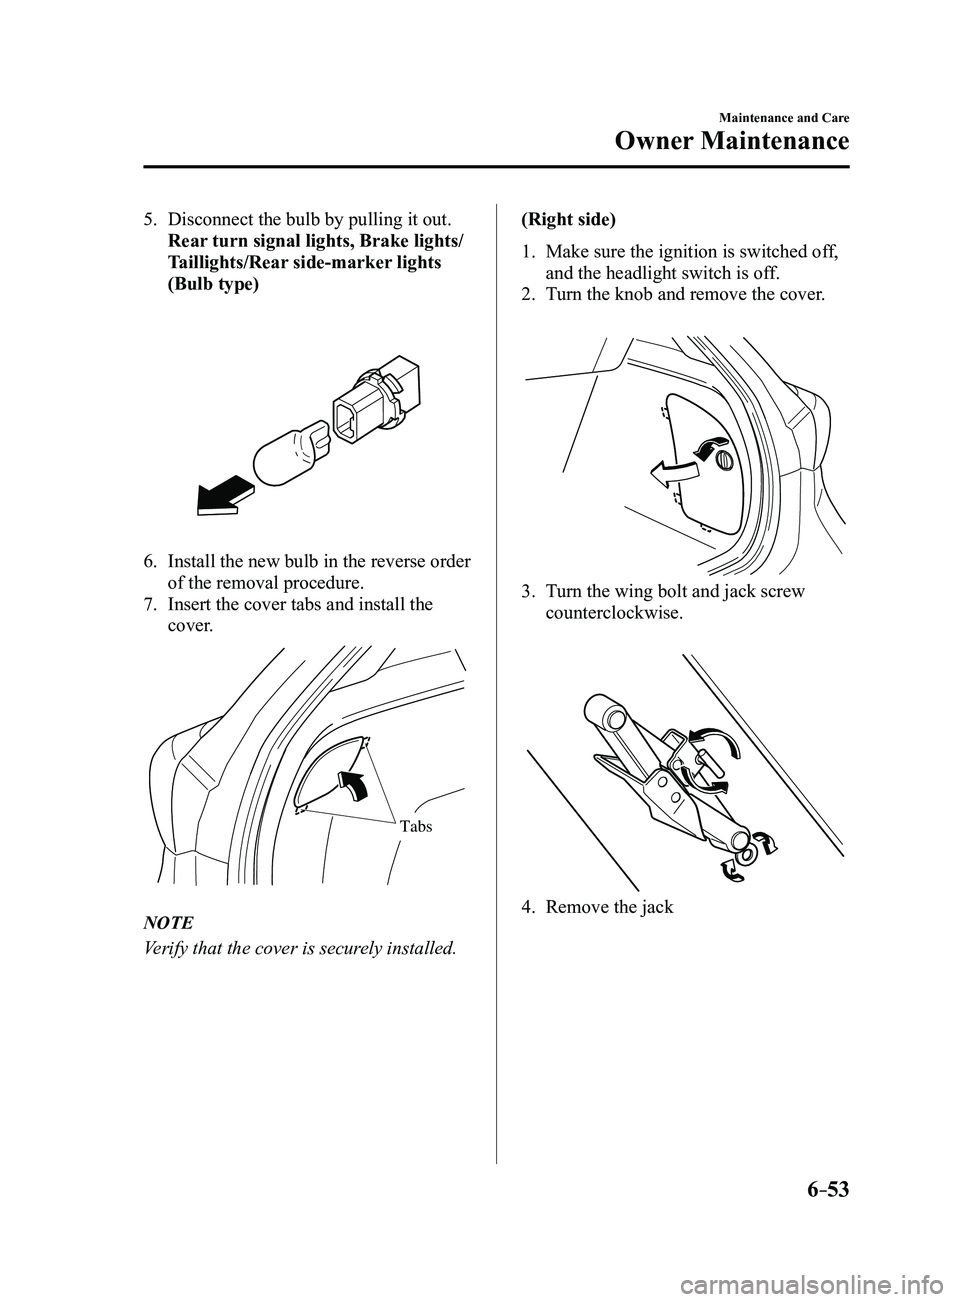
5. Disconnect the bulb by pulling it out.
Rear turn signal lights, Brake lights/
Taillights/Rear side-marker lights
(Bulb type)
6. Install the new bulb in the reverse order
of the removal procedure.
7. Insert the cover tabs and install the
cover.
Tabs
NOTE
Verify that the cover is securely installed.(Right side)
1. Make sure the ignition is switched of
f,
and the headlight switch is off.
2. Turn the knob and remove the cover.
3. Turn the wing bolt and jack screw
counterclockwise.
4. Remove the jack
Mazda3_8FL6-EA-16F_Edition2.indb 532016/08/10 17:38:55
Page 466 of 612
6–54
Maintenance and Care
Owner Maintenance
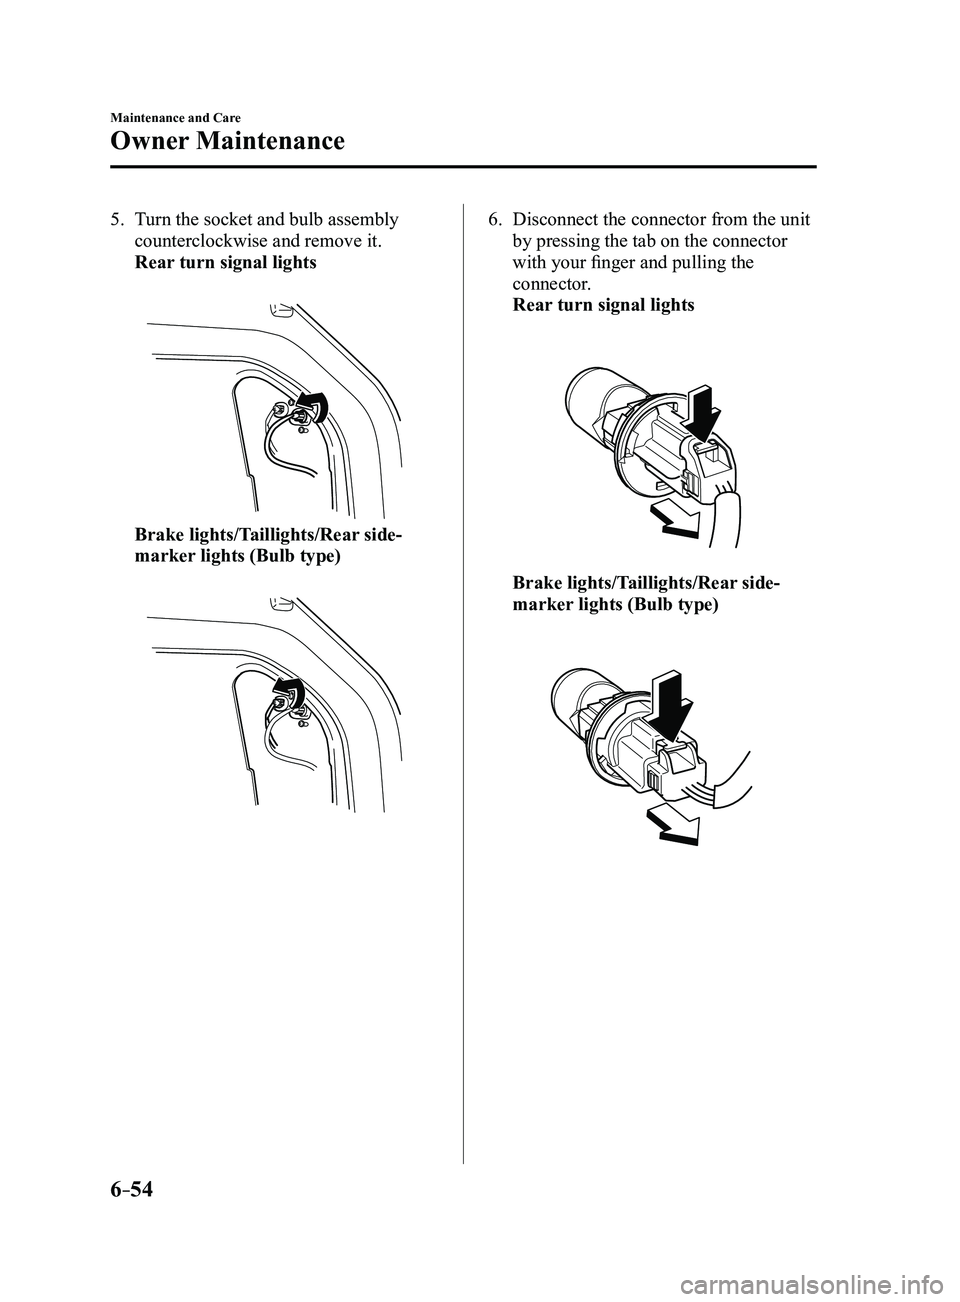
5. Turn the socket and bulb assembly
counterclockwise and remove it.
Rear turn signal lights
Brake lights/Taillights/Rear side-
marker lights (Bulb type)
6. Disconnect the connector from the unit
by pressing the tab on the connector
with your finger and pulling the
connector.
Rear turn signal lights
Brake lights/Taillights/Rear side-
marker lights (Bulb type)
Mazda3_8FL6-EA-16F_Edition2.indb 542016/08/10 17:38:56
Page 467 of 612
6–55
Maintenance and Care
Owner Maintenance
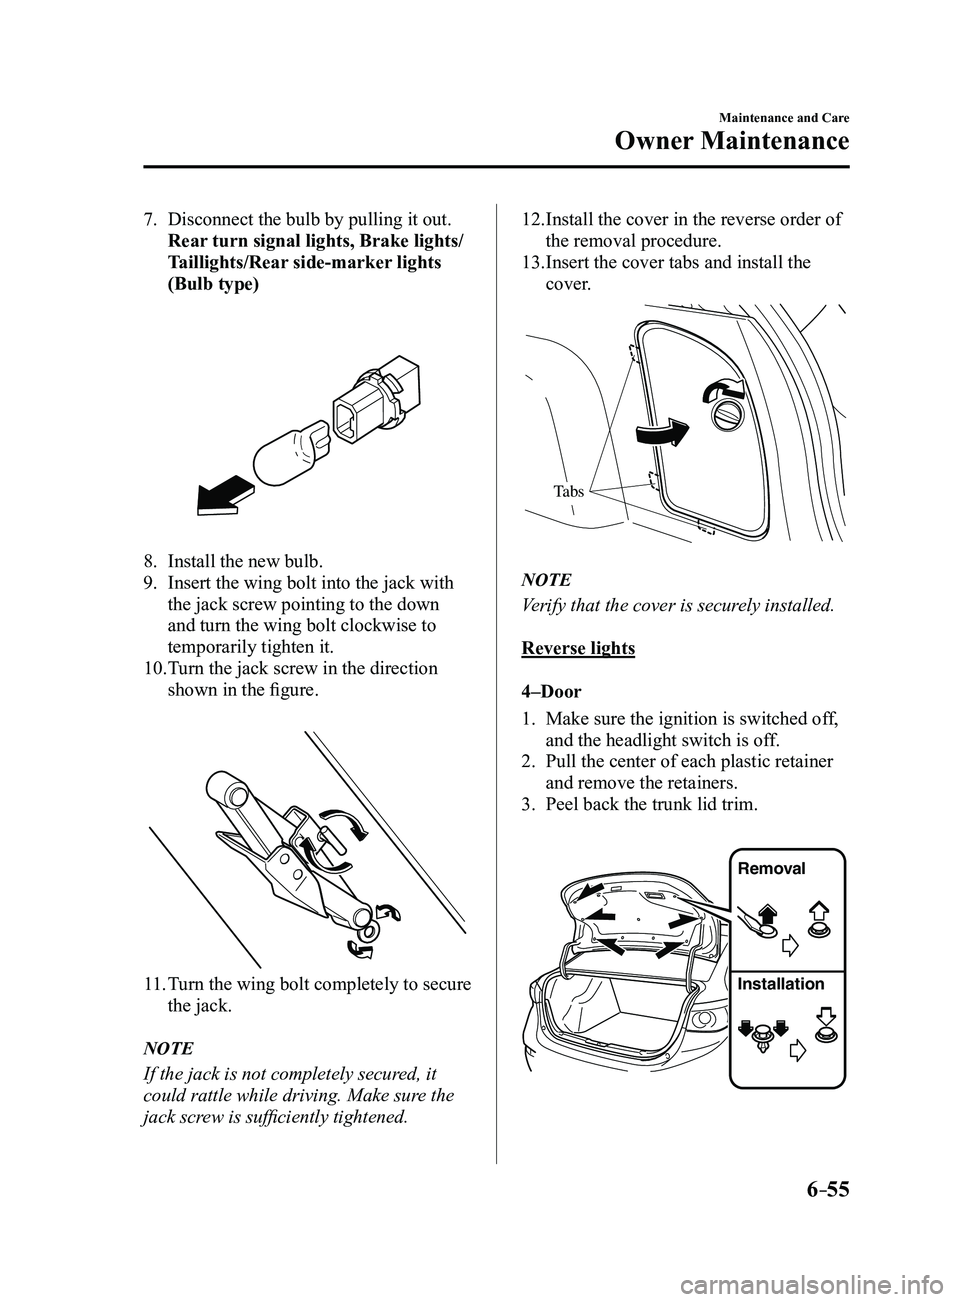
7. Disconnect the bulb by pulling it out.
Rear turn signal lights, Brake lights/
Taillights/Rear side-marker lights
(Bulb type)
8. Install the new bulb.
9. Insert the wing bolt into the jack with
the jack screw pointing to the down
and turn the wing bolt clockwise to
temporarily tighten it.
10. Turn the jack screw in the direction
shown in the figure.
11. Turn the wing bolt completely to secure
the jack.
NOTE
If the jack is not completely secured, it
could rattle while driving. Make sure the
jack screw is sufficiently tightened.
12. Install the cover in the reverse order of
the removal procedure.
13. Insert the cover tabs and install the
cover.
Tabs
NOTE
Verify that the cover is securely installed.
Reverse lights
4–Door
1. Make sure the ignition is switched off,
and the headlight switch is off.
2. Pull the center of each plastic retainer
and remove the retainers.
3. Peel back the trunk lid trim.
Removal
Installation
Mazda3_8FL6-EA-16F_Edition2.indb 552016/08/10 17:38:56
Page 468 of 612
6–56
Maintenance and Care
Owner Maintenance
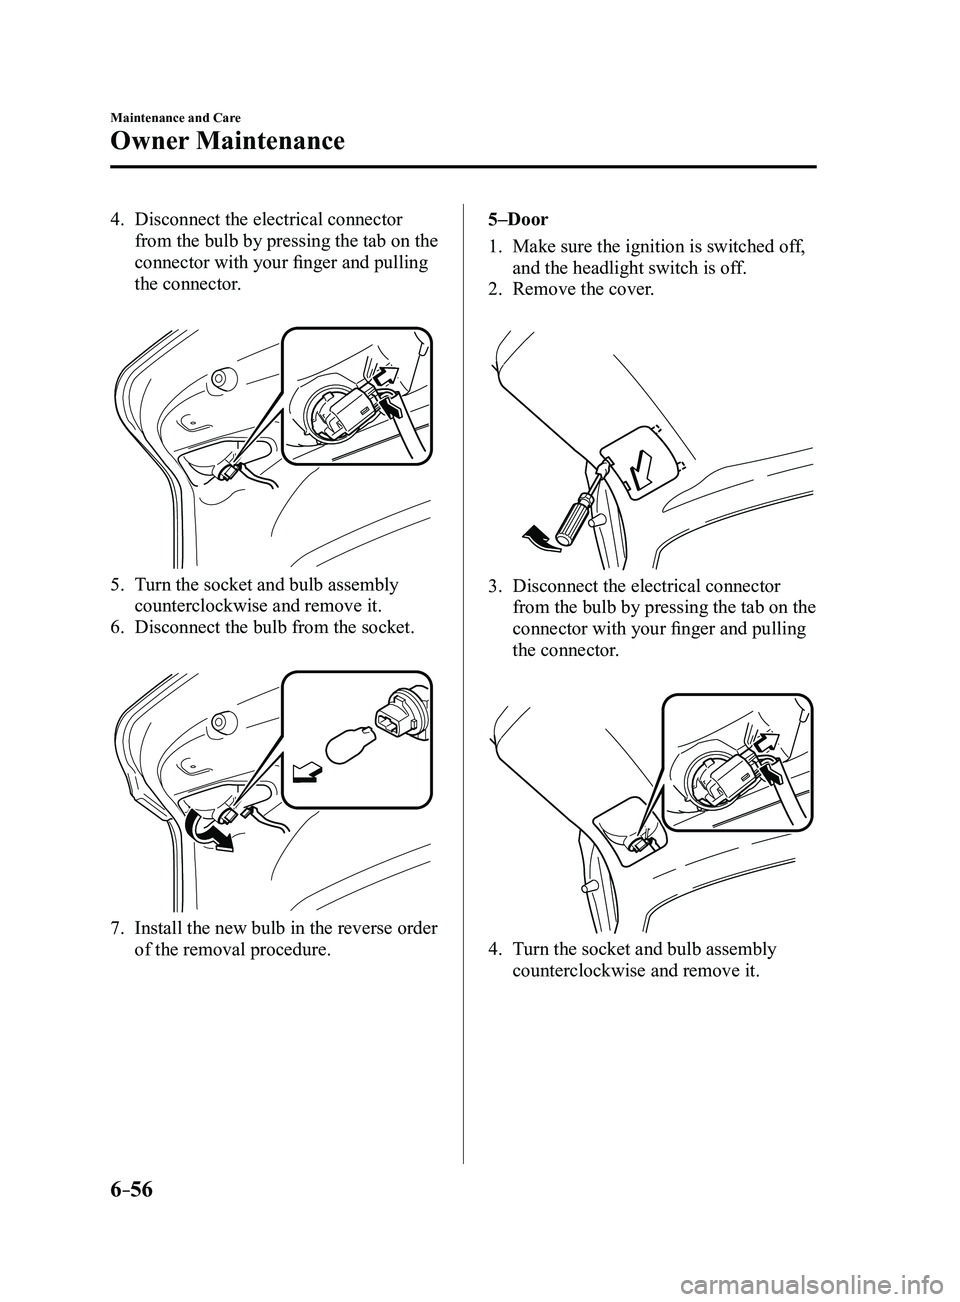
4. Disconnect the electrical connector
from the bulb by pressing the tab on the
connector with your finger and pulling
the connector.
5. Turn the socket and bulb assembly
counterclockwise and remove it.
6. Disconnect the bulb from the socket.
7. Install the new bulb in the reverse order
of the removal procedure.5–Door
1. Make sure the ignition is switched of
f,
and the headlight switch is off.
2. Remove the cover.
3. Disconnect the electrical connector
from the bulb by pressing the tab on the
connector with your finger and pulling
the connector.
4. Turn the socket and bulb assembly
counterclockwise and remove it.
Mazda3_8FL6-EA-16F_Edition2.indb 562016/08/10 17:38:57
Page 469 of 612
6–57
Maintenance and Care
Owner Maintenance
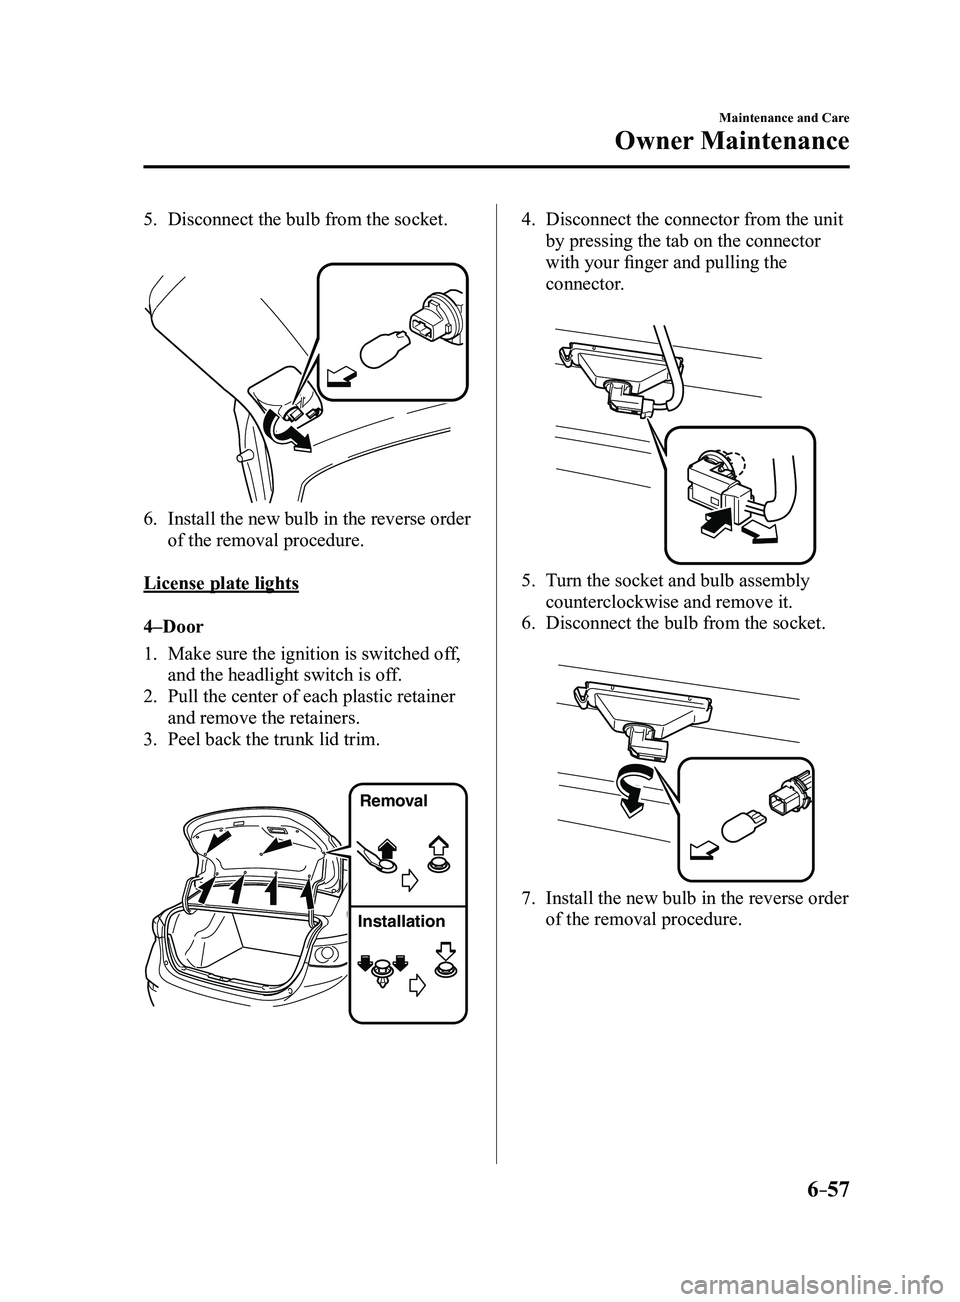
5. Disconnect the bulb from the socket.
6. Install the new bulb in the reverse order
of the removal procedure.
License plate lights
4–Door
1. Make sure the ignition is switched of f,
and the headlight switch is off.
2. Pull the center of each plastic retainer
and remove the retainers.
3. Peel back the trunk lid trim.
Removal
Installation
4. Disconnect the connector from the unit
by pressing the tab on the connector
with your finger and pulling the
connector.
5. Turn the socket and bulb assembly
counterclockwise and remove it.
6. Disconnect the bulb from the socket.
7. Install the new bulb in the reverse order
of the removal procedure.
Mazda3_8FL6-EA-16F_Edition2.indb 572016/08/10 17:38:58
Page 473 of 612
6–61
Maintenance and Care
Owner Maintenance
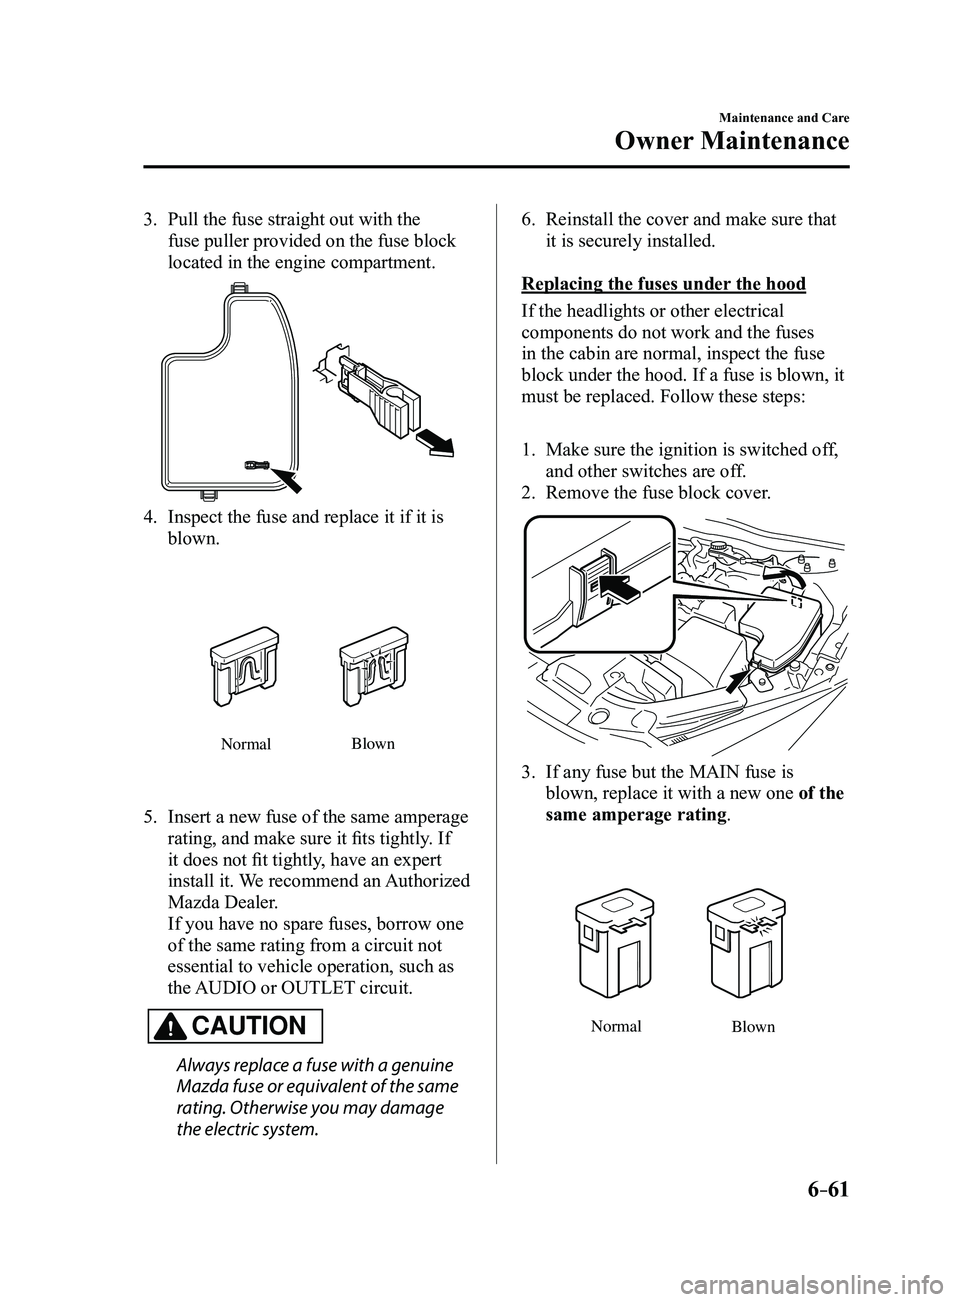
3. Pull the fuse straight out with the
fuse puller provided on the fuse block
located in the engine compartment.
4. Inspect the fuse and replace it if it is
blown.
NormalBlown
5. Insert a new fuse of the same amperage
rating, and make sure it fits tightly. If
it does not fit tightly, have an expert
install it. We recommend an Authorized
Mazda Dealer.
If you have no spare fuses, borrow one
of the same rating from a circuit not
essential to vehicle operation, such as
the AUDIO or OUTLET circuit.
CAUTION
Always replace a fuse with a genuine
Mazda fuse or equivalent of the same
rating. Otherwise you may damage
the electric system.
6. Reinstall the cover and make sure that
it is securely installed.
Replacing the fuses under the hood
If the headlights or other electrical
components do not work and the fuses
in the cabin are normal, inspect the fuse
block under the hood. If a fuse is blown, it
must be replaced. Follow these steps:
1. Make sure the ignition is switched of f,
and other switches are off.
2. Remove the fuse block cover.
3. If any fuse but the MAIN fuse is
blown, replace it with a new one of the
same amperage rating.
Normal Blown
Mazda3_8FL6-EA-16F_Edition2.indb 612016/08/10 17:39:01
Page 475 of 612
6–63
Maintenance and Care
Owner Maintenance
*Some models.
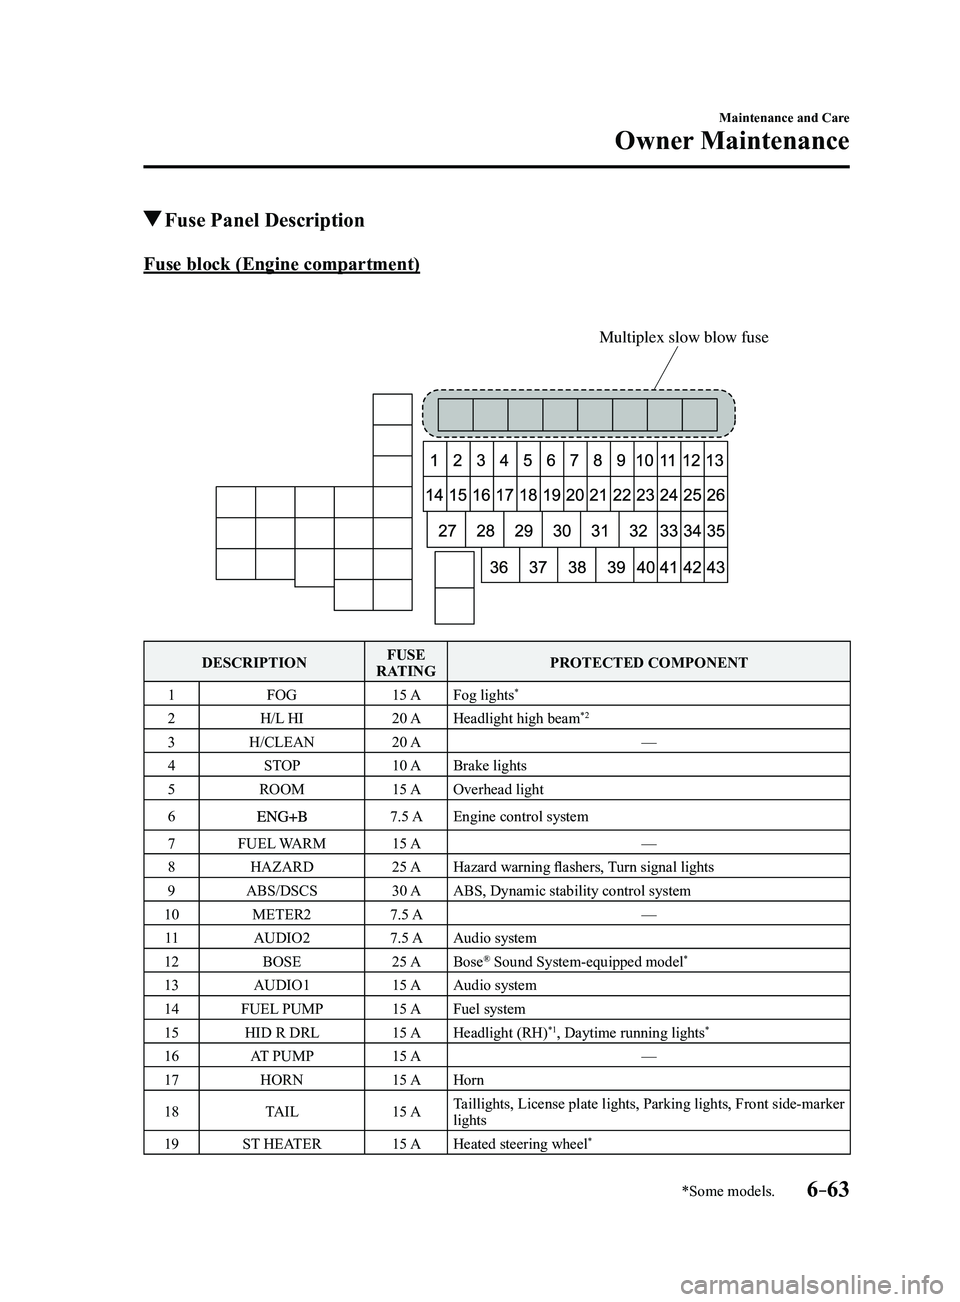
Fuse Panel Description
Fuse block (Engine compartment)
Multiplex slow blow fuse
DESCRIPTIONFUSE
RATING PROTECTED COMPONENT
1 FOG 15 AFog lights
*
2 H/L HI 20 AHeadlight high beam*2
3 H/CLEAN 20 A —
4 STOP 10 ABrake lights
5 ROOM 15 AOverhead light
6
7.5 AEngine control system
7 FUEL WARM 15 A —
8 HAZARD 25 AHazard warning flashers, Turn signal lights
9 ABS/DSCS 30 AABS, Dynamic stability control system
10 METER2 7.5 A —
11 AUDIO2 7.5 AAudio system
12 BOSE 25 ABose
® Sound System-equipped model*
13 AUDIO1 15 AAudio system
14 FUEL PUMP 15 AFuel system
15 HID R DRL 15 AHeadlight (RH)
*1, Daytime running lights*
16 AT PUMP 15 A —
17 HORN 15 AHorn
18 TAIL 15 ATaillights, License plate lights, Parking lights, Front side-marker
lights
19 ST HEATER 15 AHeated steering wheel
*
Mazda3_8FL6-EA-16F_Edition2.indb 632016/08/10 17:39:02
Page 477 of 612
6–65
Maintenance and Care
Owner Maintenance
*Some models.
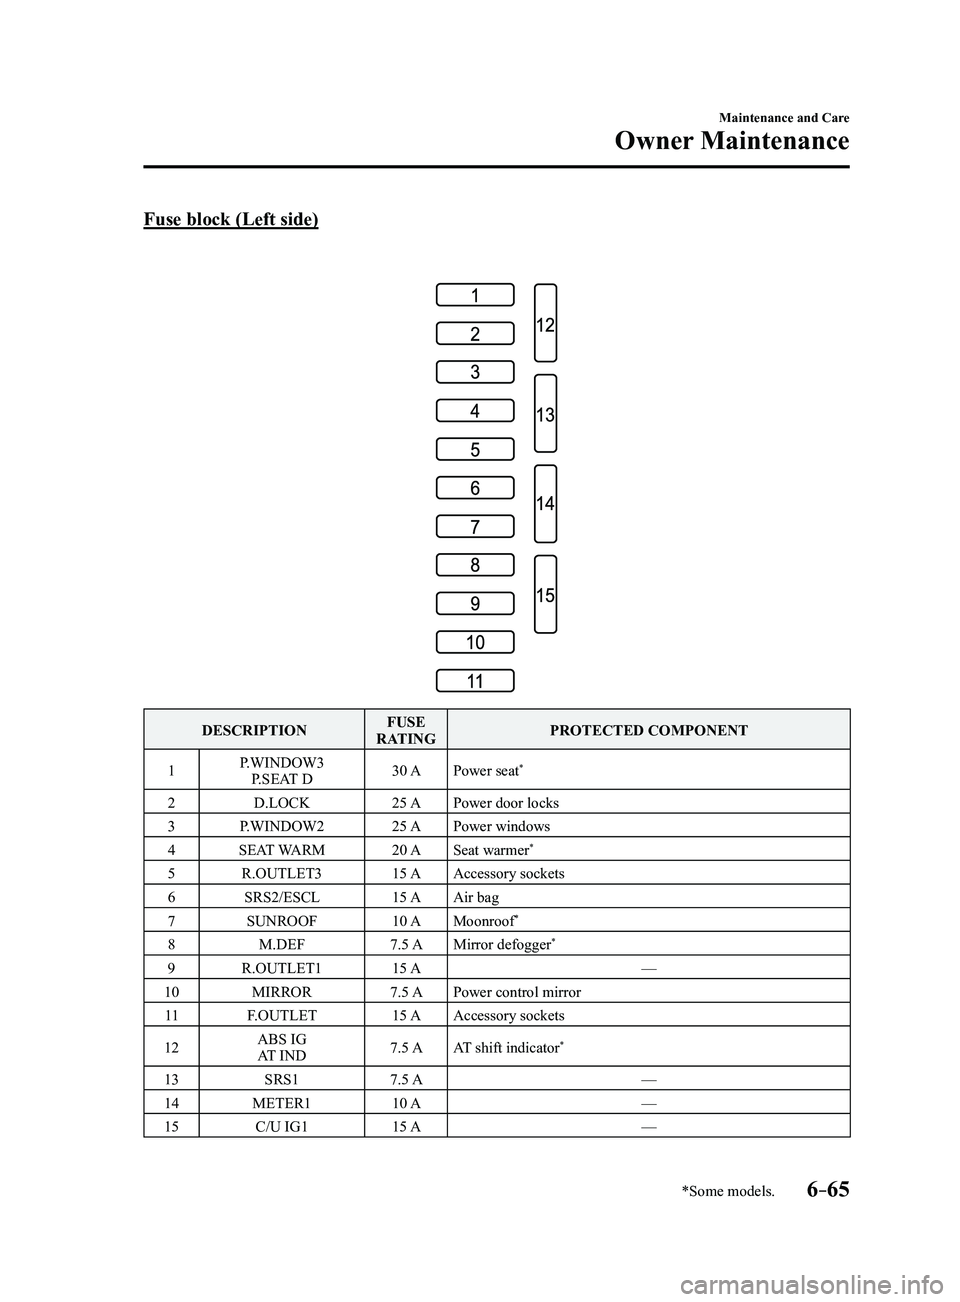
Fuse block (Left side)
DESCRIPTIONFUSE
RATING PROTECTED COMPONENT
1 P.WINDOW3
P.SEAT D 30 A
Power seat
*
2 D.LOCK 25 APower door locks
3 P.WINDOW2 25 APower windows
4 SEAT WARM 20 ASeat warmer
*
5 R.OUTLET3 15 AAccessory sockets
6 SRS2/ESCL 15 AAir bag
7 SUNROOF 10 AMoonroof
*
8 M.DEF 7.5 AMirror defogger*
9 R.OUTLET1 15 A —
10 MIRROR 7.5 APower control mirror
11 F.OUTLET 15 AAccessory sockets
12 ABS IG
AT IND 7.5 A
AT shift indicator
*
13 SRS1 7.5 A —
14 METER1 10 A —
15 C/U IG1 15 A —
Mazda3_8FL6-EA-16F_Edition2.indb 652016/08/10 17:39:03
Page 492 of 612
7–4
If Trouble Arises
Flat Tire
Jack
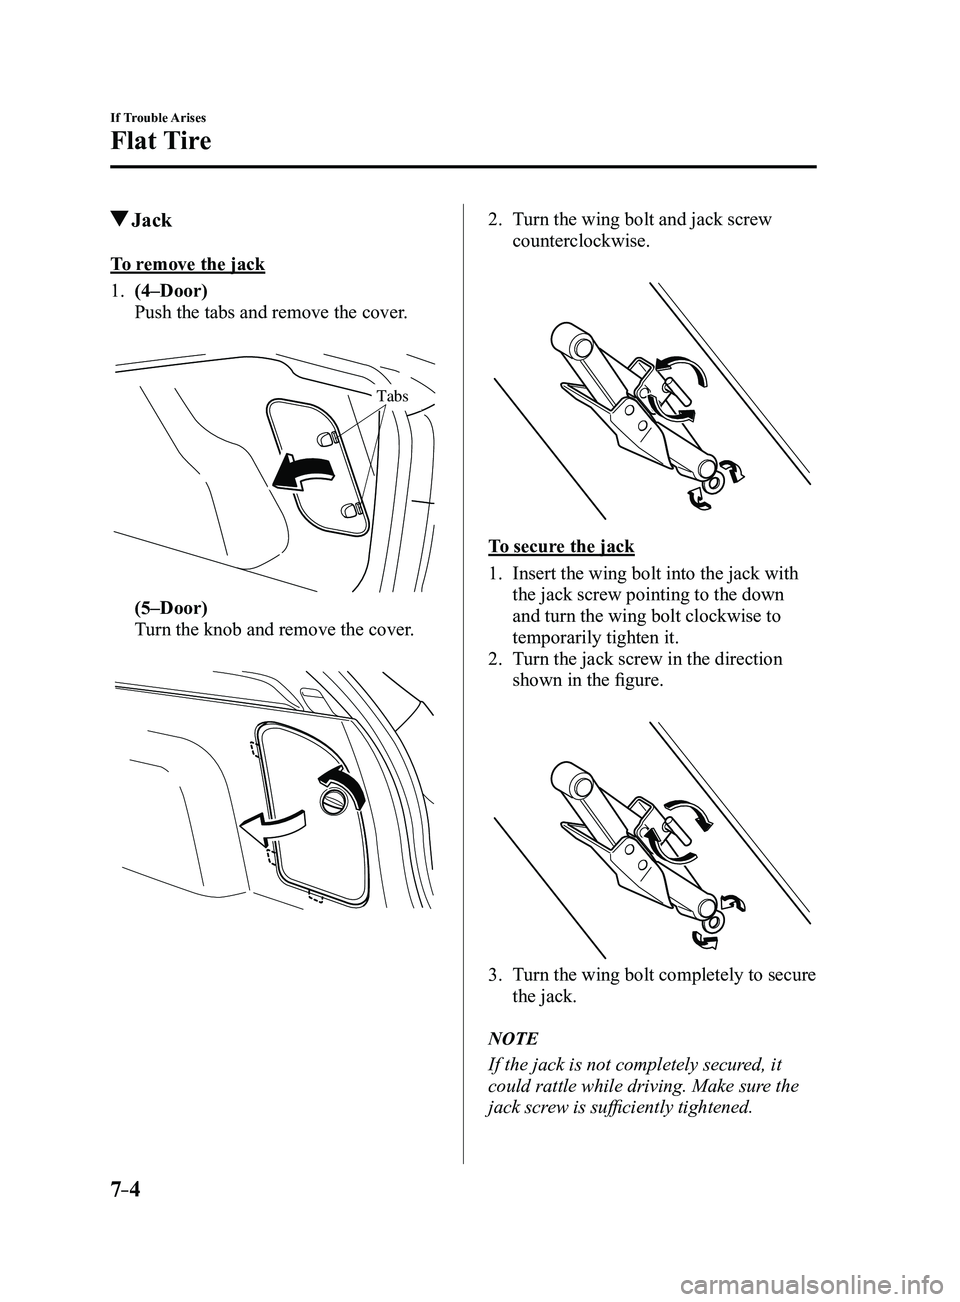
To remove the jack
1. (4–Door)
Push the tabs and remove the cover.
Tabs
(5–Door)
Turn the knob and remove the cover.
2. Turn the wing bolt and jack screw
counterclockwise.
To secure the jack
1. Insert the wing bolt into the jack with
the jack screw pointing to the down
and turn the wing bolt clockwise to
temporarily tighten it.
2. Turn the jack screw in the direction
shown in the figure.
3. Turn the wing bolt completely to secure
the jack.
NOTE
If the jack is not completely secured, it
could rattle while driving. Make sure the
jack screw is sufficiently tightened.
Mazda3_8FL6-EA-16F_Edition2.indb 42016/08/10 17:39:09