lock MAZDA MODEL 3 4-DOOR 2017 Owners Manual
[x] Cancel search | Manufacturer: MAZDA, Model Year: 2017, Model line: MODEL 3 4-DOOR, Model: MAZDA MODEL 3 4-DOOR 2017Pages: 612
Page 424 of 612
6–12
Maintenance and Care
Scheduled Maintenance
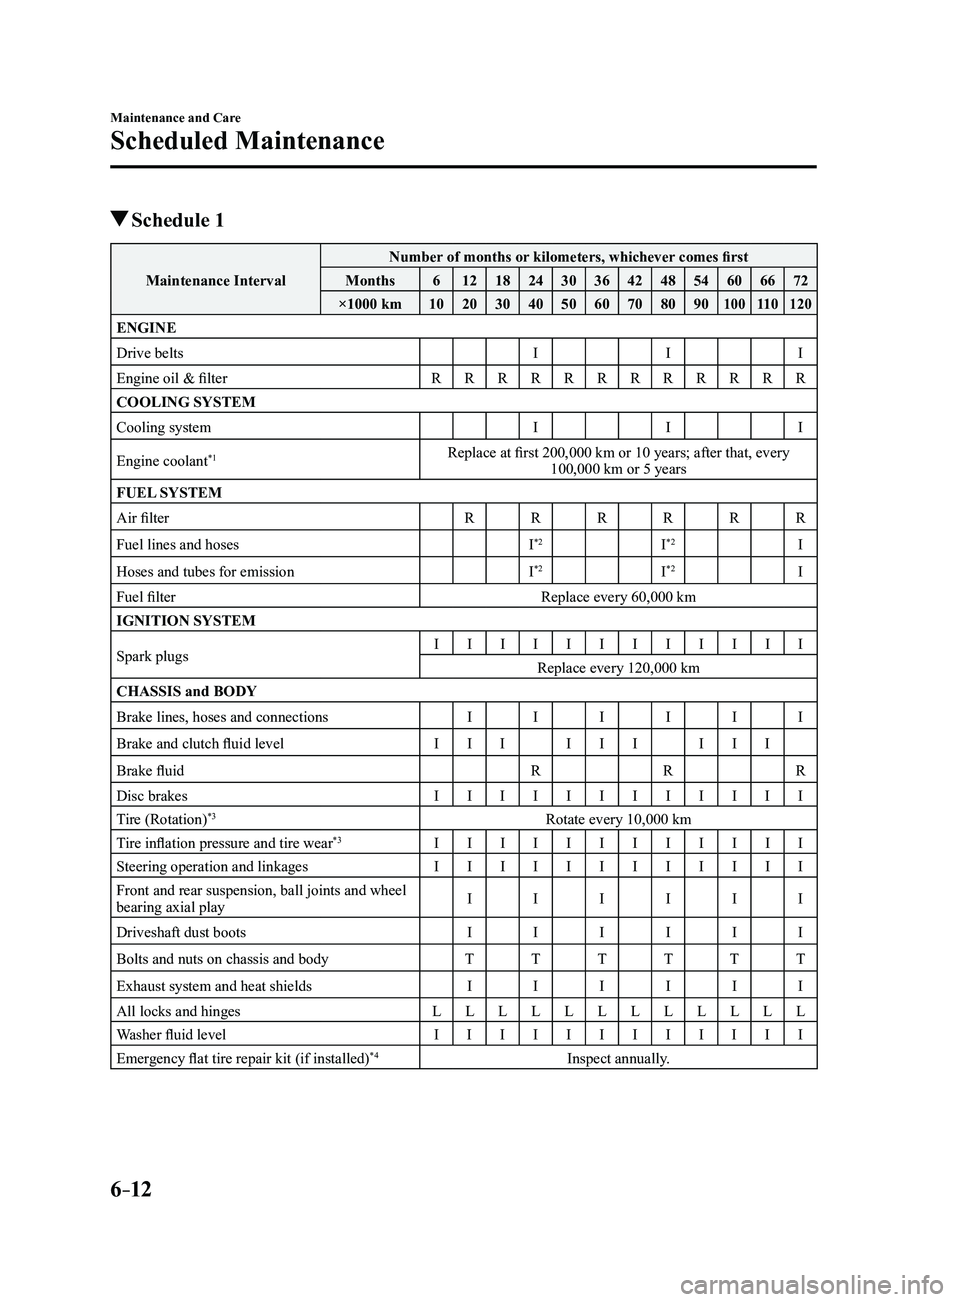
Schedule 1
Maintenance IntervalNumber of months or kilometers, whichever comes first
Months 612 18243036424854606672
×1000 km 102030405060708090
10011 0120
ENGINE
Drive belts III
Engine oil & filter RRRRRRRRRRRR
COOLING SYSTEM
Cooling system III
Engine coolant
*1Replace at first 200,000 km or 10 years; after that, every 100,000 km or 5 years
FUEL SYSTEM
Air filter RRRRRR
Fuel lines and hoses I
*2I*2I
Hoses and tubes for emission I
*2I*2I
Fuel filter Replace every 60,000 km
IGNITION SYSTEM
Spark plugs I
IIIIIIIIIII
Replace every 120,000 km
CHASSIS and BODY
Brake lines, hoses and connections IIIIII
Brake and clutch fluid level III III III
Brake fluid RRR
Disc brakes IIIIIIIIIIII
Tire (Rotation)
*3Rotate every 10,000 km
Tire inflation pressure and tire wear*3I IIIIIIIIIII
Steering operation and linkages IIIIIIIIIIII
Front and rear suspension, ball joints and wheel
bearing axial play I
IIIII
Driveshaft dust boots IIIIII
Bolts and nuts on chassis and body TTTTTT
Exhaust system and heat shields IIIIII
All locks and hinges LLLLLLLLLLLL
Washer fluid level IIIIIIIIIIII
Emergency flat tire repair kit (if installed)
*4Inspect annually.
Mazda3_8FL6-EA-16F_Edition2.indb 122016/08/10 17:38:32
Page 426 of 612
6–14
Maintenance and Care
Scheduled Maintenance
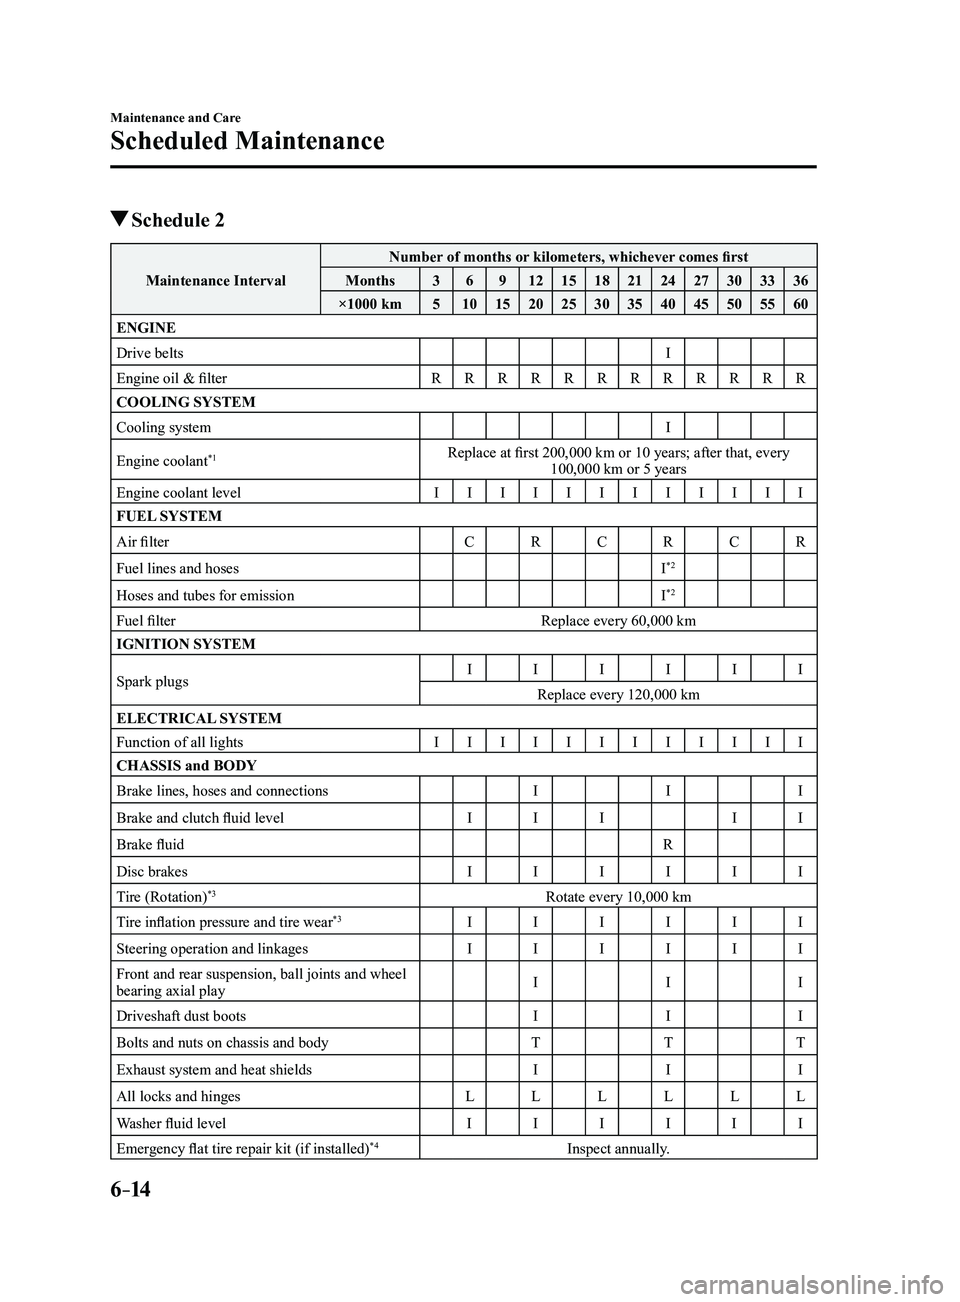
Schedule 2
Maintenance IntervalNumber of months or kilometers, whichever comes first
Months 36912 1518212427303336
×1000 km 510 15202530354045505560
ENGINE
Drive belts I
Engine oil & filter RRRRRRRRRRRR
COOLING SYSTEM
Cooling system I
Engine coolant
*1Replace at first 200,000 km or 10 years; after that, every 100,000 km or 5 years
Engine coolant level IIIIIIIIIIII
FUEL SYSTEM
Air filter CRCRCR
Fuel lines and hoses I
*2
Hoses and tubes for emissionI*2
Fuel filterReplace every 60,000 km
IGNITION SYSTEM
Spark plugs I
IIIII
Replace every 120,000 km
ELECTRICAL SYSTEM
Function of all lights IIIIIIIIIIII
CHASSIS and BODY
Brake lines, hoses and connections III
Brake and clutch fluid level III II
Brake fluid R
Disc brakes IIIIII
Tire (Rotation)
*3Rotate every 10,000 km
Tire inflation pressure and tire wear
*3I IIIII
Steering operation and linkages IIIIII
Front and rear suspension, ball joints and wheel
bearing axial play I
II
Driveshaft dust boots III
Bolts and nuts on chassis and body TTT
Exhaust system and heat shields III
All locks and hinges LLLLLL
Washer fluid level IIIIII
Emergency flat tire repair kit (if installed)
*4Inspect annually.
Mazda3_8FL6-EA-16F_Edition2.indb 142016/08/10 17:38:32
Page 428 of 612
6–16
Maintenance and Care
Scheduled Maintenance
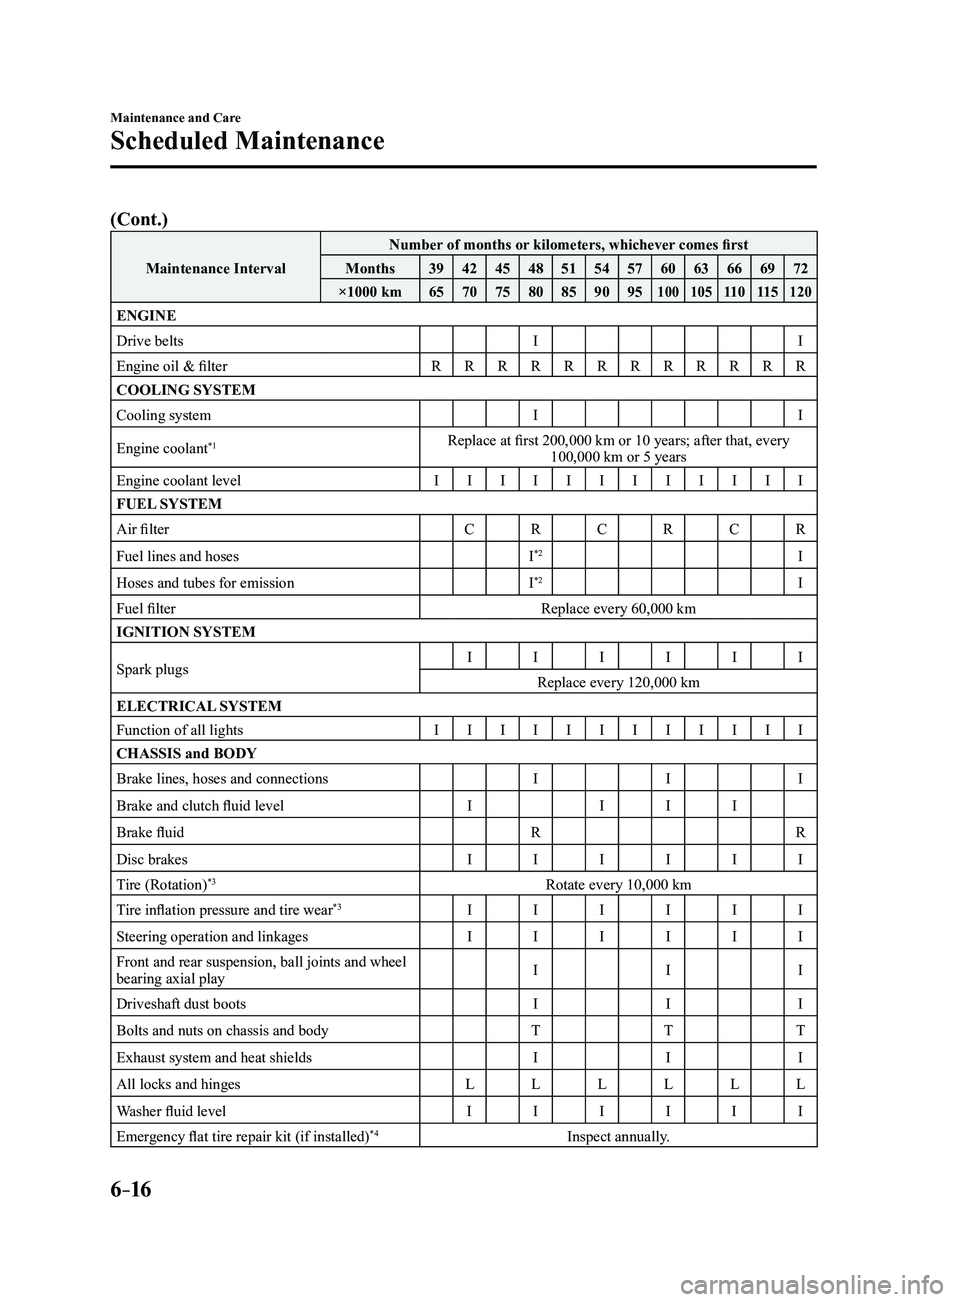
(Cont.)
Maintenance IntervalNumber of months or kilometers, whichever comes first
Months 394245485154576063666972
×1000 km 65707580859095
100 10511 011 5120
ENGINE
Drive belts II
Engine oil & filter RRRRRRRRRRRR
COOLING SYSTEM
Cooling system II
Engine coolant
*1Replace at first 200,000 km or 10 years; after that, every 100,000 km or 5 years
Engine coolant level IIIIIIIIIIII
FUEL SYSTEM
Air filter CRCRCR
Fuel lines and hoses I
*2I
Hoses and tubes for emission I
*2I
Fuel filter Replace every 60,000 km
IGNITION SYSTEM
Spark plugs I
IIIII
Replace every 120,000 km
ELECTRICAL SYSTEM
Function of all lights IIIIIIIIIIII
CHASSIS and BODY
Brake lines, hoses and connections III
Brake and clutch fluid level IIII
Brake fluid RR
Disc brakes IIIIII
Tire (Rotation)
*3Rotate every 10,000 km
Tire inflation pressure and tire wear
*3I IIIII
Steering operation and linkages IIIIII
Front and rear suspension, ball joints and wheel
bearing axial play I
II
Driveshaft dust boots III
Bolts and nuts on chassis and body TTT
Exhaust system and heat shields III
All locks and hinges LLLLLL
Washer fluid level IIIIII
Emergency flat tire repair kit (if installed)
*4Inspect annually.
Mazda3_8FL6-EA-16F_Edition2.indb 162016/08/10 17:38:33
Page 434 of 612
6–22
Maintenance and Care
Owner Maintenance
Hood
WARNING
Always check that the hood is closed
and securely locked:A hood that is not closed and securely
locked is dangerous as it could fly open
while the vehicle is moving and block
the driver's vision which could result in
a serious accident.
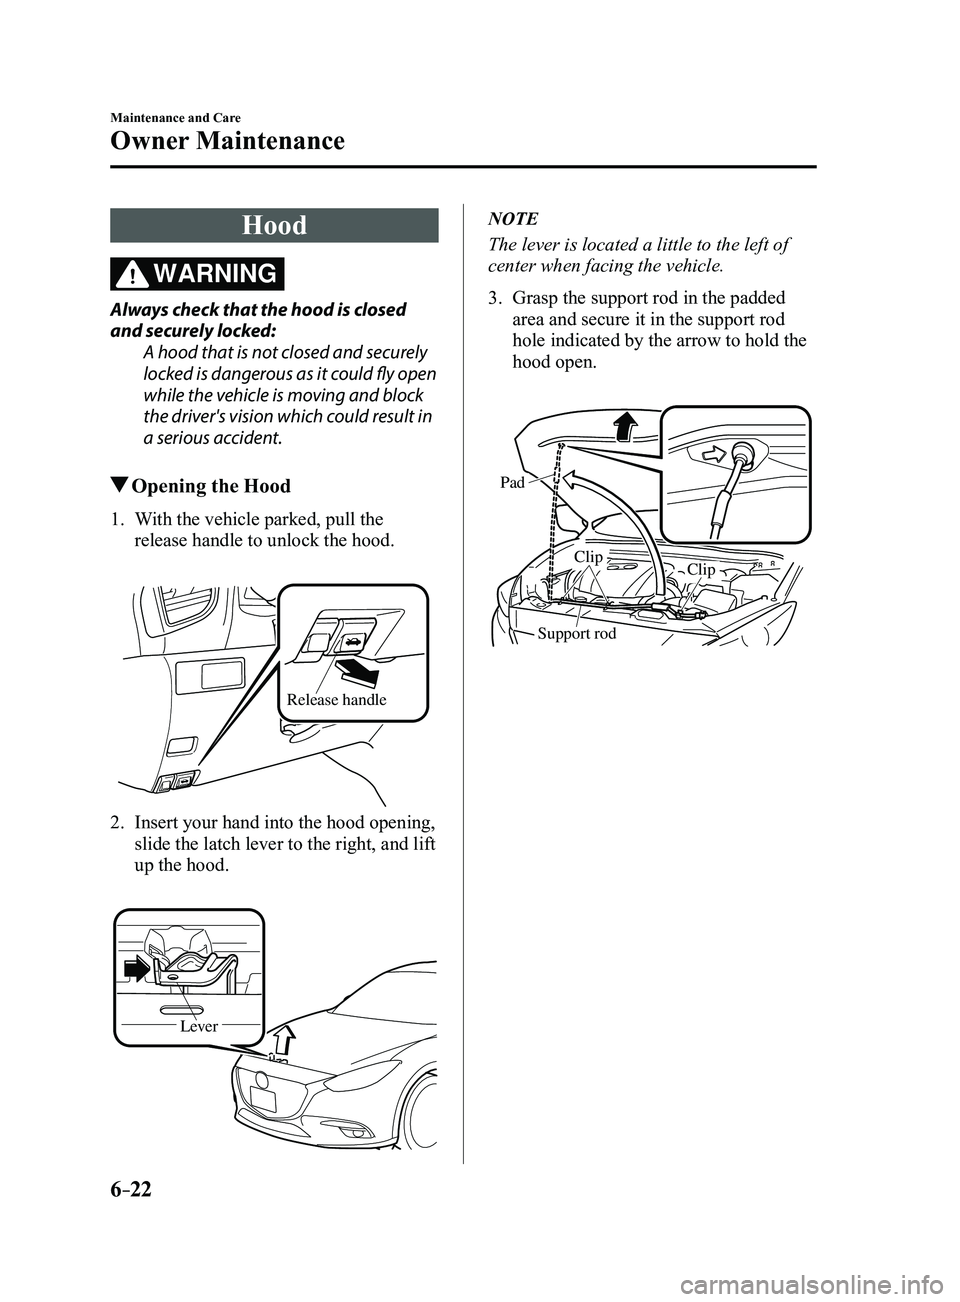
Opening the Hood
1. With the vehicle parked, pull the
release handle to unlock the hood.
Release handle
2. Insert your hand into the hood opening,
slide the latch lever to the right, and lift
up the hood.
Lever
NOTE
The lever is located a little to the left of
center when facing the vehicle.
3. Grasp the support rod in the padded
area and secure it in the support rod
hole indicated by the arrow to hold the
hood open.
Pad
Clip
Clip
Support rod
Mazda3_8FL6-EA-16F_Edition2.indb 222016/08/10 17:38:35
Page 436 of 612
6–24
Maintenance and Care
Owner Maintenance
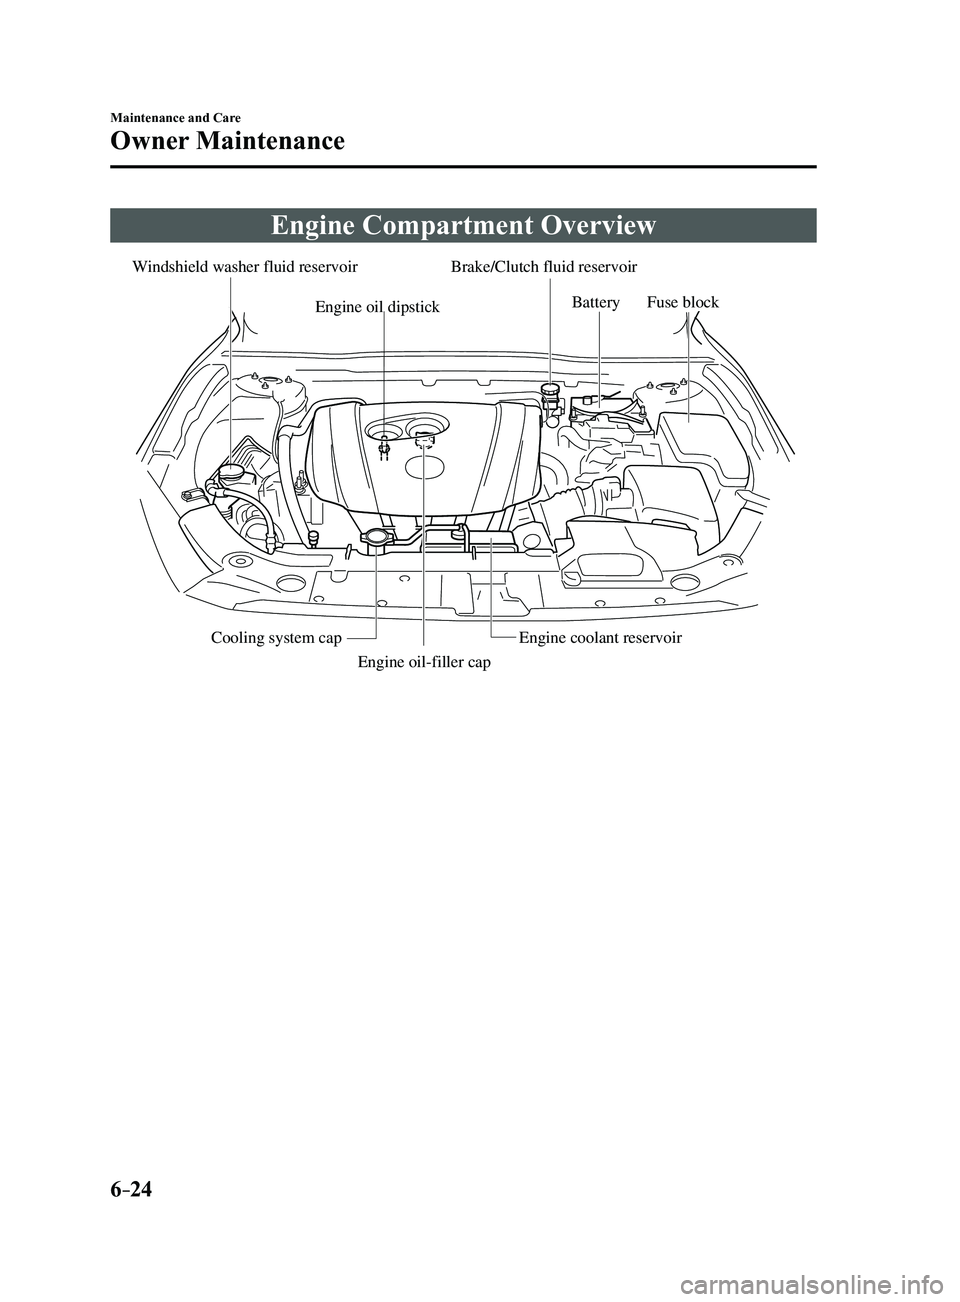
Engine Compartment Overview
Windshield washer fluid reservoirBrake/Clutch fluid reservoir
Engine oil dipstickBatteryFuse block
Cooling system cap Engine coolant reservoir
Engine oil-filler cap
Mazda3_8FL6-EA-16F_Edition2.indb 242016/08/10 17:38:36
Page 443 of 612
6–31
Maintenance and Care
Owner Maintenance
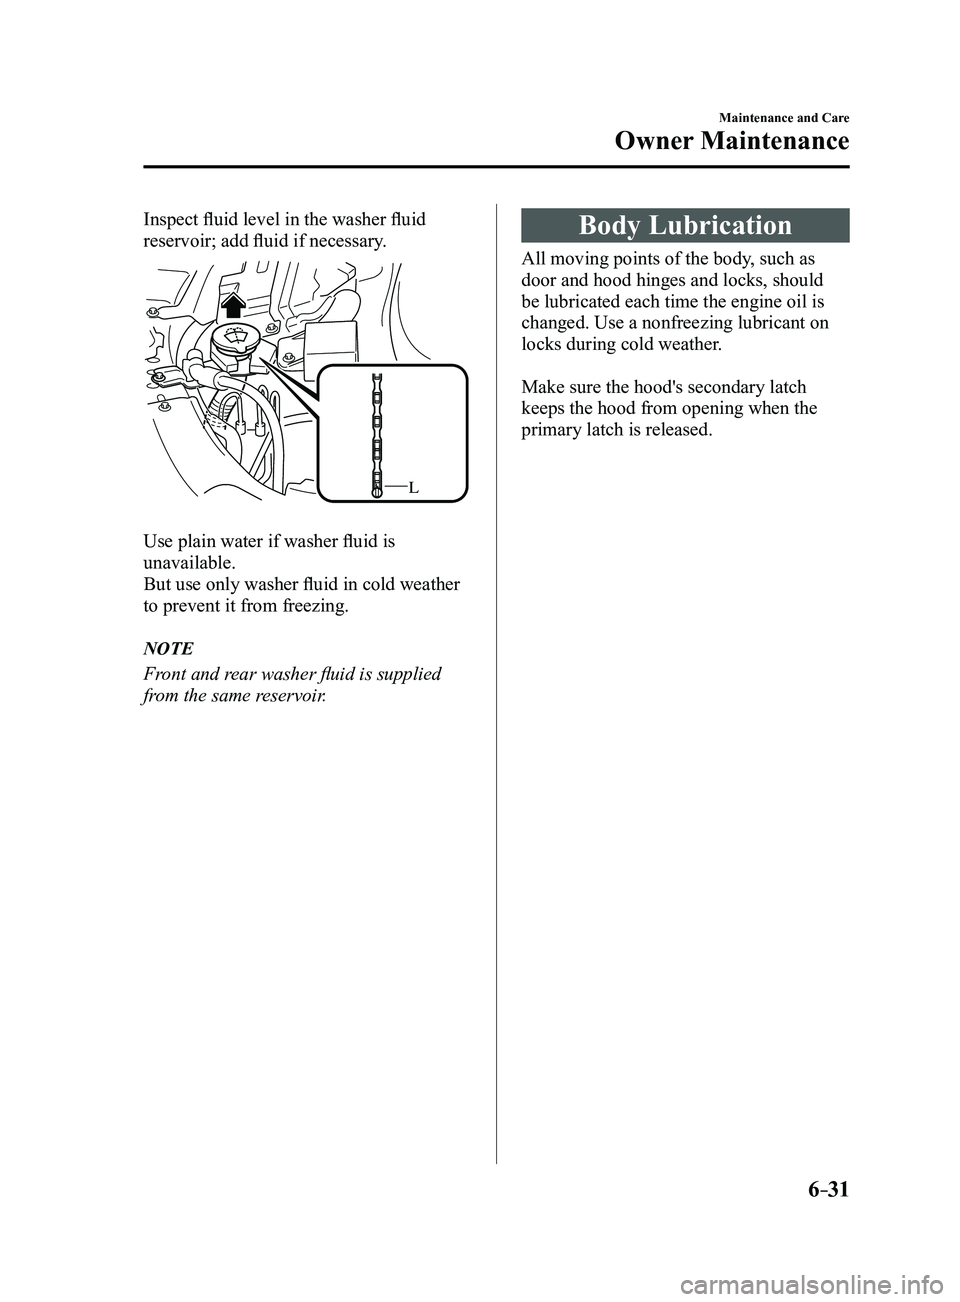
Inspect fluid level in the washer fluid
reservoir; add fluid if necessary.
L
Use plain water if washer fluid is
unavailable.
But use only washer fluid in cold weather
to prevent it from freezing.
NOTE
Front and rear washer fluid is supplied
from the same reservoir.
Body Lubrication
All moving points of the body, such as
door and hood hinges and locks, should
be lubricated each time the engine oil is
changed. Use a nonfreezing lubricant on
locks during cold weather.
Make sure the hood's secondary latch
keeps the hood from opening when the
primary latch is released.
Mazda3_8FL6-EA-16F_Edition2.indb 312016/08/10 17:38:40
Page 446 of 612
6–34
Maintenance and Care
Owner Maintenance
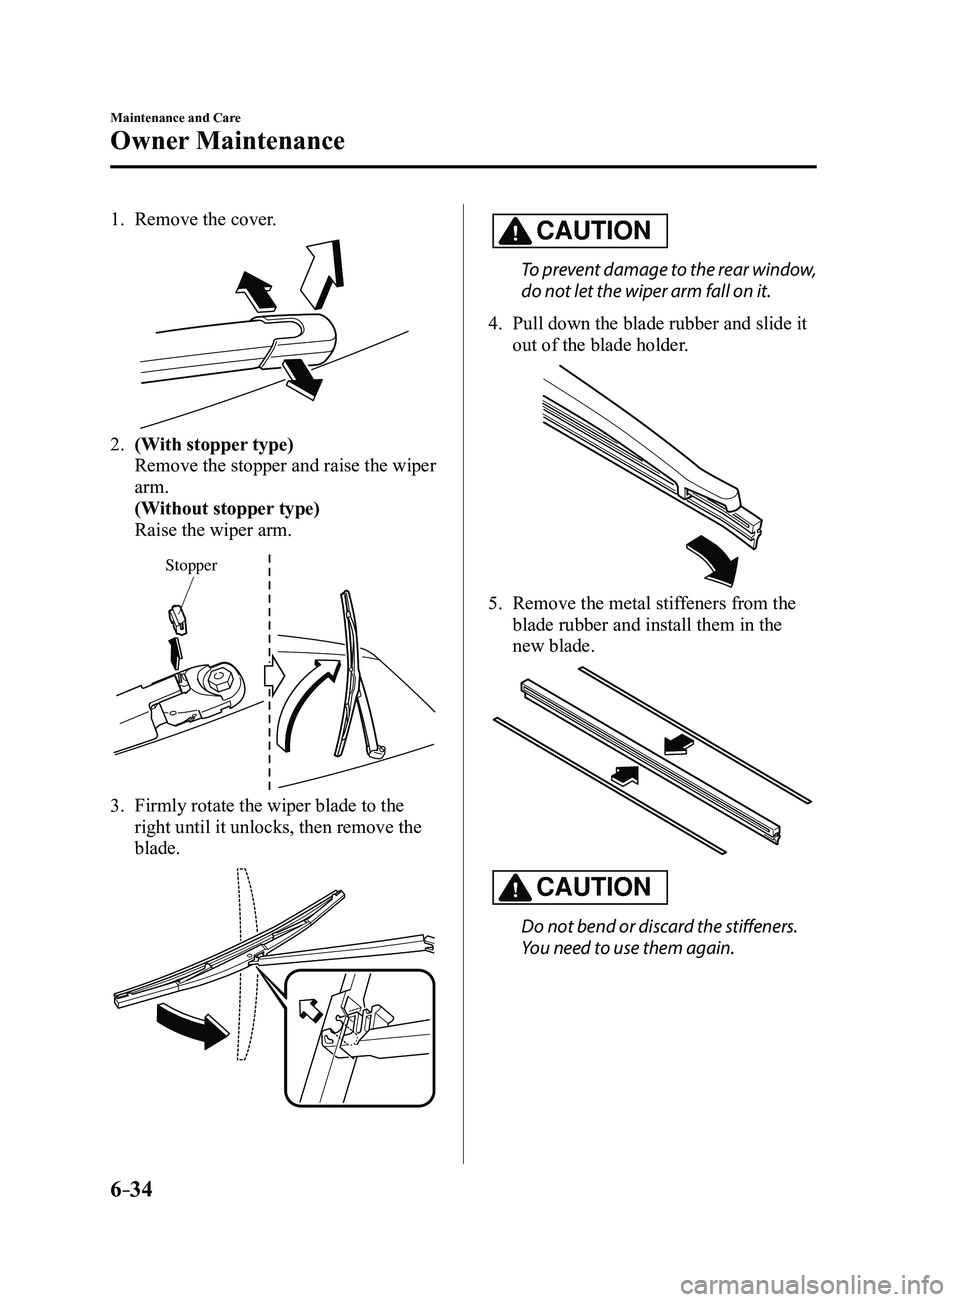
1. Remove the cover.
2. (With stopper type)
Remove the stopper and raise the wiper
arm.
(Without stopper type)
Raise the wiper arm.
Stopper
3. Firmly rotate the wiper blade to the
right until it unlocks, then remove the
blade.
CAUTION
To prevent damage to the rear window,
do not let the wiper arm fall on it.
4. Pull down the blade rubber and slide it
out of the blade holder.
5. Remove the metal stif feners from the
blade rubber and install them in the
new blade.
CAUTION
Do not bend or discard the stiffeners.
You need to use them again.
Mazda3_8FL6-EA-16F_Edition2.indb 342016/08/10 17:38:43
Page 459 of 612
6–47
Maintenance and Care
Owner Maintenance
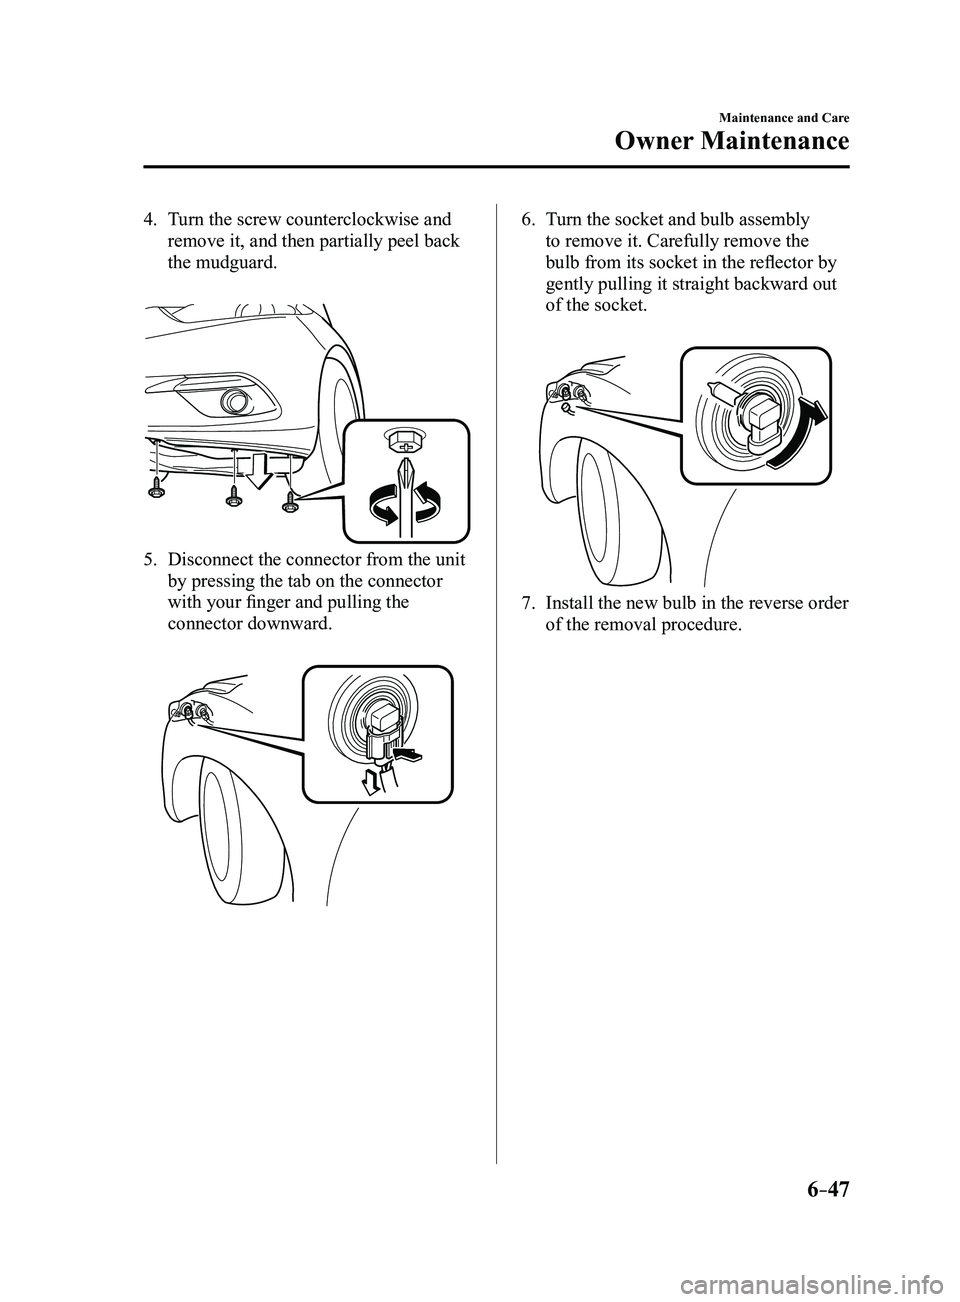
4. Turn the screw counterclockwise and
remove it, and then partially peel back
the mudguard.
5. Disconnect the connector from the unit
by pressing the tab on the connector
with your finger and pulling the
connector downward.
6. Turn the socket and bulb assembly
to remove it. Carefully remove the
bulb from its socket in the reflector by
gently pulling it straight backward out
of the socket.
7. Install the new bulb in the reverse order
of the removal procedure.
Mazda3_8FL6-EA-16F_Edition2.indb 472016/08/10 17:38:51
Page 461 of 612
6–49
Maintenance and Care
Owner Maintenance
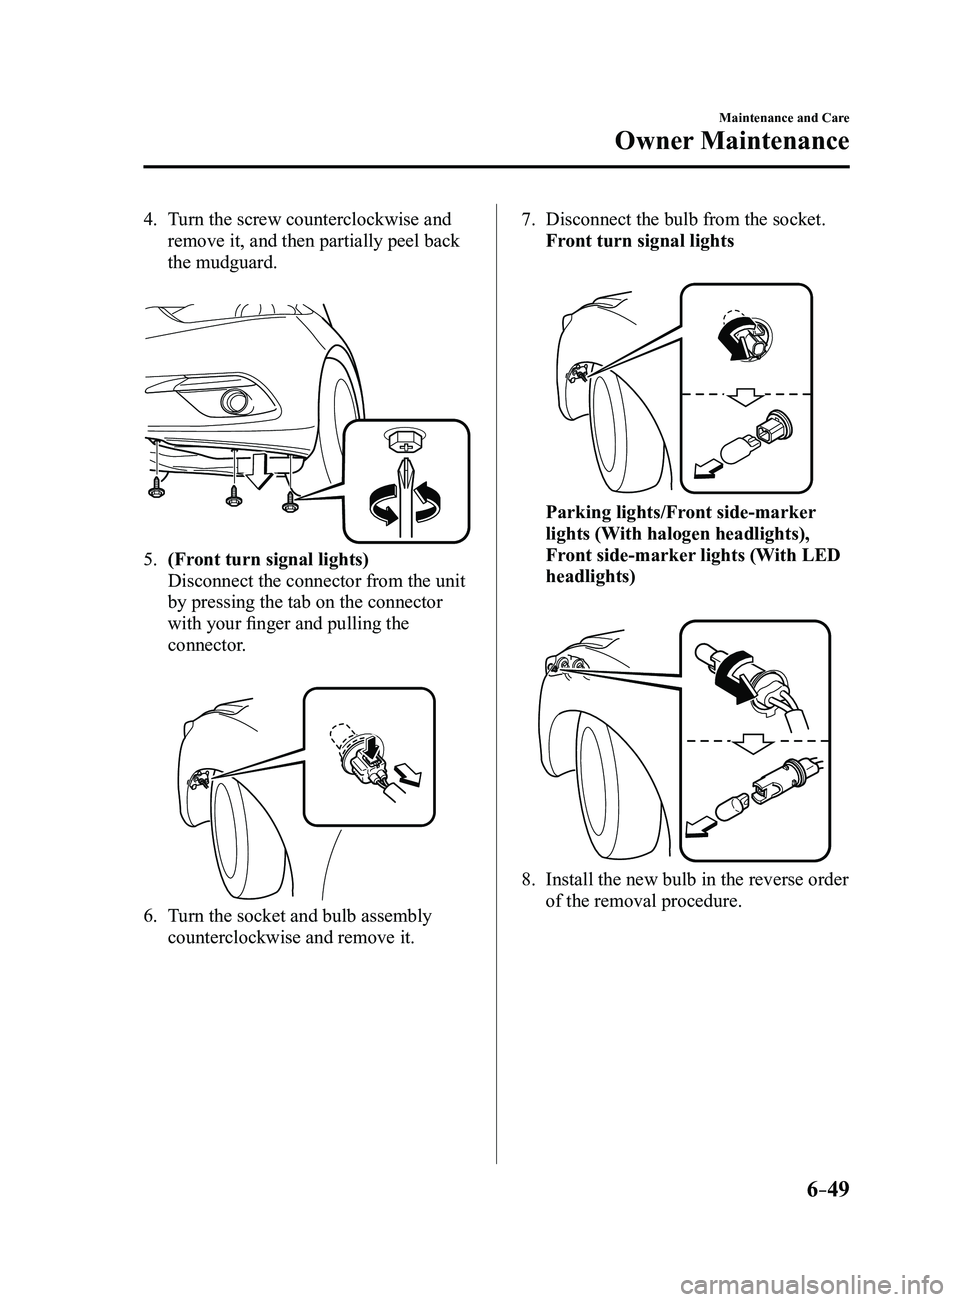
4. Turn the screw counterclockwise and
remove it, and then partially peel back
the mudguard.
5. (Front turn signal lights)
Disconnect the connector from the unit
by pressing the tab on the connector
with your finger and pulling the
connector.
6. Turn the socket and bulb assembly
counterclockwise and remove it.
7. Disconnect the bulb from the socket.
Front turn signal lights
Parking lights/Front side-marker
lights (With halogen headlights),
Front side-marker lights (With LED
headlights)
8. Install the new bulb in the reverse order
of the removal procedure.
Mazda3_8FL6-EA-16F_Edition2.indb 492016/08/10 17:38:52
Page 462 of 612
6–50
Maintenance and Care
Owner Maintenance
*Some models.
Side turn signal lights*, Brake lights
(LED type), Taillights/Rear side-marker
lights (LED type), Taillights (Trunk lid
side/Liftgate side), High-mount brake
light
The LED bulb cannot be replaced as a
single unit because it is an integrated unit.
The LED bulb has to be replaced with the
unit. We recommend an Authorized Mazda
Dealer when the replacement is necessary.
Rear turn signal lights, Brake lights/
Taillights/Rear side-marker lights (Bulb
type)
4–Door
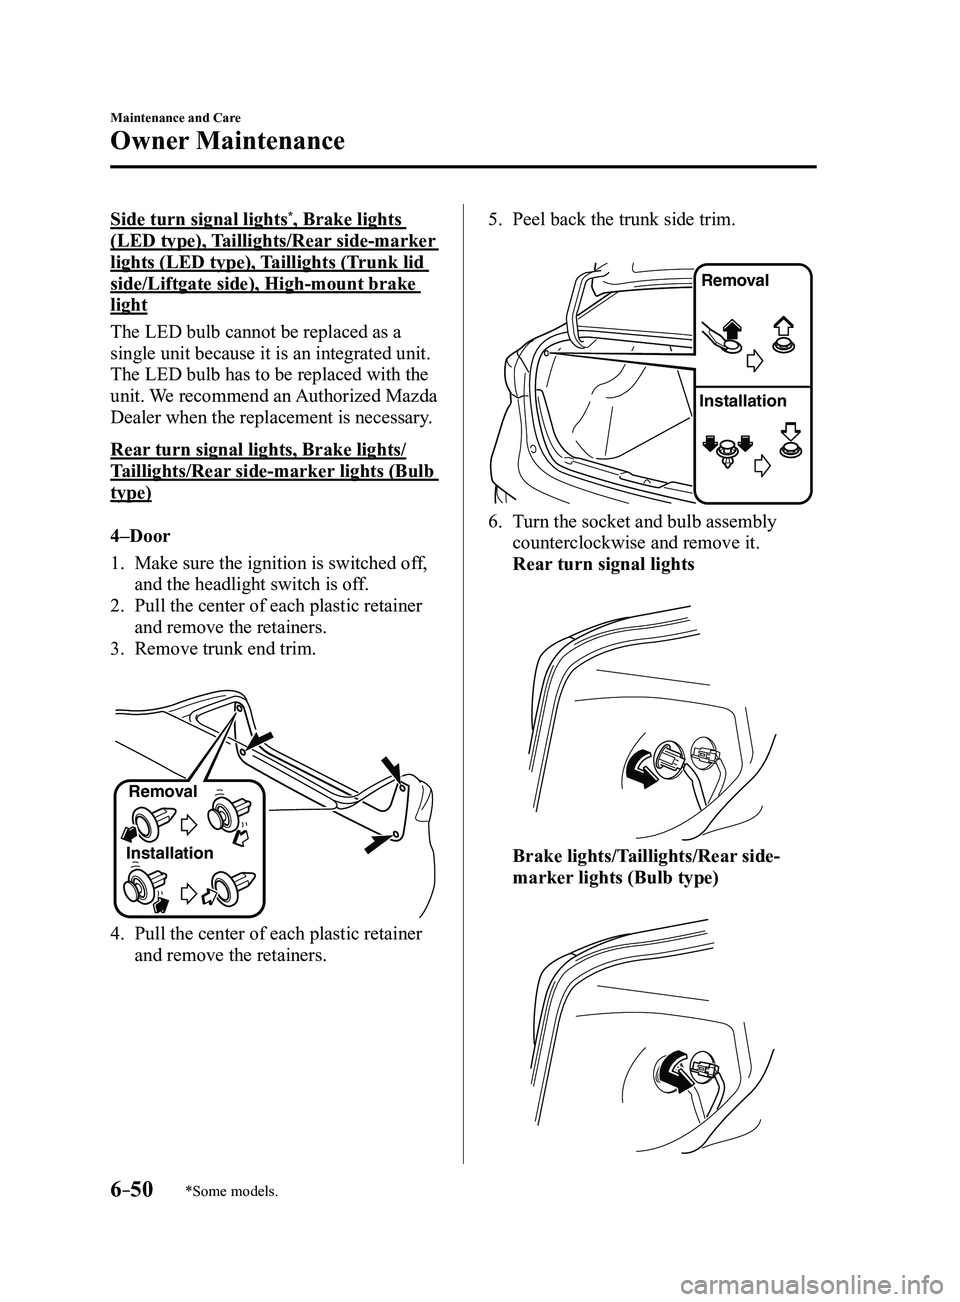
1. Make sure the ignition is switched of f,
and the headlight switch is off.
2. Pull the center of each plastic retainer
and remove the retainers.
3. Remove trunk end trim.
InstallationRemoval
4. Pull the center of each plastic retainer
and remove the retainers.
5. Peel back the trunk side trim.
Remova
l
Installation
6. Turn the socket and bulb assembly
counterclockwise and remove it.
Rear turn signal lights
Brake lights/Taillights/Rear side-
marker lights (Bulb type)
Mazda3_8FL6-EA-16F_Edition2.indb 502016/08/10 17:38:53