auto MAZDA MODEL CX-9 2015 (in English) Manual Online
[x] Cancel search | Manufacturer: MAZDA, Model Year: 2015, Model line: MODEL CX-9, Model: MAZDA MODEL CX-9 2015Pages: 604, PDF Size: 9.15 MB
Page 287 of 604

Black plate (287,1)
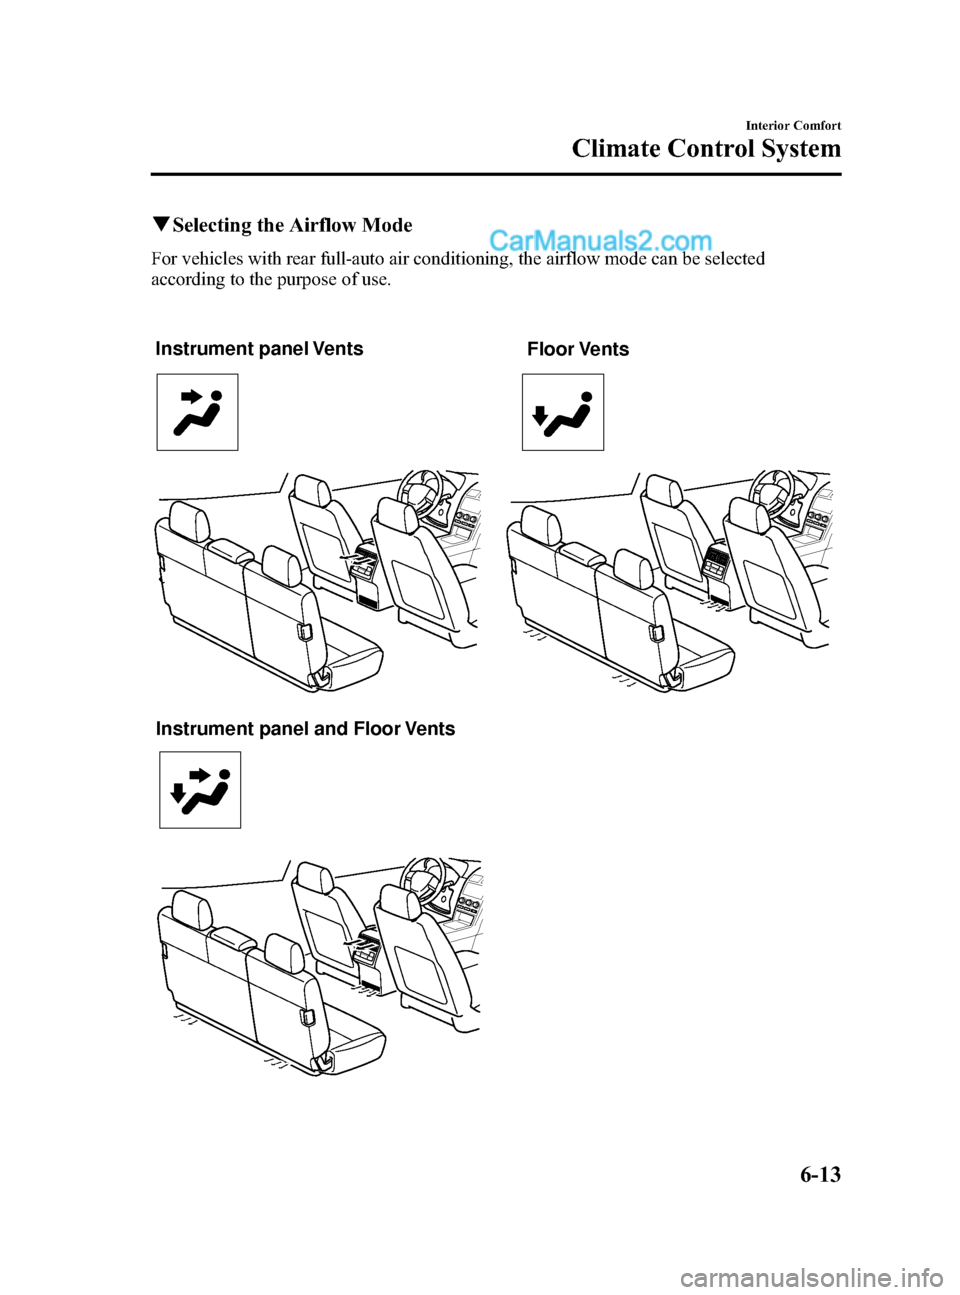
qSelecting the Airflow Mode
For vehicles with rear full-auto air conditioning, the airflow mode can be selected
according to the purpose of use.
Instrument panel Vents
Floor Vents
Instrument panel and Floor Vents
Interior Comfort
Climate Control System
6-13
CX-9_8DU1-EA-14H_Edition1 Page287
Thursday, June 5 2014 4:18 PM
Form No.8DU1-EA-14H
Page 288 of 604

Black plate (288,1)
Fully Automatic Type (Rear)
Mode selector display
Rear airflow display AU TO
Fan control switch
Temperature control
switch
OFF switch Mode selector switch
AUTO switch
AUTO switch
REAR switchFront
Rear
SYNC Temperature setting display
qControl Switches
Rear switch
Press the rear switch to operate the rear air
conditioning.
The indicator illuminates to indicate that
the rear air conditioning is operating.
AUTO switch
By pressing the AUTO switch the
following functions will be automatically
controlled in accordance with the set
temperature:
lAirflow temperature
6-14
Interior Comfort
Climate Control System
CX-9_8DU1-EA-14H_Edition1 Page288
Thursday, June 5 2014 4:18 PM
Form No.8DU1-EA-14H
Page 289 of 604

Black plate (289,1)
lAmount of airflowlSelection of airflow mode
OFF switch
Pressing the OFF switch shuts off the
climate control system.
Temperature control switch
This switch controls temperature. Press
for hot andfor cold.
Fan control switch
The fan has five speeds.
Mode selector switch
The desired airflow mode can be selected
(page 6-13).
qOperation of Automatic Air
Conditioning
Operation from front seats
1. Turn the front air conditioning on.
2. Press the rear switch. The rear air
conditioning operates.
3. Selection of the airflow mode, airflowamount and temperature will be
automatically controlled to the same
temperature setting as the front air
conditioner for the driver's side.
Interior Comfort
Climate Control System
6-15
CX-9_8DU1-EA-14H_Edition1 Page289
Thursday, June 5 2014 4:18 PM
Form No.8DU1-EA-14H
Page 290 of 604

Black plate (290,1)
NOTElIf the AUTO switch is pressed while the
front A/C switch is off, the rear air
conditioning operates only to circulate air.
lSetting the temperature to the maximum
high or low will not provide the desired
temperature at a faster rate.
lWhen selecting heat, the system will restrict
airflow until it has warmed to prevent cold
air from blowing out of the vents.
lWhen the rear air conditioner is controlled
to the same temperature setting as the front
air conditioner for the driver's side,
“SYNC” is displayed on the rear screen.
Operation from rear seats
1. Turn the front air conditioning on.
2. Press the AUTO switch. The selection
of the airflow mode and airflow
amount will be automatically
controlled.
3. Use the temperature control switch toset the desired temperature.
NOTElIf the AUTO switch is pressed while the
front A/C switch is off, the rear air
conditioning operates only to circulate air.
lSetting the temperature to the maximum
high or low will not provide the desired
temperature at a faster rate.
lWhen selecting heat, the system will restrict
airflow until it has warmed to prevent cold
air from blowing out of the vents.
lWhen the rear air conditioner is operated
automatically, “AUTO ”is displayed on the
rear screen.
lWhen the rear air conditioner is controlled
to the same temperature setting as the front
air conditioner for the driver's side,
“ SYNC” is displayed on the rear screen.
4. To turn off the system, press the OFF
switch.
6-16
Interior Comfort
Climate Control System
CX-9_8DU1-EA-14H_Edition1 Page290
Thursday, June 5 2014 4:18 PM
Form No.8DU1-EA-14H
Page 297 of 604

Black plate (297,1)
lIf a disc has both music data (CD-DA)
and MP3 files, playback of the two file
types differs depending on how the
disc was recorded.
lPacket written discs cannot be played
on this unit.
lThis unit does not play CDs recorded
using MP3i (MP3 interactive), MP3
PRO and RIFF MP3 formats.
About folders and files
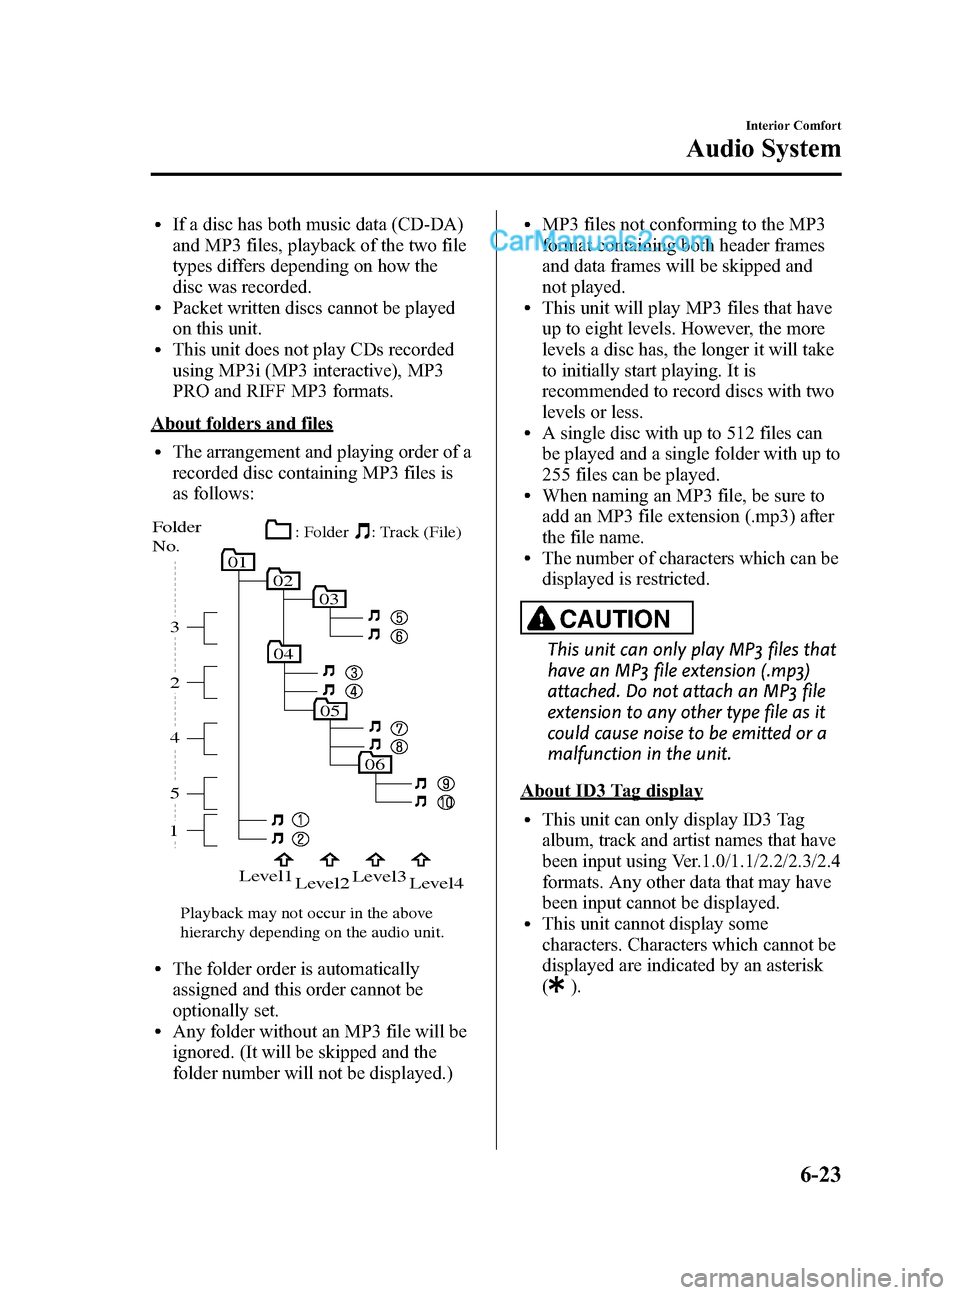
lThe arrangement and playing order of a
recorded disc containing MP3 files is
as follows:
05
06
010203
04
15 4 2 3
Folder
No.
Level1
Level2 Level3
Level4
Playback may not occur in the above
hierarchy depending on the audio unit. : Track (File)
: Folder
lThe folder order is automatically
assigned and this order cannot be
optionally set.
lAny folder without an MP3 file will be
ignored. (It will be skipped and the
folder number will not be displayed.)
lMP3 files not conforming to the MP3
format containing both header frames
and data frames will be skipped and
not played.
lThis unit will play MP3 files that have
up to eight levels. However, the more
levels a disc has, the longer it will take
to initially start playing. It is
recommended to record discs with two
levels or less.
lA single disc with up to 512 files can
be played and a single folder with up to
255 files can be played.
lWhen naming an MP3 file, be sure to
add an MP3 file extension (.mp3) after
the file name.
lThe number of characters which can be
displayed is restricted.
CAUTION
This unit can only play MP3 files that
have an MP3 file extension (.mp3)
attached. Do not attach an MP3 file
extension to any other type file as it
could cause noise to be emitted or a
malfunction in the unit.
About ID3 Tag display
lThis unit can only display ID3 Tag
album, track and artist names that have
been input using Ver.1.0/1.1/2.2/2.3/2.4
formats. Any other data that may have
been input cannot be displayed.
lThis unit cannot display some
characters. Characters which cannot be
displayed are indicated by an asterisk
(
).
Interior Comfort
Audio System
6-23
CX-9_8DU1-EA-14H_Edition1 Page297
Thursday, June 5 2014 4:18 PM
Form No.8DU1-EA-14H
Page 305 of 604

Black plate (305,1)
Daytime/nighttime screen setting*1
The daytime or nighttime screen can be
selected even if the headlights are
illuminated or turned off (when bright
screen is required at night or dark screen
is required at noon).
: Daytime screen setting
: Nighttime screen setting
: Switches screen automatically
according to headlight illumination
condition
*1 The setting cannot be made while in
rear view camera mode.
Display OFF
The display can be turned off. Touch the
on-screen button to turn the
display off.
The display can be turned back on as
follows:
lPress the audio button ()to
display the audio screen.
lPress the navigation button ()to
display the navigation screen (With
navigation system).
lPress the phone button ()to
display the Bluetooth®dial screen.lPress the setup button ()to
display the setup dial setting screen.
lPress the audio control dial to display
the setup sound setting screen.
lShift to the R position to change to the
rear view camera mode.
Shift to a position other than R to
return to the display off condition.
NOTE
The screen can also be turned off using voice
recognition.
Refer to Voice Recognition on page 6-120.
Display setting reset
All of the screen setting values can be
reset to their initial settings.
1. Touch the
on-screen button.
2. Touch the
on-screen button.
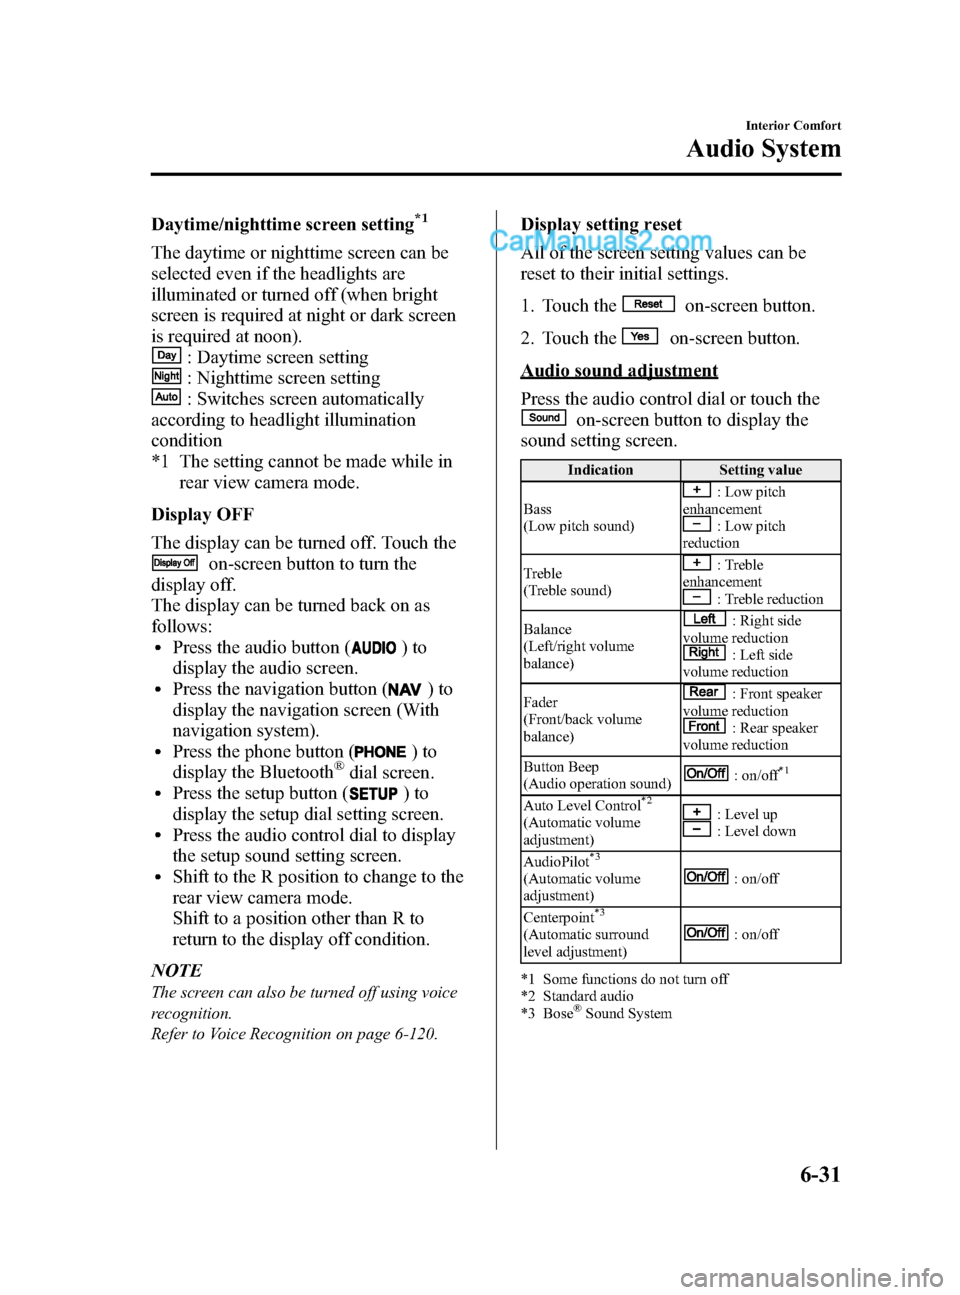
Audio sound adjustment
Press the audio control dial or touch the
on-screen button to display the
sound setting screen.
Indication Setting value
Bass
(Low pitch sound)
: Low pitch
enhancement
: Low pitch
reduction
Treble
(Treble sound)
: Treble
enhancement
: Treble reduction
Balance
(Left/right volume
balance)
: Right side
volume reduction
: Left side
volume reduction
Fader
(Front/back volume
balance)
: Front speaker
volume reduction
: Rear speaker
volume reduction
Button Beep
(Audio operation sound)
: on/off*1
Auto Level Control*2
(Automatic volume
adjustment): Level up: Level down
AudioPilot
*3
(Automatic volume
adjustment): on/off
Centerpoint
*3
(Automatic surround
level adjustment): on/off
*1 Some functions do not turn off
*2 Standard audio
*3 Bose
®Sound System
Interior Comfort
Audio System
6-31
CX-9_8DU1-EA-14H_Edition1 Page305
Thursday, June 5 2014 4:18 PM
Form No.8DU1-EA-14H
Page 306 of 604

Black plate (306,1)
Automatic Level Control (ALC)
The automatic level control is a feature
that automatically adjusts audio volume
and sound quality according to the vehicle
speed. The volume increases in
accordance with the increase in vehicle
speed, and decreases as vehicle speed
decreases.
AudioPilot
®2*4
AudioPilot®2 automatically adjusts audio
volume and sound quality in accordance
with the level of noise entering the vehicle
interior while driving. When AudioPilot
®
2 is turned on, the system automatically
calculates the conditions for optimum
hearing of sound which may be difficult
to hear depending on exterior noise.
AudioPilot
®2 can be set on or off.
*4 AudioPilot®2 is a registered
trademark of Bose Corporation.
Centerpoint
®*5
Centerpoint®offers you the experience of
5.1-channel surround sound in your
vehicle even with your conventional 2-
channel stereo CDs. Centerpoint
®can be
set on or off.
*5 Centerpoint
®is a registered trademark
of Bose Corporation.
NOTE
lCenterpoint®operates optimally with a 2-
channel stereo CD. Audio files encoded
with high compression can be played,
however, they may result in poor sound
quality.
lCenterpoint®is available for 2-channel
stereo audio except for AM radio/FM radio/
AUX/Bluetooth® audio.
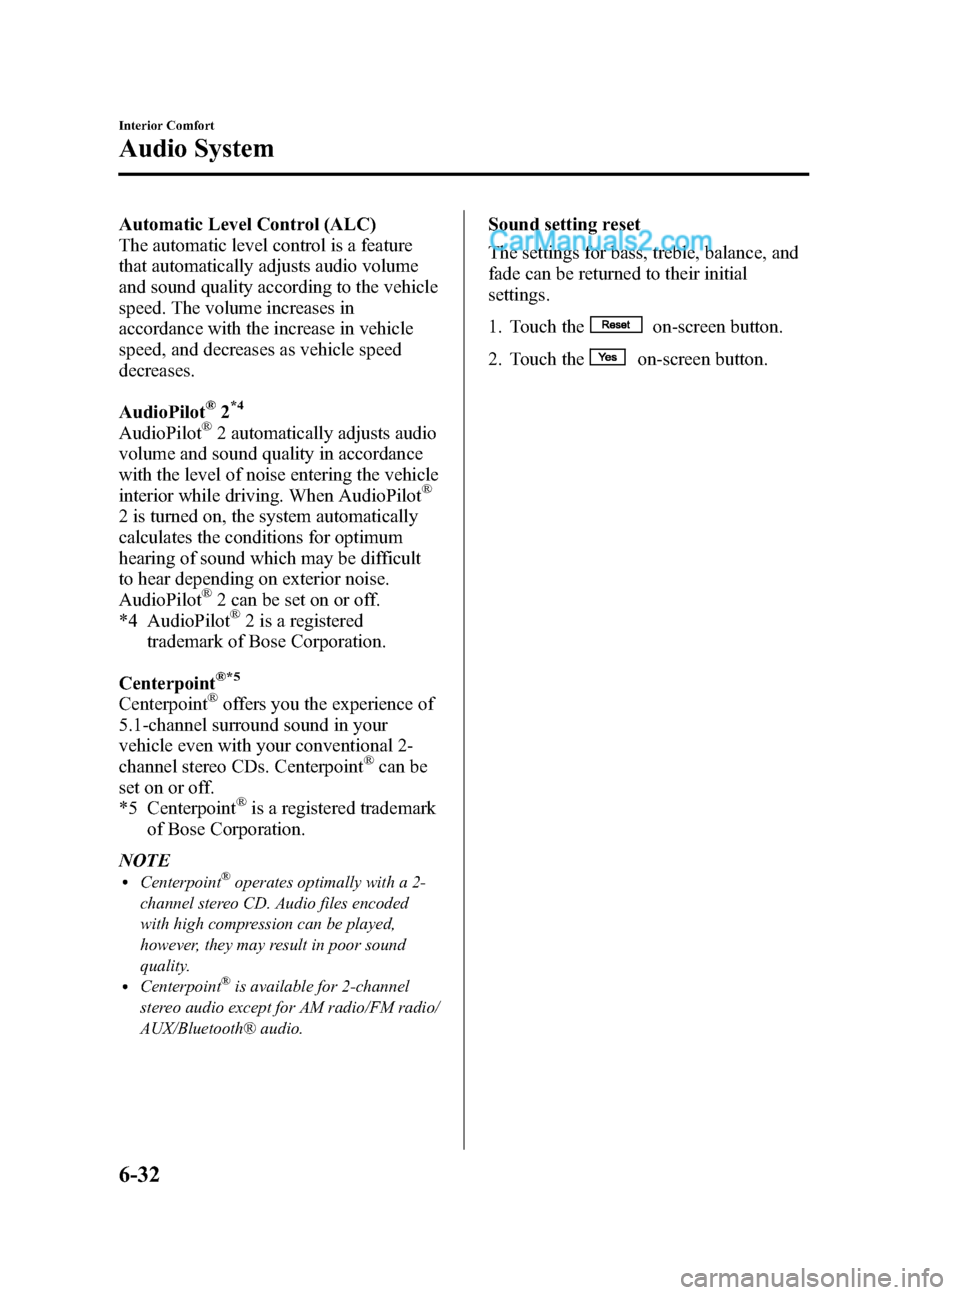
Sound setting reset
The settings for bass, treble, balance, and
fade can be returned to their initial
settings.
1. Touch the
on-screen button.
2. Touch the
on-screen button.
6-32
Interior Comfort
Audio System
CX-9_8DU1-EA-14H_Edition1 Page306
Thursday, June 5 2014 4:18 PM
Form No.8DU1-EA-14H
Page 308 of 604

Black plate (308,1)
qOperating the Radio
Audio button
Seek tuning
buttons
Manual tuning
dial
Radio ON
(Connected Satellite Radio)
Press the audio button (
) and touch
the
on-screen tab.
(Unconnected Satellite Radio)
Press the audio button (
) and touch
the
oron-screen tab.
Band selection
(Connected Satellite Radio)
Touch the
on-screen tab to switch
the band as follows:
FM1 →FM2 →AM
NOTE
lis displayed when FM1 is selected,
is displayed when FM2 is
selected, and
is displayed when AM
is selected.
lIf the FM broadcast signal becomes weak,
reception automatically changes from
STEREO to MONO for reduced noise, and
the “STEREO ”indicator will no longer
display.
(Unconnected Satellite Radio)
Touch the
on-screen tab to select
AM. Touch the
on-screen tab to
select FM1 and FM2.
NOTE
lWhen FM1 is selected,is displayed.
When FM2 is selected,
is displayed.lIf the FM broadcast signal becomes weak,
reception automatically changes from
STEREO to MONO for reduced noise, and
the “STEREO ”indicator will no longer
display.
Tuning
The radio has the following tuning
methods: Manual, Seek, Scan, Preset
channel, and Auto memory tuning. The
easiest way to tune stations is to set them
on preset channels.
NOTE
If the power supply is interrupted (fuse blows
or the battery is disconnected), the preset
channels will be erased.
6-34
Interior Comfort
Audio System
CX-9_8DU1-EA-14H_Edition1 Page308
Thursday, June 5 2014 4:18 PM
Form No.8DU1-EA-14H
Page 309 of 604

Black plate (309,1)
Manual tuning
Turning the manual tuning dial will
change the frequency higher or lower.
NOTE
When anbroadcast is being
received, a receivable multicast channel is also
received.
Seek tuning
Pressing the seek tuning button (
,)
will cause the tuner to seek a higher or
lower frequency automatically.
NOTE
lIf you continue to press and hold the seek
tuning button (
,) the frequency will
continue changing without stopping.
lWhen anbroadcast is being
received, a receivable multicast channel is
also received.
Scan tuning
You can search for receivable radio
stations by touching the
on-screen
button.
Scanning stops at each station for about
five seconds.
Touch the
on-screen button one time
during reception to continue receiving a
broadcasting station.
Preset channel tuning
The six preset channels can be used to
store six AM and twelve FM stations.
1. To set a channel, first select AM, FM1, or FM2. Tune to the desired station.
2. Press and hold any of the preset on- screen buttons. The reception
frequency is programmed and
displayed on the preset button. 3. Repeat this operation for the other
stations and bands you want to store.
When receiving a programmed
frequency, select AM, FM1, or FM2
and touch the preset on-screen button.
NOTE
The programmed frequency is displayed on the
preset button.
Auto memory tuning
This is especially useful when driving in
an area where the local stations are
unknown. Additional AM/FM stations
can be stored without disturbing the
previously set channels.
1. Touch the
on-screen button. The
auto memory preset list is displayed
and the previously tuned frequency is
received.
2. Touch the
on-screen button to
display the frequencies of up to ten
radio stations on the auto memory
preset list.
3. Touch the desired frequency.
NOTE
Touch theon-screen button during
auto memory tuning to return to the AM/FM
main screen.
Radio Broadcast Data System (RBDS)
Radio text information display
A maximum of 64 characters of radio text
information sent from a broadcasting
station is displayed in the audio display.
Interior Comfort
Audio System
6-35
CX-9_8DU1-EA-14H_Edition1 Page309
Thursday, June 5 2014 4:18 PM
Form No.8DU1-EA-14H
Page 311 of 604

Black plate (311,1)
Benefits of HD Radio™Technology
(Information)
The song title, artist name and genre will
appear on the screen when available by
the radio station.
(Multicast)
On the FM radio frequency most digital
stations have “multiple ”or supplemental
programs on each FM station.
Listening to HD Radio ™Technology
If
turns on by selecting a radio
station which is an
broadcasting station, the analog broadcast
is switched to an
broadcast
automatically after a few seconds and then
received. For FM,
, and for AM,
is displayed, and theilluminates
in orange.
If the HD Radio broadcast is stopped and
changed to an analog broadcast, press
down
to turn off.
Multicast channel selection (FM)
Press
on-screen button to
switch to the multi-cast channel for the
displayed number.
The number of multi-cast channels which
can be received differs depending on the
radio station. NOTE
lIf an analog broadcast is received once and
is received while HD1 is
selected, the audio unit switches to the
station automatically.lWhen thebutton is
illuminated, there could be a noticeable
difference in sound quality and volume
when a change from digital to analog
signals occurs. If the sound quality and
volume become noticeably diminished or
cut off, touch the HD button to turn off
(button is not
illuminated).
lOnce an analog broadcast is received when
HD1 is selected from the preset channels, it
is switched to
automatically. If
the radio reception conditions are poor, or
is off, switching to
broadcasts is not possible.lWhen an HD specialty channel (HD2 to
HD8) is selected from the preset channels,
“ No HD signal ”is displayed and no audio
is output until
is received. If
the radio reception conditions are poor,
“ No HD signal ”continues to be displayed.
lIf theis not illuminated or does not
illuminate in orange, information such as
song titles of the
station are
received, however, the audio output is
analog. If information can no longer be
received and the non-reception condition
continues,
andon-
screen buttons disappear.
Interior Comfort
Audio System
6-37
CX-9_8DU1-EA-14H_Edition1 Page311
Thursday, June 5 2014 4:18 PM
Form No.8DU1-EA-14H