ignition MAZDA MX-5 1994 Workshop Manual
[x] Cancel search | Manufacturer: MAZDA, Model Year: 1994, Model line: MX-5, Model: MAZDA MX-5 1994Pages: 1708, PDF Size: 82.34 MB
Page 309 of 1708

G INDEX INDEX 1. Battery lnspection . . . . . . . . . . . . . . . . . page G- 8 Recharging . . . . . . . . . . . . . . . . page G- 9 Replacement . . . . . . . . . . . . . . page G-10 2. Alternator Removal / lnstallation . . . . . . . page G-10 Disassembly / Assembly . . . . page G-11 lnspection . . . . . . . . . . . . . . . . . page G-12 3. Drive belt lnspection . . . . . . . . . . . . . . . . . page G-13 Adjustment . . . . . . . . . . . . . . . . page G-14 4. Spark plug Removal / Installation . . . . . . . page G-18 Spark test . . . . . . . . . . . . . . . . . page G-18 lnspection . . . . . . . . . . . . . . . . . page G-18 5. Ignition coil lnspection . . . . . . . . . . . . . . . . . page G-19 Replacement . . . . . . . . . . . . . . page G-19 6. Igniter (in ignition coil) lnspection . . . . . . . . . . . . . . . . . page G-19 7. High-tension lead Removal / lnstallation . . . . . . . page G-20 lnspection . . . . . . . . . . . . . . . . . page G-20 8. Starter Removal / lnstallation . . . . . . . page G-22 Performance lnspection . . . . . page G-23 Disassembly / Assembly . . . . page G24 -' lnspection . . . . . . . . . . . . . . . . . page G26 9. Starter interlock switch (MT) lnspection . . . . . . . . . . . . . . . . . page G-28 Gartner Banana
Page 310 of 1708

OUTLINE OUTLINE SPECIFICATIONS (i.e. powertrain control module (engine), audio, etc.) *2 With System Selector (49 B019 9AO) test switch at SELF TEST. - Engine Item Starter Ignition system Cylinder Arrangement Battery BP DOHC MT I AT 12, Negative ground S46A24L(S) (32 Ah) Maintenance-free 20.0 A.C. I REAR Voltage V Type and capacity (5-hour rate) 12-65 -. 1 2-70 Drive belt deflection mm {in} Dark current" m A Transistorized (built-in voltage regulator) 14.3-1 4.9 21.5 I0.846) 8 (0.31 1 Ignition timing** BTDC ("CA)lrpm U Alternator 'I Dark current is the constant flow of current while the ignition switch is OFF. 45UoGX-003 New Used 101850 Ignition coil Spark plug FRONT 55-7.0 (0.22-0.27) 6.0-7.5 (0.2H.29) 101800 TY pe Primary coil winding n Secondary coil winding kR Type Plug gap mm {in) Firing order Type Output V-A Regulator type Regulated voltage V TY pe Output V-kW Molded (with igniter) - 8.7-1 2.9 (20°C (68°F)) NGK : BKR5E-11 BKR6E-11 (Standard ... MT) NIPPONDENSO : K16PR-U11 K20PR-U11 (Standard ... MT, AT) 1 .O-1.1 IO.040-0.043) 1-3-4--2 Brush length mm {in) Direct 124.95 17.0 i0.67) 11.5 I0.45) Brush length mm {in} Standard Minimum Coaxial reduction 12-1.4 17.5 i0.69) 12.0 i0.47) Standard Minimum Electronic spark advance (ESA) Powertrain control module (engine) controls spark advance Type Spark advance control Gartner Banana
Page 311 of 1708

TROUBLESHOOTING GUIDE TROUBLESHOOTING GUIDE Problem Will not crank Cranks slowly Discharged battery Misfire G-5 Will not crank I Will not crank I Check 1 1 , YES, Check if engine cranks with fully charged battery Check charging system (Refer to page G-7) I NO Check ignition switch (Refer to section T), starter interlock switch (Refer to page G-28) and parWneutral switch (Refer to section K) 45uOOx-OC - Check 1 Check if click is heard from starter magnetic switch when ignition is turned to START Cranks slowly Check starting system (Refer to page G-21) Crank slowly Check 1 Check charging system (Refer to page G-7) I NO ---- Check starting system (Refer to page G-21) Check 1 Gartner Banana
Page 312 of 1708

TROUBLESHOOTING GUIDE G Discharged battery I Misfire L Misfire Check ignition system (Refer to page G-16) Discharged battery Check charging system (Refer to page G-7) 05UffiX-006 Gartner Banana
Page 314 of 1708

CHARGING SYSTEM G TROUBLESHOOTING Check 1 Check if battery p Check battery (Refer to page G-8) J Check 2 I. Turn ignition switch ON Check wire harness 2. Check if voltage exists at each terminal of alternator Check 3 YES 1. Start engine Check alternator (Refer to page G-10) 2. Check if alternator warning light goes off I YES Check if drive belt t Adjust or replace drive belt (Refer to page G-14) 1 YES I Check for dark current (Refer to page G-3) I Check 1 BATTERY r"; Check 3 I ALTERNATOR WARNING LIGHT Check 2 B+: Battery positive voltage I I I B 1 Approx. 12V 1 Approx. 12V I B+ ON ON (Idle) L S 45UOGX-006 OV Approx. 12V Approx. 1V Approx. 12V B+ B+ Gartner Banana
Page 322 of 1708
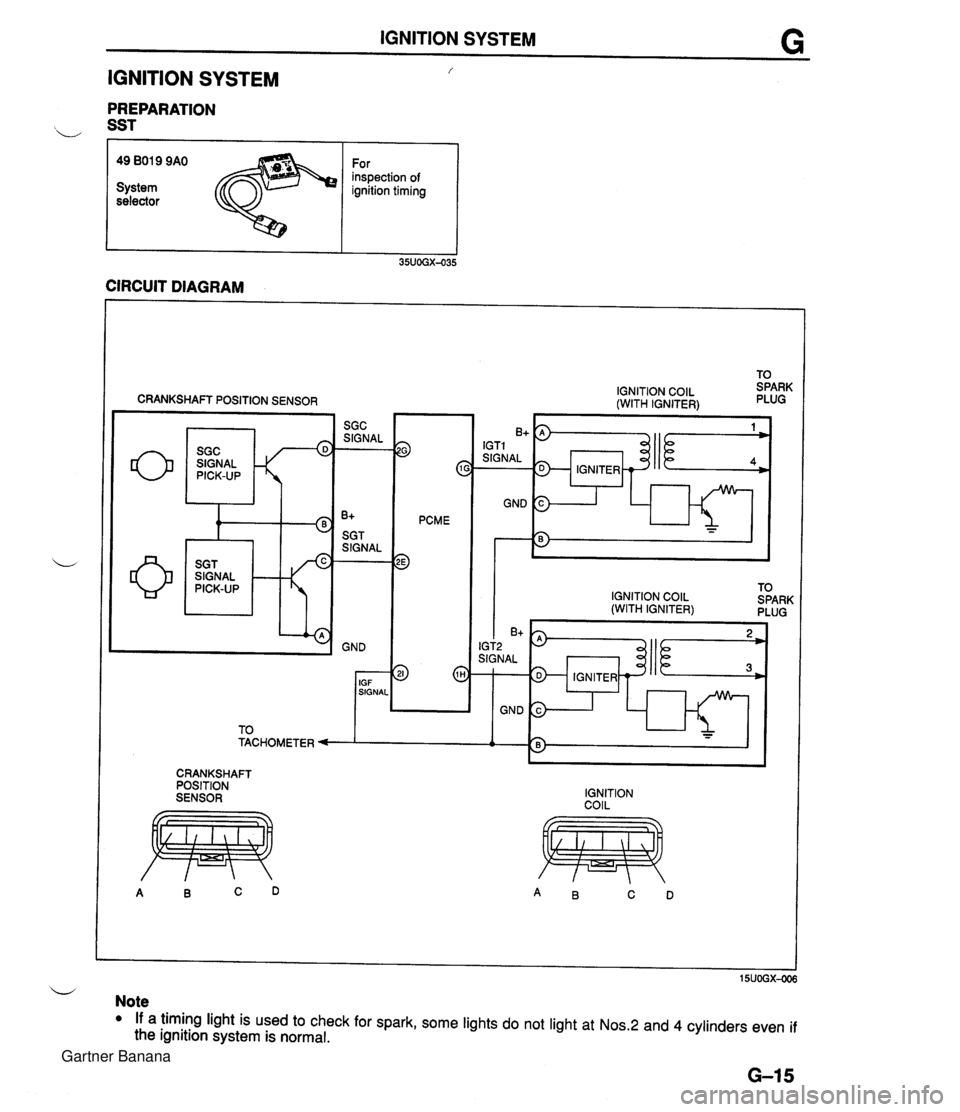
IGNITION SYSTEM G IGNITION SYSTEM f PREPARATION b SST r I I 49 BO19 9AO For inspection of System ignition timing selector CIRCUIT DIAGRAM CRANKSHAFT POSITION SENSOR SIGNAL w 9 c PCME 3 IGNITION COlL (WITH IGNITER) IGNITION COlL TO (WITH IGNITER) SPARK PLUG I I I 6'5) IGT2 SIGNAL 1 IGNITER - GND 3 1 h - - CRANKSHAFT POSITION SENSOR IGNITION COIL u Note If a timing light is used to check for spark, some lights do not light at Nos.2 and 4 cylinders even if the ignition system is normal. Gartner Banana
Page 323 of 1708
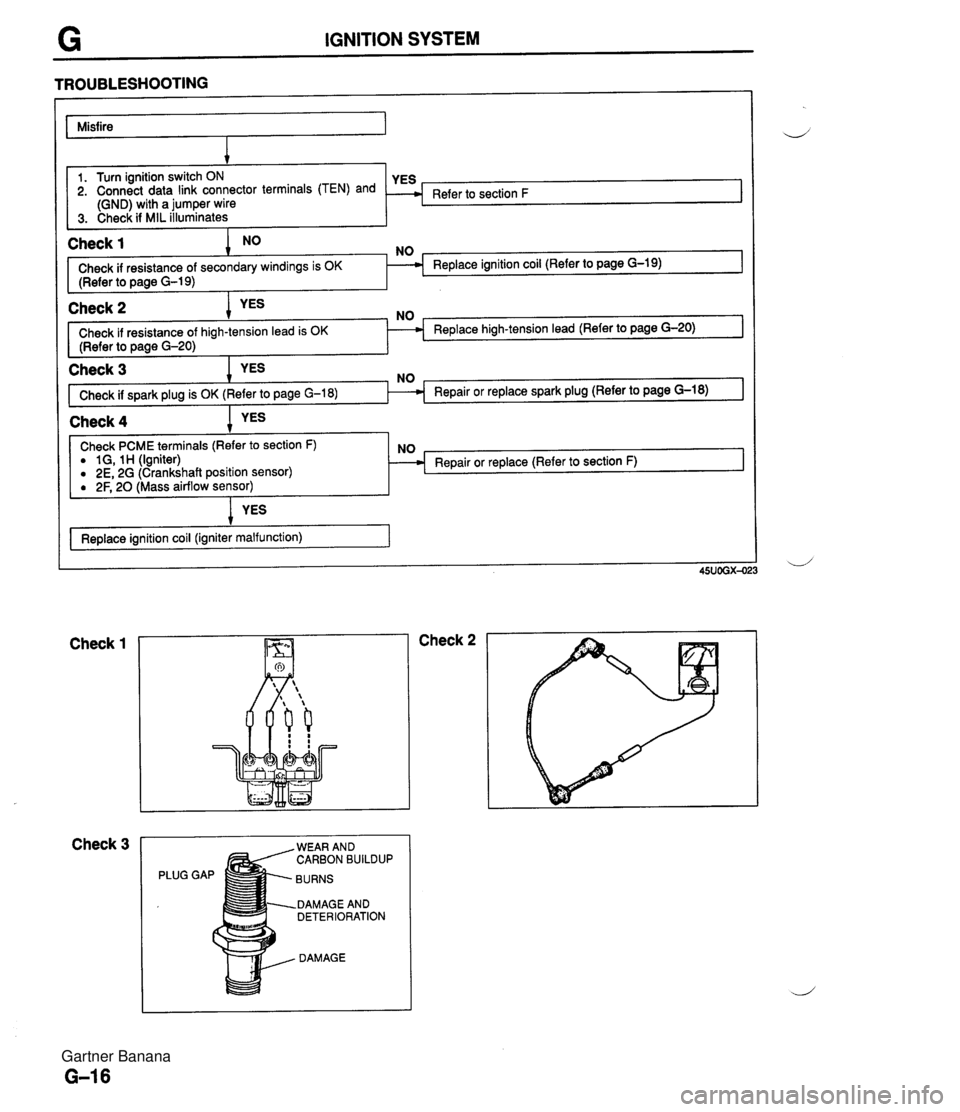
IGNITION SYSTEM TROUBLESHOOTING Misfire I 1 Check 1 NO NO 1. Turn ignition switch ON 2. Connect data link connector terminals (TEN) and (GND) with a jumper wire 3. Check if MIL illuminates I Check if resistance of secondary windings is OK Replace ignition coil (Refer to page G-19) (Refer to page G-19) I Refer to section F Check 2 Check if resistance of Replace high-tension lead (Refer to page G-20) (Refer to page G-20) I I Check 3 Check if spark plug is OK ( I Check 4 1 YES I Check PCME terminals (Refer to section F) a 1 G, 1 H (Igniter) 0 2E, 2G (Crankshaft position sensor) Repair or replace (Refer to section F) ( 2F, 20 ass airflow sensor) YES Replace ignition coil (igniter malfunction) 1 Check 1 Check 3 Check 2 PLUG WEAR AND CARBON BUILDUP BURNS DAMAGE AND DETERIORATION DAMAGE Gartner Banana
Page 324 of 1708
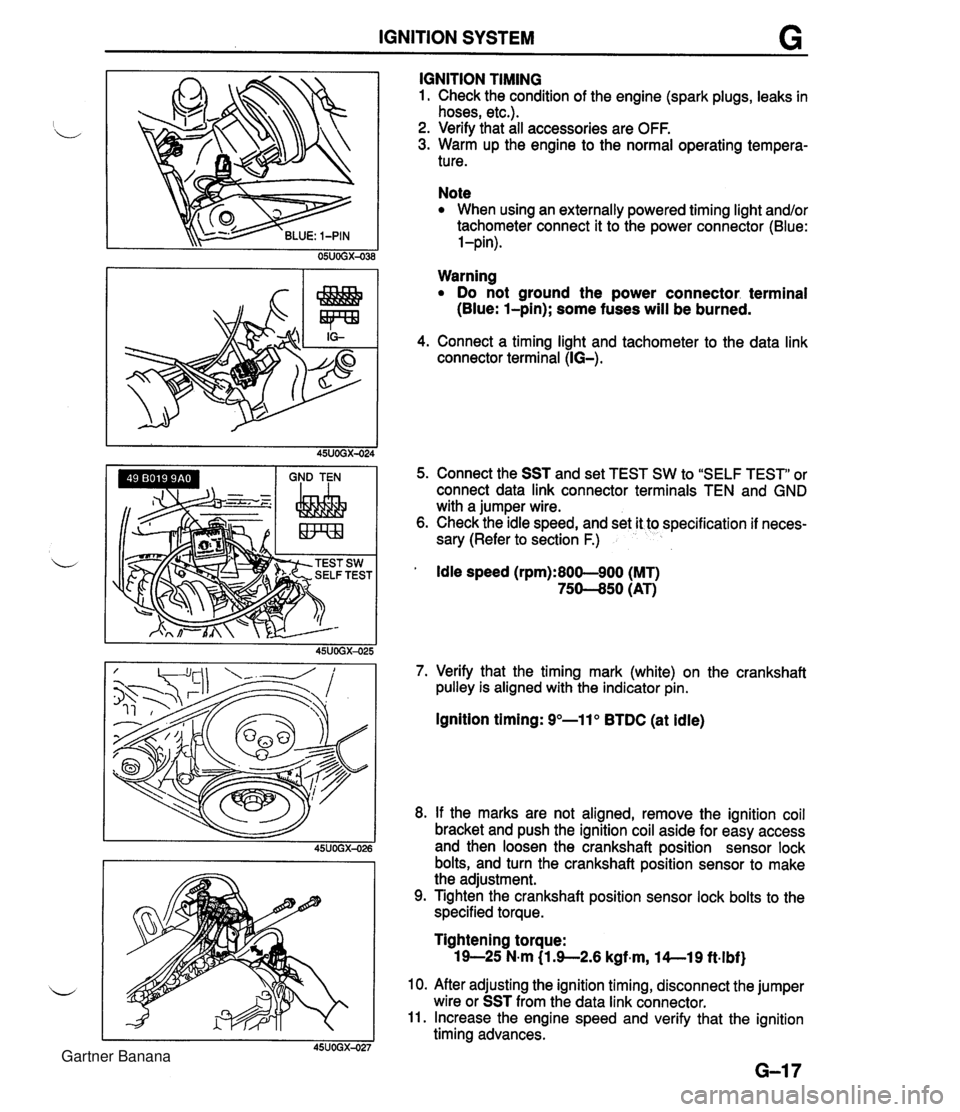
IGNITION SYSTEM G GND TEN I I I IGNITION TIMING 1. Check the condition of the engine (spark plugs, leaks in hoses, etc.). 2. Verify that all accessories are OFF. 3. Warm up the engine to the normal operating tempera- ture. Note When using an externally powered timing light and/or tachometer connect it to the power connector (Blue: l-pin). Warning Do not ground the power connector. terminal (Blue: l-pin); some fuses will be burned. 4. Connect a timing light and tachometer to the data link connector terminal (IG-). 5. Connect the SST and set TEST SW to "SELF TEST" or connect data link connector terminals TEN and GND with a jumper wire. 6. Check the idle speed, and set it to specification if neces- sary (Refer to section F.) ' Idle speed (rpm):800-900 (MT) 75-50 (AT) 7. Verify that the timing mark (white) on the crankshaft pulley is aligned with the indicator pin. Ignition timing: 9"-11" BTDC (at idle) 8. If the marks are not aligned, remove the ignition coil bracket and push the ignition coil aside for easy access and then loosen the crankshaft position sensor lock bolts, and turn the crankshaft position sensor to make the adjustment. 9. Tighten the crankshaft position sensor lock bolts to the specified torque. Tightening torque: 19-25 N-m (1 3-2.6 kgf~m, l4--19 ft.lbf) 10. After adjusting the ignition timing, disconnect the jumper wire or SST from the data link connector. 11. Increase the engine speed and verify that the ignition timing advances. Gartner Banana
Page 325 of 1708
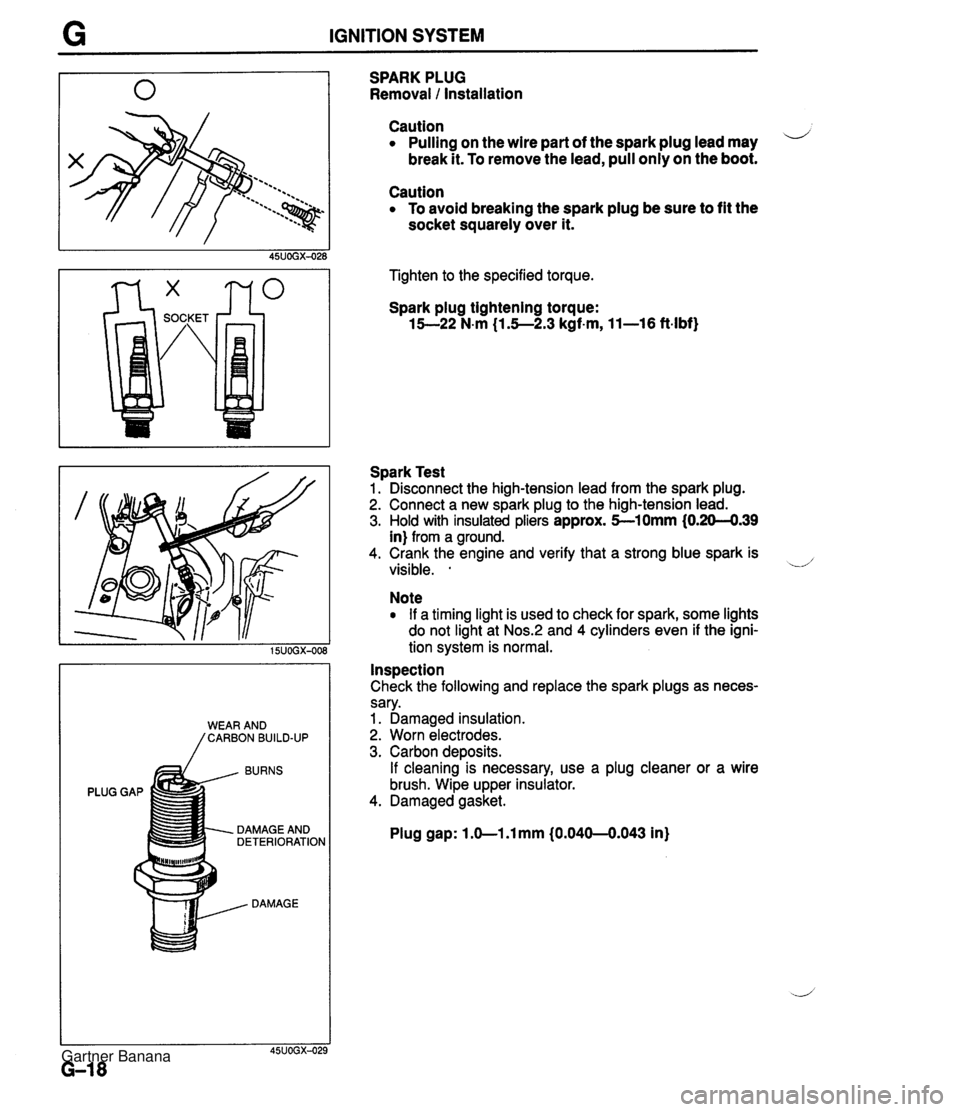
G IGNITION SYSTEM BURNS PLUG GAP DAMAGE AND DETERIORATION DAMAGE SPARK PLUG Removal 1 Installation Caution Pulling on the wire part of the spark plug lead may i/ break it. To remove the lead, pull only on the boot. Caution To avoid breaking the spark plug be sure to fit the socket squarely over it. Tighten to the specified torque. Spark plug tightening torque: 15--22 N-m (1.5--2.3 kgf-m, 11-16 ft-lbf) Spark Test 1. Disconnect the high-tension lead from the spark plug. 2. Connect a new spark plug to the high-tension lead. 3. Hold with insulated pliers approx. 5-10mm (0.20-4.39 in) from a ground. 4. Crank the engine and verify that a strong blue spark is visible. . -.d' Note If a timing light is used to check for spark, some lights do not light at Nos.:! and 4 cylinders even if the igni- tion system is normal. Inspection Check the following and replace the spark plugs as neces- sary. 1. Damaged insulation. 2. Worn electrodes. 3. Carbon deposits. If cleaning is necessary, use a plug cleaner or a wire brush. Wipe upper insulator. 4. Damaged gasket. Plug gap: 1 .O-1 .l mm (0.040-0.043 in) Gartner Banana
Page 326 of 1708
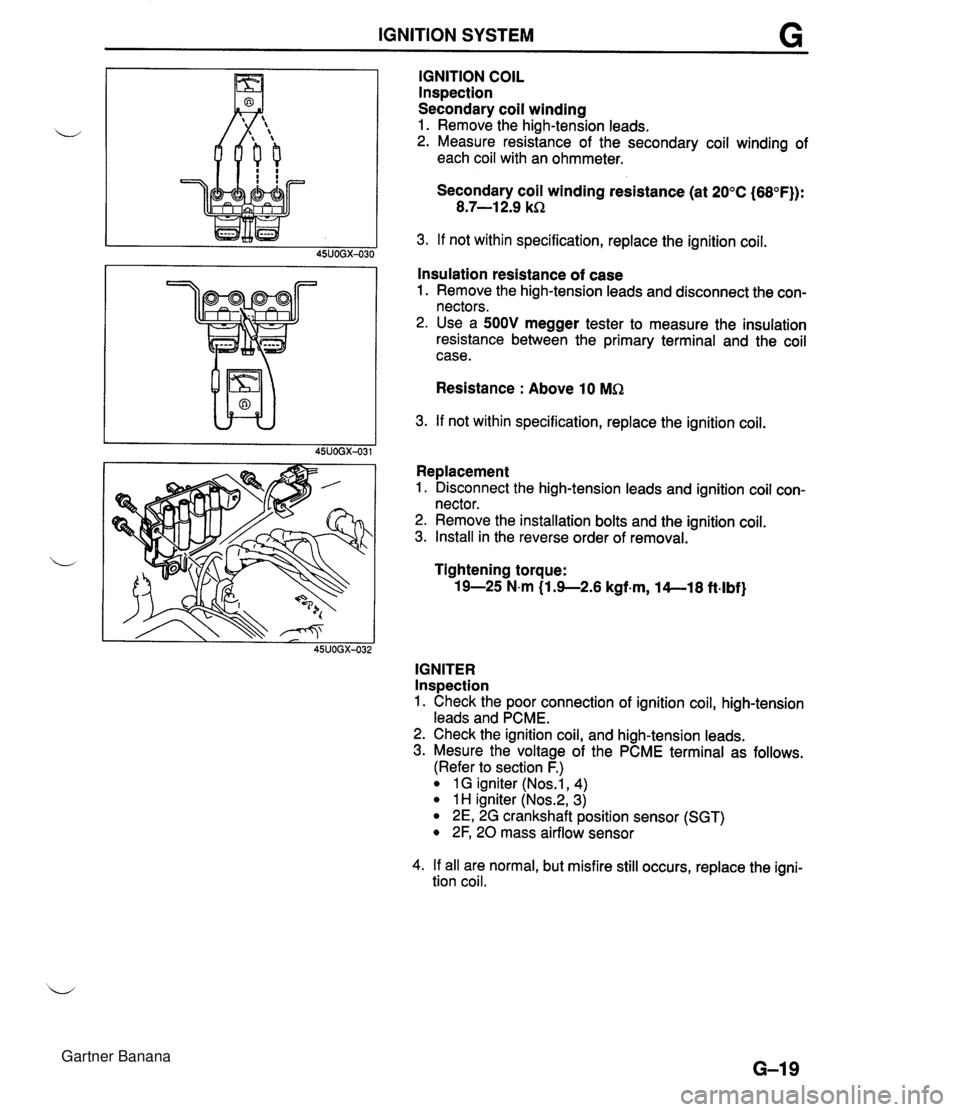
IGNITION SYSTEM IGNITION COIL lnspection Secondary coil winding 1. Remove the high-tension leads. u 2. Measure resistance of the secondary coil winding of each coil with an ohmmeter. Secondary coil winding resistance (at 20°C (68°F)): 8.7-1 2.9 kR 3. If not within specification, replace the ignition coil. 45UOGX-030 I I Insulation resistance of case 1. Remove the high-tension leads and disconnect the con- nectors. 2. Use a 500V megger tester to measure the insulation resistance between the primary terminal and the coil case. Resistance : Above 10 MR 3. If not within specification, replace the ignition coil. L I 45UOGX-031 Replacement 1. Disconnect the high-tension leads and ignition coil con- nector. 2. Remove the installation bolts and the ignition coil. 3. Install in the reverse order of removal. L Tightening torque: 19-25 N.m (1.9--2.6 kgf-m, 14--18 ft-lbf) 45UOGX-032 IGNITER Inspection 1. Check the poor connection of ignition coil, high-tension leads and PCME. 2. Check the ignition coil, and high-tension leads. 3. Mesure the voltage of the PCME terminal as follows. (Refer to section F.) 1 G igniter (Nos.1, 4) 1 H igniter (Nos.2, 3) 2E, 2G crankshaft position sensor (SGT) 2F, 20 mass airflow sensor 4. If all are normal, but misfire still occurs, replace the igni- tion coil. Gartner Banana