oil MAZDA MX-5 1994 Workshop Manual
[x] Cancel search | Manufacturer: MAZDA, Model Year: 1994, Model line: MX-5, Model: MAZDA MX-5 1994Pages: 1708, PDF Size: 82.34 MB
Page 351 of 1708
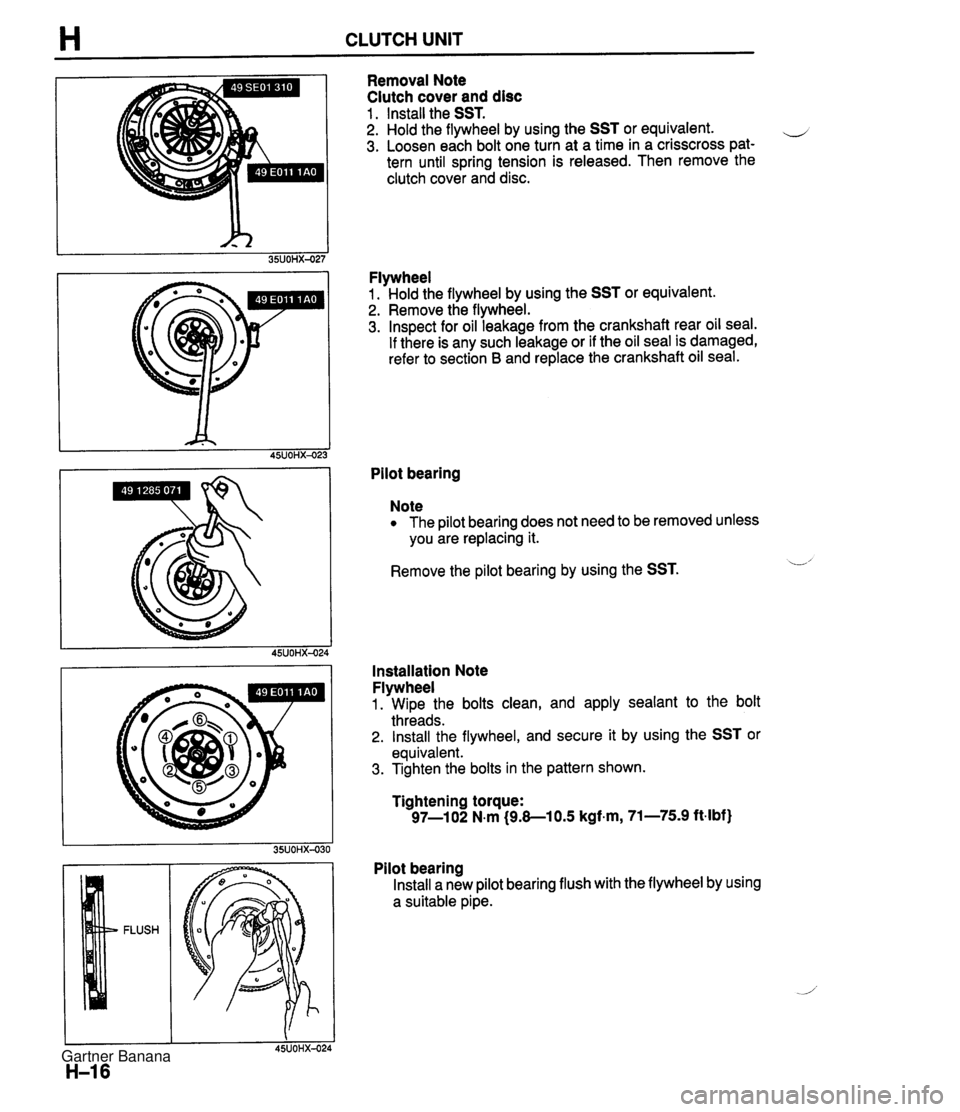
H CLUTCH UNIT Removal Note Clutch cover and disc 1 . Install the SST. 2. Hold the flywheel by using the SST or equivalent. e 3. Loosen each bolt one turn at a time in a crisscross pat- tern until spring tension is released. Then remove the clutch cover and disc. Flywheel 1. Hold the flywheel by using the SST or equivalent. 2. Remove the flywheel. 3. Inspect for oil leakage from the crankshaft rear oil seal. If there is any such leakage or if the oil seal is damaged, refer to section B and replace the crankshaft oil seal. Pilot bearing Note The pilot bearing does not need to be removed unless you are replacing it. Remove the pilot bearing by using the SST. L' Installation Note Flywheel 1. Wipe the bolts clean, and apply sealant to the bolt threads. 2. Install the flywheel, and secure it by using the SST or equivalent. 3. Tighten the bolts in the pattern shown. Tightening torque: 97-1 02 N.m (9.8-1 0.5 kgf.m, 71-75.9 ft-lbf) Pilot bearing Install a new pilot bearing flush with the flywheel by using a suitable pipe. Gartner Banana
Page 352 of 1708
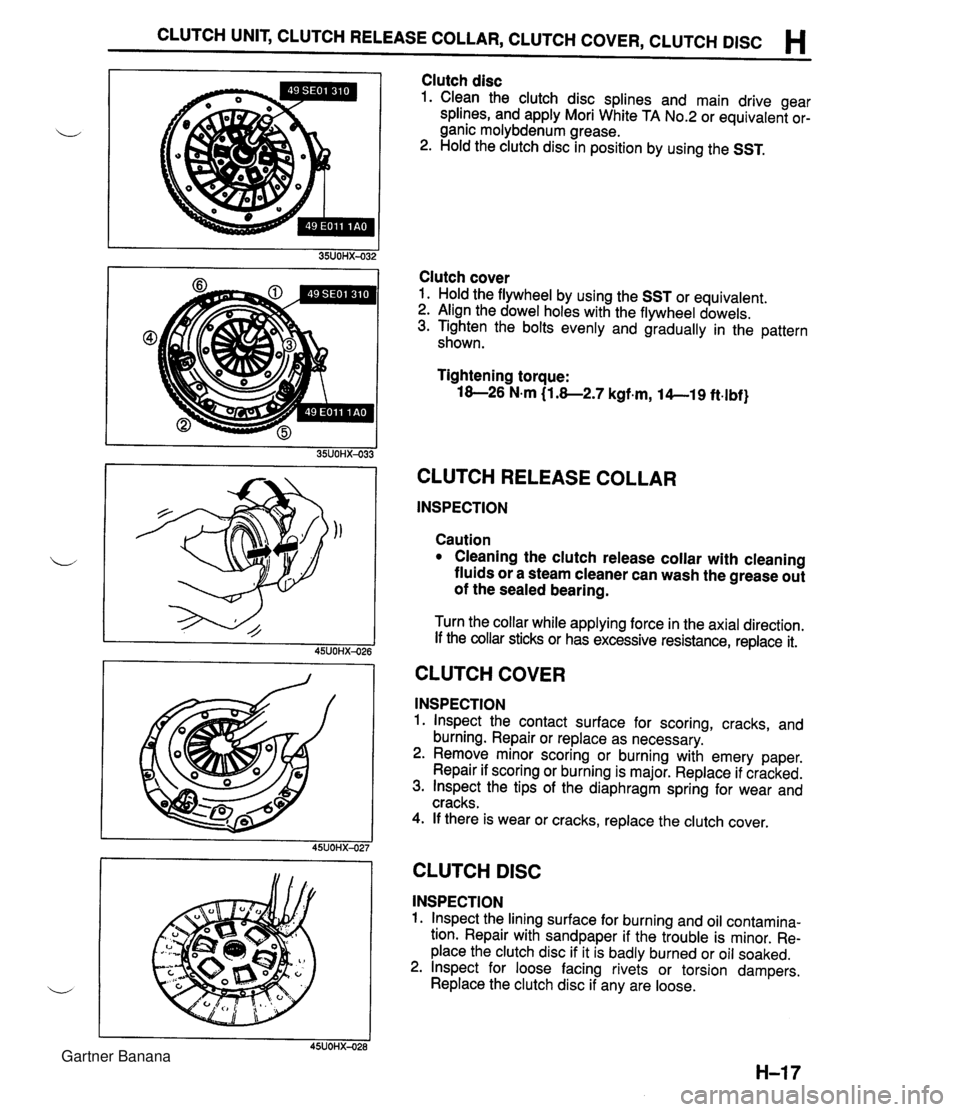
CLUTCH UNIT, CLUTCH RELEASE COLLAR, CLUTCH COVER, CLUTCH DlSC H Clutch disc 1. Clean the clutch disc splines and main drive gear splines, and apply Mori White TA No.2 or equivalent or- ganic molybdenum grease. 2. Hold the clutch disc in position by using the SST. Clutch cover 1. Hold the flywheel by using the SST or equivalent. 2. Align the dowel holes with the flywheel dowels. 3. Tighten the bolts evenly and gradually in the pattern shown. Tightening torque: 18-26 N.m (1.8-2.7 kgf.m, 14--19 ft.lbf} CLUTCH RELEASE COLLAR INSPECTION Caution Cleaning the clutch release collar with cleaning fluids or a steam cleaner can wash the grease out of the sealed bearing. Turn the collar while applying force in the axial direction. If the collar sticks or has excessive resistance, replace it. CLUTCH COVER INSPECTION 1. lnspect the contact surface for scoring, cracks, and burning. Repair or replace as necessary. 2. Remove minor scoring or burning with emery paper. Repair if scoring or burning is major. Replace if cracked. 3. lnspect the tips of the diaphragm spring for wear and cracks. 4. If there is wear or cracks, replace the clutch cover. I I 45UOHX-027 CLUTCH DlSC INSPECTION 1. lnspect the lining surface for burning and oil contamina- tion. Repair with sandpaper if the trouble is minor. Re- place the clutch disc if it is badly burned or oil soaked. 2. lnspect for loose facing rivets or torsion dampers. Replace the clutch disc if any are loose. Gartner Banana
Page 355 of 1708

Before beginning any service procedure. refer to section T of this manual for air bag system service warnings and audio antitheft system alarm conditions . MANUAL TRANSMISSION INDEX ....................................... J- 2 ..................................... OUTLINE J- 3 SPECIFICATIONS ........................... J- 3 ........................ STRUCTURAL VIEW J- 4 ............................. COMPONENTS J- 5 ............................. POWER FLOW J- 6 TROUBLESHOOTING GUIDE .................. J- 7 .......................... TRANSMISSION OIL J- 8 ............................... INSPECTION J- 8 ............................ REPLACEMENT J- 8 TRANSMISSION .............................. J- 9 ............................. PREPARATION J- 9 REMOVAL .................................. J-10 DISASSEMBLY ............................. J-13 ............................... INSPECTION 5-23 ASSEMBLY ................................. J-26 INSTALLATION ............................. J-45 25UOJX-011 Gartner Banana
Page 356 of 1708

J INDEX INDEX OIL SPECIFICATION API SERVICE GL-4 OR GL-5 ALL-SEASON TYPE: SAE 75W-90 ABOVE 10°C {50°F): SAE 80W-90 CAPACITY. 2.0 L {2.1 US qt, 1.8 Imp qt} 1. Transmission Removal . . . . . . . . . . . . . . . . . . . . page J-10 Disassembly . . . . . . . . . . . . . . . . page J-13 Inspection . . . . . . . . . . . . . . . . . . . page J-23 Assembly . . . . . . . . . . . . . . . . . . . page J-26 Installation . . . . . . . . . . . . . . . . . . page J-45 Gartner Banana
Page 361 of 1708
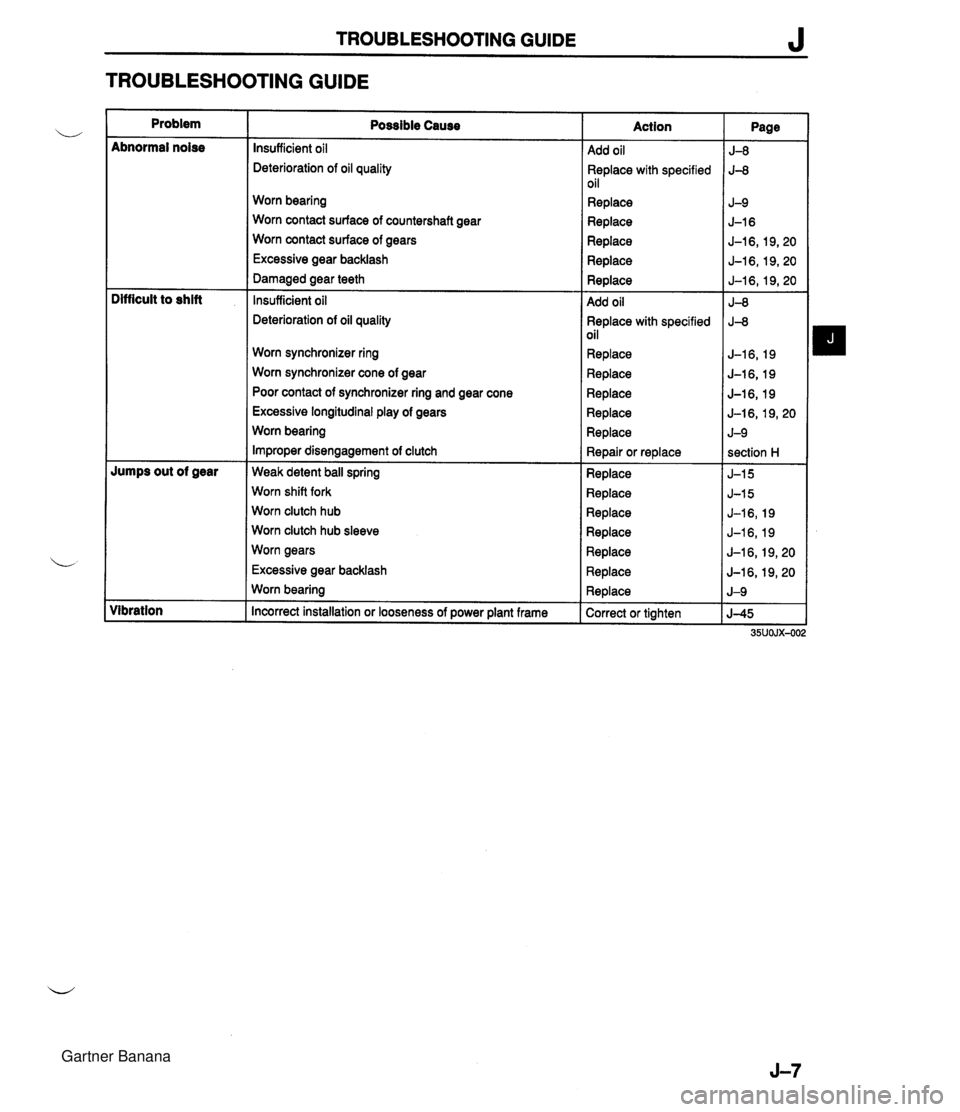
TROUBLESHOOTING GUIDE J TROUBLESHOOTING GUIDE Problem ~bnormal noise lumps out of gear libration Possible Cause nsufficient oil leterioration of oil quality Norn bearing Norn contact surface of countershaft gear Norn contact surface of gears Excessive gear backlash larnaged gear teeth nsufficient oil leterioration of oil quality Worn synchronizer ring Worn synchronizer cone of gear Poor contact of synchronizer ring and gear cone Excessive longitudinal play of gears Worn bearing Improper disengagement of clutch Weak detent ball spring Worn shift fork Worn clutch hub Worn clutch hub sleeve Worn gears Excessive gear backlash Worn bearing Incorrect installation or looseness of power plant frame Action 4dd oil 3eplace with specified )il qeplace 4dd oil 3eplace with specified ~il Replace Replace Replace Replace Replace Repair or replace Replace Replace Replace Replace Replace Replace Replace Correct or tighten Page 5-8 J-8 J-9 J-16 5-1 6,19,20 J-16,19,20 J-16,19,20 J-8 J-8 J-16,19 J-16,19 J-16, 19 J-l6,19,20 J-9 section H J-15 J-15 J-16,19 J-16,19 J-16, 19,20 J-l6,19,20 J-9 J-45 35UOJX-O( Gartner Banana
Page 362 of 1708
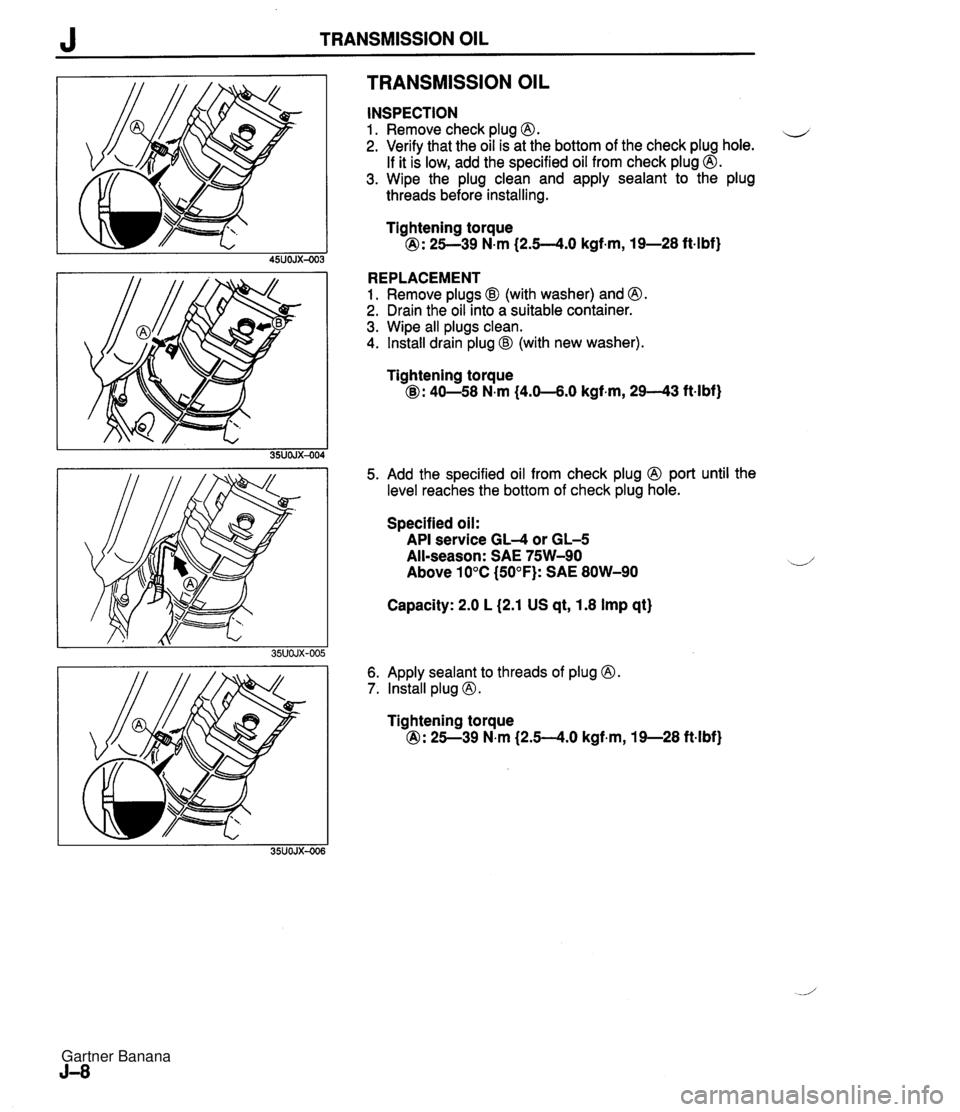
J TRANSMISSION OIL TRANSMISSION OIL INSPECTION 1. Remove check plug 0. u 2. Verify that the oil is at the bottom of the check plug hole. If it is low, add the specified oil from check plug @. 3. Wipe the plug clean and apply sealant to the plug threads before installing. Tightening torque @: 25--39 N.m (2.5--4.0 kgf.m, 19-28 ft4bf) REPLACEMENT 1. Remove plugs @I (with washer) and @. 2. Drain the oil into a suitable container. 3. Wipe all plugs clean. 4. Install drain plug @I (with new washer). Tightening torque @: 40-58 N.m (4.0-4.0 kgf.m, 2943 ftlbf) 5. Add the specified oil from check plug 0 port until the level reaches the bottom of check plug hole. Specified oil: API service GL-4 or GL-5 All-season: SAE 75W-90 Above 10°C (50°F): SAE 80W-90 Capacity: 2.0 L (2.1 US qt, 1.8 Imp qt) 6. Apply sealant to threads of plug 0. 7. lnstall plug @. Tightening torque @: 25--39 N.m (2.54.0 kgf.m, 19-28 ft-lbf) Gartner Banana
Page 363 of 1708

TRANSMISSION J TRANSMISSION 49 0839 425C Puller set, bearing For removal of bearing For installation of bearing Installer, bearing For removal of clutch hub assembly For holding mainshaft Puller, fan pulley boss Holder, mainshaft For removal of locknut 49 0862 350 Guide, shift fork / For installation of interlock pin Wrench, mainshaft locknut 49 HOl7 101 Hook For removal of bearing 49 071 0 520 Puller, bearing For removal of bearing For removal of transmission case For installation of bearing Pusher, main drive shaft \-4 I Installer, bearing 49 F401 330B Installer set, bearing For installation of bearing For installation of spring and ball Guide, interlock <-- pin For installation of clutch hub assembly 49 8025 OAO Installer, oil seal For installation of dust seal For installation of oil seal 49 6025 001 Body (Part of 49 6025 OAO) For installation of oil seal Handle (Part of 49 8025 OAO) Gartner Banana
Page 364 of 1708

J TRANSMISSION REMOVAL 1. Obtain the code number and deactivate the audio antitheft system before disconnecting the battery. (Refer to section T.) 2. is connect the negative battery cable. 3. On level grand, jack up the vehicle and support it evenly on safety stands. 4. Drain the transmission oil into a suitable container. 5. Remove in the order shown in the figure, referring to Removal Note. I. Shift lever knob ?. Rear console 9. Clutch release cylinder 10. Starter I 1 3. Shift lever 11. speedometer cable 4. Undercover 12. Power plant frame (PPF) 5. Performance rod Removal Note ............... page J-1 1 6. Differential mounting pipe 13. Transmission 7. Exhaust pipe J Removal Note ............... page J-12 8. Propeller shaft Service ...................... section L Gartner Banana
Page 367 of 1708
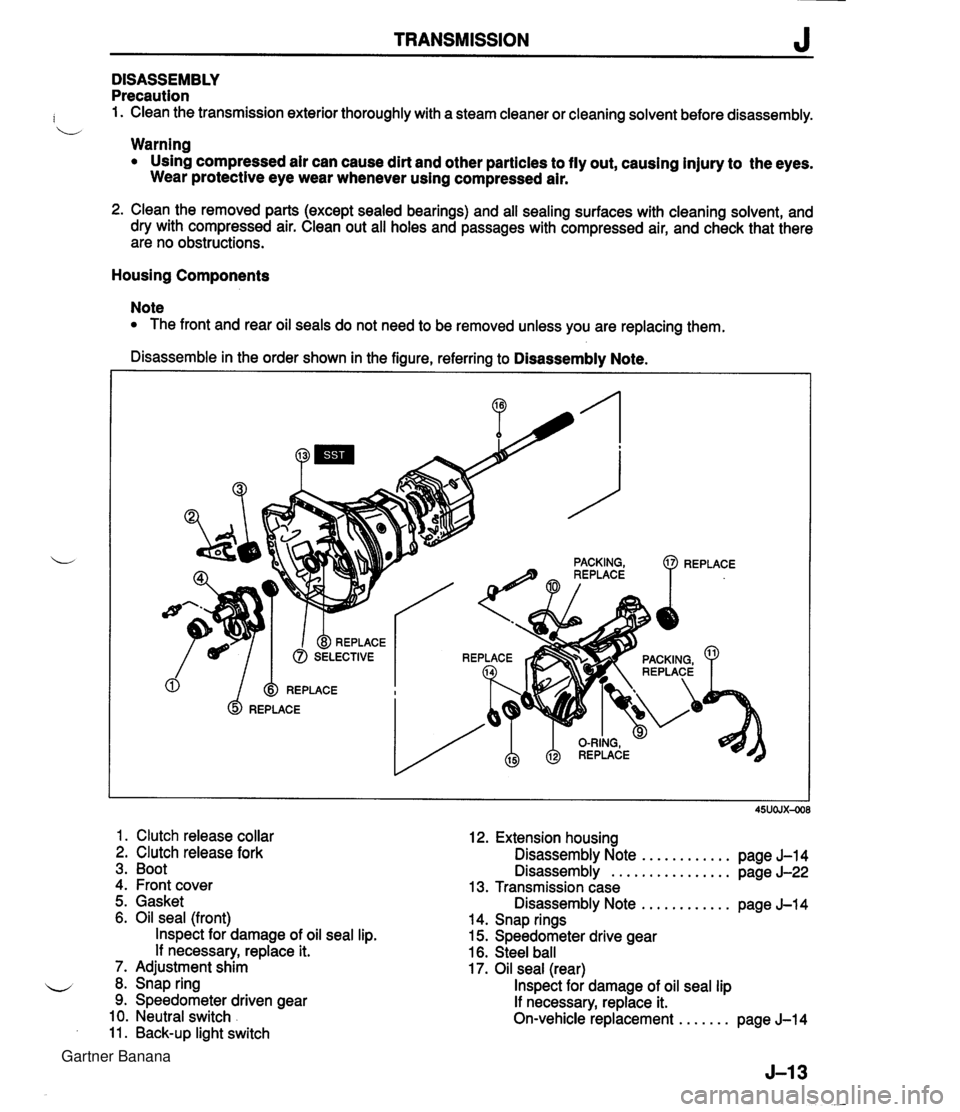
TRANSMISSION J DISASSEMBLY Precaution : 1. Clean the transmission exterior thoroughly with a steam cleaner or cleaning solvent before disassembly. b Warning Using compressed air can cause dirt and other particles to fly out, causing injury to the eyes. Wear protective eye wear whenever using compressed air. 2. Clean the removed parts (except sealed bearings) and all sealing surfaces with cleaning solvent, and dry with compressed air. Clean out all holes and passages with compressed air, and check that there are no obstructions. Housing Components Note The front and rear oil seals do not need to be removed unless you are replacing them. Disassemble in the order shown in the figure, referring to Disassembly Note. 1. Clutch release collar 2. Clutch release fork 3. Boot 4. Front cover 12. Extension housing Disassembly Note ............ page J-14 Disassembly ................ page J-22 13. Transmission case 5. Gasket Disassembly Note ............ pane J-14 6. Oil seal (front) lnspect for damage of oil seal lip. If necessary, replace it. 7. Adjustment shim 8. Snap ring 9. Speedometer driven gear 10. Neutral switch 11. Back-up light switch . - 14. Snap rings 15. Speedometer drive gear 16. Steel ball 17. Oil seal (rear) lnspect for damage of oil seal lip If necessary, replace it. On-vehicle replacement ....... page J-14 Gartner Banana
Page 368 of 1708
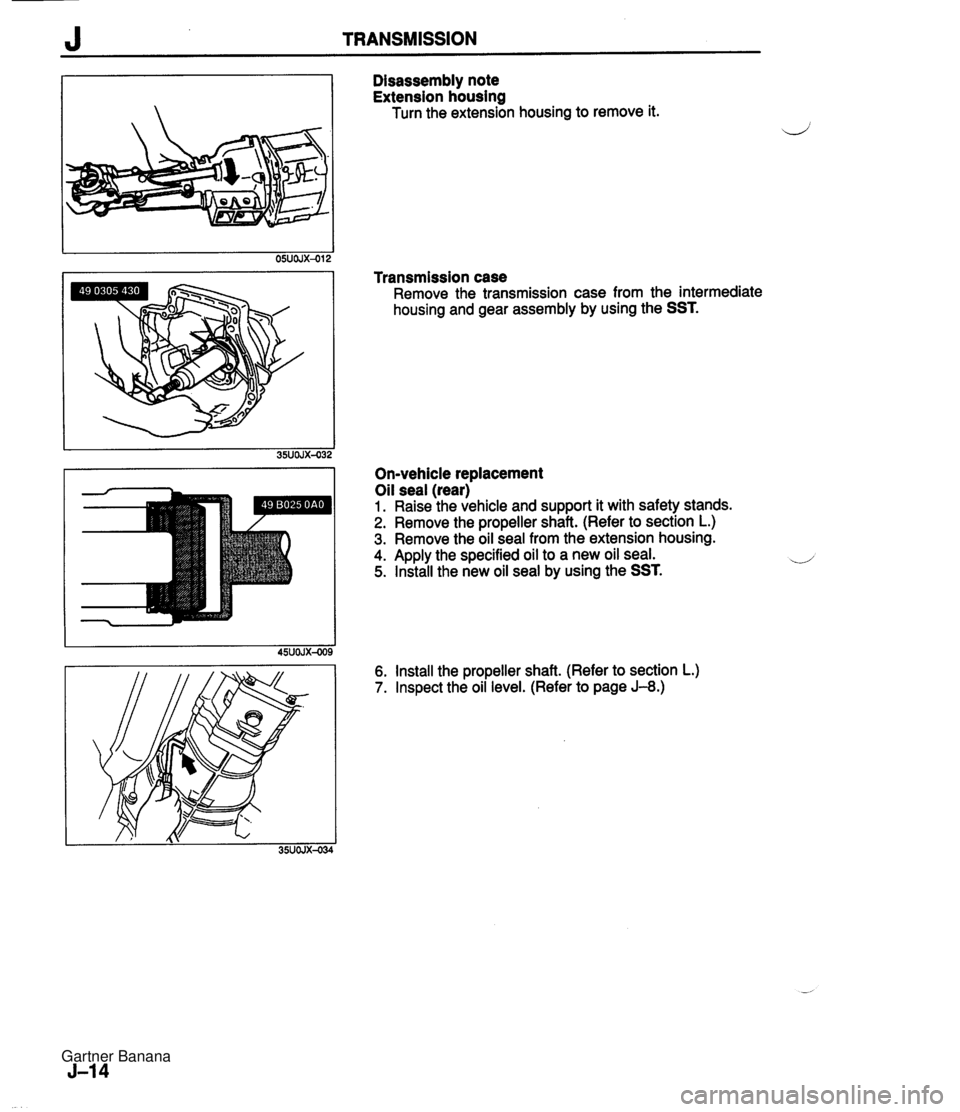
J TRANSMISSION Disassembly note Extension housing Turn the extension housing to remove it. Transmission case Remove the transmission case from the intermediate housing and gear assembly by using the SST. On-vehicle replacement Oil seal (rear) 1. Raise the vehicle and support it with safety stands. 2. Remove the propeller shaft. (Refer to section L.) 3. Remove the oil seal from the extension housing. 4. Apply the specified oil to a new oil seal. 5. Install the new oil seal by using the SST. 6. Install the propeller shaft. (Refer to section L.) 7. Inspect the oil level. (Refer to page J-8.) Gartner Banana