warning MAZDA MX-5 1994 User Guide
[x] Cancel search | Manufacturer: MAZDA, Model Year: 1994, Model line: MX-5, Model: MAZDA MX-5 1994Pages: 1708, PDF Size: 82.34 MB
Page 128 of 1708

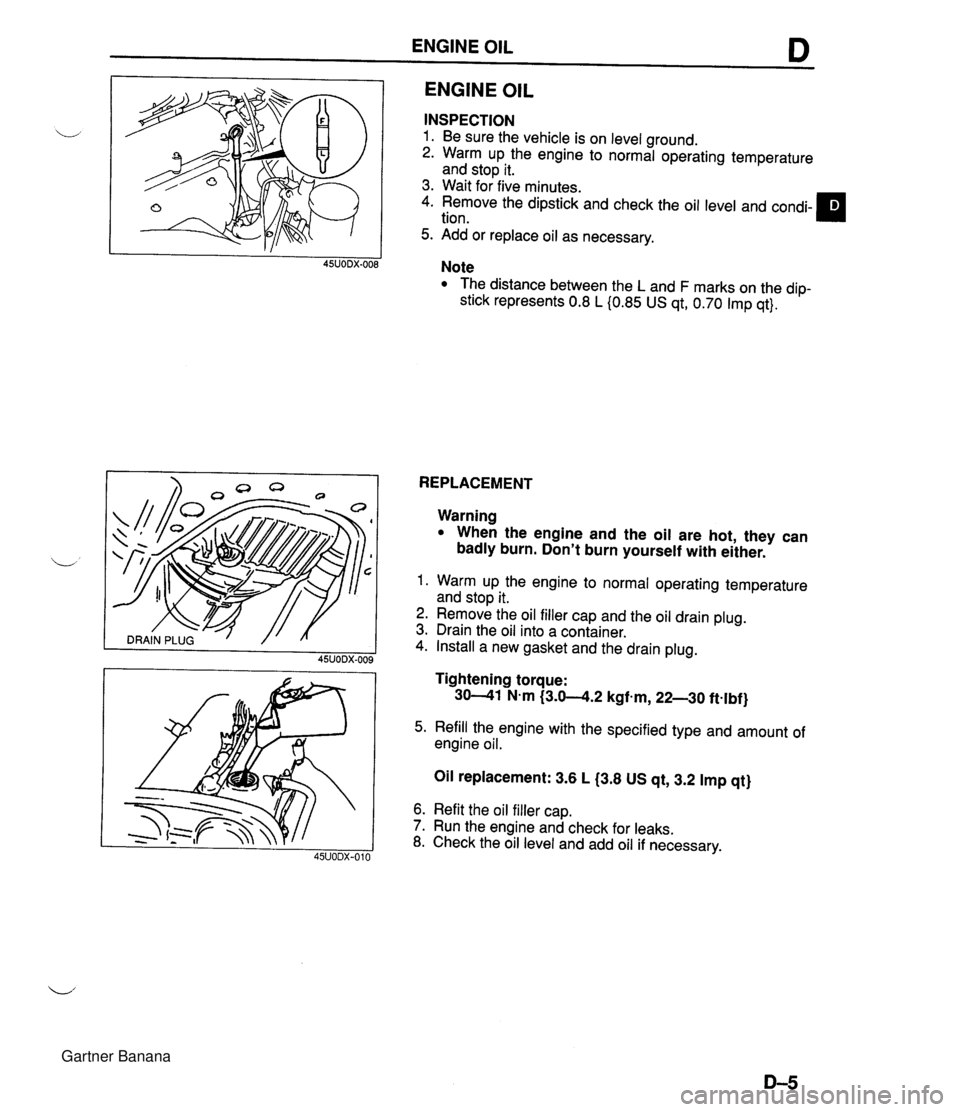
ENGINE OIL D ENGINE OIL INSPECTION 1. Be sure the vehicle is on level ground. 2. Warm up the engine to normal operating temperature and stop it. 3. Wait for five minutes. 4. Remove the dipstick and check the oil level and condi- tion. 5. Add or replace oil as necessary. Note The distance between the L and F marks on the dip- stick represents 0.8 L (0.85 US qt, 0.70 Imp qt}. REPLACEMENT Warning When the engine and the oil are hot, they can badly burn. Don't burn yourself with either. 1. Warm up the engine to normal operating temperature and stop it. 2. Remove the oil filler cap and the oil drain plug. 3. Drain the oil into a container. 4. Install a new gasket and the drain plug. Tightening torque: 3041 N-m 13.0-4.2 kgf.m, 22-30 ft-lbf) 5. Refill the engine with the specified type and amount of engine oil. Oil replacement: 3.6 L 13.8 US qt, 3.2 Imp qt) 6. Refit the oil filler cap. 7. Run the engine and check for leaks. 8. Check the oil level and add oil if necessary. Gartner Banana
Page 137 of 1708

- . - . Before beginning any service procedure, refer to section T of this manual for air bag system service warnings and audio antitheft system alarm conditions . COOLING SYSTEM INDEX ....................................... E- 2 OUTLINE ..................................... E- 3 SPECIFICATIONS ........................... E- 3 TROUBLESHOOTING GUIDE .................. E- 3 ENGINE COOLANT ........................... E- 4 PREPARATION ............................. E- 4 INSPECTION ............................... E- 4 REPLACEMENT ............................ E- 5 REFILLING ................................. E- 6 .............................. RADIATOR CAP E- 7 ............................. PREPARATION E- 7 INSPECTION ............................... E- 7 RADIATOR ................................... E- 8 REMOVAL I INSTALLATION .................. E- 8 INSPECTION ............................... E- 8 THERMOSTAT ................................ E- 9 REMOVAL I INSTALLATION .................. E- 9 INSPECTION ............................... E- 9 WATER PUMP ................................ E-10 REMOVAL / INSTALLATION .................. E-10 COOLANT FAN MOTOR ....................... E-12 INSPECTION ............................... E-12 REPLACEMENT ............................ E-12 ........................ COOLANT FAN RELAY E-13 ............................... INSPECTION E-13 45UOEX-001 Gartner Banana
Page 140 of 1708

ENGINE COOLANT ENGINE COOLANT PREPARATION SST INSPECTION 49 9200 145 Adapter set, radiator cap tester Warning Removing the radiator cap or the coolant drain plug while the engine is running, or when the engine and radiator are hot is dangerous. Scalding coolant and steam may shoot out and cause serious injury. It may also damage the engine and cooling system. Turn off the engine and wait until it is cool. Even then, be very careful when removing the cap. Wrap a thick cloth around it and slowly turn it counterclockwise to the first stop. Step back while the pressure escapes. When you're sure all the pressure is gone, press down on the cap - still using a cloth -turn it, andremove it. For inspection of cooling system pressure Coolant Level (Engine Cold) 1. Verify that the coolant level is near the radiator filler neck. 2. Verify that the coolant level in the coolant reservoir is be- tween the FULL and LOW marks. Add coolant if neces- sary. u Note The distance between the LOW and FULL marks on the coolant reservoir represents 4.5 L (4.8 US qt, 4.0 Imp qt). Coolant Quality 1. Verify that there is no buildup of rust or scale around the radiator cap or radiator filler neck. 2. Verify that coolant is free of oil. Replace the coolant if necessary. 49 9200 146 Adapter A (Part of 49 9200 145) Coolant Leakage 1. Connect a radiator tester (commercially available) and the SST to the radiator filler neck. 2. Apply 103 kPa (1.05 kgf/cm2, 14.9 psi} pressure to the system. 3. Verify that the pressure is held. If not, check for coolant leakage. For inspection of cooling system pressure / V Caution Apply more than 103 kPa (1.05 kgf/cm2, 14.9 psi) can damage the hoses, fittings, and other compo- nents, and cause leaks. Gartner Banana
Page 141 of 1708

ENGINE COOLANT COOLANT PROTECTION SPECIFIC GRAVITY COOLANT TEMPERATURE "C (OF) 45UOEX-00 Coolant Protection Caution The engine has aluminum parts that can be dam- aged by alcohol or methanol antifreeze. Do not use alcohol or methanol in the cooling system. Use only ethylene-glycol-based coolant. Use only soft (demineralized) water in the coolant mixture. Water that contains minerals will cut down on the coolant's effectiveness. 1. Measure the coolant temperature and specific gravity with a thermometer and a hydrometer. 2. Determine the coolant protection by referring to the graph shown. If the coolant protection is not proper, add water or cool- ant. Antifreeze solution mixture percentage I Coolant protection I I Above -1 6°C (3°F) 1 65 1 35 1 1.054 1 REPLACEMENT Draining Above -26°C {-15°F) Above -40°C I-40°F} Warning Removing the radiator cap or the coolant drain plug while the engine is running, or when the en- gine and radiator are hot is dangerous. Scalding coolant and steam may shoot out and cause seri- ous injury. If may also damage the engine and cooling system. Turn off the engine and wait until it is cool. Even then, be very careful when removing the cap. Wrap a thick cloth around it and slowly turn it counterclockwise to the first stop. Step back while the pressure escapes. When you're sure all the pressure is gone, press down on the cap-still using a cloth - turn it, and remove it. 1. Remove the radiator cap and loosen the drain plug. 2. Drain the coolant into a container. 3. Flush the cooling system with water until all traces of col- or are gone, then let the system drain completely. 4. Install the drain plug. 55 45 45 55 1.066 1.078 Gartner Banana
Page 142 of 1708

E ENGINE COOLANT REFILLING Use the proper amount and mixture of ethylene-glycol based coolant. (Refer to Coolant Protection, page E-5.) 1. Slowly pour the coolant into the radiator up to the coolant filler port. Filling pace: 1.0 L (1.1 US qt, 0.9 Imp qt}/min. max 2. Fill the coolant reservoir up to the FULL level. 3. Fully install the radiator cap. 4. Start the engine and let it idle until it warms up. 5. If the temperature increases beyond normal, there is ex- cessive air in the system. Stop the engine and allow it to cool; then repeat step 1-3. 6. Run the engine at 2,200-2,800 rpm for five seconds; re- peat several times. 7. Stop the engine and allow it to cool. Warning Remove the radiator cap or the coolant filler cap while the engine is running, or when the engine and radiator are hot is dangerous. Scalding cool- ant and steam may shoot out and cause serious injury. It may also damage the engine and cooling system. Turn off the engine and wait until it is cool. Even then, be very careful when removing the cap. Wrap a thick cloth around it and slowly turn it counterclockwise to the first stop. Step back while the pressure escapes. When you're sure all the pressure is gone, press ii down on the cap -still using a cloth - turn it, and remove it. 8. Remove the radiator cap and check the coolant level. If the coolant level has dropped, repeat the procedure from step 1. Gartner Banana
Page 143 of 1708

RADIATOR CAP RADIATOR CAP INSPECTION Radiator Cap Valve 1. Remove foreign material (such as water residue) from between the radiator cap valve and the valve seat. 2. Attach the radiator cap to a radiator cap tester (commer- cially available) with the SST. Apply pressure gradually to 73.6-1 02 kPa (0.75-1 .O5 kgf/cm2, 10.7-1 4.9 psi). 3. Wait about 10 seconds. Verify that the pressure has not decreased. PREPARATION L SST Negative Pressure Valve 1. Pull the negative pressure valve to open it. Verify that it closes completely when released. 2. Check for damage on the contact surfaces and for cracked or deformed seal packing. 3. Replace the radiator cap if necessary. 49 9200 145 Adapter set, radiator cap tester Warning Remove the radiator cap or the coolant drain plug while the engine is running, or when the engine and radiator are hot is dangerous. Scalding cool- ant and steam may shoot out and cause serious injury. It may also damage the engine and cooling system. Turn off the engine and wait until it is cool. Even then, be very careful when removing the cap. Wrap a thick cloth around it and slowly turn it counterclockwise to the first stop. Step back while the pressure escapes. When you're sure all the pressure is gone, press down on the cap - still using a cloth - turn it, and remove it. 05UOEX-014 For inspection of radiator cap valve For inspection of radiator cap valve 49 9200 147 Adapter B (Part of 49 9200 145) Gartner Banana
Page 144 of 1708

RADIATOR RADIATOR REMOVAL I INSTALLATION 1. Disconnect the negative battery cable. 2. Drain the engine coolant. (Refer to page E-5 for WARNING and procedure.) 3. Remove the undercover. 4. Remove in the order shown in the figure. 5. Install in the reverse order of removal. 1. Air intake pipe 5. Coolant fan, condenser fan 2. Radiator hose 6. Radiator 3. Coolant reservoir hose Inspection . . . . . . . . . . . . . . . . . . . . . . below 4. Coolant fan motor connector, condenser fan motor connector INSPECTION Check for the following and repair or replace as necessary. 1. Cracks, damage, and water leakage. 2. Bent fins (repair with a screwdriver). 3. Distorted or bent radiator inlet. Steps After Installation 1. Install the undercover. _i 2. Connect the negative battery cable. 3. Fill the radiator with coolant. (Refer to page E-6 for WARNING and procedure.) Gartner Banana
Page 145 of 1708

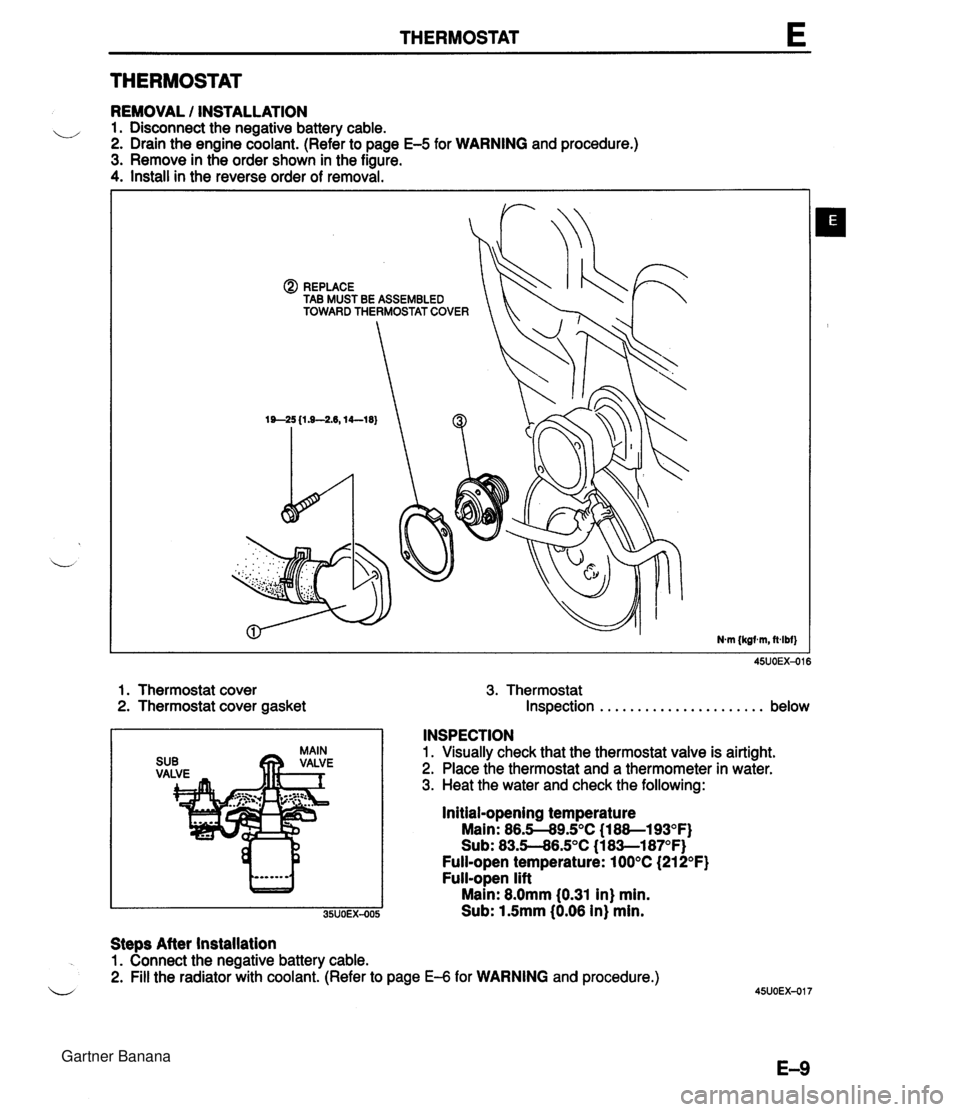
THERMOSTAT E THERMOSTAT REMOVAL / INSTALLATION u 1. Disconnect the negative battery cable. 2. Drain the engine coolant. (Refer to page E-5 for WARNING and procedure.) 3. Remove in the order shown in the figure. 4. Install in the reverse order of removal. @) REPLACE TAB MUST BE ASSEMBLED TOWARD THERMOSTAT COVER 1. Thermostat cover 3. Thermostat 2. Thermostat cover gasket Inspection . . . . . . . . . . . . . . . . . . . . . . below INSPECTION 1. Visually check that the thermostat valve is airtight. 2. Place the thermostat and a thermometer in water. 3. Heat the water and check the following: Initial-opening temperature Main: 86.5-89.S°C (1 88--193OF) Sub: 83.5--86.S°C (1 8Sl87OF) Full-open temperature: 100°C (21 2°F) Full-open lift Main: 8.0mm 10.31 in) min. Sub: 1.5mm (0.06 in) min. Steps After installation 1. Connect the negative battery cable. 2. Fill the radiator with coolant. (Refer to page €4 for WARNING and procedure.) u Gartner Banana
Page 146 of 1708

WATER PUMP WATER PUMP REMOVAL I INSTALLATION 1. Disconnect the negative battery cable. 2. Drain the engine coolant. (Refer to page E-5 for WARNING and procedure) 3. Remove in the order shown in the figure, referring to Removal Note. 4. Install in the reverse order of removal. 1. Timing belt 4. Water pump Service . . . . . . . . . . . . . . . . . . . . . Section B Inspect for cracks, damaged mounting sur- 2. PIS oil pump face, bearing condition, and leakage. Removal Note . . . . . . . . . . . . . . page E-1 1 If the water pump is damage, replace it. 3. Water hose Do not repair it. 5. Water inlet pipe Gartner Banana
Page 147 of 1708

WATER PUMP Stens After Installation 1. connect the neaative batterv cable. Removal Note PIS oil pump 1. Remove the PIS oil pump with the hoses still connected. 2. Position the pump away from the water pump and affix it with wire. 2. Fill the radiator kith coolant: (Refer to page E-6 for WARNING and procedure.) Gartner Banana