weight MAZDA MX-5 1994 Workshop Manual
[x] Cancel search | Manufacturer: MAZDA, Model Year: 1994, Model line: MX-5, Model: MAZDA MX-5 1994Pages: 1708, PDF Size: 82.34 MB
Page 98 of 1708

ASSEMBLY B SPACER TANG UPPER RAIL ...-.. OIL RlNG SPACER ENDS LOWER RAlL PISTON OIL RlNG UPPER RAIL TOP RING OIL RING + PISTOI PIN OIL RING. SECOND LOWER RAIL RING 7. Check the oscillation torque of the connecting rod. If the large end does not drop by its own weight, replace the piston and/or piston pin. Piston Ring 1. Install the three-piece oil rings on the pistons. (1) Apply clean engine oil to the oil ring spacer and rails. (2) lnstall the oil ring spacer with the ends upward. Note The upper and lower rails are the same. They can be installed with either face upward (3) Install the upper and lower rails. 2. Verify that the spacer tang separates the rails, and that the rails turn smoothly in both directions. 3. lnstall the rings with the R marks upward. 4. Using a piston ring expander, install the second ring with the scraper face downward. 5. Using a piston ring expander, install the top ring. 6. Apply clean engine oil to the top and second piston rings. 7. Position the end gaps of the rings as shown in the figure. Gartner Banana
Page 459 of 1708

K TRANSMISSION 21. Loosen the fourth gear band servo locknut and tighten the piston stem. 22. Mark the fourth gear case and oil pump for proper reas- sembly. 23. Install the SST to the oil pump assembly. 24. Slowly remove the oil pump from the transmission case by evenly sliding the weights of the SST. 25. Remove the SST from the oil pump. 26. Loosen the piston stem of the fourth gear band servo. Remove the fourth gear connecting shell and fourth gear planetary gear unit (fourth gear sun gear, fourth gear planetary pinion carrier, fourth gear clutch hub), and di- rect clutch. 27. Remove the fourth gear brake band, and hold it together with a piece of wire as shown in the figure. 28. Remove the band strut. Gartner Banana
Page 517 of 1708

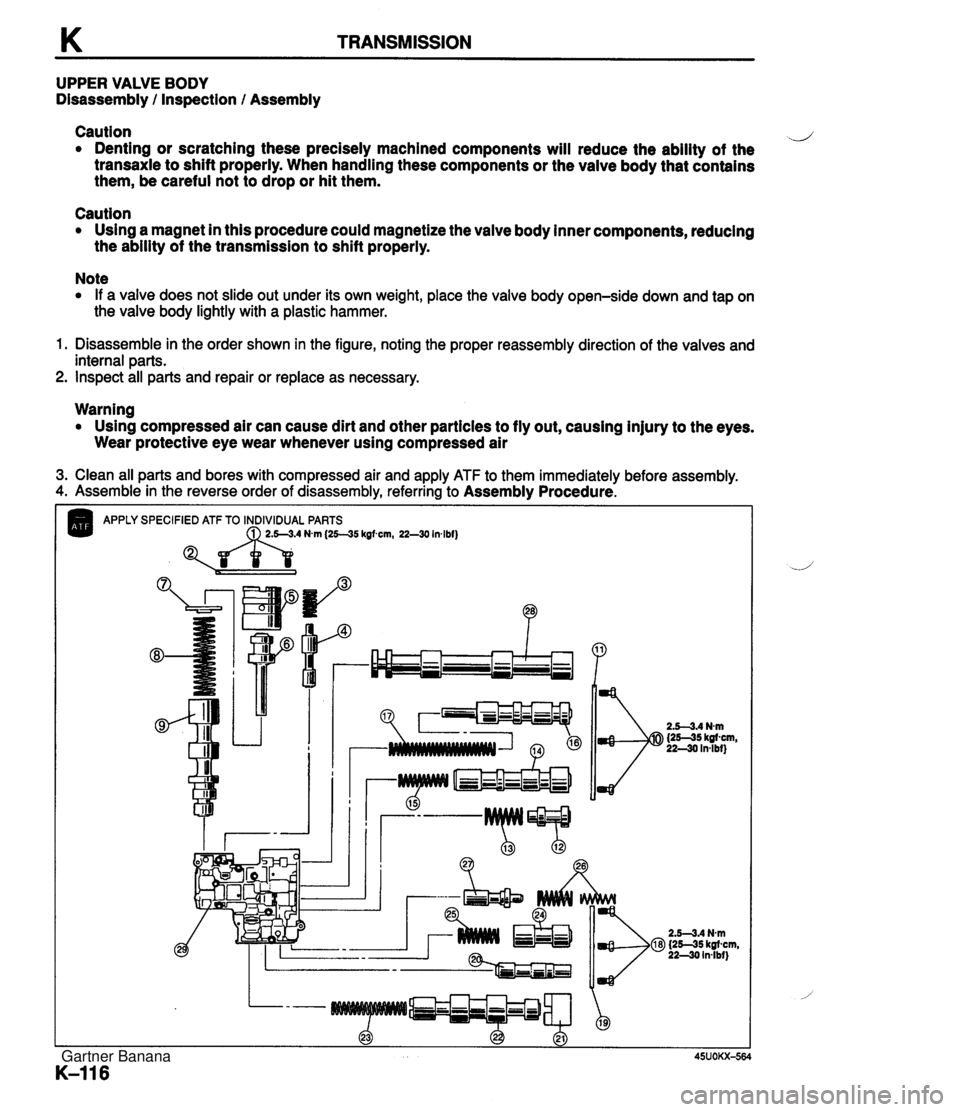
K TRANSMISSION UPPER VALVE BODY Disassembly / Inspection / Assembly Caution d Denting or scratching these precisely machined components will reduce the ability of the transaxle to shift properly. When handling these components or the valve body that contains them, be careful not to drop or hit them. Caution Using a magnet in this procedure could magnetize the valve body inner components, reducing the ability of the transmission to shift properly. Note If a valve does not slide out under its own weight, place the valve body open-side down and tap on the valve body lightly with a plastic hammer. 1. Disassemble in the order shown in the figure, noting the proper reassembly direction of the valves and internal parts. 2. Inspect all parts and repair or replace as necessary. Warning Using compressed air can cause dirt and other particles to fly out, causing injury to the eyes. Wear protective eye wear whenever using compressed air 3. Clean all parts and bores with compressed air and apply ATF to them immediately before assembly. 4. Assemble in the reverse order of disassembly, referring to Assembly Procedure. APPLY SPECIFIED ATF TO INDIVIDUAL PARTS Nvn (25--35 kgfwn, 22-30 Inlbf) Gartner Banana
Page 521 of 1708

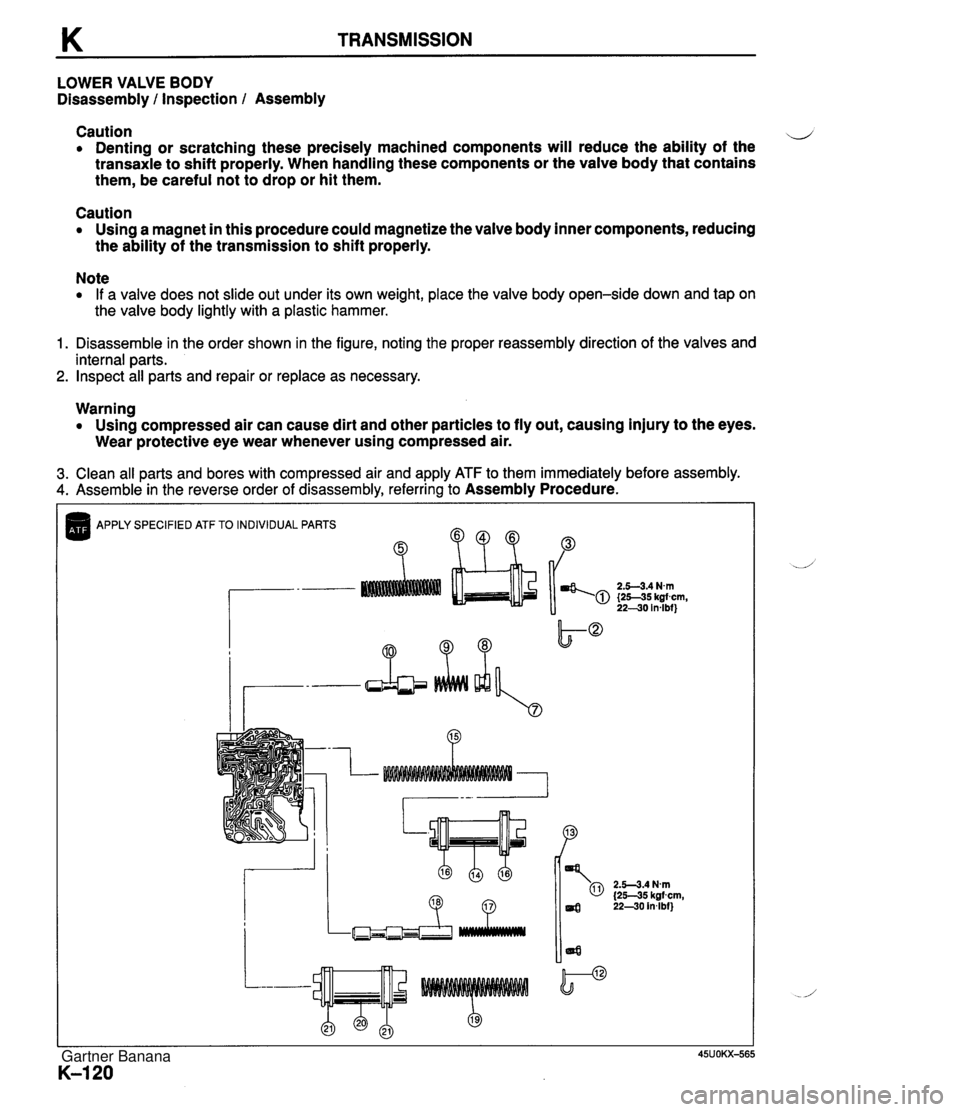
K TRANSMISSION LOWER VALVE BODY Disassembly l Inspection l Assembly Caution d Denting or scratching these precisely machined components will reduce the ability of the transaxle to shift properly. When handling these components or the valve body that contains them, be careful not to drop or hit them. Caution Using a magnet in this procedure could magnetize the valve body inner components, reducing the ability of the transmission to shift properly. Note If a valve does not slide out under its own weight, place the valve body open-side down and tap on the valve body lightly with a plastic hammer. 1. Disassemble in the order shown in the figure, noting the proper reassembly direction of the valves and internal parts. 2. Inspect all parts and repair or replace as necessary. Warning Using compressed air can cause dirt and other particles to fly out, causing injury to the eyes. Wear protective eye wear whenever using compressed air. 3. Clean all parts and bores with compressed air and apply ATF to them immediately before assembly. 4. Assemble in the reverse order of disassembly, referring to Assembly Procedure. APPLY SPECIFIED ATF TO INDIVIDUAL PARTS B ?? "P 2.5-3.4 Nm {25-35 kgfcm, 22-30 in4bf) Gartner Banana
Page 732 of 1708

WHEELS AND TIRES Q FRONT BALANCE WEIGHT TIRE ROTATION To prolong tire life and assure uniform tire wear, rotate the tires as specified below except the "TEMPORAARY- USE ONLY spair tire. After rotating the tires, adjust each tire to the specified air pressure. (Refer to page Q-3.) U.S.A: Every 6,000 km (3,750 miles) Canada: Every 24,000 km (15,000 miles) or 15 monthes (Whichever comes first) WHEEL BALANCE ADJUSTMENT If a wheel becomes unbalanced or if a tire is replaced or repaired, the wheel must be rebalanced to within specifi- cation. When balancing a wheel: (1) Use no more than two balance weights on the inner or outer side of the wheel. (2) One balance weight should weigh no more than 60g {2.1 oz}. If the total weight of all the balance weights on one side exceeds 1009 I3.53 oz}, then reba- lance after repositioning the tire on the rim. (3) Select suitable balance weights for steel or alumi- num alloy wheels. Caution Using an on-vehicle balancer may cause damage to the transmission. Always use an off-vehicle balancer whenever balancing a wheel@). Maximum unbalance (at rim edge): 10 g (0.35 oz) Gartner Banana
Page 1702 of 1708

ALPHABETICAL INDEX *** ENGLISH **E SPRING,SHIFT ROD ENS----- SPRING,SHIFT ROD-REVERSE- SPRING,SYNCHRO. KEY------ SPRlNG.SYNCHR0 .KEY------- I-LB SPRING,3-4 SHIFT--------- 1-K8 STABILIZER,FRONT--------- 1-K13 STABXLIZER,RR------------ STARTER..----------------- 1-El2 1-E7 STATOR ---.-.---- - 1-67 1 -C7 STAY(L1,RR. RUMPER------- 2-H3 STAYCR) ,RR. BUMPER------- 2-H3 STA~,B~NNET-------------- 2-K4 STAY,LOCK-BONNET--------- 2-N4 STAY,MANIFOLD------------ 1-D4 S~EM,PJSTON-------------- 1-N7 STEH,PISTON BAND--------- STOPPER SET-------------- 1-E8 1-E7 1-67 STOPPER,RUMP------------- 1 -C12 1-H13 STOPPERICONSOLE LID------ 2-N7 STOPPER,FILLER LID------- 1-K14 STOPPEK,GLASS------------ 2-L'3 STOPPERILINK-HOOD-------- 2-Dl2 STOPPERISOFT TOP--------- 2-L12 STOPPER,LIPPEP-BACK WINDO 2-El2 STRAINER,INNER----------- 1 -K8 STRAINER,OJL-------- ----- 1-18 1-J8 1-144 STRAP ,ALTERNATOR--------- 1 -M6 STRIKER-- ------ ----- ---- - 2-C10 2- J7 STRIKER(L),LOCK-TOP------ 2- J12 STRIKEK(R),LOCK-TOP------ 2- J1.2 STRIKER,LID---..---------- 2-M4 STRUT,BAND--------------- 1 -n7 STUD--------------------- 1-E3 1 -E4 STUD,EX. MANIFOLD------- -- 1-E3 STUD,HEX-HYD. UHJT------- 1 -MI5 SUN VISOR(L)-----------..- 2-F16 SUN v~so~(~)------------- 2-Fl6 §UPPORT(L),MOUNTING------ 1-F11 1-613 SUPPOHT(R),MOUNTING------ 1-F11 1-G13 SUPPORT,C€NTER----------- 1 -G9 SUPPORT,DRUH------------- 1 -D8 SUPPORT.OIL PIPE--------- 1-L7 SUPPURTER,ACTUATOR------- 1-K9 SUPPORTER,FORK----------- 1-C6 ..- - . - - - - --.- - - CAT. AUNA04 - 03 2-~12 SWITCH(R),CLUSTER-------- 2-El3 SWITCH,BACK UP LAMP------ 2-N12 SWITCH,Cl.UTCH------------ 1-L14 SWITCH ,CLUTCH CUT-------- 1 -HI4 SWITCHICOMBINATION------- SWJTCH,DOOR-------------- 2.-F13 2-113 SWITCHIFAN-HEATER CONTROL 2-Ell SWITCH,IGNITION---------- 2-C3 SWITCH,INHIBITOR--------- 2-C13 SWITCH,LEVEL-WASHER TANK- 2-El5 SWITCH,MAIN-------------- 2-El3 SWITCHIOIL PRESSURE------ 2-N12 SWITCH,OVER DRIVE CONTROL 1-616 SWITCH,PARKING LAMPe----- 1-Dl6 SWITCH,POWER WINDOW------ 2-N7 SWITCH,RMT.MIRROR--------- 2-El3 SWITCH,RR.DEF.----------- 2-El3 SWITCH,STOP-LAMP--------- 1-Dl5 1-M14 1-N14 2-Fi5 TANK,WASHEH-FRONT-------- 2-C15 2-El5 TAPE,EDGE PROTECTOR-CTR-- Z-K12 TAPE,PROTECTOR-STOPPER--- 2-El0 TAPE,SEAL-RAIN RAIL------ 2-El2 TENSIONER,T.BELT--------- 1 -C4 TERMINAL SET------------- 1-D7 THERMOSTAT SET----------- 1 -D5 THERMOSTAT,COOLIHG UNIT-- 2-Mll TIMER & BUZZER----------- TIRE ---..- ----------..----- 2-013 TOOL SET----------------- 1-L13 2-Dl6 TRA~,ASH----------------- 2-D7 TRAY,BATTER~--------.----- 1-17 TRAYIREAR PACKAGE-------- 2-L15 TRIMIL),'A'PILLAR-------- 2-K15 TRIM(L1,DOOR------------- 2-61 0 2-HlO TRIM(L1,FRONT SIDE------- 2-l.15 TRIMCL) ,UUARTER---------- 2-116 TRIM(L),SEAT BACK-------- 2-CY 2-D9 TRIM(L1,SEAT CUSHION----- 2-NO TRIM(L),TRUNK SIDE------- 2-M15 TRIM(R),'A'PILLAR-------- 2-K15 TRIM(R),DOOR------------- 2-F10 2-61 0 TRIM(R),FRONT SIDE------- 2-L15 TRIM(R),OUARTER---------- 2-116 TRIMCR) ,SEAT BACK----.---- 2-M8 TRIM(K),SEAT CUSHION----- 2-KO TKIH,FRONT HEADER------ -- 2-K15 TRIM,TRUNK END--------- -- 2-MIS TUBE,FILLER---------TuBE,FILLER------------..---TuBE,FILLER------------..-TuBE,FILLER------------..-- I -D8 TUBE,HEAD LAMP----------- 2-C4 TUBEIOIL FILTER-UPPER-- -- 1-00 TU3E,SILJCOq------------- 1-J3 TUBE,VACUUH-------------- 1 -F4 1-17 1-L4 TUNER 8 DEC.:,COHB.------- 2-M13 VALVE,CONTROL------------ 1-00 VALVE,CONTROL BACK UP---- VALVE,E,G.R. ..----------a- 1 -K8 1-L4 VALVE,EXHAUST------------ 1-N3 VALVE,EXPAHSION---------- 2-Ml VALVE,FUEL VAPOR.-------- 1-11 VALVE,IDLE AIR CONTPOL--- 1-K4 VALVE,INLET-.------------- VALVE,MANUAL----------..-- 1-N3 1-00 VAL,VE,MODIFIER----------- 1 .H8 VALVE,NON RETURN--------- 1-11 VALVE,OIL JET------------ 1-H3 VALVE,ONE WAY------------ 1-E8 1-K8 VALVEjORIFICE CHECK------ VALVE,P.B.---------------- 1-Ha 1-11 1-Ki VALVE,P.C.V.------------- 1 -F3 VALVE,REDUCING----------- 1 -18 VALVE,REGULATOR---------- 1 -GB VALVE,RELIEF------..------ 2-Kl VALVE,SHIFT 3-4---------- 1-U8 VALVEISOLENOID----------- 1-L4 2-Hl VALVE,SOLENOID N01------- 1-K8 VALVE,ST. GEAR----------- 1-N1 YALVE,THREE WAY---------- 1-L4 2-Nl VALVE,THROTTLE----------- 1-Ha VALVE,THROTTLE BACK-UP--- 1-H8 VALVE,l-2 REDUCING------- 1-18 VALVE,l-2 SHIFT---------- 1-G8 VALVE,2-3 SHIFT---------- 1 -G8 VALVE,3-4 SHIFT-COAST---- 1 -K8 WASHER------------------- 1 -F9 1-H1 1-H1 1-11 1-K1 1-L1 1 -Ml 2- J1 2-L3 WASHER SET--------------- 2-Ll 1-E7 WASHER,DISHED------------ 1 -KB WASHER,FASTEN€k-RAIN PAIL 2-El WASHER,FRONT CLUTCH------ 1-E9 WASHER,HOOKmA'----------- 2-1.1 WASHER,HOOK'A'LIB'------- 2-K1 WASHERIHYD. UNIT--------- 1-Hl WASHER,LID OPENER-------- 1-K14 WASHER,LOCK-PUMP FILTER-- 1-H14 WASHERIPLAIN------------- 1-C8 1-H9 1-J7 1-N7 WASHERIPLAIN CYL. HEAD--- 1-E3 WASHER,PLAIN-FRAME------- 1-C14 WASHERISETTING----------- 2-J9 MASHER,STOP-------------- 1-F12 WASHER,THRUST-----------• 1-F6 1-Gh 1-16 WASHER,THRUST LOCK-OVER T 1-H6 1-16 WASHER,THRUST-REVERSE IDL 1-H6 WASHEW,TOOTHED----------- 2- J15 WASHER WAVE-CHANGE C0NT.C 1-L6 WASHER. A' DECK LOCK------ 2-112 WASHERIB',DECK LOCK------ 2- J12 WEATHERSTRIP N0.1-------- 2-El0 WEATHERSTRIP N0.2-------- ?-El0 WEATHERSTRIP(L1---------- 2-K9 WEATHERSTRIP(L1,DOOR----- 2-K9 2-L9 UEATHERSTRIP(L),OUT/---- 2-El0 WEATHERSTRIP(R)---------- 2-K9 WEATHERSTRIP(R),DOOR------ 2-K9 WEATHERSTRIPCR) ,OUT, ------ 2-El0 WEATHERSTRIP, BONNET-REAii- 2-K4 WEATHERSTRIP,D.TOP-REAR-- 2-K12 WEATHEWSTRIP,LID---me---- 2 -H4 WEDGE,DOOR-FRONT--------- 2-Dl0 WEIGHT,DISC WHEEL-ALUMI-- :-HI3 WEIGHTIDISC WHEEL-STEEL-- 1-L:3 1-M13 WIRING~INJECTOR---------- 2-114 WREHCH,HUB NUT----------- 2-Dl6 WRENCHIWHEEL CAP--------- 2-Dl6 WTHSTP NO.l(L),LINK------ 2-Gl2 WTHST? tiO.l(R) ,LINK------ 2-612 WTHSTP H0.2CL) ,LINK------ 2-01 2 WTHSTP NO.?(R),LINK------ 2-812 WTHSTP NU.3(L),LINK------ 2-612 WTHSTP H0.3(K),LINK------ 2-612 WTHST?(L),CAB SIDE------- 2-H12 WTHFiP(L),ROOF PANEL----- 2-K12 WTH'TP(R),CAB SIDE------- 2-H12 WT'iSTP(R),ROOF PANEL----- 2-K12 G'IHSTP,FROHT HEADER------ 2-612 YOKE------------.-------- 1 -E7 1-67 YOKE SETISUPPORT-ST. GEAR 1-L12 YOKE,DTFFEREHTIAL-------- 1-Jl1 Gartner Banana