engine MAZDA PROTEGE 1992 Workshop Manual
[x] Cancel search | Manufacturer: MAZDA, Model Year: 1992, Model line: PROTEGE, Model: MAZDA PROTEGE 1992Pages: 1164, PDF Size: 81.9 MB
Page 256 of 1164

E RADIATOR
RADIATOR
REMOVAL / INSTALLATION
Caution
l Position the hose clamp in the original location on the hose, and squeeze the clamp lightly
with large pliers to ensure a good fit.
1. Disconnect the negative battery cable.
2. Drain the engine coolant.
3. Remove in the order shown in the figure.
4. Install in the reverse order of removal.
7.8-11 N.m (80-110 cm-kg, 69-95 in-lb)
-...__--- --- i
771 InFu.nnc; cvyILII ..,.,..
6. Oil cooler hose (ATX)
7. Radiator bracket
8. Radiator
Inspection . . . . . . . . . . . . . . . . . . . . . . . . . . . . . . . . . . . . . page E-9
9. Cooling fan and radiator cowling assembly 1. Resonance chamber
2. Cooling fan connector
3. Radiator thermoswitch connector (BP ATX)
4. Coolant reservoir hose
5. Radiator hose i
Y’
E-8
Page 257 of 1164

RADIATOR, THERMOSTAT t
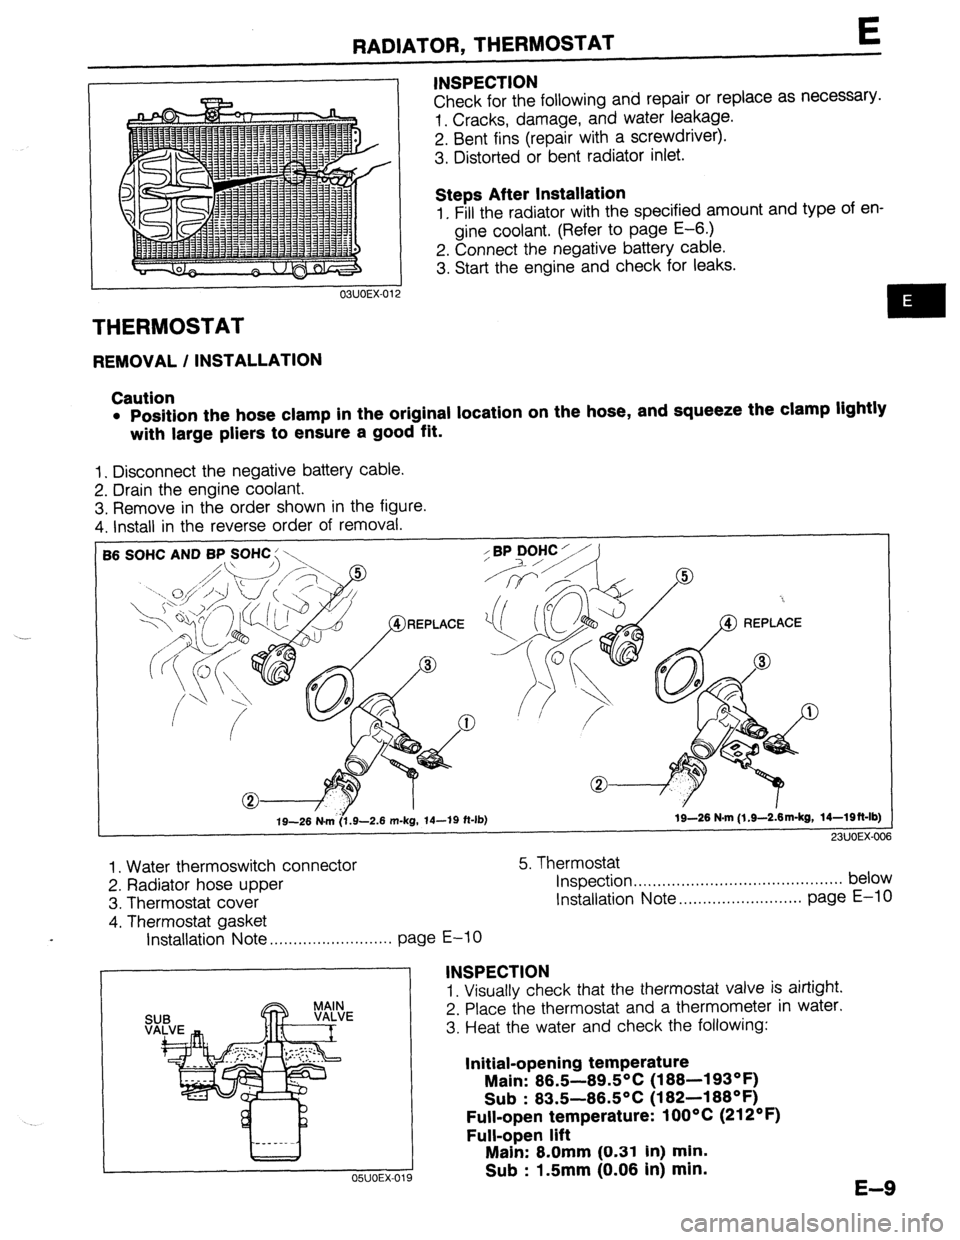
THERMOSTAT
REMOVAL / INSTALLATION INSPECTION
Check for the following and repair or replace as necessary.
1. Cracks, damage, and water leakage.
2. Bent fins (repair with a screwdriver).
3. Distorted or bent radiator inlet.
Steps After Installation
1. Fill the radiator with the specified amount and type of en-
gine coolant. (Refer to page E-6.)
2. Connect the negative battery cable.
3. Start the engine and check for leaks.
Caution
l Position the hose clamp in the original location on the hose, and squeeze the clamp lightly
with large pliers to ensure a good fit.
1. Disconnect the negative battery cable.
2. Drain the engine coolant.
3. Remove in the order shown in the figure.
4. Install in the reverse order of removal.
SOHC AND BP SOHC : \,
19-26 N&6.9-2.6 m-kg, 14-19 ft-lb) 19-26 N-m (l.S--2&m-kg, 14-Wft-lb)
23UOEX-006
1. Water thermoswitch connector
2. Radiator hose upper
3. Thermostat cover
4. Thermostat gasket 5. Thermostat
Inspection . . . . .., .., ,.. ,.. . . . ,.. . . . . . . . . . . . . . . . . . . . . . . below
Installation Note ..,....................... page E-10
Installation Note . . . . . . . . . . . . . . . . . . . . . . . . . .
page E-10
INSPECTION
1. Visually check that the thermostat valve is airtight.
2. Place the thermostat and a thermometer in water.
3. Heat the water and check the following:
Initial-opening temperature
Main: 86.5-89.5°C (188-193OF)
Sub : 83.5-86.5OC (182-188OF)
Full-open temperature: 1 OOOC (212OF)
Full-open lift
OSUOEX-019
Main: 8.0mm (0.31 In) min.
Sub : 1.5mm (0.06 in) min.
E-9
Page 258 of 1164

E THERMOSTAT
Installation Note JIGGLE PIN Thermostat
6 8 8
1. Install the thermostat into the cylinder head with the jiggle
pin at the top. ..__
Thermostat gasket
1. Install a new gasket with the seal print side facing the cylin-
der head.
03UOEX-014
Steps After Installation
1. Fill the radiator with the specified amount and type of engine coolant. (Refer to page E-6.)
2. Connect the negative battery cable,
3. Start the engine and check for leaks.
03UOEX-015
.-
E-IO
Page 259 of 1164

WATER PUMP WATER PUMP
E
REMOVAL / INSTALLATION
Caution
l Do not disassemble the water pump. If a problem is found, replace the pump as a Unit.
1. Disconnect the negative battery cable.
2. Drain the engine coolant.
3. Remove in the order shown in the figure, referring to
Removal Note.
4. Install in the reverse order of removal.
B6 SOHC AND BP SOHC
83, t B6, BP SOHC
I
I
L-----------------_-- ------- -1
/ \/
19-26 (1.9-2.6, 14-19) LVVVLI. YY,
1. Timing belt 4. Water pump assembly
Service ., . . .., ,, ., . . . . . ,. ,.,. ., ,., . . ,,.... . . . . , Section Bl Inspect for cracks, damaged mounting
2. Water inlet pipe
and gasket surface, bearing condition, and leakage
3. Water bypass pipe and O-ring 5. Water pump gasket
E-l 1
Page 260 of 1164

BP DOHC
L 7.8-11 N-m (60-110 cm-kg, 69-95 in-lb)
E WATER PUMP
157-167
I
(W-17, 116-123) I
I
/
I
I
I
---N-w------
---------------
----_---_
-I
N.m (m-kg, ft-lb) 1
^^, *--., ^^^
1. Timing belt
Service . . . . . . . . . . . . . . . . . . . . . . . . . . . . . . . . . . . . . . . . Section 5. Water pump assembly
B2
2. Water inlet pipe and gasket Inspect for cracks, damaged mounting
3. Water bypass pipe and O-ring surface, bearing condition, and leakage
4. Oil dip stick pipe bracket 6. Water pump gasket
Steps After Installation
1. Fill the radiator with the specified amount and type of engine coolant. (Refer to page E-6.)
2. Connect the negative battery cable,
3. Start the engine and check for leaks.
03UOEX-018
E-12
Page 262 of 1164

E ELECTRIC COOLING FAN SYSTEM, FAN MOTOR
03UOEX-02
I
1
I
‘4
.
2
.:
)
SYSTEM INSPECTION
1. Jump across the fan test (TFA) terminal and the ground
(GND) terminal of the diagnosis connector.
2. Turn the ignition switch ON and verify that the fan operates.
If the fan does not operate, inspect the cooling fan system
components and wire harness. -.-
3. Remove the radiator cap and place a thermometer in the
radiator filler neck.
4. Start the engine.
5. Verify that the fan operates when the coolant temperature
reaches approx. 97OC (207OF).
If it does, check the water thermoswitch.
(Refer to page E-16.)
FAN MOTOR
INSPECTION
Single-Speed Type
1. Check that the battery is fully charged.
2. Disconnect the fan motor connector.
3. Connect the battery and an ammeter to the fan motor con-
nectar.
4. Verify that current is as specified.
Current (A)
B6 SOHC
BP SOHC
BP DOHC MTX ATX
6.6 f 1 6.6 f 1
6.6 f 1 -
6.6 f 1 -
5. If current is not within specification and/or the fan does not
turn smoothly, replace the fan motor.
Two-Speed Type
1. Check that the battery is fully charged.
2. Disconnect the fan motor connector.
3. Connect the battery and an ammeter to the fan motor con-
nectors for low-speed inspection. 4. Verify that the fan motor operates smoothly at the standard
current.
Current (A): 8.8 + 10% MAX
I
03UOEX-022
E-14
Page 263 of 1164

FAN MOTOR E
I-
i.- 5. Connect the battery, an ammeter, and switch to the fan mo-
tor connectors for high-speed inspection.
6. Verify that the fan motor operates smoothly at the standard
current or less with the switch ON.
Current (A): 13.3 + 10% MAX
7. If the fan motor is faulty, replace it.
---“-. --
REPLACEMENT
Caution
l Position the hose clamp in the original location on the hose, and squeeze the clamp lightly
with large pliers to ensure a good fit.
1. Disconnect the negative battery cable.
2. Drain the engine coolant.
3. Remove in the order shown in the figure.
4. Install in the reverse order of removal.
7.8-11 N.m
7.8-11 N.m
(80-110 cm-kg,
1. Resonance chamber
4. Radiator cowling
2. Cooling fan connector
5.
Cooling fan
3. Radiator hose upper
6. Fan motor
E-l 5
Page 264 of 1164

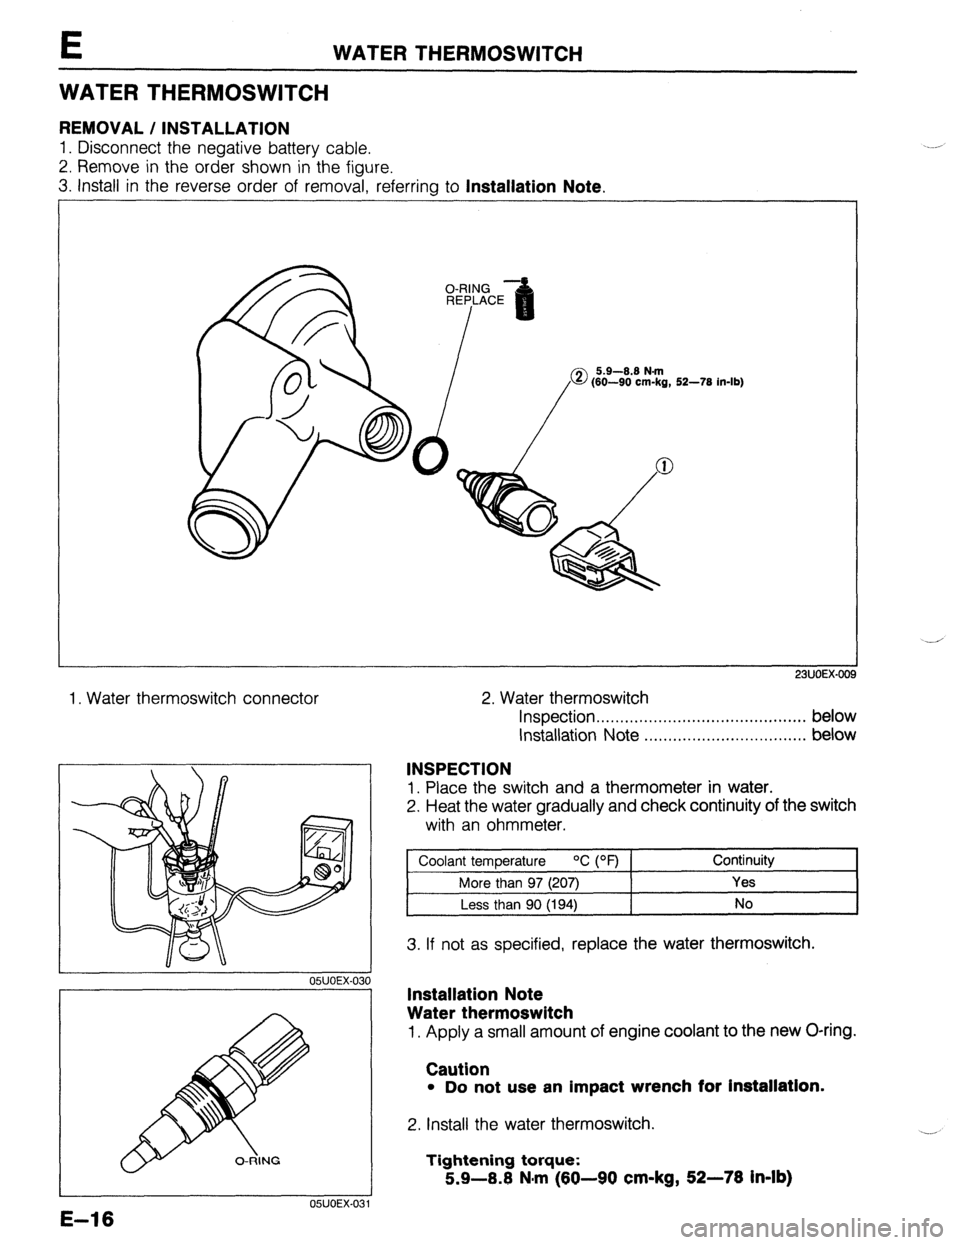
E WATER THERMOSWITCH
WATER THERMOSWITCH
REMOVAL / INSTALLATION
1. Disconnect the negative battery cable.
2. Remove in the order shown in the figure.
3. Install in the reverse order of removal, referring to
Installation Note.
2. Water thermoswitch
23UOEX-OO!
1. Water thermoswitch connector
05UOEX-031
05UOEX.03
E-16
Inspection . . . . . . . . . . . . . . . . . . . . . . . . . . . . . . . . . . . . . . . . . . . . below
Installation Note . . . . . . . . . . . . . . . . . . . . . . . . . . . . . . . . . . below
INSPECTION
1. Place the switch and a thermometer in water.
2. Heat the water gradually and check continuity of the switch
with an ohmmeter.
I Coolant temDerature
OC PF) 1 Continuity
I
More than 97 (207) Yes
Less than 90 (194) No
3. If not as specified, replace the water thermoswitch.
Installation Note
Water thermoswitch
1. Apply a small amount of engine coolant to the new O-ring.
Caution
l Do not use an impact wrench for Installation.
2. Install the water thermoswitch.
Tightening torque:
5.9-8.8 N#m (69-90 cm-kg, 52-78 in-lb)
Page 265 of 1164

RADIATOR THERMOSWITCH E
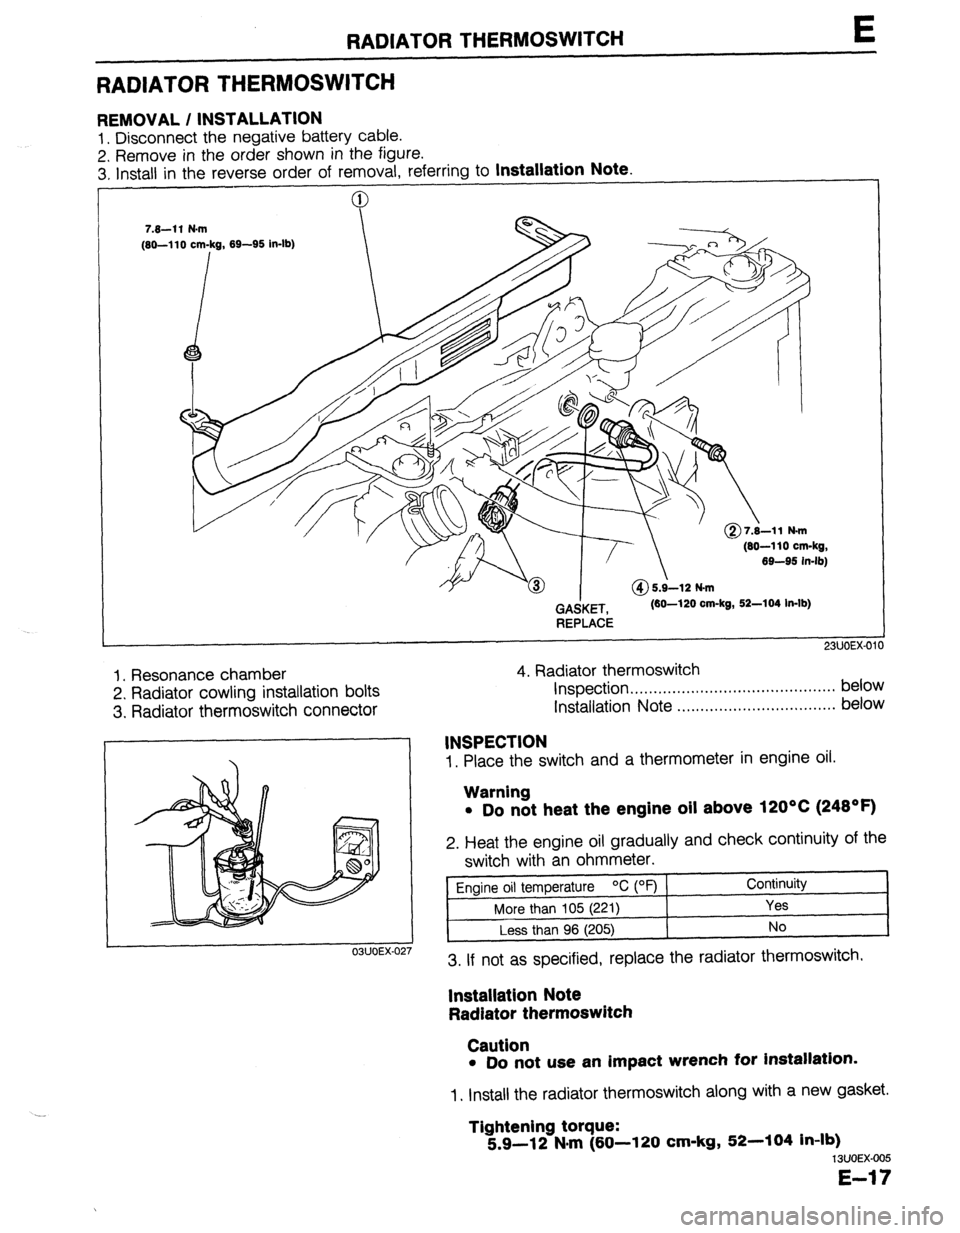
RADIATOR THERMOSWITCH
REMOVAL / INSTALLATION
1. Disconnect the negative battery cable.
2. Remove in the order shown in the figure.
3. Install in the reverse order of removal. referrina to
Installation Note.
(80-110 cm-kg,
69-95 in-lb)
GAdKET,
REPLACE (60-120 cm-kg, 52-104 In-lb)
1. Resonance chamber
2. Radiator cowling installation bolts
3. Radiator thermoswitch connector 4. Radiator thermoswitch
Inspection . . . . . . . . . . . . . . . ..*...,..,..................* below
Installation Note ..,.,........,.......,........,... below
1. Place the switch and a thermometer in engine oil.
03UOEX-02
INSPECTION
Warning
l Do not heat the engine oil above 120°C (248OF)
2. Heat the engine oil gradually and check continuity of the
switch with an ohmmeter.
Engine oil temperature OC (OF) Continuity
More than 105 (221)
Yes
Less than 96 (205) No
3. If not as specified, replace the radiator thermoswitch.
lnstallatlon Note
Radiator thermoswitch
Caution
l Do not use an impact wrench for installation.
1. Install the radiator thermoswitch along with a new gasket.
Tightening torque:
5.9-12 N#m (60-l 20 cm-kg, 52-104 in-lb)
13UOEX-005
E-17
Page 267 of 1164

F
FUEL AND EMISSION
CONTROL SYSTEM
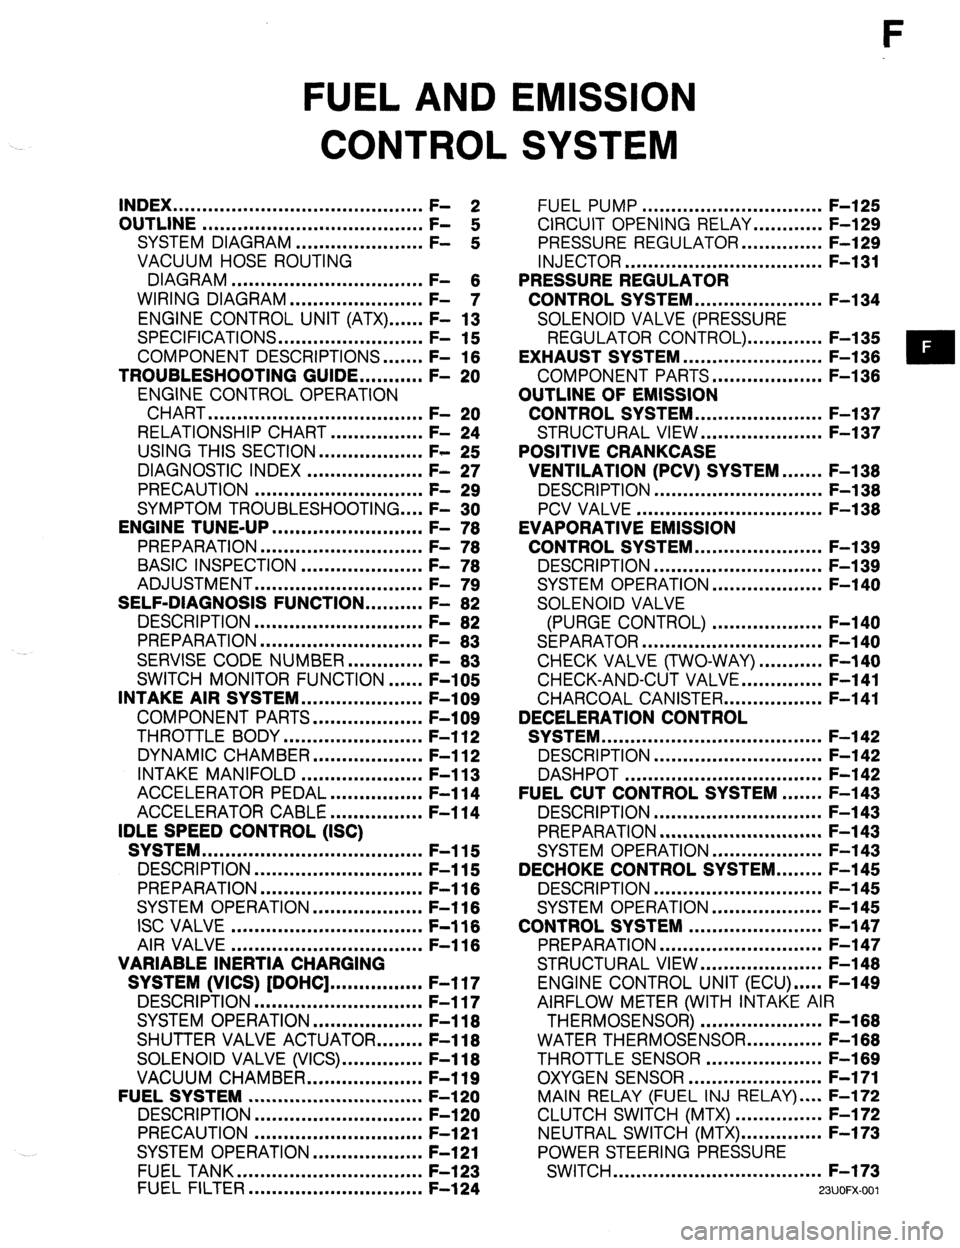
INDEX ...........................................
OUTLINE ...................................... ;: 2
SYSTEM DIAGRAM ...................... F-
:
VACUUM HOSE ROUTING
DIAGRAM .................................
WIRING DIAGRAM ....................... F- 6
- 7
ENGINE CONTROL UNIT (ATX) ...... F- 13
SPECIFICATIONS.. ....................... F- 15
COMPONENT DESCRIPTIONS.
...... F- 16
TROUBLESHOOTING GUIDE.. ......... F- 20
ENGINE CONTROL OPERATION
CHART
..................................... F- 20
RELATIONSHIP CHART.. .............. F- 24
USING THIS SECTION .................. F- 25
DIAGNOSTIC INDEX .................... F- 27
PRECAUTION ............................. F- 29
SYMPTOM TROUBLESHOOTING .... F- 30
ENGINE TUNE-UP
.......................... F- 76
PREPARATION ............................
F- 76
BASIC INSPECTION ..................... F- 78
ADJUSTMENT .............................
F- 79
SELF-DIAGNOSIS FUNCTION .......... F- 82
DESCRIPTION .............................
F- 82
PREPARATION
............................
F- 83
SERVISE CODE NUMBER.. ........... F- 83
SWITCH MONITOR FUNCTION ...... F-105
INTAKE AIR SYSTEM.. ................... F-109
COMPONENT PARTS.. ................. F-109
THROTTLE BODY ........................ F-l 12
DYNAMIC CHAMBER ................... F-l 12
INTAKE MANIFOLD ..................... F-l 13
ACCELERATOR PEDAL ................ F-l 14
ACCELERATOR CABLE ................ F-l 14
IDLE SPEED CONTROL (ISC)
SYSTEM ......................................
F-115
DESCRIPTION ............................. F-115
PREPARATION
............................ F-116
SYSTEM OPERATION.. ................. F-l 16
ISC VALVE ................................. F-116
AIR VALVE
................................. F-116
VARIABLE INERTIA CHARGING
SYSTEM (VICS) [DOHC] ................ F-l 17
DESCRIPTION ............................. F-117
SYSTEM OPERATION ................... F-l 18
SHUTTER VALVE ACTUATOR.. ...... F-l 18
SOLENOID VALVE (VICS). ............. F-118
VACUUM CHAMBER.. .................. F-119
FUELSYSTEM .............................. F-l 20
DESCRIPTION
............................. F-l 20
PRECAUTION ............................. F-121
SYSTEM OPERATION.. ................. F-121
FUEL TANK ................................
F-l 23
FUEL FILTER .............................. F-l 24 FUEL PUMP ............................... F-l 25
CIRCUIT OPENING RELAY.. .......... F-129
PRESSURE REGULATOR.. ............ F-129
INJECTOR .................................. F-l 31
PRESSURE REGULATOR
CONTROL SYSTEM.. .................... F-l 34
SOLENOID VALVE (PRESSURE
REGULATOR CONTROL). ............ F-l 35
EXHAUST SYSTEM ........................ F-l 36
COMPONENT PARTS.. ................. F-136
OUTLINE OF EMISSION
CONTROL SYSTEM.. .................... F-l 37
STRUCTURAL VIEW.. ................... F-l 37
POSITIVE CRANKCASE
VENTILATION (PCV) SYSTEM.. ..... F-138
DESCRIPTION .............................
F-l 38
PCV VALVE ................................ F-l 38
EVAPORATIVE EMISSION
CONTROL SYSTEM.. .................... F-l 39
DESCRIPTION ............................. F-l 39
SYSTEM OPERATION.. ................. F-140
SOLENOID VALVE
(PURGE CONTROL) ................... F-140
SEPARATOR ............................... F-l 40
CHECK VALVE (TWO-WAY) ........... F-140
CHECK-AND-CUT VALVE.. ............ F-141
CHARCOAL CANISTER.. ............... F-141
DECELERATION CONTROL
SYSTEM ...................................... F-l 42
DESCRIPTION ............................. F-l 42
DASHPOT .................................. F-142
FUEL CUT CONTROL SYSTEM ....... F-143
DESCRIPTION ............................. F-l 43
PREPARATION ............................ F-l 43
SYSTEM OPERATION.. ................. F-143
DECHOKE CONTROL SYSTEM.. ...... F-145
DESCRIPTION ............................. F-l 45
SYSTEM OPERATION ................... F-l 45
CONTROL SYSTEM ....................... F-l 47
PREPARATION ............................ F-147
STRUCTURAL VIEW.. ................... F-l 48
ENGINE CONTROL UNIT (ECU) ..... F-149
AIRFLOW METER (WITH INTAKE AIR
THERMOSENSOR) ..................... F-168
WATER THERMOSENSOR.. ........... F-168
THROTTLE SENSOR .................... F-l 69
OXYGEN SENSOR.. ..................... F-171
MAIN RELAY (FUEL INJ RELAY) .... F-172
CLUTCH SWITCH (MTX) ............... F-172
NEUTRAL SWITCH (MTX). ............. F-173
POWER STEERING PRESSURE
SWITCH .................................... F-173
WJOFX-001