battery MAZDA PROTEGE 1992 Workshop Manual
[x] Cancel search | Manufacturer: MAZDA, Model Year: 1992, Model line: PROTEGE, Model: MAZDA PROTEGE 1992Pages: 1164, PDF Size: 81.9 MB
Page 775 of 1164

FRONT BUMPER S
FRONT BUMPER
COMPONENTS
Removal / Installation
1. Disconnect the negative battery cable.
2. Remove in the order shown in the figure.
3. Install in the reverse order of removal.
16-23 (1.6-2.3, 12-17
6.9-9.6 N.m (70-100 cc-kg,
61-67 in-lb) 16-23 (1.6-2.3, 12-17) /
6.9-9.6 N.m (70-100 cm-kg, 61-67 in-lb)
N.m (m-kg, Mb)
1. Front combination light
Removal / Installation . . . . . . . . . . . . . . . . . . . . . Section
T
2. Radiator grille
Removal I Installation . . . . . . . . . . . . . . . . . . page S-51
3. Headlight and lower grille molding
Removal / Installation . . . . . . . . . . . . . . . . . . . . . Section
T
4. Front bumper assembly
a. Front bumper reinforcement and bracket
b. Energy absorbing foam
c. Front bumper facia
5. License plate holder
6. Front bumper bracket
s-39
Page 777 of 1164

REAR SPOILER S
REAR SPOILER
COMPONENTS
Removal / Installation
1. Disconnect the negative battery cable.
2. Remove in the order shown in the figure.
3. Install in the reverse order of removal.
1. Rear spoiler assembly
03uosx-055
s-41
Page 790 of 1164

S
OUTSIDE MIRROR
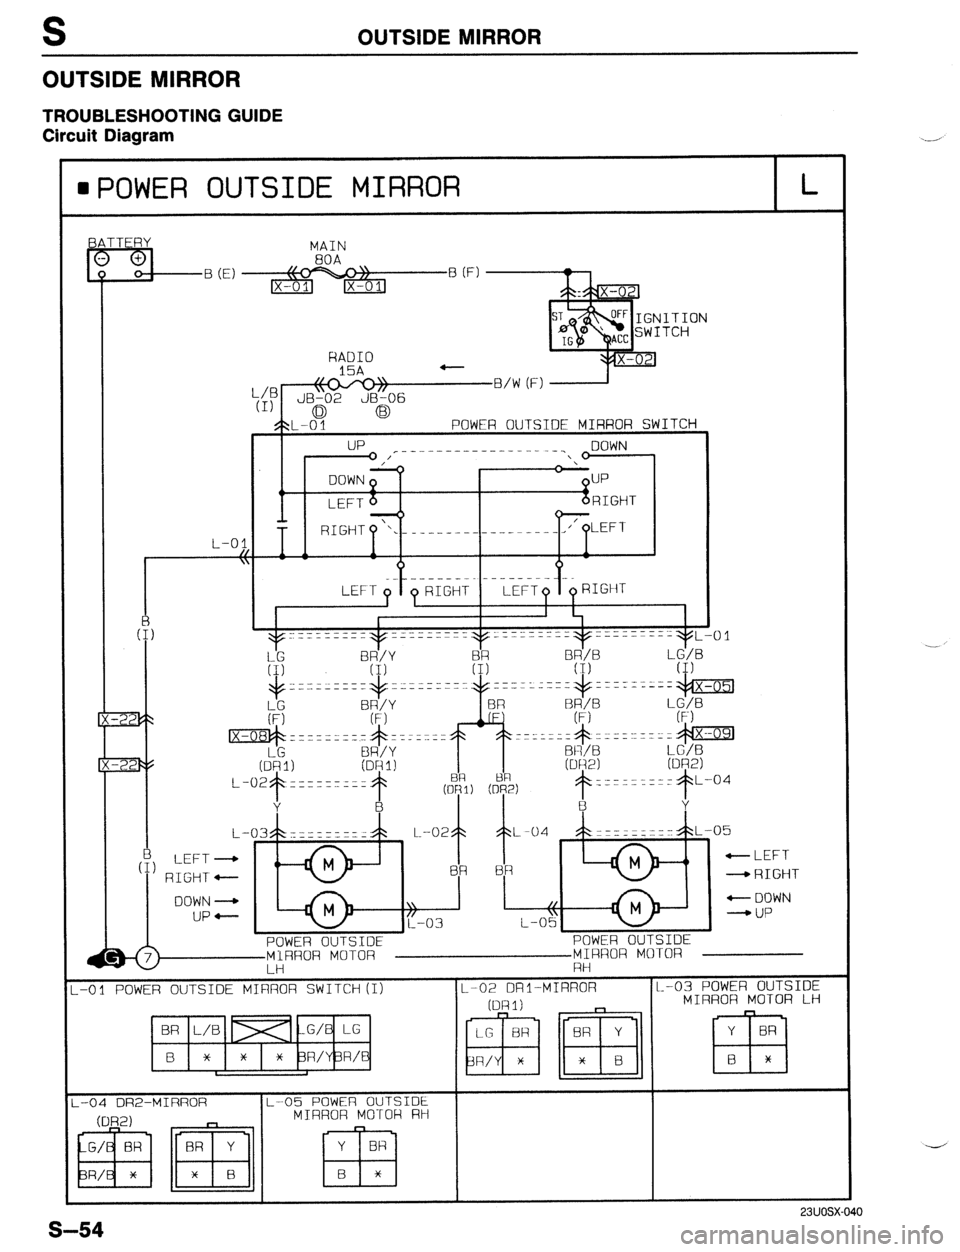
TROUBLESHOOTING GUIDE
Circuit Diagram
OUTSIDE MIRROR
IPOWER OUTSIDE MIRROR L
BATTERY
MAIN
80A
B (E) B (F)
ITION
TCH
HAD10
15A -
::P \\o-rol/
JB-02 JB-06
0 G3
$?L-0 1 POWER OUTSIDE MIRROR SWITCH
up r---~~~---------_--_ DOWN
I’ ‘
DOWN p UP
,c
LEFT 6 RIGHT
---o -
‘\.------ ------- -___-l/’
L-01
-RIGHT
MIRROR MOTOR
-01 POWER OUTSIDE MIRROR SWITCH(I) L.-O2 DRI-MIRROR
.-
Page 791 of 1164

OUTSIDE MIRROR S
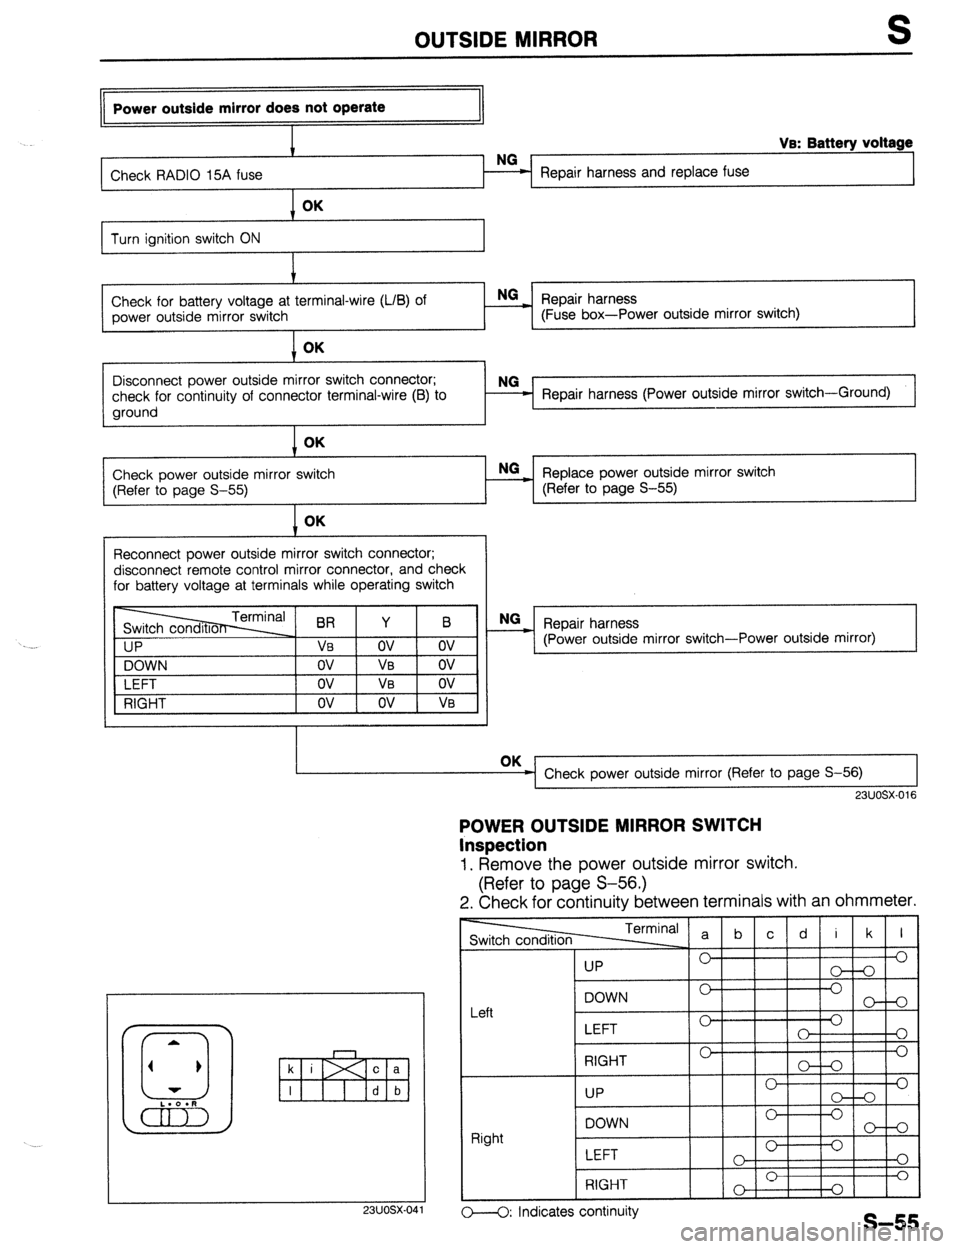
Power outside mirror does not operate
I
I VB: Battery voltage
Check RADIO 15A fuse Repair harness and replace fuse OK
Turn ignition switch ON
I.’
Check for battery voltage at terminal-wire (LIB) of NG
_ Repair harness
power outside mirror switch (Fuse box-Power outside mirror switch) OK
1
I
Disconnect power outside mirror switch connector;
check for continuity of connector terminal-wire (B) to
ground Repair harness (Power outside mirror switch-Ground)
Check power outside mirror switch
(Refer to page S-55) OK
- Replace power outside mirror switch NO
(Refer to page S-55)
Reconnect power outside mirror switch connector;
disconnect remote control mirror connector, and check
for battery voltage at terminals while operating switch
I IP
NG
_ Repair harness
(Power outside mirror switch-Power outside mirror)
VI
DOWN
LEFT
RIGHT OK
Check power outside mirror (Refer to page S-56) I I
23UOSX-016
POWER OUTSIDE MIRROR SWITCH
Inspection
1. Remove the power outside mirror switch.
(Refer to page S-56.)
2. Check for continuity between terminals with an ohmmeter.
23UOSX-04
TermIn:
-1
I I
UP 0’
LEFT 0
0
o---O: Indicates continuity
Page 792 of 1164

OUTSIDE MIRROR
c a
23UOSX.042
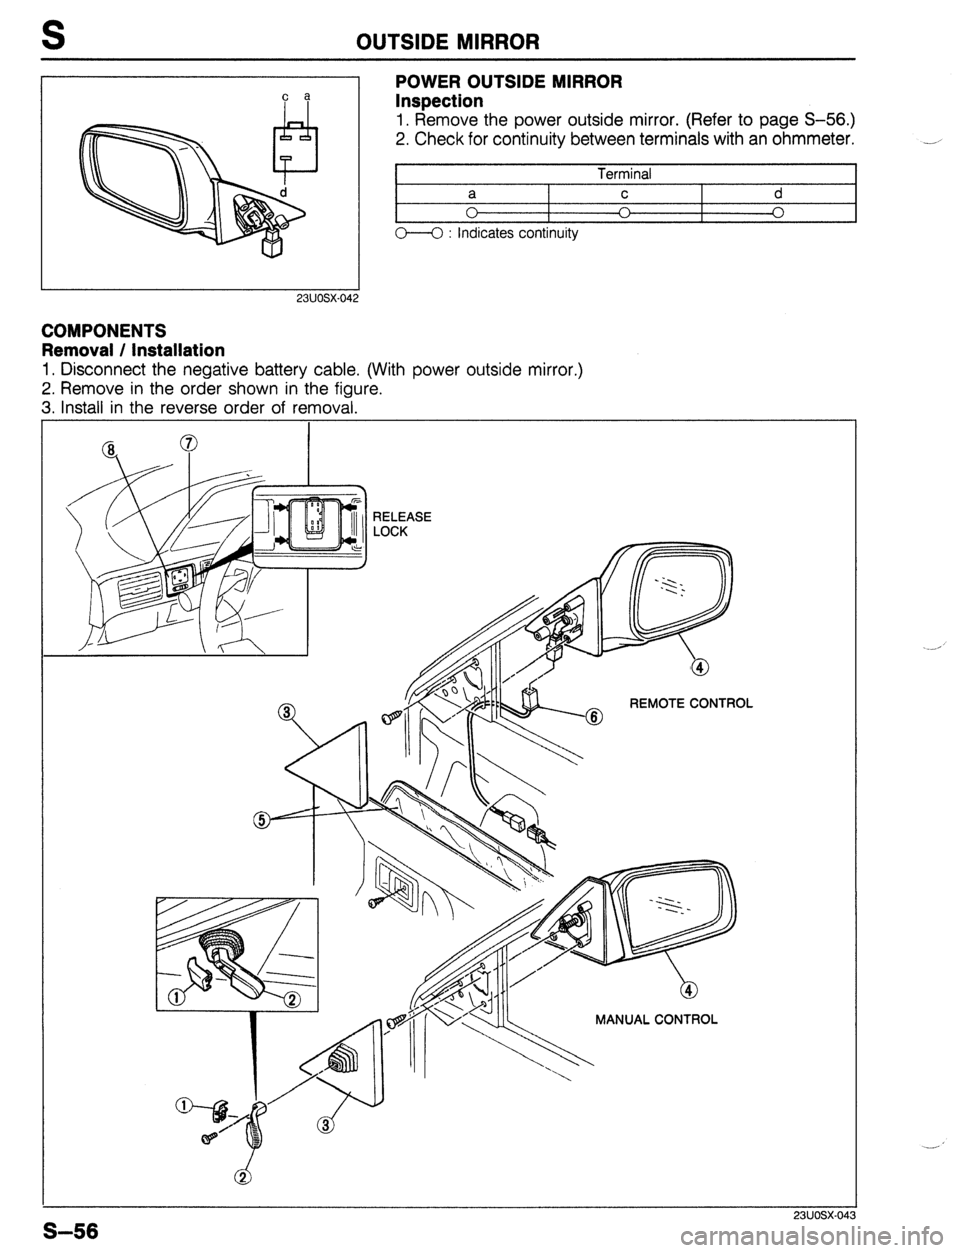
POWER OUTSIDE MIRROR
Inspection
1. Remove the power outside mirror. (Refer to page S-56.)
2. Check for continuity between terminals with an ohmmeter.
I
Terminal I
t
a C d
0 I
A I
0
o--O : indicates continuity
COMPONENTS
Removal / Installation
1. Disconnect the negative battery cable. (With power outside mirror.)
2. Remove in the order shown in the figure.
3. Install in the reverse order of removal.
MANUAL CONTROL
S-56
Page 794 of 1164

S WINDSHIELD
WINDSHIELD
PREPARATION
SST
49 0305 870A I 1 For
Tool set, window removal and
installation of
windshield
COMPONENTS
Removal / Installation
1. Disconnect the negative battery cable.
2. Remove in the order shown in the figure, referring to
Removal Note.
3. Install in the reverse order of removal, referring to Installation Note.
PROTEGC
Page 799 of 1164

REAR WINDOW GLASS S
REAR WINDOW GLASS
PREPARATION
SST
49 0305 870A
1 For
Tool set, window removal and
installation of rear
window glass
COMPONENTS
Removal / Installation
1. Disconnect the negative battery cable.
2. Remove in the order shown in the figure, referring to
Removal Note.
3. install in the reverse order of removal, referring to Installation Note.
r
I’
PROTEGi:
1. Rear seat cushion
6. Rear header trim
5
Removal I Installation . . . . . . . . . . . . . . . . page S-l 11
Removal / Installation . . . . . . . . . . . . . . . . page S-
97
2. Rear seat back/side
7. C-pillar trim
Removal I Installation . . . . . . . . . . . . . . . . page S-l 11
3. High-mount stoplight (interior mounted)
Removal / Installation . . . . . . . . . . . . . . . . . . . . . Section
T
4. Rear package trim
Removal I Installation . . . . . . . . . . . . . . . . page S-
97
5. Rear seat belt upper anchor
Removal / Installation ..,............. page
S-101
Removal / Installation . . . . . . . . . . . . . . . . page S-
97
8. Rear window molding
Removal I Installation . . . . . . . . . . . . . . . . page S-
43
9. Rear window glass
Removal Note . . . . . . . . . . . . . . . . . . . . . . . . . . .
page S- 64
Installation Note . . . . . . . . . . . . . . . . . . . . . . . . page S-
65
10. Spacer
S-63
Page 804 of 1164

WINDSHIELD WIPER AND WASHER
Wiper does not operate in Lo or Hi position
(With wiper relay)’
I
Check WIPER 20A fuse
Repair harness and replace fuse
VB: Battery voltage
OK
Turn ignition switch ON
Check for battery voltage at terminal-wires (L) of wiper
relay connector NG
- Repair harness (Fuse box-Wiper relay)
I OK
Check for battery voltage at terminal-wires (W) and
(G/W) of above connector
I Replace wiper relay (Refer to Section T)
OK
Disconnect wiper switch connector;
check for battery voltage at terminal-wires (W) and
W’J) Repair harness (Wiper relay -Wiper switch)
I OK
Check for continuity of above connector terminal-wire
(B) to ground
I
Repair harness (Wiper switch-Ground) 1
1 OK
Check wiper switch (Refer to
I Replace combination switch (Refer to Section T)
1 OK
Check for battery voltage at terminal-wires (L/W) and (R)
of wiper relay connector with switch as shown NG
Replace wiper relay (Refer to Section T)
l Lo : (L/W) Ve l Hi : (R) Ve
OK
1 I
Disconnect wiper motor connector; check for battery
voltage at terminal-wires (L/W) and (R) with switch as
shown
l !-0 : (L/w) VB l Hi : (R) VB NG
= Repair harness (Wiper relay-Wiper motor)
OK
Check continuity between wiper motor body and
ground NG
= Repair ground circuit of wiper motor body
Check wiper motor (Refer to page S-70)
*: U.S. with/without cruise control, Canada with cruise control
23UOSX-017
Wiper does not operate in Lo or Hi position
(Without wiper relay)’
Check WIPER 20A fuse
OK
Repair harness and replace fuse .-
S-68 Cont’d
Page 805 of 1164

WINDSHIELD WIPER AND WASHER S
Cont’d
Turn ignition switch ON t
VB: Battery voltage
Check for battery voltage at terminal-wire (L) of wiper
switch connector
I Repair harness (Fuse box-Wiper switch)
1 OK
Check for battery voltage at terminal-wires (L/W) and
(L/R) of wiper switch connector with switch as shown
l Lo : (L/W) va l Hi : (R) VB
I OK NG
= Check wiper switch (Refer to page S-71)
Disconnect wiper motor connector; check for battery
voltage at terminal-wires (L/W) and (R)
l Lo : (L/W) VB l Hi : (R) Ve NG
- Repair harness (Wiper switch-Wiper motor) L
J
OK
I
Check continuity between wiper motor body and
ground Repair ground circuit of wiper motor body
*: Canada without cruise control Check wiper motor (Refer to page S-70)
23UOSX-018
II Wiper automatic park function does not work
II
I t-
I 1 Turn ignition switch ON I
I
+
Check for battery voltage at terminal-wire (L) of wiper
motor connector
OK Repair harness (Fuse box-wiper motor)
Disconnect wiper motor and wiper switch connectors;
check for continuity between terminal-wire (L/Y) of
above connectors
OK Repair harness (Wiper motor-Wiper switch)
Reconnect wiper switch connector;
check for continuity between terminal-wires (L/Y) and
(L/W) of wiper motor connector Check wiper switch (Refer to page S-71)
Check wiper motor (Refer to page S-70)
I
23UOSX-019
One touch function (MIST) does not operate
Jl
Check wiper switch (Refer to page S-71)
I
03UOSX-118
S-69
Page 806 of 1164

WINDSHIELD WIPER AND WASHER
Intermittent function does not operate
(With wiper relay)*
i
Disconnect wiper relay connector;
check for continuity of terminal-wire (B) to ground
I Repair harness (Wiper relay-Ground)
OK
=j Replace wiper relay (Refer to Section T)
*: U.S. with/without cruise control, Canada with cruise control
03uosx-119
Intermittent function does not operate
(Without wiper relay)*
1
Disconnect wiper switch connector;
check for continuity of terminal-wire (B) to ground Repair harness (Wiper switch-Ground)
*: Canada without cruise control
Washer does not operate (Wiper operates OK)
1
I
wiper 1 -
repay Check for battery voltage at terminal-wire
Repair harness (Fuse box-Wiper switch) l
1 (L) of wiper switch connector J
1 OK
Check for battery voltage at terminal-wire (L/O) of
washer switch connector with washer switch ON Check washer switch (Refer to page S-71)
1
1 OK
Disconnect washer motor connector;
check for battery voltage at terminal-wire (L/O) with
washer switch ON Repair harness (Washer switch-Washer motor)
Check for continuity of above connector terminal-wire
(B) to ground Repair harness (Washer motor-Ground)
*l: Canada without cruise control
*2: U.S. with/without cruise control, Canada with cruise control
23UOSX-020
WIPER MOTOR
Inspection
Conductivity check
1. Disconnect the wiper motor connector.
2. Check for continuity between terminals with an ohmmeter.
--iizzs
In automatic park
Out automatic park
o---O: Indicates continuity