belt MAZDA PROTEGE 1992 User Guide
[x] Cancel search | Manufacturer: MAZDA, Model Year: 1992, Model line: PROTEGE, Model: MAZDA PROTEGE 1992Pages: 1164, PDF Size: 81.9 MB
Page 34 of 1164
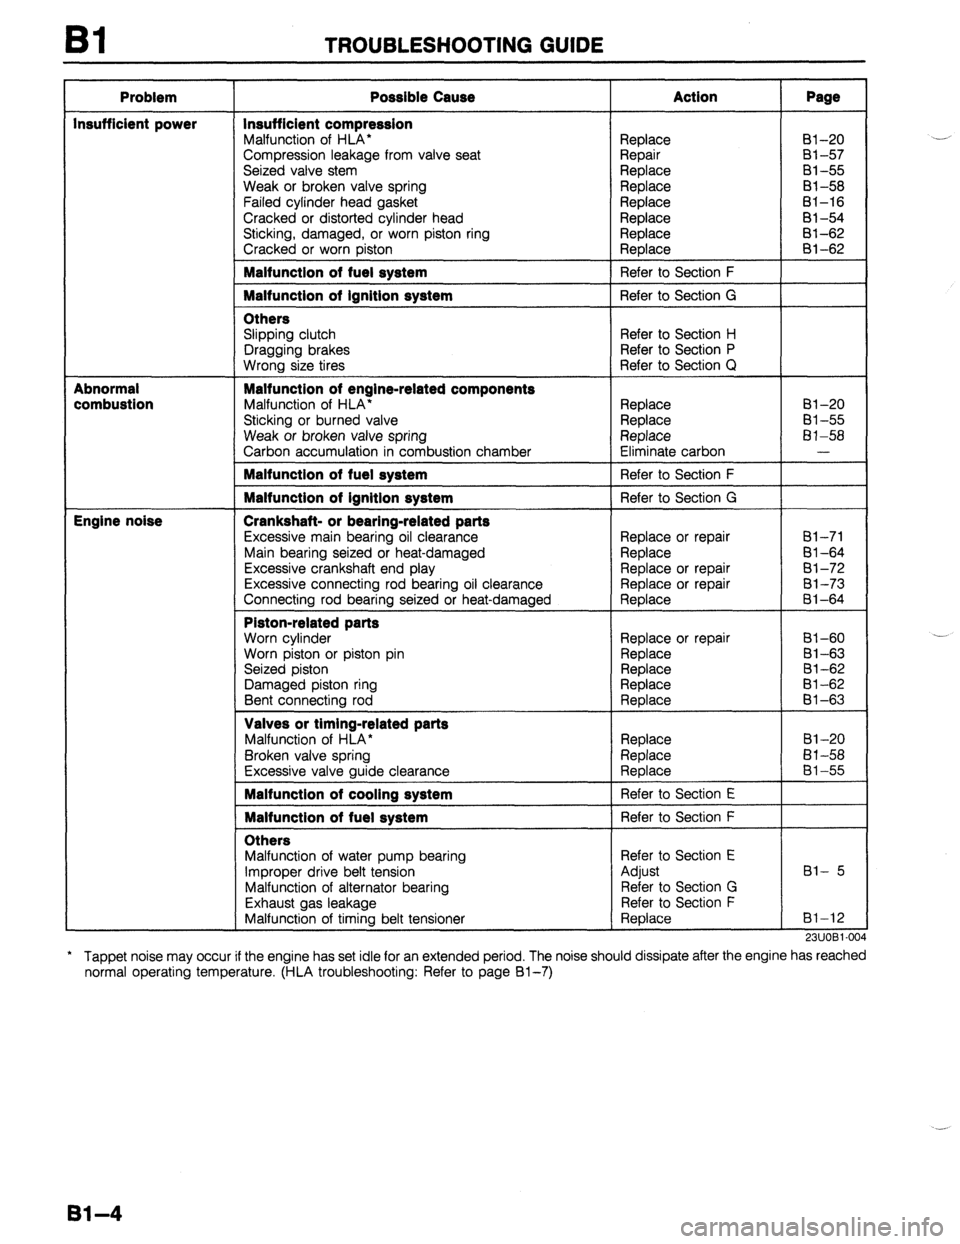
Bl TROUBLESHOOTING GUIDE
Problem
Insufficient power
Abnormal
combustion
Engine noise Possible Cause
Insufficient compression
Malfunction of HLA*
Compression leakage from valve seat
Seized valve stem
Weak or broken valve spring
Failed cylinder head gasket
Cracked or distorted cylinder head
Sticking, damaged, or worn piston ring
Cracked or worn piston Malfunction of fuel system
Malfunction of ignition system
Others
Slipping clutch
Dragging brakes
Wrong size tires Malfunction of engine-related components
Malfunction of HLA’
Sticking or burned valve
Weak or broken valve spring
Carbon accumulation in combustion chamber Malfunction of fuel system
Malfunction of ignition system
Crankshaft- or bearing-related parts
Excessive main bearing oil clearance
Main bearing seized or heat-damaged
Excessive crankshaft end play
Excessive connecting rod bearing oil clearance
Connecting rod bearing seized or heat-damaged Piston-related parts
Worn cylinder
Worn piston or piston pin
Seized piston
Damaged piston ring
Bent connecting rod Valves or timing-related parts
Malfunction of HLA*
Broken valve spring
Excessive valve guide clearance Malfunction of cooling system
Malfunction of fuel system
Others
Malfunction of water pump bearing
Improper drive belt tension
Malfunction of alternator bearing
Exhaust gas leakage
Malfunction of timing belt tensioner Action
Replace
Repair
Replace
Replace
Replace
Replace
Replace
Replace
Refer to Section F
Refer to Section G
Refer to Section H
Refer to Section P
Refer to Section Q
Replace
Replace
Replace
Eliminate carbon
Refer to Section F
Refer to Section G
Replace or repair
Replace
Replace or repair
Replace or repair
Replace
Replace or repair
Replace
Replace
Replace
Replace
Replace
Replace
Replace
Refer to Section E
Refer to Section F
Refer to Section E
Adjust
Refer to Section G
Refer to Section F
Replace Page 81-20
Bl-57
81-55
81-58
81-16
81-54
81-62
al-62
81-20
81-55
81-58
-
61-71
Bl-64
81-72
81-73 8-i-64
Bl-60
81-63
81-62
81-62
El-63
Bl-20
El-58
81-55
Bl- 5
81-12
911 IORI .N)J LI.,“l. --
* Tappet noise may occur if the engine has set idle for an extended period. The noise should
normal operating temperature. (HLA troubleshooting: Refer to page Bl-7) dissipate after the engine has reached
81-4
Page 35 of 1164
ENGINE TUNE-UP PROCEDURE Bl
ENGINE TUNE-UP PROCEDURE
PREPARATION
-.
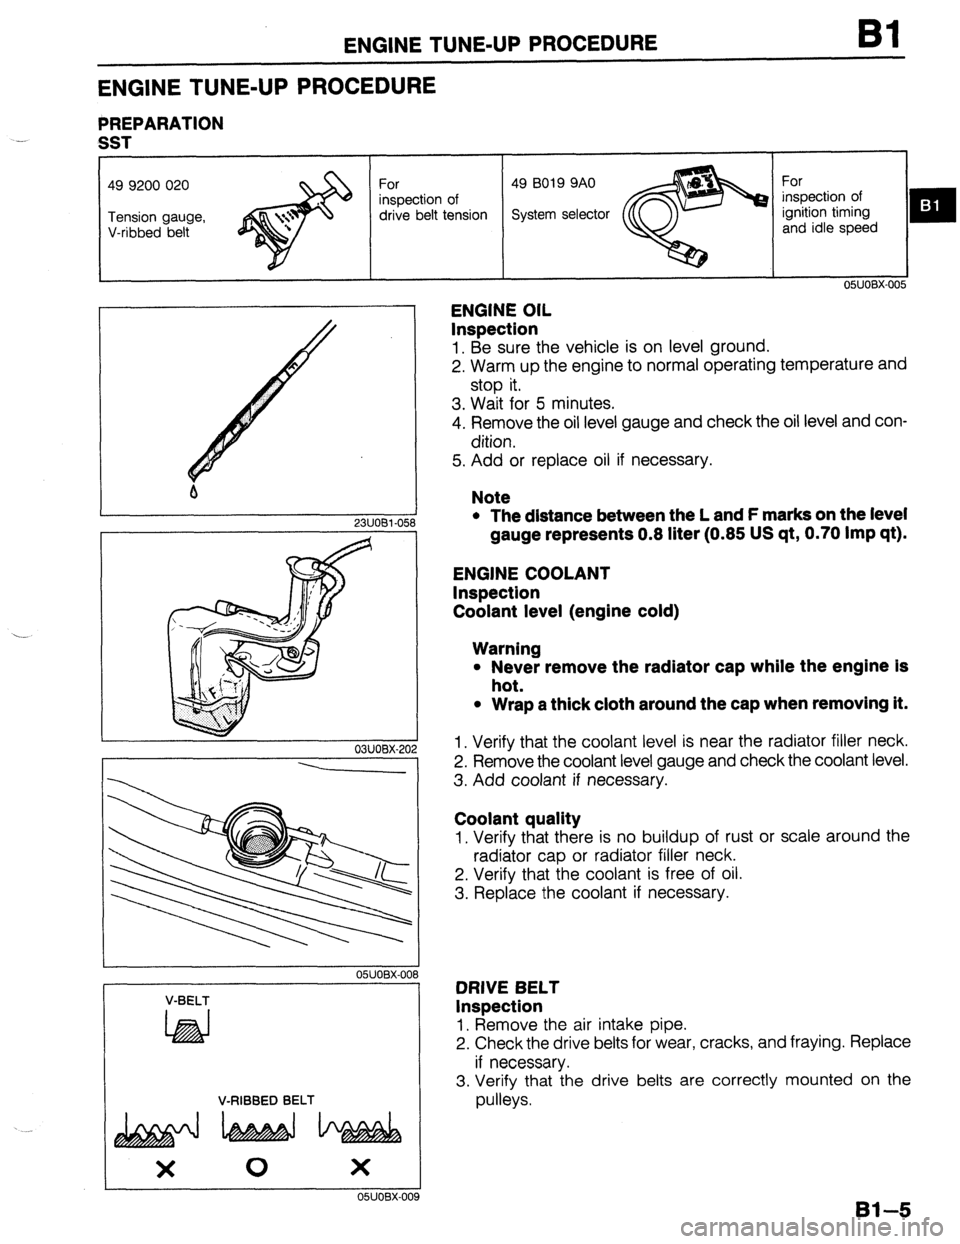
SST
drive belt tension
m :
I 1 2311081-058
- 03UOBX-20
---
OSUOBX-OC
V-BELT
LhEd
V-RIBBED BELT
OSJOBX-00
ENGINE OIL
Inspection
1. Be sure the vehicle is on level ground.
2. Warm up the engine to normal operating temperature and
stop it.
3. Wait for 5 minutes.
4. Remove the oil level gauge and check the oil level and con-
dition.
5. Add or replace oil if necessary.
Note
l The distance between the L and F marks on the level
gauge represents 0.8 liter (0.85 US qt, 0.70 Imp qt).
ENGINE COOLANT
Inspection
Coolant level (engine cold)
Warning
l Never remove the radiator cap while the engine is
hot.
l Wrap a thick cloth around the cap when removing it.
1. Verify that the coolant level is near the radiator filler neck.
2. Remove the coolant level gauge and check the coolant level.
3. Add coolant if necessary.
Coolant quality
1. Verify that there is no buildup of rust or scale around the
radiator cap or radiator filler neck.
2. Verify that the coolant is free of oil.
3. Replace the coolant if necessary.
DRIVE BELT
Inspection
1, Remove the air intake pipe.
2. Check the drive belts for wear, cracks, and fraying. Replace
if necessary.
3. Verify that the drive belts are correctly mounted on the
pulleys.
Bl--5
Page 36 of 1164
Bl ENGINE TUNE-UP PROCEDURE
iLTERNATOR
ALTERNATOR
I
I I I
IDLER
h ANKSHAFT /A/C
-LEY %OMPRESSC
PULLEY
AIC P/S AND A/C
23UOBl-006
WHEN MEASURED
WHEN SET
23UOBl.00
1 /
23UOBl-001
Bl-6
6
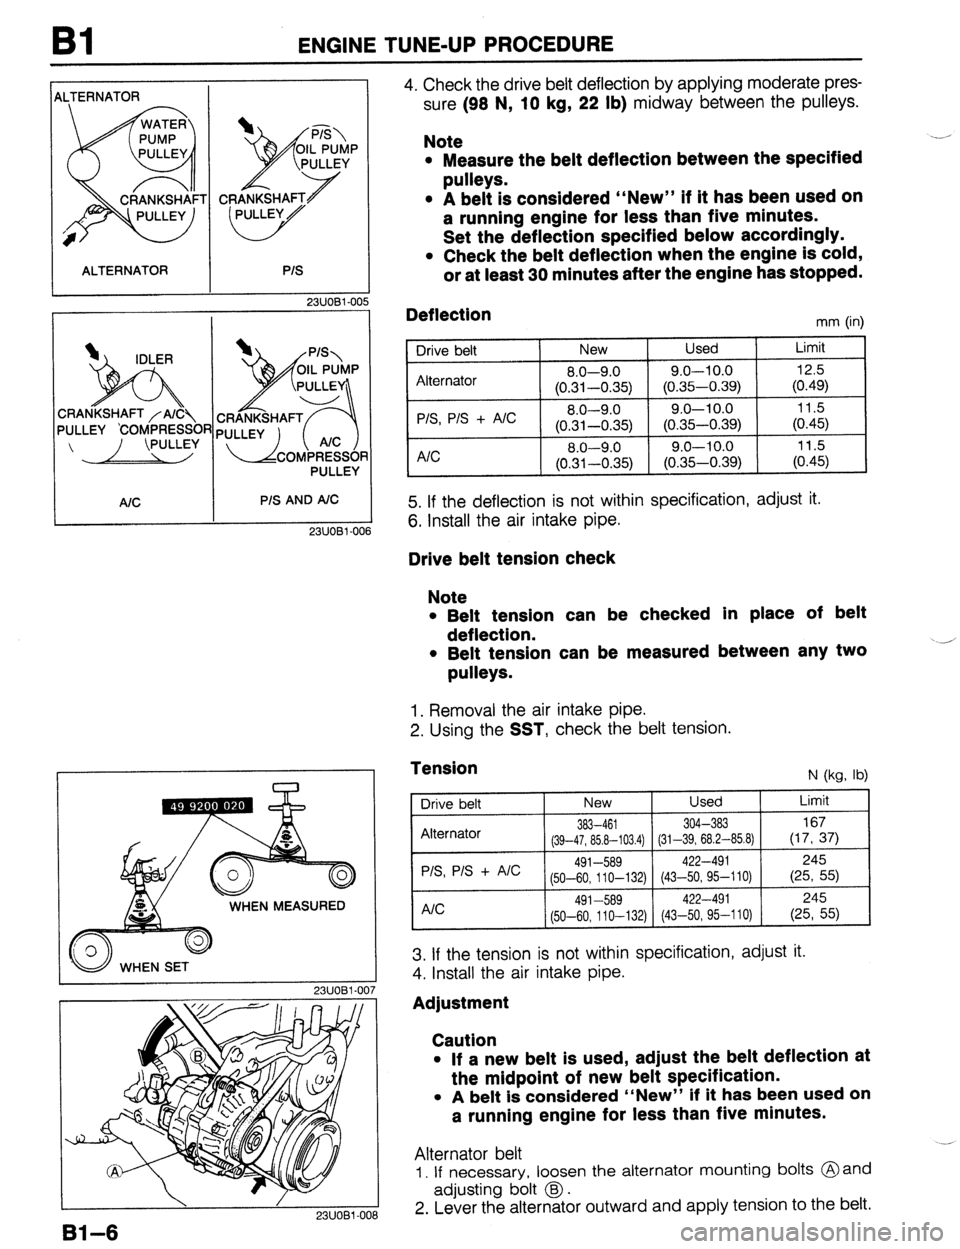
4. Check the drive belt deflection by applying moderate pres-
sure (98 N,
10 kg, 22 lb) midway between the pulleys.
Note
l Measure the belt deflection between the specified
pulleys.
l A belt is considered “New” if it has been used on
a running engine for less than five minutes.
Set the deflection specified below accordingly.
l Check the belt deflection when the engine is cold,
or at least 30 minutes after the engine has stopped.
Deflection
mm (in)
Drive
belt New Used Limit
Alternator 8.0-9.0
9.0-10.0 12.5
(0.31-0.35) (0.35-0.39) (0.49)
P/S, P/S + A/C 8.0-9.0
9.0-10.0 11.5
(0.31-0.35) (0.35-0.39) (0.45) A/C 8.0-9.0 9.0-l 0.0
11.5
(0.31-0.35) (0.35-0.39) (0.45)
5. If the deflection is not within specification, adjust it.
6. Install the air intake pipe.
Drive belt tension check
Note
l Belt tension can be checked in place of belt
deflection.
l Belt tension can be measured between any two
pulleys.
1. Removal the air intake pipe.
2. Using the
SST, check the belt tension.
Tension
N (kg, lb)
Drive belt New Used Limit
Alternator
383-461 304-383 167 (39-47, 85.8-103.4) (31-39, 68.2-85.8) (17, 37) PIS, P/S + AIC
491-589 422-491 245
(50-60, 110-132) (43~-50,95--110) (25, 55)
245 A/C 491-589 422-491
(50-60,110-132) (43-50,95-l 10) (25, 55)
3. If the tension is not within specification, adjust it.
4. Install the air intake pipe.
Adjustment
Caution
l If a new belt is used, adjust the belt deflection at
the midpoint of new belt specification.
l A belt is considered “New” if it has been used on
a running engine for less than five minutes.
Alternator belt
1. If necessary, loosen the alternator mounting bolts @and
adjusting bolt @I.
2. Lever the alternator outward and apply tension to the belt.
Page 37 of 1164
ENGINE TUNE-UP PROCEDURE Bl
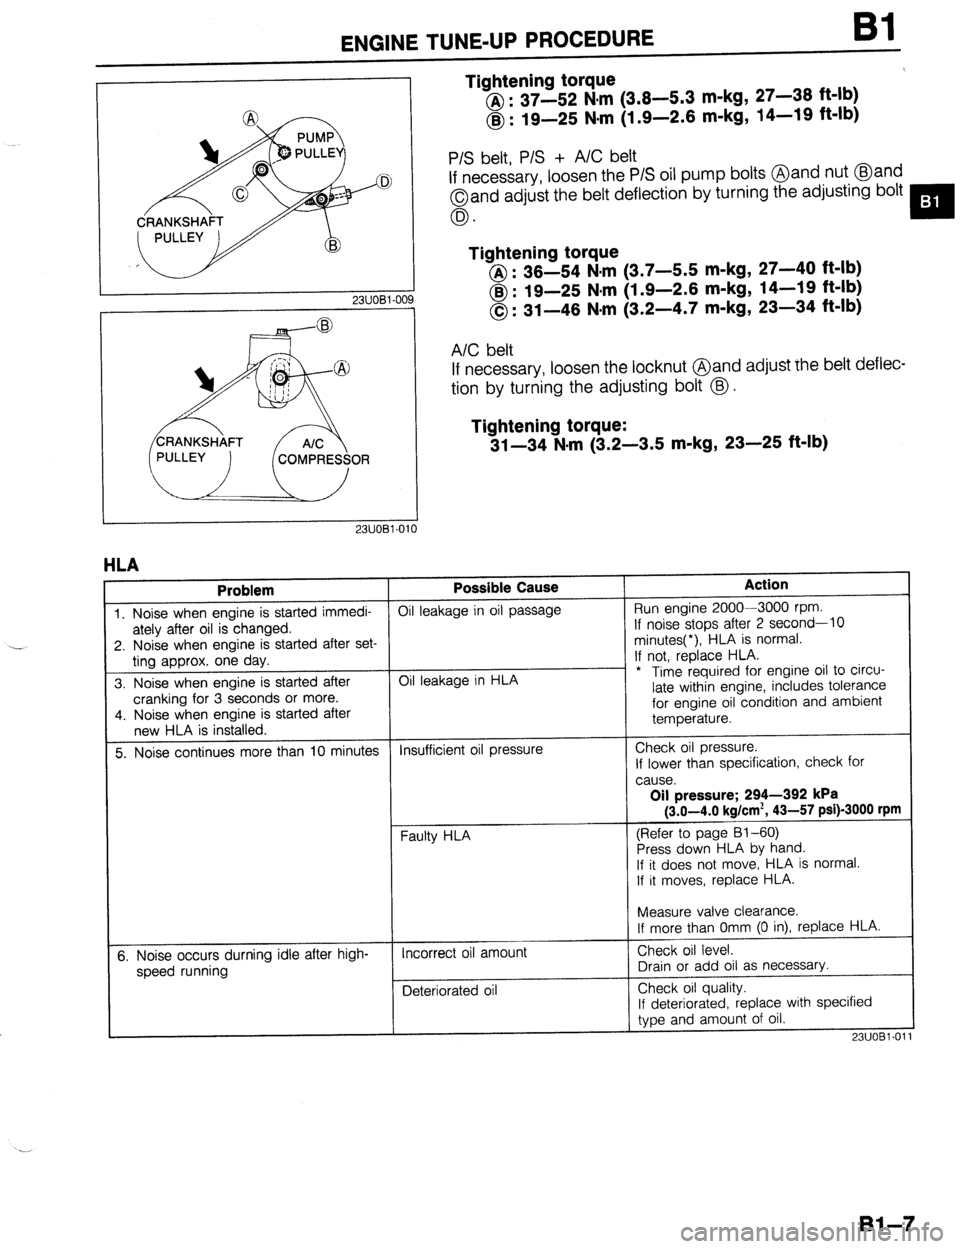
Tightening torque
@ : 37-52 N,m (3.8-5.3 m-kg, 27-38 ft-lb)
@ : 19-25 Nsm (1.9-2.6 m-kg, 14-19 ft-lb)
23UOBl-OC
P/S belt, P/S + A/C belt
If necessary, loosen the P/S oil pump bolts @and nut @and
Oand adjust the belt deflection by turning the adjusting bolt
0.
Tightening torque
@I : 36-54 N.m (3.7-5.5 m-kg, 27-40 ft-lb)
@ : 19-25 N#m (1.9-2.6 m-kg, 14-19 ft-lb)
0: 31-46 N-m (3.2-4.7 m-kg, 23-34 ft-lb)
A/C belt
If necessary, loosen the locknut @and adjust rhe belt deflec-
tion by turning the adjusting bolt @.
Tightening torque:
31-34 N-m (3.2-3.5 m-kg, 23-25 ft-lb)
1
HLA
Problem Possible Cause Action
1. Noise when engine is started immedi- Oil leakage in oil passage Run engine 2000-3000 rpm.
ately after oil is changed. If noise stops after 2 second-10
2. Noise when engine is started after set- minutes(*), HLA is normal.
ting approx. one day. If not, replace HLA.
3. Noise when engine is started after Oil leakage in HLA - * Time required for engine oil to circu-
cranking for 3 seconds or more. late within engine, includes tolerance
4. Noise when engine is started after for engine oil condition and ambient
new HLA is installed. temperature.
5. Noise continues more than 10 minutes Insufficient oil pressure Check oil pressure.
If lower than specification, check for
cause.
Oil pressure; 294-392 kPa
(3.0-4.0 kg/cm*, 43-57 psi)-3000 rpm
(Refer to page 81-60)
Press down HLA by hand.
If it does not move,. HLA is normal.
If it moves, replace HLA.
t
I
Measure valve clearance.
If more than Omm (0 in), replace HLA.
5. Noise occurs durning idle after high-
speed running Incorrect oil amount
Deteriorated oil Check oil level.
Drain or add oil as necessary.
Check oil quality.
If deteriorated, replace with specified
type and amount of oil.
23UOBl-01
Bl-7
Page 38 of 1164
Bl ENGINE TUNE-UP PROCEDURE
13UOBi-036
-i
OWOBX-261
13UOBl-08
LOCK BOLTS
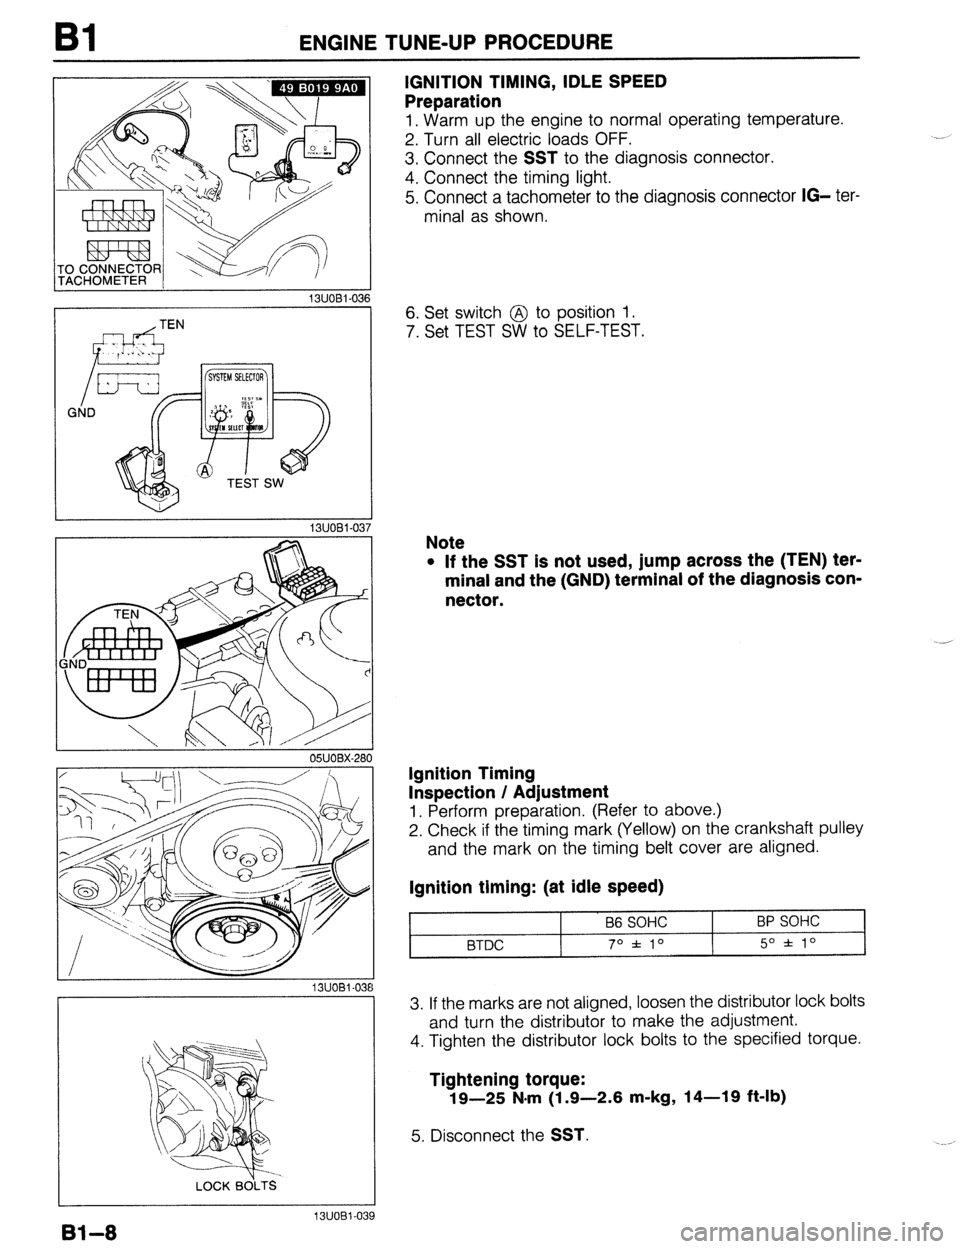
IGNITION TIMING, IDLE SPEED
Preparation
1, Warm up the engine to normal operating temperature.
2. Turn all electric loads OFF.
3. Connect the
SST to the diagnosis connector.
4. Connect the timing light.
5. Connect a tachometer to the diagnosis connector
IG- ter-
minal as shown.
6. Set switch @ to position 1.
7. Set TEST SW to SELF-TEST.
Note
l If the SST is not used, jump across the (TEN) ter-
minal and the (GND) terminal of the diagnosis con-
nector.
Ignition Timing
Inspection / Adjustment
1. Perform preparation. (Refer to above.)
2. Check if the timing mark (Yellow) on the crankshaft pulley
and the mark on the timing belt cover are aligned.
Ignition timing: (at idle speed)
B6 SOHC
BTDC 70 f 10 BP SOHC
5O f lo
3. If the marks are not aligned, loosen the distributor lock bolts
and turn the distributor to make the adjustment.
4. Tighten the distributor lock bolts to the specified torque.
Tightening torque:
19-25 N.m (1.9-2.6 m-kg, 14-19 ft-lb)
5. Disconnect the SST.
Bl-8
13UOBl-039
Page 41 of 1164
ON-VEHICLE MAINTENANCE Bl
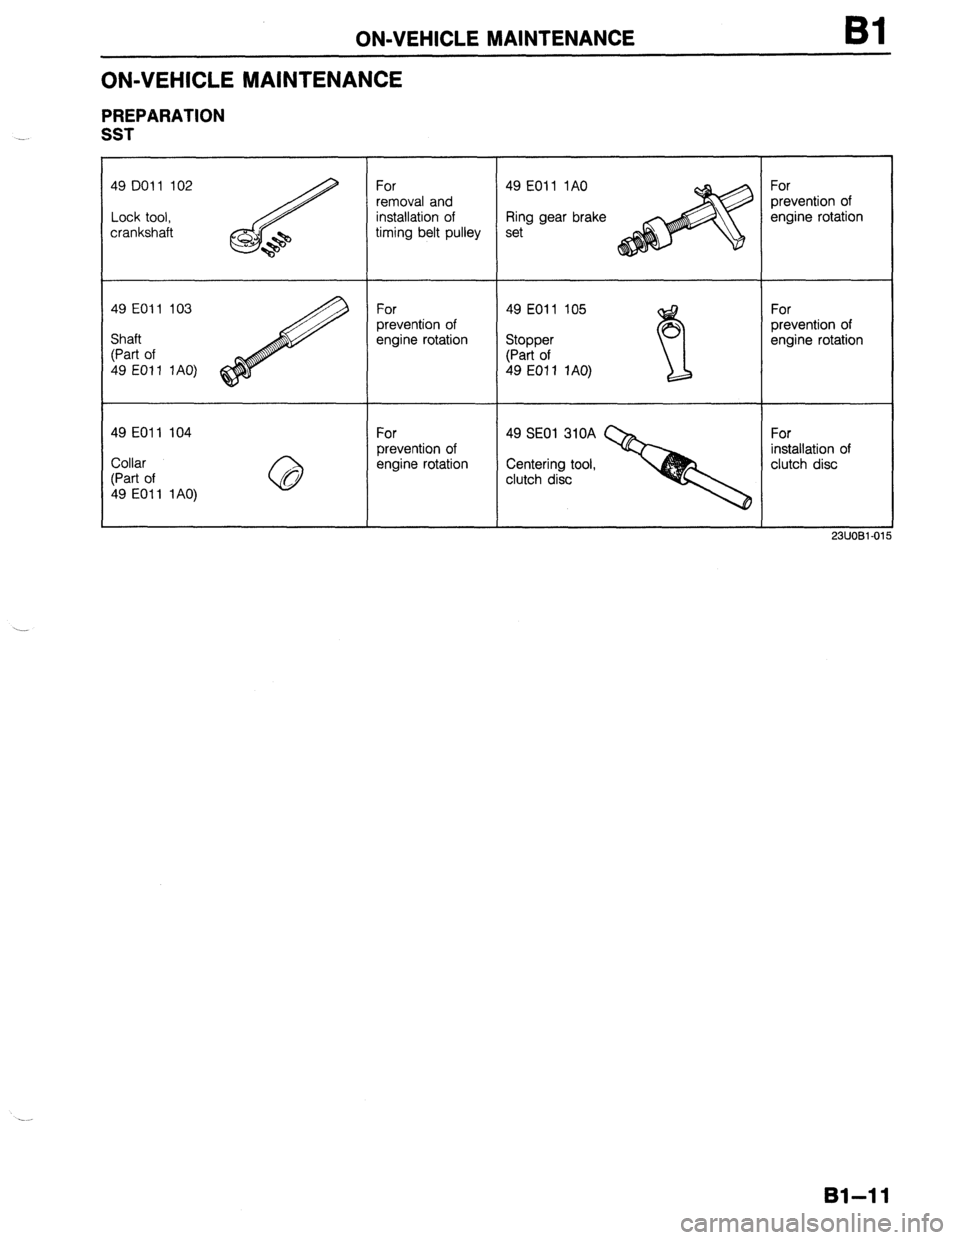
ON-VEHICLE MAINTENANCE
PREPARATION
SST
49 DO1 1 102
Lock tool,
crankshaft For
removal and
installation of
timing belt pulley 49 EOll 1AO
Ring gear brake
set For
prevention of
engine rotation
49 EOll 103
For
49 EOl 1 105
For
prevention of
prevention of
Shaft
engine rotation
Stopper
engine rotation
(Part of
(Part of
49 EOl 1 1AO)
49 EOI 1 1AO)
49 EOll 104
For
49 SE01 310A
For
prevention of
installation of
Collar
engine rotation
Centering tool,
clutch disc
(Part of
clutch disc
49 EOl 1 1 AO)
23UOBl-01
81-11
Page 42 of 1164
Bl ON-VEHICLE MAINTENANCE
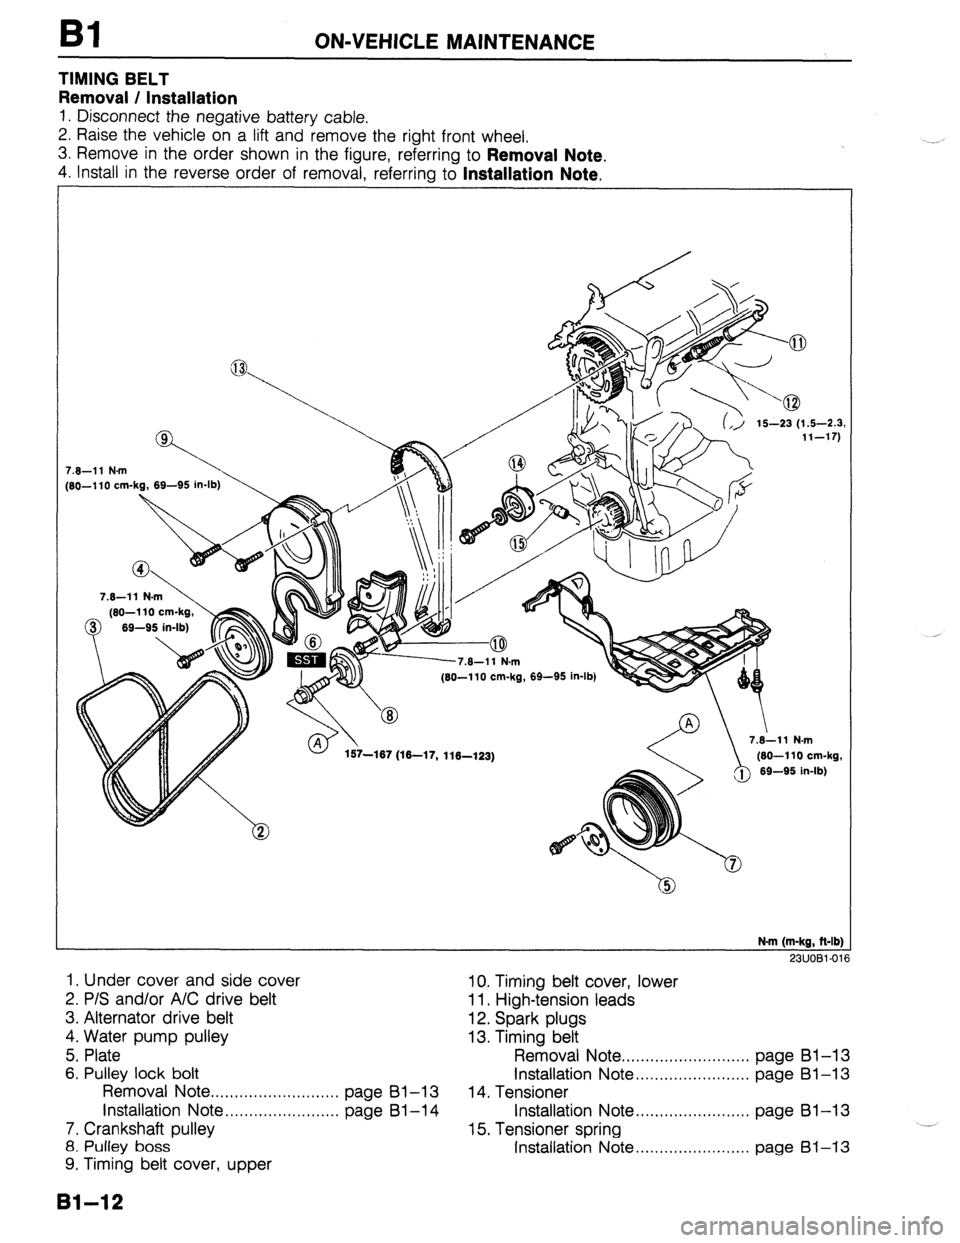
TIMING BELT
Removal / Installation
1. Disconnect the negative battery cable.
2. Raise the vehicle on a lift and remove the right front wheel.
3. Remove in the order shown in the figure, referring to
Removal Note.
4. Install in the reverse order of removal, referrina to Installation Note.
7.6-11 N.m
[SO-110 cm-kg, 69-95 in-lb)
7.6-11 N.m
(60-l 10 cm-kg,
0 69-95 in-lb)
, .v- I . (60-110 cm-kg, 69-95 in-lb)
157-167 (16-17, 116-123) /@ 7.i11 N.m
(60-110 cm-kg,
69-95 in-lb)
N.m (m-kg, ft-lb]
23UOBl-01
1. Under cover and side cover 10. Timing belt cover, lower
2. P/S and/or A/C drive belt 11. High-tension leads
3. Alternator drive belt 12. Spark plugs
4. Water pump pulley 13. Timing belt
5. Plate Removal Note . . . . . . . . . . . . . . . . . . . . . . . . . . . page Bl-13
6. Pulley lock bolt Installation Note . . . . . . . . . . . . . . . . . . . . . . . . page Bl-13
Removal Note ..,.,,.,....,....,...,...,, page Bl-13 14. Tensioner
installation Note . . . . . . . . . . . . . . . . . . . . . . . . page Bl-14 Installation Note . . . . . . . . . . . . . . . . . . . . . . . . page 81-13
7. Crankshaft pulley 15. Tensioner spring .__
8. Pulley boss Installation Note . . . . . . . . . . . . . . . . . . . . . . . . page 61-13
9. Timing belt cover, upper
131-12
Page 43 of 1164
-
. . .
ON-VEHICLE MAINTENANCE Bl
13EOBl-010
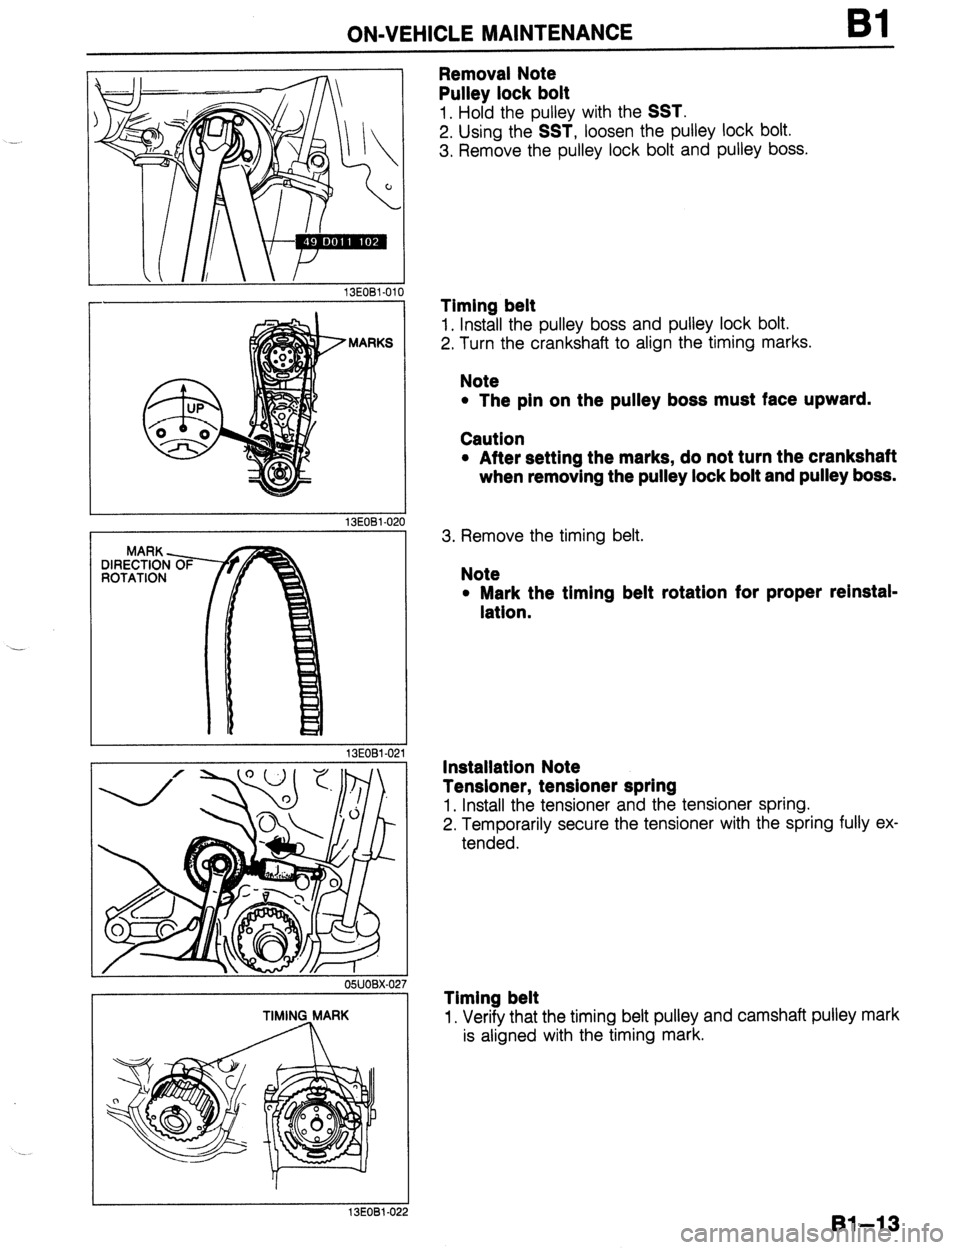
Removal Note
Pulley lock bolt
1. Hold the pulley with the SST.
2. Using the SST, loosen the pulley lock bolt.
3. Remove the pulley lock bolt and pulley boss.
MARKS
13EOBl-02
MARK -
DIRECTION
ROTATION
13EOBl-02
OBUOBX-0;
TIMING MARK
13EOBl.022
Timing belt
1. Install the pulley boss and pulley lock bolt.
2. Turn the crankshaft to align the timing marks.
Note
l The pin on the pulley boss must face upward.
Caution
l After setting the marks, do not turn the crankshaft
when removing the pulley lock bolt and pulley boss.
3. Remove the timing belt.
Note
l Mark the timing belt rotatlon for proper relnstal-
latlon.
Installation Note
Tensioner, tensioner spring
1. Install the tensioner and the tensioner spring.
2. Temporarily secure the tensioner with the spring fully ex-
tended.
Timing belt
1. Verify that the timing belt pulley and camshaft pulley mark
is aligned with the timing mark.
Bl-13
Page 44 of 1164
Bl ON-VEHICLE MAINTENANCE
13EOBl-023
MARKS
13EOBl-02, 4
I
03UOBl-02
98 N
(10 kg, 22 lb)
13EOBl-02 15
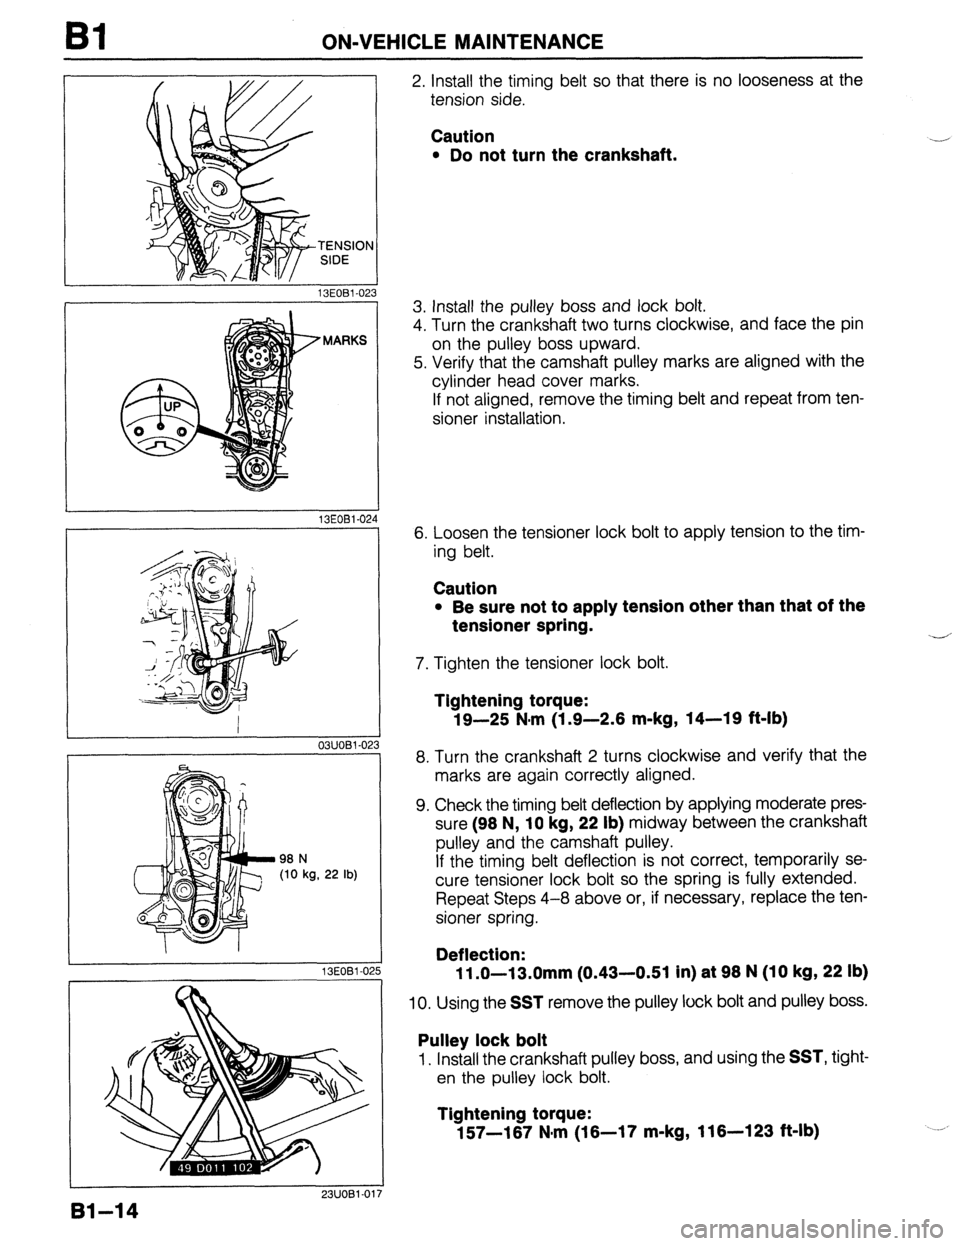
2. Install the timing belt so that there is no looseness at the
tension side.
Caution
l Do not turn the crankshaft. .-
3. Install the pulley boss and lock bolt.
4. Turn the crankshaft two turns clockwise, and face the pin
on the pulley boss upward.
5. Verify that the camshaft pulley marks are aligned with the
cylinder head cover marks.
If not aligned, remove the timing belt and repeat from ten-
sioner installation.
6. Loosen the tensioner lock bolt to apply tension to the tim-
ing belt.
Caution
l Be sure not to apply tension other than that of the
tensioner spring.
7. Tighten the tensioner lock bolt.
--
Tightening torque:
19-25 N,m (1.9-2.6 m-kg, 14-19 ft-lb)
8. Turn the crankshaft 2 turns clockwise and verify that the
marks are again correctly aligned.
9. Check the timing belt deflection by applying moderate pres-
sure (96 N,
10 kg, 22 lb) midway between the crankshaft
pulley and the camshaft pulley.
If the timing belt deflection is not correct, temporarily se-
cure tensioner lock bolt so the spring is fully extended.
Repeat Steps 4-8 above or, if necessary, replace the ten-
sioner spring.
Deflection:
11 .O-13.0mm (0.43-0.51 in) at 96 N (10 kg, 22 lb)
10. Using the SST remove the pulley lock bolt and pulley boss.
Pulley lock bolt
1. Install the crankshaft pulley boss, and using the SST, tight-
en the pulley lock bolt.
Tightening torque:
157-167 N,m (16-17 m-kg, 116-123 ft-lb)
91-14
Page 47 of 1164
ON-VEHICLE MAINTENANCE Bl
I. Air hose assembly 1 I. Timing belt cover, upper
2. Resonance chamber 12. Timing belt
3. Accelerator cable Removal / Installation.. . . . . . . . . . . . . . . page Bl-12
Installation Note . . . . . . . . . . . . . . . . . . . . . . . . page BI-I9 13. Front exhaust pipe
4. Throttle cable (ATX)
14. Intake manifold bracket
Removal / Installation . . . . . . . . . . . . . . . . . . . . . Section K 15. Cylinder head bolt
5. Hoses Removal Note . . . . . . . . . . . . . . . . . . . . . . . . . . . page BI-18
Removal I Installation Note ..,............... below Installation Note . . . . . . . . . . . . . . . . . . . . . . . . page Bl-I9
6. Harnesses 16. Cylinder head
Removal I Installation Note....... page BI-I8 Disassembly . . . . . . . . . . . . . . . . . . . . . . . . . . . . page 61-43
7. Water bypass pipe nut
Inspection . . , . . . . . . . . . . . . . . . . . . . . . . . . . ., . . page BI -54
8. Drive belt Assembly . . . . . . . . . . . . . . . . . . . . . . . . . . . . . . . . . . page BI-79
9. Water pump pulley 17. Cylinder head gasket
10. Cylinder head cover
23UOBl-019
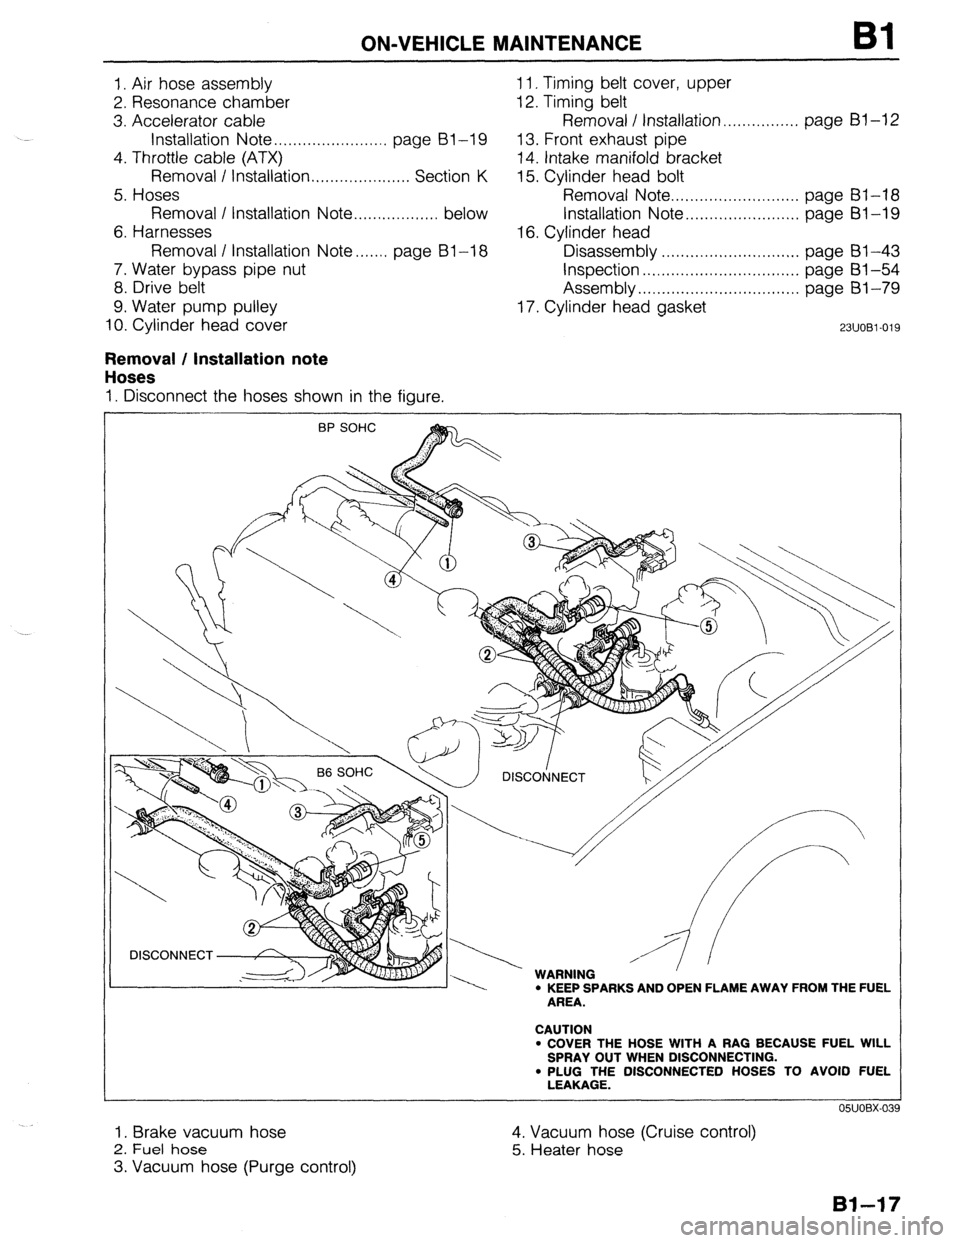
Removal / Installation note
Hoses
I. Disconnect the hoses shown in the figure.
\ / DlSCOtjNECT
, w I.,,, -----. WARNING ’ ’ ’ l KEEP SPARKS AND OPEN FLAME AWAY FROM THE FUEL
AREA.
CAUTION
l COVER THE HOSE WITH A RAG BECAUSE FUEL WILL
SPRAY OUT WHEN DISCONNECTING.
. PLUG THE DISCONNECTED HOSES TO AVOID FUEL
LEAKAGE.
I. Brake vacuum hose
2. Fuel hose
3. Vacuum hose (Purge control) 4. Vacuum hose (Cruise control)
5. Heater hose