belt MAZDA PROTEGE 1992 Owner's Manual
[x] Cancel search | Manufacturer: MAZDA, Model Year: 1992, Model line: PROTEGE, Model: MAZDA PROTEGE 1992Pages: 1164, PDF Size: 81.9 MB
Page 53 of 1164

ON-VEHICLE MAINTENANCE
FRONT OIL SEAL
Replacement
1. Disconnect the negative battery cable.
2. Remove in the order shown in the figure, referring to
Removal Note.
3. Install in the reverse order of removal, referring to Installation Note.
I- I
I
I
I
157-167 (16-17, 116-123)
I
t
I
I
/
L---- -____ - _......_____________ -----------!
N.m (m-kg, It-lb)
^ ^ ^ -
_ _
1. Timing belt
- 3. Timing belt pulley
Removal I Installation..
.............. page
61-12 Installation
Note.. ......................
page Bl-24
2. Pulley lock bolt
4. Oil seal
Installation Note ........................
page Bl-24
Removal Note
..................................... below
Installation
Note.. ......................
page Bl-24
01 EOBX-055
Removal Note
Oil seal
1. Cut the oil seal lip with a razor knife.
2. Remove the oil seal with a screwdriver protected with a rag.
61-23
Page 54 of 1164
Bl ON-VEHICLE MAINTENANCE
01 EOBX-056
23UOBi -0:
Steps After Installation
1. Lower the vehicle.
2. Connect the negative battery cable.
3. Start the engine and check the ignition timing.
(Refer to page 61-8)
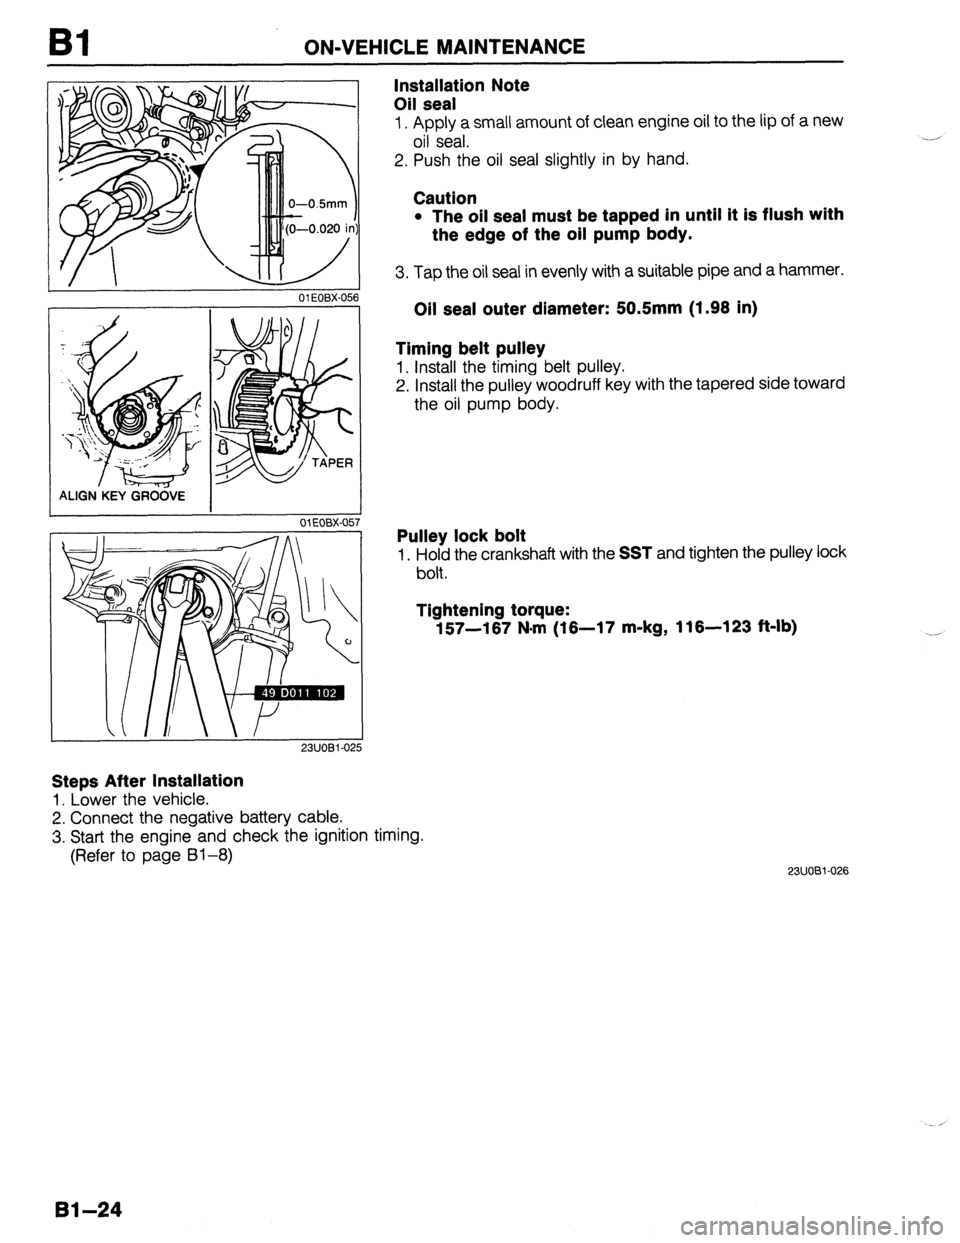
Installation Note
Oil seal
1. Apply a small amount of clean engine oil to the lip of a new
oil seal.
2. Push the oil seal slightly in by hand.
Caution
l The oil seal must be tapped in until it is flush with
the edge of the oil pump body.
3. Tap the oil seal in evenly with a suitable pipe and a hammer.
Oil seal outer diameter: 50.5mm (1.98 in)
Timing belt pulley
1. Install the timing belt pulley.
2. Install the pulley woodruff key with the tapered side toward
the oil pump body.
Pulley lock bolt
1. Hold the crankshaft with the SST and tighten the pulley lock
bolt.
Tightening torque:
157-167 N*rn (16-17 m-kg, 116-123 ft-lb)
23UOBi-026
Bl-24
Page 58 of 1164
REMOVAL
REMOVAL
Warning
l Release the fuel pressure. (Refer to Section F.)
PROCEDURE
1. Disconnect the negative battery cable.
2. Drain the engine coolant and transaxle oil.
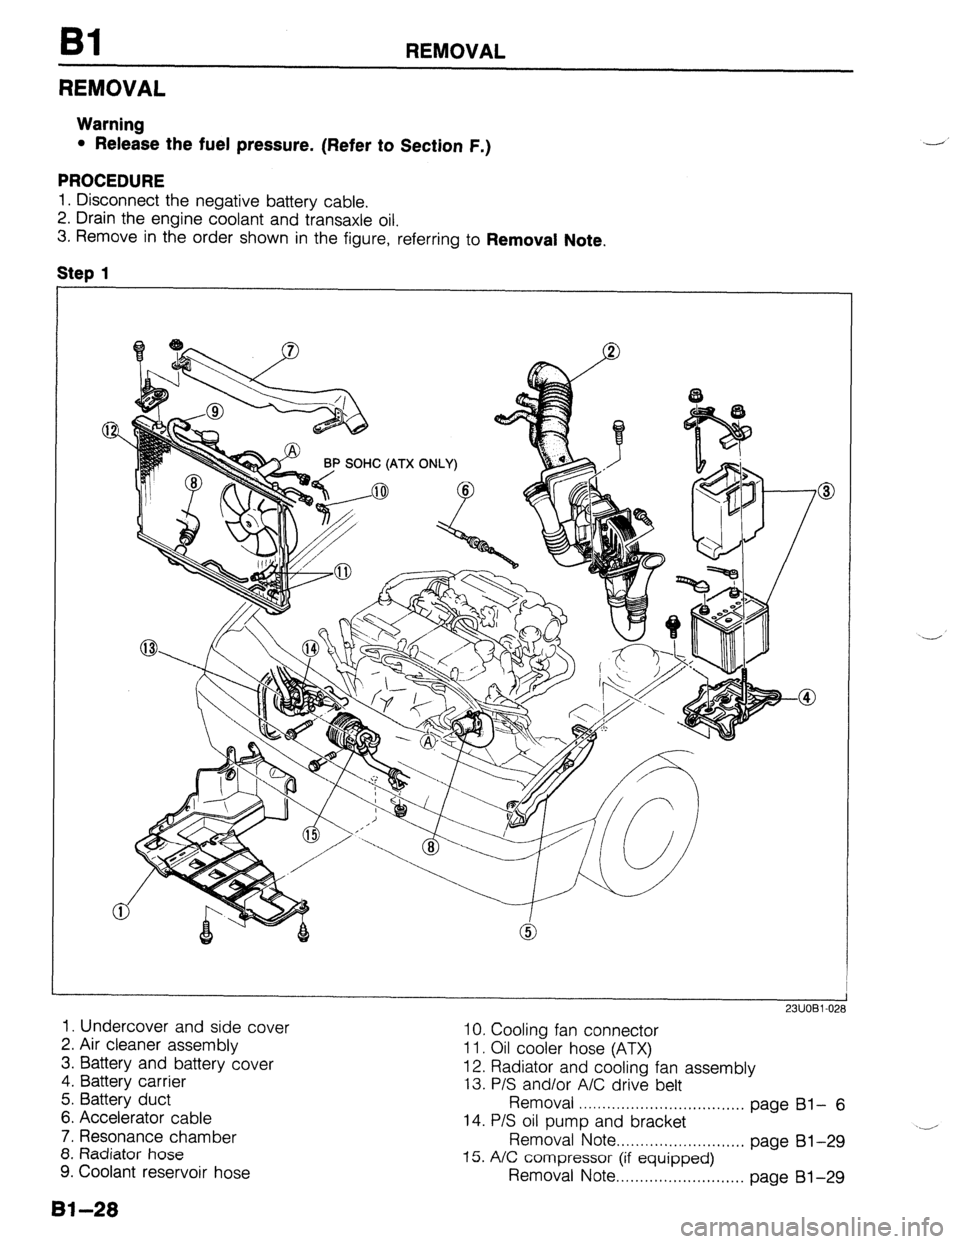
3. Remove in the order shown in the figure, referring to Removal Note,
Step 1
1. Undercover and side cover
2. Air cleaner assembly 10. Cooling fan connector
3. Battery and battery cover 11. Oil cooler hose (ATX)
4. Battery carrier 12. Radiator and cooling fan assembly
13. P/S and/or A/C drive belt
5. Battery duct
Removal . . . . . . . . . . . . . . . . . . . . . . . . . . . . . . . . . . .
6. Accelerator cable page Bl- 6
7. Resonance chamber 14. P/S oil pump and bracket
8. Radiator hose Removal Note . . . . . . . . . . . . . . . . . . . . . . . . . . . page 81-29
9. Coolant reservoir hose 15. A/C compressor (if equipped)
Removal Note . . . . . . . . . . . . . . . . . . . . . . . . . . . page 81-29
81-28
Page 70 of 1164
Bl DISASSEMBLY
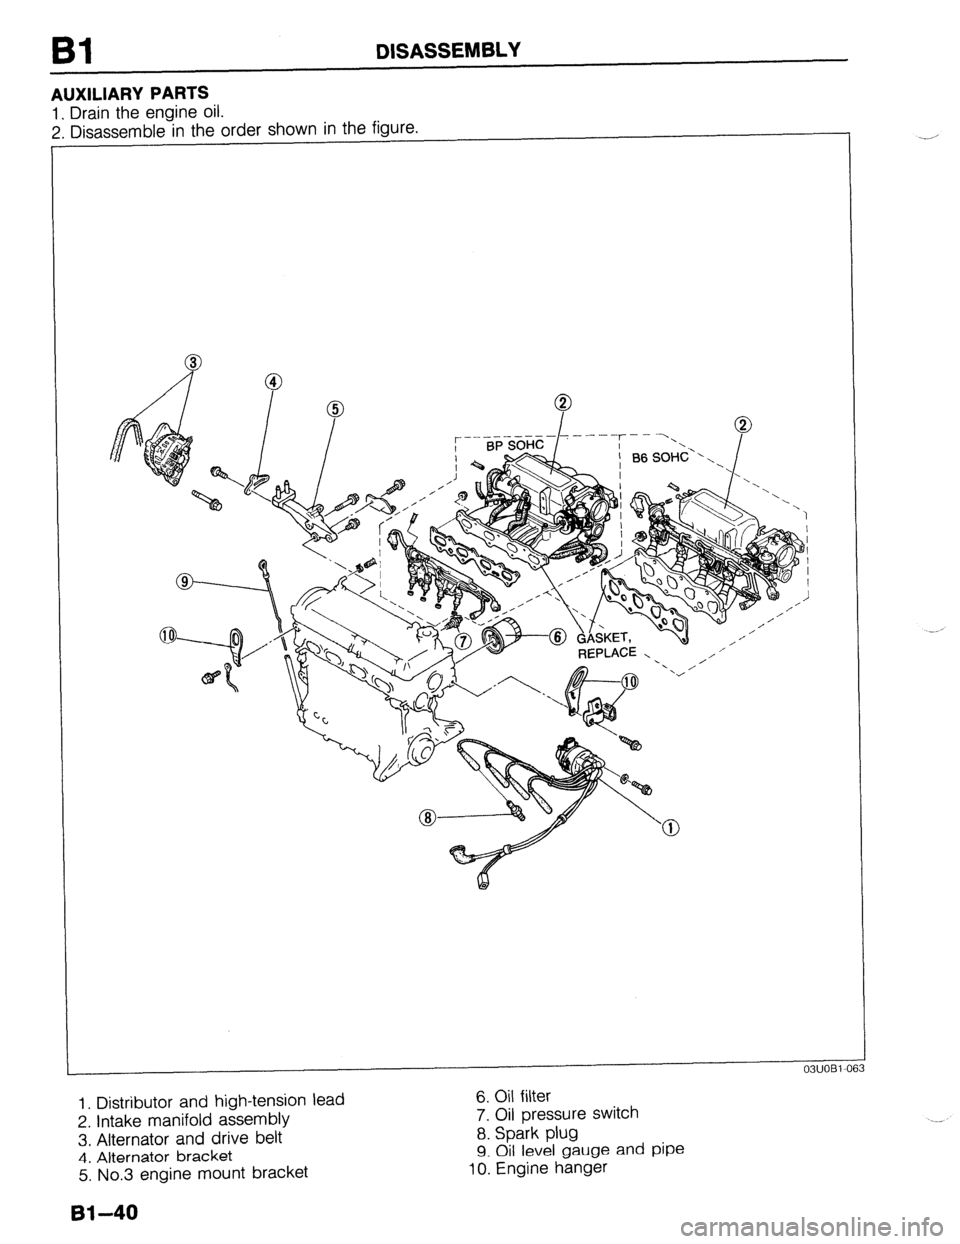
AUXILIARY PARTS
1. Drain the engine oil.
2. Disassemble in the order shown in the figure.
- REPLACE - ’ ,/ I’
1. Distributor and high-tension lead
2. Intake manifold assembly
3, Alternator and drive belt
4. Alternator bracket
5. No.3 engine mount bracket 6. Oil filter
7. Oil pressure switch
8. Spark plug
9. Oil level gauge and pipe 10. Engine hanger
61-40
Page 71 of 1164
DISASSEMBLY Bl
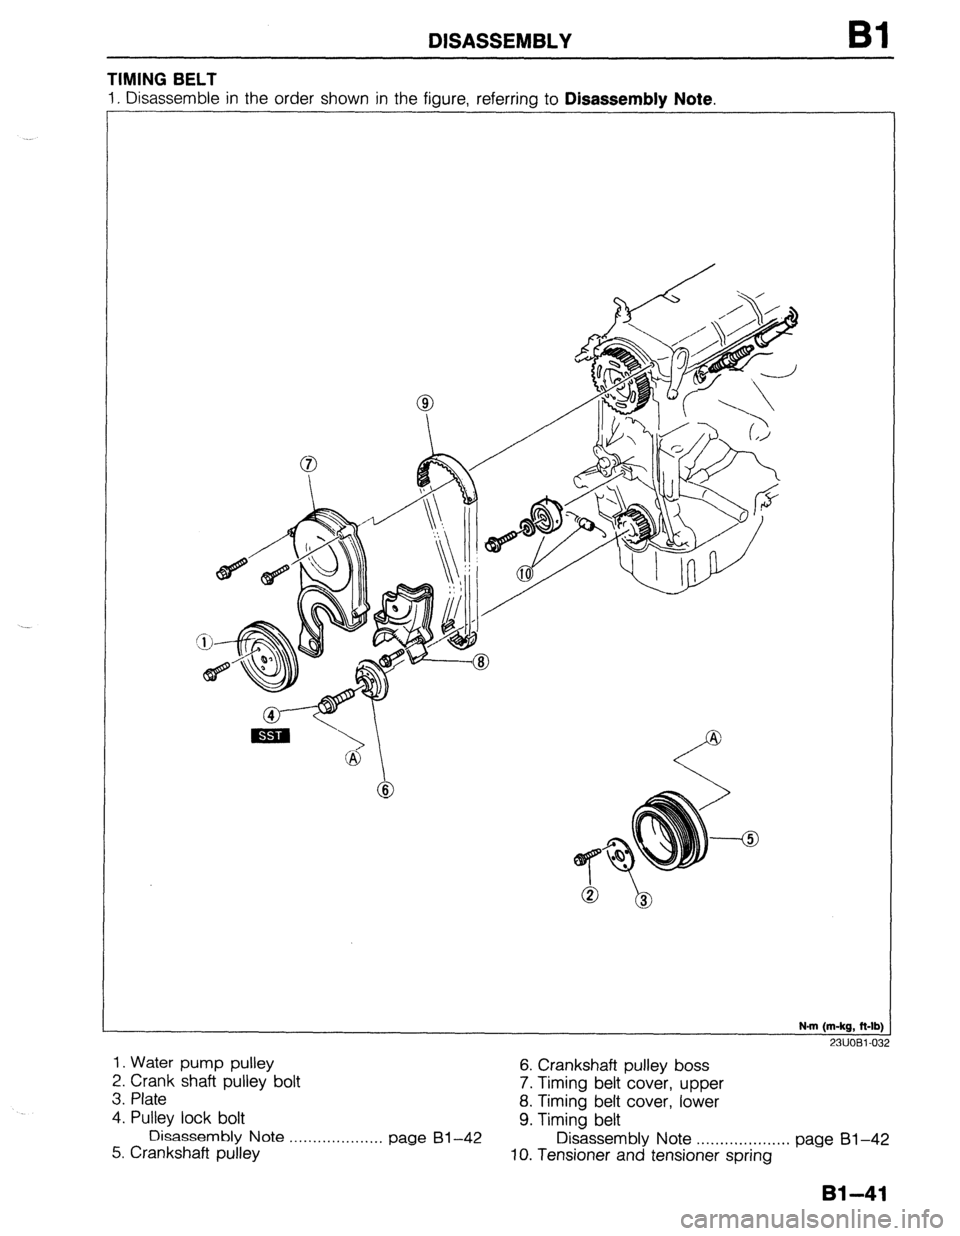
TIMING BELT
23UOBl-032
1. Water pump pulley
2. Crank shaft pulley bolt 6. Crankshaft pulley boss
3. Plate 7. Timing belt cover, upper
4. Pulley lock bolt 8. Timing belt cover, lower
9. Timing belt
Disassembly
Note . . . . . . . . . . . . . . . . . . . . page Bl-42
Disassembly
Note . . . . . . . . . . . . . . . . . . . . page
81-42
5. Crankshaft pulley
10. Tensioner and tensioner spring
Bl-41
Page 72 of 1164

DISASSEMBLY
23UOBl-067
; MARKS
MARKS
Qe
x
25mm (1.0 in) MIN
13EOBl-0:
Disassembly Note
Pulley lock bolt
1. Hold the flywheel (MTX) or drive plate (ATX) with the SST
or equivalent.
2. Remove the pulley lock bolt.
Timing belt
1. Turn the crankshaft and align the marks.
2. Mark the timing belt rotation for proper reinstallation.
Caution
l Never forcefully twist the timing belt. Do not turn
it inside out or bend it.
l Do not allow oil or grease on the belt.
81-42
Page 77 of 1164
DISASSEMBLY Bl
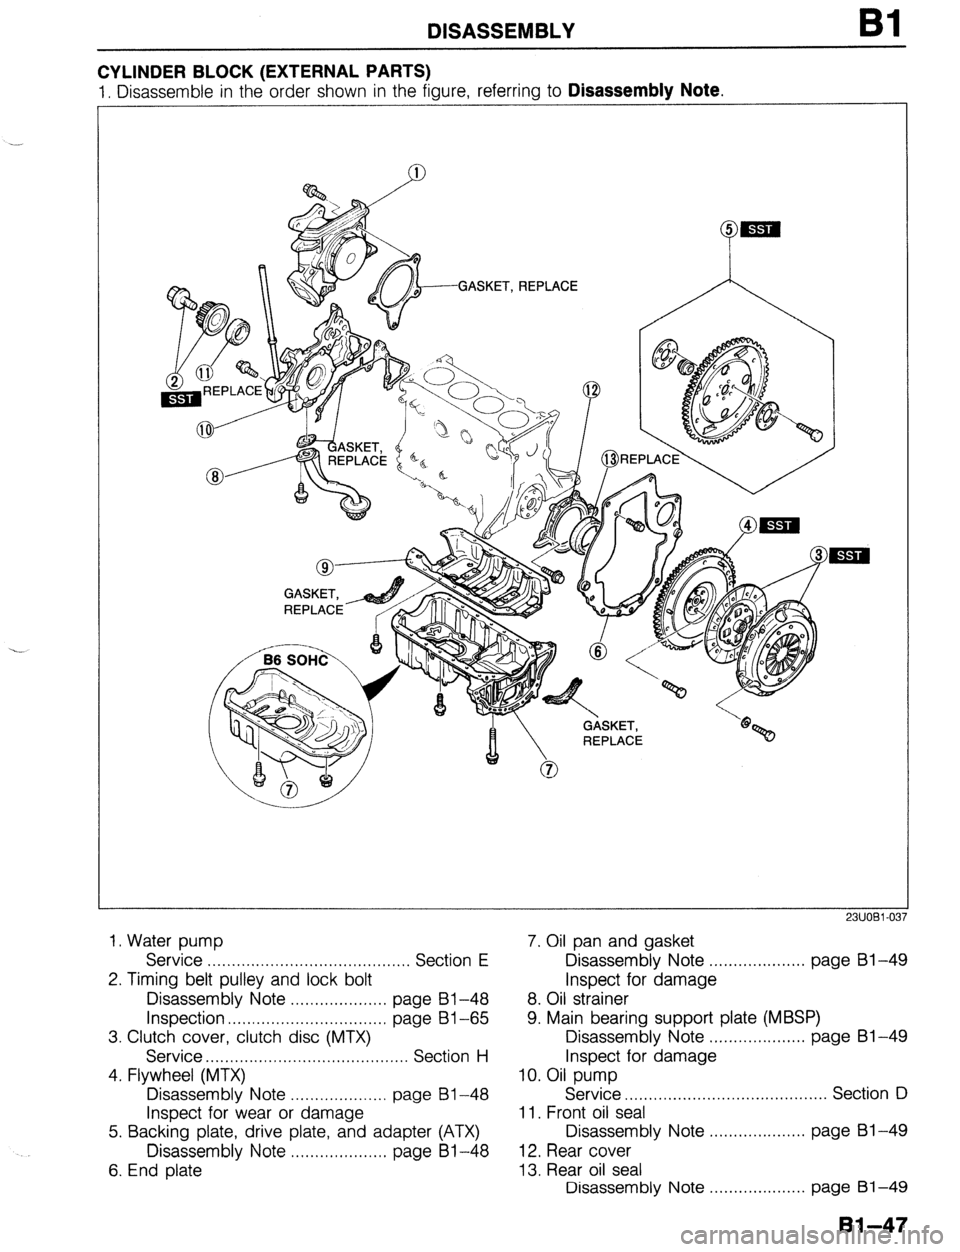
CYLINDER BLOCK (EXTERNAL PARTS)
1. Disassemble in the order shown in the fiaure, referrina to Disassembly Note.
.-.
1. Water pump
Service . . . . . . . . . . . . . . . . . . . . . . . . . . . . . . . . . . . . . . . . . . Section E
2. Timing belt pulley and lock bolt
Disassembly Note . . . . . . . . . . . . . . . . . . . . page Bl-48
Inspection . . . . . . . . . . . . . . . . . . . . . . . . . . . . . . . . . page Bl -65
3. Clutch cover, clutch disc (MTX)
Service . . . . . . . . . . . . . . . . . . . . . . . . . . . . . . . . . . . . . . . . Section H
4. Flywheel (MTX)
Disassembly Note . . . . . . . . . . . . . . . . . . . page 81-48
Inspect for wear or damage
5. Backing plate, drive plate, and adapter (ATX)
Disassembly Note ..,.....,.,........, page 81-48
6. End plate 7. Oil pan and gasket
Disassembly Note . . . . . . . . . . . . . . . . . . . . page 81-49
Inspect for damage
8. Oil strainer
9. Main bearing support plate (MBSP)
Disassembly Note . . . . . . . . . . . . . . . . . . . . page Bl-49
Inspect for damage
10. Oil pump
Service . . . . . . . . . . . . . . . . . . . . . . . . . . . . . . . . . . . . . . . . Section D
11. Front oil seal
Disassembly Note . . . . . . . . . . . . . . . . . . . . page 81-49
12. Rear cover
13. Rear oil seal
Disassembly Note . . . . . . . . . . . . . . . . . . . . page 81-49
Bl-47
Page 78 of 1164

Bl DISASSEMBLY
23UOBl-068
23UOBl-06!
I 2311081-070
23UOBl-071
Disassembly Note
Timing belt pulley
1. Hold the flywheel (MTX) or drive plate (ATX) with the SST
or equivalent.
2. Loosen the pulley lock bolt.
3. Remove the pulley lock bolt. -
4. Remove the timing belt pulley.
5. Remove the pulley Woodruff key.
2311081-059
Clutch cover (MTX)
1. Hold the flywheel with the SST or equivalent.
2. Loosen the clutch cover lock bolts in two or three steps in
the order shown in the figure.
3. Remove the clutch cover.
-
Flywheel (MTX)
1. Hold the flywheel with the SST or equivalent.
2. Remove the flywheel lock bolts.
3. Remove the flywheel.
4. Remove the
SST or equivalent.
Backing plate, drive plate, and adapter (ATX)
1. Hold the drive plate with the SST or equivalent.
2. Remove the drive plate lock bolts.
3. Remove the backing plate, drive plate, and adapter.
4. Remove the
SST or equivalent.
Bl-48
Page 95 of 1164
INSPECTION / REPAIR 81
---
L
25mm (1 .O in) min.
OSJOBX-161
DAMAGE,
WEAR
05UOBX-16!
03UOEl-12: 7
05UOBX-17: 2 05UOBX-170
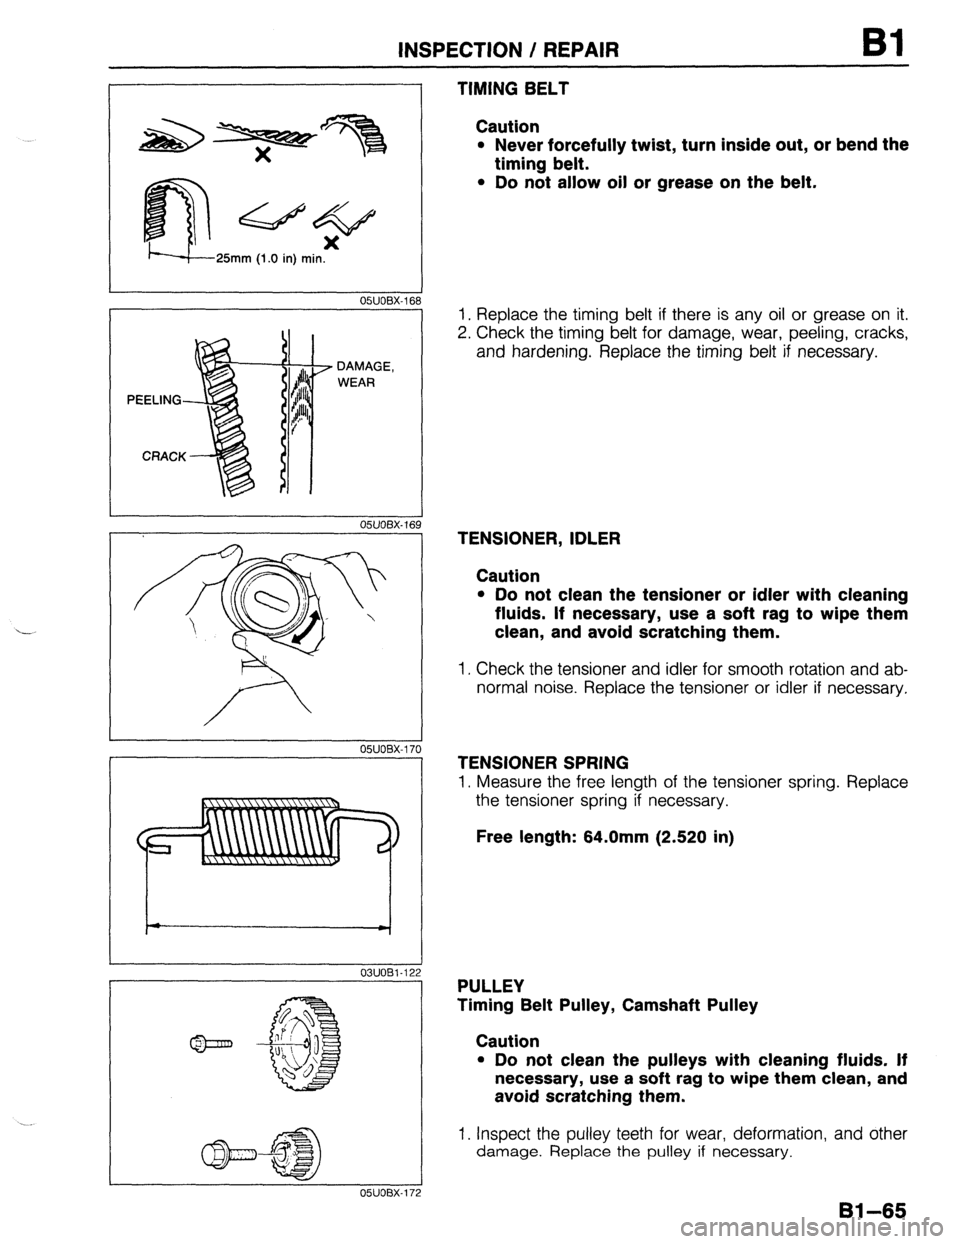
TIMING BELT
Caution
l Never forcefully twist, turn inside out, or bend the
timing belt.
l Do not allow oil or grease on the belt.
1. Replace the timing belt if there is any oil or grease on it.
2. Check the timing belt for damage, wear, peeling, cracks,
and hardening. Replace the timing belt if necessary.
TENSIONER, IDLER
Caution
l Do not clean the tensioner or idler with cleaning
fluids. If necessary, use a soft rag to wipe them
clean, and avoid scratching them.
1. Check the tensioner and idler for smooth rotation and ab-
normal noise. Replace the tensioner or idler if necessary,
TENSIONER SPRING
1. Measure the free length of the tensioner spring. Replace
the tensioner spring if necessary.
Free length: 64.0mm (2.520 in)
PULLEY
Timing Belt Pulley, Camshaft Pulley
Caution
l Do not clean the pulleys with cleaning fluids. If
necessary, use a soft rag to wipe them clean, and
avoid scratching them.
1. Inspect the pulley teeth for wear, deformation, and other damage. Replace the pulley if necessary.
Bl-65
Page 116 of 1164

ASSEMBLY
TIMING BELT
Torque Specifications
78-l 1 N-m (80-l 10 -kg, 69-95 in-lb)
12-17 (1.25-1.75, 109-152) N-m (m-kg, Mb)
03UOBl-15 2
Timing Belt Tensioner
1. Install the tensioner and the tensioner spring.
2. Temporarily secure the tensioner with the spring fully ex-
tended.
Timing Belt
1. Verify that the timing belt pulley mark is aligned with the tim-
ing mark.