belt MAZDA PROTEGE 1992 Owner's Guide
[x] Cancel search | Manufacturer: MAZDA, Model Year: 1992, Model line: PROTEGE, Model: MAZDA PROTEGE 1992Pages: 1164, PDF Size: 81.9 MB
Page 117 of 1164

ASSEMBLY Bl
CYLINDER HEAD
MARKS
03UOBl-15!
TENSION
SIDE
03UOBl-15
03UOBl-15
03UOBl-158
I
98 N
(10 kg, 22 lb)
1
03UOBl-159
2. Verify that the camshaft pulley marks are aligned with the
cylinder head cover marks.
3. Install the timing belt so that there is no looseness at the
tension side.
Caution
l Do not turn the crankshaft counterclockwise.
4. Turn the crankshaft two turns clockwise, and align the tim-
ing belt pulley mark with the timing mark.
5. Verify that the camshaft pulley marks are aligned with the
cylinder head cover mark.
if not aligned, remove the timing belt and repeat from ten-
sioner installation.
6. Loosen the tensioner lock bolt to apply tension to the tim-
ing belt.
Caution
l Be sure not to apply tension other than that of the
tensioner spring.
7. Tighten the tensioner lock bolt.
Tightening torque:
19-25 N#m (1.9-2.6 m-kg, 14-19 ft-lb)
8. Turn the crankshaft 2 turns clockwise and verify that the
timing marks are correctly aligned.
9. Measure the timing belt deflection by applying moderate
pressure (96 N, 10 kg, 22 lb) midway between the crank-
shaft pulley and the camshaft pulley.
If the timing belt deflection is not correct, temporarily se-
cure tensioner lock bolt so the spring is fully extended and
repeat steps 4-8 above or replace the tensioner spring.
Deflection:
11 .O-13.0mm (0.43-0.51 In) at 96 N (10 kg, 22 lb)
Bl-87
Page 118 of 1164

Bl ASSEMBLY
1IMING
COVER
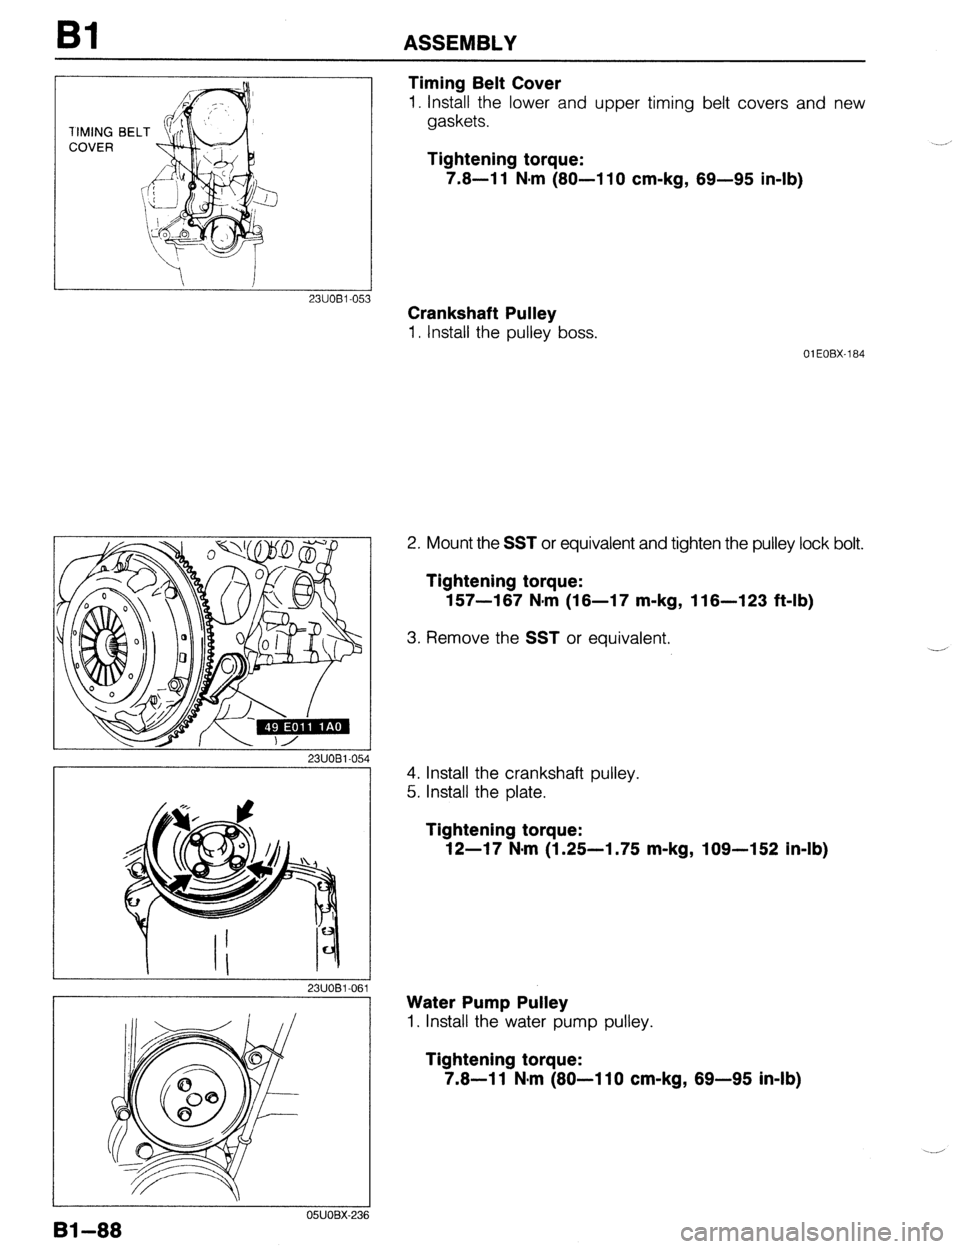
Timing Belt Cover
1. Install the lower and upper timing belt covers and new
gaskets.
Tightening torque:
7.8-l 1 N-m (80-l 10 cm-kg, 69-95 in-lb)
Crankshaft Pulley
1. Install the pulley boss.
01 EOBX-164
2. Mount the SST or equivalent and tighten the pulley lock bolt.
Tightening torque:
157-167 N,m (16-17 m-kg, 116-123 ft-lb)
3. Remove the SST or equivalent,
4. Install the crankshaft pulley.
5. Install the plate.
Tightening torque:
12-17 N*m (1.25-l .75 m-kg, 109-152 in-lb)
Water Pump Pulley
1. Install the water pump pulley.
Tightening torque:
7.8-11 N,m (80-110 cm-kg, 69-95 in-lb)
I
I OSJOBX-236
Bl-88
Page 119 of 1164

ASSEMBLY Bl
AUXILIARY PARTS
Torque Specifications
DRIVE BELT
INSTALLATION
PAGE Bl-6 19-25 (1.9-2.6, 14-19)
w-113 (9.5-11.5, 69-83) I _______ _ - ..- - -,
(3.8-5.3, 27-38)
19-25 Il.9-2.8. 14- 37-63 (3.8-6.4, 27-46)
15-23 (1.5-2.3, 11-17)
N.m (m-kg, ft-It
OWOBX-2
03UOBl.16
Engine Hanger
1. Install the front and rear engine hangers.
Tightening torque
Front: 37-63 N-m (3.8-6.4 m-kg, 27-46 ft-lb)
Rear: 19-25 N.m (1.9-2.6 m-kg, 14-19 ft-lb)
81-89
Page 120 of 1164

Bl ASSEMBLY
05UOBX-24:
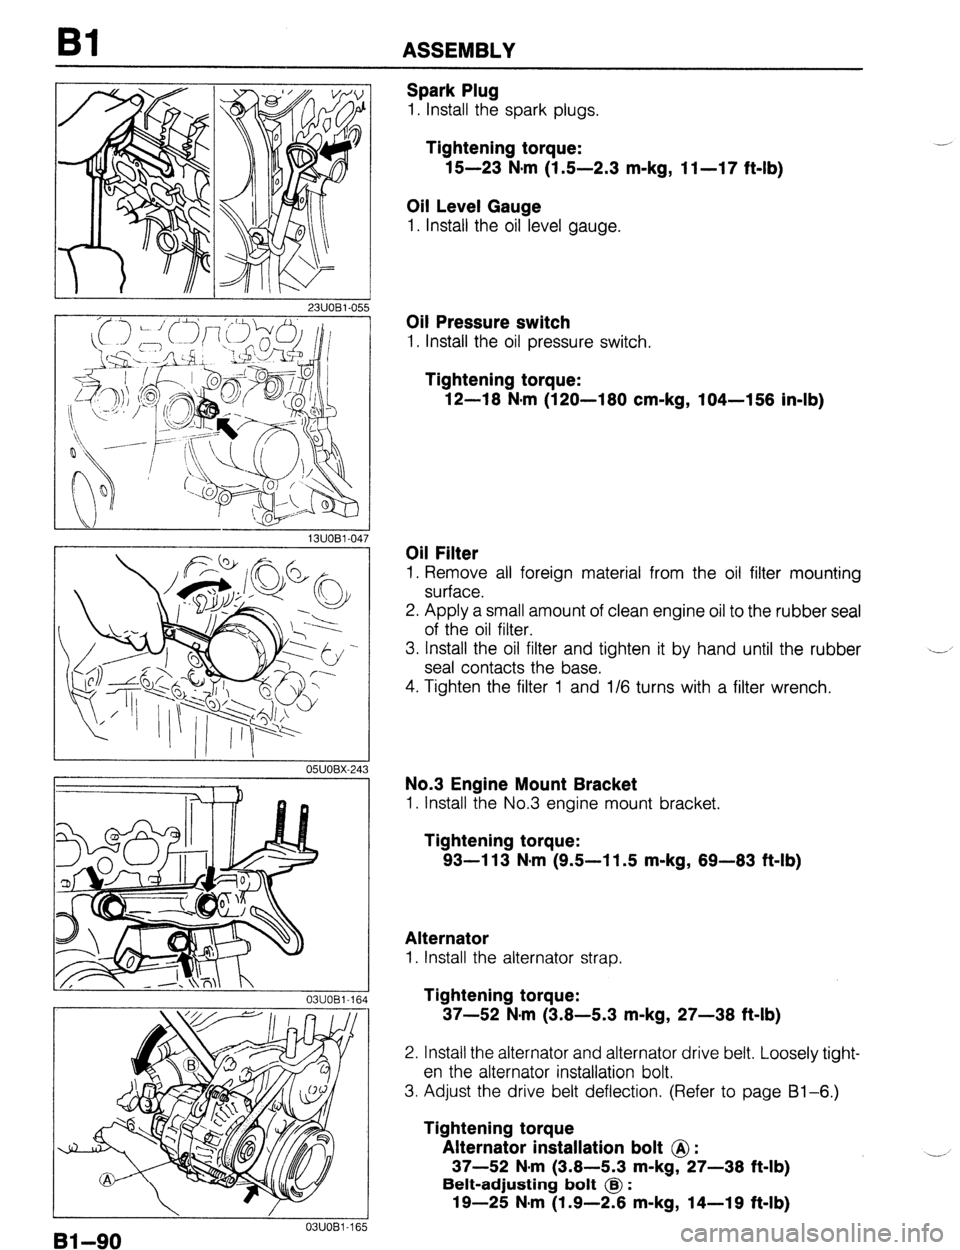
Spark Plug
1. Install the spark plugs.
Tightening torque:
15-23 N*m (1.5-2.3 m-kg, 1 I-17 ft-lb)
Oil Level Gauge
1. Install the oil level gauge.
Oil Pressure switch
1. Install the oil pressure switch.
Tightening torque:
12-18 N-m (120-180 cm-kg, 104-158 in-lb)
Oil Filter
1. Remove all foreign material from the oil filter mounting
surface.
2. Apply a small amount of clean engine oil to the rubber seal
of the oil filter.
3. Install the oil filter and tighten it by hand until the rubber
seal contacts the base.
4. Tighten the filter 1 and l/6 turns with a filter wrench.
No.3 Engine Mount Bracket
1. Install the No.3 engine mount bracket.
Tightening torque:
93-l 13 N-m (9.5-l 1.5 m-kg, 89-83 ft-lb)
Alternator
1. Install the alternator strap.
Tightening torque:
37-52 N#m (3.8-5.3 m-kg, 27-38 ft-lb)
2. Install the alternator and alternator drive belt. Loosely tight-
en the alternator installation bolt.
3. Adjust the drive belt deflection. (Refer to page Bl-6.)
Tightening torque
Alternator installation bolt @ :
37-52 N-m (3.8-5.3 m-kg, 27-38 ft-lb)
Belt-adjusting bolt @ :
19-25 N#m (1.9-2.8 m-kg, 14-19 f&lb) --’ I
I 0311081-165
Bl-90
Page 131 of 1164

INSTALLATION Bl
I I
03UOBl-193
03UOBl-19
1
PULLEY
P/S AND A/C
OWOBl-19
03UOBl-15
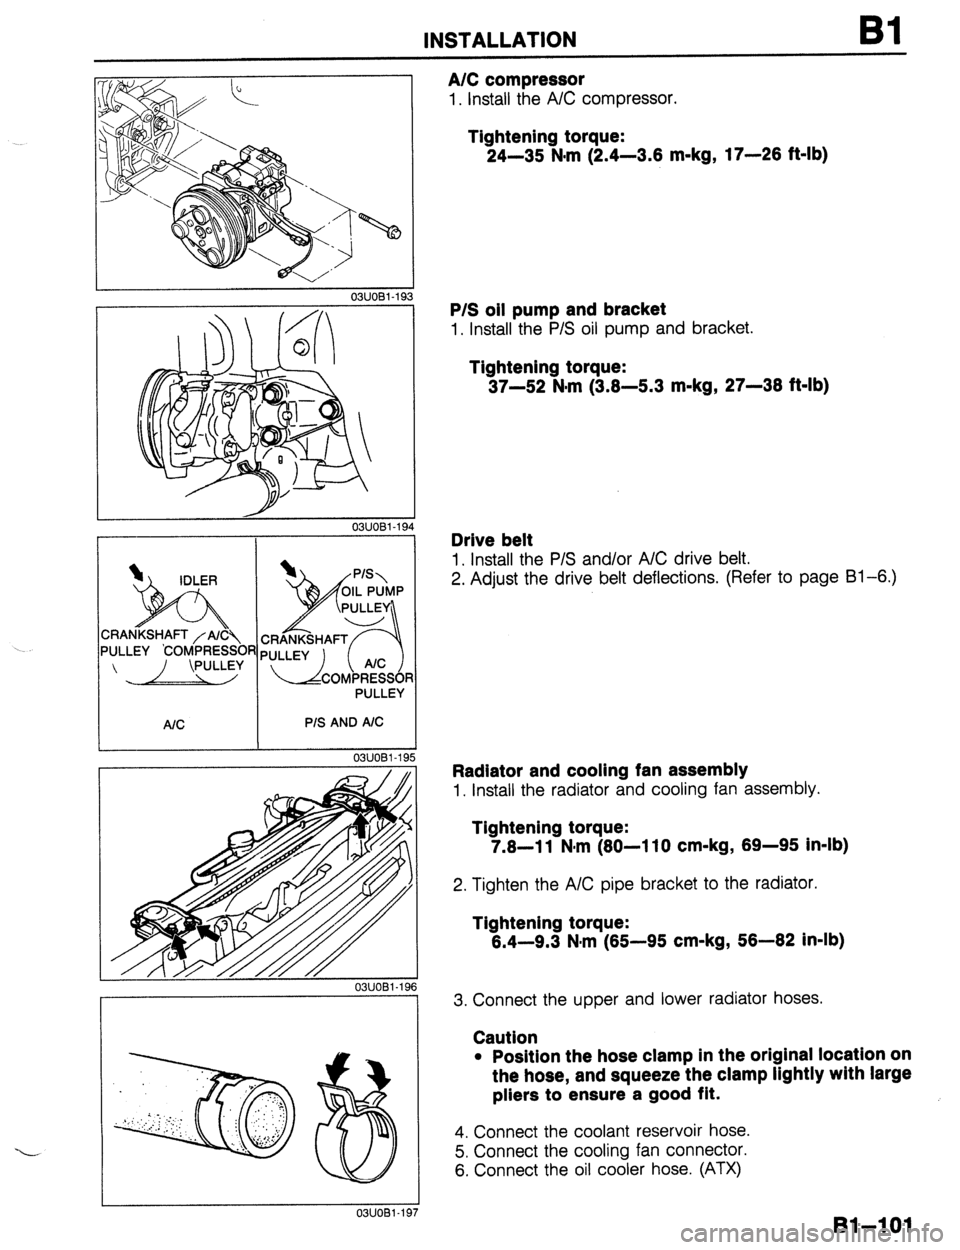
A/C compressor
1. Install the A/C compressor.
Tightening torque:
24-35 N-m (2.4-3.6 m-kg, 17-26 ft-lb)
P/S oil pump and bracket
1. Install the P/S oil pump and bracket.
Tightening torque:
37-52 N-m (3.6-5.3 m-kg, 27-36 ft-lb)
Drive belt
1. Install the P/S and/or A/C drive belt.
2. Adjust the drive belt deflections. (Refer to page Bl-6.)
Radiator and cooling fan assembly
1. Install the radiator and cooling fan assembly.
Tightening torque:
7.6-11 N#m (60-110 cm-kg, 69-95 in-lb)
2. Tighten the A/C pipe bracket to the radiator.
Tightening torque:
6.4-9.3 N*rn (65-95 cm-kg, 56-62 in-lb)
3. Connect the upper and lower radiator hoses.
Caution
l Position the hose clamp in the original location on
the hose, and squeeze the clamp lightly with large
pliers to ensure a good fit.
4. Connect the coolant reservoir hose.
5. Connect the cooling fan connector.
6. Connect the oil cooler hose. (ATX)
Bl-=lOl
Page 133 of 1164

82
ENGINE
m :
(DOHC)
INDEX .......................................... B2- 2
OUTLINE ...................................... B2- 3
SPECIFICATIONS ........................ B2- 3
TROUBLESHOOTING GUIDE .......... B2- 3
ENGINE TUNE-UP PROCEDURE ......
B2- 5
PREPARATION ............................
B2- 5
ENGINE OIL ............................... B2- 5
ENGINE COOLANT.. ....................
B2- 5
DRIVE BELT ............................... B2- 5
HLA .......................................... B2- 7
IGNITION TIMING, IDLE SPEED ..... B2- 8
COMPRESSION ............................. 82-l 0
INSPECTION ...............................
82-l 0
ON-VEHICLE MAINTENANCE.. ........ 82-l 1
PREPARATION ............................
B2-11
TIMING BELT .............................. 82-l 2
CYLINDER HEAD GASKET ...........
82-16
HLA .......................................... 82-22
FRONT OIL SEAL.. ......................
62-26
REAR OIL SEAL .......................... 82-28
REMOVAL ..................................... 82-31
PROCEDURE .............................. 82-31
ENGINE STAND MOUNTING.. .........
82-38
PREPARATION ............................ 82-38
PROCEDURE ..............................
82-39
DISASSEMBLY .............................. 82-41
PREPARATION ............................ B2-41
AUXILIARY PARTS.. ..................... 82-42
TIMING BELT ..............................
82-43
CYLINDER HEAD.. ...................... 82-45
CYLINDER BLOCK
(EXTERNAL PARTS) ...................
B2-48
CYLINDER BLOCK
(INTERNAL PARTS). ................... 82-51 INSPECTION / REPAIR.. ................. 82-54
PREPARATION ............................ 82-54
CYLINDER HEAD.. ...................... B2-54
VALVE MECHANISM.. .................. 82-55
CAMSHAFT ................................ B2-58
HLA .......................................... 82-80
CYLINDER BLOCK ...................... 82-60
OIL JET ..................................... B2-61
PISTON, PISTON RING, AND
PISTON PIN .............................. 82-62
CONNECTING ROD.. ...................
82-63
CRANKSHAFT ............................ B2-64
BEARING ................................... 82-64
TIMING BELT ..............................
82-65
TENSIONER, IDLER.. ................... 82-65
TENSIONER SPRING ................... 82-65
PULLEY ..................................... 82-65
ASSEMBLY ................................... B2-66
PREPARATION ............................ B2-66
CYLINDER BLOCK
(INTERNAL PARTS). ................... 82-68
CYLINDER BLOCK
(EXTERNAL PARTS) ................... 82-73
CYLINDER HEAD.. ...................... 82-79
TIMING BELT .............................. 82-84
AUXILIARY PARTS.. .....................
B2-87
ENGINE STAND DISMOUNTING ..a” . . 82-91
PROCEDURE ..............................
82-91
INSTALLATION ............................. 82-93
PROCEDURE .............................. 82-93
23UOB2-001
Page 134 of 1164

82 INDEX
NDEX
COMPRESSION INSPECTION, PAGE 92-10
STANDARD: 1,256 kPa (12.8 kg/cm2, 182 psi)-300 rpm
MINIMUM: 883 kPa (9.0 kg/cm2, 128 psi)-300 rpm
INTAKE MANIFOLD
TIGHTENING TORQUE
*(I-I)* hl.m I, (I-0 c m.h.
DRIVE BELT
ADJUSTMENT, PAGE 82-6 TIGHTENIF
36-46 N.m (3.9-4.7 rlG TORQUE
m-kg, 26-34 ft-lb)
JEFLECTION
mm (in)
DRIVE BELT
New Used Limit
ALTERNATOR
8.0-9.0 (0.31-0.35) 9.0-10.0 (0.35-0.39)
12.5 (0.49)
PIS, PIS + AIC 8.0-9.0 (0.31-0.35) 9.0-10.0 (0.35-0.39)
11.5 (0.45)
23UOB2-00:
1. Timing belt
6. Engine
Removal I Installation..
..............
page 62-l 2 Removal ...................................
page 82-31
2. Cylinder head gasket
Engine stand mounting..
.......... page 82-38
Replacement ............................
page B2-16 Disassembly
.............................
page 82-41
3. HLA
Inspection / Repair.. ..................
page B2-54
Removal / Installation
................ page
82-22 Assembly ..................................
page B2-66
4. Front oil seal
Engine stand dismounting
....... page 62-91
Replacement
page 82-26 Installation..
.-- ............................
............................... page 62-93
5. Rear oil seal
Replacement ............................
page 82-28
82-2
Page 135 of 1164

OUTLINE, TROUBLESHOOTING GUIDE
OUTLINE
SPECIFICATIONS
ItC- Engine
BP DOHC
Type Gasoline, 4-cycle
Cylinder arrangement and number In-line, 4 cylinders
Combustion chamber Pentroof
Valve svstem DOHC, belt-driven 16 valves
Displacement
Bore and stroke cc (cu in) 1,839 (112.2)
mm (in) I 83.0 x 85.0 (3.27 x 3.35)
Compression ratio
Compression pressure
IN
Valve timing
EX kPa (kg/cm*, psi)-rpm
BTDC Open
Close ABDC
Open BBDC
Close ATDC 9.0
1,256 (12.8, 182)300
!zJ”
48O
56O
140
Valve clearance IN 0: Maintenance-free
mm (in)
EX 0: Marntenance-free
Idle speed *’ *’ MTX
rpm
ATX
Ignition timing*2
Firing order
::...With parking brake applied. (Canada)
. ..TEN terminal of diagnosis connector grounded BTDC 700-800
700-800 (P range)
90-l 1 O
l-3-4-2
P3UOBZ003
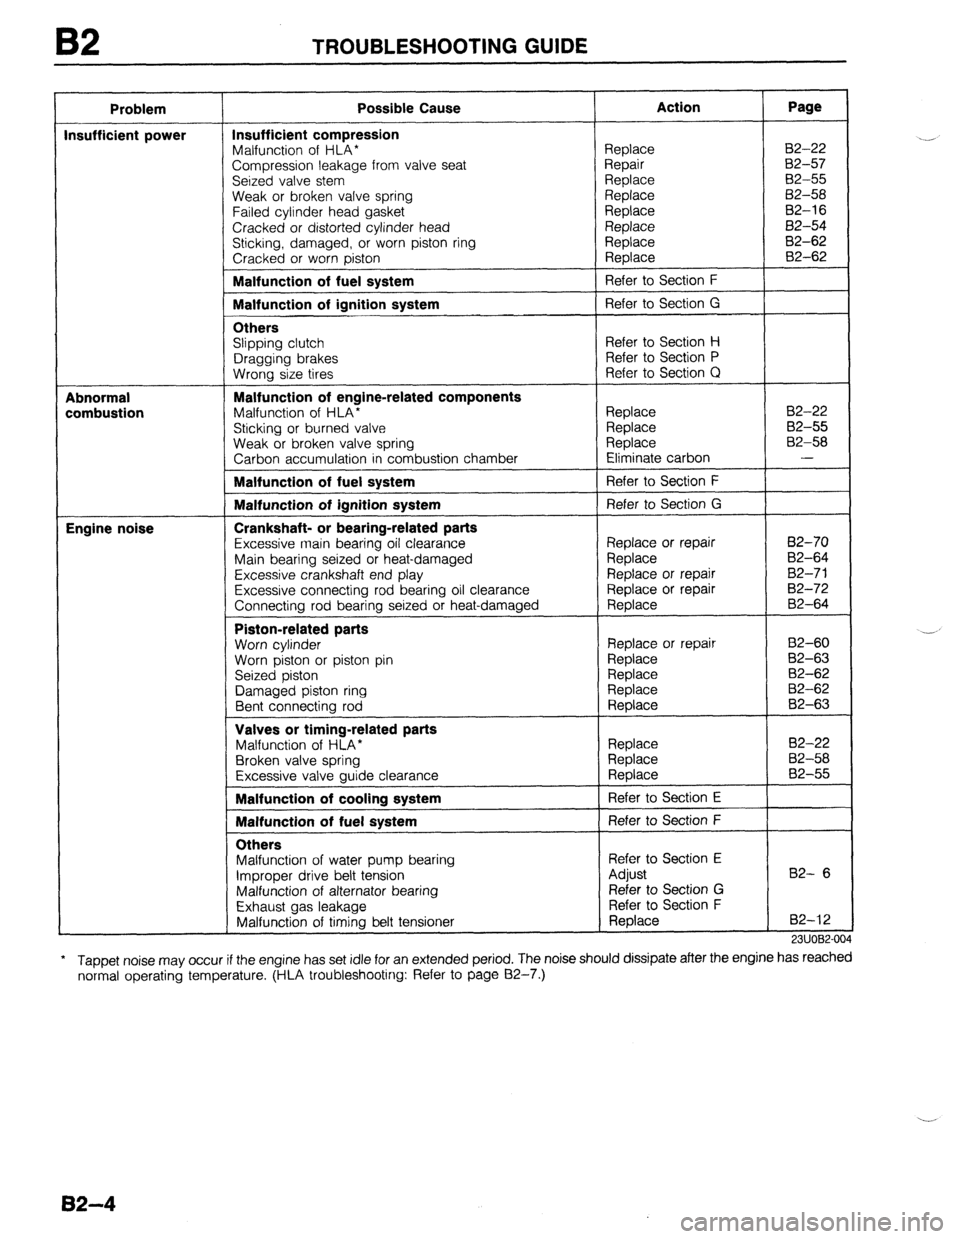
TROUBLESHOOTING GUIDE
Problem
Difficult starting
Poor idling
Excessive oil
consumption Possible Cause
Malfunction of engine-related components
Burned valve
Worn piston, piston ring, or cylinder
Failed cylinder head gasket
Malfunction of fuel system
Malfunction of ignition system
Malfunction of engine-related components
Malfunction of HLA*
Poor valve-to-valve seat contact
Failed cylinder head gasket
Malfunction of fuel system
Malfunction of ignition system
Oil working up
Worn piston ring groove or sticking piston ring
Worn oiston or cvlinder
Oil working down
Worn valve seal
Worn valve stem or auide
Oil leakaae i
Replace 82-55
Replace or repair 92-60, 62
Reolace B2-16
Refer to Section F
I
Replace 82-47, 79
Replace 82-55
Refer to Section 0 I
82-3
Page 136 of 1164

B2 TROUBLESHOOTING GUIDE
Problem
Insufficient power
Abnormal
combustion
Engine noise -
I
I
f
,
I
I
,
I
I Possible Cause Action Page
Insufficient compression
Malfunction of HLA*
Compression leakage from valve seat
Seized valve stem
Ueak or broken valve spring
Failed cylinder head
gasket Cracked or distorted cylinder head
Sticking, damaged, or worn piston ring
Cracked or worn piston Replace
Repair
Replace
Replace
Replace
Replace
Replace
Replace
Refer to Section F 82-22
82-57
02-55
B2-58
82-16
82-54
82-62
82-62 Malfunction of fuel system
Malfunction of ianition svstem
Others
Slipping clutch
Dragging brakes
Wrong size tires Malfunction of engine-related components
Malfunction of HLA*
Sticking or burned valve
Weak or broken valve spring
Carbon accumulation in combustion chamber Malfunction of fuel system
Malfunction of ignition system
Crankshaft- or bearing-related parts
Excessive main bearing oil clearance
Main bearing seized or heat-damaged
Excessive crankshaft end play
Excessive connecting rod bearing oil clearance
Connecting rod bearing seized or heat-damaged Piston-related parts
Worn cylinder
Worn piston or piston pin
Seized piston
Damaged piston ring
Bent connecting rod Valves or timing-related parts
Malfunction of HLA*
Broken valve spring
Excessive valve guide clearance Malfunction of cooling system
Malfunction of fuel svstem
Others
Malfunction of water pump bearing Refer to Section E
Improper drive belt tension Adjust
Malfunction of alternator bearing Refer to Section G
Exhaust gas leakage Refer to Section F
Malfunction of timing belt tensioner Replace Refer to Section G
Refer to Section H
Refer to Section P
Refer to Section C!
Replace B2-22
Replace 82-55
Replace 82-58
Eliminate carbon -
Refer to Section F
Refer to Section G
Replace or repair B2-70
Replace 82-64
Replace or repair 82-7 1
Replace or repair B2-72
Replace B2-64
Replace or repair
82-60
Replace 82-63
Replace 82-62
Replace 82-62
Replace 82-63
Replace
Replace
Replace
Refer to Section E
Refer to Section F 82-22
82-58
82-55
B2- 6
82-12
23UOB2-00,
..J
.-,
l
Tappet noise may occur if the engine has set idle for an extended period. The noise should dissipate after the engine has reached
normal operating temperature. (HLA troubleshooting: Refer to page 82-7.)
82-4
Page 137 of 1164

ENGINE TUNE-UP PROCEDURE 82
ENGINE TUNE-UP PROCEDURE
PREPARATION
SST
49 BO19 9AO
drive belt tension
23UOB2-048
OBUOBX-158
I’ ,
OSJOBX-001
V BELT
V RIBBED BELT
_
x 0 x
3
L
03UOB2-005
ENGINE OIL
Inspection
1. Be sure the vehicle is on level ground.
2. Warm up the engine to normal operating temperature and
stop it.
3. Wait for 5 minutes.
4. Remove the oil level gauge and check the oil level and con-
dition.
5. Add or replace oil if necessary.
Note
l The distance between the L and F marks on the level
gauge represents 0.8 liter (0.85 US qt, 0.70 Imp qt).
ENGINE COOLANT
Inspection
Coolant level (engine cold)
Warning
l Never remove the radiator cap while the engine is
hot.
l Wrap a thick cloth around the cap when removing it.
1. Verify that the coolant level is near the radiator filler neck.
2. Remove the coolant level gauge and check the coolant level.
3. Add coolant if necessary.
Coolant quality
1. Verify that there is no buildup of rust or scale around the
radiator cap or radiator filler neck.
2. Verify that the coolant is free of oil.
3. Replace the coolant if necessary.
DRIVE BELT
Inspection
1. Check the drive belts for wear, cracks, and fraying. Replace
if necessary.
2. Verify that the drive belts are correctly mounted on the
pulleys.
B2-5