lock MAZDA PROTEGE 1992 Owner's Guide
[x] Cancel search | Manufacturer: MAZDA, Model Year: 1992, Model line: PROTEGE, Model: MAZDA PROTEGE 1992Pages: 1164, PDF Size: 81.9 MB
Page 88 of 1164
Bl INSPECTION / REPAIR
r
BP SPHC
I /
._~~ ~_ ’
--
23UOB1-06(
1
I 2-l
_I_
23UOBl-074
lt- OUT-OF-SQUARE
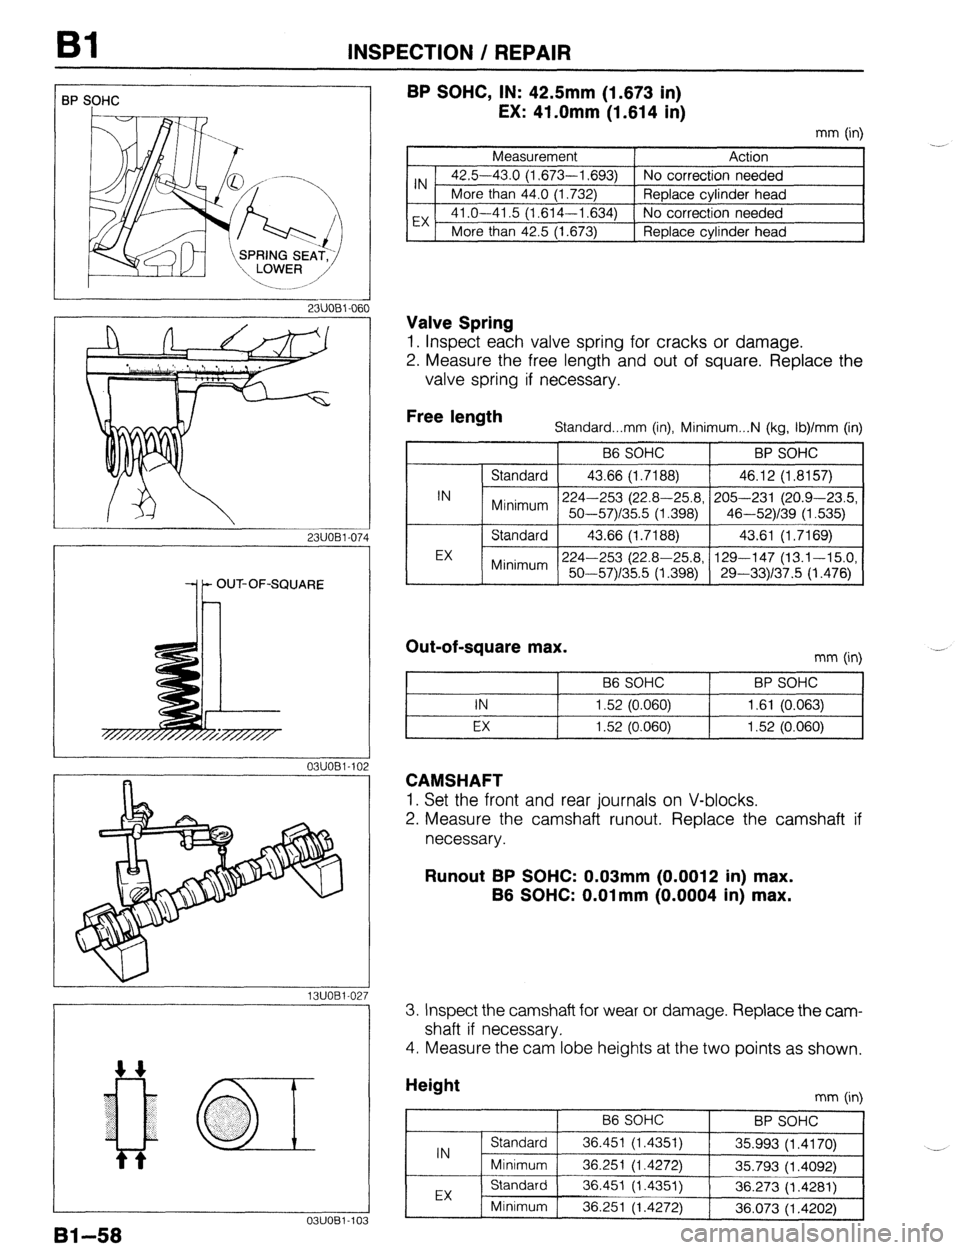
BP SOHC, IN: 42.5mm (1.673 in)
EX: 41 .Omm ‘(1.614 ii)
mm (in)
Measurement Action
IN . 42.5-43.0 (1,673-l ,693) No correction needed
More than 44.0 (1.732) Replace cylinder head
EX 41 .O-41.5 (1,614-l ,634) No correction needed
More than 42.5 (1.673) Replace cylinder head
Valve Spring
1. Inspect each valve spring for cracks or damage.
2. Measure the free length and out of square. Replace the
valve spring if necessary.
Free length
Standard...mm (in), Minimum...N (kg, Ib)/mm (in)
B6 SOHC BP SOHC
I
IN Standard 43.66 (1.7188) 46.12 (1.8157)
224-253 (22.8-25.8, 205-231 (20.9-23.5,
Minimum 50-57)/35.5 (1.398) 46-52)/39 (1.535)
EX Standard 43.66 (1.7188) 43.61 (1.7169)
224-253 (22.8-25.8, 129-147 (13.1-15.0,
Minimum 50-57Y35.5 (1.398) 29-331137.5 (1.476)
Out-of-square max. mm (in)
B6 SOHC BP SOHC I
I I IN 1.52 (0.060) 1.61 (0.063)
t I I
I I EX 1.52 (0.060) 1.52 (0.060)
CAMSHAFT
1. Set the front and rear journals on V-blocks.
2. Measure the camshaft runout. Replace the camshaft if
necessary.
Runout BP SOHC: 0.03mm (0.0012 in) max.
B6 SOHC: O.Olmm (0.0004 in) max.
13UOBl.02; 3. Inspect the camshaft for wear or damage. Replace the cam-
shaft if necessary.
4. Measure the cam lobe heights at the two points as shown.
0311081-103
91-58
mm (in)
Page 90 of 1164
Bl INSPECTION / REPAIR
a3
03UOBl.109
03UOBl-11t
03UOBl-111 i
3
03UOBl-112
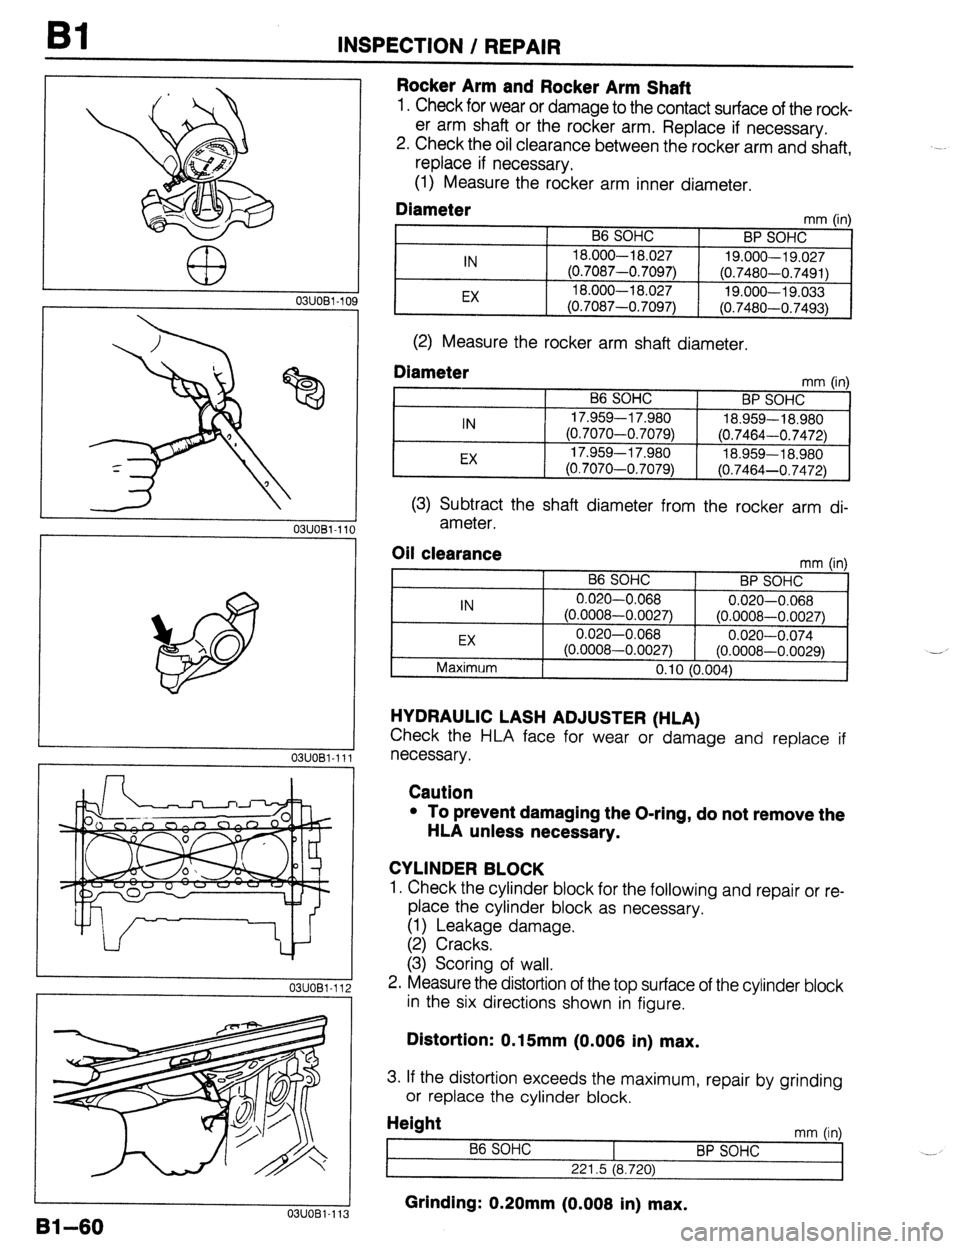
Rocker Arm and Rocker Arm Shaft
1. Check for wear or damage to the contact surface of the rock-
er arm shaft or the rocker arm. Replace if necessary.
2. Check the oil clearance between the rocker arm and shaft,
replace if necessary.
(1) Measure the rocker arm inner diameter.
Diameter mm (in)
B6 SOHC
BP SOHC
IN 18.000-l 8.027
19.000-19.027
(0.7087-0.7097)
(0.7480-0.7491)
EX 18.000-l 8.027
19.000-19.033
(0.7087-0.7097) (0.7480-0.7493)
(2) Measure the rocker arm shaft diameter.
Diameter mm tin1
IN
EX B6 SOHC
BP SOHC ’ ’
17.959-l 7.980
18.959-18.980
(0.7070-0.7079)
(0.7464-0.7472)
17.959-l 7.980
18.959-l 8.980
(0.7070-0.7079)
(0.7464-0.7472)
(3) Subtract the shaft diameter from the rocker arm di-
ameter.
Oil clearance
IN
EX
Maximum mm (in)
B6 SOHC
BP SOHC
0.020-0.068
0.020-0.068
(0.0008-0.0027) (0.0008-0.0027)
0.020-0.068
0.020-0.074
(0.0008-0.0027) (0.0008-0.0029)
0.10 (0.004) -_
HYDRAULIC LASH ADJUSTER (HLA)
Check the HLA face for wear or damage and replace if
necessary.
Caution
l To prevent damaging the O-ring, do not remove the
HLA unless necessary.
CYLINDER BLOCK
1. Check the cylinder block for the following and repair or re-
place the cylinder block as necessary.
(1) Leakage damage.
(2) Cracks.
(3) Scoring of wall.
2. Measure the distortion of the top surface of the cylinder block
in the six directions shown in figure.
Distortion: 0.15mm (0.006 in) max.
3. If the distortion exceeds the maximum, repair by grinding
or replace the cylinder block.
Height
t mm (in)
86 SOHC
BP SOHC _._
221.5 (8.720)
Grinding: 0.20mm (0.006 in) max. U3UU81-113
Page 94 of 1164
INSPECTION / REPAIR
05UOBX-1E
X
8 Y
03UOBl-21
CRANKPIN
MAIN JOURNAL
03UOBl-21
BP SOHC .r -
FILLET ROLL
DO NOT REMOVE FILLET ROLL AREA
WHEN GRINDING
1311081-028
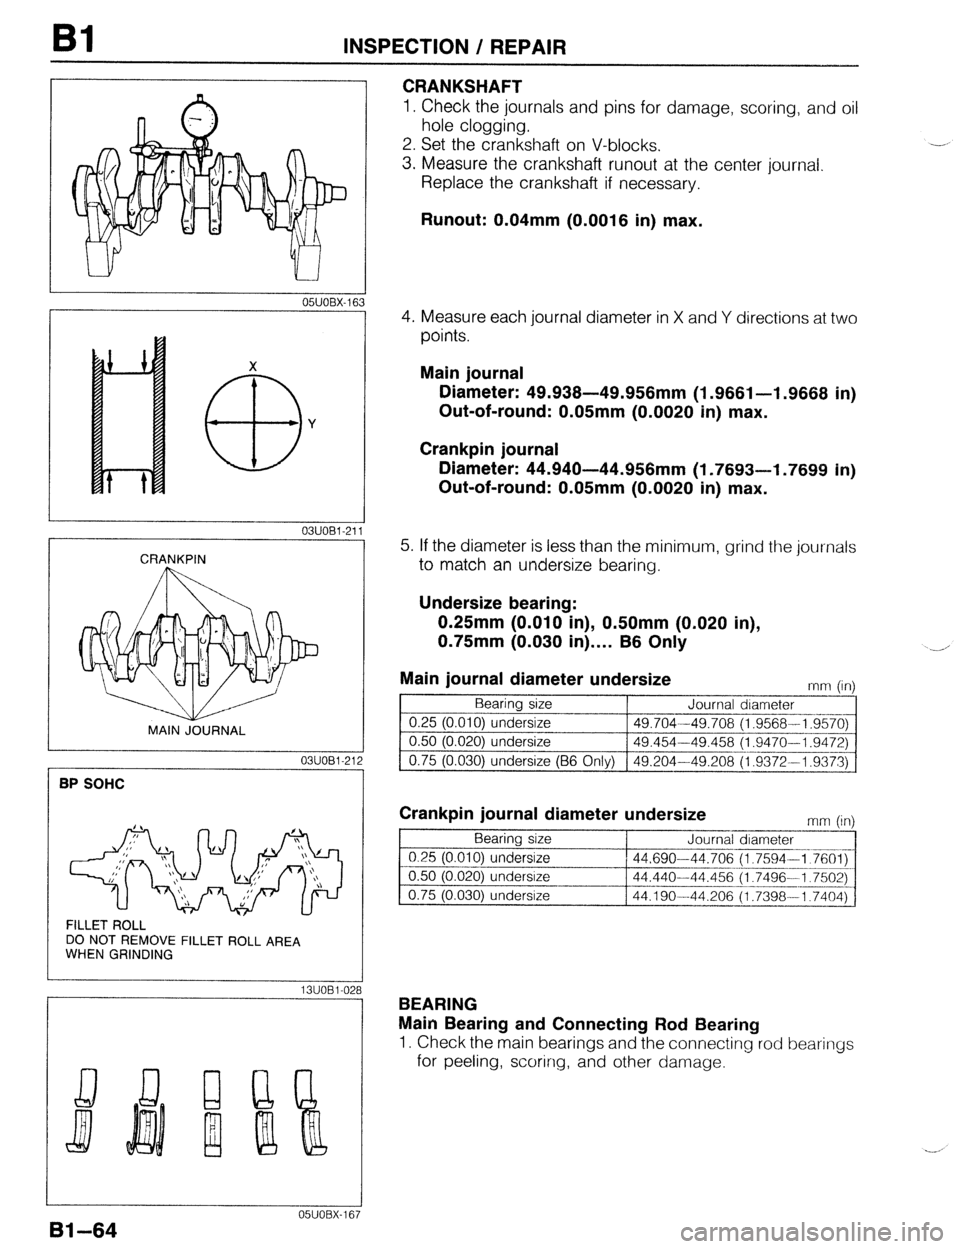
CRANKSHAFT
1. Check the journals and pins for damage, scoring, and oil
hole clogging.
2. Set the crankshaft on V-blocks.
3. Measure the crankshaft runout at the center journal.
Replace the crankshaft if necessary. -.
Runout: 0.04mm (0.0016 in) max.
4. Measure each journal diameter in X and Y directions at two
points.
Main journal
Diameter: 49.938-49.956mm (1.9661-l .9668 in)
Out-of-round: 0.05mm (0.0020 in) max.
Crankpin journal
Diameter: 44.940-44.956mm (1.7693-l .7699 in)
Out-of-round: 0.05mm (0.0020 in) max.
5. If the diameter is less than the minimum, grind the journals
to match an undersize bearing.
Undersize bearing:
0.25mm (0.010 in), 0.50mm (0.020 in),
0.75mm (0.030 in).... B6 Only
Main journal diameter undersize
mm iin) 1. Bearing size Journal diameter
_-.---
0.25 (0.010) undersize 49.704.-49.708 (1.9568-l .9570)
---.-___
0.50 (0.020) undersize 49.454-49.458 (1.9470-l .9472)
0.75 (0.030) undersize (B6 Only) 49.204-49.208(1.9372--l .9373)
Crankpin journal diameter undersize ” ” ” 1” Bearing size Journal diameter
-_ ____~_.
0.25 (0.010) undersize 44.690-44.706
(1.7594 -1 7601) .--.._-.~.--~-.~
0.50
(0.020) underslze 44.440-44.456 (1.7496-I .7502) -- _____----.
0.75 (0.030) undersize 44.190--44.206 (1.7398---i .7404)
BEARING
Main Bearing and Connecting Rod Bearing
1. Check the main bearings and the connecting rod bearings
for peeling, scoring, and other damage.
05UOBX-167
Bl-64
Page 96 of 1164
Bl ASSEMBLY
ASSEMBLY
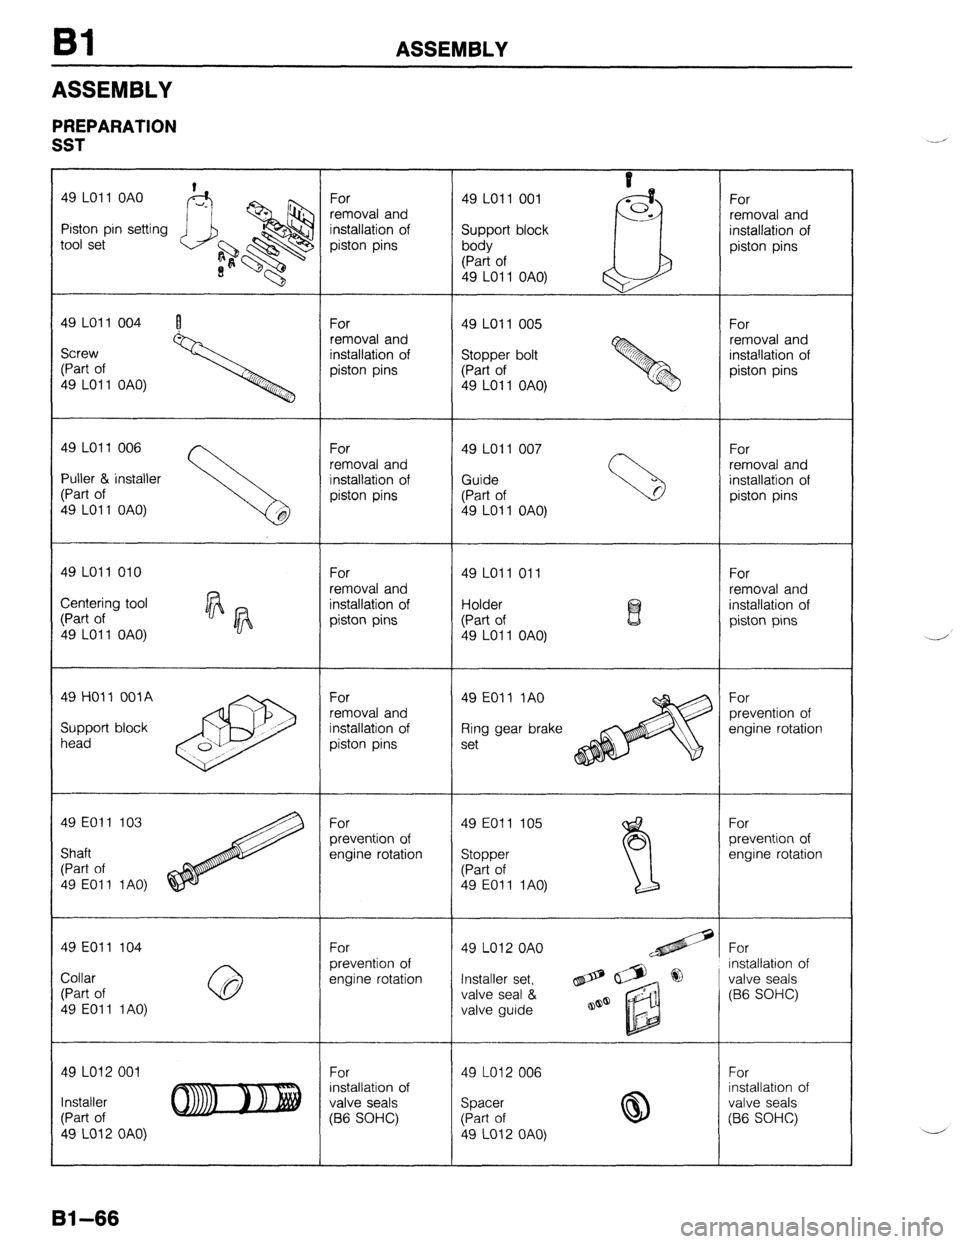
PREPARATION
SST
49 LO1 1 OAO
Piston pin setting
tool set
49 LO1 1 004 I
Screw
(Part of
49 LO1 1 OAO)
49 LO1 1 006
Puller & installer
49 LO1 1 OAO) For
removal and
installation of
piston pins 49 LO11 001
Support block
body
(Part of
49 LO11 OAO)
49 LO1 1 005
Stopper bolt
(Part of
49 LO1 1 OAO)
49 LO1 1 007 For
removal and
installation of
piston pins
For
removal and
installation of
piston pins
Centering tool
49 LO1 1 OAO)
49 HO11 OOlA
Support block
49 EOll 103
49 EOll 104
installation of
Collar
49 LO12 001
installation of
Page 97 of 1164
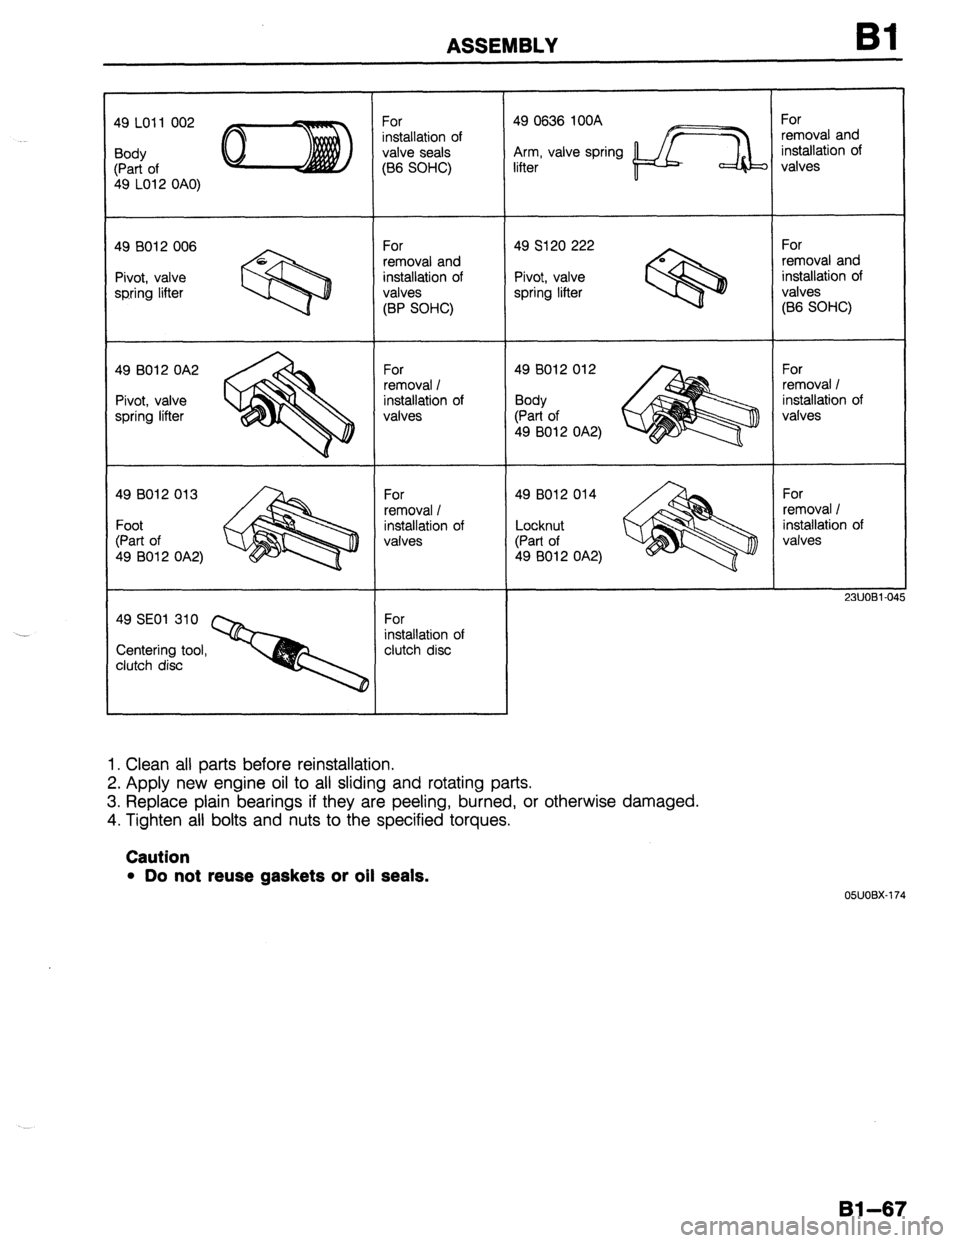
ASSEMBLY Bl
19 LO11 002
Body
:Part of
49 LO12 OAO)
49 8012 006
Pivot, valve
spring lifter
49 8012 OA2
Pivot, valve
spring lifter
49 8012 013
Foot
(Part of
49 B012 OA2)
49 SE01 310
Centering tool,
clutch disc For
installation of
valve seals
(B6 SOHC)
For
removal and
installation of
valves
(BP SOHC)
For
removal I
installation of
valves
For
removal I
installation of
valves
For
installation of
clutch disc 49 0636 1OOA
Arm, valve spring
lifter
49 s120 222
0
Pivot, valve
spring lifter
%
49 8012 012
Body
(Part of
49 8012 OA2)
49 B012 014
Locknut
(Part of
49 8012 OA2)
1. Clean all parts before reinstallation.
2. Apply new engine oil to all sliding and rotating parts.
3. Replace plain bearings if they are peeling, burned, or otherwise damaged.
4. Tighten all bolts and nuts to the specified torques.
Caution
l Do not reuse gaskets or oil seals.
I
3 For
removal and
installation of
valves
For
removal and
installation of
valves
(B6 SOHC)
For
removal I
installation of
valves
For
removal I
installation of
valves
23UOBl-0,
05UOBX-174
Bl-67
Page 98 of 1164
Bl ASSEMBLY
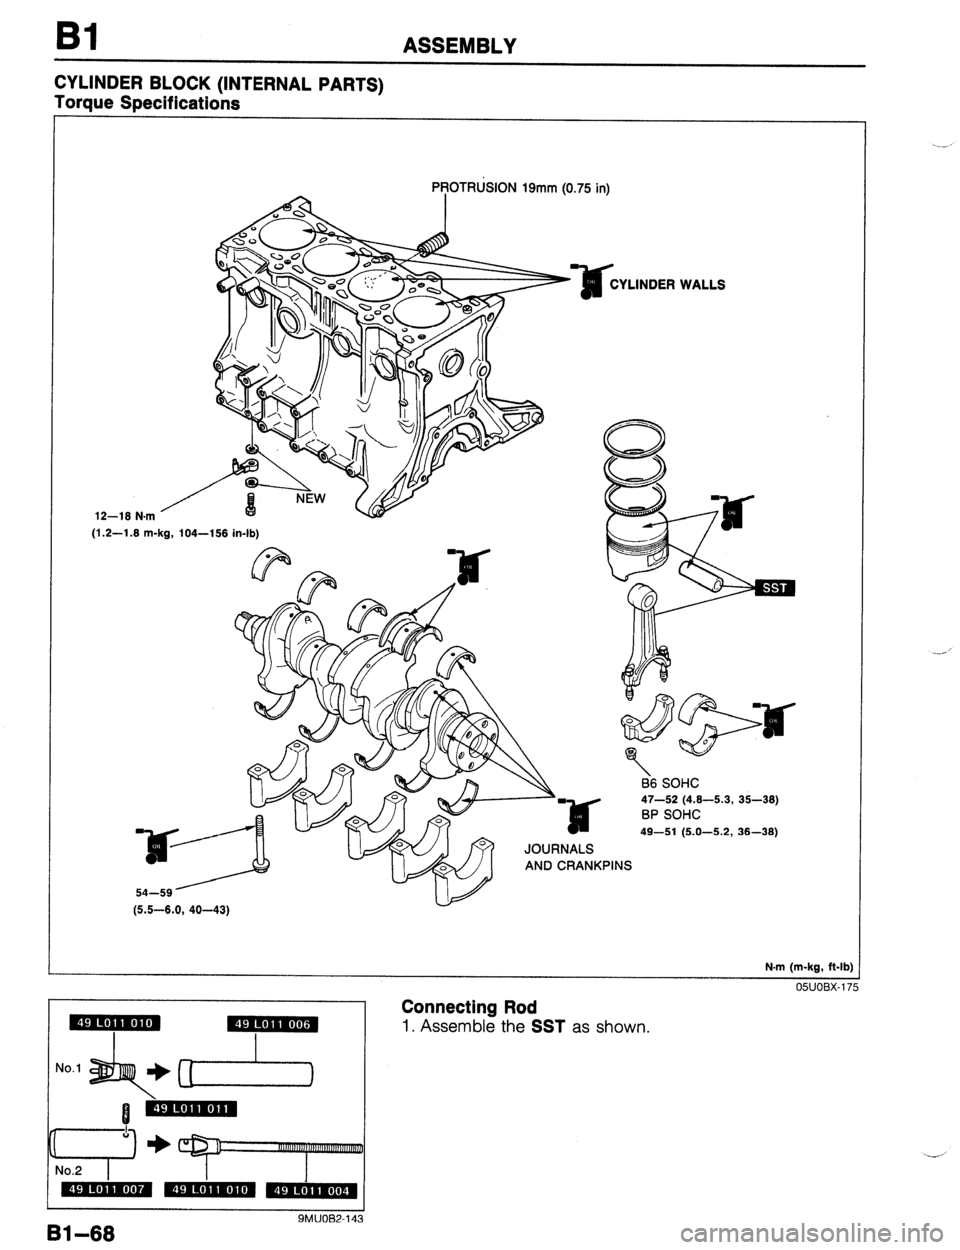
CYLINDER BLOCK (INTERNAL PARTS)
Torque SPecifications
12-18 N.m PROTRLklON 19mm (0.75 in)
YLINDER
(1.2-1.8 m-kg, 104-158 in-lb)
JOURNALS
AND CRANKPINS
(5.5-8.0, 40-43) WALLS
66 SOHC
47-52 (4.8-5.3, 35-38)
BP SOHC
49-51 (5.0-5.2, 36-38)
N.m (m-kg, ft-lb)
05UOBX-171
Connecting Rod
1. Assemble the SST as shown.
9MUOW143
Page 99 of 1164
ASSEMBLY Bl
I-
r
I 03UOBl-12
A NO.1
M
9MUOB2-14 I ‘NDENTIFICATION MARK
03UOBl-02
I
23UOBl-04
05UOBX.179
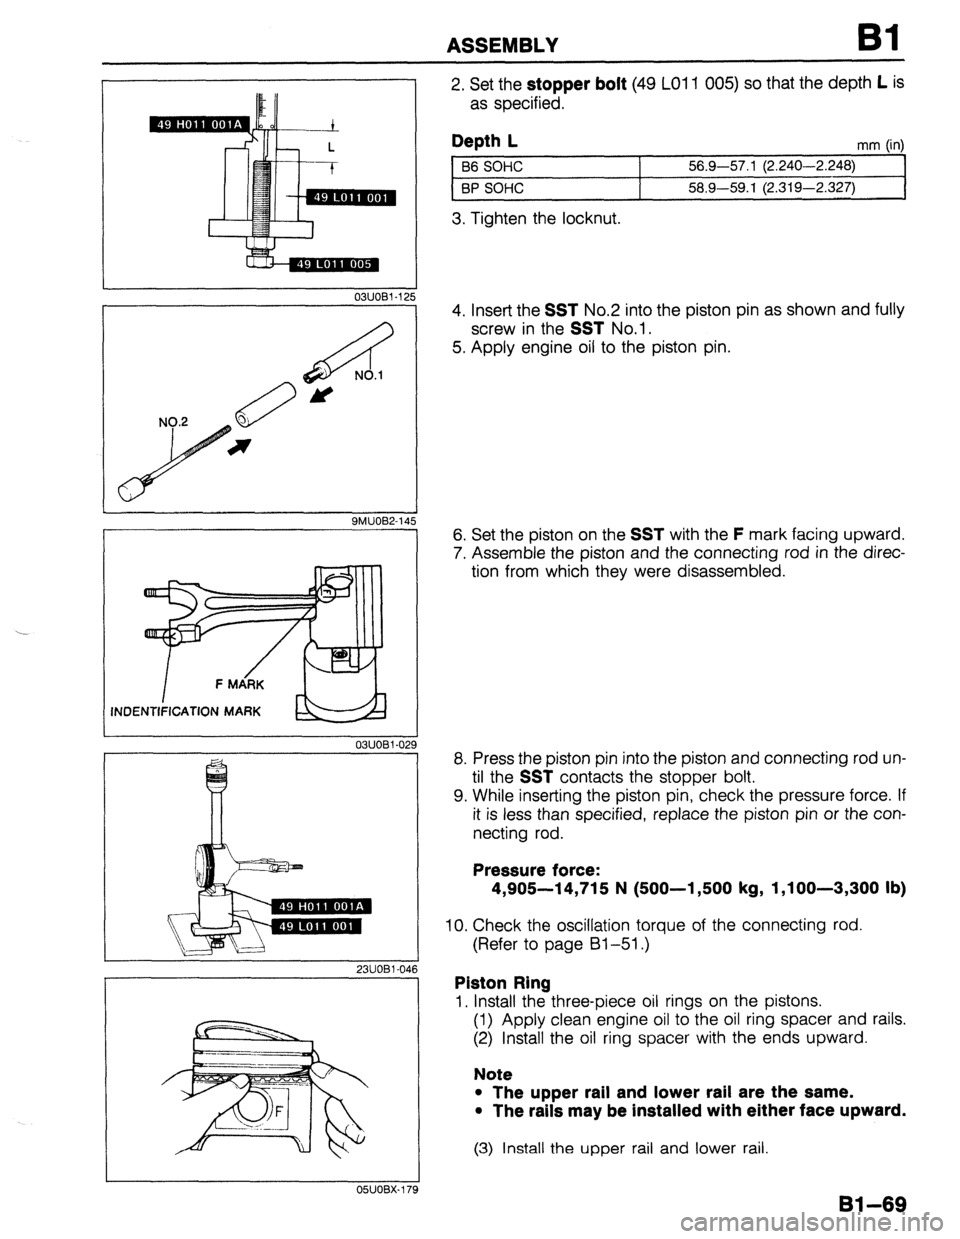
2. Set the stopper bolt (49 LO1 1 005) so that the depth L is
as specified.
Depth L
B6 SOHC
BP SOHC mm (in)
I 56.9-57.1 (2.240-2.248)
58.9-59.1 (2.319-2.327)
3. Tighten the locknut.
4. Insert the
SST No.2 into the piston pin as shown and fully
screw in the
SST No.1.
5. Apply engine oil to the piston pin.
6. Set the piston on the
SST with the F mark facing upward.
7. Assemble the piston and the connecting rod in the direc-
tion from which they were disassembled.
8. Press the piston pin into the piston and connecting rod un-
til the SST contacts the stopper bolt.
9. While inserting the piston pin, check the pressure force. If
it is less than specified, replace the piston pin or the con-
necting rod.
Pressure force:
4,905-14,715 N (500-l ,500 kg, 1 ,lOO-3,300 lb)
10. Check the oscillation torque of the connecting rod.
(Refer to page Bl-51.)
Piston Ring 1,
Install the three-piece oil rings on the pistons.
(1) Apply clean engine oil to the oil ring spacer and rails.
(2) Install the oil ring spacer with the ends upward.
Note
l The upper rail and lower rail are the same.
l The rails may be installed with either face upward. (3) Install the upper rail and lower rail
Bl-69
Page 101 of 1164

ASSEMBLY
f
05UOW18
THRUST BEARING
OYJOBX-18
05UOBX-18
23UOBl-04
OWOBX-181
Crankshaft
1. Before installing the crankshaft, inspect the main bearing
oil clearances as follows.
Oil clearance inspection
(1) Remove all foreign material and oil from the journals and
bearings.
Caution
l Install the grooved upper main bearings in the cyl-
inder block.
l Install the thrust bearings with the oil groove fac-
ing the crankshaft.
(2) Install the upper main bearings and thrust bearings.
(3) Set the crankshaft in the cylinder block.
Caution
l Do not rotate the crankshaft when measurlng the
oil clearances.
(4) Position Plastigage atop the journals in the axial di-
rection.
(5) Install the lower main bearings and the main bearing
caps according to the cap number and + mark.
(6) Tighten the main bearing cap bolts in two or three steps
in the order shown in the figure.
Tightening torque:
54-59 N-m (5.5-6.0 m-kg, 40-43 ft-lb)
(7) Remove the main bearing caps, and measure the P lasti-
gage at each journal at the widest point for the smallest
clearance and at the narrowest point for the largest
clearance.
(8) If the oil clearance exceeds specification, grind the
crankshaft and use undersize main bearings.
(Refer to page Bl-64.)
Oil clearance: 0.016-0.036mm (0.0007-0.0014 in)
Maximum: O.lOmm (0.004 in)
2. Apply a liberal amount of clean engine oil to the main bear-
ings, thrust bearings and main journals.
3. Install the crankshaft and the main bearing caps accord-
ing to the cap number and + mark.
61-71
Page 104 of 1164

Bl ASSEMBLY
CYLINDER BLOCK (EXTERNAL PARTS)
Torque Specifications
19-25
(1.9-2.6, 14-19)
GASKET, NEW
OIL SEAL,
NEW
7.6-11 N.m
(60-l 10 cm-kg,
69-95 in-lb)
GASKET, NE
16-21 (1.6-2.1, 12--15)-j
R
A -22% / 7.6-11 N.m
(60-110 cm-kg, 69-95 in-lb) 6-103 w
,..6-10.6,
71-76) 16-26
(1.6-2.7, 13-20)
7.6-11 N-m
(60-110 cm-kg, 69-95 in-lb)
N.m (m-kg, R-lb)
Bl-74
OWOBX-201 0
Rear Cover
1. Apply a small amount of clean engine oil to the lip of a new
oil seal.
2. Push the oil seal slightly in by hand.
Caution
l The oil seal must be pressed in until it is flush with
the edge of the rear cover.
3. Press the oil seal in evenly with a suitable pipe.
Oil seal outer diameter: 1OOmm (3.94 in)
4. Apply silicone sealant to the shaded area shown in the
figure.
Page 105 of 1164
ASSEMBLY Bl
OWOBX-20
23UOBl-049
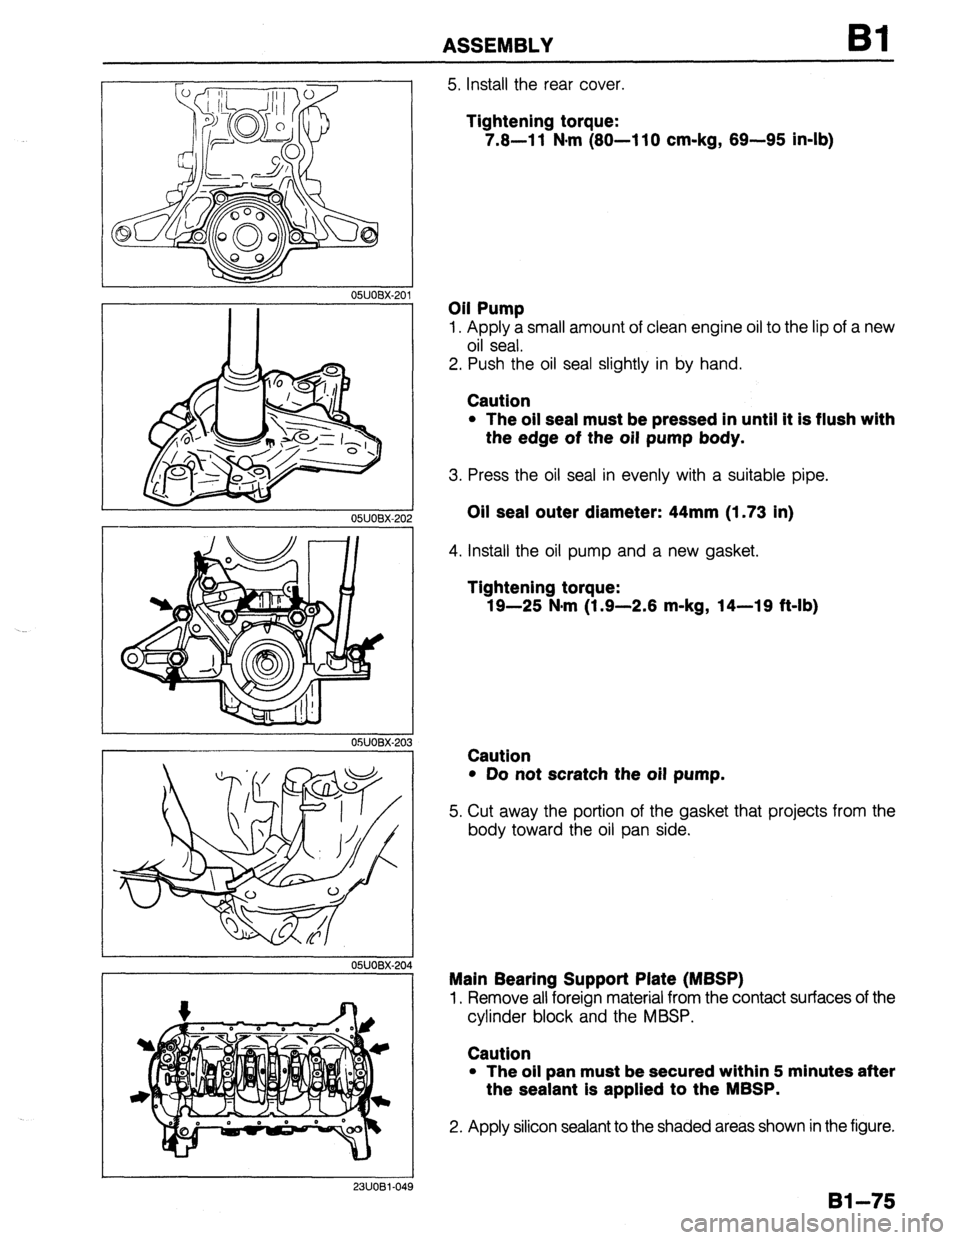
5. Install the rear cover.
Tightening torque:
7.8-l 1 N*m (80-l 10 cm-kg, 89-95 in-lb)
Oil Pump
1. Apply a small amount of clean engine oil to the lip of a new
oil seal.
2. Push the oil seal slightly in by hand.
Caution
l The oil seal must be pressed in until it is flush with
the edge of the oil pump body.
3. Press the oil seal in evenly with a suitable pipe.
Oil seal outer diameter: 44mm (1.73 in)
4. Install the oil pump and a new gasket.
Tightening torque:
19-25 N-m (1.9-2.8 m-kg, 14-19 ft-lb)
Caution
l Do not scratch the oil pump.
5. Cut away the portion of the gasket that projects from the
body toward the oil pan side.
Main Bearing Support Plate (MBSP)
1, Remove all foreign material from the contact surfaces of the
cylinder block and the MBSP.
Caution
l The oil pan must be secured within 5 minutes after
the sealant is applied to the MBSP.
2. Apply silicon sealant to the shaded areas shown in the figure.
81-75