engine MAZDA PROTEGE 1992 Repair Manual
[x] Cancel search | Manufacturer: MAZDA, Model Year: 1992, Model line: PROTEGE, Model: MAZDA PROTEGE 1992Pages: 1164, PDF Size: 81.9 MB
Page 112 of 1164

Bl ASSEMBLY
Cylinder Head Gasket
1. Remove all foreign material from the top of the cylinder
block.
2. Place the new cylinder head gasket in position.
05UOBX-219
36 SOHC
Cylinder Head
1. Install the cylinder head.
2. Apply clean engine oil to the bolt threads and seat faces
3. Tighten the cylinder head bolts in two or three steps in the
order shown.
Tightening torque:
76-81 N.m (7.7-8.3 m-kg, 56-80 ft-lb)
3P SOHC OWOBX-221
03UOBl-205
Camshaft Oil Seal
1. Apply a thin coat of engine oil to the camshaft oil seal and
cylinder head.
2. Tap the camshaft oil seal into the cylinder head with a suita-
ble pipe.
Caution
. The oil seal must be tapped in until it is flush with
the cylinder head.
Oil seal outer diameter: 40mm (1.57 in)
--
Bl-82
Page 113 of 1164

ASSEMBLY Bl
BP SOHC
THRUST PLATE
DOWEL PIN AND PIN GROOVE
63UOlX-121
63UOlX-12
01; RESERVOIR
03UOBl-1’ 16
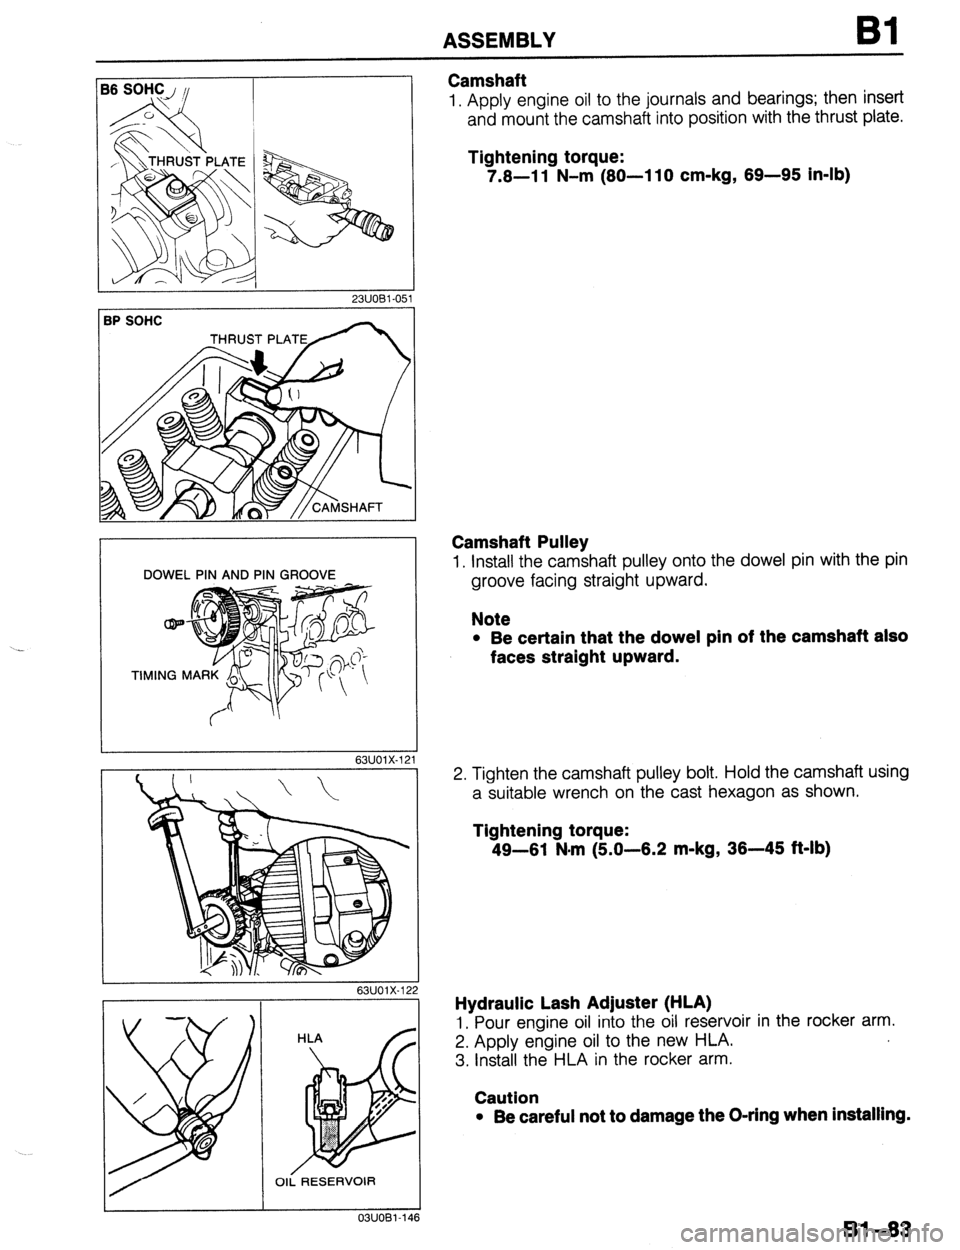
Camshaft
1. Apply engine oil to the journals and bearings; then insert
and mount the camshaft into position with the thrust plate.
Tightening torque:
7.8-l 1 N-m (80-l 10 cm-kg, 89-95 In-lb)
Camshaft Pulley
1. Install the camshaft pulley onto the dowel pin with the pin
groove facing straight upward.
Note
l Be certain that the dowel pin of the camshaft also
faces straight upward.
2. Tighten the camshaft pulley bolt. Hold the camshaft using
a suitable wrench on the cast hexagon as shown.
Tightening torque:
49-81 N-m (5.0-8.2 m-kg, 38-45 ft-lb)
Hydraulic Lash Adjuster (HLA)
1. Pour engine oil into the oil reservoir in the rocker arm.
2. Apply engine oil to the new HLA.
3. install the HLA in the rocker arm.
Caution
l Be careful not to damage the O-ring when installing.
81-83
Page 119 of 1164

ASSEMBLY Bl
AUXILIARY PARTS
Torque Specifications
DRIVE BELT
INSTALLATION
PAGE Bl-6 19-25 (1.9-2.6, 14-19)
w-113 (9.5-11.5, 69-83) I _______ _ - ..- - -,
(3.8-5.3, 27-38)
19-25 Il.9-2.8. 14- 37-63 (3.8-6.4, 27-46)
15-23 (1.5-2.3, 11-17)
N.m (m-kg, ft-It
OWOBX-2
03UOBl.16
Engine Hanger
1. Install the front and rear engine hangers.
Tightening torque
Front: 37-63 N-m (3.8-6.4 m-kg, 27-46 ft-lb)
Rear: 19-25 N.m (1.9-2.6 m-kg, 14-19 ft-lb)
81-89
Page 120 of 1164

Bl ASSEMBLY
05UOBX-24:
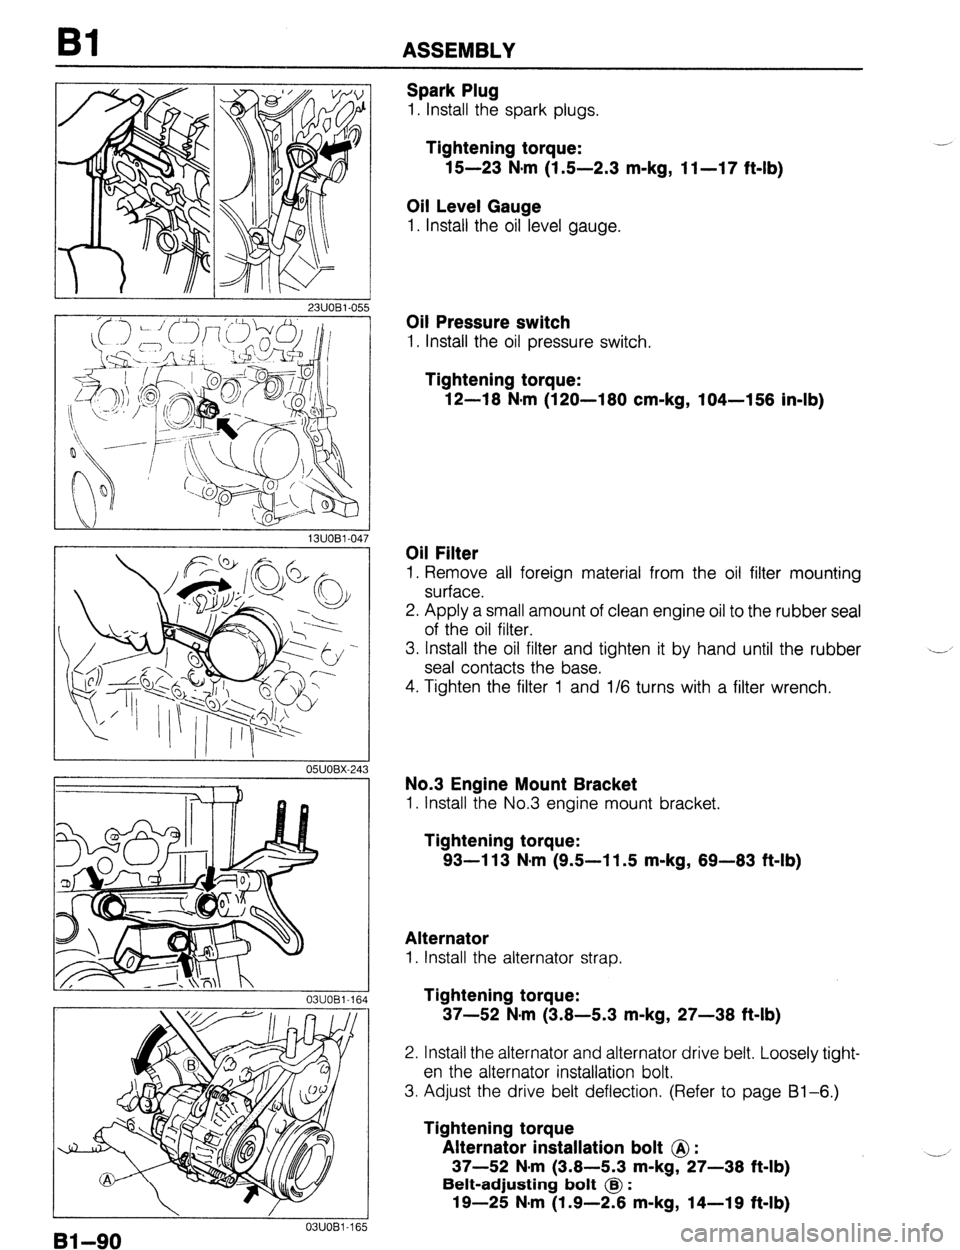
Spark Plug
1. Install the spark plugs.
Tightening torque:
15-23 N*m (1.5-2.3 m-kg, 1 I-17 ft-lb)
Oil Level Gauge
1. Install the oil level gauge.
Oil Pressure switch
1. Install the oil pressure switch.
Tightening torque:
12-18 N-m (120-180 cm-kg, 104-158 in-lb)
Oil Filter
1. Remove all foreign material from the oil filter mounting
surface.
2. Apply a small amount of clean engine oil to the rubber seal
of the oil filter.
3. Install the oil filter and tighten it by hand until the rubber
seal contacts the base.
4. Tighten the filter 1 and l/6 turns with a filter wrench.
No.3 Engine Mount Bracket
1. Install the No.3 engine mount bracket.
Tightening torque:
93-l 13 N-m (9.5-l 1.5 m-kg, 89-83 ft-lb)
Alternator
1. Install the alternator strap.
Tightening torque:
37-52 N#m (3.8-5.3 m-kg, 27-38 ft-lb)
2. Install the alternator and alternator drive belt. Loosely tight-
en the alternator installation bolt.
3. Adjust the drive belt deflection. (Refer to page Bl-6.)
Tightening torque
Alternator installation bolt @ :
37-52 N-m (3.8-5.3 m-kg, 27-38 ft-lb)
Belt-adjusting bolt @ :
19-25 N#m (1.9-2.8 m-kg, 14-19 f&lb) --’ I
I 0311081-165
Bl-90
Page 121 of 1164

ASSEMBLY Bl
03UOBl-16
03UOB1.21 38
Injector and Distribution Pipe Assembly (BP SOHC)
1. Install the injector and distribution pipe assembly with new
insulators.
Tightening torque:
19-25 N-m (1.9-2.6 m-kg, 14-19 ft-lb)
Intake Manifold Assembly
1, Remove all foreign material from the intake manifold con-
tact surface.
2. Install a new gasket and the intake manifold assembly.
Tightening torque:
19-25 N*m (1.9-2.6 m-kg, 14-19 ft-lb)
Distributor and High-tension Lead
1. Apply engine oil to the O-ring, and position it on the dis-
tributor.
2. Apply engine oil to the blade.
3. Install the distributor with the blade fit into the camshaft
groove.
4. Temporarily, loosely tighten the distributor installing bolt.
5. Adjust the ignition timing after engine installation.
(Refer to Section G.)
6. Connect the high-tension leads.
81-91
Page 122 of 1164

Bl ENGINE STAND DISMOUNTING
ENGINE STAND DISMOUNTING
PROCEDURE
1. Remove the engine from the SST (engine stand).
2.
Remove the SST (engine hanger) from the engine.
3. Install the parts shown in the figure.
Torque Specifications
19-25 11.9-2.6. 14-191
(3.8-5.3, 27-38)
52 (3.8-5.3, 27-38)
7.0111 N-m
(80-110 cm-kg, 69-95 in-lb)
T- :p,;f W-23 (1.6-2.3, 12-17)
19-25 (1.9-2.6, 14-19)
N-m (m-kg, Mb)
OWOBX-25‘
Water Inlet Pipe
1. Remove all foreign material from the water inlet pipe mount-
ing surface.
2. Install a new gasket and the water inlet pipe.
Tightening torque:
19-25 N-m (1.9-2.6 m-kg, 14-19 ft-lb)
-,
03UOBl-169
81-92
Page 123 of 1164

ENGINE STAND DISMOUNTING Bl
VIEW A
c==A
03UOBi -17
I
03UOBi-2C
05UOBX-25
03UOBl-171
OWOBX-25
3. Apply a small amount of engine coolant to the new O-ring.
4. Install the water bypass pipe.
Exhaust Pipe Bracket
1. Install the exhaust pipe bracket.
Tightening torque:
37-52 N*m (3.8-5.3 m-kg, 27-38 ft-lb)
A/C Compressor Bracket
1. Install the A/C compressor bracket.
Tightening torque
@: 19-25 N-m (1.9-2.8 m-kg, 14-19 ft-lb)
@I: 37-52 N-m (3.8-5.3 m-kg, 27-38 ft-lb)
Exhaust Manifold
1. Remove all foreign material from the exhaust manifold con-
tact surface.
2. Install a new gasket and the exhaust manifold.
Tightening torque:
18-23 N-m (1.8-2.3 m-kg, 12-17 ft-lb)
Exhaust Manifold Insulator
1. Install the exhaust manifold insulator.
Tightening torque:
7.8-l 1 N*m (80-l 10 cm-kg, 89-95 in-lb)
Bl-93
Page 124 of 1164

81 INSTALLATION
INSTALLATION
PROCEDURE
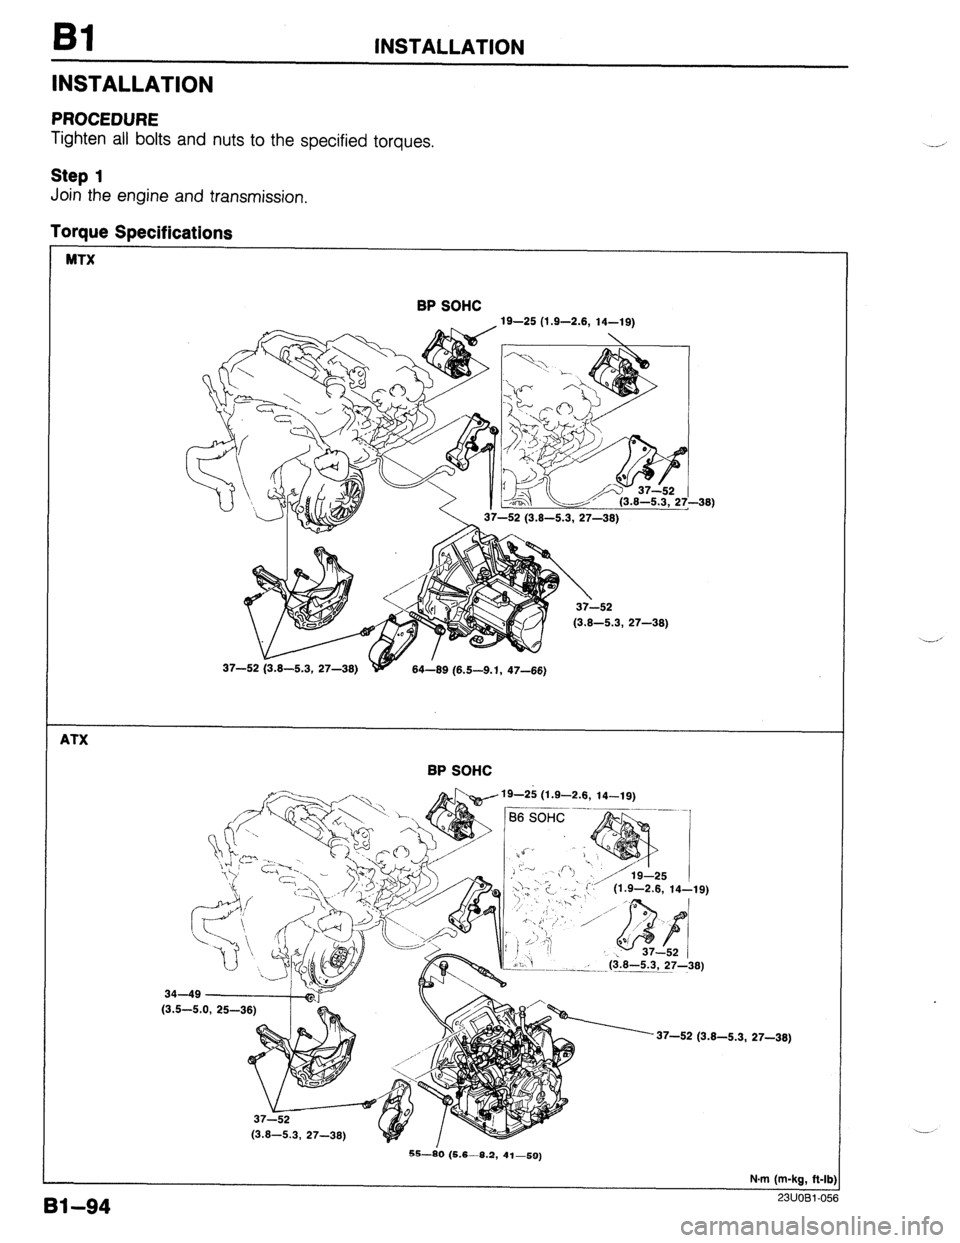
Tighten all bolts and nuts to the specified torques.
Step 1
Join the engine and transmission,
Torque Specifications
MTX
BP SOHC
19-25 (1.9-2.8, 14-19)
W
y
37-52 (3.8-5.3, 27-38)
37-52 (3.8-5.3, 27-38)
84-89 (6.5-9.1, 47-66)
ATX
BP SOHC
19-2ii (1.9-2.8, 14-19)
An
I
y 37-52 /
b ‘i
--< ($8-5.3, 27-36)
34-49
(3.5-S
37-52 (3.8-5.3, 27-38)
Bl--94
S--i0 (5.6-8.2, 41-59)
N.m (m-kg, R-lb)
23UOBl-0%
Page 125 of 1164

INSTALLATION Bl
Step 2
Warning
l Be sure the vehicle is securely supported on safety stands.
Taraue Soecifications
'S-80 (5.6-6.2, 41-59) 74-103 (7.5-10.5, 54-76)
h // 67-93 43-61
(6.8-9.5, 49-69) (4.4-6.2, 32- .45)
64-89 (6.5-9.1, 47-66)'
'
/cR-x&l /84-89 (6.5-9.1, 47-66)
>\----37-L5i (3.8-5.3.
27-38)
N.m (m-kg, ft-II
0311081-i
Ii------ //Ill 1 Engine mount member
1. Install the engine mount member.
Tightening torque:
64-69 N#m (6.5-9.1 m-kg, 47-66 f&lb)
Bl-95
Page 126 of 1164

INSTALLATION
03UOBl-17
No.2 ENGINE /I Ill
03UOBl-171
DYNAMIC DAMPER
03UOBl-17;
03UOBl-178
ATX
1 03UOBl.179
91-96
Engine and transaxle assembly
1. Suspend the engine and transaxle assembly.
Caution
l Do not damage any components in the engine com-
partment.
2. Align the No.1 and No.2 engine mount bolts with the en-
gine mount member mounting holes.
Engine mount
1. Install the No.1 engine mount nut and tighten.
Tightening torque:
37-52 N-m (3.8-5.3 m-kg, 27-38 f&lb)
2. Install the No.2 engine mount nut and tighten.
Tightening torque:
37-52 N-m (3.8-5.3 m-kg, 27-38 ft-lb)
3. Install the engine mount rubber with new washer and tight-
en nut @.
Tightening torque:
74-103 N.m (7.5-10.5 m-kg, 54-76 ft-lb)
4. Install the bolt @, while aligning the engine location and
tighten nut (I!$.
Tightening torque:
67-93 N-m (6.8-9.5 m-kg, 49-69 ft-lb)
5. Install the dynamic damper.
Tightening torque:
55-80 N.m (5.6-8.2 m-kg, 41-59 ft-lb)
6. Install the No.4 engine mount rubber and bracket and loose-
ly tighten nuts @.
7. Align the bracket bolt holes with the body side holes, and
install the bolt @and tighten in the sequence shown in the
figure.
Tightening torque:
43-61 N-m (4.4-6.2 m-kg, 32-45 f&lb)
8. Tighten the nuts @.
Tightening torque: 67-93 N.m (6.6-9.5 m-kg, 49-69 ft-lb)