MERCEDES-BENZ CL-Class 2002 C215 Comand Manual
Manufacturer: MERCEDES-BENZ, Model Year: 2002, Model line: CL-Class, Model: MERCEDES-BENZ CL-Class 2002 C215Pages: 251
Page 231 of 251
System settings229Introduction
Audio Telephone
Navigation
Index Info Services and
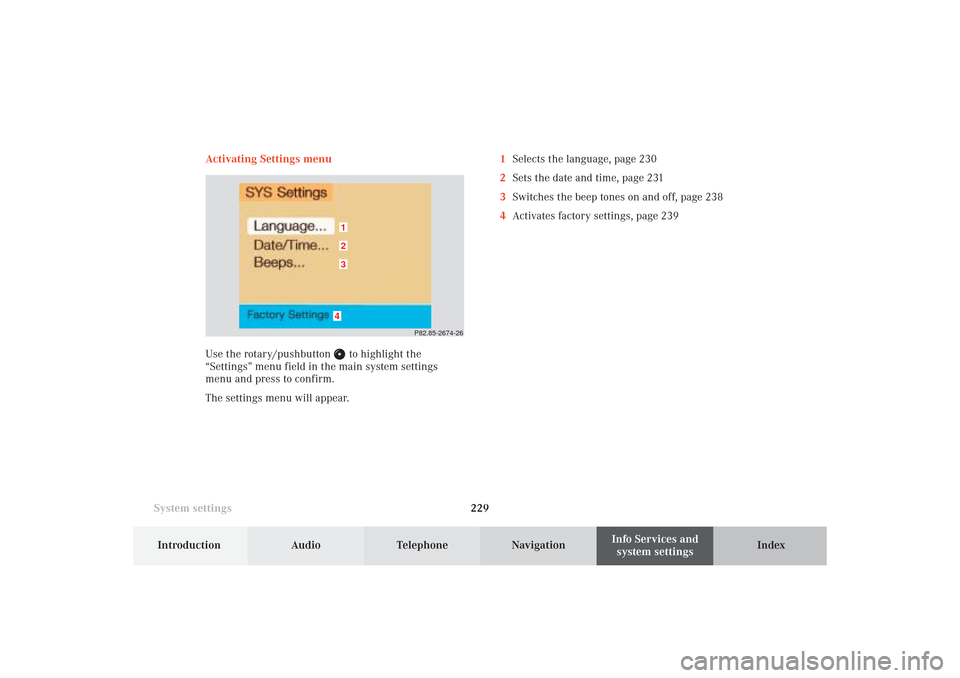
system settings Activating Settings menu
Use the rotary/pushbutton
to highlight the
“Settings” menu field in the main system settings
menu and press to confirm.
The settings menu will appear.1Selects the language, page 230
2Sets the date and time, page 231
3Switches the beep tones on and off, page 238
4Activates factory settings, page 239
P82.85-2674-26
4321
12-System-25-US.pm517.10.2001, 11:06 Uhr 229
Page 232 of 251
230 System settings
Audio Telephone Navigation
Index Info Services and
system settings Introduction
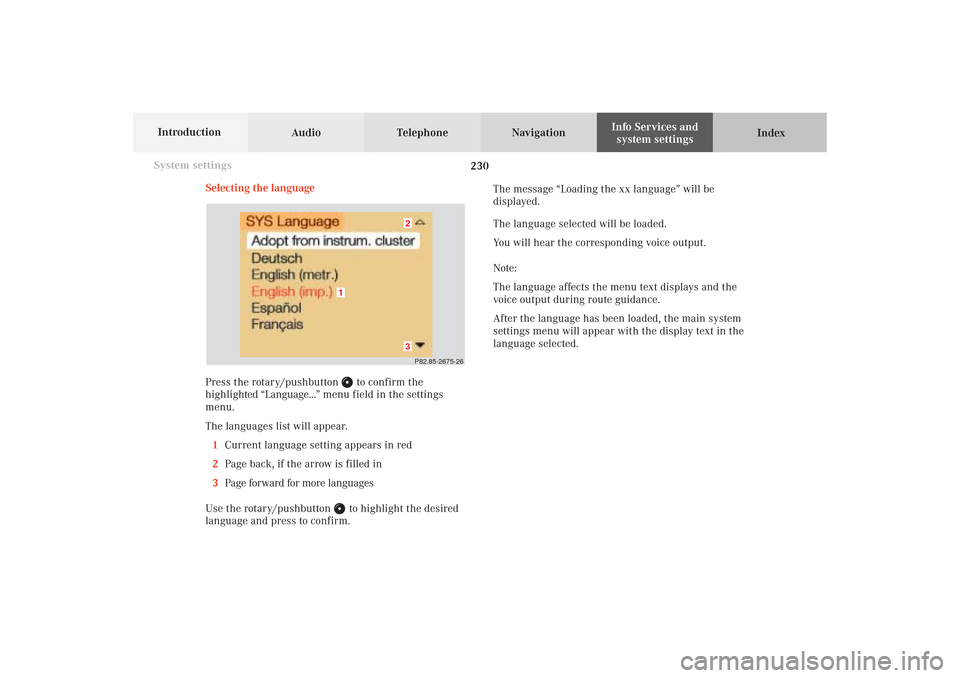
Selecting the language
Press the rotary/pushbutton
to confirm the
highlighted “Language...” menu field in the settings
menu.
The languages list will appear.
1Current language setting appears in red
2Page back, if the arrow is filled in
3Page forward for more languages
Use the rotary/pushbutton to highlight the desired
language and press to confirm.The message “Loading the xx language” will be
displayed.
The language selected will be loaded.
You will hear the corresponding voice output.
Note:
The language affects the menu text displays and the
voice output during route guidance.
After the language has been loaded, the main system
settings menu will appear with the display text in the
language selected.
P82.85-2675-2632
1
12-System-25-US.pm517.10.2001, 11:06 Uhr 230
Page 233 of 251
System settings231Introduction
Audio Telephone
Navigation
Index Info Services and
system settings Set the date and time
COMAND is equipped with an integrated clock. Press
to display the current time. The clock is used e.g.
for indicating the estimated time of arrival at the
destination, page 181.
There are several ways to set the time:
• With GPS reception, page 232
Set the time in 30 minute steps, page 233
Set the time by selecting a country and the time
zone, page 234
• Without GPS reception, page 232
Set the date and time manually, page 236
Note:
The clock must always be reset if the COMAND
system was disconnected or if the vehicle battery
was discharged. List of languages:
• “Adopt from Instrument Cluster” – the system will
use the same language as is set in instrument
cluster
• “Deutsch”
• “English (metric)” – distance measured in km,
speed in km/h
• “English (imperial)” – distance measured in yards,
miles, speed in mph
• “Español“
• “Français“
• “Italiano“
• “Nederlands“
12-System-25-US.pm517.10.2001, 11:06 Uhr 231
Page 234 of 251
232 System settings
Audio Telephone Navigation
Index Info Services and
system settings Introduction
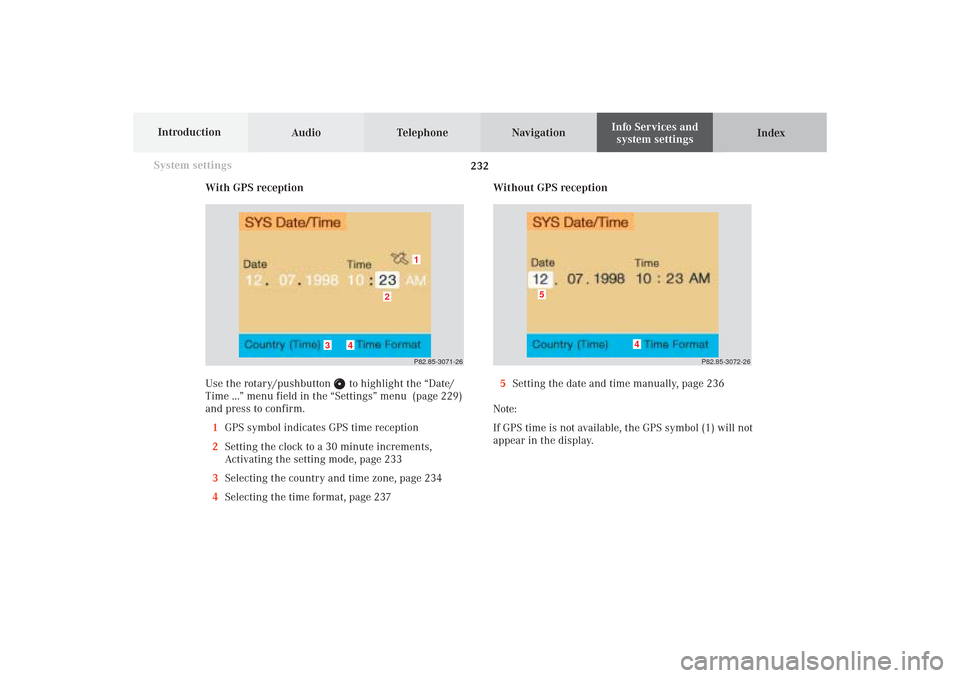
With GPS reception
Use the rotary/pushbutton
to highlight the “Date/
Time ...” menu field in the “Settings” menu (page 229)
and press to confirm.
1GPS symbol indicates GPS time reception
2Setting the clock to a 30 minute increments,
Activating the setting mode, page 233
3Selecting the country and time zone, page 234
4Selecting the time format, page 237Without GPS reception
5Setting the date and time manually, page 236
Note:
If GPS time is not available, the GPS symbol (1) will not
appear in the display.
P82.85-3071-26
2
1
3
4
P82.85-3072-26
4
5
12-System-25-US.pm517.10.2001, 11:06 Uhr 232
Page 235 of 251
System settings233Introduction
Audio Telephone
Navigation
Index Info Services and
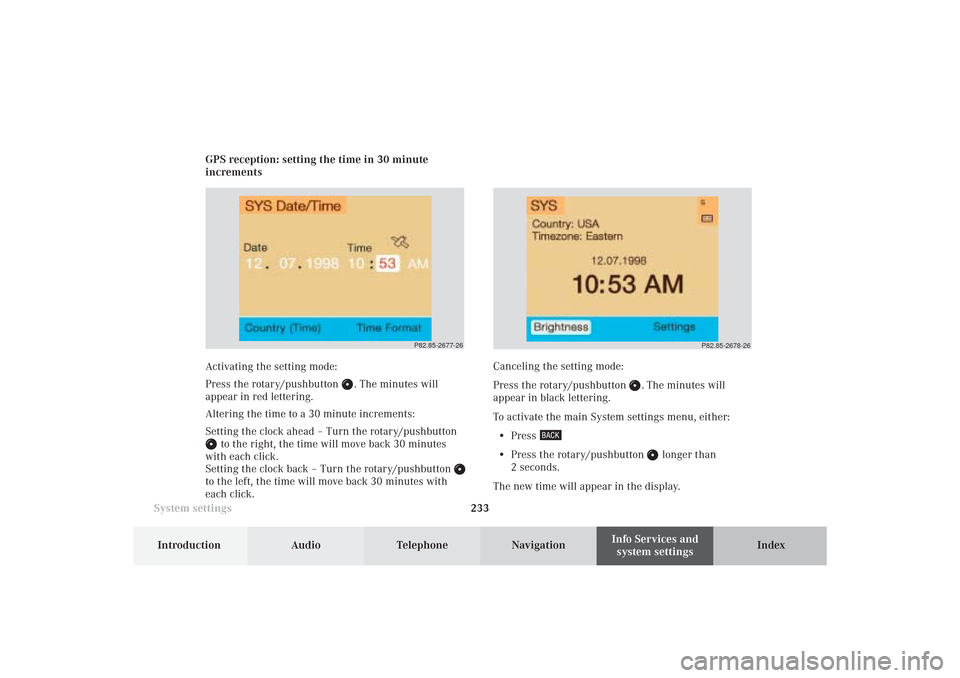
system settings GPS reception: setting the time in 30 minute
increments
Activating the setting mode:
Press the rotary/pushbutton
. The minutes will
appear in red lettering.
Altering the time to a 30 minute increments:
Setting the clock ahead – Turn the rotary/pushbutton
to the right, the time will move back 30 minutes
with each click.
Setting the clock back – Turn the rotary/pushbutton
to the left, the time will move back 30 minutes with
each click.Canceling the setting mode:
Press the rotary/pushbutton
. The minutes will
appear in black lettering.
To activate the main System settings menu, either:
• Press
• Press the rotary/pushbutton
longer than
2 seconds.
The new time will appear in the display.
P82.85-2677-26
P82.85-2678-26
12-System-25-US.pm517.10.2001, 11:06 Uhr 233
Page 236 of 251
234 System settings
Audio Telephone Navigation
Index Info Services and
system settings Introduction
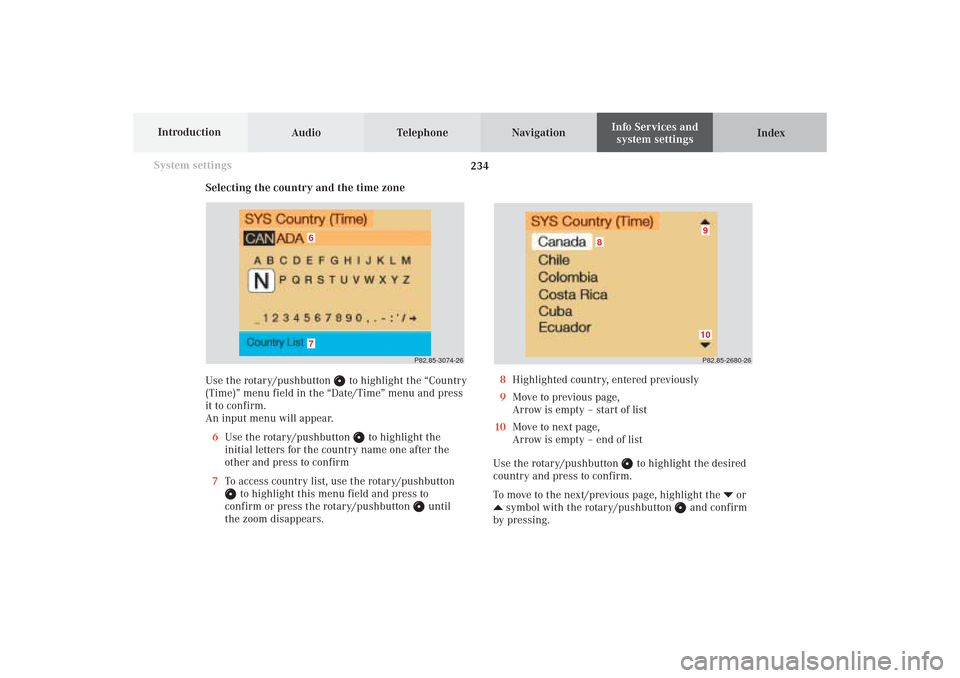
Selecting the country and the time zone
Use the rotary/pushbutton
to highlight the “Country
(Time)” menu field in the “Date/Time” menu and press
it to confirm.
An input menu will appear.
6Use the rotary/pushbutton
to highlight the
initial letters for the country name one after the
other and press to confirm
7To access country list, use the rotary/pushbutton
to highlight this menu field and press to
confirm or press the rotary/pushbutton
until
the zoom disappears.P82.85-3074-26
67
P82.85-2680-269
8
10
8Highlighted country, entered previously
9Move to previous page,
Arrow is empty – start of list
10Move to next page,
Arrow is empty – end of list
Use the rotary/pushbutton
to highlight the desired
country and press to confirm.
To move to the next/previous page, highlight the
or
symbol with the rotary/pushbutton
and confirm
by pressing.
12-System-25-US.pm517.10.2001, 11:06 Uhr 234
Page 237 of 251
System settings235Introduction
Audio Telephone
Navigation
Index Info Services and
system settings
P82.85-2686-26
P82.85-3076-26
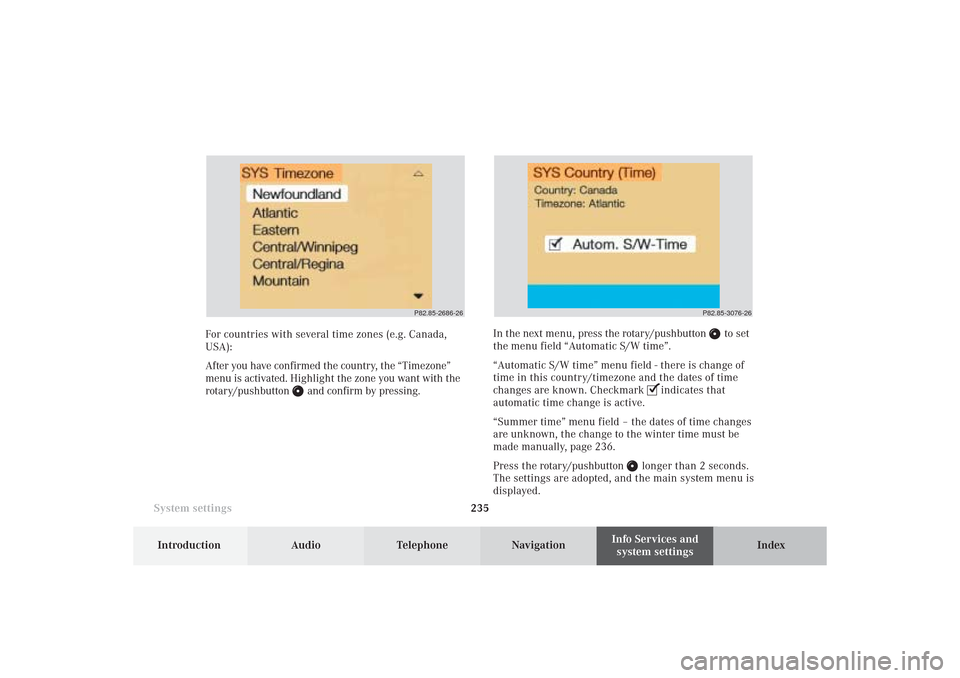
For countries with several time zones (e.g. Canada,
USA):
After you have confirmed the country, the “Timezone”
menu is activated. Highlight the zone you want with the
rotary/pushbutton
and confirm by pressing.In the next menu, press the rotary/pushbutton
to set
the menu field “Automatic S/W time”.
“Automatic S/W time” menu field - there is change of
time in this country/timezone and the dates of time
changes are known. Checkmark
indicates that
automatic time change is active.
“Summer time” menu field – the dates of time changes
are unknown, the change to the winter time must be
made manually, page 236.
Press the rotary/pushbutton
longer than 2 seconds.
The settings are adopted, and the main system menu is
displayed.
12-System-25-US.pm517.10.2001, 11:06 Uhr 235
Page 238 of 251
236 System settings
Audio Telephone Navigation
Index Info Services and
system settings Introduction
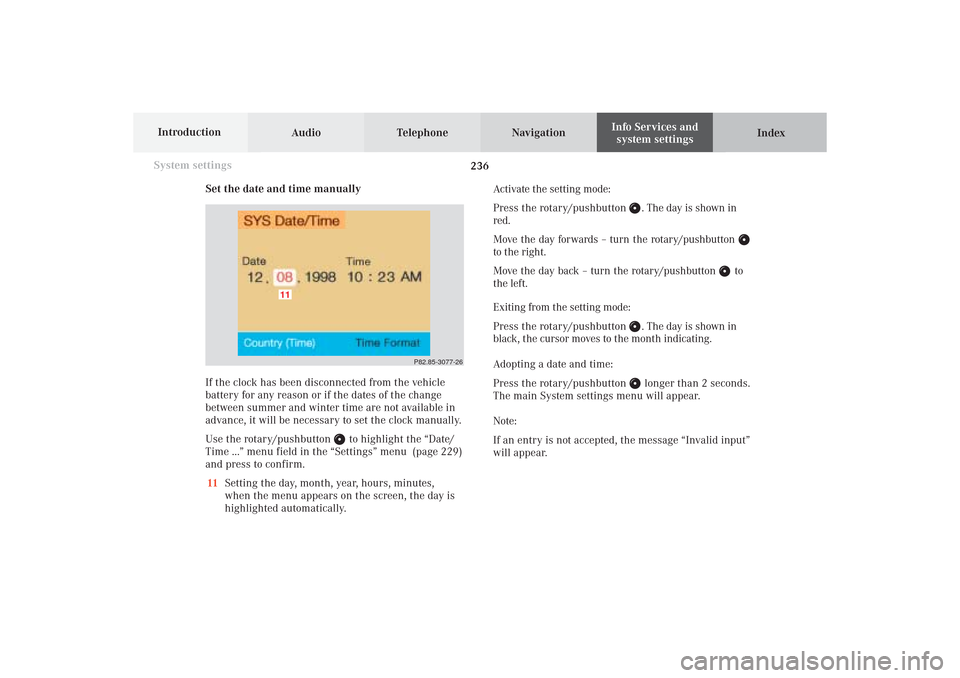
Set the date and time manually
If the clock has been disconnected from the vehicle
battery for any reason or if the dates of the change
between summer and winter time are not available in
advance, it will be necessary to set the clock manually.
Use the rotary/pushbutton
to highlight the “Date/
Time ...” menu field in the “Settings” menu (page 229)
and press to confirm.
11Setting the day, month, year, hours, minutes,
when the menu appears on the screen, the day is
highlighted automatically.Activate the setting mode:
Press the rotary/pushbutton
. The day is shown in
red.
Move the day forwards – turn the rotary/pushbutton
to the right.
Move the day back – turn the rotary/pushbutton
to
the left.
Exiting from the setting mode:
Press the rotary/pushbutton
. The day is shown in
black, the cursor moves to the month indicating.
Adopting a date and time:
Press the rotary/pushbutton longer than 2 seconds.
The main System settings menu will appear.
Note:
If an entry is not accepted, the message “Invalid input”
will appear.
P82.85-3077-26
11
12-System-25-US.pm517.10.2001, 11:06 Uhr 236
Page 239 of 251
System settings237Introduction
Audio Telephone
Navigation
Index Info Services and
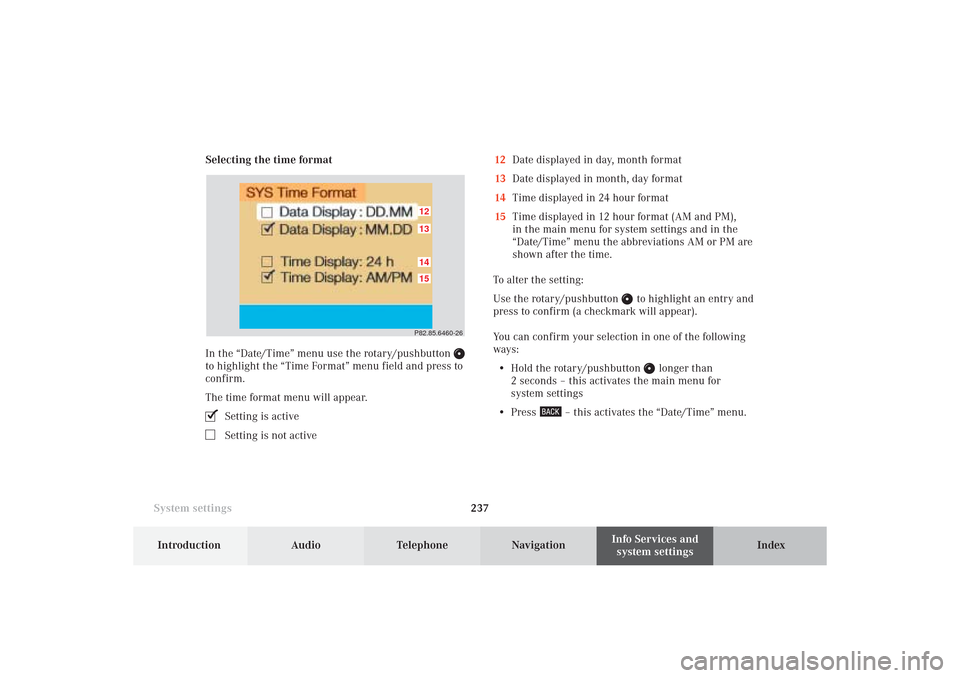
system settings Selecting the time format
In the “Date/Time” menu use the rotary/pushbutton
to highlight the “Time Format” menu field and press to
confirm.
The time format menu will appear.
Setting is activeSetting is not active12Date displayed in day, month format
13Date displayed in month, day format
14Time displayed in 24 hour format
15Time displayed in 12 hour format (AM and PM),
in the main menu for system settings and in the
“Date/Time” menu the abbreviations AM or PM are
shown after the time.
To alter the setting:
Use the rotary/pushbutton
to highlight an entry and
press to confirm (a checkmark will appear).
You can confirm your selection in one of the following
ways:
• Hold the rotary/pushbutton
longer than
2 seconds – this activates the main menu for
system settings
• Press
– this activates the “Date/Time” menu.
P82.85.6460-2615121413
12-System-25-US.pm517.10.2001, 11:06 Uhr 237
Page 240 of 251
238 System settings
Audio Telephone Navigation
Index Info Services and
system settings Introduction
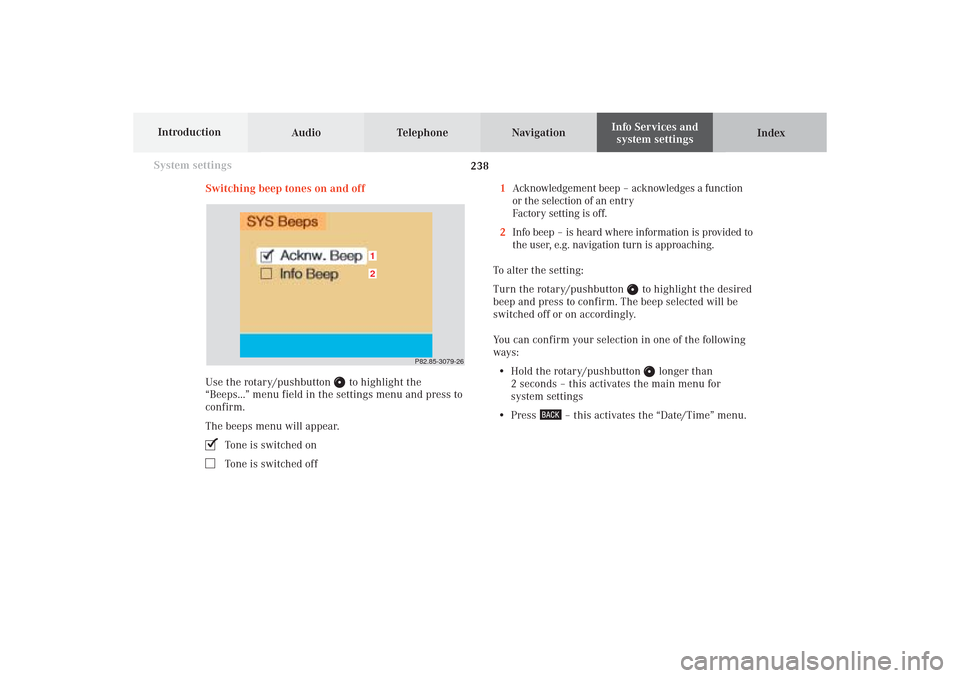
Switching beep tones on and off
Use the rotary/pushbutton
to highlight the
“Beeps...” menu field in the settings menu and press to
confirm.
The beeps menu will appear.
Tone is switched onTone is switched off1Acknowledgement beep – acknowledges a function
or the selection of an entry
Factory setting is off.
2Info beep – is heard where information is provided to
the user, e.g. navigation turn is approaching.
To alter the setting:
Turn the rotary/pushbutton
to highlight the desired
beep and press to confirm. The beep selected will be
switched off or on accordingly.
You can confirm your selection in one of the following
ways:
• Hold the rotary/pushbutton
longer than
2 seconds – this activates the main menu for
system settings
• Press
– this activates the “Date/Time” menu.
P82.85-3079-26
21
12-System-25-US.pm517.10.2001, 11:07 Uhr 238