key MERCEDES-BENZ CL-Class 2011 C216 Owners Manual
[x] Cancel search | Manufacturer: MERCEDES-BENZ, Model Year: 2011, Model line: CL-Class, Model: MERCEDES-BENZ CL-Class 2011 C216Pages: 480, PDF Size: 19.76 MB
Page 277 of 480
Engaging park position PXPush the DIRECT SELECT lever in the
direction of the arrow P.
i
The automatic transmission shifts
automatically into park position P if you
open the driver's door when the vehicle is
stationary or at very low speed and the
transmission is in position D or R.
! If the engine speed is too high or the
vehicle is moving, do not shift the
automatic transmission directly from D to
R , from R to D or directly to P. The
automatic transmission could otherwise be
damaged.
Engaging reverse gear R
! Only shift the automatic transmission to
R when the vehicle is stationary.
i The ECO start/stop function is not
available when reverse gear is engaged.
For further information on the ECO start/
stop function ( Y page 270).
XWhen the vehicle is stationary, depress the
brake pedal.XPush the DIRECT SELECT lever up past the
first point of resistance.
Neutral N with ECO start/stop function
activated
The ECO start/stop function switches the
engine off automatically when the vehicle is
stationary if the vehicle is braked to a
standstill with neutral N engaged and the
brake depressed.
For further information on the ECO start/stop
function ( Y page 270).
Shifting to neutral N
XWhen the vehicle is stationary, depress the
brake pedal.XPush the DIRECT SELECT lever up or down
to the first point of resistance.When the engine is switched off, the
automatic transmission shifts to N
automatically.
Remaining in neutral N
If you wish to keep the automatic
transmission in neutral N, e.g. to wash the
vehicle in a car wash with a towing device,
observe the following:GWarning!
When leaving the SmartKey in the starter
switch, do not leave children unattended in
the vehicle. It is possible for children to switch
on the ignition which could result in
unsupervised use of vehicle equipment.
Unsupervised use of vehicle equipment could
result in an accident and/or serious personal
injury.
Using the SmartKey:
R make sure the ignition is switched on.
R when the vehicle is stationary, depress the
brake pedal and keep it depressed.
R shift to neutral N.
R release the brake pedal.
R if applied, release the electric parking
brake.
R switch off the ignition and leave the
SmartKey in the ignition lock.
Using KEYLESS-GO:
R make sure the ignition is switched on.
R when the vehicle is stationary, depress the
brake pedal and keep it depressed.
R shift to park position P.
R release the brake pedal.
R remove the Start/Stop button from the
ignition lock.
R insert the SmartKey into the ignition lock.
R switch on the ignition.
R depress the brake pedal and keep it
depressed.
R shift to neutral N.
R release the brake pedal.
Automatic transmission275Driving and parkingZ
Page 278 of 480
Rif applied, release the electric parking
brake.
Rswitch off the ignition and leave the
SmartKey in the ignition lock.
Transmission position D with ECO
start/stop function activated
The ECO start/stop function switches the
engine off automatically when the vehicle is
stationary if the vehicle is braked to a
standstill with transmission position N
engaged and the brake depressed.
For further information on the ECO start/stop
function (Y page 270).
Shifting to transmission position D
XWhen the vehicle is stationary, depress the
brake pedal.
XPush the DIRECT SELECT lever down past
the first point of resistance.
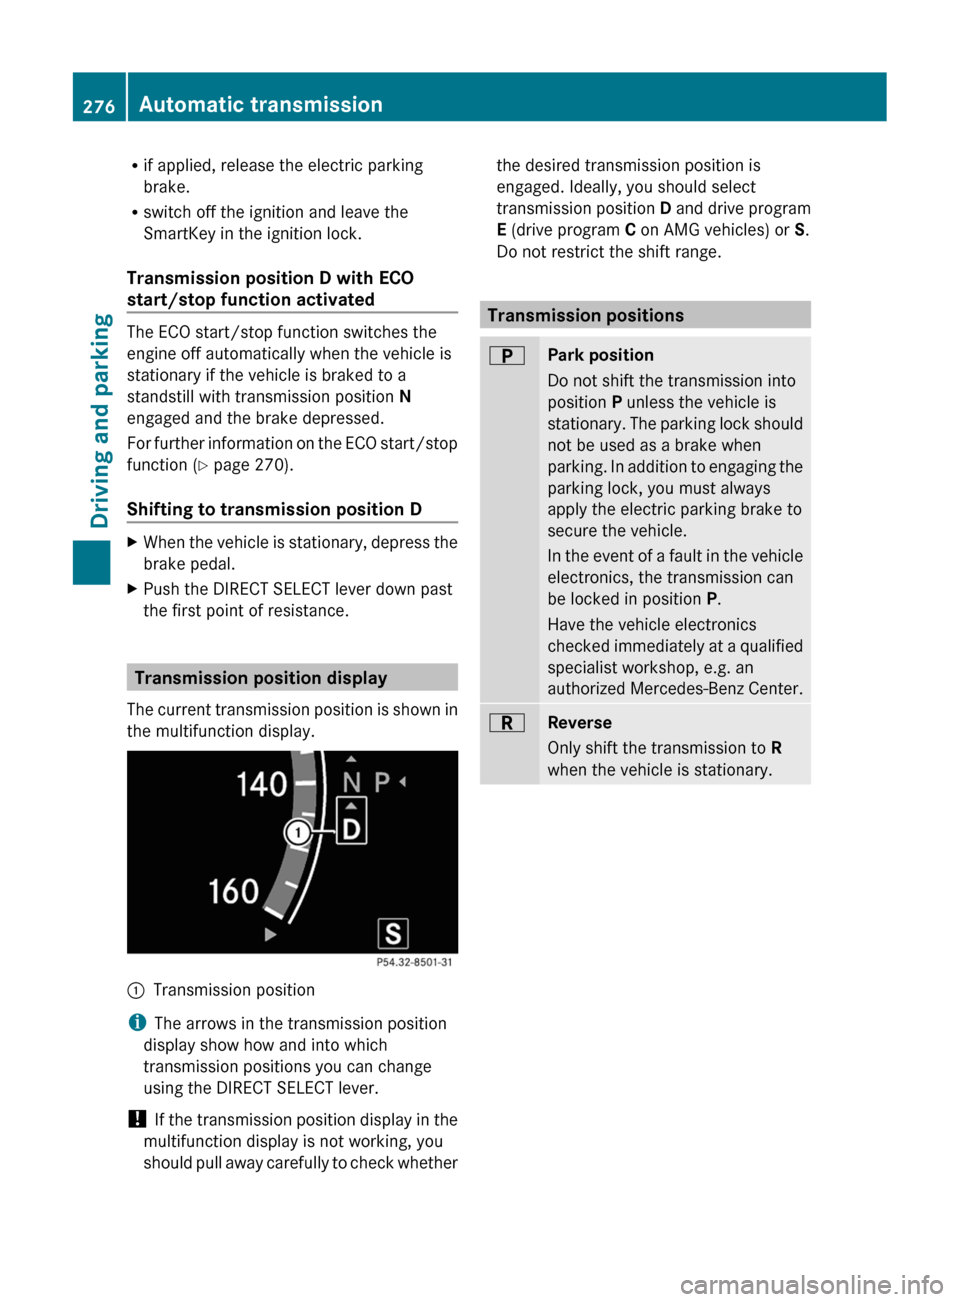
Transmission position display
The current transmission position is shown in
the multifunction display.
:Transmission position
iThe arrows in the transmission position
display show how and into which
transmission positions you can change
using the DIRECT SELECT lever.
! If the transmission position display in the
multifunction display is not working, you
should pull away carefully to check whether
the desired transmission position is
engaged. Ideally, you should select
transmission position D and drive program
E (drive program C on AMG vehicles) or S.
Do not restrict the shift range.
Transmission positions
BPark position
Do not shift the transmission into
position P unless the vehicle is
stationary. The parking lock should
not be used as a brake when
parking. In addition to engaging the
parking lock, you must always
apply the electric parking brake to
secure the vehicle.
In the event of a fault in the vehicle
electronics, the transmission can
be locked in position P.
Have the vehicle electronics
checked immediately at a qualified
specialist workshop, e.g. an
authorized Mercedes-Benz Center.
CReverse
Only shift the transmission to R
when the vehicle is stationary.
276Automatic transmissionDriving and parking
Page 283 of 480
Problems with the transmissionProblemPossible causes/consequences and M SolutionsThe acceleration ability
is deteriorating.
The transmission no
longer changes gear.The transmission is in emergency mode.
It is only possible to shift into 2nd gear and reverse gear.XStop the vehicle.XShift the transmission to position P.XSwitch off the engine.XWait at least 10 seconds before restarting the engine.XShift the transmission to position D or R.
If D is selected, the transmission shifts into 2nd gear; if R is
selected, the transmission shifts into reverse gear.XHave the transmission checked at a qualified specialist
workshop immediately.Transfer case
This section is only valid for vehicles with 4-
wheel drive (4MATIC). Power is always
transmitted to both axles.
! Performance tests may only be carried
out on a 2-axle dynamometer. The brake
system or transfer case could otherwise be
damaged. Contact an authorized
Mercedes-Benz Center for a performance
test. Mercedes-Benz recommends that you
use an authorized Mercedes-Benz Center
for this purpose.
! To prevent ESP ®
from intervening, the
ignition must be switched off (SmartKey or
the Start/Stop button in position 0 or 1) if:
R the electric parking brake is being tested
on a brake dynamometer.
R the vehicle is being towed with only one
axle raised (not permitted for vehicles
with 4MATIC).
The brake system could otherwise be
damaged.Refueling
Important safety notes
GWarning
Gasoline is highly flammable and poisonous.
It burns violently and can cause serious
personal injury.
Never allow sparks, flames or smoking
materials near gasoline.
Turn off the engine before refueling.
Whenever you are around gasoline, avoid
inhaling fumes and any skin or clothing
contact.
Direct skin contact with fuels and the
inhalation of fuel vapors are damaging to your
health.
GWarning
Overfilling of the fuel tank may create
pressure in the system which could cause a
gas discharge. This could cause the gasoline
to spray back out when removing the fuel
pump nozzle, which could cause personal
injury.
! Do not use diesel to refuel vehicles with a
gasoline engine. Even small amounts of the
Refueling281Driving and parkingZ
Page 284 of 480
wrong fuel result in damage to the fuel
system and engine.
! Do not switch on the ignition if you
accidentally refuel with the wrong fuel.
Otherwise, the fuel will enter the fuel lines.
Notify a qualified specialist workshop and
have the fuel tank and fuel lines drained
completely.
Gasoline
Fuel grade
! You should only refuel with unleaded
premium-grade gasoline as this avoids
damaging the catalytic converter.
If engine running problems are apparent,
have the cause checked immediately and
repaired. Excess unburned fuel can
otherwise enter the catalytic converter,
leading to overheating and possibly
causing a fire.
iOnly refuel with unleaded premium-grade
gasoline with a specified minimum octane
number of 91 (average value of 96 RON/
86 MON).
Usually you will find information about the
fuel grade on the pump. If you cannot find
the label on the gasoline pump, ask the gas
station staff.
You can find further information under
"Fuel" (Y page 470), by consulting an
authorized Mercedes-Benz Center or
visiting http://www.mbusa.com (USA
only).
Refueling
Fuel filler flap
The fuel filler flap is unlocked or locked
automatically when you open or close the
vehicle with the key or using KEYLESS-GO.
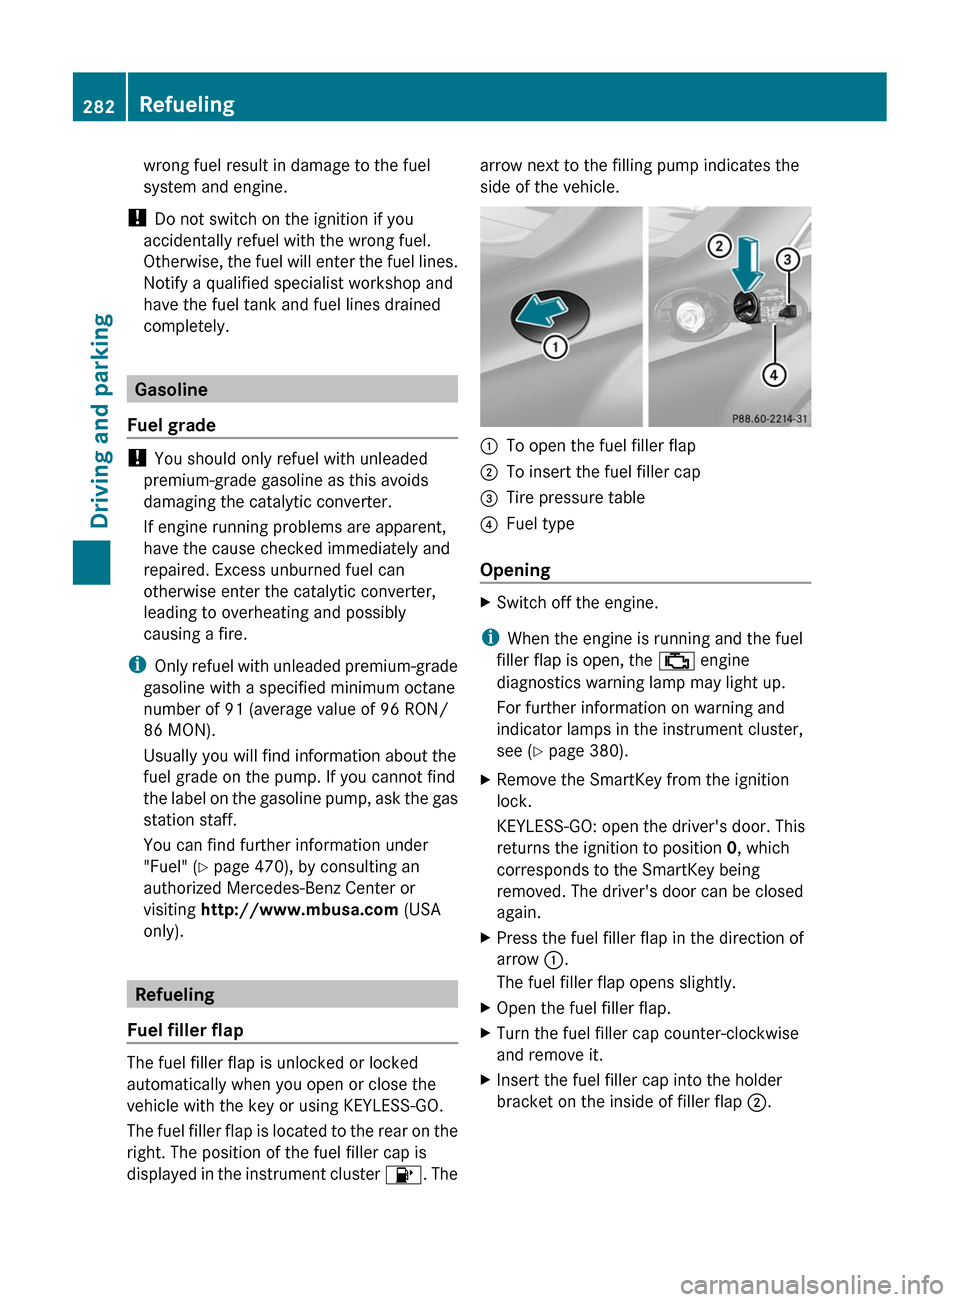
The fuel filler flap is located to the rear on the
right. The position of the fuel filler cap is
displayed in the instrument cluster 8. The
arrow next to the filling pump indicates the
side of the vehicle.:To open the fuel filler flap;To insert the fuel filler cap=Tire pressure table?Fuel type
Opening
XSwitch off the engine.
iWhen the engine is running and the fuel
filler flap is open, the ; engine
diagnostics warning lamp may light up.
For further information on warning and
indicator lamps in the instrument cluster,
see (Y page 380).
XRemove the SmartKey from the ignition
lock.
KEYLESS-GO: open the driver's door. This
returns the ignition to position 0, which
corresponds to the SmartKey being
removed. The driver's door can be closed
again.
XPress the fuel filler flap in the direction of
arrow :.
The fuel filler flap opens slightly.
XOpen the fuel filler flap.XTurn the fuel filler cap counter-clockwise
and remove it.
XInsert the fuel filler cap into the holder
bracket on the inside of filler flap ;.
282RefuelingDriving and parking
Page 286 of 480
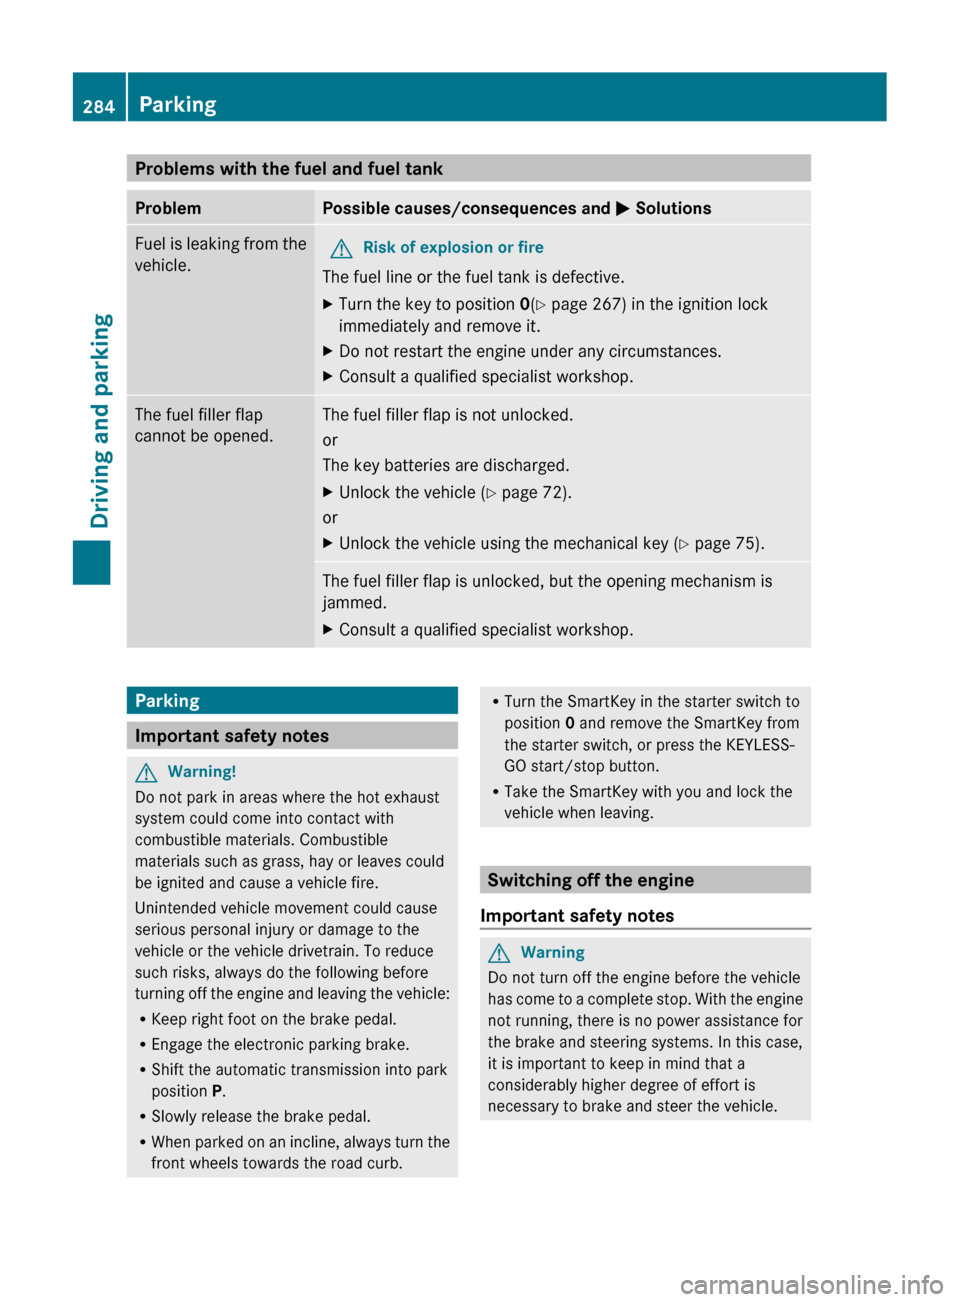
Problems with the fuel and fuel tankProblemPossible causes/consequences and M SolutionsFuel is leaking from the
vehicle.GRisk of explosion or fire
The fuel line or the fuel tank is defective.
XTurn the key to position 0(Y page 267) in the ignition lock
immediately and remove it.XDo not restart the engine under any circumstances.XConsult a qualified specialist workshop.The fuel filler flap
cannot be opened.The fuel filler flap is not unlocked.
or
The key batteries are discharged.XUnlock the vehicle ( Y page 72).
or
XUnlock the vehicle using the mechanical key ( Y page 75).The fuel filler flap is unlocked, but the opening mechanism is
jammed.XConsult a qualified specialist workshop.Parking
Important safety notes
GWarning!
Do not park in areas where the hot exhaust
system could come into contact with
combustible materials. Combustible
materials such as grass, hay or leaves could
be ignited and cause a vehicle fire.
Unintended vehicle movement could cause
serious personal injury or damage to the
vehicle or the vehicle drivetrain. To reduce
such risks, always do the following before
turning off the engine and leaving the vehicle:
R Keep right foot on the brake pedal.
R Engage the electronic parking brake.
R Shift the automatic transmission into park
position P.
R Slowly release the brake pedal.
R When parked on an incline, always turn the
front wheels towards the road curb.
R Turn the SmartKey in the starter switch to
position 0 and remove the SmartKey from
the starter switch, or press the KEYLESS-
GO start/stop button.
R Take the SmartKey with you and lock the
vehicle when leaving.
Switching off the engine
Important safety notes
GWarning
Do not turn off the engine before the vehicle
has come to a complete stop. With the engine
not running, there is no power assistance for
the brake and steering systems. In this case,
it is important to keep in mind that a
considerably higher degree of effort is
necessary to brake and steer the vehicle.
284ParkingDriving and parking
Page 287 of 480
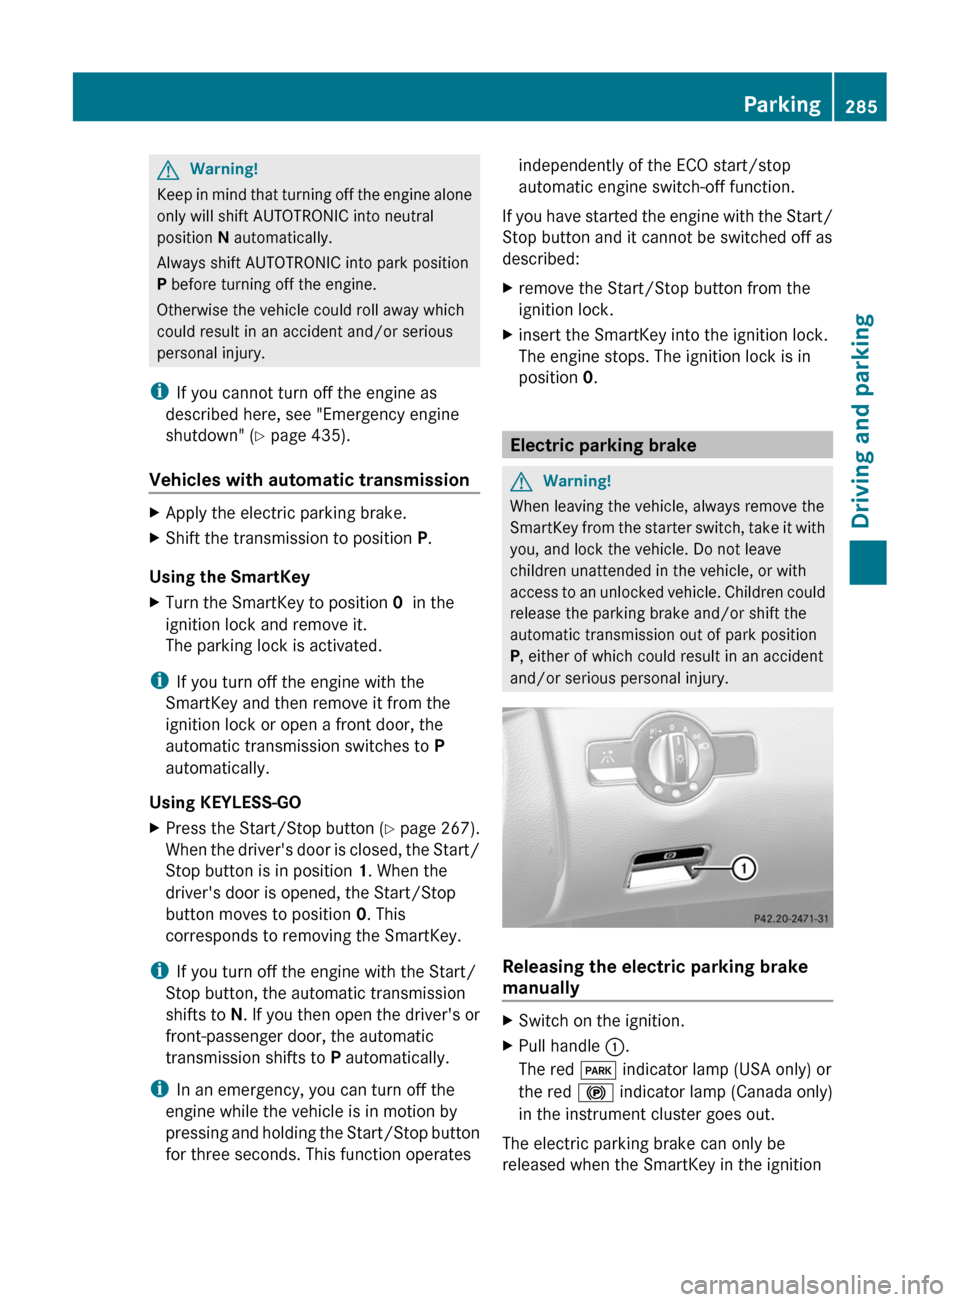
GWarning!
Keep in mind that turning off the engine alone
only will shift AUTOTRONIC into neutral
position N automatically.
Always shift AUTOTRONIC into park position
P before turning off the engine.
Otherwise the vehicle could roll away which
could result in an accident and/or serious
personal injury.
iIf you cannot turn off the engine as
described here, see "Emergency engine
shutdown" (Y page 435).
Vehicles with automatic transmission
XApply the electric parking brake.XShift the transmission to position P.
Using the SmartKey
XTurn the SmartKey to position 0 in the
ignition lock and remove it.
The parking lock is activated.
iIf you turn off the engine with the
SmartKey and then remove it from the
ignition lock or open a front door, the
automatic transmission switches to P
automatically.
Using KEYLESS-GO
XPress the Start/Stop button (Y page 267).
When the driver's door is closed, the Start/
Stop button is in position 1. When the
driver's door is opened, the Start/Stop
button moves to position 0. This
corresponds to removing the SmartKey.
iIf you turn off the engine with the Start/
Stop button, the automatic transmission
shifts to N. If you then open the driver's or
front-passenger door, the automatic
transmission shifts to P automatically.
iIn an emergency, you can turn off the
engine while the vehicle is in motion by
pressing and holding the Start/Stop button
for three seconds. This function operates
independently of the ECO start/stop
automatic engine switch-off function.
If you have started the engine with the Start/
Stop button and it cannot be switched off as
described:
Xremove the Start/Stop button from the
ignition lock.
Xinsert the SmartKey into the ignition lock.
The engine stops. The ignition lock is in
position 0.
Electric parking brake
GWarning!
When leaving the vehicle, always remove the
SmartKey from the starter switch, take it with
you, and lock the vehicle. Do not leave
children unattended in the vehicle, or with
access to an unlocked vehicle. Children could
release the parking brake and/or shift the
automatic transmission out of park position
P, either of which could result in an accident
and/or serious personal injury.
Releasing the electric parking brake
manually
XSwitch on the ignition.XPull handle :.
The red F indicator lamp (USA only) or
the red ! indicator lamp (Canada only)
in the instrument cluster goes out.
The electric parking brake can only be
released when the SmartKey in the ignition
Parking285Driving and parkingZ
Page 288 of 480
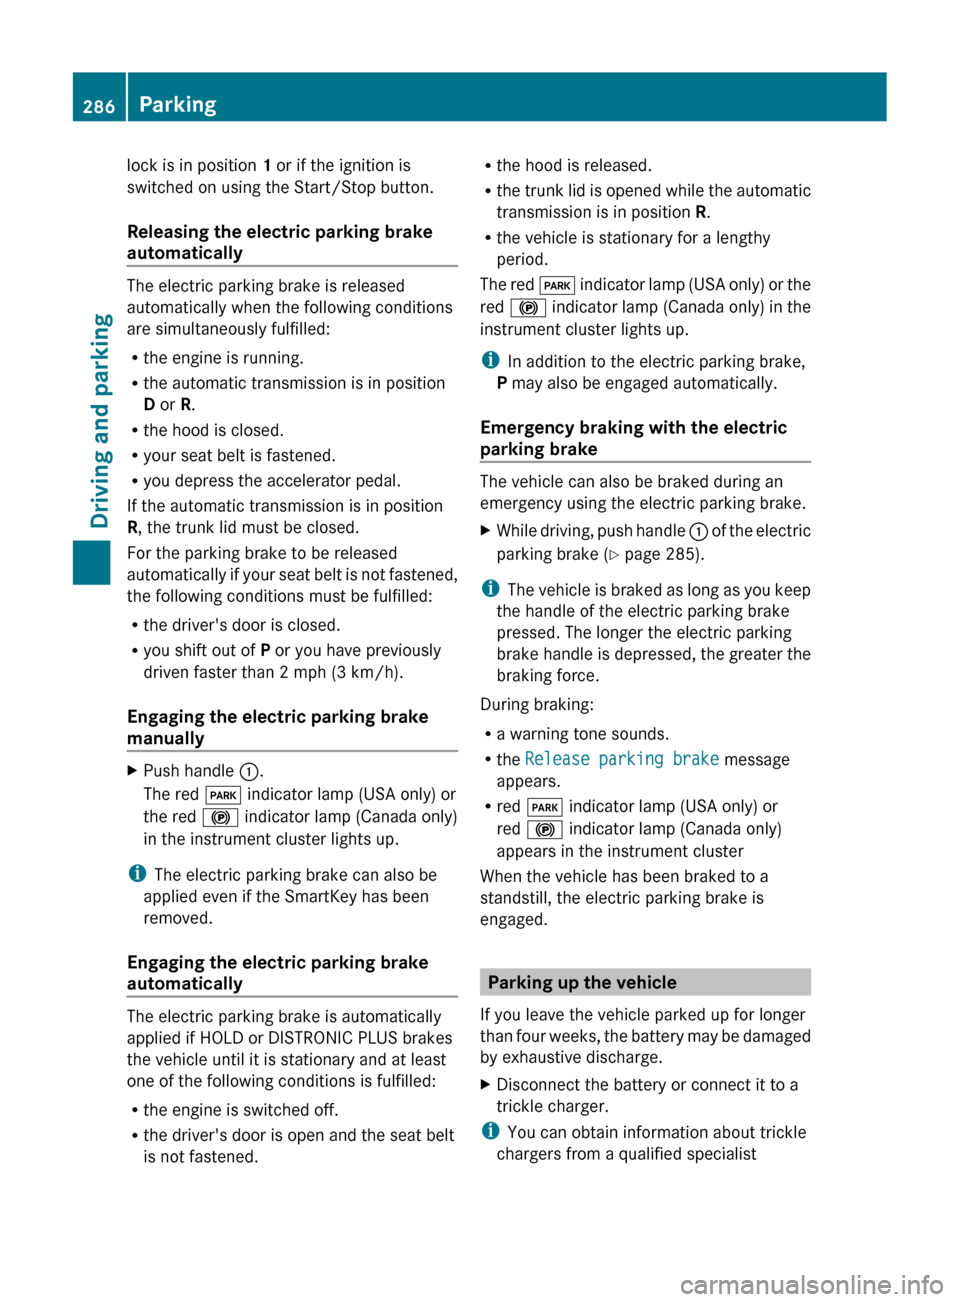
lock is in position 1 or if the ignition is
switched on using the Start/Stop button.
Releasing the electric parking brake
automatically
The electric parking brake is released
automatically when the following conditions
are simultaneously fulfilled:
R the engine is running.
R the automatic transmission is in position
D or R.
R the hood is closed.
R your seat belt is fastened.
R you depress the accelerator pedal.
If the automatic transmission is in position
R , the trunk lid must be closed.
For the parking brake to be released
automatically if your seat belt is not fastened,
the following conditions must be fulfilled:
R the driver's door is closed.
R you shift out of P or you have previously
driven faster than 2 mph (3 km/h).
Engaging the electric parking brake
manually
XPush handle :.
The red F indicator lamp (USA only) or
the red ! indicator lamp (Canada only)
in the instrument cluster lights up.
i The electric parking brake can also be
applied even if the SmartKey has been
removed.
Engaging the electric parking brake
automatically
The electric parking brake is automatically
applied if HOLD or DISTRONIC PLUS brakes
the vehicle until it is stationary and at least
one of the following conditions is fulfilled:
R the engine is switched off.
R the driver's door is open and the seat belt
is not fastened.
R the hood is released.
R the trunk lid is opened while the automatic
transmission is in position R.
R the vehicle is stationary for a lengthy
period.
The red F indicator lamp (USA only) or the
red ! indicator lamp (Canada only) in the
instrument cluster lights up.
i In addition to the electric parking brake,
P may also be engaged automatically.
Emergency braking with the electric
parking brake
The vehicle can also be braked during an
emergency using the electric parking brake.
XWhile driving, push handle : of the electric
parking brake ( Y page 285).
i
The vehicle is braked as long as you keep
the handle of the electric parking brake
pressed. The longer the electric parking
brake handle is depressed, the greater the
braking force.
During braking:
R a warning tone sounds.
R the Release parking brake message
appears.
R red F indicator lamp (USA only) or
red ! indicator lamp (Canada only)
appears in the instrument cluster
When the vehicle has been braked to a
standstill, the electric parking brake is
engaged.
Parking up the vehicle
If you leave the vehicle parked up for longer
than four weeks, the battery may be damaged
by exhaustive discharge.
XDisconnect the battery or connect it to a
trickle charger.
i You can obtain information about trickle
chargers from a qualified specialist
286ParkingDriving and parking
Page 291 of 480
but drive on for a short while. This allows the
airflow to cool the brakes more quickly.
Wet roadsGWarning
After driving in heavy rain for some time
without applying the brakes or through water
deep enough to wet brake components, the
first braking action may be somewhat
reduced. You have to depress the brake pedal
more firmly. Maintain a safe distance from
vehicles in front.
After driving on a wet road or having the
vehicle washed, brake firmly while paying
attention to the traffic conditions. This will
warm up the brake discs, thereby drying them
more quickly and protecting them against
corrosion.
Limited braking performance on salt-
treated roads
GWarning
The layer of salt on the brake discs and the
brake pads/linings may cause a delay in the
braking effect, resulting in a significantly
longer braking distance, which could lead to
an accident.
To avoid this danger, you should:
R occasionally brake carefully, without
putting other road users at risk, when you
are driving on salted roads. This helps to
remove any salt that may have started to
build up on the brake discs and the brake
pads/linings.
R maintain a greater distance to the vehicle
ahead and drive with particular care.
R carefully apply the brakes at the end of a
trip and immediately after commencing a
new trip, so that salt residues are removed
from the brake discs.
Servicing the brakes
! If the red brake warning lamp lights up in
the instrument cluster and you hear a
warning tone while the engine is running,
the brake fluid level may be too low.
Observe additional warning messages in
the multifunction display.
The brake fluid level may be too low due to
brake pad wear or leaking brake lines.
Have the brake system checked
immediately. This work should be carried
out at an authorized Mercedes-Benz
Center.
All checks and maintenance work on the
brake system must be carried out at a
qualified specialist workshop. Contact an
authorized Mercedes-Benz Center.
Only install brake pads and use brake fluid
recommended by Mercedes-Benz.
GWarning
If other than recommended brake pads are
installed, or other than recommended brake
fluid is used, the braking properties of the
vehicle can be degraded to an extent that safe
braking is substantially impaired. This could
result in an accident.
! Vehicles with 4MATIC: a function or
performance test may only be carried out
on a two-axle dynamometer. If you are
planning to have the vehicle tested on such
a dynamometer, contact an authorized
Mercedes-Benz Center to obtain further
information first. Otherwise, the drive train
or the brake system may suffer damage.
! Vehicles with 4MATIC: as the ESP®
system operates automatically, the engine
and the ignition must be switched off
(SmartKey in position 0 or 1 in the ignition
lock or Start/Stop button in position 0 or
1 ) when the electric parking brake is being
tested on a brake dynamometer.
Braking maneuvers triggered automatically
by ESP ®
may seriously damage the brake
system.
Driving tips289Driving and parkingZ
Page 292 of 480
! Vehicles with 4MATIC: as the ESP®
system operates automatically, the engine
and the ignition system must be switched
off (SmartKey in position 0 or 1 in the
ignition lock or Start/Stop button in
position 0 or 1) when:
R testing the electric parking brake on a
brake dynamometer.
R you intend to have the vehicle towed with
one of the axles raised.
Braking maneuvers triggered automatically
by ESP ®
may seriously damage the brake
system.
If your brake system is only subjected to
moderate loads, you should regularly test
your brake system's function by forcefully
depressing the brake pedal when driving at
high speed. This also improves the brake
pads' friction.GWarning
Make sure that you do not endanger other
road users when you apply the brakes.
A description of Brake Assist (BAS) can be
found on ( Y page 62) or of BAS PLUS on
( Y page 62).
High-performance brake system for
AMG vehicles
The high-performance brake system is only
installed on the CL 63 AMG and CL 65 AMG.
GWarning
New vehicle brake pads and discs, and
replacement brake pads and discs may take
several hundred miles of driving until they
provide optimum braking efficiency. Until that
time, you may need to use increased brake
pedal pressure while braking. Please be aware
of this and adjust your driving and braking
accordingly during this break-in period.
Excessive high-demand braking will cause
correspondingly high brake wear. Please be
attentive to the brake warning lamp in the
instrument cluster and brake condition
messages in the multifunction display.
Especially for high performance driving, it is
important to maintain and have the brake
system checked regularly.
The high-performance brake system is
designed for heavy loads. This may lead to
noise when braking. This will depend on:
R speed
R braking force
R environmental conditions, such as
temperature and humidity
The wear of individual components of the
brake system, such as the brake pads/linings
or brake discs, depends on the individual
driving style and operating conditions.
Driving on wet roads
Hydroplaning
If water has accumulated to a certain depth
on the road surface, there is a danger of
hydroplaning occurring, even if:
R you drive at low speeds
R the tires have adequate tread depth
For this reason, in the event of heavy rain or
in conditions in which hydroplaning can occur
you must drive in the following manner:
R Lower your speed
R Avoid ruts
R Brake carefully
Driving on flooded roads
! Do not drive through flooded areas.
Check the depth of any water before driving
through it. Drive slowly through standing
water. Otherwise, water may enter the
vehicle interior or the engine compartment.
This can damage the electronic
components in the engine or AUTOTRONIC.
Water can also be drawn in by the engine's
air suction nozzles and this can cause
engine damage.
290Driving tipsDriving and parking
Page 306 of 480
Rthe electrical system in the engine
compartment, the battery or the fuses are
tampered with.
Rthe battery is disconnected.
AIRMATIC
Vehicle level
Your vehicle regulates its height
automatically. All-round self-leveling ensures
the best possible suspension and constant
ground clearance, even with a laden vehicle.
When you drive fast, the vehicle is lowered
automatically to improve driving safety and to
reduce fuel consumption.
The following vehicle levels are possible:
Rnormal.
Rraised: the vehicle is raised above the
normal level by 1.20 in (30 mm).
Rlowered: the vehicle is lowered beyond the
normal level by 0.40 in (10 mm).
The "Normal" and "Raised" vehicle levels can
be set manually.
The "Lowered” vehicle level is set
automatically at speeds over 60 mph
(100 km/h).
Setting the vehicle level
Select the "Normal" setting for normal road
surfaces and "Raised" for driving with snow
chains or on particularly poor road surfaces.
Your selection remains stored even if you
remove the SmartKey from the ignition lock.
GWarning!
To help avoid personal injury, keep hands and
feet away from wheel housing area, and stay
away from under the vehicle when lowering
the vehicle chassis.
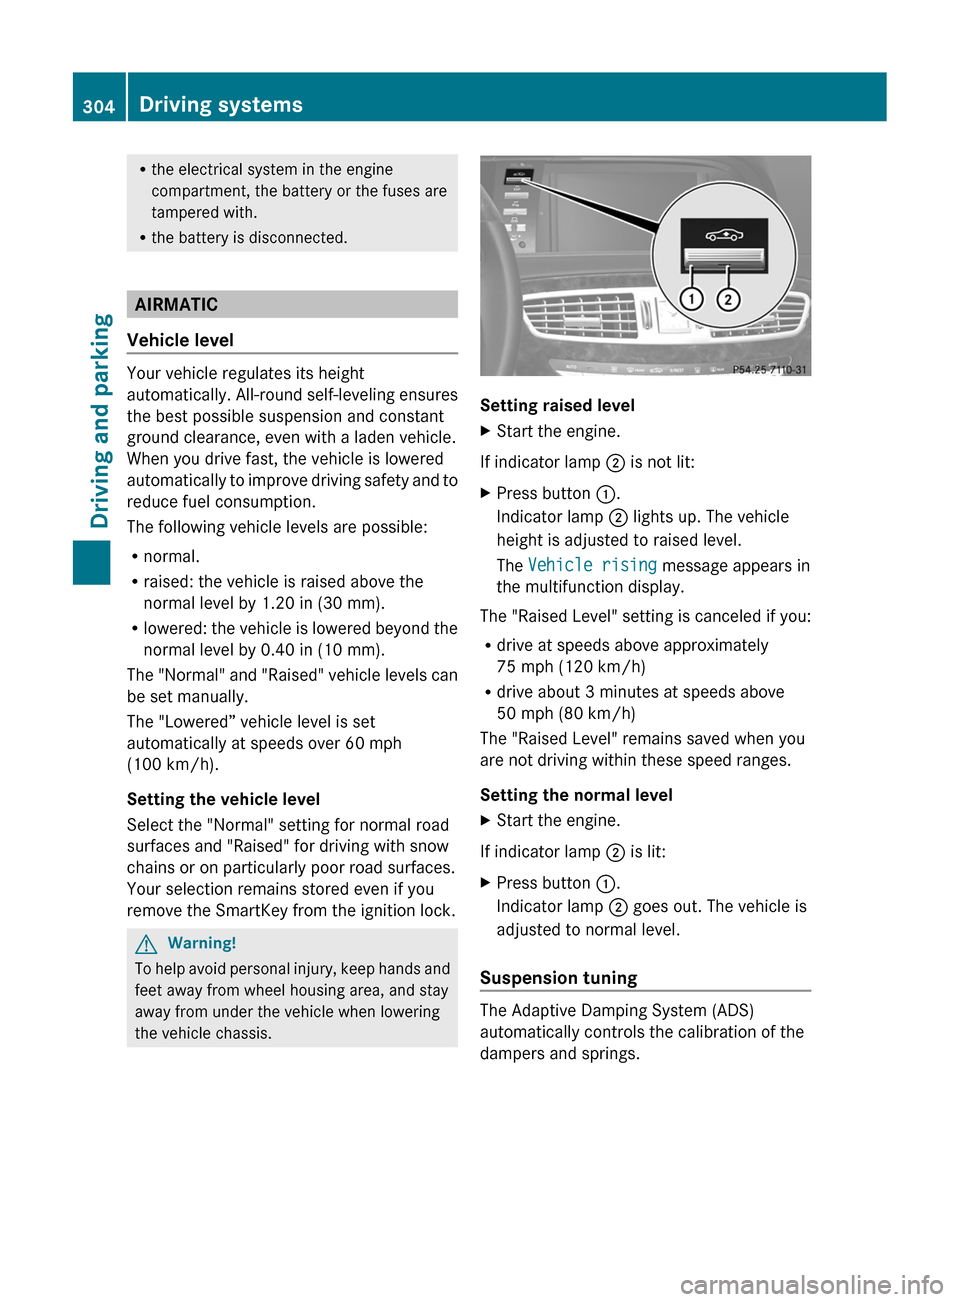
Setting raised level
XStart the engine.
If indicator lamp ; is not lit:
XPress button :.
Indicator lamp ; lights up. The vehicle
height is adjusted to raised level.
The Vehicle rising message appears in
the multifunction display.
The "Raised Level" setting is canceled if you:
Rdrive at speeds above approximately
75 mph (120 km/h)
Rdrive about 3 minutes at speeds above
50 mph (80 km/h)
The "Raised Level" remains saved when you
are not driving within these speed ranges.
Setting the normal level
XStart the engine.
If indicator lamp ; is lit:
XPress button :.
Indicator lamp ; goes out. The vehicle is
adjusted to normal level.
Suspension tuning
The Adaptive Damping System (ADS)
automatically controls the calibration of the
dampers and springs.
304Driving systemsDriving and parking