MERCEDES-BENZ E-CLASS CABRIOLET 2010 Owners Manual
Manufacturer: MERCEDES-BENZ, Model Year: 2010, Model line: E-CLASS CABRIOLET, Model: MERCEDES-BENZ E-CLASS CABRIOLET 2010Pages: 333, PDF Size: 7.64 MB
Page 261 of 333
Vehicl
eequipment
i Thismanua ldesc ribe sallthe standard
and optional equipment of your vehicle
which wa savailable at th etime of pur-
chase. Countr y-specif ic differences are
possible. Bear in mind tha tyour vehicle
ma ynot featur eall function sdescribed
here. Engine comp
artment Bonnet
Active bonnet (pedestrian protection) Operating principle
i
The activ ebonnet is only available in cer-
tain coun tries.
The activ ebonnet can reduce the risk of injury
to pedestrian sincertain acciden tsituations.
Raising the bonnet increases the clearanc eto
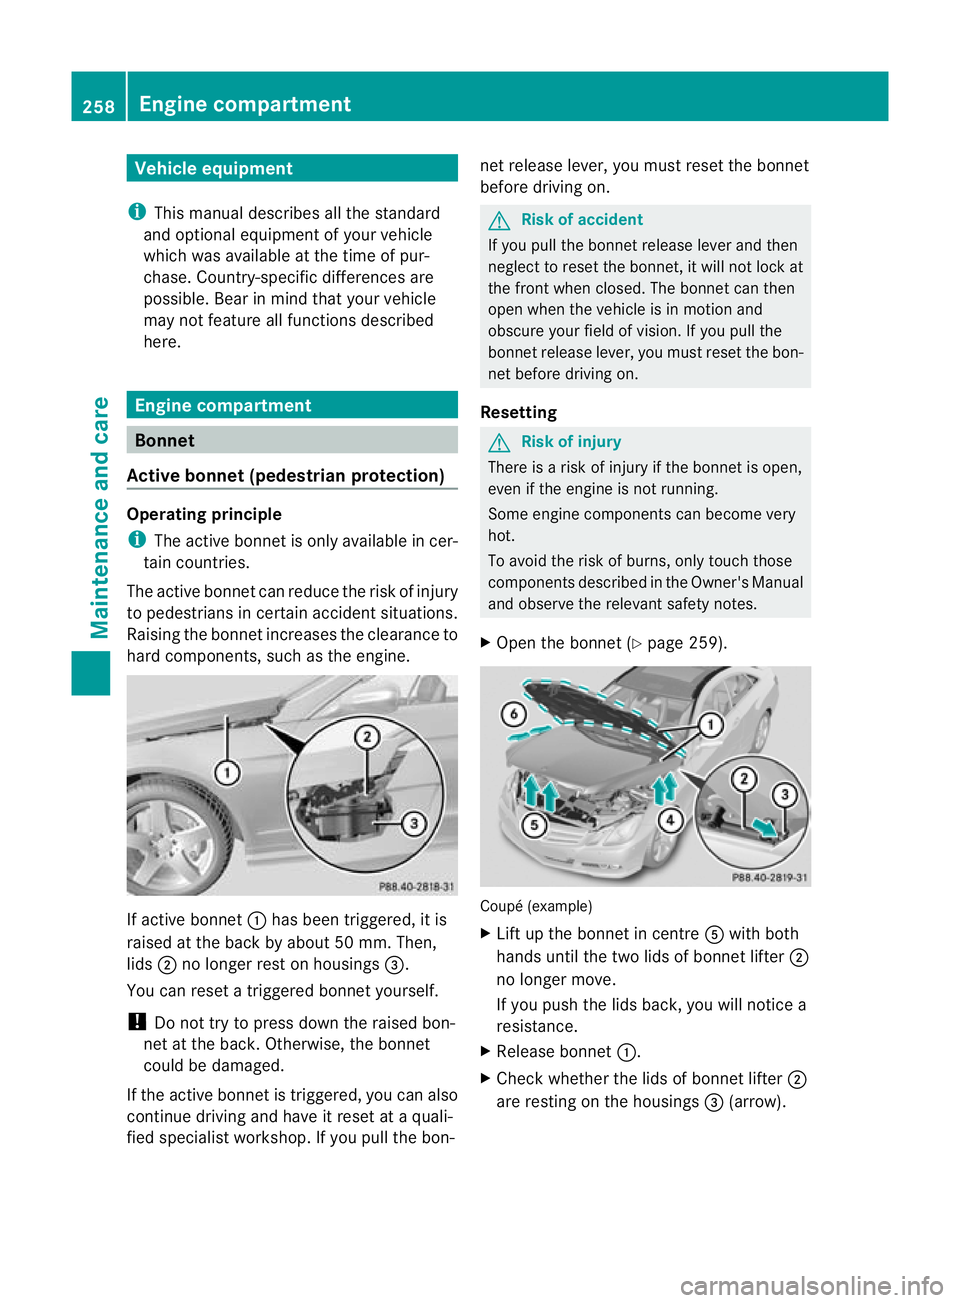
har dcomponents, such as the engine. If active bonnet
:has been triggered, it is
raised at the back by about 50 mm .Then,
lids ;no longer rest on housings =.
You can reset atriggere dbonnet yourself.
! Do not tr ytopressdown the raised bon-
net at the back .Otherwi se,the bonnet
could be damaged.
If the act iveb onnet is triggered, yo ucan also
continue driving and have it reset at aquali-
fied specialis tworkshop. If you pull the bon- net release lever, you must reset the bonnet
befor edriving on. G
Ris
kofa ccident
If you pull the bonnet release lever and then
neglect to reset the bonnet, it will not lock at
the front when closed. The bonnet can then
open when the vehicle is in motion and
obscure your field of vision. If you pull the
bonnet release lever, you must reset the bon-
net before driving on.
Resetting G
Risk of injury
There is arisk of injur yifthe bonnet is open,
even if the engin eisnot running.
Som eengine compone ntsc an become very
hot.
To avoid the risk of burns, only touch those
components described in the Owner's Manual
and observe the relevant safety notes.
X Open the bonnet (Y page 259). Coupé (example)
X
Lift up the bonnet in centre Awith both
hands until the two lids of bonnet lifter ;
no longer move.
If you push the lids back, you will notice a
resistance.
X Releas ebonnet :.
X Check whether the lids of bonnet lifter ;
ar er estin gont he housings =(arrow). 258
Engine compartmentMaintenance and care
BA 20
7ECE ÄJ 2010 /1a; 1; 2, en-GB
mkalafa Version: 3.0.2.11 2010-01-26T13:03:22+01:00 -Seite 258
Page 262 of 333
X
The lids of bonnet lifter ; are resting
on the hous ings:close bon-
net :(Ypage 260).
or
X The lids of bonnet lifter ; are no
trest-
in gont he housings: first lift up bon-
net :on left-h and?and then on right-
hand side B.Lift up bonnet :until the lid
of bonnet lifter ;no longe rmoves.
The lids of bonnet lifter ;must rest on
housings =(arrow).
X Close bonnet :(Ypage 260).
If you can notc lose bonnet :or the L
symbol appears in the multi-function display,
repeat the steps. G
Risk of accident
If the bonnet can still not be engaged properly
or the Lsymbol appears in the multifunc-
tion display, do not continue driving. The bon-
net can then open when the vehicle is in
motion and obscure your field of vision. Con-
sult aqualified specialist workshop .Other-
wise ,you may cause an accident and injure
yourself and others.
Opening th ebonnet G
Risk of accident
Do not pull the release lever while the vehicle
is in motion .Ifyou do so, the bonne tmay open
up and block your view. G
Risk of injury
There is arisk of injur yifthe bonnet is open,
even if the engin eisnot running.
Som eengine compone ntsc an become very
hot.
To avoid the risk of burns, only touch those
components described in the Owner's Manual
and observe the relevant safety notes. G
Risk of injury
The radiator fan between the radiator and the
engine can start automatically, even if the key has been removed from the ignition lock. For
this reason, you must not reach into the fan
rotation area. You could otherwise be injured.
Vehicles with
apetrol engine: The elec-
tronic ignition system uses high voltage. For
this reason ,you must never touc hignition
system component s(ignition coil, ignition
cables, spark plug connectors or test socket)
while:
R the engine is running
R the engine is being started
R the ignition is switched on and the engine
is being cranked by hand
You could otherwise suffer an electric shock
and be seriously or even fatally injured.
Vehicles with adiesel engine: The elec-
tronic injection control uses high voltage. For
this reason ,you must never touc hinjection
system components while:
R the engi neis running
R the engin eisbeing started
R the ignition is switched on
You could otherwise suffer an electric shock
and be seriously or even fatally injured.
X Make sure that the windscreen wipers are
switched off. G
Risk of injury
The windscreen wipers and wiper linkage
could be set in motion.
When the bonnet is open, you or others could
be injured by the wiper linkage.
Make sure that the windscreen wipers are
switched off .Remov ethe key or make sure
that no ignition position has been selected
with KEYLESS-GO. All indi cator lamps must be
off in the instrumen tpanel. Engine compartment
259Maintenance and care
BA 207 ECE ÄJ 2010/1a; 1; 2, en-GB
mkalafaV ersion: 3.0.2.11
2010-01-26T13:03:22+01:00
-Seite 259 Z
Page 263 of 333
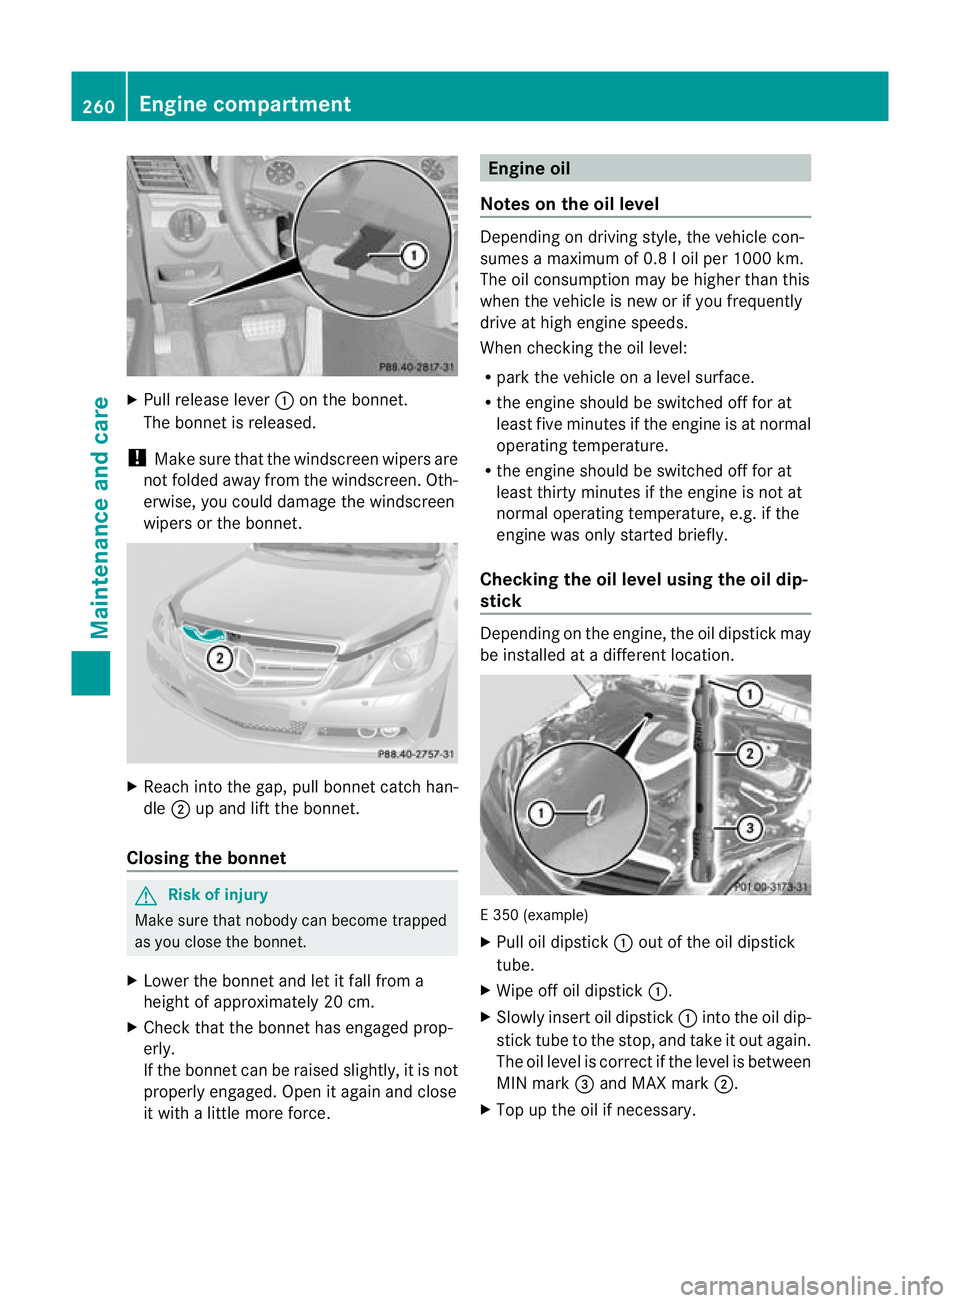
X
Pull release lever :on the bonnet.
The bonnet is released.
! Make sure that the windscreen wiper sare
not folde daway from the windscreen .Oth-
erwise, yo ucould damage the windscreen
wipers or the bonnet. X
Reach int othe gap, pull bonnet catch han-
dle ;up and lift the bonnet.
Closin gthe bonnet G
Ris
kofi njury
Make sure tha tnobody can becom etrapped
as you close th ebonnet.
X Lower the bonnet and let it fal lfrom a
height of approximatel y20c m.
X Check that th ebonnet has engaged prop-
erly.
If the bonnet can be raised slightly ,itisn ot
properly engaged. Open it again and close
it with alittle more force. Engine oil
Notes on the oil level Depending on drivin
gstyle, the vehicle con-
sumes amaximum of 0.8 loil per 100 0km.
Th eo il consumption may be higher than this
when the vehicle is new or if you frequently
drive at high engine speeds.
When checking the oil level:
R park the vehicle on alevel surface.
R the engine should be switched off for at
least fiv eminutes if the engine is at normal
operating temperature.
R the engine should be switched off for at
least thirt yminutes if the engine is not at
normal operating temperature, e.g. if the
engine was only started briefly.
Checking the oil level using the oil dip-
stick Depending on the engine, the oil dipstick may
be installed at
adifferent location. E3
50 (example)
X Pull oi ldipstick :out of the oil dipstick
tube.
X Wipe off oil dipstick :.
X Slowly insert oil dipstick :into the oil dip-
stick tube to the stop, and take it out again.
The oil level is correc tifthe level is between
MIN mark =and MAX mark ;.
X Top up the oil if necessary. 260
Engine compartmentMaintenance and care
BA 20
7ECE ÄJ 2010 /1a;1;2,e n-GB
mkalafa Version: 3.0.2.11 2010-01-26T13:03:22+01:00-Seite 260
Page 264 of 333
Adding engine oil
H
Environmenta
lnote
When toppin guptheoil, tak ecaren ot to spill
any .Ifo il enter sthe soil or waterways, it is
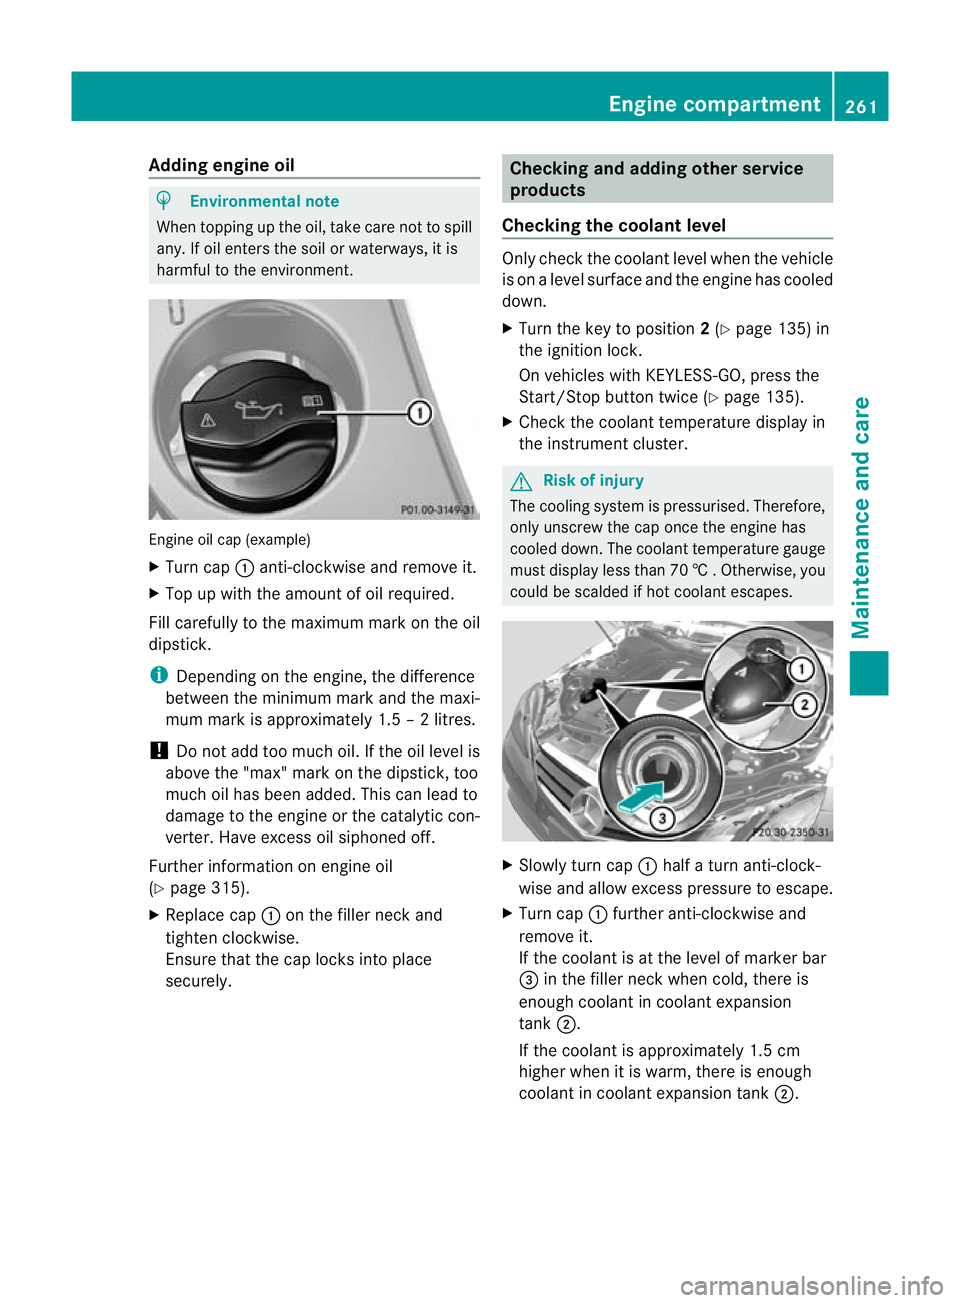
harmful to the environmen t.Engine oil cap (example)
X
Turn cap :anti-clockwise and remove it.
X Top up with the amount of oil required.
Fill carefully to the maximum mark on the oil
dipstick.
i Depending on the engine, the difference
between the minimum mark and the maxi-
mum mark is approximately 1.5 –2litres.
! Do not add too muc hoil. If the oil level is
above the "max "mark on the dipstick, too
much oil has been added. This can lead to
damage to the engine or the catalytic con-
verter .Have excess oil siphoned off.
Further information on engin eoil
(Y page 315).
X Replac ecap : on the filler nec kand
tighten clockwise.
Ensure that the cap locks int oplace
securely. Checking and addin
gother service
products
Checking th ecoolan tlevel Only check th
ecoolant leve lwhen th evehicle
is on alevel surface and th eengine has cooled
dow n.
X Tur nthe ke ytop osition 2(Y page 135) in
th ei gnitio nlock.
On vehicles with KEYLESS -GO, press the
Star t/Stop butto ntwice (Y page 135).
X Check the coolant temperature display in
the instrument cluster. G
Risk of injury
The cooling system is pressurised. Therefore,
only unscrew the cap once the engine has
cooled down. The coolant temperature gauge
must display less than 70 †.Otherwi se,you
could be scalded if ho tcoolant escapes. X
Slowl yturn cap :half aturna nti-clock-
wis eand allo wexcess pressure to escape.
X Turn cap :further anti-clockwis eand
remove it.
If the coolant is at the level of marker bar
= in the filler neck when cold, ther eis
enough coolan tincoolant expansion
tank ;.
If the coolant is approximately 1. 5cm
higher when it is warm, ther eisenough
coolant in coolant expansion tank ;. Engin
ecompartment
261Maintenance and care
BA 207ECE ÄJ 2010/1a; 1; 2, en-GB
mkalafa Version:3.0.2.11
2010-01-26T13:03:22+01:0
0-Seite 261 Z
Page 265 of 333
X
If necessary ,top up with coolant which has
been tested and approved by Mercedes-
Benz.
X Replace cap :and tur nitclockwise as far
as it wil lgo.
For further information on coolant, see
(Y page 317).
Windscreen washer system/headlamp
cleaning system The washer fluid reservoir is used for both the
windscreen washer system and the headlamp
cleaning system. G
Risk of fire
Windscreen washe rfluid is highly flam mable.
Fir e, naked flam es and smoking are prohibi-
ted when handlin gwasher fluid concentrate.
! Only use washe rfluid concentrate which
is suitable for plastic lamp lenses. Unsuit-
able washer fluid concentrate could dam-
age the plastic lamp lenses of the head-
lamps.
! Do not used distilled or de-ionised water
in the washer fluid container. Otherwise,
the fluid level measurin ggauge could be
damaged.
i Add windscreen washe rconcentrate, e.g.
MB Sum merFit, to th ewasher fluid all year
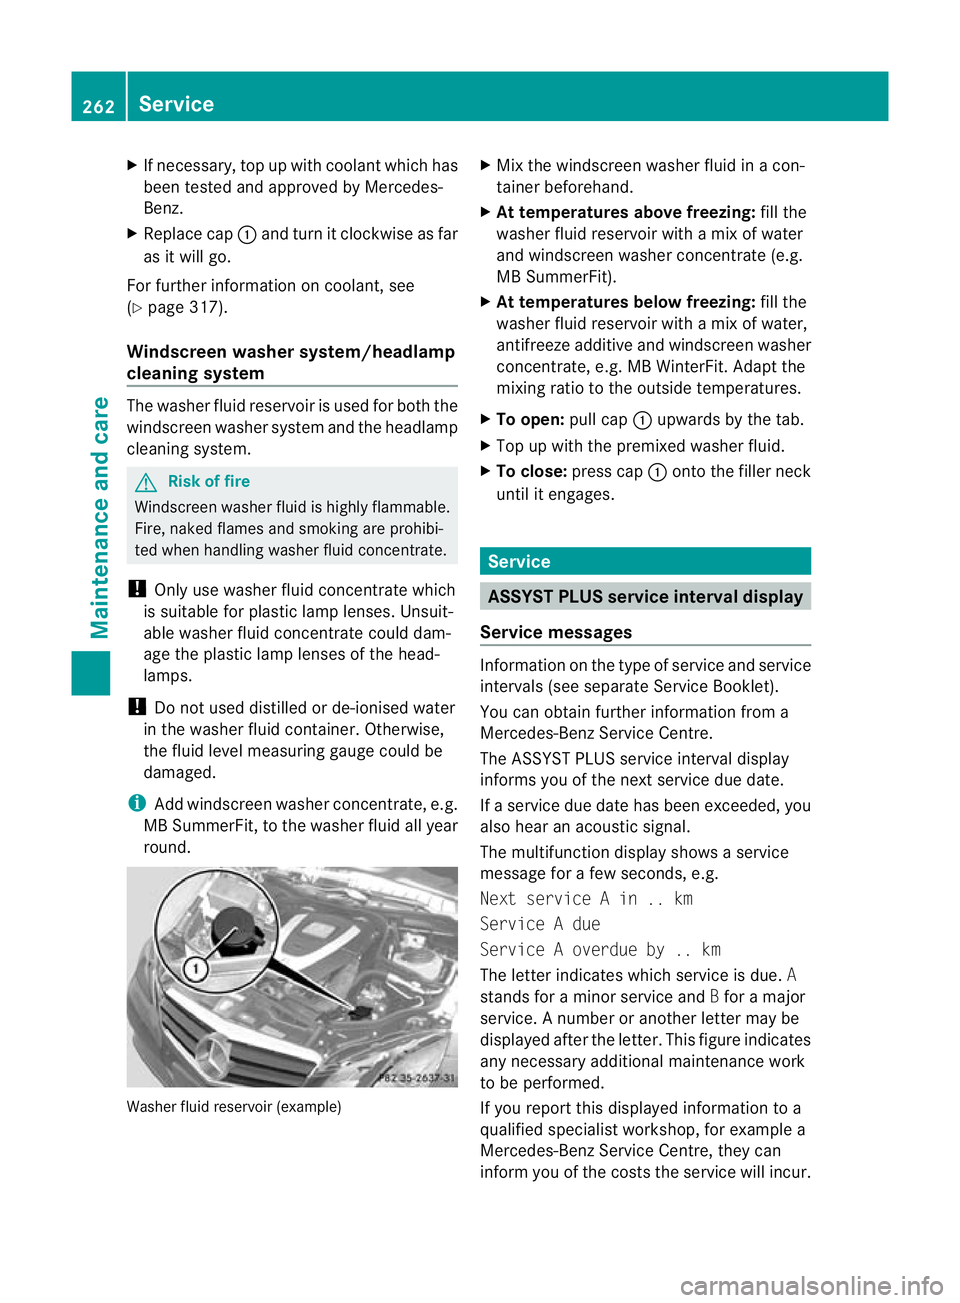
round. Washer fluid reservoir (example) X
Mix the windscreen washe rfluid in acon-
tainer beforehand.
X At temperatures above freezing: fillt he
washer fluid reservoi rwith am ix of water
and windsc reen washer concentrate (e.g.
MB Sum merFit).
X At temperatures belo wfreezing: fill the
washer fluid reservoir with amix of water,
antifreeze additiv eand windscreen washer
concentrate, e.g. MB WinterFit. Adapt the
mixing ratio to the outside temperatures.
X To open: pull cap:upward sbythe tab.
X Top up with the pre mixed washer fluid.
X To close: presscap : ontothe filler neck
until it engages. Service
ASSYST PLUS service interval display
Service messages Informa
tion on the type of service and service
intervals (see separat eServic eBooklet).
You can obtain further information fr om a
Mercedes-Ben zServic eCentre.
The ASSYS TPLUS service interva ldisplay
inform syou of the nex tservice due date.
If as ervic edue date has been exceeded, you
also hear an acoustic signal.
The multifunction display shows aservice
message for afew seconds, e.g.
Next servic eAin..km
Service Adue
Service Aoverdue by .. km
Th eletter indicates which servic eisdue.A
stands for aminor servic eand Bfor am ajor
service. Anumber or another letter may be
displayed after the letter. This figure indicates
any necessary additional maintenanc ework
to be performed.
If you repor tthis displayed information to a
qualified specialist workshop, for example a
Mercedes-Ben zService Cent re,they can
infor myou of the cost sthe service will incur. 262
ServiceMaintenance and care
BA 20
7ECE ÄJ 2010 /1a; 1; 2, en-GB
mkalafa Version: 3.0.2.11 2010-01-26T13:03:22+01:00 -Seite 262
Page 266 of 333
The ASSYST PLU
Sservice interval display
does not take into account any periods of
tim eduring which the battery is disconnec-
ted.
Maintaining the time-dependent service
schedule:
X Note down the service due date displayed
in the multifunction display before discon-
necting the battery.
or
X Subtract the battery disconnection periods
from the service date shown on the display
after reconnecting the battery.
Hiding the service message X
Press %ora on the steering wheel.
Displaying the service message X
Switc hont he ignition.
X Press =or; to selec tthe Service
men uont he steerin gwheel.
X Press 9or: to selec tthe ASSYST
PLUS submenu and press ato con firm.
Th es ervice due date appear sint he multi-
func tion display.
Please bear th efollowing in mind Aq
ualified specialist workshop, e.g. a
Mercedes-Ben zService Cent re,w ill reset the
ASSYST PLU Sservic einterval display after
the necessary service work has bee ncarried
out.
You can obtain further information ,e.g.
regarding servic ework,from aMercedes-
Ben zService Cent reor directly from
Mercedes-Ben z.
! If th eASSYST PLU Sservic einterval indi-
cator has bee ninadvertently reset, this set-
ting can be corrected at aMercedes-Benz
Ser vice Centre.
Have the servic ework carried out as descri-
bed in the Ser vice Boo klet. There may oth-
erwise be inc reased wear, resulting in dam- age to the vehicle or to the major assem-
blies. Care
Notes on care
Regular care of your vehicle is acondition for
retaining the quality in the long ter m.
Use car eproducts and cleaning agent srec-
ommended and approved by Mercedes-Benz.
! For cleanin gyour vehicle, do not use any
of the following:
R dry ,rough or hard cloths
R abrasiv ecleanin gagents
R solven ts
R cleaning agents containing solvents
Do not scrub.
Do not touch the surface sorprotective
films with hard objects ,e.g. aring or ice
scraper .You coul dotherwise scratch or
damage the surfaces and protective film. H
Environmental note
Dispose of empty packaging and cleaning
cloths in an environmentally respo nsible man-
ner.
! Do not park up your vehicle for alonger
period immediately after cleanin git, espe-
cially not after cleaning the whee lrims with
wheel rim cleanin gagent. Wheel rim clean-
ing agent scan increase corrosio nofbrake
discs and brake pads .Generally speaking,
you should not park the vehicle after clean-
ing until you have run it at regula roperating
temperature. Exterior care
Automatic car wash G
Risk of accident
Braking efficiency is reduced after washing
the vehicle. This could cause an accident. For Care
263Maintenance and care
BA 207ECE ÄJ 2010/1a; 1; 2, en-GB
mkalafa Version:3.0.2.11
2010-01-26T13:03:22+01:0
0-Seite 263 Z
Page 267 of 333
thi
sreason, following acar wash, drive with
particular care unti lthe brakes are dry. G
Risk of accident
Th ev ehicle is braked when th eHOLDfunction
or DISTRONI CPLUSisa ctivated. Therefore,
dea ctivate th eHOLD function and DISTRONIC
PLU Sbefor ethe vehicle is washed in an auto-
matic car wash.
You can wash the vehicle in an automatic car
wash from the ver ystart.
! We recommend automatic car washes
with an adjustable 40
high-pressure pre-
cleaning program. In car washes that use
hig hw ater pressures, there is adanger that
as mall quantity of water may leak int othe
vehicle.
! Cabriolet: do not treat the vehicle with
hot wax under any circumstan ces.
! Cabriolet: pull the key out of the ignition
lock when washing the vehicle .This
ensures that the win ddeflector on the
windscreen is retracted. The wind deflector
may otherwise be damaged.
If the vehicle is ver ydirty, pre-wash it before
cleaning it in an automatic car wash.
! In car washes with atowing mechanism,
make sure that the automatic transmission
is in transmission position N,otherwis ethe
vehicle could be damaged.
! Make sur ethat the side windows ar ecom-
pletel yclosed, that the ventilation/heater
blowe risfully turned off and that the wind-
screen wiper switch is set to 0.Otherwi se,
the rain/light senso rmay be activated, trig-
gering unintended wiper movemen ts.T his
could cau se damage to the vehicle.
After using an automatic car wash, wip eoff
wax from th ewindscreen and the wiper
blades. This will prevent smears and reduce
wiping noises caused by residue on the wind-
screen. High-pressur
ecleaners G
Risk of accident
Do not use high-pressur ecleaners with circu-
lar-jet nozzles (dirt grinders) to clean your
vehicle, in particular the tyres. You could oth-
erwise damage the tyres and cause an acci-
dent.
! Always maintain adistance of at least
30 cm between the vehicle and the high-
pressure cleaner nozzle. Information about
the correct distance is available from the
equipment manufacturer.
Move the high-pressure cleaner nozzle
around when cleaning your vehicle.
Do not aim directly at any of the following:
R tyres
R door joint
R soft top (Cabriolet)
R wind deflector net (Cabriolet)
R electrical components
R battery
R connectors
R lights
R seals
R trim elements
R ventilation slots
Damaged seals or electrical components
can lead to leaks or failures.
Cleanin gthe whee ls !
Do not use acidic whee lcleaning products
to remov ebrake dust .This could damage
wheel bolts and brake componen ts.
! Do not park up the vehicle for an extended
perio dstraight after cleaning it, particularly
after having cleaned the wheels with wheel
cleaner. Wheel cleaners could cause
increased corrosio nofthe brake discs and
brake pads/linings. For this reason, you
should drive for afew minutes after clean-
ing. Brakin gheats the brak ediscs and
40 In accordance with the specification sfor Cabriolet programs. 264
CareMaintenance and care
BA 20
7ECE ÄJ 2010/1a; 1; 2, en-GB
mkalafa Version: 3.0.2.11 2010-01-26T13:03:22+01:00-Seite 264
Page 268 of 333
brak
epads, thus drying them .The vehicle
can then be parked up.
Cleaning th epaintwork Scratches, corrosive deposits, area
saffected
by corrosion and damage caused by inade-
quate care canno talways be completely
repaired. In such cases, visit aqualified spe-
cialist worksho pimmediately, e.g .a
Mercedes-Ben zService Centre.
X Remov eimpurities immediately, where
possible ,whilst avoidin grubbing too hard.
X Soak insect remains with insect remover
and rinse off the treated areas afterwards.
X Soak bird droppings with water and rinse
off the treated areas afterwards.
X Remove coolant, brake fluid, tree resin,
oils ,fuels and greases by rubbing gently
with acloth soaked in petroleum ether or
lighter fluid.
X Use tar remover to remov etar stains.
X Use silicone remover to remove wax.
! Do not affix:
R stickers
R films
R magnetic plates or similar items
to painted surfaces. You could otherwise
damage the paintwork.
Care and treatment of mat tpaintwork If you
rvehicle has aclear matt finish, observe
the following instruc tions in order to avoid
damage to the paintwor kdue to incorrect
care.
! Under no circumstances should you pol-
ish the vehicle. Polishing will make the
paintwork shine.
! Do not use paintwork cleaner, grinding or
polishing products or glos spreservers such
as wax .These product sare onl ysuitable for
high-glos ssurfaces. Using them on vehi-
cles with matt paintwork can cause severe damage to the surface (shiny, mottled
patches).
Always have paintwork repairs performed
at
aq ualified specialist workshop, e.g. a
Mercedes-Ben zService Centre.
! Do not use wash programs with ahot wax
treatmen tunder any circumstances.
i Use only insect remover and car shampoo
from the range of recommended and
approved Mercedes-Be nz care products.
Cleanin gthe cabriolet soft top X
Light soiling: you can clean the sof ttop
whil eitisd ry or rinse it with clear water.
X Norma ltoheavy soiling: clean theroof
wit hab rush and clear water. Clean stains
and othe rdirt wit habrush and aMercedes-
Ben zrecom mended and approved cleani ng
agent. Always brush from fron ttoback in
the direction of the fabric.
! Never use any of the following to clean the
soft top:
R petrol
R thinner
R tar or stain remover
R other organic solvents
! Remove bird droppings immediately as
they are corrosive and, therefore, can make
the soft- topf abric leak. Do not use high-
pressure cleanin gequipmen ttoclean the
vehicle. Do not use sharp-edged equipment
to remov eice and snow.
Frequent cleaning reduce sthe resistanc eto
dirt of the soft top.
To restore this resistanc etodirt, clean the
soft top using soft top cleanin gagents that
have been recommended and approved by
Mercedes-Benz.
In co rrect cleaning and care, as well as ageing,
can cause th esoft top seam stoleak. Have
the soft-top seams sealed at aqualified spe-
cialist workshop, e.g. at aMercedes-Benz
Servic eCentre. Care
265Maintenance and care
BA 207ECE ÄJ 2010/1a; 1; 2, en-GB
mkalafa Version: 3.0.2.11 2010-01-26T13:03:22+01:00-Seite2 65 Z
Page 269 of 333
i
Cover the soft top with asuitable cover if
you plan to leave the vehicle outsid efor a
long period of time.
Cleaning AIRCAP Cleaning th
ewind deflector
Clean the wind deflector on the windscreen
with the soft top closed.
X Apply the parkin gbrake firmly.
X Vehicle swith key: turn the key to position
2 (Y page 135) in the ignition lock.
X Vehicles with KEYLESS-GO: press the
Star t/Stop butto ntwice (Y page 135).
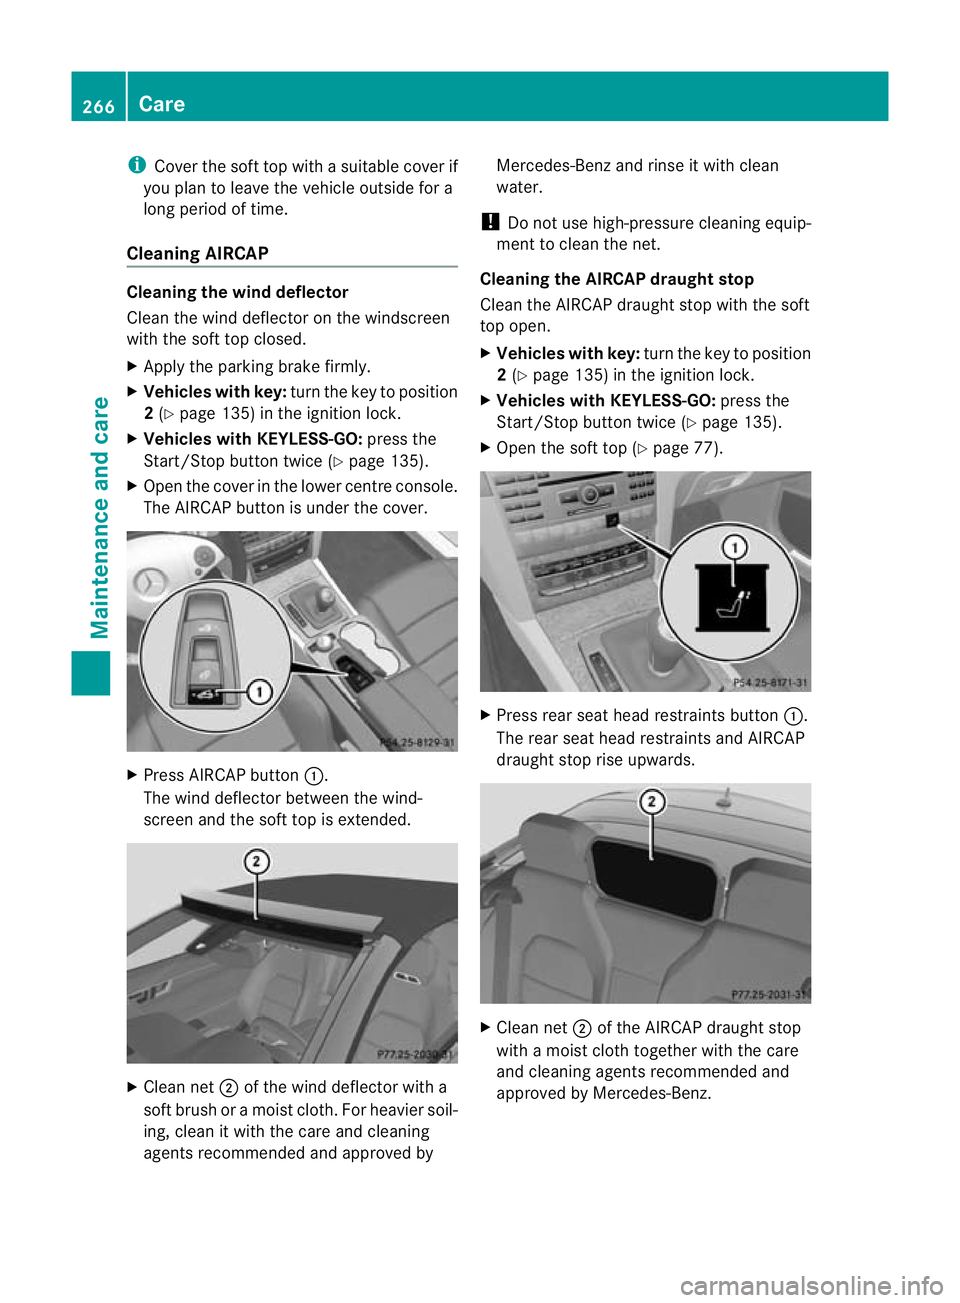
X Open the cover in the lower centre console.
The AIRCA Pbutton is under the cover. X
Press AIRCAP button :.
The wind deflector betwee nthe wind-
screen and the soft top is extended. X
Clean net ;of the wind deflec torw ith a
soft brush or amoist cloth. For heavier soil-
ing, clea nitwith the care and cleaning
agents recommended and approved by Mercedes-Ben
zand rins eitwithc lean
water.
! Do not us ehigh-pressure cleaning equip-
ment to clean the net.
Cleanin gthe AIRCA Pdraught stop
Clea nthe AIRCA Pdraught stop with th esoft
top open.
X Vehicles with key: turnthe key to position
2 (Y page 135) in the ignition lock.
X Vehicle swith KEYLESS-GO: press the
Star t/Stop butto ntwice (Y page 135).
X Open the soft top (Y page 77). X
Press rear seat head restraint sbutton :.
The rear seat head restraint sand AIRCAP
draugh tstop rise upwards. X
Clea nnet; of the AIRCAP draught stop
with amoist clot htogether with the care
and cleanin gagents recommended and
approved by Mercedes-Benz. 266
CareMaintenance and care
BA 20
7ECE ÄJ 2010/1a; 1; 2, en-GB
mkalafa Version:3.0.2.11
2010-01-26T13:03:22+01:0
0-Seite 266
Page 270 of 333
Cleaning th
ewindows G
Ris
kofi njury
Switch off th ewindscree nwipers and remove
the key fro mthe ignition lock befor ecleaning
the windscreen or the wiper blades. On vehi-
cles with KEYLESS-GO, press the Star t/Stop
butto nuntil all indicato rlamps in the instru-
ment cluster go out. The windscreen wipers
could otherwise move and injure you.
X Clea nthe insid eand outside of the win-
dow swithadamp cloth and acleaning
agent that is recommended and approved
by Mercedes-Benz.
! Do not use dry cloths, abrasive products,
solvents or cleaning agents containing sol-
vent stoc lean the inside of the windows.
Do not use hard object stoclean the insides
of the windows, e.g. an ice scraper or ring.
There is otherwise arisk of damaging the
windows.
! Clean the water drainage channels of the
windscreen and the rear window at regular
intervals. Under certain circumstances,
deposits such as leaves, petals and pollen
may prevent water from drainin gaway
leading to corrosion damage.
Cleaning the wiper blades G
Risk of injury
Switch off the windscreen wipers and remove
the key from the ignition lock before cleaning
the windscreen or the wiper blades. On vehi-
cles with KEYL ESS-GO, pres sthe Start/S top
button until all indicator lamps in the instru-
ment cluster go out. The windscreen wipers
could otherwise mov eand injure you.
! Do not pull on the wipe rblade. Otherwise,
the wiper blade could be damaged.
! Do not clean wiper blades too often and
do not rub them too hard. Otherwise, the
graphite coating could be damaged. This
could cause wiper noise. X
Fold the wiper arm saway from the wind-
screen.
X Carefully clean the wiper blades with a
damp cloth.
X Fold the windscreen wipers back again
before switching on the ignition.
! Hold the wiper arm securely when folding
back. The windscreen could be damaged if
the wiper arm hits against it suddenly.
Cleaning the headlamps X
Clean the plastic lamp lenses on the head-
lamps using awet sponge and amild clean-
ing agent, e.g. Mercedes-Benz car sham-
poo or cleaning cloths.
! Only use cleaning agents or cleaning
cloths which are suitable for plastic head-
lamp lenses. Unsuitable cleaning agents or
cleaning cloths could scratc hordamage
the plastic headlamp lenses.
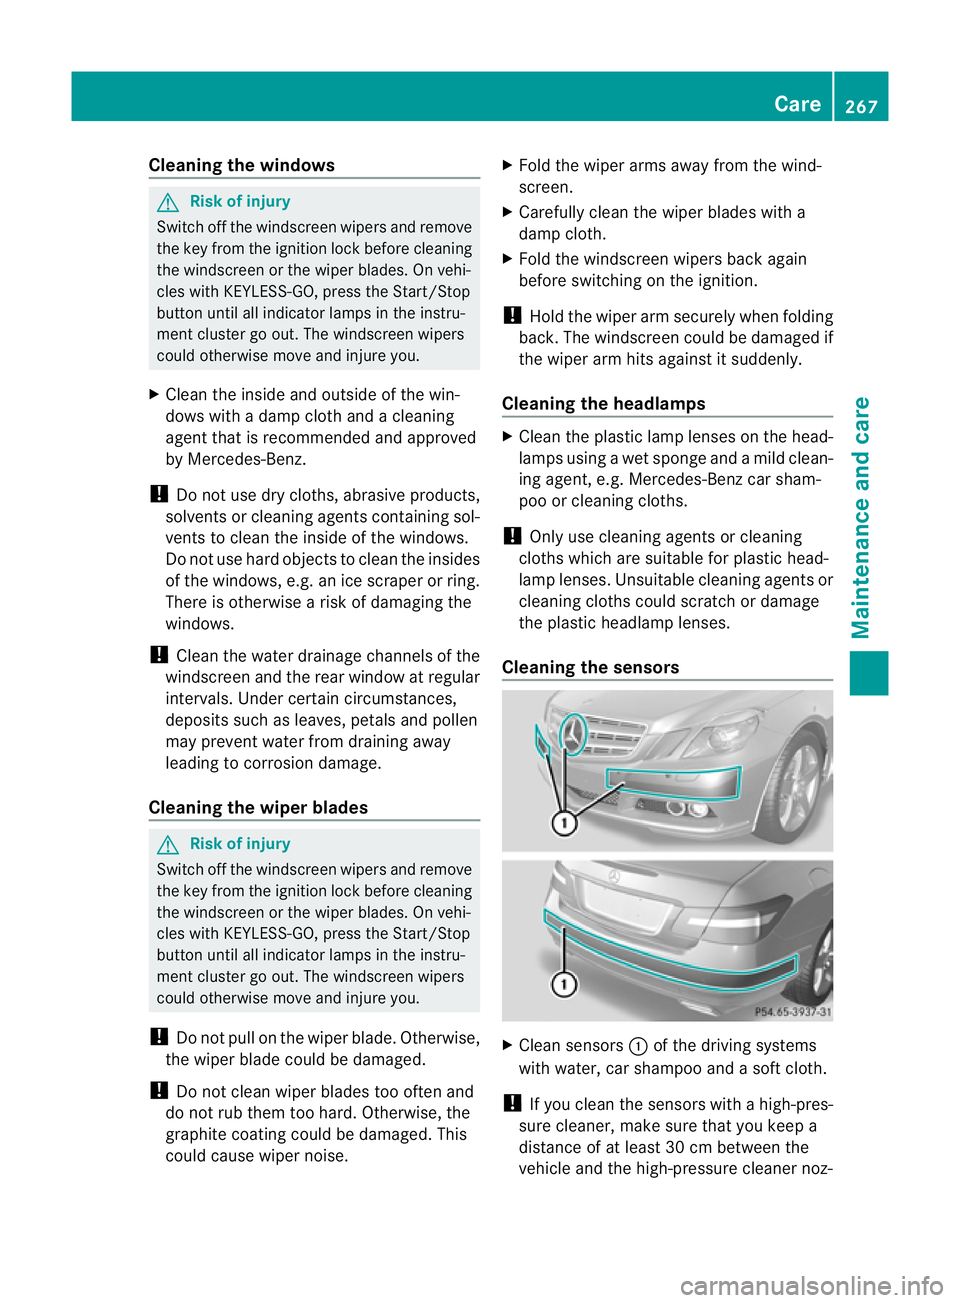
Cleaning the sensors X
Clean sensors :of the driving systems
with water, car shampoo and asoft cloth.
! If you clea nthe sensor swithahigh-pres-
sure cleaner ,make sure that you keep a
distance of at least 30 cm between the
vehicle and the high-pressure cleaner noz- Care
267Maintenance and care
BA 207 ECE ÄJ 2010/1a; 1; 2, en-GB
mkalafa Version:3.0.2.11
2010-01-26T13:03:22+01:00
-Seite 267 Z