MERCEDES-BENZ E-CLASS CABRIOLET 2010 Owners Manual
Manufacturer: MERCEDES-BENZ, Model Year: 2010, Model line: E-CLASS CABRIOLET, Model: MERCEDES-BENZ E-CLASS CABRIOLET 2010Pages: 333, PDF Size: 7.64 MB
Page 281 of 333
X
Make sur epressure release screw Fon
pressure gauge Gis full yclosed.
X Screw filler hose Donto valve E.
X Insert connector Ainto the cigarette
lighter socket (Y page 252)orinto a12V
socket in your vehicle (Y page 253).
X Tur nthe key to position 1(Ypage 135) in
the ignition lock.
X Press on/off switch ?on the electric air
pum pto I.
The electric air pum pisswitched on. The
tyre is inflated.
i First, TIREFI Tispumped into the tyre. The
pressure can briefly rise to approximately
500 kPa (5 bar/73 psi).
Do not switch off the electric pum pdur-
in gt his phase.
X Let th eelectric pump run for fiv eminutes.
The tyre should then have attained apres-
sure of at le ast180 kPa (1.8 bar/26 psi).
! Do not operate the el ectric ai rpump for
longe rthan eight minutes at atime without
ab reak. It may otherwis eoverheat.
Th ea ir pump can be operated again once
it has cooled down.
If after fiv eminutes apressure of 180 kPa
(1.8 bar/26 psi) ha sbeen achieved, see
(Y page 279).
If after fiv eminutes apressure of 180 kPa
(1.8 bar/26 psi) ha snot been achieved, see
(Y page 279). TIREFIT kit version 2 X
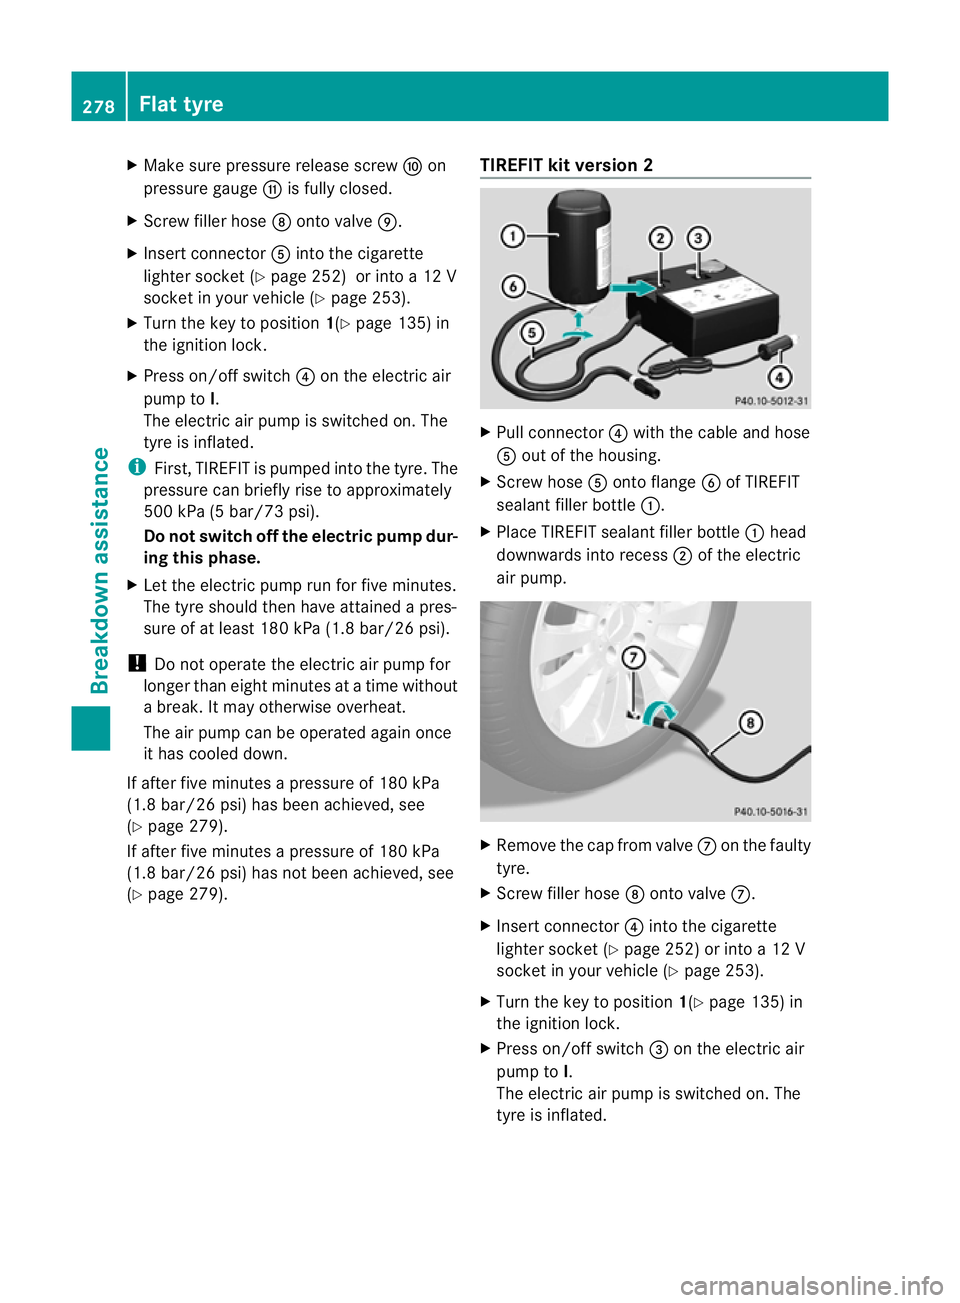
Pull connector ?with the cable and hose
A out of the housing.
X Screw hose Aonto flange Bof TIREFIT
sealant fil lerb ottle :.
X Place TIREFI Tsealant filler bottle :head
downwards into recess ;of the electric
air pump. X
Remove the cap from valve Con the faulty
tyre.
X Screw filler hose Donto valve C.
X Insert connector ?into the cigarette
lighter socket (Y page 252) or into a12V
socket in your vehicle (Y page 253).
X Turn the key to position 1(Ypage 135 )in
the ignition lock.
X Press on/off switch =on the electric air
pump to I.
The electric air pump is switched on. The
tyre is inflated. 278
Flat tyreBreakdown assistance
BA 207 ECE ÄJ 2010/1a; 1; 2, en-GB
mkalafa
Version:3.0.2.11
2010-01-26T13:03:22+01:0
0-Seite 278
Page 282 of 333
i
First, TIREFIT is pumpe dinto the tyre .The
pressur ecan briefly rise to approximately
500 kPa (5 bar/73 psi).
Do not switch off the electric pum pdur-
in gt his phase.
X Let th eelectric pump run for fiv eminutes.
The tyre should then have attained apres-
sure of at le ast180 kPa (1.8 bar/ 26 psi).
! Do not operate the el ectric ai rpump for
longe rthan eight minutes at atime without
ab reak. It may otherwis eoverheat.
Th ea ir pump can be operated again once
it has cooled down.
If after fiv eminutes apressure of 180 kPa
(1.8 bar/26 psi) ha sbeen achieved, see
(Y page 279).
If after fiv eminutes apressure of 180 kPa
(1.8 bar/26 psi) ha snot been achieved, see
(Y page 279).
Tyre pressur eof180 kPa (1.8 bar, 26
psi) is not reached If after fiv
eminutes apressure of 180 kPa
(1.8 bar/26 psi) ha snot been achieved:
X Press the on/off switch on the electri cair
pump to 0.
The electric air pump is switched off.
X Unscrew the filler hose from the valv e.
X Very slowly drive forwards or reverse
ap proximately 10 m.
X Pum pupt he tyreagain. G
Risk of accident
If after fiv eminutes apressure of 180 kPa
(1 8 bar/26 psi) cannot be achieved ,the tyre
is too severel ydamaged.
Do not drive any further. Consult aqualified
specialist workshop which has the necessary
specialist knowledge and tools to carry out
the work required. Mercedes-Benz recom-
mends that you use aMercedes-Ben zService
Centr efor this pur pose.Inp articular, work
relevant to safety or on safety-related sys- tems must be carrie
dout at aqualified spe-
cialist workshop.
Tyre pressure of 180 kPa (1.8 bar, 26
psi) is reached X
Press the on/off switch on the electric air
pump to 0.
The electric air pump is switched off.
X Remove the TIREFIT kit from the wheel. G
Warning
The air hos emay still be hot. Exercise proper
cautio ntoavoidb urning yourself when
detaching the electric air pump.
! After use, excess TIREFIT may run out of
the filler hose. This may cause stains.
Therefore, place the filler hos einthe plastic
bag whic hcontaine dthe TIREFIT kit.
X Stow away the TIREFIT kit ,the electric air
pum pand the warning triangle.
X Pull away immediately. G
Risk of accident
Do not exceed the maximum speed of
80 km/h.
The "max. 80 km/h" labe lmust be affixed in
the driver's field of vision.
The vehicle's handling characteristics may be
affected.
X Stop after driving for approximately ten
minutes and check the tyre pressure with
the electric air pump. G
Risk of accident
If the tyre pressure is less than 130 kPa
(1.3 bar/26 psi), the tyre is too severely dam-
aged. Do not drive any further. Consult a
qualified specialist workshop which has the
necessary specialist knowledg eand tool sto
carry out the work required. Mercedes-Benz
recommends that you use aMercedes-Benz
Ser vice Centre for thi spurpose. In particular,
work relevant to safety or on safety-related Flat tyre
279Breakdown assistance
BA 207 ECE ÄJ 2010/1a; 1; 2, en-GB
mkalafa Version: 3.0.2.11 2010-01-26T13:03:22+01:00-Seite 279 Z.
Page 283 of 333
systems must be carried out at
aqualified
specialist workshop.
X Correct the tyre pressure if it is at least
130 kPa(1.3 bar/26 psi) (for the value ssee
the fuel filler flap).
X To increase th etyre pressure: switch on
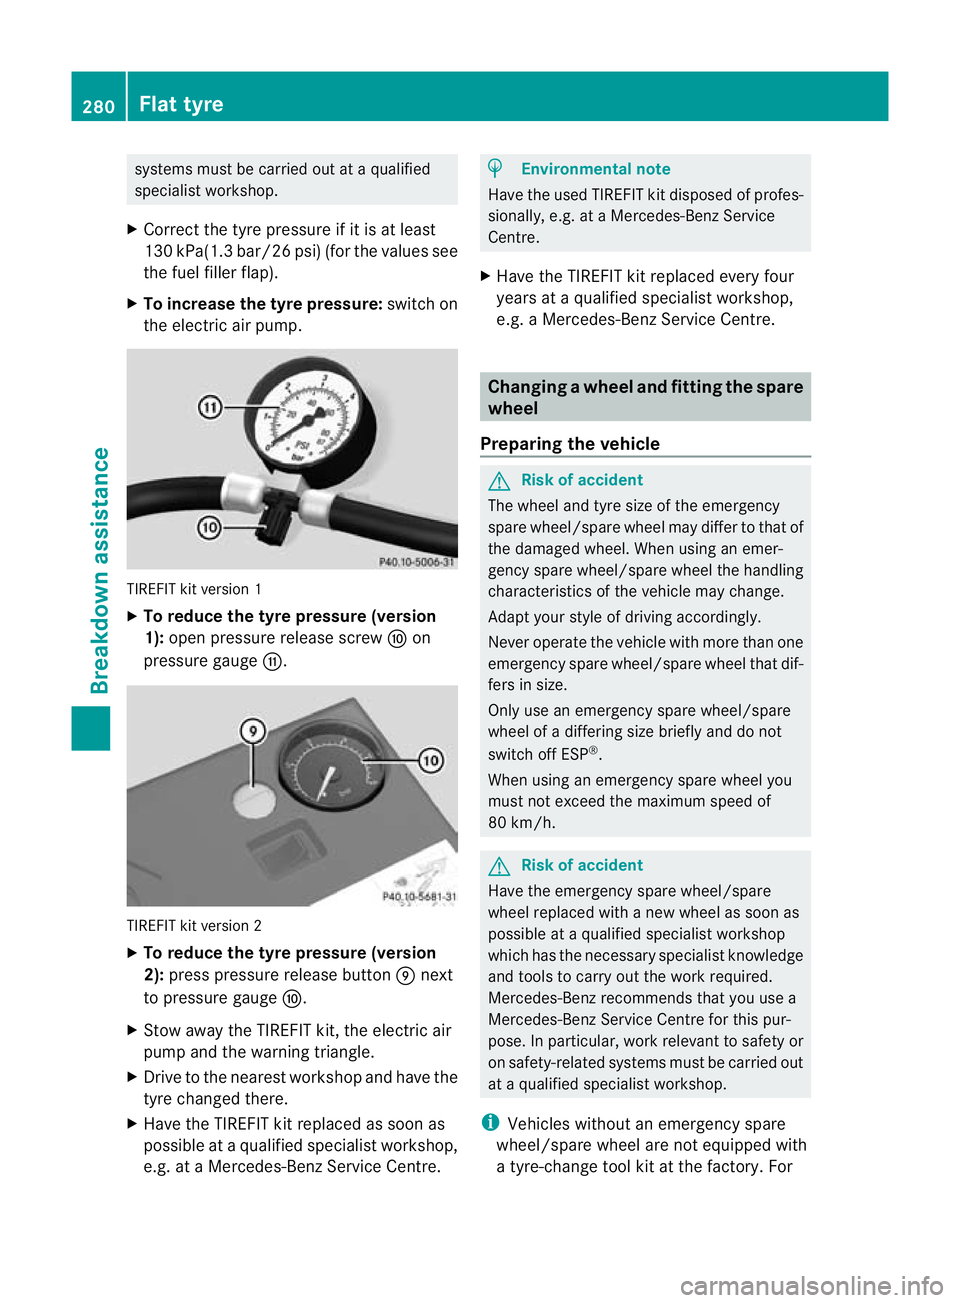
th ee lectric air pump. TIREFIT kit version 1
X
To reduce the tyr epressure (version
1): ope npressure release screw Fon
pressure gauge G. TIREFIT kit versio
n2
X To reduce the tyre pressure (version
2): pres spressure release button Enext
to pressure gauge F.
X Sto wa waythe TIREFIT kit ,the electric air
pum pand the warning triangle.
X Drive to the neares tworkshop and have the
tyr ec hange dthere.
X Hav ethe TIREFIT kit replaced as soon as
possible at aqualified special istworkshop,
e.g. at aMercedes-Ben zService Centre. H
Environmenta
lnote
Have the used TIREFI Tkit dispose dofprofes-
sionall y, e.g. ataM ercedes-Ben zService
Centre.
X Hav ethe TIREFIT kit replaced ever yfour
year sataq ualified special istworkshop,
e.g. aMercedes-Ben zService Centre. Changing
awhee land fitting th espare
wheel
Preparing the vehicle G
Risk of accident
The wheel and tyre size of the emergency
spare wheel/s pare wh eelm ay differ to tha tof
the damaged wheel. Whe nusing an emer-
genc yspare wheel/spar ewheel the handling
characteristic softhe vehicle ma ychange.
Adap tyour style of driving accordingly.
Never operate the vehicle with mor ethan one
emergenc yspare wheel/spar ewheel that dif-
fer sins ize.
Only use an emergenc yspare wheel/spare
wheel of adiffering size briefly and do not
switch off ESP ®
.
When using an emergenc yspare wheel you
must not exceed the maximum speed of
80 km/h. G
Risk of accident
Hav ethe emergenc yspare wheel/spare
wheel replaced with anew wheel as soon as
possible at aqualified specialist workshop
which has the necessary specialist knowledge
and tools to carry out the work required.
Mercedes-Benz recommends that you use a
Mercedes-Benz Service Centre for this pur-
pose .Inp articular, work relevant to safety or
on safety-related systems must be carried out
at aq ualified specialist workshop.
i Vehicles withou tanemergency spare
wheel/spare whee lare not equippe dwith
at yre-change tool kit at the factory. For 280
Flat tyreBreakdown assistance
BA 207 ECE ÄJ 2010
/1a; 1; 2, en-GB
mkalafa Version: 3.0.2.11 2010-01-26T13:03:22+01:00 -Seite 280
Page 284 of 333
more informati
on on which tools are
required to perfor mawheel change on your
vehicle, e.g. wheel chock ,wheel wrenc hor
centring pin, consult aMercedes-Benz
Servic eCentre.
X Prepar ethe vehicle as described
(Y page 275).
X Ifat railer is coupled to th evehicle, uncou-
ple it.
X Remov ethe followin gitems from the stow-
age well under the boo tfloor:
R the emergenc yspare wheel
R the vehicle tool kit
R the foldin gwheel chock
R the jack
X Secur ethe vehicle to preven titfrom rolling
awa y.
Se curing the vehicle to prevent it from
rolling away If your vehicle is equipped with
awheel choc k,
it can be found in the vehicle tool kit
(Y page 274).
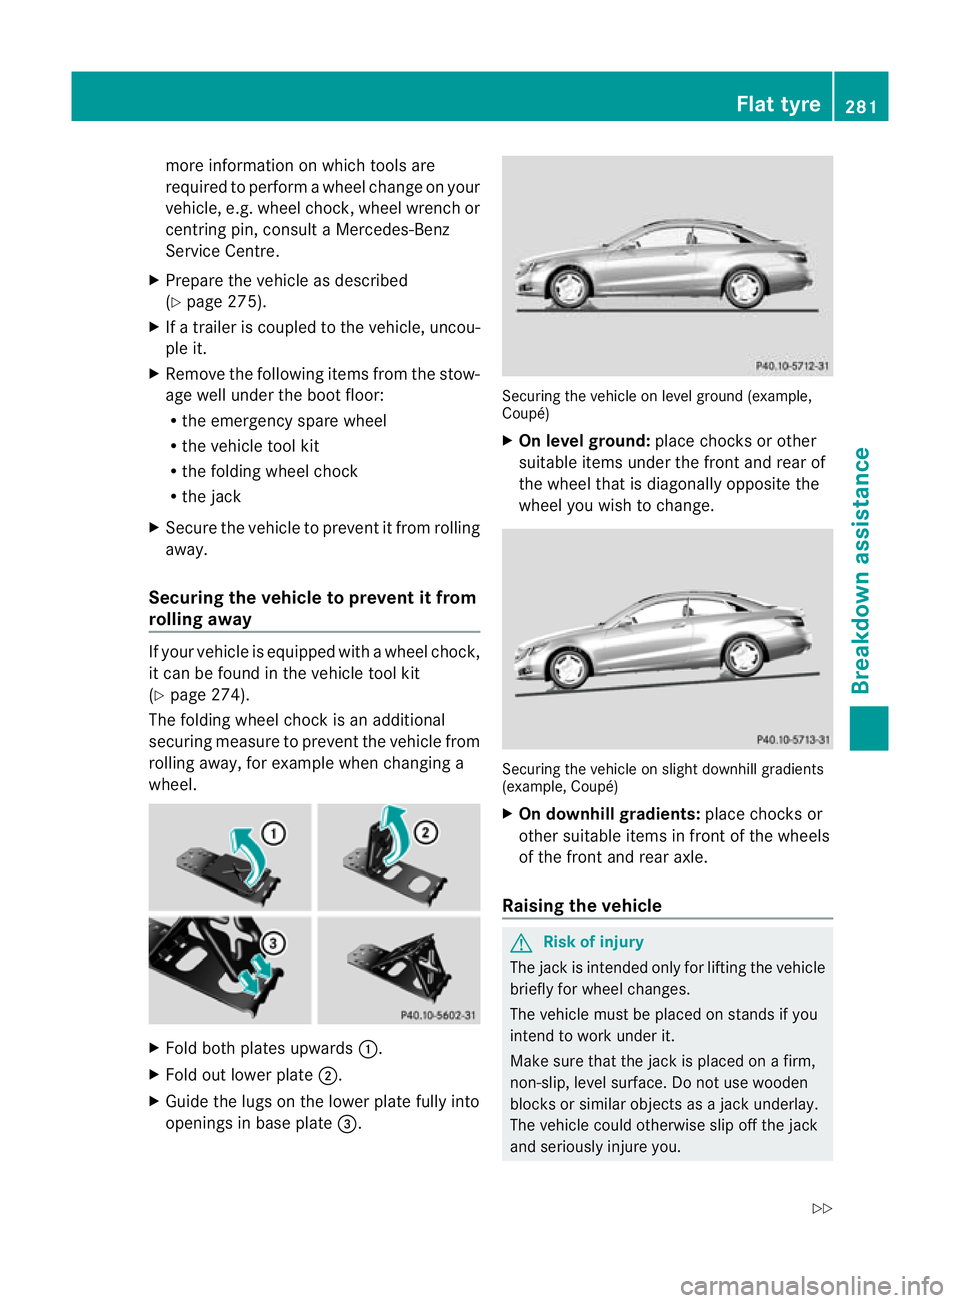
The folding wheel chock is an additional
securing measure to prevent the vehicle from
rolling away, for example when changing a
wheel. X
Fold both plates upwards :.
X Fold out lower plate ;.
X Guide the lugs on the lower plate fully into
openings in base plate =. Securing the vehicle on level ground (example,
Coupé)
X
On level ground: place chocksorother
suitable items under the front and rear of
the whee lthat is diagonally opposit ethe
wheel you wish to change. Securing the vehicl
eonslight downhill gradients
(example, Coupé)
X On downhill gradients: place chocksor
other suitable item sinfront of th ewheels
of the front and rea raxle.
Raisin gthe vehicle G
Ris
kofi njury
The jac kisintende donly for lifting the vehicle
briefly for wheel changes.
The vehicl emust be placed on stands if you
intend to work under it.
Make sure that the jack is placed on afirm,
non-slip, level surface. Do not use wooden
blocks or similar object sasajack underlay.
The vehicle could otherwise slip off the jack
and seriousl yinjure you. Flat tyre
281Breakdown assistance
BA 207 ECE ÄJ 2010/1a; 1; 2, en-GB
mkalafa Version: 3.0.2.11 2010-01-26T13:03:22+01:00-Seite 281 Z
Page 285 of 333
Do not start the engine at any time whil
ethe
whee lisbeing changed.
Do not li eunder the vehicl ewheniti sbeing
supporte dbythe jack. If you do not raise the
vehicle as described, it could slip off the jack
(e.g. if the engine is started or adoorort he
boot lid is opene dorclosed)and seriously
injure you. G
Ris
kofa ccident
If you fail to position the jac kcorrectly, the
vehicle may:
R slip off th ejack
R injure you or others
R be damaged.
Therefore, mak esure that the jac kisposi-
tioned correc tlyint he respective jacking
points. Before positionin gthe jack, remove
any dir tthat ma yhave collected in the jacking
points. Please note that you must positio nthe
jac kint he openin gofthe jackin gpoint. X
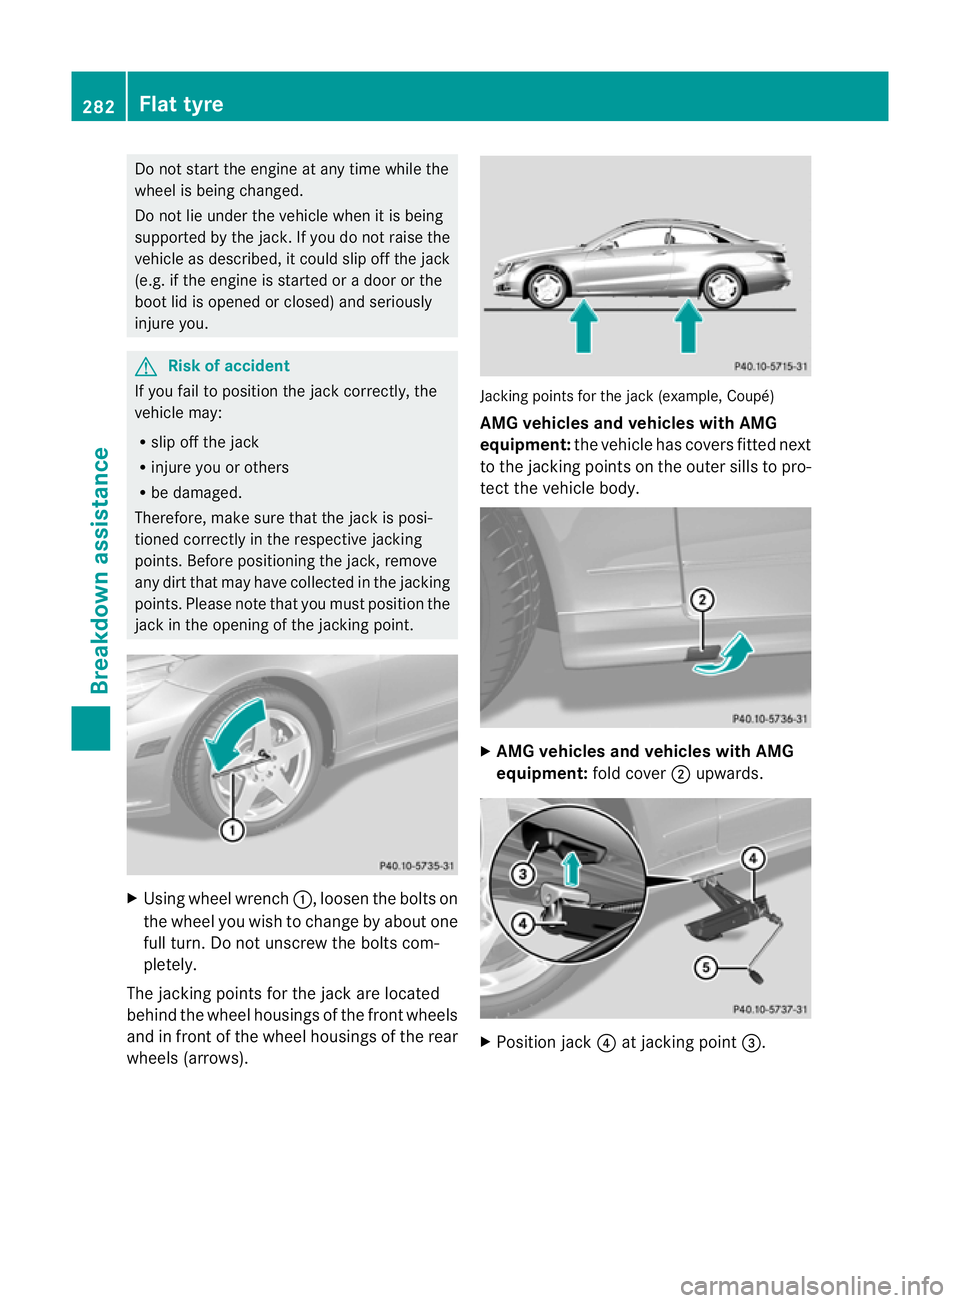
Usin gwheel wrench :,loosen the bolts on
the wheel you wish to change by about one
full turn. Do not unscrew th ebolts com-
pletely.
The jacking points for the jack are located
behind the whee lhousings of the front wheels
and in front of the whee lhousings of the rear
wheels (arrows). Jackin
gpoints for the jack (examp le,C oupé)
AMG vehicles an dvehicles with AMG
equipment: the vehicle has covers fitted next
to the jackin gpoints on th eouter sills to pro-
tec tthe vehicle body. X
AM Gvehicles and vehicle swith AMG
equipment: fold cover;upwards. X
Position jack ?at jackin gpoint =. 282
Flat ty
reBreakdown assistance
BA 207 ECE ÄJ 2010/1a; 1; 2, en-GB
mkalafaV ersion: 3.0.2.11
2010-01-26T13:03:22+01:0
0-Seite 282
Page 286 of 333
X
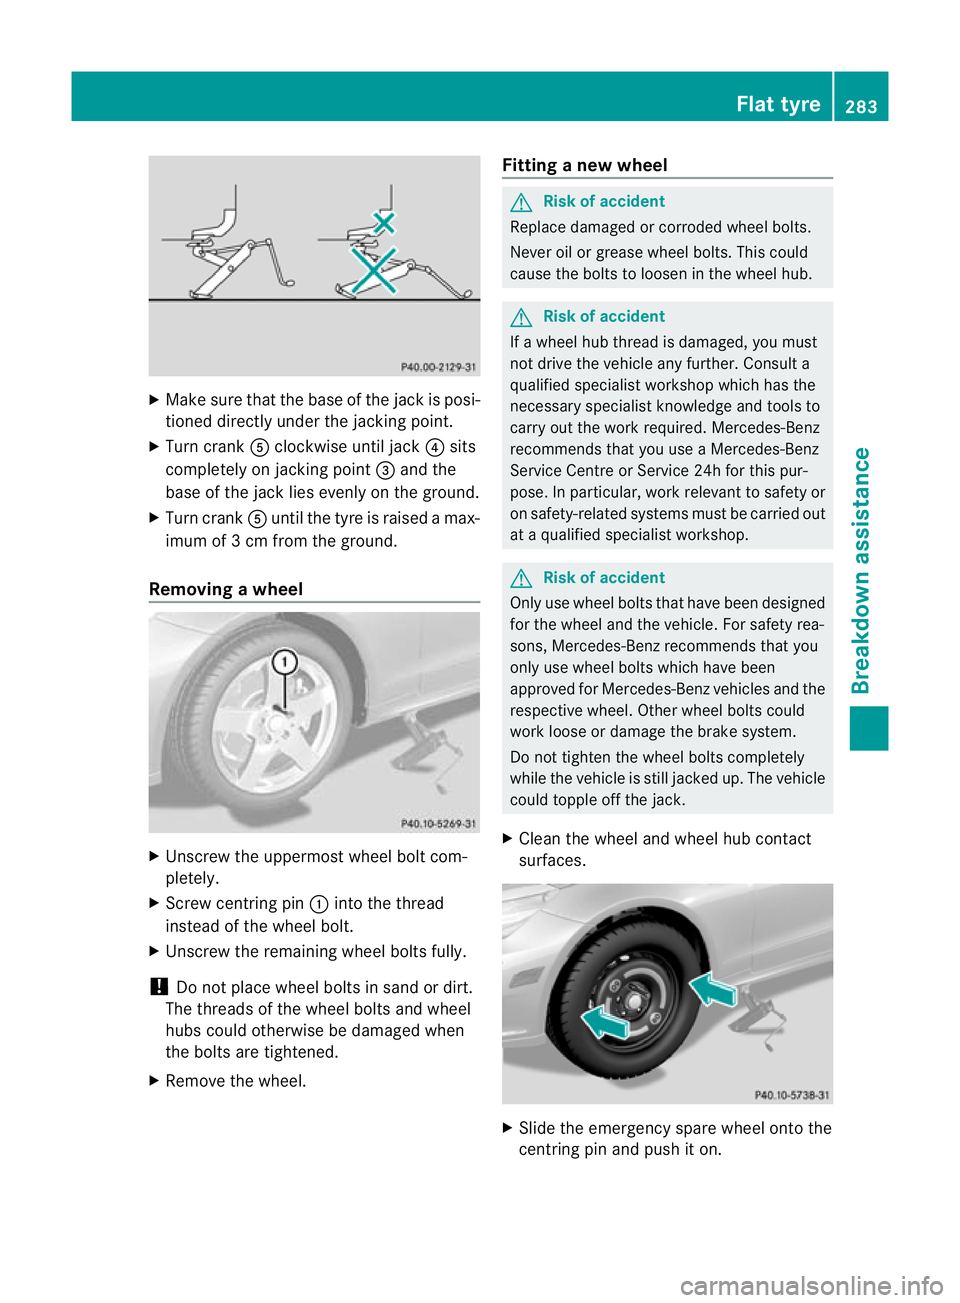
Make sur ethat the base of the jac kisp osi-
tioned directly under the jackin gpoint.
X Tur ncrank Aclockwise unti ljack ?sits
completely on jackin gpoint =and the
base of the jac klies evenly on the ground.
X Turn crank Auntil the tyre is raised amax-
imum of 3cmfrom th eground.
Removin gawheel X
Unscre wthe uppermost wheel bolt com-
pletely.
X Screw centring pin :into the thread
instead of the wheel bolt.
X Unscrew the remaining wheel bolts fully.
! Do not place wheel bolts in sand or dirt.
The threads of the wheel bolts and wheel
hubs could otherwise be damaged when
the bolts are tightened.
X Remove the wheel. Fitting
anew wheel G
Risk of accident
Replac edamaged or corroded wheel bolts.
Never oil or grease wheel bolts. This could
cause the bolts to loosen in the wheel hub. G
Risk of accident
If aw heel hub thread is damaged, you must
not drive the vehicle any further. Consult a
qualified specialist workshop whic hhas the
necessary specialis tknowledge and tool sto
carry out the work required. Mercedes-Be nz
re commends that you use aMercedes-Benz
Ser vice Centre or Service 24h for thi spur-
pose .Inp articular, work relevant to safety or
on safety-related systems must be carried out
at aq ualified specialist workshop. G
Risk of accident
Only use wheel bolts that have been designed
for the wheel and the vehicle. For safety rea-
sons, Mercedes -Benz recommends that you
only use wheel bolts which have been
approved for Mercedes-Benz vehicles and the
respective wheel. Other wheel bolts could
work loose or damage the brak esystem.
Do not tighten the whee lbolts completely
while the vehicle is still jac kedu p. The vehicle
could topple off the jack.
X Clean the wheel and wheel hub contact
surfaces. X
Slide the emergency spare wheel ont othe
cen tring pin and push it on. Flat tyre
283Breakdown assistance
BA 207ECE ÄJ 2010/1a; 1; 2, en-GB
mkalafa Version: 3.0.2.11 2010-01-26T13:03:22+01:00-Seite 283 Z
Page 287 of 333
X
Tighten the wheel bolts until they are fin-
ger- tight.
X Unscrew the cen tring pin.
X Tighten the last wheel bolt until it is finger-
tight.
Lowering the vehicle X
Turn the cran kofthe jac kanti-clockwise
until the vehicl eisonce agai nstanding
firmly on the ground.
X Place the jack to one side. X
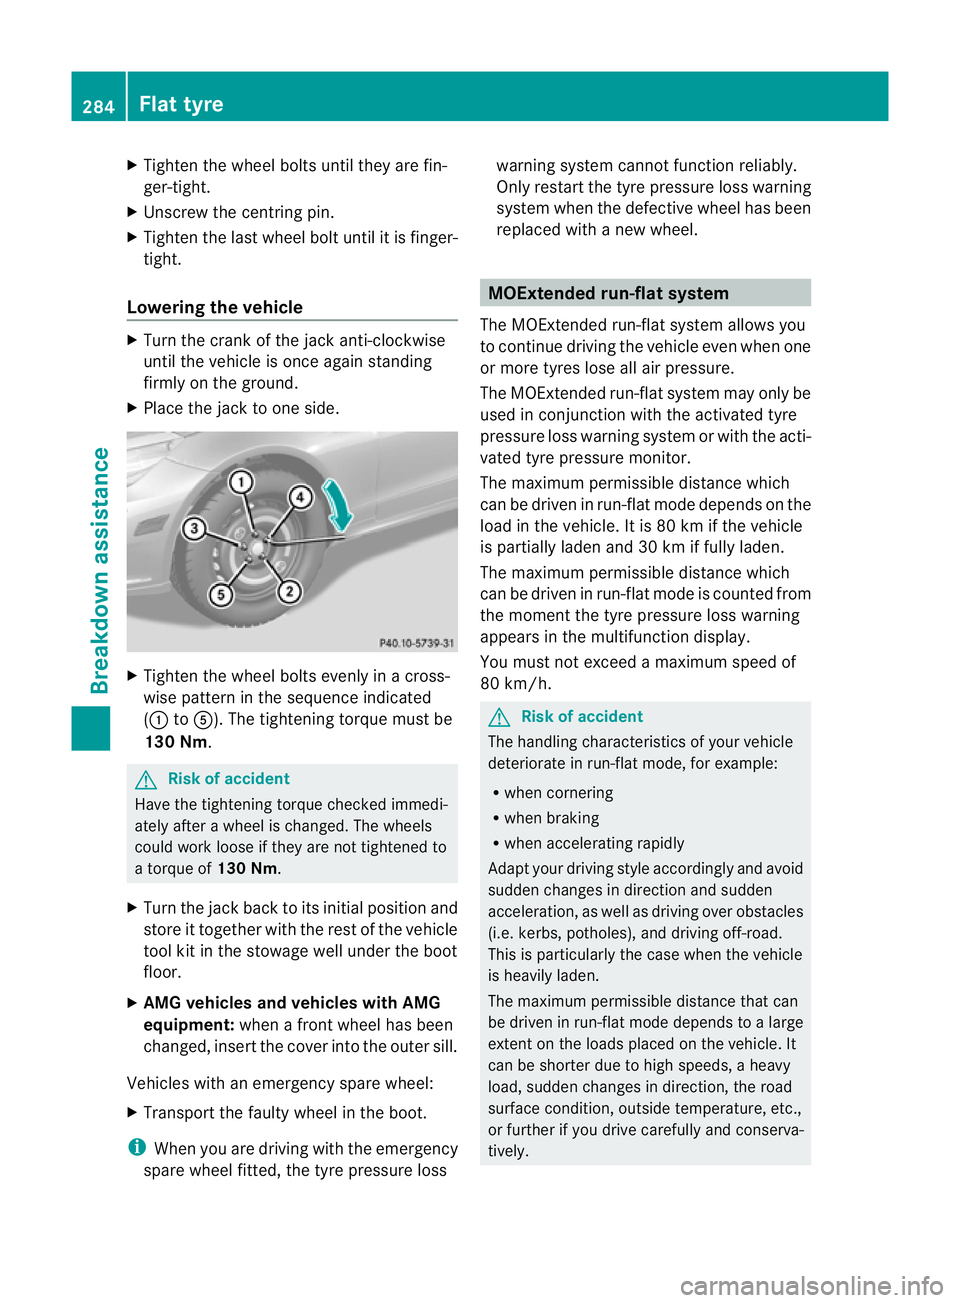
Tighten the whee lbolts evenly in across-
wis epattern in the sequence indicated
(: toA). The tightening torque must be
130 Nm. G
Risk of accident
Have the tightening torque checked immedi-
ately after awheel is changed. The wheels
coul dwork loose if they are not tightened to
at orqu eof130 Nm.
X Turn the jack back to its initia lposition and
stor eitt ogether with the rest of the vehicle
tool kit in the stowage well under the boot
floor.
X AM Gvehicles and vehicles with AMG
equipment: whenafront whee lhas been
changed, insert the cover into the outer sill.
Vehicles with an emergency spare wheel:
X Transport the faulty wheel in the boot.
i When you are driving with the emergency
spare wheel fitted, the tyre pressure loss warning system cannot function reliably.
Only restart the tyre pressure loss warning
system when the defective wheel has been
replaced with
anew wheel. MOExtended run-
flat system
Th eM OEx tended run-flat system allo wsyou
to continue driving the vehicle even when one
or more tyres los eall air pressure.
The MOExtended run-flat system may only be
used in conjunction with the activated tyre
pressure loss warnin gsystem or with the acti-
vated tyre pressure monitor.
The maximum permissible distance which
can be driven in run-flat mode depends on the
load in the vehicle. It is 80 km if the vehicle
is partially laden and 30 km if fully laden.
The maximum permissible distance which
can be driven in run-flat mode is counted from
the moment the tyre pressure los swarning
appears in the multifunction displ ay.
Yo um ust not exceed amaximum spee dof
80 km/h. G
Ris
kofa ccident
The handling characteristics of your vehicle
deteriorate in run-flat mode, for example:
R when cornering
R when braking
R when accelerating rapidly
Adapt your driving style accordingly and avoid
sudden changes in direction and sudden
acceleration, as well as driving over obstacles
(i.e. kerbs, potholes), and driving off-road.
This is particularly the case when the vehicle
is heavily laden.
The maximum permissible distance that can
be driven in run-flat mode depends to alarge
exten tonthe loads placed on the vehicle. It
can be shorter due to high speeds, aheavy
load, sudden changes in direction, the road
surface condition, outside temperature, etc.,
or further if you driv ecarefully and conserva-
tively. 284
Flat tyreBreakdown assistance
BA 207 ECE ÄJ 2010/1a; 1; 2, en-GB
mkalaf
aV ersion: 3.0.2.11
2010-01-26T13:03:22+01:0
0-Seite 284
Page 288 of 333
Do not continue to drive in run-flat mod
eif:
R youh earb anging noises.
R the vehicl estarts to shake.
R yous ee smoke and smell rubber.
R ESP ®
is intervening constantly.
R there are tears in the sidewall softhe tyre.
After driving in run-flat mode, you must have
the wheel(s) checked for damage at aquali-
fie ds pecialist workshop whic hhas the nec-
essary specialis tknowledge and tool stocarry
out the work required. The faulty tyre must be
replaced in every case.
Mercedes-Benz recommends that you use a
Mercedes-Benz Service Centre for this pur-
pose .Inp articular, work relevant to safety or
on safety-related systems must be carried out
at aq ualified specialist workshop.
i Whe nreplacing one or all tyres, make
sure that you only use tyres marked
MOExtended and of the specified size for
the vehicle.
i Vehicles featuring the MOExtended run-
flat system are not equipped with the
TIREFI Tkit. It is therefor erecommended
that you additionally equip your vehicle
with the TIREFI Tkit if you fit tyres that do
not featur erun-flat properties ,e.g. winter
tyres .You can obtain aTIREFIT kit from a
Mercedes-Benz Service Centre ,for exam-
ple. Ba
ttery Important safety notes
In order for the battery to achieve the maxi-
mum possible service life, it must always be
sufficiently charged.
Have the battery charge checked more fre-
quently if you use the vehicle mainly for short
trips or if you leave it standing idle for a
lengthy period. To prevent damage from corrosion, only
replace the battery with one that has
acentral
ven tilation cover.
Only replace abattery with abattery that has
been recommended by Mercedes-Benz.
Consult aMercedes-Benz Servic eCentr eif
you wish to leave your vehicle parked up for
al ong period of time. G
Risk of inju
ry
Comply with safety precautions and take pro-
tective measures when handling batteries. Risk of explosion
Fire, naked flames and
smoking are prohibited
when handling the battery.
Avoid creatin
gsparks. Battery acid is caustic.
Avoid contact with the skin,
eyes or clothing.
Wear suitable protec
tive
clothing, in particular
gloves, an apro nand aface
mask.
Immediately rinse acid
splashes off with clean
water. Consult adoctor if
necessary. Wear eye protection.
Keep children away.
Observ
ethis Owner's Man-
ual. H
Environmental note
Do not dispose of batteries in the household
rubbish. Dispose of defective batteries in an
environmen tally responsible manner .Take Battery
285Breakdown assistance
BA 207ECE ÄJ 2010/1a; 1; 2, en-GB
mkalafa Version: 3.0.2.11 2010-01-26T13:03:22+01:00-Seite 285 Z
Page 289 of 333
the
mtoa Mercedes-Benz Service Centre or
to as pecial collectio npoint for old batteries. G
Risk of inju
ry
Fo rs afety reasons, Mercedes-Benz recom-
mends that you only use batteries which have
been tested and approved for your vehicle by
Mercedes-Benz. Thes ebatteries provide
increased impact protection to prevent vehi-
cle occupant sfrom suffering aci dburns
should the battery be damaged in the event
of an accident.
To prevent acid burns, observe the following
safety notes when handling batteries:
R do not lean over the battery.
R do not place any metal objects on abattery.
Otherwise ,you coul dcause ashort circuit
and the battery's gas mixtur ecould ignite.
R mak esure that you do not create an elec-
trostatic charge, e.g. by wearing synthetic
clothing or as aresult of friction on fabrics.
Therefore, you should not pull or slide the
batter yover carpets or other synthetic
materials.
R neve rtouch the battery first. To discharge
ap ossible electrostatic charge, step out of
the vehicle first and touc hthe bodywork.
R do not wipe the battery usin gacloth. The
battery may explode as aresult of electro-
static charge or due to flying sparks.
! Switc hoff th eengine and remove the key
before disconnectin gthe termi nalclamps
from the battery .Onvehicles with KEY-
LE SS -GO, make sure that the ignition is
switched off. Check that all the indicator
lamps in the instrument cluste rare off.
Otherwise, yo umay destroy electronic
components, such as the alternator.
i Remove the key if you park the vehicle
and do not require any electrical consum-
ers. The vehicle will then use very little
energy, thus conserving battery power.
Mercedes-Benz recommends that you do not
carr yout work on batteries yourself, e.g.
removing, charging or replacing. Always have this work performed at
aqualified specialist
workshop, e.g. aMercedes-Ben zService
Cent re. Installation location of the battery
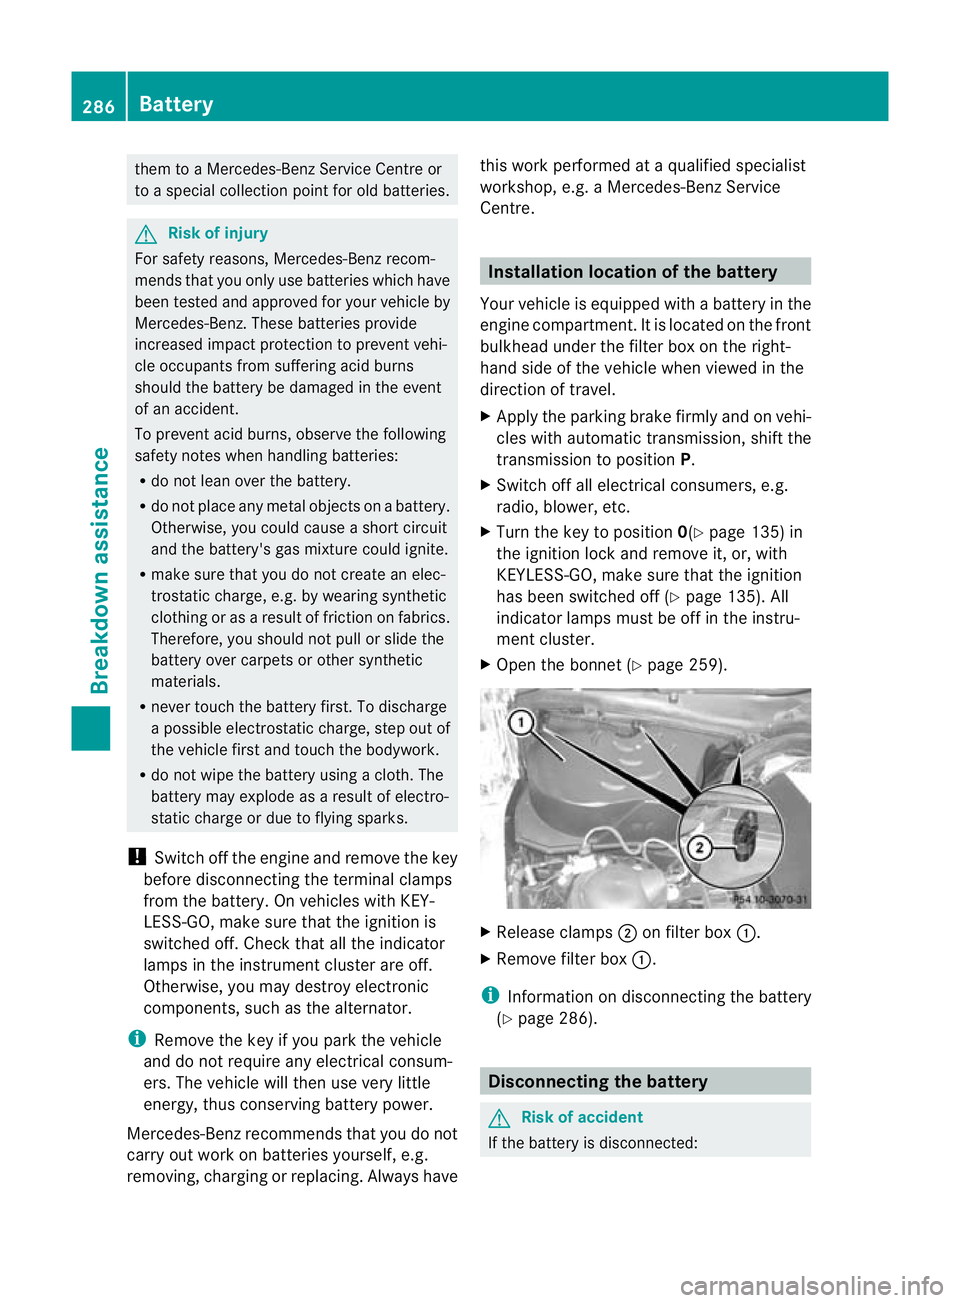
Your vehicle is equippe dwithabatter yint he
engin ecompartmen t. Itis located on the front
bulkhea dunder the filter box on the right-
hand sid eofthe vehicle when viewed in the
direction of travel.
X Appl ythe parkin gbrake firml yand on vehi-
cles with automati ctransmission, shift the
transmission to position P.
X Switch off all electrica lconsumers, e.g.
radio, blower ,etc.
X Turn the key to position 0(Ypage 135) in
the ignition lock and remove it, or, with
KEYLESS-GO, make sure that the ignition
has bee nswitched off (Y page 135). All
indicator lamps must be off in the instru-
ment cluster.
X Open the bonnet (Y page 259). X
Release clamps ;on filter box :.
X Remove filter box :.
i Information on disconnecting the battery
(Y page 286). Disconnecting the battery
G
Risk of accident
If the battery is disconnected: 286
BatteryBreakdown assistance
BA 207 ECE ÄJ 2010/1a; 1; 2, en-GB
mkalafa
Version: 3.0.2.11 2010-01-26T13:03:22+01:00-Seite 286
Page 290 of 333
R
the brake boosting effect will not be avail-
able .Greater braking force wil lthen be
required and brake pedal travel will be lon-
ger. If necessar y,depress the brak epedal
with maximum force.
R the transmission is locked in position Pon
vehicles with automati ctransmission.
! Alwaysd isconnect the battery in the
order described below. Never mix up the
terminal clam pdisconnection/connection
order and never mix up the terminal
clam ps.You may otherwis edamag ethe
vehicle electronics. :
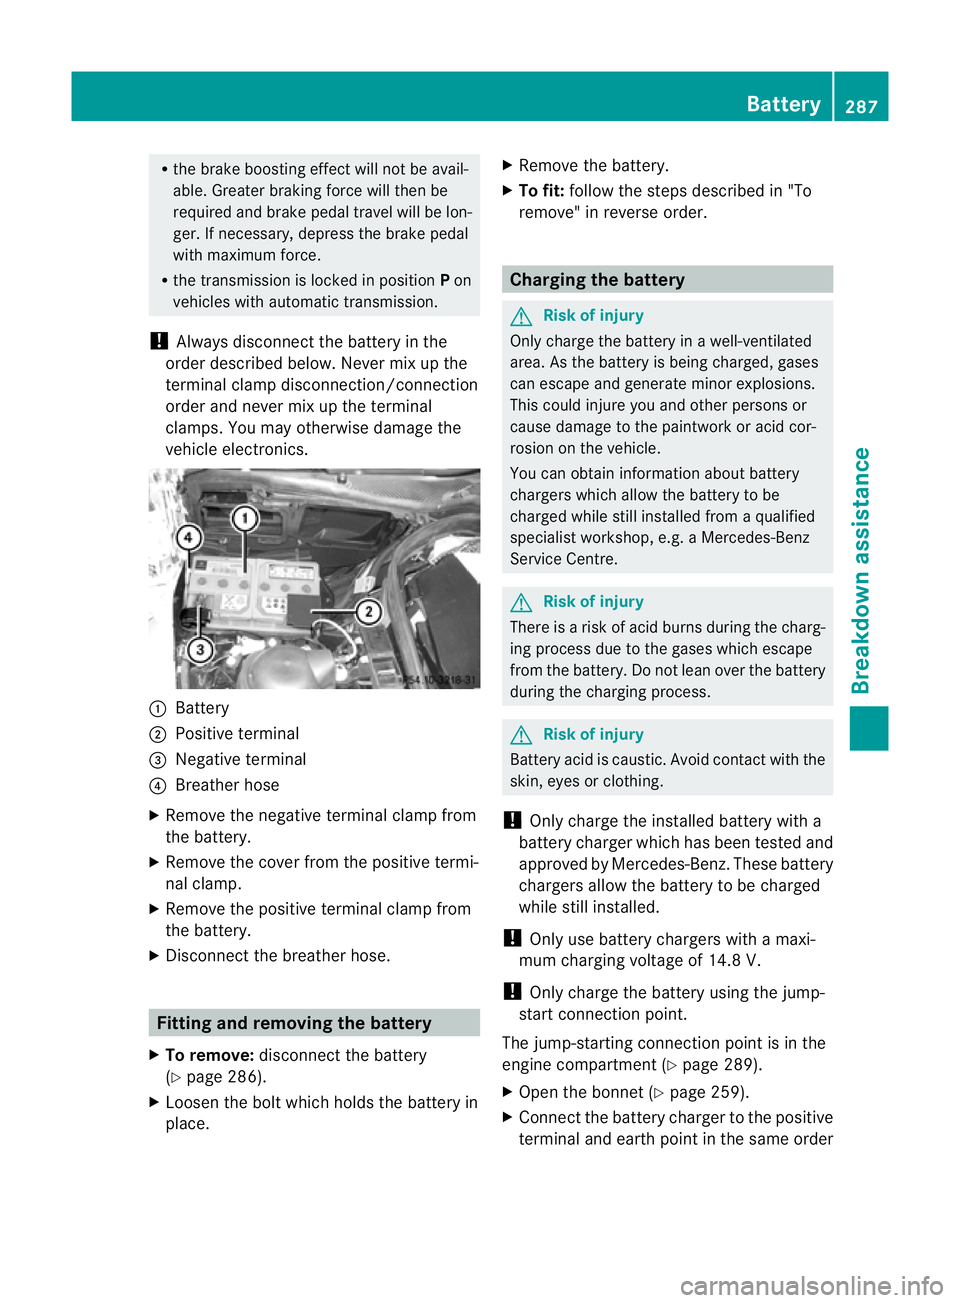
Battery
; Positive terminal
= Negativ eterminal
? Breather hose
X Remove the negative terminal clam pfrom
th eb attery.
X Remove the cover from the positive termi-
nal clamp.
X Remove the positive terminal clamp from
the battery.
X Disconnect the breather hose. Fittin
gand removin gthe battery
X To remove: disconnect th ebattery
(Y pag e286).
X Loose nthe bolt which holds the battery in
place. X
Rem ovet he battery.
X To fit: follow the steps described in "To
remove" in reverse order. Charging th
ebattery G
Ris
kofi njury
Only charge the batter yinawell-ventilated
area. As the battery is being charged ,gases
can escape and generate minor explosions.
This could injure you and other persons or
cause damage to the paintwork or acid cor-
rosion on the vehicle.
You can obtain information about battery
chargers which allow the battery to be
charged while still installed from aqualified
specialist workshop ,e.g. aM ercedes-Benz
Ser vice Centre. G
Risk of injury
There is arisk of acid burns during the charg-
ing process due to the gases which escape
from the battery. Do not lean over the battery
during the chargin gprocess. G
Ris
kofi njury
Bat tery aci discaustic. Avoid contact with the
skin, eyes or clothing.
! Only charge the installed batter ywith a
batter ycharger whic hhas been tested and
approved by Mercedes -Benz .These battery
chargers allow the battery to be charged
while still installed.
! Only use battery chargers with amaxi-
mum charging voltage of 14.8 V.
! Only charge the battery using the jump-
start connection point.
The jump-starting connection point is in the
engine compartmen t(Ypage 289).
X Open the bonnet (Y page 259).
X Connec tthe battery charger to the positive
terminal and earth point in the sam eorder Battery
287Breakdown assistance
BA 207 ECE ÄJ 2010/1a; 1; 2, en-GB
mkalafa Version: 3.0.2.11 2010-01-26T13:03:22+01:00-Seite 287 Z