MERCEDES-BENZ E-CLASS CABRIOLET 2010 Owners Manual
Manufacturer: MERCEDES-BENZ, Model Year: 2010, Model line: E-CLASS CABRIOLET, Model: MERCEDES-BENZ E-CLASS CABRIOLET 2010Pages: 333, PDF Size: 7.64 MB
Page 271 of 333
zle
.Informatio nabout the correct distance
is ava ilable fromt he equipment manufac-
turer.
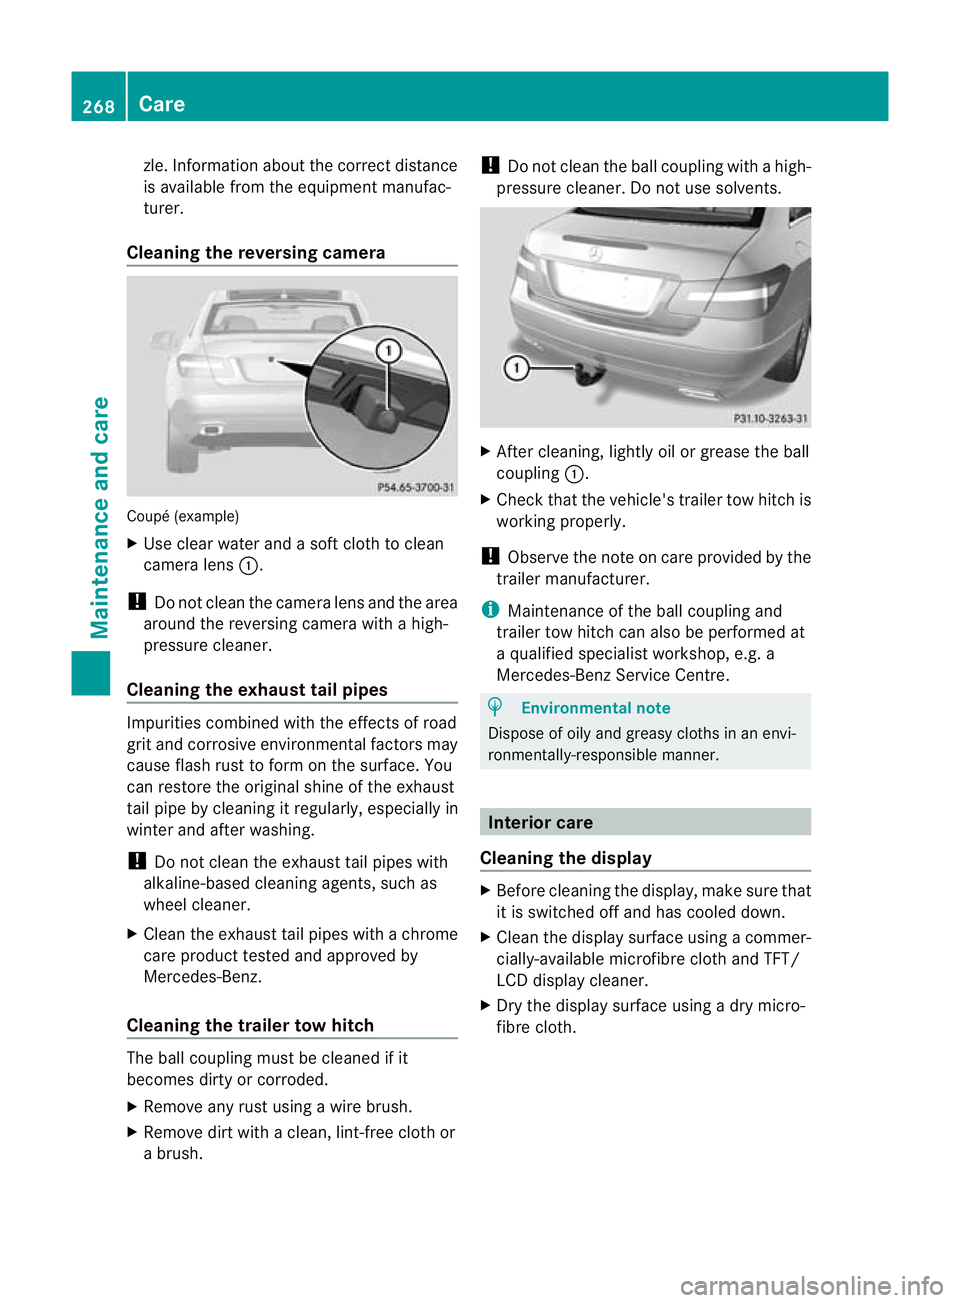
Cleaning th ereversing camera Coupé (example)
X
Use clear water and asoft clot htoclean
camera lens :.
! Do not clean the camera lens and the area
around the reversing camera with ahigh-
pressure cleaner.
Cleanin gthe exhaust tail pipes Impuritie
scombined with the effect sofroad
grit and corrosiv eenvironmental factors may
cause flash rust to form on the surface. You
can restore the original shine of the exhaust
tail pip ebycleaning it regularly, especiall yin
winter and after washing.
! Do not clean the exhaust tail pipes with
alkaline-based cleaning agents, such as
wheel cleaner.
X Clea nthe exhaust tai lpipes with achrome
car eproduct tested and approved by
Mercedes-Benz.
Cleanin gthe trailer tow hitch Th
eb all coupling must be cleaned if it
becomes dirty or corroded.
X Remove any rust using awire brush.
X Remove dirt with aclean, lint-free cloth or
ab rush. !
Do not clean th eball coupling with ahigh-
pressure cleaner. Do not use solvents. X
After cleaning, lightly oil or grease the ball
coupling :.
X Check that the vehicle' strailer to whitch is
working properly.
! Observe the note on care provided by the
trailer manufacturer.
i Maintenanc eofthe ball couplin gand
trailer tow hitch can also be performed at
aq ualified specialist workshop, e.g. a
Mercedes-Ben zService Centre. H
Environmenta
lnote
Dispose of oily and greasy cloths in an envi-
ronmentally-responsible manner. Interior care
Cleanin gthe display X
Before cleaning th edisplay, make sure that
it is switched off and has cooled down.
X Clean the displa ysurface using acommer-
cially-available microfibr ecloth and TFT/
LCD displa ycleaner.
X Dry the displa ysurface using adry micro-
fibre cloth. 268
CareMaintenance an
dcare
BA 207 ECE ÄJ 2010/1a; 1; 2, en-GB
mkalafa Version: 3.0.2.11 2010-01-26T13:03:22+01:00-Seite 268
Page 272 of 333
!
For cleaning ,donot use any of the fol-
lowing:
R alcohol-based thinner or petrol
R abrasive cleanin gagents
R commercially-available household clean-
ing agents
These ma ydamage the displ ay surface.Do
not put pressure on the displa ysurface
when cleaning. This could lead to irrepara-
ble damage to the display.
Cleaning the plastic trim G
Risk of injury
When cleaning the steering wheel boss and
dashboard, do not use cockpit sprays or
cleaning agents containing solvents. Cleaning
agents containing solvents cause the surface
to become porous, and as aresult plastic
part smay break away and be thrown around
the interior when an airbag is deployed, which
may result in severe injuries.
! Do not affix the following to plastic surfa-
ces:
R stickers
R films
R scented oil bottles or similar items
You can otherwise damage the plastic.
! Do not allow cosmetics, insect repellent
or sunscreen to come in contact with the
plastic trim .This maintain sthe high-quality
look of the surfaces.
X Wipe the plastic trim with adamp, lint-free
cloth, e.g. amicrofibre cloth.
X Heavy soiling: use car care and cleaning
products recommended and approved by
Mercedes-Benz.
The surface may change colour tempora-
rily. Wait until the surface is dry again. Cleanin
greal wood and trim strips X
Wipe the wooden trim and trim strips with
ad amp, lint-free cloth, e.g. amicrofibre
cloth.
X Heavy soiling: use car care and cleaning
products recommended and approved by
Mercedes-Benz.
! Do not use solvent-based cleaning agents
such as tar remover, wheel cleaners, pol-
ishes or waxes. There is otherwise arisk of
damaging the surface.
Cleanin gthe seat covers !
Do not us emicrofibre cloths to clean gen-
uine leather, artificial leather or
Alcantara ®
covers. If used often ,these can
damage the cover.
! Observ ethe followin gwhen cleaning:
R clea ngenuin eleather covers carefully
with adamp cloth and then wipe the cov-
ers down with adry cloth .Make sure that
the leather does not become soaked .It
may otherwise become rough and
cracked .Only use leather care agents
that have bee ntested and approved by
Mercedes-Benz. You can obtain these
from aqualified specialist workshop, e.g.
aM ercedes-Ben zService centre.
R clean artificial leather covers with acloth
moistened with asolution con taining 1%
detergent (e.g. washing-up liquid).
R clean cloth cover switham icrofibre cloth
moistened with asolution con taining 1%
detergent (e.g. washing-up liquid). Rub
carefully and always wipe entire seat sec-
tions to avoid leaving visible lines. Leave
the seat to dry afterwards. Cleaning
results depend on the type of dirt and
how long it has been there.
R clean Alcantara ®
cover swithadamp
cloth. Make sure you wipe entire seat
sections to avoid leaving visible lines. Care
269Maintenance and care
BA 207 ECE ÄJ 2010/1a; 1; 2, en-GB
mkalafa Version:3.0.2.11
2010-01-26T13:03:22+01:00
-Seite 269 Z
Page 273 of 333
i
Notethat regular car eisessential to
ensure that the appearanc eand comfort of
the covers is retaine dover time.
Cl eaning the seat belts X
Use clean, lukewarm water and soa psolu-
tion.
! Do not clea nthe seat belts usin gchemical
cleanin gagents. Do not dry the seatbelts
at temperatures abov e80† or by exposing
them to direc tsunlight. 270
CareMain
tenance and ca re
BA 207ECE ÄJ 2010/1a; 1; 2, en-GB
mkalaf aV ersion: 3.0.2.11
2010-01-26T13:03:22+01:00
-Seite 270
Page 274 of 333
Vehicl
eequipment ............................ 272
After an accident .............................. 273
Wher ewillIfind...? ........................... 273
Flat ty re............................................. 275
Ba ttery ............................................... 285
Jump-starting .................................... 289
Towing and tow-starting ..................290
Fuses .................................................. 293 271Break
down assistance
BA 20 7ECE ÄJ 2010/1a; 1; 2, en-GB
mkalafa Version:3.0.2.11
2010-01-26T13:03:22+01:0
0-Seite 271
Page 275 of 333
Vehicl
eequipment
i Thismanua ldesc ribe sallthe standard
and optional equipment of your vehicle
which wa savailable at th etime of pur-
chase. Countr y-specif ic differences are
possible. Bear in mind tha tyour vehicle
ma ynot featur eall function sdescribed
here. 272
Vehicle equipmentBreak
down assistance
BA 20 7ECE ÄJ 2010/1a; 1; 2, en-GB
mkalafa Version:3.0.2.11
2010-01-26T13:03:22+01:0
0-Seite 272
Page 276 of 333
After an accident
Problem Possible causes/consequences and
M Solutions
Fue
lisl eaking from the
vehicle. G
Ris
kofe xplosion or fire
The fuel line or the fuel tan kisf aulty.
X Immediately turn the key to position 0(Ypage 135)in the ignition
lock and remove it.
X Do not restart the engine under any circumstances.
X Consult aqualified special istworkshop. You are unable to
determine the exten
tof
the damag e. X
Consult aqualified specialis tworkshop. You can
notd etect any
damage. X
Start the engine as normal. The active bonnet func-
tion (pedestrian protec-
tion) has been trig-
gered. Your vehicle has been involved in
afrontal collision.
X Rese tthe triggered activ ebonnet (pedestrian protection)
(Y page 258). The NECK
-PRO head
restraints on the driv-
er's and front-
passenger seats have
been triggered. Your vehicle has been involved in
arear-end collision.
X Reset the triggered NECK-PRO head restraint s(Ypage 40). Where will
Ifind...? Wa
rning triangle
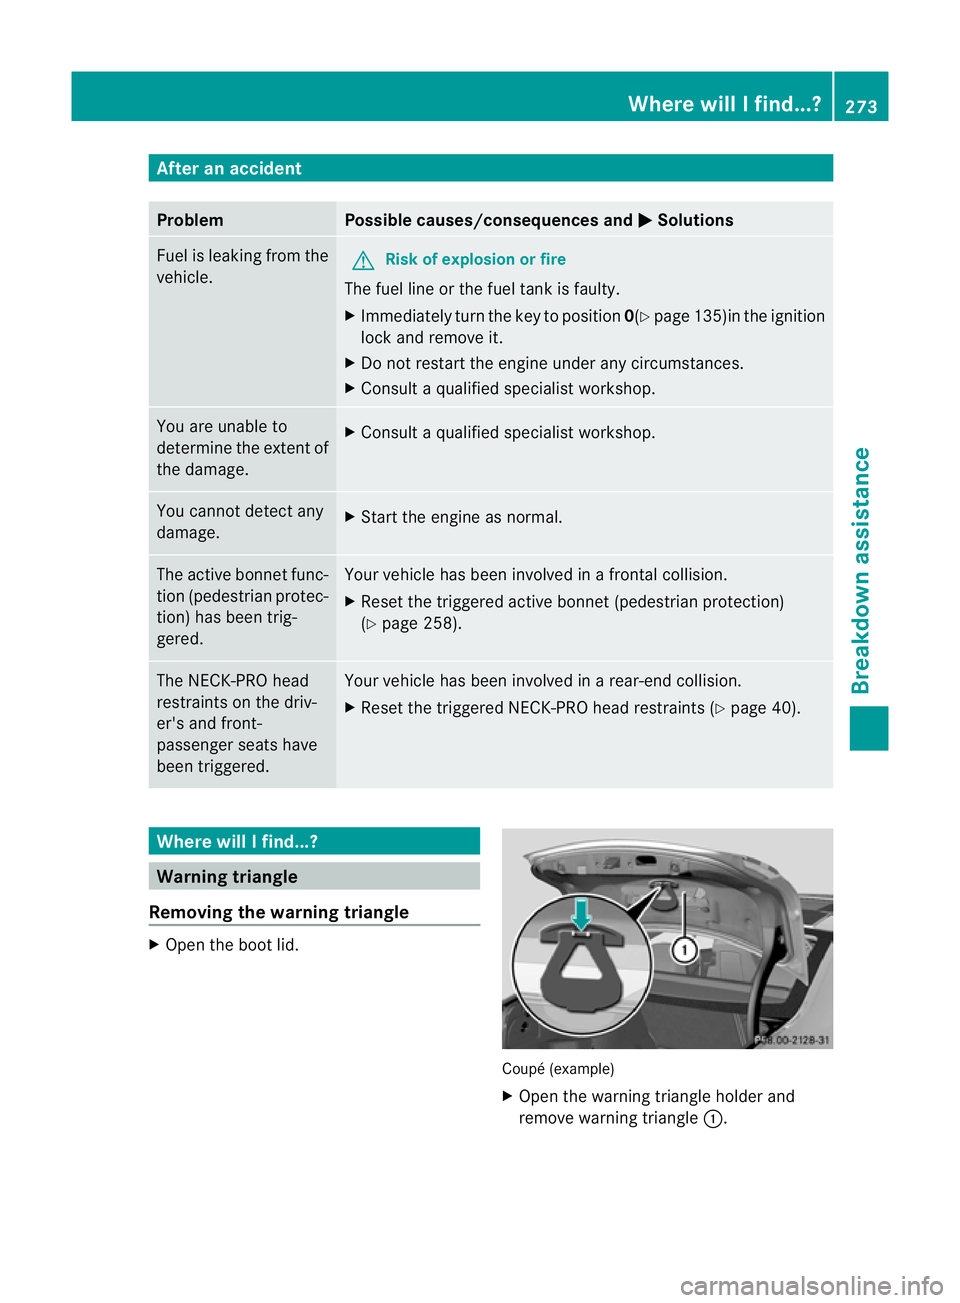
Removing the warning triangle X
Open the boot lid. Coupé (example)
X
Open the warning triangle holder and
remove warning triangle :. Where will
Ifind...?
273Breakdown assistance
BA 207ECE ÄJ 2010 /1a; 1; 2, en-GB
mkalafa Version: 3.0.2.11 2010-01-26T13:03:22+01:00 -Seite 273 Z
Page 277 of 333
Setting up th
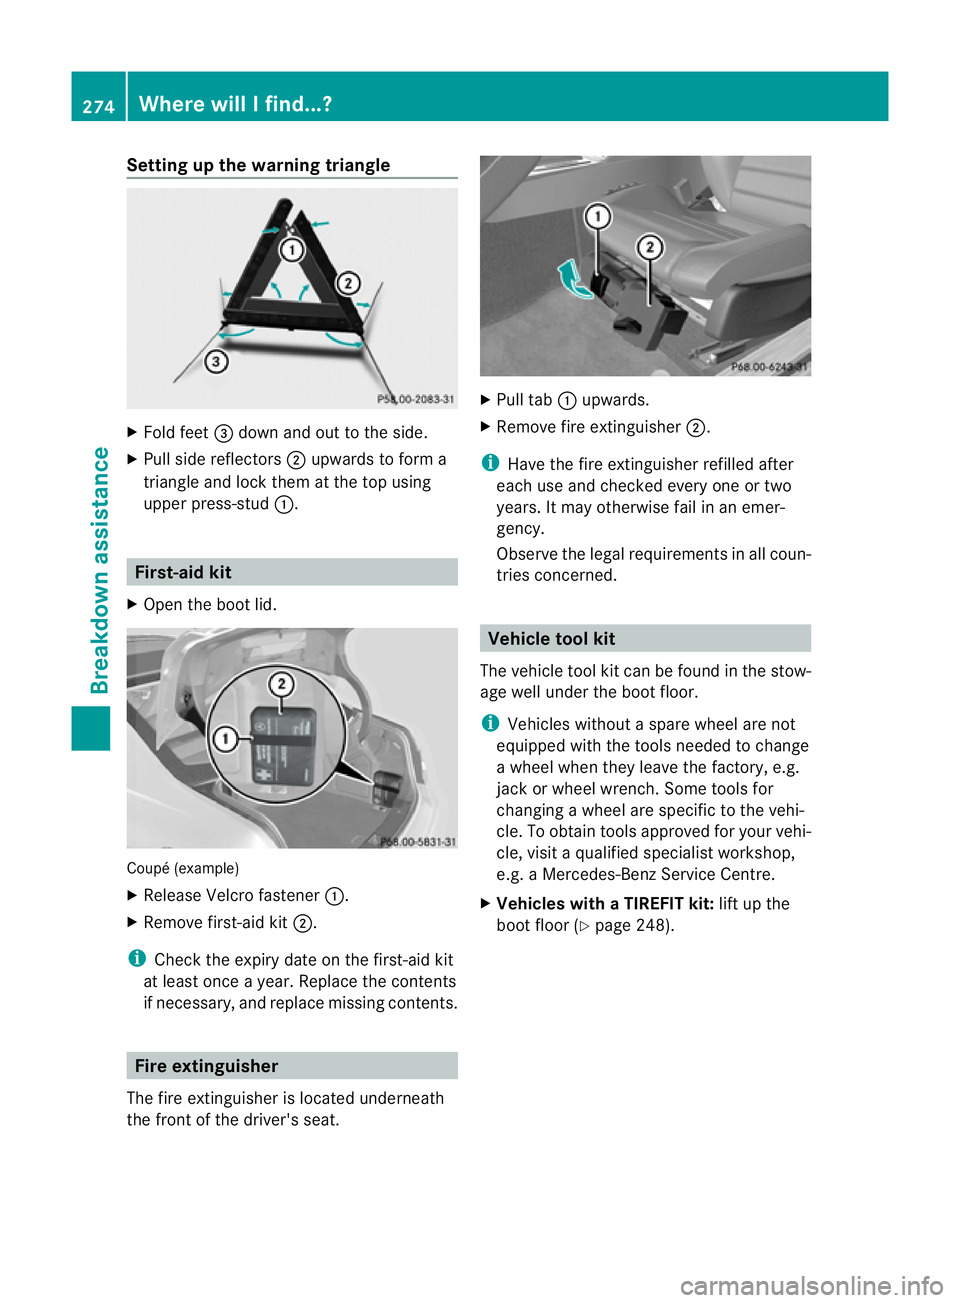
ewarning triangle X
Fol dfeet =down and out to the side.
X Pull side reflectors ;upwards to for ma
triangle and lock them at the top using
uppe rpress-stud :. First-ai
dkit
X Open the boot lid. Coupé (example)
X
Release Velcro fastener :.
X Remov efirst-aid kit ;.
i Check the expiry date on the first-aid kit
at least once ayear. Replace the contents
if necessary, and replace missin gcontents. Fire extinguisher
The fir eextinguisher is locate dunderneath
the front of the driver's seat. X
Pull tab :upwards.
X Remove fire extinguisher ;.
i Have the fire extinguisher refille dafter
each us eand checked every one or two
years. It may otherwis efail in an emer-
gency.
Observe the legal requirements in all coun-
tries concerned. Vehicle tool kit
The vehicle tool kit can be found in the stow-
age well under the boot floor.
i Vehicles without aspare wheel are not
equipped with the tools needed to change
aw heel when they leav ethe factory ,e.g.
jack or wheel wrench .Some tools for
changing awheel ar especific to the vehi-
cle. To obtain tools approved for your vehi-
cle, visit aqualified specialist workshop,
e.g. aMercedes-Benz Servic eCentre.
X Vehicles with aTIREFIT kit: lift up the
boot floor (Y page 248).274
Where wil
lIfind...?Breakdown assistance
BA 20 7ECE ÄJ 2010 /1a; 1; 2, en-GB
mkalafa Version: 3.0.2.11 2010-01-26T13:03:22+01:00 -Seite 274
Page 278 of 333
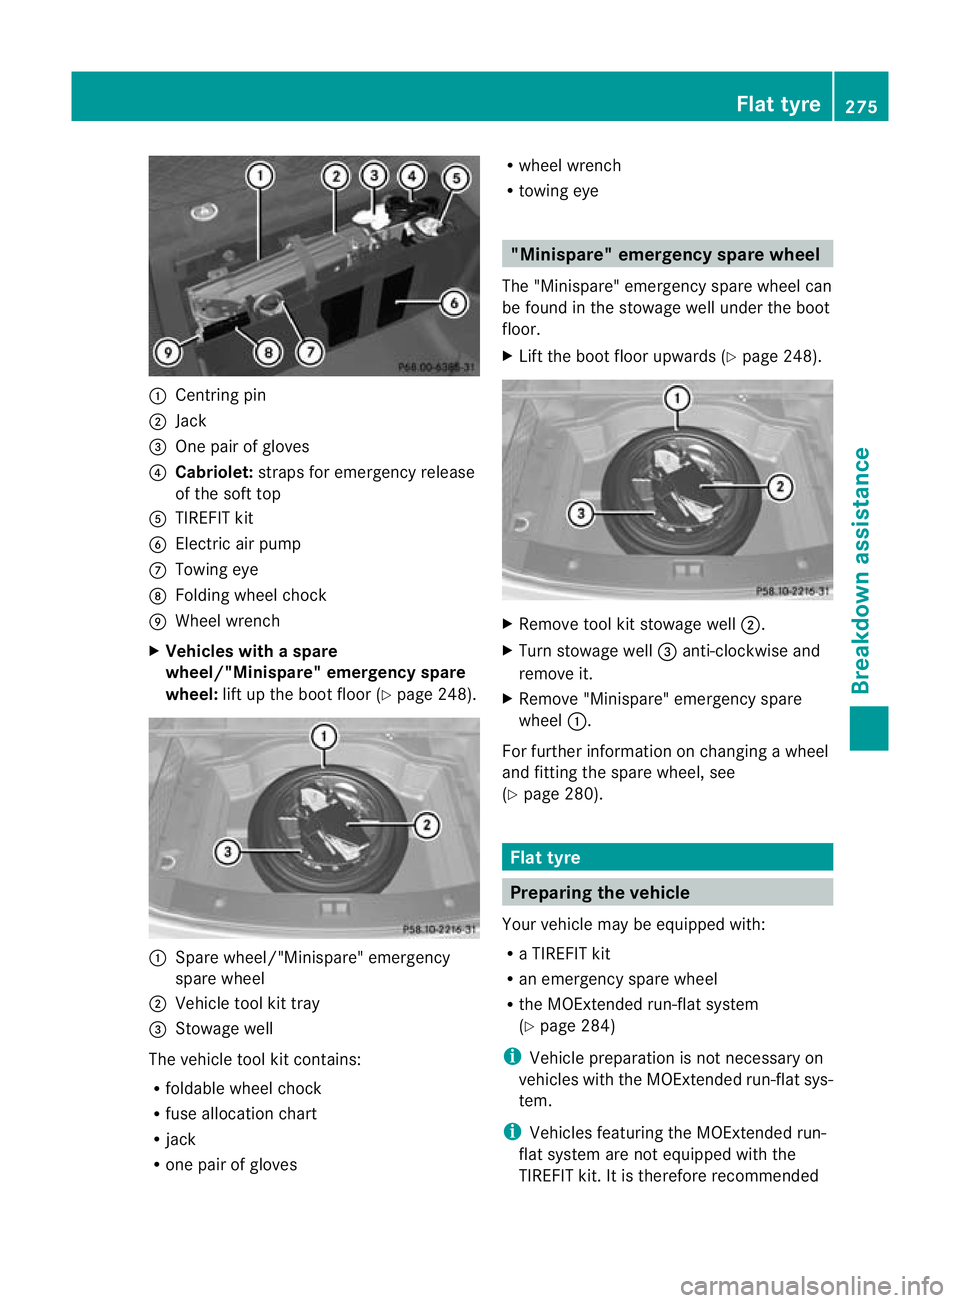
:
Cent ring pin
; Jack
= One pair of glo ves
? Cabriolet: straps for emergenc yrelease
of th esoftt op
A TIREFIT kit
B Electric air pump
C Towin geye
D Foldin gwheel chock
E Whee lwrench
X Vehicle swithaspare
wheel/"Minispare" emergency spa re
wheel: lift up the boo tfloor (Y page 248). :
Spare wheel/"Min ispare" emergency
spar ewheel
; Vehicl etoolkit tray
= Stowage well
The vehicle tool kit contains:
R foldable wheel chock
R fuse allocation chart
R jack
R on ep air of gloves R
wheel wrench
R towin geye "Minis
pare"emergency spa rewheel
The "Minispare" emergenc yspar ew heel can
be fou ndin th estowage well under th eboot
floor.
X Lif tthe boot floor upwards (Y page 248). X
Remove tool kit stowage well ;.
X Tur nstowag ewell= anti-clockwise and
remove it.
X Remov e"Minispare" emergenc yspare
wheel :.
For further information on changin gawheel
and fittin gthe spar ewheel, see
(Y page 280). Fla
ttyre Preparing the vehicle
Your vehicl emay be equipped with:
R aT IREFIT kit
R an emergency spare wheel
R theM OEx tended run-flat system
(Y pag e284)
i Vehicl epreparatio nisnot necessary on
vehicles with the MOExtended run-flat sys-
tem.
i Vehicles featuring the MOExtended run-
fla ts ystem are not equip pedw ith the
TIREFIT kit. It is therefor erecommended Flat ty
re
275Breakdown assistance
BA 207ECE ÄJ 2010 /1a;1;2,e n-GB
mkalafa Version: 3.0.2.11 2010-01-26T13:03:22+01:00-Seite 275 Z
Page 279 of 333
tha
tyou additionally equip your vehicle
with the TIREFI Tkit if you fit tyres that do
not featur erun-flat properties ,e.g. winter
tyres .You can obtain aTIREFIT kit from a
Mercedes-Benz Service Centre ,for exam-
ple.
X Stop the vehicle as far away as possible
from traffic on solid, non-slipper yand level
ground.
X Switch on the hazard warning lamps.
X Firmly depress the parking brake.
X Bring the front wheels into the straight-
ahead position.
X Vehicles with manua ltran smission:
engage first or reverse gear.
X Vehicles with au tomatic transmission:
move the selector lever to P.
X Switch off the engine.
X Vehicles without KEYLESS-GO: remove
the key from the ignition lock.
X Vehicles with KEYLESS-GO: openthe
driver's door.
The on-boar delectronics have status 0,
which is the same as the key having been
removed.
X Vehicles with KEYLESS-GO: removethe
Star t/Stop butto nfrom th eignition lock
(Y page 135).
X All occupan ts must get out of the vehicle.
Make sur ethat they ar enot endangered as
they get out of the vehicle.
X Make sure that no one is near the danger
area whilst awheel is being changed. Any-
one who is not directly assisting in the
wheel change should, for example, stand
behind the barrier.
X Get out of the vehicle. Pay attention to traf-
fic conditions when doing so.
X Close the driver's door.
X Plac ethe warnin gtriangl e(Ypage 273) a
suitable distanc eaway .Observ elegal
requirements. TIREFIT kit
Using th eTIREFIT kit You can use the TIREFIT kit to seal small
punctures, particularly those in the tyre tread.
You can use TIREFIT at outside temperatures
down to -20 †.
G
Risk of accident
In the following situations, your safety is at
particular risk and tyre sealant is unable to
provide breakdown assistance if:
R ther eare cuts or punctures in th etyre
greater than 4mm
R the whee lrim is damaged
R you have driven at very low tyre pressures
or on aflat tyre
Do not drive any fur ther. Consult aqualified
specialist workshop which has the necessary
specialist knowledg eand tool stocarry out
the work required.
Mercedes-Benz recommends that you use a
Mercedes-Benz Service Centr efor this pur-
pose. In particular ,work relevant to safet yor
on safety-related system smust be carried out
at aq ualified specialist workshop.
X Do not remov eany foreig nobjects which
have penetrated the tyre, e.g. screw sor
nails.
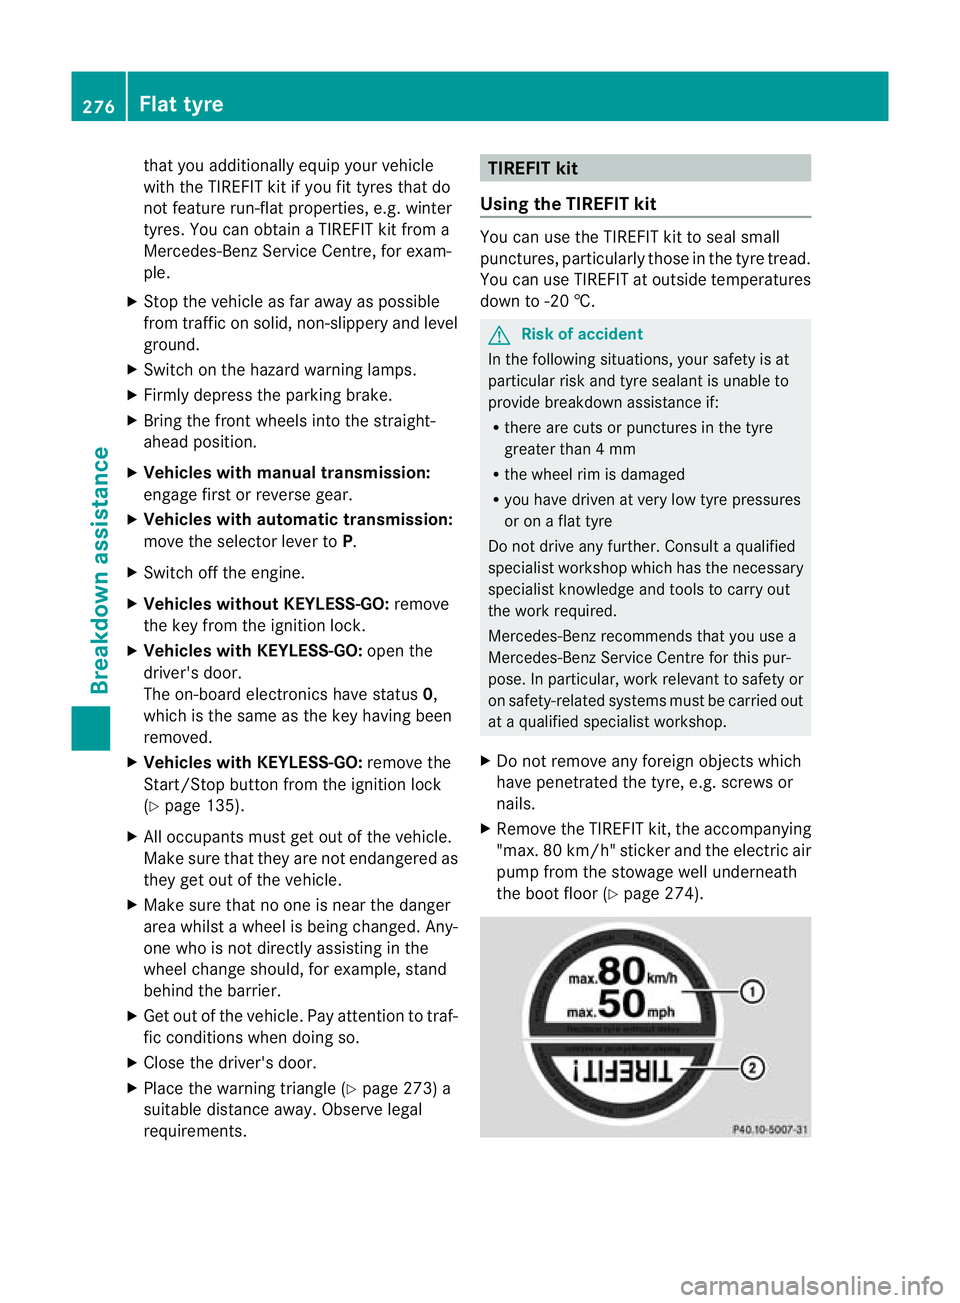
X Remove the TIREFI Tkit,t he accompanying
"max. 80 km /h"sticker and the electric air
pump from the stowage well underneath
the boo tfloor (Y page 274). 276
Flat tyreBreakdown assis
tance
BA 207ECE ÄJ 2010/1a; 1; 2, en-GB
mkalafa Version:3.0.2.11
2010-01-26T13:03:22+01:0
0-Seite 276
Page 280 of 333
X
Affix part :of the sticker withi nthe driv-
er's field of vision.
X Affix part ;of the sticker near the valve
on the whee lwitht he defective tyre. G
Risk of injury
TIREFI Tmust not come into contact with your
skin, eyes or clothing.
R If TIREFIT come sinto contact with your
eyes or skin, imme diatelyr ins ethoroughly
with clean water.
R Chang eout of clothin gwhich has com einto
contac twith TIREFIT immediately.
R If an allergic reaction occurs, consult adoc-
tor immediately.
Keep TIR EFITaway fro mchildren.
R If TIREFIT is swallowed, immediately rinse
your mouth out thoroughly and drink plenty
of water.
R Do not induce vomiting. Consult adoctor
immediately.
R Do not inhal eTIREFIT fumes.
i If TIREFIT leaks out, allo wittod ry. It can
then be removed like alaye roff ilm.
If you get TIREFIT on your clothing, have it
cleaned as soon as possible with perchloro-
ethylene. G
Risk of injury
Comply with the manufacturer's safety
instructions shown on the sticker on the elec-
tric air pump.
Your vehicle is provided with one of two dif-
feren telectric air pumps:
R Version 1: the hose with the pressure
gauge and the cable are behind aflap.
R Version 2: the pressure gauge is in the
electric air pump. TIREFIT kit version 1
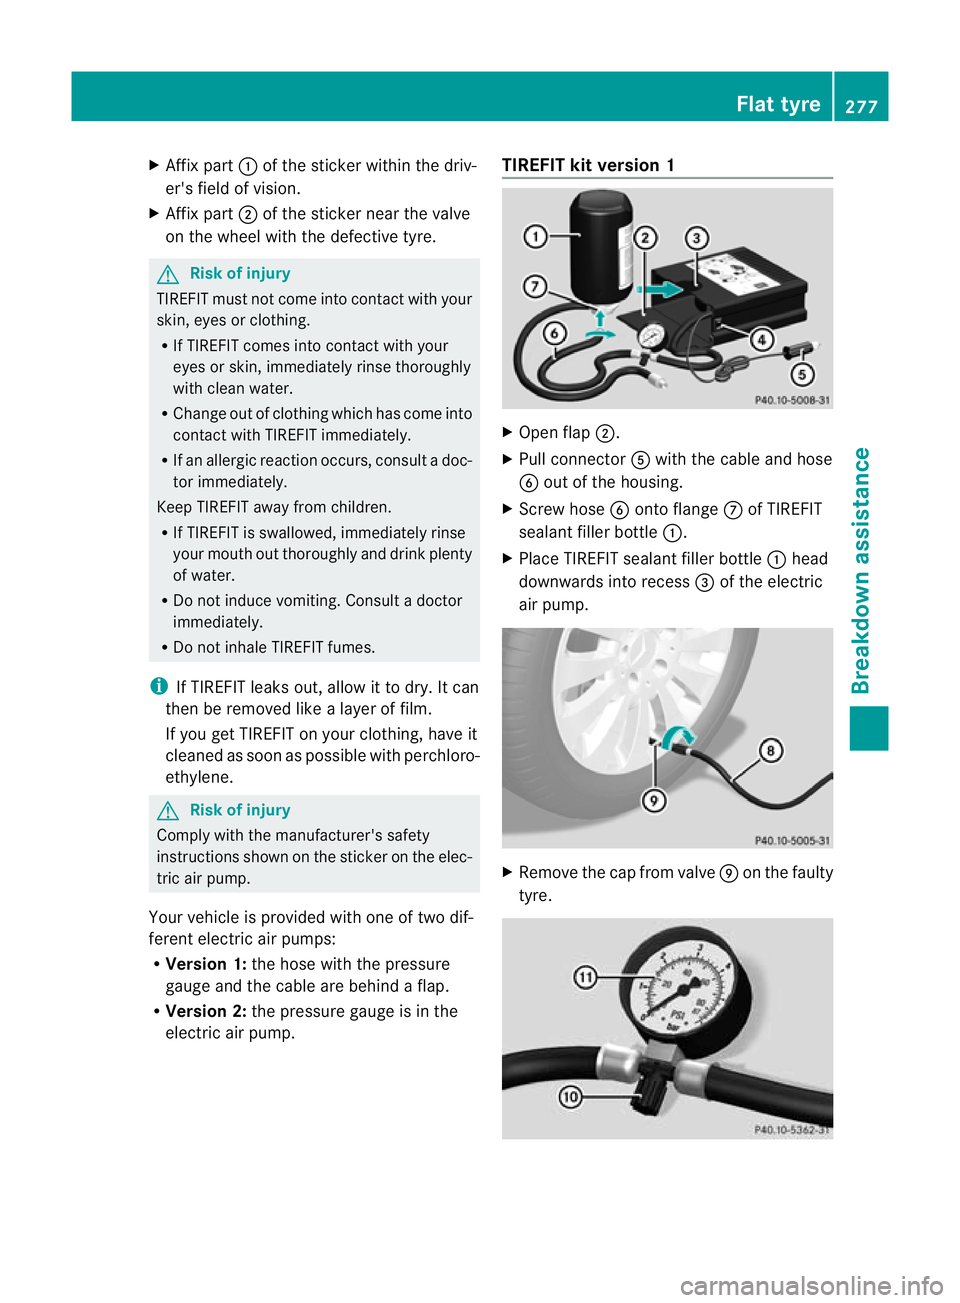
X
Open flap ;.
X Pull connector Awith the cable and hose
B out of the housing.
X Screw hose Bonto flange Cof TIREFIT
sealant filler bottle :.
X Place TIREFIT sealant filler bottle :head
downwards into recess =of the electric
air pump. X
Remove the cap from valve Eon the faulty
tyre. Flat tyre
277Breakdown assistance
BA 207ECE ÄJ 2010/1a; 1; 2, en-GB
mkalafa Version: 3.0.2.11 2010-01-26T13:03:22+01:00 -Seite 277 Z