MERCEDES-BENZ E-CLASS ESTATE 2016 Owners Manual
Manufacturer: MERCEDES-BENZ, Model Year: 2016, Model line: E-CLASS ESTATE, Model: MERCEDES-BENZ E-CLASS ESTATE 2016Pages: 565, PDF Size: 11.34 MB
Page 101 of 565
Ad
justing the seat contour in the lumbar
re gion of the seat backrest #
Select Lumbar . #
Adjust the air cushion. #
Save the settings with the memory function
(→ page 107). Ad
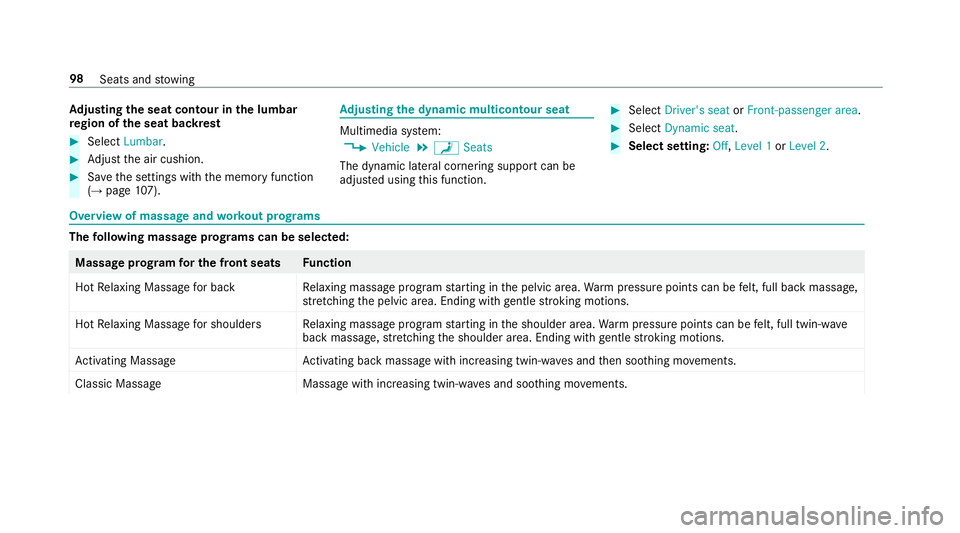
justing the dynamic multicon tour seat Multimedia sy
stem:
, Vehicle .
a Seats
The dynamic lateral cornering support can be
adjus ted using this function. #
Select Driver's seat orFront-passenger area. #
Select Dynamic seat. #
Select setting: Off,Level 1 orLevel 2. Overview of massage and
workout prog rams The
following massage prog rams can be selected: Massage prog
ram for the front seats Function
Hot Relaxing Massage for bac kR elaxing massage prog ram starting in the pelvic area. Warm pressure points can be felt, full back massage,
st re tching the pelvic area. Ending with gentle stroking motions.
Hot Relaxing Massage for shoulder sR elaxing massage prog ram starting in the shoulder area. Warm pressure points can be felt, full twin-w ave
back massage, stre tching the shoulder area. Ending with gentle stroking motions.
Ac tivating Massa ge Activating ba ckmassa gewith inc reasing twin-w aves and then soo thing mo vements.
Classic Massa ge Massage with increasing twin-w aves and soo thing mo vements. 98
Seats and stowing
Page 102 of 565
Massage prog
ram for the front seats Function
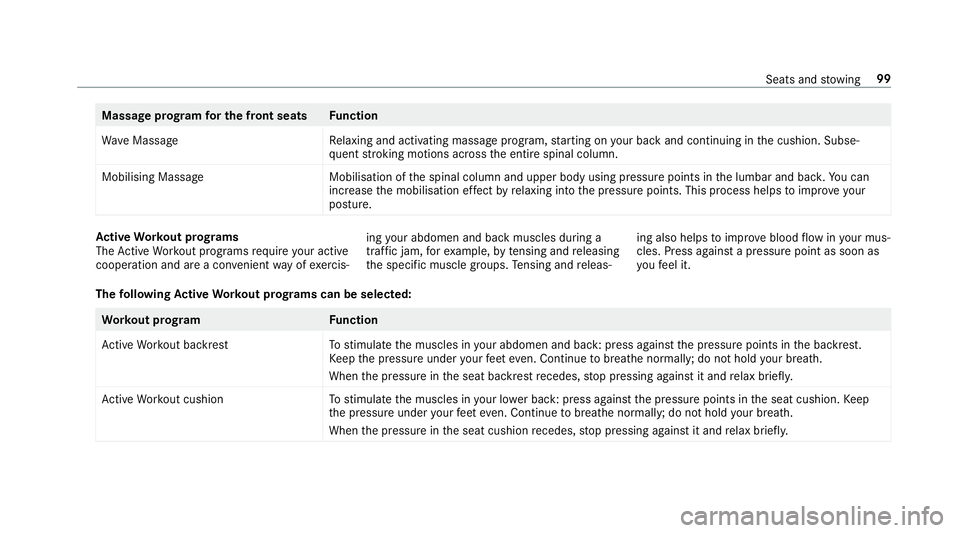
Wa veMassag eR elaxing and activating massage program, starting on your back and continuing in the cushion. Subse‐
qu ent stro king motions across the entire spinal column.
Mobilising Massag eM obilisation ofthe spinal column and upper body using pressure points in the lumbar and bac k.You can
inc rease the mobilisation ef fect by relaxing into the pressure points. This process helps toimpr oveyour
posture. Ac
tive Workout prog rams
The Active Workout programs requ ire your active
cooperation and are a co nvenient way of exercis‐ ing
your abdomen and back muscles during a
traf fic jam, forex ample, bytensing and releasing
th e specific muscle groups. Tensing and releas‐ ing also helps
toimpr oveblood flow inyour mus‐
cles. Press against a pressure point as soon as
yo ufe el it.
The following Active Workout prog rams can be selected: Wo
rkout prog ramF unction
Ac tive Workout backres tT ostimulate the muscles in your abdomen and back: press against the pressure points in the backrest.
Ke ep the pressure under your feet eve n. Continue tobreathe normally; do not hold your breath.
When the pressure in the seat backrest recedes, stop pressing against it and relax briefly.
Ac tive Workout cushion Tostimulate the muscles in your lo wer back: press against the pressure points in the seat cushion. Keep
th e pressure under your feet even. Continue tobreathe normall y;do not hold your breath.
When the pressure in the seat cushion recedes, stop pressing against it and relax briefly. Seats and
stowing 99
Page 103 of 565
Selecting
the massage prog ramme for the
front seats Multimedia sy
stem:
, Vehicle .
a Seats #
Select Driver's seat orFront-passenger area. #
Select Massage. #
Select a massage programme.
The massage programme runs for appro x‐
ima tely 9to 15 minutes, depending on the
setting. #
Toset the massage intensity: switch High
intensity onO or off ª. Re
setting seat and massa gesettings Multimedia sy
stem:
, Vehicle .
a Seats .
Reset #
Select YesorNo.
Depending on whe ther the settings forth e driver
or front passenger seat are selected, only the
selected seat can be reset. Switching
the seat heater on/off &
WARNING Risk of bu rns due torepeat‐
edly switching on the seat heater
Re peatedly switching on the seat heater can
cause the seat cushion and seat backrest
padding tobecome very hot.
The health of persons with limited temp era‐
ture sensitivity or a limited ability toreact to
exc essively high temp eratures may be af fec‐
te d or they may even suf fer burn-like injuries. #
Do not repeatedly switch on the seat
heater. #
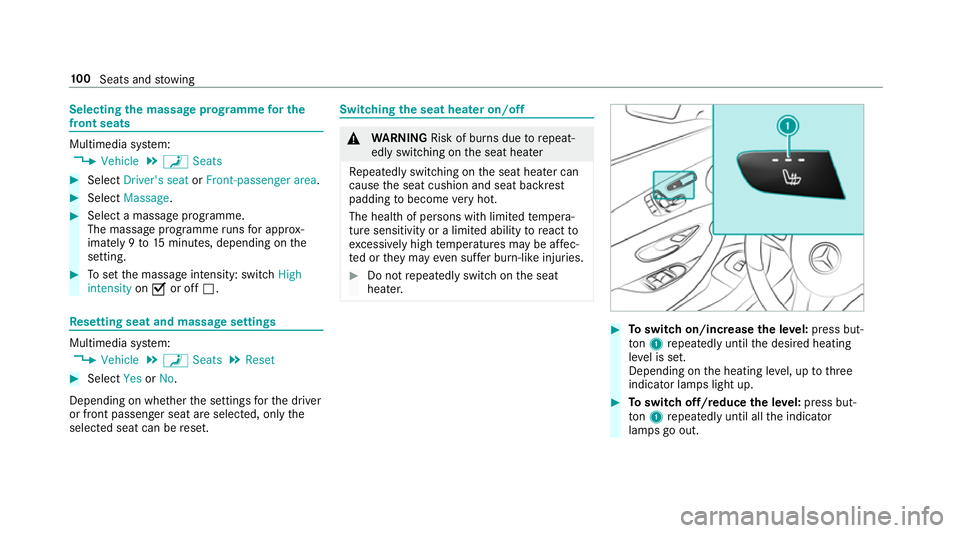
Toswitch on/increase the le vel:press but‐
to n1 repeatedly until the desired heating
le ve l is set.
Depending on the heating le vel, up tothree
indicator lamps light up. #
Toswitch off/reduce the le vel:press but‐
to n1 repeatedly until all the indicator
lamps go out. 100
Seats and stowing
Page 104 of 565
%
The seat heater automatically switches down
from theth re e heating le vels af ter cer tain
periods of time: 8, 10and 20 minutes until
th e seat heater is switched off. Setting
the panel heating Multimedia sy
stem:
, Vehicle .
î Vehicle set-
tings .
Panel heating
When the seat heater is switched on, the armr‐
ests in theve hicle as well as the cent reconsole
can be hea ted using this function.
Setting options #
Select Front and rear, Front only,Rear only
or Off . Switching
the seat ventilation on/off Re
quiremen t:
R powe r supp lyswitched on #
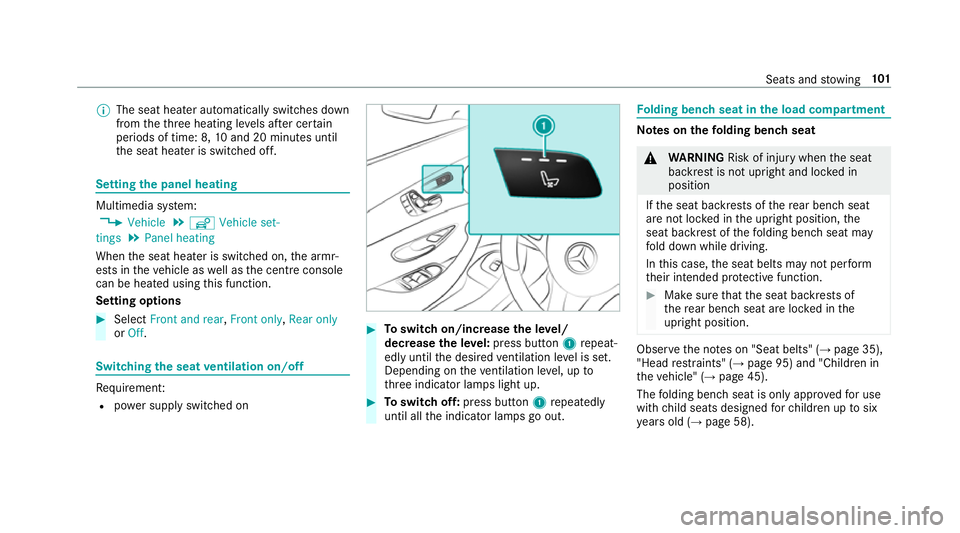
Toswitch on/increase the le vel/
decrease the le vel:press button 1repeat‐
edly until the desired ventilation le vel is set.
Depending on theve ntilation le vel, up to
th re e indicator lamps light up. #
Toswitch off: press button 1repeatedly
until all the indicator lamps go out. Fo
lding bench seat in the load compa rtment Note
s onthefo lding bench seat &
WARNING Risk of inju rywhen the seat
backrest is not upright and loc ked in
position
If th e seat backrests of there ar ben chseat
are not loc ked in the upright position, the
seat backrest of thefo lding bench seat may
fo ld down while driving.
In this case, the seat belts may not per form
th eir intended pr otective function. #
Make sure that the seat backrests of
th ere ar ben chseat are loc ked in the
upright position. Obser
vethe no tes on "Seat belts" (→ page 35),
"Head restra ints" (→ page 95) and "Children in
th eve hicle" (→ page 45).
The folding bench seat is only appr ovedfo r use
with child seats designed forch ildren up tosix
ye ars old (→ page 58). Seats and
stowing 101
Page 105 of 565
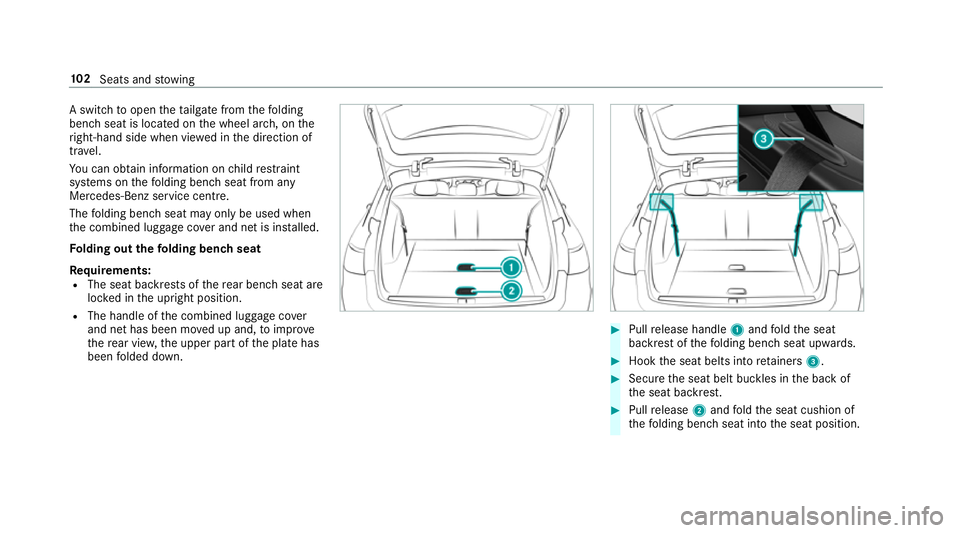
A switch
toopen theta ilgate from thefo lding
bench seat is located on the wheel ar ch, on the
ri ght-hand side when vie wed in the direction of
tra vel.
Yo u can obtain information on child restra int
sy stems on thefo lding bench seat from any
Mercedes-Benz service centre.
The folding bench seat may only be used when
th e combined luggage co ver and net is ins talled.
Fo lding out thefo lding bench seat
Re quirements:
R The seat backrests of there ar ben chseat are
loc ked in the upright position.
R The handle of the combined luggage co ver
and net has been mo ved up and, toimpr ove
th ere ar vie w,the upper part of the plate has
been folded down. #
Pull release handle 1and fold the seat
backrest of thefo lding bench seat upwards. #
Hook the seat belts into retainers 3. #
Secure the seat belt buckles in the back of
th e seat backrest. #
Pull release 2and fold the seat cushion of
th efo lding bench seat into the seat position. 102
Seats and stowing
Page 106 of 565
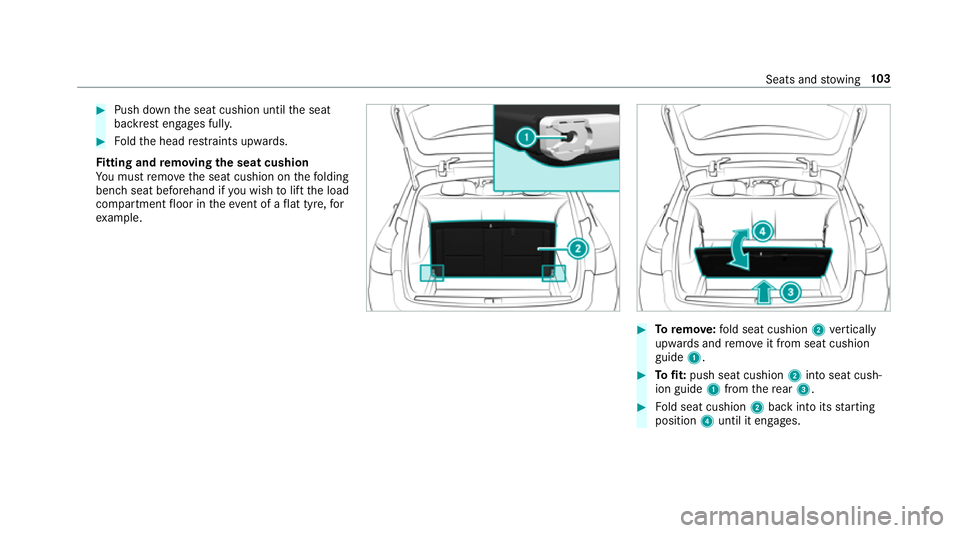
#
Push down the seat cushion until the seat
backrest engages full y.#
Foldthe head restra ints upwards.
Fi tting and removing the seat cushion
Yo u must remo vethe seat cushion on thefo lding
bench seat beforehand if you wish tolift the load
compartment floor in theeve nt of a flat tyre, for
ex ample. #
Toremo ve:fo ld seat cushion 2vertically
upwards and remo veit from seat cushion
guide 1. #
Tofit: push seat cushion 2into seat cush‐
ion guide 1from there ar 3. #
Fold seat cushion 2back into its starting
position 4until it engages. Seats and
stowing 103
Page 107 of 565
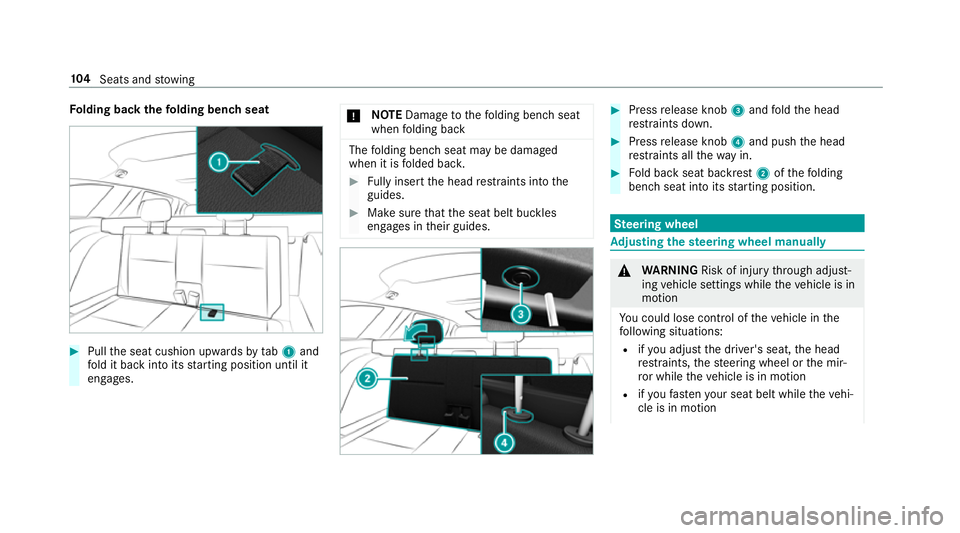
Fo
lding back thefo lding bench seat #
Pull the seat cushion upwards bytab1 and
fo ld it back into its starting position until it
engages. *
NO
TEDama getothefo lding bench seat
when folding back The
folding bench seat may be damaged
when it is folded bac k. #
Fully inse rtthe head restra ints into the
guides. #
Make sure that the seat belt buckles
engages in their guides. #
Press release knob 3and fold the head
re stra ints down. #
Press release knob 4and push the head
re stra ints all thewa y in. #
Fold back seat backrest 2ofthefo lding
bench seat into its starting position. Ste
ering wheel Ad
justing the steering wheel manually &
WARNING Risk of inju rythro ugh adjust‐
ing vehicle settings while theve hicle is in
motion
Yo u could lose cont rol of theve hicle in the
fo llowing situations:
R ifyo u adjust the driver's seat, the head
re stra ints, thesteering wheel or the mir‐
ro r while theve hicle is in motion
R ifyo ufast enyour seat belt while theve hi‐
cle is in motion 104
Seats and stowing
Page 108 of 565
#
Before starting the engine: adjust the
driver's seat, the head restra ints, the
st eering wheel or the mir ror and fasten
yo ur seat belt. &
WARNING Risk of entrapment forch il‐
dren when adjusting thesteering wheel
Children could injure themselves if they
adjust thesteering wheel. #
Never lea vechildren unat tended in the
ve hicle. #
When leaving theve hicle, alw aysta ke
th eke y with you and lock theve hicle.
This also applies tomobile phones if the
"Digital Car Key in the smartphone"
function is activated via the Mercedes
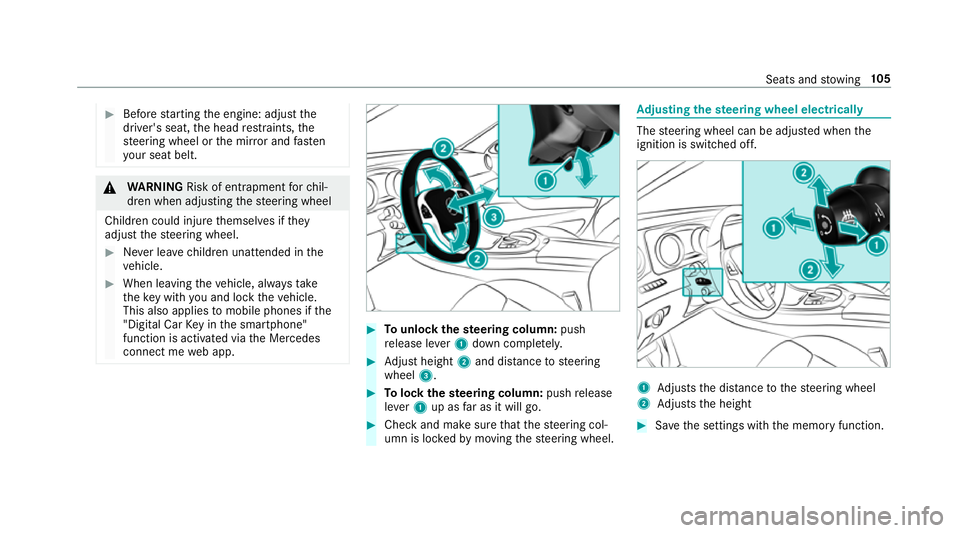
connect me web app. #
Tounlo ckthest eering column: push
re lease le ver1 down comple tely. #
Adjust height 2and di stance tosteering
wheel 3. #
Tolock thest eering column: pushrelease
le ve r1 up as far as it will go. #
Check and make sure that thesteering col‐
umn is loc kedby moving thesteering wheel. Ad
justing the steering wheel electrically The
steering wheel can be adjus ted when the
ignition is switched off. 1
Adjusts the dis tance tothesteering wheel
2 Adjusts the height #
Save the settings with the memory function. Seats and
stowing 105
Page 109 of 565
Switching
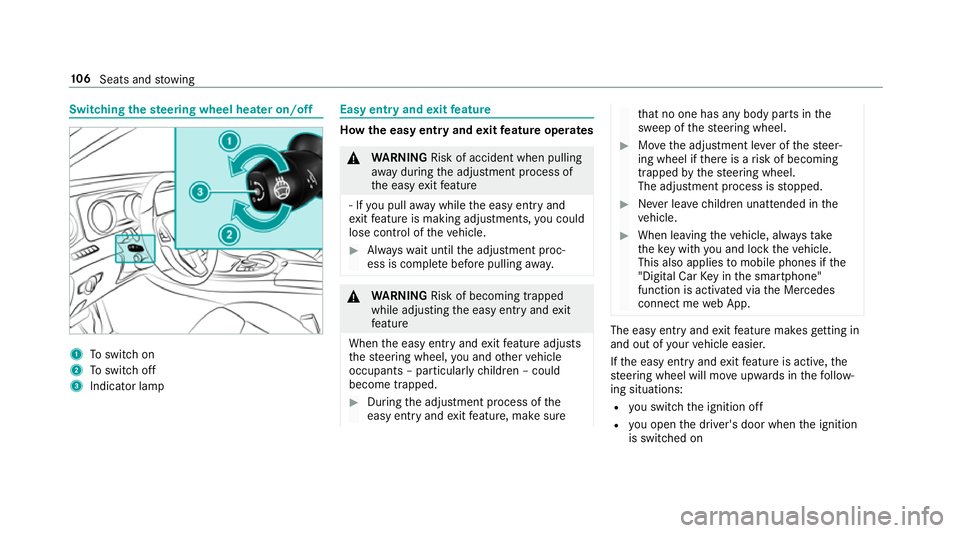
thest eering wheel heater on/off 1
Toswitch on
2 Toswitch off
3 Indicator lamp Easy entry and
exitfeature How
the easy entry and exitfeature operates &
WARNING Risk of accident when pulling
aw ay during the adjustment process of
th e easy exitfeature
‑ If you pull away while the easy entry and
ex itfeature is making adjustments, you could
lose cont rol of theve hicle. #
Alw ayswa it until the adjustment proc‐
ess is comple tebefore pulling away. &
WARNING Risk of becoming trapped
while adjusting the easy entry andexit
fe ature
When the easy entry andexitfeature adjusts
th esteering wheel, you and other vehicle
occupants – particularly children – could
become trapped. #
During the adjustment process of the
easy entry andexitfeature, make sure th
at no one has any body parts in the
sweep of thesteering wheel. #
Movethe adjustment le ver of thesteer‐
ing wheel if there is a risk of becoming
trapped bythesteering wheel.
The adjustment process is stopped. #
Never lea vechildren unat tended in the
ve hicle. #
When leaving theve hicle, alw aysta ke
th eke y with you and lock theve hicle.
This also applies tomobile phones if the
"Digital Car Key in the smartphone"
function is activated via the Mercedes
connect me web App. The easy ent
ryand exitfeature makes getting in
and out of your vehicle easier.
If th e easy entry andexitfeature is active, the
st eering wheel will mo veupwards in thefo llow‐
ing situations:
R you swit chthe ignition off
R you open the driver's door when the ignition
is switched on 106
Seats and stowing
Page 110 of 565
The
steering wheel mo ves back tothe last drive
position in thefo llowing cases:
R you swit ch the ignition on when the driver's
door is closed
R you close the driver's door when the ignition
is switched on
The last drive position of thesteering wheel is
st ored:
R when you swit choff the ignition
R using the last setting stored using the mem‐
ory function
If yo u press one of the memory function position
buttons, the adjustment process is stopped.
The crash-responsive exit aid only functions
when the easy entry andexitfeature is active.
Setting the easy entry and exitfeature
Multimedia sy stem:
, Vehicle .
î Vehicle set-
tings .
Easy Entry/Exit #
Activate Oor deacti vate ª the function. Using
the memory function &
WARNING Risk of an accident if memo ry
function is used while driving
If yo u use the memory function on the driv‐
er's side while driving, you could lose cont rol
of theve hicle as a result of the adjustments
being made. #
Only use the memory function on the
driver's side when theve hicle is station‐
ar y. &
WARNING Risk of entrapment when set‐
ting the seat with the memory function
If yo u use the memory function toset the
seat or thesteering wheel, you and other
ve hicle occupants, especially children, could
be ent rapped. – – #
During the setting procedure of the
memory function, ensure that no body
parts are in the sweep of the seat or
th esteering wheel. #
If somebody becomes trapped, immedi‐
ately release the memory function posi‐
tion button.
The adjustment process is stopped. &
WARNING Risk of entrapment if the
memory function is activated bychildren
Children could become trapped if they acti‐
va te the memory function, particularly when
unattended. #
Never lea vechildren unat tended in the
ve hicle. #
When leaving theve hicle, alw aysta ke
th eke y with you and lock theve hicle.
This also applies tomobile phones if the
"Digital Car Key in the smartphone"
function is activated via the Mercedes
connect me web app. The memory function can be used when
the igni‐
tion is switched off.
Seat comfort positions for up tothre e people
can be stored and called up using the memory
function. Seats and
stowing 107