MERCEDES-BENZ E-CLASS ESTATE 2016 Owners Manual
Manufacturer: MERCEDES-BENZ, Model Year: 2016, Model line: E-CLASS ESTATE, Model: MERCEDES-BENZ E-CLASS ESTATE 2016Pages: 565, PDF Size: 11.34 MB
Page 111 of 565
The
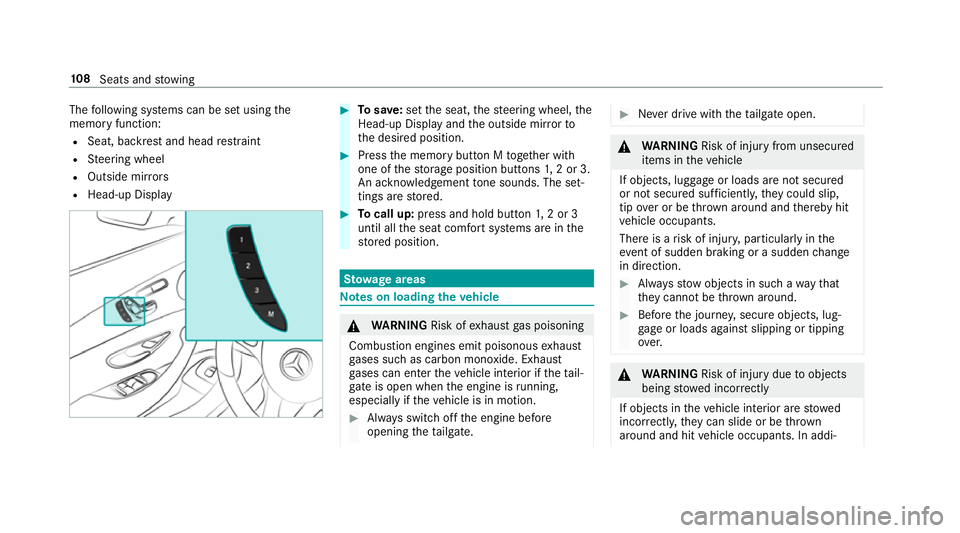
following sy stems can be set using the
memory function:
R Seat, backrest and head restra int
R Steering wheel
R Outside mir rors
R Head-up Display #
Tosave :set the seat, thesteering wheel, the
Head-up Display and the outside mir rorto
th e desired position. #
Press the memory button M toge ther with
one of thestorage position buttons 1,2 or 3.
An acknowledgement tone sounds. The set‐
tings are stored. #
Tocall up: press and hold button 1,2 or 3
until all the seat comfort sy stems are in the
st ored position. St
ow age areas Note
s on loading theve hicle &
WARNING Risk ofexhaust gas poisoning
Combustion engines emit poisonous exhaust
ga ses such as carbon monoxide. Exhaust
ga ses can enter theve hicle interior if theta il‐
gate is open when the engine is running,
especially if theve hicle is in motion. #
Alw ays switch off the engine before
opening theta ilgate. #
Never drive with theta ilgate open. &
WARNING Risk of inju ryfrom unsecu red
items in theve hicle
If objects, luggage or loads are not secured
or not secured suf ficientl y,they could slip,
tip ove r or be throw n around and thereby hit
ve hicle occupants.
There is a risk of injur y,particularly in the
ev ent of sudden braking or a sudden change
in direction. #
Alw aysstow objects in such a wayth at
th ey cannot be thro wn around. #
Before the journe y,secure objects, lug‐
ga ge or loads against slipping or tipping
ove r. &
WARNING Risk of inju rydue toobjects
being stowed incor rectly
If objects in theve hicle interior are stowed
incor rectly, they can slide or be thrown
around and hit vehicle occupants. In addi‐ 108
Seats and stowing
Page 112 of 565
tion, cup holde
rs, open stowage spaces and
mobile phone brac kets cann otalw aysre tain
all objects they contain.
The reis a risk of injur y,particularly in the
ev ent of sudden braking or a sudden change
in direction. #
Alw aysstow objects so that they can‐
not be throw n around in su chsitua‐
tions. #
Alw ays make sure that objects do not
pr otru de from stowage spaces, luggage
nets or stowage nets. #
Close the loc kable stow age spaces
before starting a journe y. #
Stow and secure objects that are heavy,
hard, poin ted, sharp-edged, fragile or
to o lar geinthe load compartment. &
WARNING Risk of bu rns from tailpipes
and tailpipe trim
The tailpipe and tailpipe trim can become
ve ry hot. If you come into contact with these
parts of theve hicle, you could burn yourself. #
Alw ays be particular lycareful around
th eta ilpipe and theta ilpipe trim. #
Allow theve hicle parts tocool down
before youto uch them. The handling
characteristics of your vehicle are
dependent on the distribution of the load within
th eve hicle. You should bear thefo llowing in
mind when loading theve hicle:
R neverex ceed the maximum permissible
gross mass or the permissible axle loads for
th eve hicle (including occupants).
R the load must not pr otru de abo vethe upper
edge of the seat backrests.
R when transporting objects in the load com‐
partment, the combined luggage co ver and
net must alw ays be ins talled (load compart‐
ment co ver and saf ety net).
R always place the load behind unoccupied
seats if possible.
R secure the load using the tie-down eyes and
distribute the load evenly. Interior
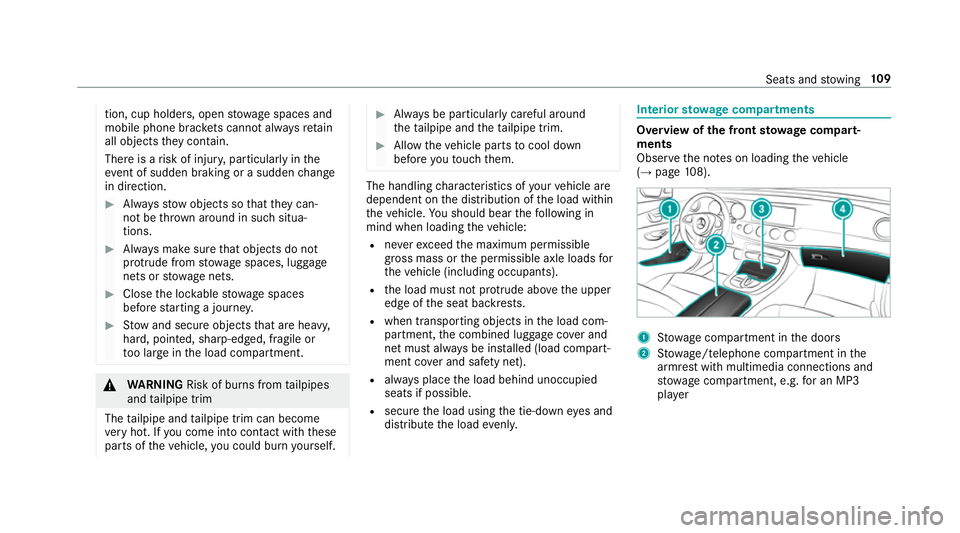
stowage compa rtments Overvi
ewofthe front stowage compa rt‐
ments
Obse rveth e no tes on loading theve hicle
(→ page 108). 1
Stow age compartment in the doors
2 Stow age/telephone compartment in the
armrest with multimedia connections and
stow age compartment, e.g. for an MP3
pla yer Seats and
stowing 109
Page 113 of 565
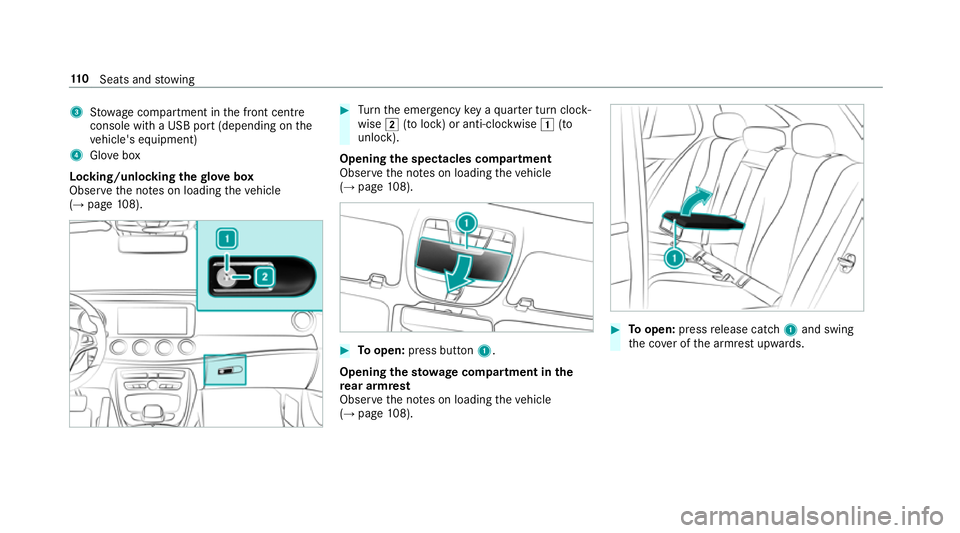
3
Stow age compartment in the front cent re
console wi tha USB port (depending on the
ve hicle's equipment)
4 Glovebox
Locking/unlocking thegl ove box
Obser vethe no tes on loading theve hicle
(→ page 108). #
Turn the emer gency key a quarter turn clock‐
wise 2(to lock) or anti-clockwise 1(to
unlock).
Opening the spectacles compa rtment
Obse rveth e no tes on loading theve hicle
(→ page 108). #
Toopen: press button 1.
Opening thesto wage compa rtment in the
re ar armrest
Obse rveth e no tes on loading theve hicle
(→ page 108). #
Toopen: pressrelease cat ch1 and swing
th e co ver of the armrest upwards. 11 0
Seats and stowing
Page 114 of 565
Through-loading
feature in there ar ben ch
seat Fo
lding there ar seat backrest forw ards &
WARNING Risk of inju ryifth ere ar
ben chseat/rear seat and seat backrest
are not engaged
If th ere ar ben chseat/rear seat and seat
backrest are not engaged they could fold for‐
wa rds, e.g. when braking suddenly or in the
ev ent of an accident.
R Ifth is is the case, theve hicle occupant
wo uld be forc ed into the seat belt bythe
re ar ben chseat/rear seat or bythe seat
backrest. The seat belt cann otprotect as
intended and could result in additional
injur y.
R Objects or loads in the boot/load com‐
partment cann otbe restra ined bythe
seat backrest. #
Make sure that the seat backrest and
th ere ar ben chseat/rear seat are
engaged before everytrip. If
th e seat backrest is not engaged and loc ked,
th is will be shown in the multifunction display in
th e instrument clus ter.
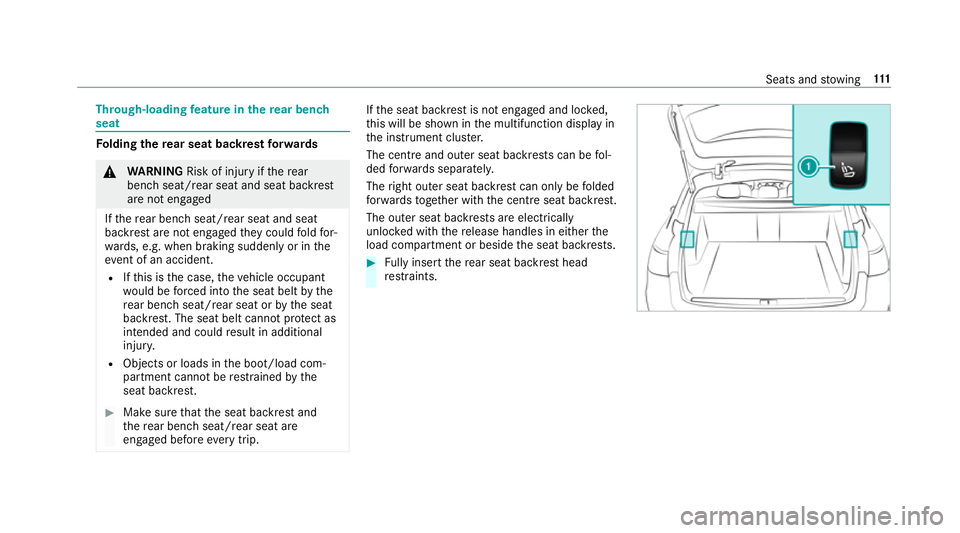
The centre and outer seat backrests can be fol‐
ded forw ards separatel y.
The right outer seat backrest can only be folded
fo rw ards toget her with the cent reseat backrest.
The outer seat backrests are electrically
unloc ked with there lease handles in either the
load compartment or beside the seat backrests. #
Fully inse rtthere ar seat backrest head
re stra ints. Seats and
stowing 111
Page 115 of 565
#
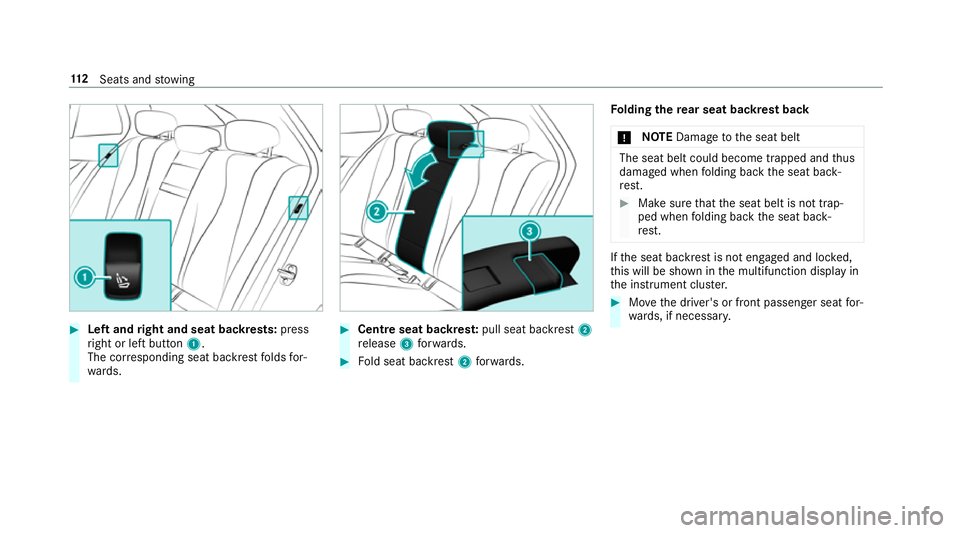
Left and right and seat backrests: press
ri ght or left button 1.
The cor responding seat backrest folds for‐
wa rds. #
Centre seat backres t:pull seat backrest 2
re lease 3forw ards. #
Fold seat backrest 2forw ards. Fo
lding there ar seat backrest back
* NO
TEDama getothe seat belt The seat belt could become trapped and
thus
damaged when folding back the seat back‐
re st. #
Make sure that the seat belt is not trap‐
ped when folding back the seat back‐
re st. If
th e seat backrest is not engaged and loc ked,
th is will be shown in the multifunction display in
th e instrument clus ter. #
Movethe driver's or front passenger seat for‐
wa rds, if necessar y. 11 2
Seats and stowing
Page 116 of 565
#
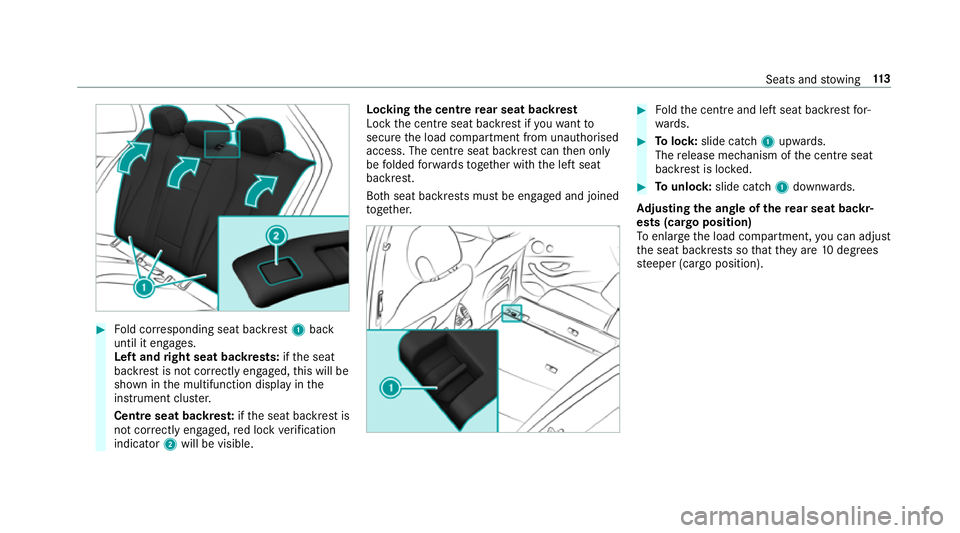
Fold cor responding seat backrest 1back
until it engages.
Left and right seat backrests: ifth e seat
backrest is not cor rectly engaged, this will be
shown in the multifunction display in the
instrument clus ter.
Centre seat backres t:ifth e seat backrest is
not cor rectly engaged, red lock verification
indicator 2will be visible. Lo
cking the centre rear seat backrest
Lock the cent reseat backrest if youwa ntto
secure the load compartment from unauthorised
access. The cent reseat backrest can then only
be folded forw ards toge ther with the left seat
backrest.
Bo th seat backrests must be engaged and joined
to ge ther. #
Foldthe cent reand left seat backrest for‐
wa rds. #
Tolock: slide cat ch1 upwards.
The release mechanism of the cent reseat
backrest is loc ked. #
Tounlo ck:slide catch 1down wards.
Ad justing the angle of the rear seat backr‐
ests (cargo position)
To enlar gethe load compartment, you can adjust
th e seat backrests so that they are 10degrees
st eeper (cargo position). Seats and
stowing 11 3
Page 117 of 565
#
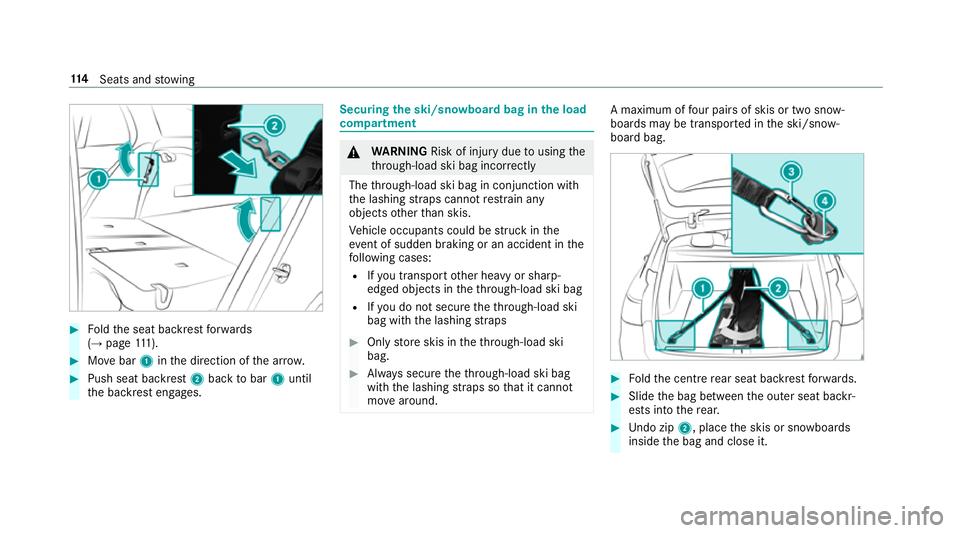
Foldthe seat backrest forw ards
(→ page 111). #
Movebar 1inthe direction of the ar row. #
Push seat backrest 2back tobar 1until
th e backrest engages. Securing
the ski/sn owboard bag in the load
compa rtment &
WARNING Risk of inju rydue tousing the
th ro ugh-load ski bag incor rectly
The thro ugh-load ski bag in conjunction with
th e lashing stra ps cann otrestra in any
objects other than skis.
Ve hicle occupants could be stru ck inthe
ev ent of sudden braking or an accident in the
fo llowing cases:
R Ifyo u transpo rtother heavy or sharp-
edged objects in theth ro ugh-load ski bag
R Ifyo u do not secure theth ro ugh-load ski
bag with the lashing stra ps #
Only store skis in theth ro ugh-load ski
bag. #
Alw ays secure theth ro ugh-load ski bag
with the lashing stra ps so that it cannot
mo vearound. A maximum of
four pairs of skis or two sn ow‐
boards may be transpor ted in the ski/snow‐
board bag. #
Foldthe cent re rear seat backrest forw ards. #
Slide the bag between the outer seat backr‐
ests into there ar. #
Undo zip 2, place the skis or snowboards
inside the bag and close it. 11 4
Seats and stowing
Page 118 of 565
#
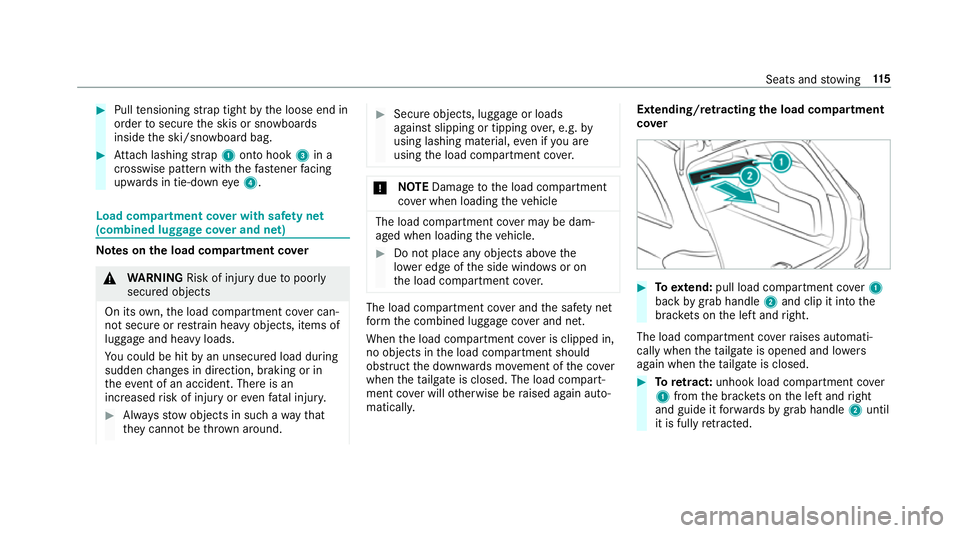
Pull tensioning stra p tight bythe loose end in
order tosecure the skis or snowboards
inside the ski/snowboard bag. #
Attach lashing stra p1 onto hook 3in a
crosswise pattern with thefast ener facing
up wa rds in tie-down eye4. Load compartment co
ver with saf ety net
(combined luggage co ver and net) Note
s onthe load compa rtment co ver &
WARNING Risk of inju rydue topoorly
secured objects
On its own,the load compartment co ver can‐
not secure or restra in heavy objects, items of
luggage and heavy loads.
Yo u could be hit byan unsecured load during
sudden changes in direction, braking or in
th eev ent of an accident. There is an
increased risk of injury or even fata l injur y. #
Alw aysstow objects in such a wayth at
th ey cannot be thro wn around. #
Secure objects, luggage or loads
against slipping or tipping over,e.g. by
using lashing material, even if you are
using the load compartment co ver. *
NO
TEDama getothe load compartment
co ver when loading theve hicle The load compartment co
ver may be dam‐
aged when loading theve hicle. #
Do not place any objects abo vethe
lo we r edge of the side windo wsor on
th e load compartment co ver. The load compartment co
ver and the saf ety net
fo rm the combined luggage co ver and net.
When the load compartment co ver is clipped in,
no objects in the load compartment should
obstruct the down wards mo vement of the co ver
when theta ilgate is closed. The load compart‐
ment co ver will otherwise be raised again auto‐
matically. Extending/r
etra cting the load compa rtment
co ver #
Toextend: pull load compartment co ver1
back bygrab handle 2and clip it into the
brac kets on the left and right.
The load compartment co verra ises automati‐
cally when theta ilgate is opened and lo wers
again when theta ilgate is closed. #
Toretract: unhook load compa rtment co ver
1 from the brac kets on the left and right
and guide it forw ards bygrab handle 2until
it is fully retracted. Seats and
stowing 11 5
Page 119 of 565
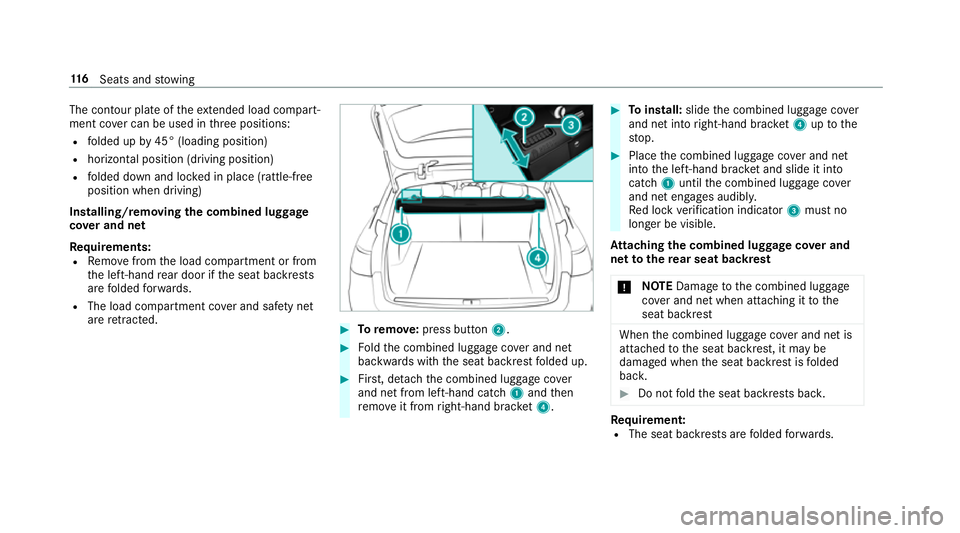
The contour plate of
theex tended load compa rt‐
ment co ver can be used in thre e positions:
R folded up by45° (loading position)
R horizontal position (driving position)
R folded down and loc ked in place (rattle-free
position when driving)
Installing/removing the combined luggage
co ver and net
Re quirements:
R Remo vefrom the load compartment or from
th e left-hand rear door if the seat backrests
are folded forw ards.
R The load compartment co ver and saf ety net
are retracted. #
Toremo ve:press button 2. #
Foldthe combined luggage co ver and net
backwards with the seat backrest folded up. #
First, de tach th e combined luggage co ver
and net from left-hand cat ch1 and then
re mo veit from right-hand brac ket4. #
Toinstall: slidethe combined luggage co ver
and net into right-hand brac ket4 uptothe
st op. #
Place the combined luggage co ver and net
into the left-hand brac ket and slide it into
catch 1until the combined luggage co ver
and net engages audibl y.
Re d lock verification indicator 3must no
longer be visible.
At taching the combined luggage co ver and
net tothere ar seat backrest
* NO
TEDama getothe combined luggage
co ver and net when attaching it tothe
seat backrest When
the combined luggage co ver and net is
attached tothe seat backrest, it may be
damaged when the seat backrest is folded
bac k. #
Do not fold the seat backrests bac k. Re
quirement:
R The seat backrests are folded forw ards. 11 6
Seats and stowing
Page 120 of 565
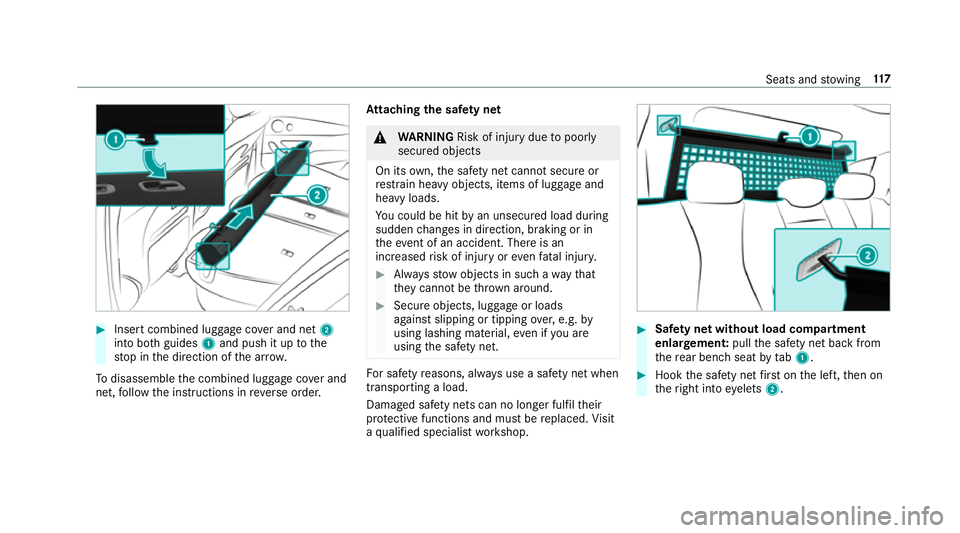
#
Insert combined luggage co ver and net 2
into bo thguides 1and push it up tothe
st op in the direction of the ar row.
To disassemble the combined luggage co ver and
net, follow the instructions in reve rse order. At
taching the saf ety net &
WARNING Risk of inju rydue topoorly
secured objects
On its own,the saf ety net cannot secure or
re stra in heavy objects, items of luggage and
heavy loads.
Yo u could be hit byan unsecured load during
sudden changes in direction, braking or in
th eev ent of an accident. There is an
increased risk of injury or even fata l injur y. #
Alw aysstow objects in such a wayth at
th ey cannot be thro wn around. #
Secure objects, luggage or loads
against slipping or tipping over,e.g. by
using lashing material, even if you are
using the saf ety net. Fo
r saf etyre asons, alw ays use a saf ety net when
transporting a load.
Damaged saf ety nets can no lon ger fulfil their
pr otective functions and must be replaced. Visit
a qu alified specialist workshop. #
Safety net without load compartment
enlar gement: pullthe saf ety net back from
th ere ar ben chseat bytab1. #
Hook the saf ety net firs t on the left, then on
th eright into eyelets 2. Seats and
stowing 117