MERCEDES-BENZ G500 2002 W463 Owner's Manual
Manufacturer: MERCEDES-BENZ, Model Year: 2002, Model line: G500, Model: MERCEDES-BENZ G500 2002 W463Pages: 385, PDF Size: 30.37 MB
Page 131 of 385
128 Engine oil level indicator
Te ch n i c a l
data Instruments
and controlsOperationDrivingInstrument
cluster displayPractical hints Car care Index
The “ENGINE OIL LEVEL – MEASUREMENT IN
PROCESS” message is displayed after approximately
3seconds.
One of the following messages will subseq uently appear
on the indicator:
“ENGINE OIL LEVEL – O.K.”
No oil needs to be added.
“ENGINE OIL LEVEL – ADD 1.0 QUART”
(Canada: 1.0 L)
“ENGINE OIL LEVEL – ADD 1.5 QUART”
(Canada: 1.5 L)
“ENGINE OIL LEVEL – ADD 2.0 QUART”
(Canada: 2.0 L)
See “Checking engine oil level”, on page 304 for
instructions on adding engine oil.
“ENGINE OIL LEVEL – REDUCE OIL LEVEL”
This message will only be displayed if the engine is at
operational temperature.
Do not overfill the engine.
Excessive oil must be siphoned or drained off. It could
cause damage to the engine and catalytic converter not
covered by the Mercedes-Benz Limited Warranty.The “PERF. SERV. ON TIME” message will be displayed
if a proper oil level check cannot be performed. The
engine oil level check can be repeated after a short
while.
Perform the engine oil level check with the dipstick, if it
cannot completed via the multifunction display.
See “Checking engine oil level”, on page 304.
In this case we recommend that you have the system
checked at a Mercedes-Benz Light Truck Center.
Notes:
See malfunction and warning messages on page 272
and page 282 if an engine oil level indicator appears on
the multifunction display when the engine is running.
The engine oil level cannot be checked while the engine
is running. The “ENGINE OIL LEVEL – NOT WHEN
ENGINE ON” message will appear.
J_G463.book Seite 128 Mittwoch, 19. September 2001 8:06 08
Page 132 of 385
129 Exterior lamp switch
Te ch n i c a l
data Instruments
and controlsOperationDrivingInstrument
cluster displayPractical hints Car care Index Exterior lamp switch
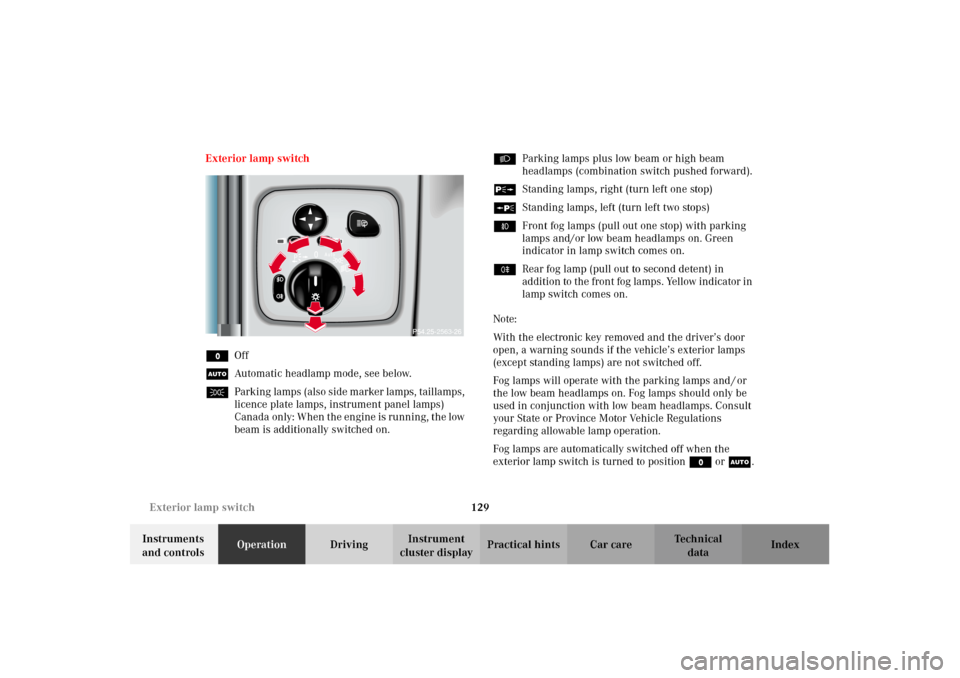
MOff
UAutomatic headlamp mode, see below.
CPar k ing lamps (als o s id e m ar ker lamps , taillamps ,
licence plate lamps, instrument panel lamps)
Canada only: When the engine is running, the low
beam is additionally switched on.BParking lamps plus low beam or high beam
headlamps (combination switch pushed forward).
ˆStanding lamps, right (turn left one stop)
‚Standing lamps, left (turn left two stops)
‡Front fog lamps (pull out one stop) with parking
lamps and/or low beam headlamps on. Green
indicator in lamp switch comes on.
†Rear fog lamp (pull out to second detent) in
addition to the front fog lamps. Yellow indicator in
lamp switch comes on.
Note:
With the electronic key removed and the driver’s door
open, a warning sounds if the vehicle’s exterior lamps
(except standing lamps) are not switched off.
Fog lamps will operate with the parking lamps and / or
the low beam headlamps on. Fog lamps should only be
used in conjunction with low beam headlamps. Consult
your State or Province Motor Vehicle Regulations
regarding allowable lamp operation.
Fog lamps are automatically switched off when the
exterior lamp switch is turned to position M or U.
2563
J_G463.book Seite 129 Mittwoch, 19. September 2001 8:06 08
Page 133 of 385
130 Exterior lamp switch
Te ch n i c a l
data Instruments
and controlsOperationDrivingInstrument
cluster displayPractical hints Car care Index
Headlamp mode
Manual headlamp mode
The low beam headlamps and parking lamps can be
switched on and off with the exterior lamp switch. For
exterior lamp switch, see above.
Note:
With the daytime running lamp mode activated and the
engine running, the low beam headlamps cannot be
switched off manually.Automat ic headlamp mode
Turn exterior lamp switch to positionU.
•Electronic key in starter switch position 1:
The parking lamps switch on and off automatically
depending on the brightness of the ambient light.
•Electronic key in starter switch position 2 and the
engine running:
The low beam headlamps and parking lamps are
switched on and off automatically depending on the
brightness of the ambient light.
The low beam headlamps and parking lamps can
still be switched on and off manually using the
exterior lamp switch.
Note:
With the daytime running lamp mode activated, the low
beam headlamps cannot be switched off manually.
The headlamps will not be automatically switched on
under foggy conditions.
Front fog lamps and rear fog lamp cannot be switched
on manually with exterior lamp switch in positionU.
To activate the fog lamps turn exterior switch to
positionB.
Wa r n i n g !
The driver is responsible for the operation of the
vehicle’s lights at all times. The automatic
headlamp feature is only an aid to the driver.
Switch on the vehicle lights by hand when driving
or traffic conditions require you to do so.
J_G463.book Seite 130 Mittwoch, 19. September 2001 8:06 08
Page 134 of 385
131 Exterior lamp switch
Te ch n i c a l
data Instruments
and controlsOperationDrivingInstrument
cluster displayPractical hints Car care Index Daytime running lamp mode
Turn exterior lamp switch to positionM orU.
When the engine is running, the low beam headlamps
are automatically switched on. In low ambient light
conditions the parking lamps will also switch on.
•Canada only:
When shifting from a driving position to
position “N” or “P”, the low beam switches off
(3 minutes delay).
For nighttime driving the exterior lamp switch
should be turned to position B to permit
activation of the high beam headlamps.•USA only:
The high beam headlamps can also be activated
when driving with the daytime running lamp mode
activated and exterior lamp switch in positionM.
To activate the daytime running lamp mode, see the
individual setting menu “LIGHTING” – “LIGHT
CIRCUIT HEADLAMP MODE” on page 114.
Note:
See page 129 for notes on the exterior lamp switch.
J_G463.book Seite 131 Mittwoch, 19. September 2001 8:06 08
Page 135 of 385
132 Exterior lamp switch
Te ch n i c a l
data Instruments
and controlsOperationDrivingInstrument
cluster displayPractical hints Car care Index
Night security illumination
Turn exterior lamp switch to positionU.
At low ambient light conditions and with the engine
having been switched off, the exterior lamps (fog lamps
and parking lamps) switch on for added illumination,
(except in daytime running mode). After the last door
has been closed the lamp-on time period commences.
See the individual setting menu “LIGHTING” –
“HEADLAMPS DELAYED SWITCH–OFF” on page 114,
for instructions on how to activate the function.
The lamp-on time period for night security illumination
can be set at several different timed levels from 0 (off) to
60 seconds, see the individual setting menu
“LIGHTING” – “HEADLAMPS DELAYED SWITCH–OFF”
on page 114.Notes:
Within 10 minutes after closing the last door the night
security illumination can be reactivated by opening a
door.
If after switching the engine off, no doors are opened or
if after opening the doors or tailgate they are not closed,
the night security illumination will switch off
automatically after 60 seconds.
Deactivating night security illumination temporarily:
Turn the electronic key in starter switch to position 0
then to position 2 and back to position 0 again before
getting out of the vehicle. The night security
illumination will not be activated when the door is
opened.
J_G463.book Seite 132 Mittwoch, 19. September 2001 8:06 08
Page 136 of 385
133 Exterior lamp switch
Te ch n i c a l
data Instruments
and controlsOperationDrivingInstrument
cluster displayPractical hints Car care Index Locator lighting
Turn exterior lamp switch to positionU.
After unlocking the vehicle with the electronic key
during darkness the fog lamps and parking lamps
switch on for approximately 40 seconds.
The exterior lamps will be switched off when opening
the driver’s door.
See the individual setting menu “LIGHTING” –
“LOCATOR LIGHTING” on page 114, for instructions on
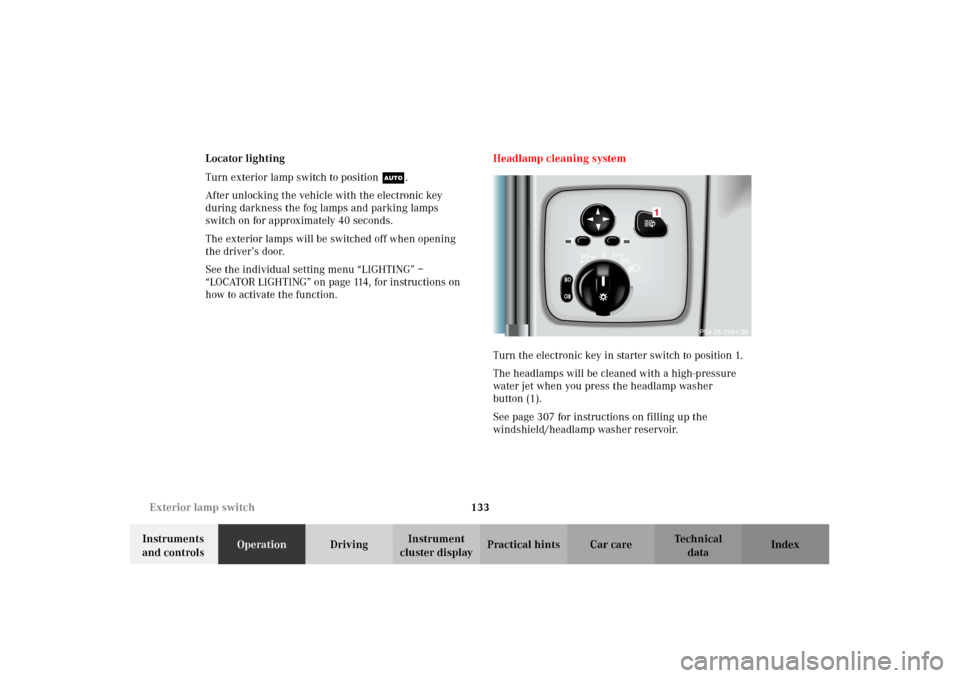
how to activate the function. Headlamp cleaning system
Turn the electronic key in starter switch to position 1.
The headlamps will be cleaned with a high-pressure
water jet when you press the headlamp washer
button (1).
See page 307 for instructions on filling up the
windshield/headlamp washer reservoir.
2564
J_G463.book Seite 133 Mittwoch, 19. September 2001 8:06 08
Page 137 of 385
134 Combination switch
Te ch n i c a l
data Instruments
and controlsOperationDrivingInstrument
cluster displayPractical hints Car care Index
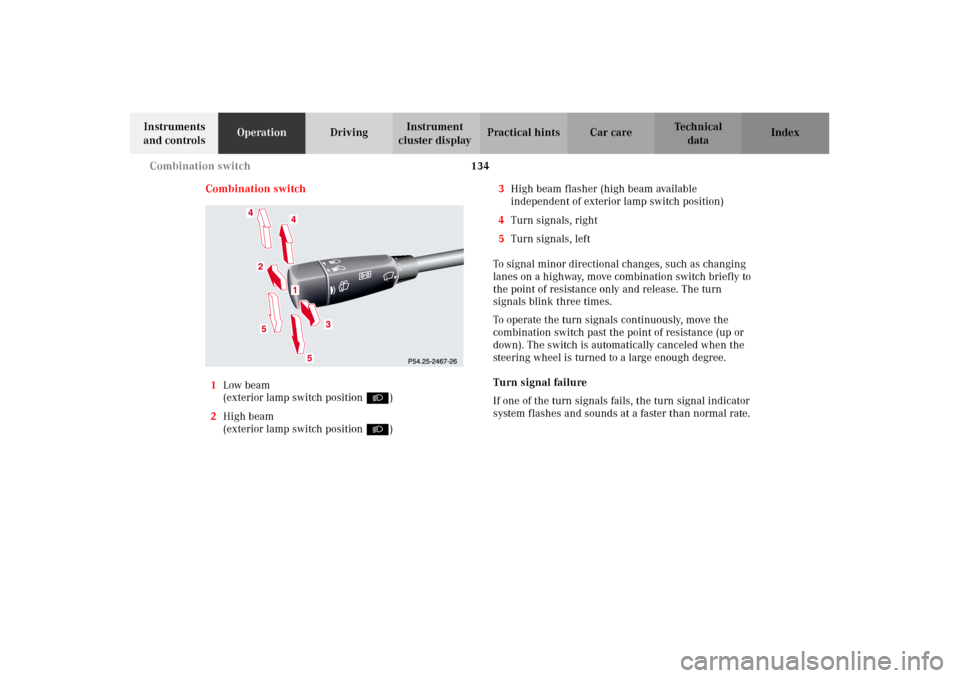
Combination switch
1Low beam
(exterior lamp switch position B)
2High beam
(exterior lamp switch position B)3High beam flasher (high beam available
independent of exterior lamp switch position)
4Turn signals, right
5Turn signals, left
To signal minor directional changes, such as changing
lanes on a highway, move combination switch briefly to
the point of resistance only and release. The turn
signals blink three times.
To operate the turn signals continuously, move the
combination switch past the point of resistance (up or
down). The switch is automatically canceled when the
steering wheel is turned to a large enough degree.
Turn signal failure
If one of the turn signals fails, the turn signal indicator
system flashes and sounds at a faster than normal rate.
J_G463.book Seite 134 Mittwoch, 19. September 2001 8:06 08
Page 138 of 385
135 Combination switch
Te ch n i c a l
data Instruments
and controlsOperationDrivingInstrument
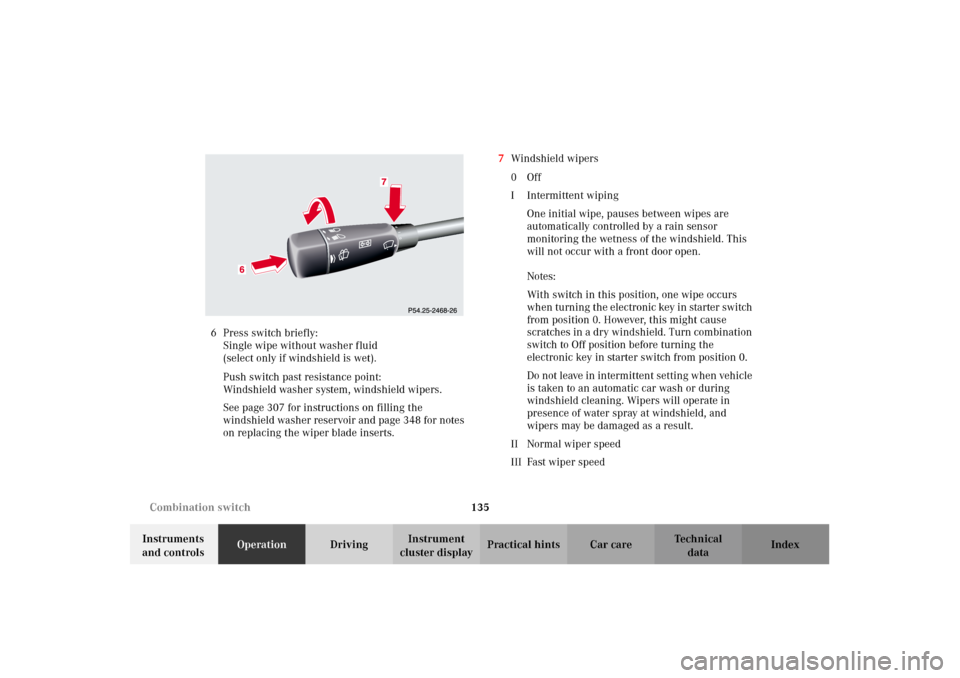
cluster displayPractical hints Car care Index 6Press switch briefly:
Single wipe without washer fluid
(select only if windshield is wet).
Push switch past resistance point:
Windshield washer system, windshield wipers.
See page 307 for instructions on filling the
windshield washer reservoir and page 348 for notes
on replacing the wiper blade inserts.7Windshield wipers
0Off
I Intermittent wiping
One initial wipe, pauses between wipes are
automatically controlled by a rain sensor
monitoring the wetness of the windshield. This
will not occur with a front door open.
Notes:
With switch in this position, one wipe occurs
when turning the electronic key in starter switch
from position 0. However, this might cause
scratches in a dry windshield. Turn combination
switch to Off position before turning the
electronic key in starter switch from position 0.
Do not leave in intermittent setting when vehicle
is taken to an automatic car wash or during
windshield cleaning. Wipers will operate in
presence of water spray at windshield, and
wipers may be damaged as a result.
II Normal wiper speed
III Fast wiper speed
J_G463.book Seite 135 Mittwoch, 19. September 2001 8:06 08
Page 139 of 385
136 Combination switch
Te ch n i c a l
data Instruments
and controlsOperationDrivingInstrument
cluster displayPractical hints Car care Index
Blocked windshield wipers
If the windshield wipers become blocked (for example,
due to snow), switch off the wipers.
For safety reasons before removing ice or snow, remove
electronic key from starter switch. Remove blockage.
Activate combination switch again (electronic key in
starter switch position 1).Emergency operation of windshield wipers
In case of windshield wiper malfunction in switch
positions I or III, turn combination switch to wiper
setting II. Have the system checked at your authorized
Mercedes-Benz Light Truck Center as soon as possible.
J_G463.book Seite 136 Mittwoch, 19. September 2001 8:06 08
Page 140 of 385
137 Combination switch
Te ch n i c a l
data Instruments
and controlsOperationDrivingInstrument
cluster displayPractical hints Car care Index Windshield wipers smear
If the windshield wipers smear the windshield, even
during rain, activate the washer system as often as
necessary. The fluid in the washer reservoir should be
mixed in the correct ratio.
See page 307 for instructions on filling up the
windshield washer reservoir and page 348 for notes on
replacing the wiper blade inserts. Windshield and headlamp washer fluid mixing ratio
For temperatures above freezing:
MB Windshield Washer Concentrate “S” and water.
1 part “S” to 100 parts water
(40 ml “S” to 1 gallon water).
For temperature below freezing:
MB Windshield Washer Concentrate “S” and
commercially available premixed windshield washer
solvent / antifreeze
1 part “S” to 100 parts solvent
(40 ml “S” to 1 gallon solvent).
J_G463.book Seite 137 Mittwoch, 19. September 2001 8:06 08